Windows error: faulty hard drive. Windows has detected a hard drive problem - what to do
Subscribe:

The hard drive is one of the main components of any computer, responsible for storing and processing information. Among computer technicians It is widely believed that the hard drive is the most vulnerable link in the machine, because it combines a complex mechanical structure and electronic control boards. Any physical impact on the hard drive can lead to its permanent failure.
In case of serious problems with the hard drive, Windows OS is able to warn the user and display the following message: “Windows has detected a hard drive problem.” There may be several reasons for its occurrence, but the main ones are given below.
If your OS produces a similar error, then the problem most likely lies in the hard drive itself. The fact is that Windows receives information from the system during memory operations hard testing disk, which is called S.M.A.R.T. This system shows what condition the equipment is in, how many memory blocks are available, how many are damaged, etc. If S.M.A.R.T. shows negative data about the state of the device, Windows will issue such an error.
There are several programs that can “read” this information, for example “HDD-Health”. By using them, the user will be able to understand what the cause of the breakdown is.
Types of Hard Drive Failures Windows May Report
There can be only two reasons for a breakdown: physical and logical. As the name suggests, the former occur when physical damage is caused to the hard drive, the latter - when damaged information structure. And if they can cope with the second type service programs, then when physical breakdown, the hard drive must be taken to service center or purchase a new one and transfer all the information to it before it’s too late.
Logical errors are most often caused by failures in the program's calculation of checksums. Also, viruses can cause this type of problem. In this case, the device needs to be scanned with an antivirus, the disk defragmentation procedure must be performed and, as a last resort, formatting must be applied. This will destroy all existing data, so again you should resort to archiving a backup copy of your files.
It often happens that Windows crashes by incorrectly reading S.M.A.R.T. system data. In this case, you can resort to disabling the output of messages from this system. This can be done in bios or via command line Windows.
Comments
A number of operating room users Windows systems may encounter system message"Windows has detected a hard drive problem." If you skip this message, it appears again, and the frequency of its appearance increases over and over again. In this article I will tell you how to fix the error - Windows has detected a hard drive problem, what are the causes and symptoms of this problem, and how to fix it.
What does the message “Windows has detected a hard drive problem” mean?
The main attribute of this dysfunction is the message “Windows has detected a hard drive problem” that appears, as well as the system’s offer to immediately begin the process of archiving existing data. This problem is fixed on almost all modern operating systems of the Windows family, from Windows XP to Windows 10.
Wherein this message usually appears not just once, but over and over again, forcing the user to start thinking about a Windows error in which hard drive problems were detected.

Typically, this message is a litmus test for serious problems on the hard drive, such as:
- The hard drive is crumbling and will soon stop working altogether;
- The information on the hard drive will soon be lost forever;
- The system files on such a disk are seriously damaged, and soon the system will no longer boot at all;
- The computer will slow down and freeze, take a very long time to load, and will soon stop responding to user commands.
Causes of the problem
Before we consider the solution to the “Windows has detected a hard drive problem” error, we need to determine the causes of this dysfunction. They are as follows:

How to fix the error when Windows detected problems with the HHD disk
So, how to fix the “Windows has detected a hard drive problem” error? I recommend doing the following:

If problems are observed on the “c” drive, and it is your system drive, then the chkdsk utility will suggest checking it the next time the system starts. Agree with the proposal by clicking on “Y”, reboot the system, and wait while the utility checks your disk for errors.
- Perform a hard drive surface test. Among various programs recommended for these purposes, I would highlight free application MiniTool Partition Wizard (other alternatives can also be mentioned, such as MHDD or HDAT2). Download, install and run the specified application, click right key mouse on the problem disk (usually the system C:\), and select the “Surface Test” option. Then click on “Start now”. The program will analyze the surface of the hard drive; the more errors there are, the more “red” blocks you will see in the program’s graphic window.

As for the already mentioned MHDD, you can also take advantage of its functionality by analyzing the disk surface in REMAP mode.
You can also disable the appearance of the most problematic message “Windows has detected a hard drive problem” by changing the corresponding parameter system registry. To do this, it will be enough to follow the steps indicated in this video:
At the same time, I would advise you not to rush to disable this message, since it is an important indicator of the health of your hard drive and operating system generally;
- Check the integrity of your OS registry using special utilities such as CCleaner, RegCleaner and analogues;
- Take care of cooling your hard drive. In some cases, the appearance of bad sectors was caused by overheating of the hard drive. Use special cooling pads with a built-in cooling system to avoid overheating of the hard drive.
Conclusion
Most common cause When the error “Windows has detected a hard drive problem” occurs, the hard drive crumbles and gradually fails. In this case, it is recommended to first make a copy (backup) necessary files on this disk(some make a copy in the form of an image of the entire hard drive), and only then carry out the whole set of actions described by me above. If the problems with the disk are random, then the action of the system chkdsk utilities and sfc will allow you to restore the functionality of your hard drive, guaranteeing it stable work in future.
In contact with
One day it may turn out that a PC or laptop refuses to start the Windows operating system or freezes during important and urgent work. Hard drive errors when Windows work- Not last reason computer failure. However, any problem can be corrected if you know what its cause is.
The essence of the disk problem
Whether it is a traditional hard drive or a newfangled SSD drive, a critical error appears anywhere on it. Disk error - physically or software damaged sectors, system infection Windows viruses, failures in PC components (from parts of the drive itself to components of the computer motherboard). The user's task is to figure out what caused the errors on the disk.
How to fix hard drive problems detected by Windows
Hard drive problems are unspecified errors on it that are not signed numeric code(for example, error 11). First of all, the media from which it is proposed to copy valuable data is indicated.
Windows warns you that your data could be seriously damaged
Action plan:
- Urgent copying important files to another storage device: flash drives, disks, memory cards, placing some of these files on “cloud” Internet services.
- Checking the disk for bad sectors.
- Antivirus scanning.
- Checking the CMOS/BIOS settings on your computer.
- PC maintenance: checking the integrity of the cables, external inspection of PC components and cleaning them.
- If you find faults that you could not fix on your own, take your PC or laptop in for repair.
The last two points will not be considered - this is the task of specialists at computer service centers.
Backing up files in Windows 7
Do the following.
- Click "Start" and search bar In the Windows main menu, enter the word “archiving”. Launch the Backup and Restore application.
 Click on the first option offered - this is the backup wizard
 - Start setting up your archiving program. Click "Customize" backup».
 Get started setting up your backup
 - Select the disk or partition where it will be created backups. Best suited external drives and large-capacity flash drives or memory cards (from ten gigabytes).
 Select another, healthy and working disk
 - Click on "Give Windows a choice." However, if you have clearly decided what you need first, choose the independent option.
 If you give the system a choice, Windows will copy the contents of all custom folders default
 - Select system folders user files and/or the contents of the copied disks - except for the disk on which the copy will be created.
 Select everything you want to copy except the destination drive
 - Windows will ask for confirmation and display the categories of files being sent to backup storage.
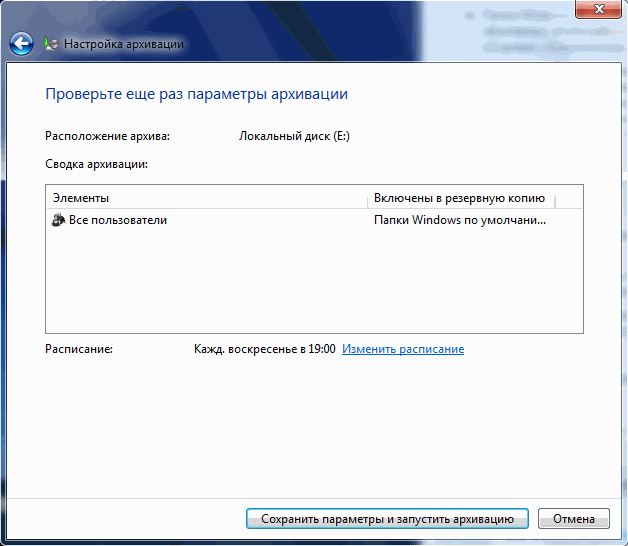 After this, the system will ask you to double-check the settings and start copying
To restore files from a backup, do the following:

The process will start. After the copying is complete, check if everything has been restored.
 Click the link that appears to view a list of files and folders from the previous copy
 Checking the disk using the Windows 7 command line
Disk scan identifies logically or physically problematic sectors of the hard drive or SSD drive, which is the main one in the computer. Do the following:

If you still don’t trust standard disk checking tools, use Victoria program. The Victoria version for Windows is almost the same as the version for DOS - with one exception: after downloading, you can immediately run it to check a disk running a still working Windows system, without resorting to other disks, including removable ones.
Also get a new disk - in case the old one has outlived its usefulness.
Checking your PC for viruses
Boot viruses spoil boot entry and the NTFS(5) file table, with which Windows 7 works. Because of this, valuable data “flies” and is not easy to recover special utilities, as well as the system itself.
As an example, use the Dr. utility. Web CureIt, which allows you to quickly check your hard drive for malicious code.

The application takes up more than 100 MB - due to the extensive anti-virus database of all times. After two days of work, this database is considered outdated - viruses appear almost hourly.
If an error appears when starting Windows
The computer refuses to boot from the hard drive, reporting an error reading system Windows files.
 To try to resolve the hard drive read error, press Ctrl+Alt+Del to restart
 Professional way eliminating such an error - third party utility disk check with bootable media Windows or another operating system (if there is a version of this utility for it).
Checking the disk using built-in tools hides some details, although its use is not useless.
What makes no sense to do:
- restore the Windows system to an earlier date;
- run automatic recovery;
- launch safe mode Windows.
Setting up the BIOS to boot your PC from a flash drive or external drive
Change to BIOS priority PC boot from different disks. Do the following (the Award BIOS version is taken as an example).
- When you turn on the computer, after the manufacturer's logo appears (or immediately below it), a prompt line to enter the BIOS will appear - press this key.
 Press the key indicated at the end of the list of devices scanned when turning on the PC
 - After logging in BIOS Setup select Embedded Peripherals.
 To enter component management, select Integrated Peripherals
 - Check if it is active USB controller-ports.
 USB Controller Enabled means that the USB controller is enabled
 - If USB support is enabled, exit this submenu using the Esc key. If disabled, enable support USB keys Page Up\Down (the meanings of all BIOS settings control keys are revealed below), then exit by pressing Esc.
- From the main BIOS menu, select Advanced BIOS Settings.
 Go to the advanced BIOS settings to control how your PC boots from different types carriers
 - Enter the priority menu hard drives and turn on the flash drive as the first boot disk.
 To configure the system, the boot order from media must be changed
 - Use the “+” or “Page UP/Down” key to designate the flash drive as the first boot device.
 The first place in the boot list should be a flash drive.
 - Exit this submenu by pressing Esc and set USB drives as the first device to be launched.
 Set the USB-HDD parameter in the First Boot Device section (First boot from a USB drive)
 - Exit all submenus to the main BIOS menu and press F10 to save the settings.
 When a message appears asking the BIOS to save settings, press Y and Enter
 - Give the command “Y” - “Enter”, the computer will restart.
Now, when you restart the PC, it will first poll the ports for the presence of a flash drive or removable hard drive (HDD/SSD) - and only then try to start Windows from the built-in disk.
Checking a hard drive from a flash drive running the Victoria program
For example, we took a ready-made flash drive with Victoria under DOS and a laptop with faulty disk. Do the following.
- Insert the USB flash drive and restart the PC. The boot menu with Victoria should appear.
 In the window that appears, select Victoria
 - Victoria app can offer different versions- select the version for laptops.
 In the Victoria for Notebook section, select the second option
 - If you want to familiarize yourself with Victoria's functionality, read the key help by pressing F1.
 First, find out how to run different functions Victoria program by pressing F1
 - To exit the help, press the X key or any other key that is not in the list.
 To exit the help, press X and go to Check Disk
 - From the main menu, press F2 to display disk information. If this does not happen, press the P key to select the IDE interface channel on which the disk sits. All modern PCs are equipped hard drives SATA.
 In the window that appears, select Ext. PCI ATA/SATA and press Enter
 - After selecting the channel type, enter its number, for example, 1. If there are no other hard drives, the following numbers will be empty, there is no point in entering them.
 Busy channels in the program are immediately visible - enter the channel number of your disk and press Enter
 - Wait until Victoria detects the disk on channel 1.
 A message indicating successful channel detection will appear at the bottom
 - If your disk turns out to be IDE-based, go back to the interface selection submenu and select one of the options Primary/Secondary Master/Slave (English: “Primary/Secondary Main/Auxiliary disk”) - check on the disk itself what position it is in switch. IDE is outdated - modern wheels based on SATA do not require switching. The Primary Master mode is taken as an example.
 Select the mode with the cursor keys and confirm the selection with the Enter key
 - The disk details will appear at the bottom. Press F2 to display information.
 The channel port number is attached to the disk information
 - Initialization (passport data) of the disk shows that its recognition by the Victoria application has been completed.
 After the disk is fully initialized, you can start checking it
 - Press F4 - the disk scanning menu will appear. Here LBA is a disk sector (512 bytes). We multiply the number of LBA sectors by 512, divide by 1024 3 - we get the size in gigabytes. The size of the disk area being scanned in Victoria for DOS should not exceed 1024 GB. If the size is more than 1 TB, calculate the beginning (Start LBA) and end (EndLBA) and scan the disk in several stages.
 Check that the disk size does not exceed 1 TB
 - Press the spacebar and enter an integer number in gigabytes or percentage - this will determine the location of the last sector in the scanned area. The scanning start point is also changeable - similarly calculate the size in gigabytes. When you're finished typing, press Enter.
 Enter the last gigabyte that will end the scanned disk area
 - The size of the scanned disk area will be recalculated into the number of LBA sectors. Switch to linear reading. Do not change this reading algorithm to another (random and “floating” reads will take longer and wear out the already old disk more).
 Select the program's linear disk scanning mode
 - Go to the next item and select “BB (Bad Blocks) Advanced Remap”. Options are selected using the left/right cursor keys or the space bar.
 Select the BB Advanced Remap option - it will use sectors from the spare area
 - Don’t rush to set the “Erase 256 sect.” algorithm. (“Erasing 256 adjacent sectors”) - in place of one problematic sector, 128 KB of data on the disk will be erased. In this case, the size of the destroyed information will be multiplied by the number of “broken” sectors - depending on the proximity of each of these sectors to each other throughout the scanned area of the disk. Try other sector recovery options first! Press "Enter" to start scanning.
That’s it, the process has begun, the Victoria application will notify you of completion with the sound of a “beeper” on the computer. When bad sectors are found, “remapping” (reassignment of sectors) will be automatically performed.
 Replacing bad sectors with with Victoria-one of the effective ways to temporarily fix a hard drive
 The future operation of the disk can be predicted based on SMART monitoring data. Press F9. The status will be indicated at the top. If it is “Good”, there is still a reserve for replacing bad sectors. The status has changed - the disk will be replaced with a new one. If it is not possible to replace the disk, try to programmatically trim it, excluding the bad sectors from the cropped area (often they are close to each other, many of them in a row), but this is for those who like difficulties.
 The Good status indicates that the disk is in good condition.
 Other ways to check the disk
There are several options:
- using other applications recorded on a flash drive in a similar way (DOS boot loader);
- scandisk.exe utility launched through DOS using the appropriate commands;
- Windows XP command line launched from LiveCD/DVD;
- connecting the problematic drive to another computer via a free cable.
Video: checking and trimming “broken” space
Error 11 when writing or unpacking data
The “11th error” has nothing to do with damaged sectors on the disk. 90% of this software problem. It occurs when installing unverified programs that have installation sources that were compiled by the developers with some omissions. Message is generated system library unarc.dll, which is responsible for unpacking content for any installed program and is one of the components of the service " Windows Installer».
 Error code 11 can be replaced by any code from 1 to 10
 Some users, not understanding the problem with the source code of the installed program, update or replace this file (it “lies” in the C:\Windows\System32 directory) with any version of it from the Internet. As a result, Windows may report that some files have been replaced with unknown versions and require you to insert installation DVD or a flash drive to restore them.
The solutions to the problem are as follows:
- try not to allow Russian names of files and folders in installed applications. For example, instead of the \Truckers-2 folder, when installing the game “Truckers-2”, the \Rig&Roll folder is created. If, after all, the directory name is written in Cyrillic, it means the game is from a dubious source, download the licensed one (hacking the version does not matter, as long as it is file structure, as in the licensed source);
- There is not enough disk space (in any of its partitions) for the program to be installed. Clean the disk from unnecessary programs, documents and other content;
- error unpacking archives downloaded from the Internet. Install several archivers (for example, WinRar, WinZip, 7zip and several others);
- disable the antivirus and Windows firewall - sometimes they become an obstacle, especially if any application or game requires crack (activator with key selection).
Other hard drive errors
They may be:
- 3f1 (the error is inherent in HP laptops);
- 300 (boot record not detected);
- 3f0 (no boot disk);
- 301 (SMART disk health diagnostic error), etc.
Video: checking partition C: and flash drives for errors in Windows 7/8/10
Restoring the functionality of a PC or laptop in the event of disk failures is not a problem if you act wisely and consistently. May you be lucky!
IN modern computer There are only two types of units with moving parts left: cooling system fans and storage drives. hard drives- "Winchesters". The presence of rotating disks in the hard disk enormous speed plates and magnetic head block makes this device very vulnerable to mechanical stress, as a result of which errors and fatal damage can occur on the disk. How to test a disk in a timely manner, detect errors and in what cases they can be corrected, and when it’s time to go to the store for a new one hard drive - important question. Take it seriously, because money cannot buy missing data.
Hard drive malfunctions and troubleshooting at home
A lot of thick books have been written about hard drive reading errors, there are a dozen specialized forums, and even a specialty has appeared as a “data rescue service engineer.” In order not to get lost in this ocean of information, let us firmly understand one thing: there are two types of errors that arise - software and hardware (“hardware”).
Hardware errors occur for several reasons:
- physical damage to the surfaces of the hard drive due to impact or movement with high acceleration;
- malfunction computer unit nutrition, due to which increased voltage burns out electronic components controller;
- banal age, because the hard drive is in constant motion, and the life of bearings, motors and solenoids is limited.
Errors of this type cannot be eliminated at home. All we can do is track their occurrence in time and try to save the data before the disk completely fails.
And here software errors can be corrected at home, and it is not at all necessary to be an engineer or a computer guru.
The nature of these errors is almost always related to a deferred write failure. The thing is that both the operating system and the hard drive controller use cache memory. Before reaching the magnetic surface, your data ends up in the cache, because its speed is several orders of magnitude higher than the speed of magnetic recording. Once the cache memory is full, it is paged out to the magnetic disk. And if before the cache is written, your electricity is turned off and there is no UPS, then the controller will already reserve space on the disk for data, but will not have time to write it. As a result, we will get errors in the file system and directory system. In the worst case, so-called SoftBads are formed - disk sectors that are problematic according to the logic of the controller, but are physically perfectly functional.
UPS - uninterruptible power supply - helps to avoid hardware failures in the event of a sudden power outage. At a minimum, it gives time to shut down the computer correctly.
Types of disk errors encountered in Windows 7 The most unpleasant, but at the same time the most easily eliminated errors are problems with boot sector disk (MBR) and errors in accessing the hidden system partition. The reason for their occurrence lies in incorrect installation operating system, use software
Disk read error when booting Windows 7
Among all the mistakes, this is the worst. It occurs immediately after turning on the computer and passing the tests, but before loading the OS. But there will be no download; instead, we will see a disk read error on the screen.
Correcting this error using the operating system is impossible, since the system will not boot. We need a disk disaster recovery OS, or even better - a flash drive. Before starting treatment, a few words about how such errors occur.
On every computer with the Windows 7 operating system, the hard drive contains an MBR (Master Boot Record) - the master boot record. There is located small program, which starts further loading of the operating system. Starting with version 7 of the Windows operating system, boot files located on a separate disk partition, hidden from the user. It is to this that the MBR transfers control.
Thus, if the MBR is damaged, we see a “disk read error” on the screen. If the hidden system partition is damaged or contains errors, the error will be slightly different.
Both options can be a consequence of both actions malware, and unqualified user intervention. The latter most often happens either when using disk partitioning programs ( Partition Magic, Paragon Partition Manager), or when trying to install a second operating system, and a lower version. For example, when Windows installation XP on a computer with Windows 7.
An attempt to install a lower version of an OS on a computer than the one already installed will, with 100% probability, result in the impossibility of booting from the hard drive, since the MBR will be corrupted.
Restoring the disk's functionality in both cases will occur according to a similar algorithm. We will need Windows distribution 7 or an emergency recovery disk of the same system. It is better to create a disaster recovery disk in advance, label it and keep it handy. To do this you need from the website Microsoft download and install Media utility Creation Tool, which, after launch, will independently download the necessary components from the network and create bootable media.
MBR recovery
Restoring the active partition (hidden system disk)
Almost certainly, while playing with a disk partitioning program, you assigned the “active” status to some partition, which automatically removed this status from our system partition. You can return everything back in a program with a beautiful graphical interface in a couple of mouse clicks. The only problem is that the program, along with the operating system, remained on that disk, which now does not load. And again the command line will come to our aid.

Repairing Windows bootmgr and boot store configuration files (BCD)
In rare cases, along with the MBR, the playful hands of the experimental user (this is not about you and me, old man?) demolish the operating system boot loader and boot storage configuration files, i.e. everything that is in root directory hidden system partition. Or rather, it was lying there. Fortunately, Microsoft employees have foreseen this development scenario. The emergency recovery disk includes utilities that will allow you to cure the system partition. Let's get started:

Disk Error 11 in Windows 7
This error usually occurs when there are problems with the cable that connects the hard drive or the hard drive controller on the board.
Physical damage to the disk surface is also possible. The main symptom is that the speed of disk operations drops to indecent levels. When copying large groups of files, the process may freeze for 10–15 seconds.
- When viewing the event log, the controller to which the patient disk is connected produces error 11. Then it gets worse: the computer suddenly begins to freeze and reboot, and not the first time. The algorithm for solving the problem in this case is as follows: Open the computer case and inspect the integrity SATA connectors
- on the motherboard and hard drive controller board.
- We inspect the computer's power supply - it should not be hot or have a burning smell.
- If knowledge allows and there are instruments, we measure the voltages of the +12V and +5V lines on the computer that is turned on. A deviation of 1–1.5V is already a reason to sound the alarm. The power supply needs to be replaced.
- SATA cables must be firmly held by the connector and not dangle. Checking the surface of the hard drive standard means
- operating system:
- open “My Computer” on the desktop and in the file explorer we see a window with a list of disks; select the disk that needs checking with the right mouse button, call context menu
- and open “Properties”;
- go to the “Service” tab and select the “Run check” action in the disk check section; system errors" and "Check and repair damaged sectors";
- Click the “Launch” button and wait for the test results.
- Using the Victoria program for Windows We carry out an extended SMART test and a drive speed test over the entire surface:
- download the program from the network;
- run from an administrator account or with administrator rights;
- select the disk to check and press the red “Pass” button;
- Go to the “Smart” tab and click the “Get Smart” button. The program will display the Smart attribute table. For each attribute, we are interested in the rightmost column of the table - “Health”. If the value is in the red zone, then the condition of the disk is critical and needs to be replaced;
- To conduct a surface test, go to the Test tab, select the reading test (read) and click the Start button. We are waiting for the test to finish. The presence of deep dips in the reading graph means damage to the surface and the presence of reassigned sectors;
- The presence of 5–10 orange or red sectors in the “legend” indicates that the hard drive has physical surface damage. It's time to buy new disk and transfer important data to it.
It should be noted that despite the high variability of the causes of the error, in most cases it warns of physical damage to the hard drive or its wear. In this case, performing surface tests with high load on a hard drive can provoke an avalanche-like formation of “bad” sectors and even make the disk unreadable. Be sure to back up important files before testing.
Video: checking the hard drive with Victoria
Windows has detected a hard drive problem
This is the message the user sees most often. It appears after each incorrectly completed work session (the computer rebooted due to an error, a power outage, or the owner simply pulled the cord out of the outlet instead of shutting down normally). Even kicks to the body system unit standing under the table do not pass without a trace. The case is inexpensive, there is no vibration isolation from the hard drive, and all shocks are transferred to the patient. And modern HDDs have such a recording density that even a slight touch of the heads to the surface of the disks is normal mode the heads fly above the surface on a cushion of air - leading to micro-scratches of the surface. Areas are formed to which the controller can no longer write data.
This is even more true for laptop disks. The recording density in them is higher than in desktop ones, the mechanics are lighter and have less strength. Impatient owners fold up the laptop and begin moving it without waiting for the system to fall asleep and the hard drive spindle to stop.
In such cases, 100% delayed write (overwrite) errors occur. disk cache onto the magnetic surface of the disk), and the next time you boot, the operating system displays a message about problems. In addition, each such error changes the SMART attributes of the hard drive, and when their number exceeds a threshold value, the system signals critical error disk.
If you see a window with the error “Windows has detected a hard drive problem”:

A damaged drive can be used as external storage for low-value data: movies, music, audiobooks - things you don’t mind losing. A complete failure of such a disk can occur at any time.
A hard drive is a complex electronic-mechanical device, and it is the mechanical component that makes it so vulnerable. That's why Account in popular cloud service (Google Drive, DropBox, YandexDisk) and regular copying there important data will allow you to sleep peacefully, and not tear your hair out if the equipment fails. And the future belongs to solid-state drives (SSD), their price has already dropped enough to install such a drive as a system drive.
You have become familiar with the most common cases of hard disk errors in Windows 7. Various file system damages are left “overboard” and are not visible. logical drives and file directories. Recovering such errors requires special software and a thorough knowledge base. For the average user, in this case, the most reasonable thing is to turn to specialists. If their verdict is “it’s time for the disk to be scrapped,” then do not wait until the last minute to purchase a new drive and transfer data. After all, at any moment a fatal failure can occur, and you will be left with nothing.
Hard drives, like any other “hardware” equipment installed on a computer, alas, not only do not last forever, but are also not immune to malfunctions due to various types of unforeseen or permanent errors. At the same time, the operating system very often, for no apparent reason, persistently reports that Windows has detected a problem with the hard drive.
The solution to eliminating such a problem, it would seem, lies on the surface. It is enough to run a scan of the problem partition (usually the system one), and then install automatic correction errors of bad sectors (in the eighth and tenth modifications this is not required), and then agree to its execution the next time you reboot (similarly, the procedure can be activated via the command line). But not everything is so simple here, since there are quite a lot of situations when checking the hard drive does not give the desired results or simply turns out to be impossible. In this case, the disk status is monitored in the background, and a notification that Windows has detected a hard disk problem is issued again and again. You can disable its appearance in several ways: in simple ways, which will be discussed further. But first, let's look at the most common problems.
Windows discovered why this message appears?
Most often, such a notification appears at system startup, since disk diagnostics starts right at the Windows boot.
As already mentioned, the tools standard check is not always able to eliminate identified problems. This most often manifests itself when the hard drive simply begins to “crumble” or too much a large number of unstable BAD sectors or areas containing uncorrectable errors. The situation is similar with the installation of the system, when after the first start it informs the user that Windows has detected a hard drive problem. It is clear that in such a situation it is best to replace the hard drive, otherwise over time the entire system will stop working due to fatal failures. Almost all users think so. However, if I may say so, you can deceive the system by simply disabling the corresponding service, and quite simply.
Windows has detected a hard drive problem: how can I stop the notification from constantly appearing through group policies?
Among all the methods for disabling the appearance of messages about detected failures, we will first focus on changing group policy settings. In the editor, called through the standard “Run” menu - with the combination gpedit.msc, through the administrative templates of the computer configuration, system and diagnostic sections, find the item diagnosing hard disk.

On the right side of the window you will see two options. By default they are in the active state. By entering the editing of each of them through a double click or the corresponding item RMB menu, you need to specify shutdown as the current state, save changes and restart computer system. After this, the message that at some stage problems were detected with the hard drive, Windows 7 or any other OS of this family will no longer appear both at startup and during operation.
How to get rid of a message in the “Task Scheduler”?
The problem of disabling the appearance of a notification is no less simply solved in the so-called “Task Scheduler”, which can be accessed through the computer management section or called up its tools directly from the “Run” console.

To disable the constant reminder that Windows has detected problems with the hard drive, you need to use the computer management (administration) section, through the libraries item and the Microsoft and Windows sections, get to the DiskDiagnostic folder, then on the right set the similar group policies parameters, which, however, will be presented exclusively in the English version. As in the previous case, you will need to reboot (reboot) the computer.
Other methods to mute a message
In principle, you can disable the appearance of the above reminder by stopping the corresponding service (and several at once) or by changing the values of some system registry keys, however, these two methods, compared to those described above, are somewhat more complex, and interfering with the registry without a clear understanding of what is being done actions and necessary knowledge unacceptable.

In addition, accidentally changing an entry can lead to the most unpredictable consequences for the entire system, and usually it is quite difficult to undo the changes made without saving a copy of the registry (sometimes even standard rollback Does not help). Therefore, as the most acceptable and simple solutions to eliminate the problem described above, it is better to use exclusively the presented methods, especially since there is nothing complicated in them, and even the most ignorant of them can cope with such a task Windows setup user.
In general, disable diagnostics by by and large is not recommended, since this will result in the loss of the possibility of timely detection possible problems and malfunctions in the operation of the hard drive itself, which is very strong and far from the most in the best possible way may also affect the behavior of the operating system. Such actions make sense only if you are determined to replace the disk, but you cannot copy the necessary information to another medium at one time, or there are problems with creating a disk image (or snapshot) Windows status). If we're talking about about installing Windows or any other OS on a problematic hard drive or updating it, then, as is already clear, it is better not to do such things (the hard drive will refuse to work after a while anyway).


