Victoria hdd is not working. Victoria HDD program: hard drive diagnostics, reading SMART on a computer, searching for bad sectors. Program for checking disk and recovering bad sectors Victoria
Oddly enough, sometimes the operating system actually crashes without user intervention. The fact is that such a disastrous outcome is greatly facilitated by the incredible recording density on modern hard drives, as well as the complexity of modern SATA interfaces. Even a system backup does not always save you.
Introduction to the topic
The reason is damage to the sectors. Such zones among professional computer scientists are called “Bad sector” or “Bad block” (from the English word Bad, that is, bad). The trouble is that the presence of such zones very often makes it completely impossible not only to restore the OS, but even to cleanly install it with formatting the media. In this case, you will have to remap the “broken” sectors to “restore” them.
It is no coincidence that we put the word “Recovery” in quotation marks. The fact is that Remap is the replacement of a bad sector with a similar block from the reserve, which is always available on all hard drives. As a rule, all this is done by system tools in a fully automatic mode, but for a number of reasons some hard drives do not support this feature (automatic replacement).
Special programs
This is where specialized utilities become necessary. One of the best and most revered of them is “Victoria”. This wonderful program saved hard drives back in the ancient days of DOS, and even now many experts prefer to run it in this mode. Today we will learn how to use Victoria.

Beginning of work
First of all, you need to make a bootable flash drive. Of course, traditionally the utility is launched from a floppy disk, and the manufacturer even offers it for this purpose, but today it’s almost impossible to find a drive for floppy disks on the computers of home users.
Tips for writing a boot image to a flash drive are available on the program’s official website, so we won’t dwell on this.
Having booted from the media (having previously set the desired boot option in the BIOS), you can see the classic test one inherited from its distant ancestors of DOS times. We continue to learn how to use the Victoria program.
Important aspects

By default, you will be prompted to download Victoria Russian for Desktop. This version is the first one in the boot line and is intended for desktop computers. If you have a laptop, then you should select the item: ...for Notebook, and then press the Enter key.
Determining the disk connection interface
In the first window, be sure to press the F2 key to automatically detect the hard drive interface type. If the program fails to do this automatically, you will have to do it manually. To do this, press the P (English) key, after which a window with a list of interfaces will appear. Select the one you need using the arrow keys, then press Enter.
In general, the Victoria program in Russian was released relatively recently, so it is better to immediately remember the English terms, since in older versions they are found everywhere.
Attention!
If you have an old hard drive with an IDE interface, you should be extremely careful about the last step. In particular, if you do not know the difference between Primary Master and Secondary Slave, it is better to exit the program, since all your subsequent actions can lead to irreversible consequences, including damage to the hard drive itself.
So how to use Victoria?
Let's start work
Once you have selected the correct one and pressed Enter, a message indicating the successful completion of the preliminary settings will appear at the bottom of the program window. After this, you need to press the F2 button on the keyboard. The passport of the selected hard drive will immediately appear in front of you.

To start scanning the disk surface, press the F4 button. The HDD-scan menu appears. In it you should set the parameters that the program will use when scanning your hard drive.
By default, it is proposed to scan the entire surface of the disk (Start and End positions). If desired, you can change the value (in bytes) to the amount that you want to check. In addition, you should select the option “Linear reading”, Ignore Bad Blocks and Change end of test. The creation of a graph can also be disabled, especially since this is recommended by the developers of Victoria HDD: many users know how to use the program itself, but deciphering such information is not an activity for amateurs.
Note!
However, in most cases, the active system partition is located at the very “beginning” of the disk, so in some cases it is quite acceptable (to reduce scanning time) to specify a smaller amount of disk space to be scanned.
By the way, you can indicate this value not only in bytes, but also as a percentage, which can significantly facilitate the diagnostic procedure. In addition, in the latest versions of the program it is possible to set the volume in gigabytes. But! Due to software limitations, the one terabyte limit cannot be exceeded.
Before using the Victoria program, we would recommend once again remembering the risks that come with careless handling of hard drive partitions. Don't forget about it!
About reading modes
In addition to “Linear”, you can set the “Random” mode and use the “Butterfly” option. Using the last two methods, you can get much more reliable test results, but we strongly do not recommend using them unless absolutely necessary. Firstly, the test time itself increases by about 10 (!) times. Secondly, and much worse, these methods dramatically increase the wear rate of the mechanical part of the spindle disk. An old hard drive may simply fail from such “executions.”

Since you have to work with the Victoria program to extend the life of the drive, this outcome is very sad...
No room for error
With the Ignore Bad Blocks line selected, press Spacebar, changing the value to BB = Advanced REMAP. If you carefully read the introductory part, then you already know about the meaning of this term. But! If you press the “Space” again, the option BB = Erase 256 sect will be set. This mode erases (!) data from the hard drive! It is extremely useful when preparing a hard drive for sale, but it can play a very cruel joke on an inexperienced user... We warn you once again: before using Victoria, check everything again!
All! After pressing the Enter key, the one for which everything was started will begin. The number of bad hard disk sectors found will be displayed in the lower right part of the working window. If any are detected, they will be automatically replaced with reserve sectors (“Remap”).
To exit the program when finished, click on X (X). Here's how to use Victoria.
Many users use a backup copy to quickly restore the OS, but this does not always work.Sometimes this occurs as a result of damaged sectors of the hard drive!
Damaged sectors of a hard drive are called bad sector or bad block.
The appearance of bad blocks can make it impossible not only to restore, but also to install a new OS. In any case, unreadable clusters have to be remapped.
What is Remap? – This is the procedure for replacing the address of an unreadable sector with one of the reserve ones. It is carried out both by a special command in the service software and automatically when writing to an unreadable sector. On some hard drive models this function may be blocked.
Reasons that cause damage to the disk surface or errors in the file system.
The reasons may be the following:
- Short-term interruptions in the power supply. Some short-term outages may not be noticeable to the eye, since the lighting fixtures and monitor do not have time to turn off. But, such interruptions are registered (UPS, UPS) and prevent malfunctions of the HDD.
- Power loss or forced shutdown of the computer. Sometimes the user himself uses a forced power shutdown when other methods to restart a frozen OS do not work.
- Unreliable contact in HDD connectors.
- Vibration or too strong shocks that can be transmitted to the hard drive when the latter is rigidly installed in the system unit case.
Symptoms of HDD surface damage or file system errors.
Symptoms may include:
- Inability to boot OS.
- Impossibility of installing a new OS over a faulty OS in Repair mode.
- Unreasonable disruption of the operating system or applications. This may manifest itself in the form of disappearance of some settings or functions of the OS and programs used.
- Launching applications and the OS itself is too slow.
- Missing files and folders.
- File corruption.
- Slowing down the process of copying and accessing files.
- The load on the processor or one of the processor cores is too high during any access to the hard drive.
- The OS freezes when trying to copy or open a file.
This page of the site is not intended to provide a complete description and capabilities of the Victoria program.
- Various versions of the programs can be downloaded from the links provided on the computer portal RU-BOARD. Please note that the different versions of the program Victoria 3.5 are loaded into DOS, which is important if you cannot run Windows on your computer!
Program Victoria 3.5 allows the reading test to be combined with remapping. That is, if you immediately select the options “Linear reading” and “Advanced REMAP”, then you don’t need to do anything else. This is especially useful if there are too many unreadable blocks.
Victoria 3.5, for example, can be launched from a floppy disk, which can be created by running the MAKEDISK.BAT file of the V35FDD.zip archive, which can be downloaded. Unpack the archive, insert the floppy disk into the drive and run the makedisk.bat file. A boot floppy disk will be created. To use the program, you must boot your computer from this floppy disk.
You can run the program from a flash drive, see “Creating a bootable flash drive with Victoria 3.5 Rus and MemTest 86x”.
Below we will look at an example of replacing damaged sectors with working ones (Remap) by running the program Victoria 3.5 from a flash drive.
Upon loading, by default the menu item “Victoria 3.5 Russian for Desktop” is displayed - for personal computers. If you do not select anything, Victoria will boot itself in 10 seconds. For laptops, use the and keys ↓ select the item “Victoria 3.5 Russian for Notebook” and press the key Enter.

At the bottom of the Victoria 3.5 program window that opens, we are asked to press the key P to select the IDE channel (interface) for connecting the hard drive, or the key F1 to call the help system. When you press a key F1 The following window opens:

Having become familiar with the purpose of the function keys of the Victoria 3.5 program, by pressing any key, we exit the help system (for more details, see: Purpose of all involved keys).
In the first window of the Victoria 3.5 program (Figure 2), you can immediately press the key F2
to display the disk passport. If the Victoria 3.5 program itself detects the hard drive, the hard drive passport will be displayed. If after pressing the key F2, the program itself did not find the hard drive, then you will have to do it manually. To do this, press the key P. The same will have to be done if the system has several hard drives and you need to select one of them.

On key press P The HDD port selection menu will appear. If you have hard drives with a SATA interface, then in the “Select HDD port” menu that appears, select “Ext. PCI ATA/SATA". We move using the cursor keys “↓”, and confirm the selection by pressing the key Enter.

In the table, select the desired channel according to the hard drive model. For example, enter the number “1” and press Enter.

At the bottom left we will see “Completed”.
Then pressing the key F2 you can see the passport of the selected hard drive....
Let's return to the case if you have hard drives with an IDE interface.

Select Primary Master; Primary Slave; Seconday Master or Seconday Slave, depending on the position of the jumper (Master/Slave) and the type of connection (Primary/Seconday) of your hard drive.
We choose, for example, “Primary Master”. We move using the cursor keys and ↓
, and confirm the selection by pressing the key Enter.

On key press Enter A message about the selected hard drive will appear at the bottom of the window. Then press the key F2.

The passport of the selected hard drive opens.
Next, to set up a check (scan) of the disk surface, press the key F4.
“HDD scan menu:” appears

In the default menu that opens, we are offered hard drive scanning options:
Start LBA: 0 – start of scanning (start of hard drive)*;
End LBA: 40188960 - end of scanning (end of hard drive);
Linear reading;
Ignore Bad Blocks;
Change end of test;
Graphic: OFF.
We move through the menu lines using the cursor keys and ↓
, change the value with the key Space(space), and confirm the selection by pressing the key Enter.
For more information about menu items, see “Online documentation: © Sergey Kazansky”
*LBA (Logical Block Addressing) – block address. When setting testing boundaries in LBA, - 1 LBA = 512 bytes.
You can do the math: 40,188,960 x 512 = 20,576,747,520 bytes, which equals 19.16 GB.
That is, by default it is proposed to scan the entire disk “Start LBA: 0” and “End LBA: 40188960” (from beginning to end of the disk with a capacity of 19.16 GB). Of course, you need to scan the entire hard drive.
Typically, the system disk partition is located at the beginning of the hard drive (drive “C”). Therefore, sometimes, to reduce the time it takes to identify a computer malfunction, you can select a test location on the hard drive that corresponds to the size of the partition on which the operating system is installed.
For such cases, it is possible to set scanning boundaries not only in LBA, but also in G (gigabytes are written here with the letter G) and in %!
The value of the start and end boundaries of hard disk scanning can be entered here in percentages or gigabytes, but only in integer values.
Example: 14G or 73%.
This feature will also be useful in cases where you have a large disk, but you should not set values exceeding the limit of 1 terabyte in the Victoria version of DOS!

The figure shows an example of specifying the start of testing in the line “Start LBA: 0” and the end of End LBA: in 14G (14 gigabytes). To be able to enter a value, you need to press the key Space.

By confirming the action by pressing the key Enter, entered values in G or % are automatically converted to LBA address.

The next default menu line is “Linear Reading”. By pressing the Spacebar you can select:
- Linear reading;
- Random reading;
- BUTTERFLY reading.
“Linear reading” is better not to change this, although the latest modes allow you to obtain more reliable data, it is not recommended to use them, since this can increase the duration of the test by 12-15 times. In addition, these modes wear out the HDD mechanism much more than “Linear reading”.

In the next line by pressing the key Space set “BB = Advanced REMAP”
Attention! Here you can set " BB = Erase 256 sect", which erases information on the hard drive!

By pressing “Enter,” the process of testing the surface begins; a report will be generated in the upper right part of the interface on the number of certain clusters that differ in access time. The lower right part of the interface displays a list of bad block addresses in LBA format. Lower reading speed and time remaining until the end of the test.

At the end of the test, the speaker of the system unit will emit a melodic signal.
No “Bad Blocks” (bad sectors) were found in this test!
If they are present,

“Remap” will be automatically performed - the procedure for replacing the address of an unreadable sector with one of the reserve ones.

Upon completion of the test, information about the correction, in this case, 210 “Bad Blocks” is displayed.

This picture shows the result of retesting this hard drive after completing the "Remap" in the previous one, from zero to final LBA. No defects were found during repeated scanning!
Next, let's look at the forecasts. There is SMART technology (Self-Monitoring, Analysis and Reporting Technology), which allows you to monitor the main parameters of the HDD and predict the operating time of the disk before failure. Click F9,

to view SMART metrics. You can decipher SMART readings using the table, -Table for decoding SMART readings. The quality of the disk surface and the reliability of the HDD mechanism can be judged by the colored thermometers located next to each indicator. Red color means that things are moving towards the death of the hard drive (except for the temperature thermometer).
If at the top of the interface it says “Smart return status: Good", then the prognosis is good.
If the fix fails, or the prognosis is poor, you will have to replace this hard drive.
Due to “poverty”, you can, of course, try to “cut off” part of the disk, but this is a separate topic...
To exit the program, press the “X” key.

Then with three keys Alt + Ctrl + Delete reboot the computer.
“Find the beginning of everything, and you will understand a lot.”
/Kozma Prutkov/
The Victoria program interface is a Windows window - the main form, which contains:
- 5 sheets of tabs.
- Common to all tabs:
- Top menu with buttons and indicators.
- Side panel with buttons and indicators.
- Text log 4
Let's look at all the elements of the Standard tab one by one.
1
— Switch for access modes to the drive under test. It has 2 positions - API and PIO.
API is an abbreviation for “Application Programming Interface”, and translates as “Application Programming Interface”. This means that the program uses Windows built-in means of accessing the drive under test for its work, in particular, system drivers.
PIO is an abbreviation for “Programmed input/output”, and translates as “Programmed input/output”. Indicates the mode of access to the tested drive directly through I/O ports, bypassing Windows functions, BIOS and drivers. In this chapter, we will consider exclusively the API mode, as the simplest and most universal.
In some cases, the API/PIO switch may be disabled (inactive), and forced into API mode. This occurs when PIO mode is not possible, such as on 64-bit operating systems.
2
— In the upper right corner there is a list of Windows drives found by the program at startup or when API mode is enabled. The list is numbered starting with the number 0. Each line indicates the capacity of the drive and its name as provided by its developer for Windows. Some lines may be empty:
- Disconnected drive - the device was disconnected while Windows was running (for example, a USB flash drive);
- Invalid geometry—the device, such as a DVD drive, does not contain media (no disc is inserted) or the drive is faulty;
- Etc.
In addition to numbers, the list contains letters of logical drives of removable devices. This is done if some device is not displayed in the list under a number. Drive letters can be hidden by unchecking the “Show logical drives” checkbox on the “Setup” tab, but more on this in the corresponding chapter.
It is important to know that devices are not automatically displayed in the list! The list must be manually updated after each drive is connected or disconnected.
This was done on purpose. After all, the program can be used to examine a drive that is not entirely serviceable, and unnecessary calls are harmful to it.
To update the list of devices, you need to click on its title.
In addition to displaying drives, the list 2
also serves for choice drive being tested. To do this, just click on the desired list line. In this case, the drive passport is displayed on the left side of the form.
3
. So, the device is selected. In most cases, this will be a hard drive - a disk drive with an ATA interface. The abbreviation ATA, "Advanced Technology Attachment" is a standard for working with hard drives, which includes a standard command system and standard data structures. That is why the first tab of “Victoria” is named “Standard”. One such standard structure is the so-called “drive passport”.

The passport specifies many technical parameters of the drive:
- Model— name of the model and manufacturer;
- Firmware— microcode (firmware) version of the device;
- Serial— device serial number;
- Disk size— disk size in logical sectors and conversion of the number of sectors into volume units;
- C.H.S.— disk geometry (an outdated, but sometimes necessary parameter) — the number of cylinders, heads and sectors on a track;
- SMART— information about the S.M.A.R.T. self-diagnosis system;
- CACHE— information about the drive cache buffer. Look-Ahead - read prefetch. Write - write buffer. The cache is used to speed up data exchange operations between the computer and the disk.
- Support— supported drive functions: will be described later;
- AAM val— current value of the acoustic noise control mode;
- APM val— current value of the energy saving mode;
- Erase— the time it takes the drive to completely destroy information by erasing it with the built-in security subsystem;
- Security— Security subsystem and its condition;
- ATA-8— supported functions of the extended ATA standard. In practice, ATA-8 is SATA.
- Sector— sizes of logical and physical sectors of the drive;
In the process of improving the Victoria program, new and up-to-date parameters will be displayed in the passport, and outdated ones will be deleted.
Under the passport there is a panel with buttons and indications:
6, 7
- Indicator LEDs showing the rotation speed of the HDD or the presence of a semiconductor drive - SSD.
SATA dev— the device has a Serial ATA interface (although it can be a USB drive).
Removable— removable device (flash drive, DVD);
Virtual— Virtual disk, for example BestCrypt container;
9
— Jackdaw Save bin. If it is installed, the program saves the structure with the passport in the directory with logs, from where it can be extracted at any time and loaded into the program with the button Open bin. In this way, you can look at the characteristics of a physically missing drive or send a passport file for research.
8
— This is just a button for obtaining a passport, duplicating a mouse click on the line of the list of disks. It is also associated with a function key F2
.
10
— Text field for entering a password related to managing the drive’s security subsystem (“Security manager” group). However, to avoid problems, these controls are unlocked only for HDD/SSD drives with a USB interface, and in PIO mode. Working with this subsystem will be discussed in a separate chapter. The text field can be used for other purposes, for example, entering any commands, keys for paid versions of the program, etc.
4
— Text log (event log) of the program. Designed to display messages from the program to the user. Each newly printed line scrolls the log upward. At the same time, all lines are written to a text file, the name of which can be set on the Setup tab.
The contents of the entire log, individual lines or a numeric value can be copied to the clipboard by right-clicking. The log can be cleared with the button 18
. If the number of lines in the log exceeds 1000, it is cleared automatically to save PC memory. In this case, all information remains in the text file.
When you press a key F7— the program shows the last 20 lines of the log in a separate window.
Let's look at the functions of the sidebar, common to all tabs.
11
— Sleep button — HDD sleep mode. Designed to stop the rotation of the motor on the HDD or put the SSD into sleep mode. This action makes sense primarily for USB devices, or those drives that are not accessed by system processes. Otherwise, with any attempt to “put them to sleep,” the very first call of the system will bring them out of this state.
12
— Recall button. HDD recalibration. Designed to wake up the drive from sleep mode. The HDD spins the shaft and sets the heads to track 0.
13
— Indicator LED for the status of program transients. If it is turned off, then the program operates normally (or is inactive, or a test is running). Yellow color indicates that preparatory operations are being performed (for example, long calculations or waiting for an event). A green indicator means that a button has been pressed 14
“Break All” - “to break everything.” This button causes the immediate termination of all actions depending on the program itself. The reaction to it is immediate. However, it cannot interrupt the operating system's initiated access to the drive and processes within the drive's firmware. It is for this reason that professionals almost never work with disks via the API.
15
— Indicator LEDs showing what the program is currently doing with the drive: reading or writing data? When the program is reading, the green LED lights up. When recording (erasing, repair operations), the red LED lights up. If an action with the drive is performed without data exchange (verification, erasing through the security subsystem), then the LEDs will still be turned off.
16
- Power button. HDD power control via an external switch included in the data recovery equipment kit. This button is not functional in the free version of the program, and serves a purely decorative function.
17
— Checkbox to turn off the sound in the program.
18
— Button to clear the text log window.
19
and F8— Calling the HEX viewer of program buffers. Allows you to “look” in real time inside the hard drive from which information is read.
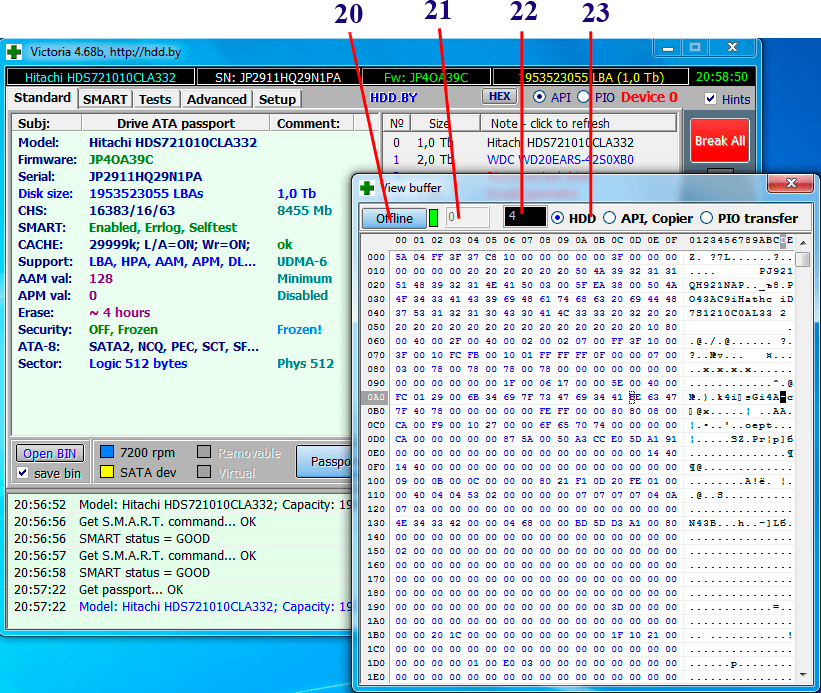
23 — Selecting the buffer to be viewed:
- HDD— a buffer into which the disk sends service data. We received a passport - the 512-byte structure of the passport was in the buffer. We received SMART - we see the table of thrashholds (it is taken last). We pressed the Recall button or started a surface test - the contents of sector 0 were displayed in the buffer.
- API, Copier— read buffer from the drive. We launched a surface reading test and we can observe a continuous stream of read data.
- PIO transfer— used to work in PIO, remap and auxiliary operations.
22
— The size of the selected buffer in sectors of 512 bytes. Static, displayed as reference information.
20
— Button to disconnect the viewer from the buffer. Offline mode allows you to take a leisurely look at the content if it changes quickly.
21
— Data offset position in the buffer, active only in Offline mode. By scrolling this value with the mouse or entering the number manually, you can view different sections of the buffer. The change step is 512 bytes.
When you right-click on the passport field, a menu of additional actions appears.

- Copy ALL— Copy the text of the entire passport to the Windows clipboard.
- Copy value— Copy the selected passport line to the clipboard.
- Get passport- Get a passport. Similar to the “Passport” button or key F2 .
- Maximize— Expand the width of the passport field. In this case, some interface elements are shifted outside the form. You can also arbitrarily move the edge of the passport window with the mouse. The same action can be performed without a menu by double-clicking on the field.
- Big/Small— Compact the height of the passport lines by reducing the distance between them.
To be continued…
Victoria hdd is a program for extensive analysis of the hard drive of a computer, laptop, or external hard drive. This program is used by both beginners and professionals, as it has a very user-friendly interface with many tips, and at the same time, the program provides a large number of opportunities for setting up a hard drive and repairing it.
Features of the Victoria hdd program
- Works directly with Windows OS.
- View complete technical information of the hard drive.
- View SMART information.
- Scanning the surface of the hard drive and searching for bad sectors.
- Perform normal formatting.
- Recovering or reassigning damaged (Bad) blocks of the hard disk surface.
How to download and run the program
Victoria hdd 4.47 is completely free software.
You can download the program from the official website http://victoria4.ru/
Once you have downloaded the program, you can simply unpack it and immediately start working without installation.
For the program to work correctly, it must be run as Administrator.
After launching the program, we will see an interface where it is necessary, first of all, to select the hard drive with which we are going to work. To do this, simply select the disk we need with one click.
After selecting a disk, the hard drive's nameplate information will be displayed in the left window:

Hard drive SMART information
In order to view information about the status of the SMART hard drive, you need to select the hard drive you need and go to the SMART tab.
On the SMART tab, click the “Get SMART” button and wait while the program scans the hard drive information.
After the scanning is completed, we can see the general condition of the disk by the signal in the upper right part of the screen near the “Get SMART” button, in my case the condition of the hard disk is good, so the program displays the “GOOD” signal if the disk is in a critical state then in this place there will be an inscription “BAD”.
On the left side we see detailed SMART information.
To determine the status of the hard drive, you need to analyze the following points:
- Reallocated sector count – number of bad (BAD) sectors that were reassigned. If this number exceeds 10, then you should think about transferring information from this drive
- HAD Temperature – average operating temperature of the hard drive. This parameter should not exceed 40°C if the temperature is higher. Then you should think about cooling your hard drive.
- Seek error rate - the frequency of errors during the operation of the heads, this value should also be equal to zero, if the number is higher, then it is worth diagnosing the hard drive for the presence of overheating or vibrations.
Scanning your hard drive for bad sectors (BAD)
In order to scan the surface of the hard drive for the presence of bad (BAD) sectors, you need to go to the “Test” tab.
Consider the interface of this tab. The first thing you should pay attention to is the large gray field, in which the scanning process and the surface of the hard drive will be graphically displayed.
On the right we can see a field that will display the number of sectors with different response times.
Learn more about the field that displays the number of sectors with different response times.
The first 3 types of blocks are allowed on the surface of the hard drive; they display the number of sectors with an acceptable response time that will allow you to use the hard drive without problems.
Green sectors are also acceptable and may be present, but a large number of them will significantly reduce the writing and reading speed of the hard drive. Such sectors may be present in large numbers on old drives, or on hard drives that are in constant, uninterrupted use.
All other sectors (orange, red, Err) can cause the system to freeze or severely slow down the hard drive.
Scan options and what they mean:

Restore - this option is used to restore damaged sectors if they can be restored, but this option is only available in the paid version of the program.
If you have decided on the scanning parameter, then select it and press the “Start” button. We are waiting for the scanning to complete; while the program is running, we can monitor the found and successfully corrected bad (BAD) sectors in the status field, which is located at the bottom of the program window.
Conclusion
The Victoria HDD program is a good tool for viewing information about the hard drive, or SMART status, you can view complete passport information and SMART status, which cannot be done in most similar programs, or you can, but the information will not be complete. If you don’t know much about restoring and minor repairs of hard drives, but want to diagnose and return the drive to good condition on your own, then this program is just for you. But if you need to carry out more accurate and high-quality work with a hard drive, then I recommend using the program, it is a more professional tool for working with hard drives and has more functions.
Victoria is one of the most popular programs for testing, service and assistance in recovering information from hard drives. There are versions for DOS and for Windows.
Using the second version, you can diagnose and repair hard drives directly in a running OS. But it is worth noting that fixing bad sectors directly from the OS often ends in failure, so experienced users use a different version.
The version of the Victoria program that runs under DOS is loaded from a boot disk or flash drive. With its help, you can carry out diagnostics and, if necessary, “treat” the hard drive. A boot disk with the Victoria program installed will be useful for those whose operating system cannot start due to bad blocks, or if you have one hard drive and you want to fix bad blocks on it.
Bad blocks or bad sectors– a bad or unreadable sector, an attempt to access which the drive returns an error.
Bad blocks can be: logical - the sector checksum is broken, which is easily corrected by the program; and physical - the surface of the hard drive or its mechanisms are destroyed.
To check your hard drive for bad sectors, it will be enough to install a version of the program that runs directly in Windows. Download it by following the link below.
Extract the files from the archive to the selected folder. Then we go to this folder, look for the executable file “vcr446f.exe”, right-click on it and run it as administrator.
In the main program window, go to the “Tests” tab. On the right side of the window, mark “Ignore” and “read” and click “Start”. Thus, we ran a simple hard drive surface test - it will not affect it in any way, but upon completion of the test, it will be clear what state your hard drive is in.

LBA is a mechanism for addressing and accessing a block of data on a hard or optical disk, in other words, it is a sector number. In the fields “Start LBA”, “End LBA” you can specify the starting and ending numbers of the sectors for which you want to scan.
Just below, the percentages passed from the maximum LBA value specified in the menu are indicated, and there is an indicator of the remaining time until the end of the test.

Now let's look at the test results. Read data blocks are sorted by access time, colored rectangles in the middle of the screen, which allows you to identify the condition of the hard drive surface, and detect not only bad blocks, but also emerging defects.
I only tested 14.1% of the hard drive surface, and of these blocks - 152 blocks with a latency of 600 ms - and these are possible candidates for bad problems. 600 ms is the block access time; ideally, the value should not exceed 30 ms.
Usually, working drives do not have “colored” rectangles, and the appearance of red and brown ones indicates some problems. If after checking you have blocks related to the “Err” field, these are irreparable bad sectors.

To fix bad blocks on your hard drive, you can try to “zero” them - the “Erase” function - the checksum of bad blocks will be restored when the entire sector is rewritten. You can also use the “Remap” function - replacing the address of an unreadable sector with one of the reserve sectors that were created specifically for such cases.
If the damaged sectors are not curable, that is, they are of a physical nature, then you can use the following methods.
If the bad sectors are at the end of the disk, then trim that end of the disk. We remember the sector number and use it in the same program to trim the size of the hard disk (hpa): we trim the disk to the first bad sector.
If bad sectors are located in the middle or beginning of the disk, then leave this part of the disk unmarked. That is, split the hard drive into logical volumes so that the logical drives used are not located in an area where there are bad sectors.
I will end here. Program for checking a hard drive for bad sectors Victoria showed us the condition of the hard drive surface. It's up to you to decide what to do next - treat it or buy a new one.
Rate this article:


