Programs for checking and fixing hard disk errors. Checking and fixing disk errors using the Windows Chkdsk utility
The computer hard drive is a very sensitive component. Errors that appear in its file system, bad sectors on the surface, and mechanical problems sometimes cause a complete failure of the computer system.
The same problems are typical for flash drives, which in essence are practically no different from a hard drive. How to determine the presence of errors and bad sectors and how to correct them if possible?
Just a little bit of theory
Many people simply confuse file system errors and bad sectors. Therefore, we will try to explain the difference between these phenomena and the reason for their occurrence. We will also determine what the symptoms of errors that appear on the surface of the hard drive may be.
File system errors
When people talk about hard drive errors and trying to fix them using the chkdsk utility built into Windows, they most often mean file system errors. Such errors are associated with problems in the metadata that describe the file system itself: errors in the $Bitmap, $BadClus files, the main file table, and various indexes.
For example, errors in the $Bitmap file of the NTFS file system can cause the system to incorrectly recognize the amount of free space on a volume. And problems with the $BadClus file can lead to incorrect identification of bad sectors and an attempt to write data to such sectors, which will cause the computer to completely freeze.
Bad sectors
The nature of bad sectors is somewhat different. The hard drive is “cut” into sectors at the factory during production. It is then that its logical structure is created, then it receives magnetic properties for recording data. These structures become faulty as a result of the gradual degradation of areas of the surface of the hard drive, which become so due to careless handling of the hard drive, which was accidentally dropped on the floor or was hit on the case even with an ordinary screwdriver.
Testing programs that fall on parts of a degrading surface detect so-called faulty or damaged sectors - bad sectors. Sectors that have lost their magnetic properties do not allow data to be read or written to them. It is possible to eliminate faulty hard drive structures. For this purpose, manufacturers create special reserve areas of sectors. When a bad sector appears, diagnosed at a specific address, its address is reassigned to a sector from this reserve area.
Symptoms of errors and bad sectors
We have already talked a little about the symptoms of file system errors above. However, the symptoms are sometimes very varied. Here are some manifestations of errors and bad sectors that have arisen in the hard drive.
- Noticeable freezing of the operating system when performing read and write operations.
- Failure to load the operating system. For example, downloading continues only until the download notification and Windows logo appear.
- Frequent occurrence of errors in the operating environment.
- Extremely slow and unproductive operating system.
Here is a far from complete list of error manifestations associated with file system problems and the presence of degrading areas of the hard drive. What to do in such cases?
Checking errors using Windows
Checking and correcting file system errors in Windows is carried out by a standard utility of this operating environment called chkdsk. It can also be useful in eliminating programmatically generated bad sectors as a result of viruses. It can be launched both in a graphical environment and from the command line. Let's consider the most accessible option for performing it in a graphical environment.
Checking an inactive volume
Checking an inactive volume is the simplest. It can be done entirely in graphical mode. By inactive volume we mean a partition on which the currently running operating system is not installed. This could be another connected hard drive or, for example, drive D.
Click the "Run check" button.
The utility is launched from the “Service” tab of the volume properties. This tab contains the “Perform check” button. If you click it, the chkdsk utility window will open. To check bad sectors that appeared as a result of software errors, you need to check the box next to the corresponding option. Next, just click the “Run” button - the utility will check and correct errors.
The chkdsk utility checks volume D, also diagnosing bad sectors.
Checking the system volume
Checking and correcting errors on the system volume, where the operating environment valid at the time of checking is located, is carried out a little differently. The utility identifies such a volume as mounted, and therefore warns that it cannot perform the check, but offers to perform it during the next reboot.
The chkdsk utility reports that it cannot scan the disk.
After restarting the computer, the user will find that during boot, after the Windows logo appears, a black screen appears. This black screen is gradually filled with lines of text. This is the chkdsk utility that checks the system volume of the hard drive. After checking and making the necessary corrections, it will show the result, and then the operating system will continue loading.
The chkdsk utility checks volume C after a reboot.
Programs for checking hard drives for bad sectors
There are a number of applications on the software market that can test the surface of a hard drive. In this case, not just one volume is tested, but the entire surface of the hard drive. Of course, the user can independently set the boundary sectors and test individual areas. To identify bad sectors, a sector read test is usually performed.
Important: the results of the test for the presence of bad sectors must be considered in conjunction with SMART indicators, such as Reallocation Sector Count, Reallocation Event Count.
Data Lifeguard Diagnostic
This utility was created by Western Digital developers. It is available for download on the company's official website. Lifeguard Diagnostic works great with hard drives from almost any manufacturer, and not just native WD hard drives, as one might think. It offers a number of tests: Quick, Advanced, as well as the ability to fill hard drive sectors with zeros.
Interface of the Data Lifeguard Diagnostic utility.
We are most interested in the extended test. This test allows you to detect bad sectors on the surface of disks. When the program finds a bad sector, it informs the user about it, asking him to choose whether he wants to fix the detected error. If it agrees, then the application writes to sector 0, so the sector data will be lost.
A selection of utility tests. We need Extended Test.
This test takes longer than the quick test. Testing time depends on the size of the drive, since the test is carried out on the entire surface, starting from sector 0 and ending with the maximum LBA value.
Extended Test utilities in operation.
HDDScan
The HDDScan application also seems to be an excellent hard drive surface tester. It can often be seen as part of entire software packages such as LiveCD. This application has a graphical interface and offers a number of tests, among which, in our case, the most interesting is “Surface Tests”.
Select the Surface Test from the drop-down list.
Important: when conducting surface tests under Windows, you must close all running programs to avoid random results during the test caused by the action of these programs.
After selecting a test, an additional window will open, which presents the test parameters. Let's leave the “Read” option enabled, which will only allow us to read data from sectors. Thus, we will define sectors from which information cannot be read within a specified time (bad sectors), frozen sectors and normal cells. We will leave the fields of the initial and final sectors unchanged if we want to check the entire surface.
Let's leave the Read test option enabled.
When testing with this program, a number of sectors are identified:
- bad sectors,
- stuck sectors, reading data from which takes more than 500 ms,
- sectors with reading time from 150 to 500 ms,
- sectors with reading time from 50 to 150 ms,
- sectors with reading time from 10 to 20 ms,
- HDDScan considers sectors whose data is read within 5 ms to be normal.
The program test result is available in the form of a line graph, a sector distribution map, and also as a regular text report.
Checking the hard drive surface.
Ashampoo HDD Control
Unlike the programs discussed above, HDD Control is not a free program. This application is a whole set of tools designed to restore the health of your hard drive. This program also offers the ability to test the surface of the hard drive.
Select the "Surface Test" option.
The test is very simple and accessible to the average HDD Control user. To start it, you just need to click the “Surface Testing” button. It lacks additional options that would allow you to customize the type of test. During testing, only two types of sectors are identified: with excellent reading results and bad sectors.
Victoria HDD
Victoria considers the health of the hard drive being tested to be "GOOD".
This application can collect information about the SMART health of your hard drive. It also allows you to test the disk surface, reassign damaged sectors using the Remap operation, and reset bad sectors. It also divides sectors into groups:
- bad sectors (Error),
- stuck sectors with a read time of more than 600 ms,
- freezing sectors with readout times from 200 to 600 ms,
- sectors with reading time from 50 to 200 ms,
- sectors with reading time from 20 to 50 ms,
- Victoria diagnoses normal sectors within the framework of data reading up to 5 ms.
To test your hard drive, you can run this program in Windows graphical mode. Next, you will need to select the “Tests” tab. This is where the surface tests are located. There are four options available for working with the hard surface:
- Ignore,
- Remap
- erase,
- Restore.
First of all, you can perform the Ignore test to determine whether there are bad sectors on the surface of the hard drive. If they are, then you need to start the Remap test. This test will allow you to reassign the addresses of damaged sectors to the reserved area, where normal sectors are located.
Types of tests available and sector categories. Victoria checks the surface.
If, after the Remap test, Victoria continues to diagnose bad sectors, then you can still try to restore their functionality by using the Restore test. The Erase option should be used wisely under Windows, as it writes zeros to sectors - erases sector data. It can only be used within a certain selection of sectors, the data of which is not related to the operating system.
Brief summary
It should be noted that there is a difference between errors eliminated by the chkdsk utility of the Windows operating system and bad sectors eliminated by programs such as Victoria HDD. The former are caused by file system problems, and the latter are often the result of the loss of magnetic properties of sectors of the hard drive surface and its gradual degradation. However, chkdsk can also fix some problems with bad sectors.
To eliminate bad sectors, you can use such applications as: Data Lifeguard Diagnostic, Ashampoo HDD Control, HDDScan, Victoria. We highlight the Victoria HDD application as the best for checking and eliminating bad sectors, as it offers a number of tests: Ignore, Remap, Erase and Restore. It allows you not only to detect faulty hard surface structures, but also to treat the HDD.
One day it may turn out that a PC or laptop refuses to start the Windows operating system or freezes during important and urgent work. Hard drive errors when running Windows are not the last reason for computer failure. However, any problem can be corrected if you know what its cause is.
The essence of the disk problem
Whether it is a traditional hard drive or a newfangled SSD drive, a critical error appears anywhere on it. Disk error - physically or software damaged sectors, infection of the Windows system with viruses, failures in PC components (from parts of the drive itself to components of the computer motherboard). The user's task is to figure out what caused the errors on the disk.
How to fix hard drive problems detected by Windows
Hard drive problems are unspecified errors on it that are not signed with a numeric code (for example, error 11). First of all, the media from which it is proposed to copy valuable data is indicated.
Windows warns you that your data could be seriously damaged
Action plan:
- Urgent copying of important files to another storage device: flash drives, disks, memory cards, placing some of these files on cloud Internet services.
- Checking the disk for bad sectors.
- Antivirus scanning.
- Checking the CMOS/BIOS settings on your computer.
- PC maintenance: checking the integrity of the cables, external inspection of PC components and cleaning them.
- If you find faults that you could not fix yourself, send your PC or laptop for repair.
The last two points will not be considered - this is the task of specialists at computer service centers.
Backing up files in Windows 7
Do the following.
- Click “Start” and enter the word “backup” in the search bar of the Windows main menu. Launch the Backup and Restore application.
 Click on the first option offered - this is the backup wizard
 - Start setting up your archiving program. Click "Set Up Backup".
 Get started setting up your backup
 - Select the disk or partition where backups will be created. External drives and flash drives or large-capacity memory cards (from ten gigabytes) are best suited.
 Select another, healthy and working disk
 - Click on "Give Windows a choice." However, if you have clearly decided what you need first, choose the independent option.
 If you give the system a choice, Windows will copy the contents of all user folders by default
 - Select the system folders of user files and/or the contents of the copied disks - except for the disk on which the copy will be created.
 Select everything you want to copy except the destination drive
 - Windows will ask for confirmation and display the categories of files being sent to backup storage.
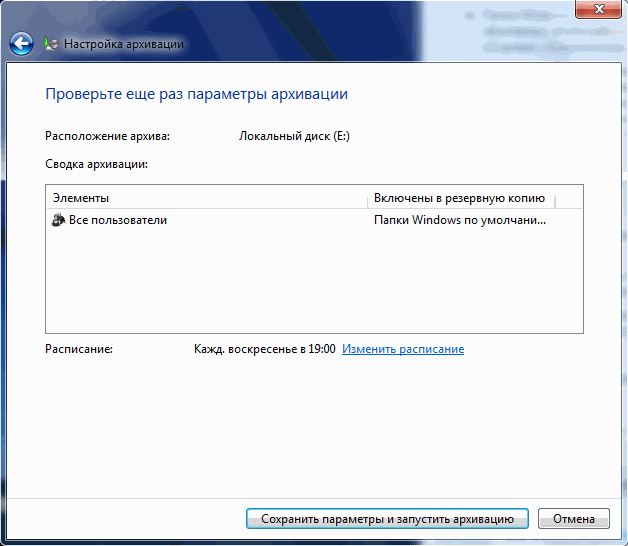 After this, the system will ask you to double-check the settings and start copying
To restore files from a backup, do the following:

The process will start. After the copying is complete, check if everything has been restored.
 Click the link that appears to view a list of files and folders from the previous copy
 Checking the disk using the Windows 7 command line
Disk scan identifies logically or physically problematic sectors of the hard drive or SSD drive, which is the main one in the computer. Do the following:

If you still don’t trust standard disk checking tools, use the Victoria program. The Victoria version for Windows is almost the same as the version for DOS - with one exception: after downloading, you can immediately run it to check a disk running a still working Windows system, without resorting to other disks, including removable ones.
Also get a new disk - in case the old one has outlived its usefulness.
Checking your PC for viruses
Boot viruses corrupt the boot record and the NTFS(5) file table, with which Windows 7 works. Because of this, valuable data that is not easy to recover with special utilities, as well as the system itself, is lost.
As an example, use the Dr. utility. Web CureIt, which allows you to quickly check your hard drive for malicious code.

The application takes up more than 100 MB - due to the extensive anti-virus database of all times. After two days of work, this database is considered outdated - viruses appear almost hourly.
If an error appears when starting Windows
The computer refuses to boot from the hard drive, reporting an error reading Windows system files.
 To try to resolve the hard drive read error, press Ctrl+Alt+Del to restart
 A professional way to resolve such an error is a third-party disk check utility from bootable media of Windows or another operating system (if there is a version of this utility for it).
Checking the disk using built-in tools hides some details, although its use is not useless.
What makes no sense to do:
- restore the Windows system to an earlier date;
- run automatic recovery;
- start Windows safe mode.
Setting up the BIOS to boot your PC from a flash drive or external drive
Change the PC boot priority from different drives in the BIOS. Do the following (the Award BIOS version is taken as an example).
- When you turn on the computer, after the manufacturer's logo appears (or immediately below it), a prompt line to enter the BIOS will appear - press this key.
 Press the key indicated at the end of the list of devices scanned when turning on the PC
 - After entering BIOS Setup, select “Integrated Peripherals”.
 To enter component management, select Integrated Peripherals
 - Check if the USB port controller is active.
 USB Controller Enabled means that the USB controller is enabled
 - If USB support is enabled, exit this submenu using the Esc key. If it is disabled, enable USB support using the Page Up\Down keys (the meanings of all keys for managing BIOS settings are revealed below), then exit by pressing Esc.
- From the main BIOS menu, select Advanced BIOS Settings.
 Go to the advanced BIOS settings to control how your PC boots from different media types
 - Enter the hard drive priority menu and turn on the flash drive as the first boot drive.
 To configure the system, the boot order from media must be changed
 - Use the “+” or “Page UP/Down” key to designate the flash drive as the first boot device.
 The first place in the boot list should be a flash drive.
 - Exit this submenu by pressing Esc and set USB drives as the first device to be launched.
 Set the USB-HDD parameter in the First Boot Device section (First boot from a USB drive)
 - Exit all submenus to the main BIOS menu and press F10 to save the settings.
 When a message appears asking the BIOS to save settings, press Y and Enter
 - Give the command “Y” - “Enter”, the computer will restart.
Now, when you restart the PC, it will first poll the ports for the presence of a flash drive or removable hard drive (HDD/SSD) - and only then try to start Windows from the built-in disk.
Checking a hard drive from a flash drive running the Victoria program
For example, we took a ready-made flash drive with Victoria under DOS and a laptop with a faulty disk. Do the following.
- Insert the USB flash drive and restart the PC. The boot menu with Victoria should appear.
 In the window that appears, select Victoria
 - The Victoria app may offer different versions - choose the laptop version.
 In the Victoria for Notebook section, select the second option
 - If you want to familiarize yourself with Victoria's functionality, read the key help by pressing F1.
 First, find out how to launch different functions of the Victoria program by pressing F1
 - To exit the help, press the X key or any other key that is not in the list.
 To exit the help, press X and go to Check Disk
 - From the main menu, press F2 to display disk information. If this does not happen, press the P key to select the IDE interface channel on which the disk sits. All modern PCs are equipped with SATA hard drives.
 In the window that appears, select Ext. PCI ATA/SATA and press Enter
 - After selecting the channel type, enter its number, for example, 1. If there are no other hard drives, the following numbers will be empty, there is no point in entering them.
 Busy channels in the program are immediately visible - enter the channel number of your disk and press Enter
 - Wait until Victoria detects the disk on channel 1.
 A message indicating successful channel detection will appear at the bottom
 - If your disk turns out to be IDE-based, go back to the interface selection submenu and select one of the options Primary/Secondary Master/Slave (English: “Primary/Secondary Main/Auxiliary disk”) - check on the disk itself what position it is in switch. IDE is obsolete - modern SATA-based drives do not require switching. The Primary Master mode is taken as an example.
 Select the mode with the cursor keys and confirm the selection with the Enter key
 - The disk details will appear at the bottom. Press F2 to display information.
 The channel port number is attached to the disk information
 - Initialization (passport data) of the disk shows that its recognition by the Victoria application has been completed.
 After the disk is fully initialized, you can start checking it
 - Press F4 - the disk scanning menu will appear. Here LBA is a disk sector (512 bytes). We multiply the number of LBA sectors by 512, divide by 1024 3 - we get the size in gigabytes. The size of the disk area being scanned in Victoria for DOS should not exceed 1024 GB. If the size is more than 1 TB, calculate the beginning (Start LBA) and end (EndLBA) and scan the disk in several stages.
 Check that the disk size does not exceed 1 TB
 - Press the spacebar and enter an integer number in gigabytes or percentage - this will determine the location of the last sector in the scanned area. The scanning start point is also changeable - similarly calculate the size in gigabytes. When you're finished typing, press Enter.
 Enter the last gigabyte that will end the scanned disk area
 - The size of the scanned disk area will be recalculated into the number of LBA sectors. Go to linear reading. Do not change this reading algorithm to another (random and “floating” reads will take longer and wear out the already old disk more).
 Select the program's linear disk scanning mode
 - Go to the next item and select “BB (Bad Blocks) Advanced Remap”. Options are selected using the left/right cursor keys or the space bar.
 Select the BB Advanced Remap option - it will use sectors from the reserve area
 - Don’t rush to set the “Erase 256 sect.” algorithm. (“Erasing 256 adjacent sectors”) - in place of one problematic sector, 128 KB of data on the disk will be erased. In this case, the size of the destroyed information will be multiplied by the number of “broken” sectors - depending on the proximity of each of these sectors to each other throughout the scanned area of the disk. Try other sector recovery options first! Press "Enter" to start scanning.
That's it, the process has begun, the Victoria application will notify you of completion with the sound of a beep on the computer. When bad sectors are found, “remapping” (reassignment of sectors) will be automatically performed.
 Replacing bad sectors using Victoria is one of the effective ways to temporarily fix a hard drive
 The future operation of the disk can be predicted based on SMART monitoring data. Press F9. The status will be indicated at the top. If it is “Good”, there is still a reserve for replacing bad sectors. The status has changed - the disk will be replaced with a new one. If it is not possible to replace the disk, try to programmatically trim it, excluding the bad sectors from the cropped area (often they are close to each other, many of them in a row), but this is for those who like difficulties.
 The Good status indicates that the disk is in good condition.
 Other ways to check the disk
There are several options:
- using other applications recorded on a flash drive in a similar way (DOS boot loader);
- scandisk.exe utility launched through DOS using the appropriate commands;
- Windows XP command line launched from LiveCD/DVD;
- connecting the problematic drive to another computer via a free cable.
Video: checking and trimming “broken” space
Error 11 when writing or unpacking data
The “11th error” has nothing to do with damaged sectors on the disk. This is 90% a software problem. It occurs when installing unverified programs that have installation sources that were compiled by the developers with some omissions. The message is generated by the system library unarc.dll, which is responsible for unpacking content for any installed program and is one of the components of the Windows Installer service.
 Error code 11 can be replaced by any code from 1 to 10
 Some users, not understanding the problem with the source code of the installed program, update or replace this file (it “lies” in the C:\Windows\System32 directory) with any version of it from the Internet. As a result, Windows may report that some files have been replaced with unknown versions and require you to insert an installation DVD or flash drive to restore them.
The solutions to the problem are as follows:
- try not to allow Russian names of files and folders in installed applications. For example, instead of the \Truckers-2 folder, when installing the game “Truckers-2”, the \Rig&Roll folder is created. If, after all, the directory name is written in Cyrillic, it means the game is from a dubious source, download the licensed one (hacking the version does not matter, as long as it has a file structure like the licensed source);
- There is not enough disk space (in any of its partitions) for the program to be installed. Clean the disk from unnecessary programs, documents and other content;
- error unpacking archives downloaded from the Internet. Install several archivers (for example, WinRar, WinZip, 7zip and several others);
- disable the antivirus and Windows firewall - sometimes they become an obstacle, especially if any application or game requires crack (activator with key selection).
Other hard drive errors
They may be:
- 3f1 (the error is inherent in HP laptops);
- 300 (boot record not detected);
- 3f0 (no boot disk);
- 301 (SMART disk health diagnostic error), etc.
Video: checking partition C: and flash drives for errors in Windows 7/8/10
Restoring the functionality of a PC or laptop in the event of disk failures is not a problem if you act wisely and consistently. May you be lucky!
The process of checking a hard drive for bad sectors is a search for erroneous records and bad sectors located on the drive.
Some of these problems can cause information loss - in most cases, beyond recovery.
Therefore, every user should be aware of their occurrence - both in order to try to correct errors on the disk, and to back up important information to another location.
The principle of formation of bad sectors
Over time, the owner of almost every HDD has to deal with problem sectors.
The principle of their appearance is as follows:
- During the production of disks, sectors are created, with the help of magnetization of which information can be written to the drive.
- Reading and writing information on (especially if the disk is hit or dropped), and sometimes also the influence of computer viruses, lead to a gradual deterioration in the condition of its structure.
- Bad sectors begin to appear on the surface of magnetic disks - areas in which information is stored incorrectly or not recorded at all.
It is possible to eliminate bad sectors, but the system does not automatically perform such actions - the user will have to manually run the scan and repair.
If there are few bad sectors, they are replaced by reserve areas.
When damaged HDD blocks appear, their addresses are reassigned to sectors from the reserve, and no data loss occurs.
Signs of a problem
Among the main signs that problem sectors have appeared on the disk and need to be restored are: The following are worth noting:
- The computer freezes while loading the operating system;
- failure to start the OS - in most cases, the download only reaches a certain point (for example, the Windows logo or the “Welcome” sign) and stops;
- unreasonable and frequent computer reboots;
- errors in the operation of the system, expressed in the inability to launch applications, closing windows and slow response to user actions.
The list of utilities that can be used to solve the problem is quite large.
They are divided into two main groups– those that are already built into the operating system (for example, Windows), and applications from other manufacturers.
The latter can also be divided into paid programs and free versions, which are more popular among domestic users.
Using Windows Tools
To correct errors and bad sectors, Windows OS already contains .
The advantages of using it include the ability to restore areas damaged during operation or as a result of infection of the system with viruses.
Another plus– the ability to start in two ways, in normal mode or.
The utility is capable of checking any physical and logical disks, however, there are slight differences in working with inactive and system areas.
Thus, the stages of checking and restoring a regular partition (which does not contain system control files and the OS itself) will be as follows:
1 Going to the window "My computer".
2 Right-click to open properties of the selected disk.
3 Select a tab "Service".
4 Pressed check disk button.
5 Put checkbox next to check bad sectors.

System volumes on which Windows is installed are scanned differently.
Starting the utility launch coincides with the steps for a regular partition, but when you try to check the disk, a message appears on the screen stating that it is impossible and asking you to do this after a reboot.

After a reboot, the system does not boot - instead, the system HDD partition is checked, the progress of which can be determined by the information displayed on the screen.
And you can run Hitachi Drive Fitness Test not only from Windows, but also in mode if problems with the disk have already made it impossible to boot the system.
Seagate Seatools
The Seatools utility is a free application that whose capabilities include:
- detection of HDD structure violations, including bad sectors and write or read errors;
- fixing bad sectors or overwriting them with zeros, so that in the future the system ignores damaged areas;
- Windows OS problems;
- damage to the system bootloader;

The application works most effectively with Seagate drives.
The average time to fix detected errors (together with the verification process), depending on the size of the partition, can reach 4 hours.
The advantages of the program include its free distribution and the provision of a detailed report.
HDD Health
The free HDD Health program features the ability to receive while checking bad sectors the following information:
- HDD manufacturer and firmware;
- current storage temperature;
- the general condition of the device structure, including whole and damaged sectors;
- a number of other useful attributes.

The utility is distributed free of charge by Panterasoft.
At the same time, the disk health assessment is carried out only using S.M.A.R.T indicators and is less effective than checking the disk with other applications.
Victoria
A good way is the free Victoria program.
During the scanning process, the user can obtain information not only about disk sectors, but also about all partitions (volumes) of the computer and the connectors to which they are connected.
The utility does not require installation, but should only be run as Administrator.

Rice. 9. HDDScan disk problem detection program.
Among the additional information– temperature control of all disks that are connected to the PC. In addition, the scan results are generated in the form of a report and can be saved in a separate file.
Windows malfunctions, emergency shutdown of the computer, experiments with disk space management software, the consequences of viruses - these and other problems can lead to the automatic launch of the standard Windows Chkdsk utility, designed to correct errors in the file system of hard drives. Incorrectly completed operation of the operating system with files leads to file system errors, and sometimes even damage to the file system. In emergency cases, the Chkdsk utility turns on itself before Windows starts, scans disk partitions and corrects errors. However, the fact that there are problems with the file system may not make itself felt during normal use of the computer and only become apparent when trying to manage disk space. So, for example, when trying to shrink a disk partition using standard Windows tools, we may receive the following notification: “It is possible that the volume selected for compression is damaged. Use Chkdsk to troubleshoot the problem, and then try shrinking the volume again."
In this case, disk check will not start automatically. How to run Chkdsk manually in Windows 7, 8.1 and 10? How can I use Chkdsk to fix disk errors if this problem is the reason the operating system is unable to boot?
Inside Windows, the Chkdsk utility can be launched in several ways.
1. Run Chkdsk using Windows GUI
To run Chkdsk, in the system explorer on drive C, right-click and open “Properties”.

In the disk partition properties window that opens, go to the “Services” tab, and in it click the “Check” button (or “Run check” for Windows 7).

In versions of Windows 8.1 and 10, if everything is in order with the disk file system, in the window that appears next, we will see a notification that checking is not required. But if you wish, you can start checking the disk with the Chkdsk utility by clicking “Check disk”.

If the system suspects file system errors, this window will contain a button to start scanning and repairing the disk.

For Chkdsk to work relative to drive C, you must restart the computer. You can do this immediately or delay running the scan until the next reboot.

After restarting the computer, we will be able to observe the operation of Chkdsk.

In Windows 7, launching Chkdsk is slightly different: to the preinstalled option of automatic error correction, you can add another possible option - checking and repairing bad sectors of the hard drive. When activating this option, it is worth considering that in this case Chkdsk may take longer to run.

As with Windows 8.1 and 10, in version 7 the system drive C cannot be scanned within a running operating system. To start the scan, the computer must be restarted. Click “Schedule disk check”.


When checking a non-system partition of a disk, if it is used by some programs, the situation is simpler than with the system partition. In the window with a notification that the disk is currently in use, you just need to click the “Disconnect” button to, accordingly, disable this partition for the duration of the scan.
2. Run Chkdsk using the command line
To run Chkdsk using the command line, first, accordingly, launch the latter.
In the command line enter a command like this:
In this command, instead of drive C, we each time substitute the letter of the desired partition on which the scan is required. If Chkdsk needs to check the system partition C, as with the GUI, you will need to restart the computer. When a message appears in the command line about the impossibility of locking the specified drive, you need to enter “Y”, then restart the computer.

In addition to the /f parameter, which is responsible for correcting disk errors, Chkdsk can be run with the /r parameter, designed to search for bad sectors and restore data. As a result of Chkdsk running with this parameter, hard disk clusters with unreadable sectors will be listed as damaged (bad blocks) and their functions will be transferred to a new cluster. Therefore, it is recommended to run Chkdsk with the /r parameter only when the usual error correction - running the utility with the /f parameter - does not bring the necessary results. Using the same drive C as an example, the command would look like this:
3. Running Chkdsk on a non-booting Windows
If Windows freezes at a certain point in the boot process, one of the possible causes of this problem is file system errors. In this case, you need to run Chkdsk by booting from the rescue media. As such, you can use regular installation media with versions of Windows 7, 8.1 or 10. With its help, we will launch the Chkdsk utility inside the command line. At the first stage of starting the system installation process, press the command line launch keys – Shift+F10.

In the command line that opens, before running the Chkdsk command, you need to clarify which letters define the disk partitions. This is easy to do using a notepad. We launch it with the command:
Click the notepad menu “File”, then “Open”.

In the explorer that opens, remember the new drive designations. As a rule, in Windows 8.1 and 10, the C drive partition (as it exists inside the running operating system) is listed as D, since the letter C is assigned to the first technical partition of the system. And all other sections are shifted by one letter of the alphabet.

Having decided on the letters of the disk partitions, close Notepad, then, returning to the command line, enter a command like this:


As with Chkdsk inside Windows, you must first try to fix disk errors by running the utility with the /f parameter. And only if the problem is not solved, only then run the command with the /r parameter, as indicated in the previous paragraph of the article.
In cases where Windows is unable to boot, you can pre-burn an emergency Live disk with a selection of various tools to restore the operating system. Among these, for example, is AdminPE based on WinPE. Its image for recording on a disk or flash drive can be downloaded from the official website of the project Adminpe.Ru. Using AdminPE, you can launch a command prompt and enter the Chkdsk launch commands discussed above. But in this Live disk, the Chkdsk utility has its own interface and is launched using a script. The shortcut to launch the utility is placed directly on the desktop.

In the drop-down list to check the disk, select the desired disk partition. Next, activate the checkboxes for restoring damaged sectors and forcibly disabling a partition (volume). Let's check the launches.


AdminPE's tools include a number of other utilities for working with hard drives, as well as the well-known programs Hard Disk Sentinel and Victoria.
Have a great day!
Most old hard drives contain erroneous records, etc. . Some of them lead to sad consequences; It's only a matter of time before this happens to your hard drive.
Windows OS offers tools for finding errors on the HDD, but they are not intended for diagnostics and testing. We invite you to familiarize yourself with much more effective tools.
So, how can you check your hard drive for errors? Here is a list of recommended programs:
HDD Regenerator – a program for testing the hard drive and treating bad sectors
HDD Regenerator is a utility for checking your hard drive, a professional tool for diagnosing, finding and fixing errors. The word "Regenerator" clarifies: the program is not only capable of detecting possible malfunctions, structure errors and bad sectors, but is also suitable for correcting them.
HDD Regenerator program interface
HDD Regenerator is a program for checking your hard drive and fixing errors. Can also be used as a full-fledged tool for . If the information is not readable, regeneration will allow you to bypass bad blocks and read problematic files.
In order to determine the condition of the HDD, you must pass a special test. Additional information can be retrieved. HDD Regenerator has the corresponding tools.
Other features of the program:
- FAT and NTFS file systems are supported, but the system type does not matter when testing
- Displaying detailed statistics about the operation and status of the hard drive
- Creating a bootable regenerating flash drive or CD/DVD based on HDD Regenerator
- Prescan mode: quick diagnostics of the hard drive (surface scanning)
- HDD monitoring in real time
- Data security: the program works in read mode (with the exception of overwriting bad sectors)
The cost of the PRO version of HDD Regenerator is $79.99/year. There is a free trial version available that allows you to restore 1 bad sector for free.
Hitachi Drive Fitness Test (WinDFT) – a program for testing and checking the condition of the hard drive
Hitachi Drive Fitness Test is a program for diagnosing a hard drive and finding read errors. The utility allows you to quickly check the status of internal and external hard drives that support G-Technology.
Seagate Seatools for Windows: Testing Drive Performance
Seatools from Seagate is a free HDD diagnostic tool for Windows and DOS. The utility will allow you to identify some problems on the HDD before contacting the warranty service to repair the disk (In our realities, instead of repairs, you will be offered a replacement device, as a result of which you will lose all saved data).
Note. The program is not compatible with all HDD models; it is only relevant for hard drives from Seagate.
Problems that the program can detect:
- Violation of the HDD file system structure
- Bad sectors and read errors
- Driver errors and Windows system problems
- Equipment incompatibility
- Windows bootloader (MBR) corruption on the disk
- Presence of viruses, keyloggers or other malicious applications
Seatools works as follows: the user selects tests for diagnostics, runs them, and as a result receives a detailed report. If the test is passed, the PASS mark will be displayed, otherwise FAIL. Please note that HDD testing can take up to 4 hours. To save time, you can choose one of three testing modes.
Seagate Seatools can also be used to “treat” your hard drive. That is, the program is able to detect bad blocks and try to restore or overwrite them with zeros (this method allows you to subsequently ignore problem blocks when reading/writing the disk structure).
HDD Health program: checking the disk and reading SMART attributes
HDD Health is another free program for testing your hard drive and monitoring its performance. The utility checks the hard drive for errors (SSD / HDD) and makes a forecast (Health indicator as a percentage).
Preliminary check of the disk for errors using basic SMART indicators. HDD Health program interface
The main program window displays the following information:
- manufacturer, model, firmware version
- current HDD (SSD) temperature (available through the notification area)
- general condition of the disk structure
- other attributes (via the Extended info menu)
Similar to other diagnostic tools, HDD Health reads S.M.A.R.T indicators, which allows you to clarify the current hardware performance. The program does not have any other tools for calculating errors or checking for bad blocks.
HDD Health 4.2: checking the status of the SSD disk
Thus, the tools of the HDD Health program will be useful to those for whom S.M.A.R.T. indicators are sufficient to check the condition of the hard drive (and if the condition of the device is not critical). Fortunately, the latest HDD/SSD drives have S.M.A.R.T technology. implemented.
HDDScan - a program to check your hard drive for bad sectors
HDDScan is a free program for hard drive diagnostics, reading S.M.A.R.T. and other parameters. After testing, you will receive a detailed log file detailing the disk status.
HDDScan supports various types of storage devices:
- RAID arrays
- HDD drives with IDE/SATA interface
- SATA/ATA SSD
- USB flash drives
Let's note the most useful functions of HDDScan:
- Checking the hard drive for errors that are not detected by standard Windows utilities: bad blocks and bad sectors
- Testing the hard drive (Read/Wipe)
- Checking the temperature for all hard drives connected to the PC
- Export any information as a custom report
CHKDSK is a Windows OS utility for checking errors and fixing bad blocks
You can check your hard drive for errors without installing third-party programs. The Windows operating system allows you to do this through the Check Disk utility.
The CHKDSK utility appeared in DOS. It not only searches for, but also corrects basic file system errors. It should be clarified that it is not intended to search for all types of errors and is not a HDD diagnostic tool.
However, using CHKDSK you can fix errors on various storage devices: not only on your hard drive, but also on a flash drive and an SD card. Starting with Windows NT, it fixes bad blocks (physically bad sectors) by marking them accordingly. Subsequently, these areas are bypassed by other programs when reading/writing.
HDDLife - a program for monitoring the status of your hard drive
Usually the heart of a computer is called the processor or motherboard. But they serve faithfully for several years, and then the hard drive suddenly fails. In terms of loss, no component can compare with it.
The hard drive is computer memory, which, of course, needs to be protected. In order to prevent sudden data loss, you need to regularly back up your data to another HDD or storage media. However, if you want to prevent hard drive failure in advance, you need to determine its current state. The HDDLife program will help with this.
HDDLife has several very useful features. First of all, monitoring the status of the hard drive. The “health” of the HDD is shown as a color scale. If everything is in order, the scale is green, if the disk has worked for a decent period of time, the color is yellow. The red scale is already a signal of a pre-emergency condition: the hard drive has worked and is ready to retire. In this case, it is better not to take risks and quickly replace the component. In the pro version of HDDLife, you can set up an email notification about the pre-failure state of hard drives. If there are a lot of computers on the network, then the diagnostic option will come in handy. The status graph also informs you how long the disk has been working. This is worth paying attention to, especially if you are buying a used drive or just want to make sure it is new.
The second important section is displaying the disk temperature. Any electronics works, or rather wears out faster, at elevated temperatures. And too high a temperature, as a rule, leads to disastrous consequences. If the indicator text is green, then everything is in order and the disk is in good thermal conditions. Otherwise, you need to buy special cooling or check the ventilation of the slot in which the disk is located. On some HDDs, the program allows you to adjust the noise level and performance. This is done using a slider that determines the relationship between the characteristics. Either this is the possibility of a special version for a laptop, or a limitation of the trial version - however, the option was not available for us. Some HDDLife functions cannot be called unique: for example, an indicator of available space. If there is not enough space on the partitions, the now familiar warning is displayed. Free space monitoring is available in Windows, as in almost any OS, so the message is more annoying than informative.
The program is distributed in three versions: free, HDDLife Professional and HDDLife for Notebooks. The differences can be found on the page http://www.hddlife.ru/rus/compare.html.
Answers to readers' questions
I often resort to system recovery due to a crash. It often freezes, the processor is constantly overloaded, I have already deleted unnecessary programs. As best I could, I closed all background programs. Experts say that you need to change the hard drive, they say, there are many damaged (broken) sectors. I want to try this program to check sectors. How to check your hard drive for errors?
Answer. Indeed, if you experience the problems described in your question, checking your hard drive for bad sectors will not hurt. At a minimum, we recommend scanning the disk using applications such as HDD Regenerator and Victoria. You can find out how to check your hard drive for bad sectors directly in the documentation. Whether it’s worth it or not, the wording is not very correct. You should check your HDD for errors regularly if the data is of even minimal value to you.


