Step-by-step installation of Windows XP. Installing Windows XP
Greetings. I decided to write about it today how to install Windows XP. They just brought me a computer, it’s kind of old, it’s already old. 256 MB RAM, Celeron processor, 40 GB hard drive. Well then? But whatever, XP is just right for him.
It’s just that everyone is already writing about installing Windows 8, but something has gone wrong with me. Well, oh well, I think that XP will still live, because whatever one may say, it’s a good OS and many people still work with it. I would like to immediately apologize for the photos; I took the photos on a 15-inch monitor and also on my phone. Ideally, of course, you could install Windows XP on a virtual machine and take beautiful screenshots, but I have a living example :).
Preparing to install Windows XP
Important! Make sure that drive C (the drive on which you have or have installed the operating system) does not contain information that is important to you. Desktop and folder "My Documents" is stored on drive C. If there is information, it can be copied to drive D using a boot disk.
If everything is fine, then we move on. Insert the Windows XP installation disc into your computer's drive and restart your computer. If, after the download starts, you see loading at the bottom of the screen (the dots will move), then everything is fine. Quickly press any key (we didn’t have time:), restart the computer again) and you can proceed to the beginning of the installation.
Well, if you didn’t boot from the CD, but the computer started booting as usual from the hard drive, or an error appeared that caused you to reinstall the operating system, then it means that you don’t have boot from the drive set first in your BIOS. I already wrote an article about that, but in this computer the BIOS was different from what is described in the article.

Go to the “Boot” tab.

Click “Boot Device Priority”.

Using the “Enter” and “Top” “Down” keys, set CD/DVD first, then the hard drive, etc. Now press F10 and save the changes. The computer will restart and the CD will begin loading. Press any button and proceed to the beginning of the installation.
Windows XP installation process
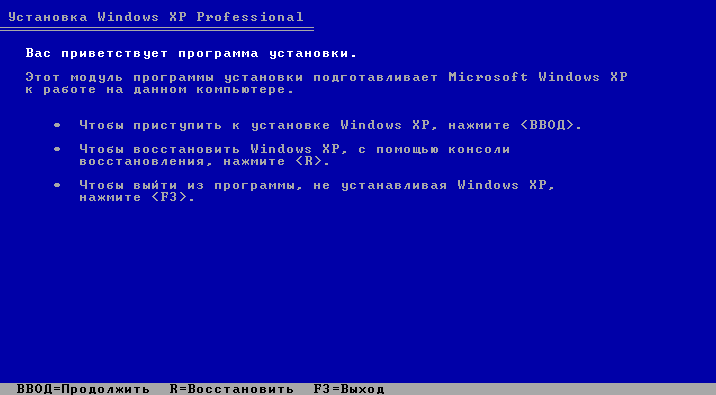
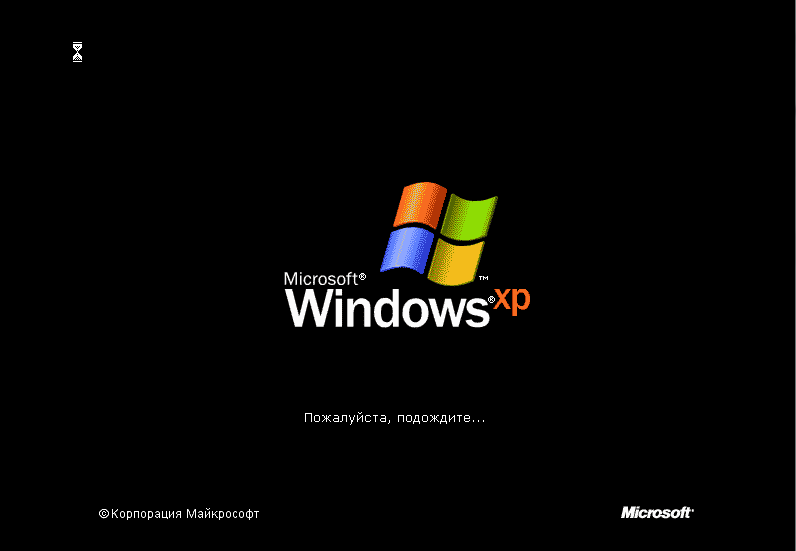
As soon as you press any key, we see this:

Here you will have to wait, well, nothing can be done, we wait :).

In this window, press “Enter”.

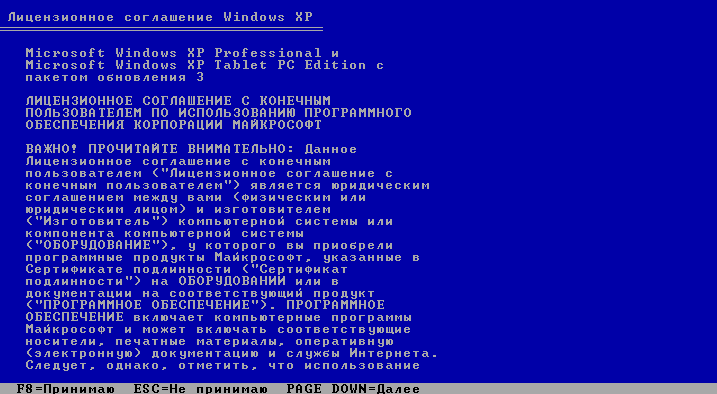
We accept the license agreement by pressing the F8 key.

As you can see, I have already found an old version of Windows XP and you can try to restore it, but I think you also need a clean installation, so press “Esc”.

We select the partition on the hard drive in which we want to install the operating system. As a rule, this is C:, select it and press “Enter”.

Confirm the installation with the “C” key.

Here you need to choose how the partition will be formatted. I advise you to choose FAT and not fast. Press “Enter”. Confirm formatting by pressing the “F” key.

We wait until the partition on the hard drive is formatted.

Copying files from the disk will start immediately, wait again :(.

You can immediately set up the language and keyboard. Click “Next”.

Enter your name and organization name. Go ahead.

Setting the time and date. Click “Next”.

We're waiting again, just don't go too far :).

I left “Regular settings” and clicked “Next”.

We enter the name of the computer on the network. And we continue with the installation.

We read the greeting and, as usual, click “Next”.

Configuring automatic update settings.

We skip these settings, or you can configure the Internet.

You can register with Microsoft. But I refused. Let's continue.

We specify users by computer.

Congratulations! Windows XP installation is complete.
All friends, the installation is complete and you can start using your computer. I also want to note that I installed the simplest build of Windows XP. You may also have an assembly, for example from ZWER, where the installation process may be slightly different. For example, in this version I still entered the key, I forgot to take a photo. But in the assembly from ZWER there seems to be no such item. Well, if it asks for a key, then look for it in the text file that you most likely downloaded with the disk image.
Well, that's it. Good luck friends!
Also on the site:
How to install Windows XP? Guide with pictures updated: December 20, 2012 by: admin
Reinstalling the operating system allows you to correct accumulated operating errors, reformat hard drives, and completely clear the registry. It is recommended to reinstall Windows XP every six months.
Step 1. When you turn on your computer, enter the BIOS and set your drive to be the first priority boot device.

On a note! You can boot from the drive in another way: during the procedure “POST" enter the boot menu and select yourCD-ROM orDVD-ROM.
Step 2. During installation, you will be prompted to download specific drivers for SCSI or RAID devices. These drivers are used for server systems, so you can skip this step for a home computer.
Step 3. Please review the End User License Agreement (EULA). To confirm your consent, press F8. In case of failure (ESC), the installation will be interrupted.

On a note! The agreement has several points that few people pay attention to. For example, according to the specified document, you have the right to copy the installation disk no more than twice for each paid license. This way you can avoid various lawsuits related to the use of unlicensed copies of distributions!
Step 4. Check out the capacity of your hard drive. To install to the selected partition, use the Enter key and go to step 7. If you want to change the number of volumes, go to step 5.

Step 5. Create the required number of logical partitions (volumes) of the hard drive by pressing the “C” key. Specify the size of the new volume.

Step 6. Specify the logical drive where you want to install XP.

Step 7 Check the desired option to format your hard drive.

Important! It is preferable to choose a full format rather than a quick format, since it checks for bad sectors. Please note that when installingXP volume selected for installation is completely cleared!
Step 8 Wait until the partition formatting process finishes.

Step 9 Wait until the process of copying system files finishes.

Step 10 To continue, a reboot is required; as a rule, it occurs automatically.

Step 11 After downloading, the system installation process begins.

Step 12 At the request of the installer program, configure the regional settings you need.

It is advisable to select the default layout as the one you use most often. You can change it later, in an already installed system.

Step 13 Setting up the ownership of programs is necessary for subsequent display in Windows XP of the name of the copyright holder of this licensed copy.

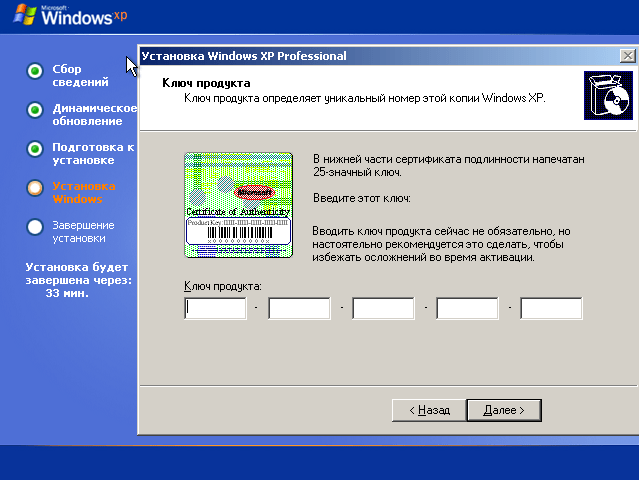
Step 14 When prompted by the installer, enter the key. As a rule, stickers with license keys are located on the computer case or on the original boxes for installation disks.

Step 15 Create and enter a computer name (required parameter), as well as a password for the “Administrator” account (optional parameter, but it is better to specify).
On a note! If your computer is not on a workgroup or domain network, you can specify any name. Otherwise, you should use the name in Latin, but make sure that it does not coincide with the previous one, otherwise problems may arise when connecting to a domain controller or another computer.

Step 16 Specify date and time settings.
On a note! When installing older versionsXP may have a problem with time zones. Currently, winter and summer time have been cancelled, but these transitions remain in the system. To avoid them without installing additional updates, specify your time zone for another country (for example, instead of Moscow, specify Istanbul).

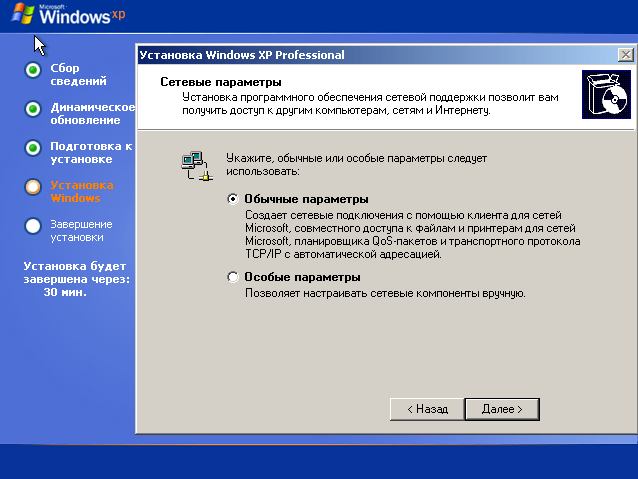
Step 17 Network parameters are set as follows: if your computer should have a static IP, check the “Special parameters” option. If you select “Regular settings”, the network address of your computer, gateway and DNS server will be assigned automatically.

Step 18 Specify the domain or network group that your computer belongs to. The default is Workgroup.
Important! If you need to connect to a domain, it is better to specify it immediately during installation - this will allow you to quickly receive all operating system updates, security settings and standard workstation settings.

Step 19 Wait for the installation to complete.

Step 20. When prompted by your computer, give your consent to the system automatically adjusting your screen settings.

Step 21 Check the desired option in the Screen Resolution Wizard.

Step 22 Perform the final setup of the operating system according to the instructions.

Step 23 Check the desired system update option.
Important! Technical supportWindowsXP was discontinued in 2014, so there are currently no updates, with the exception of very important ones, for example, protection against ransomware viruses.

Step 24 Upon request, register your copy of Windows with Microsoft Corporation. Essentially, this feature provides access to all system updates.

Step 25 Specify computer users.
On a note! Users must be specified even if your machine is on a domain, since these records only apply to a specific workplace.

Step 26 Complete the installation wizard.

Step 27 After completing the Windows installation process, you need to update the drivers for all devices.

Conclusion
We have looked at the main points of OS installation, but do not forget about the difference between installing on a “stand-alone” machine and a station in the domain. Try to update your system drivers as often as possible to maintain stable operation.
Video - Installing Windows XP
Every day computer technology is developing more and more, as is the software for it. But today, many are left with computers that do not meet the stated technical requirements. An example of such software is Windows 7, which requires at least 1 GB of RAM for comfortable operation.
What should those who have only 512 MB of memory do? In this case, our good old friend Windows Xp comes to our aid. In this article you will learn how to install Windows Xp. This operating system is the second most popular in the Microsoft line. But this is not even strange, because the quality and ease of operation were and are at their best.
Let's compare Xp with its older brother Windows Vista; somehow this OS did not catch on with us, since it had many shortcomings. And this was proven by the same users who worked on XP without switching to a new OS. And most people, having bought a laptop or computer already with Vista, eventually switched to XP or Windows 7.
If you are ready to learn how to reinstall Windows XP correctly, then move on to our installation, starting with preparing the computer.
Preparing to install Windows Xp
To install, first of all we need an installation CD with Windows xp. Or, as an alternative, it could be a bootable flash drive, 2GB or more. You can learn how to create a bootable USB flash drive. If your choice fell on a CD, then be sure to read how to burn a disc with a Windows image
Of course, we will need to save all our data to drive “D” in case you reinstall Windows. And you may need it. For example, I have a lot of bookmarks of the pages I liked, and it would be expensive to look for everything again after reinstalling. But having exported, I saved all my favorites in one file, and after installation I restored them in a few clicks, and this is quite convenient.
Having saved all the data, the last step remains, we need to put it in a flash drive. Having done all this, you can proceed to the installation itself.
Installing Windows Xp
Having prepared the computer and set everything in the BIOS as recommended, after inserting the CD into the drive, booting from it should begin. A window will open asking you to press a key to continue the installation. The main thing is to react in time and have time to press, because if there is nothing to do, the computer will start to turn on as always with the previously installed OS.
By pressing any key, a blue screen will appear on which the configuration of your computer will be checked. You'll have to wait a little here.

After checking, the installation program will offer to install a new Windows XP or restore the existing one. Since we will be installing a clean system, click “ Enter».


To install Windows XP, I used a blank disk and created one partition by simply pressing "Enter". But if you want to divide the disk into 2 partitions, click “C” and indicate the size that suits you, for example, 20GB disk “C:\” and confirm. Selecting “Unallocated area” again, press the “C” key and specify the remaining 20GB, thus creating a second logical drive “D:\”.

Having finished allocating free space, select “Format partition in NTFS system<Быстрое>».

The formatting process will begin, it will take a few seconds, although if you chose simple formatting, you will have to wait a little longer.

After formatting, copying of the installation files will automatically begin, again here we don’t need to click anything, we just wait.

After copying all the files, the system will reboot and proceed to the installation itself.

Our computer rebooted and the installation of Windows XP began, with an approximate time until it was completed.

At the 33rd minute, a window will appear to configure regional settings, change the layout and add a language, just click “Next”. Thus, you will leave the standard set of languages English and Russian. As a rule, I set additional languages after installation.

In the next window we need to specify a Name.


Let's give our computer a name.

Set the time zone and set the date and time.

We select the usual parameters.

We simply skip this step without changing anything.

Attention!!! If you set to boot from a CD drive, then a window will again appear asking you to press a key to boot from the disk. Your task is not to press anything, because Windows XP is almost installed and we won’t need the disk anymore. After the reboot, auto-adjustment of the image will begin, we agree with everything by clicking “OK”.


Windows greets us and thanks you for your choice, proceed to the next step with the “Next” button.

“Delay this action” is what we need to select. In the screenshot I scored to change the choice.

If Windows XP managed to install drivers on the network card and the cable was plugged in, it may begin checking the Internet connection. But we just need to click on “Skip”.

Again, if there is a connection, then Windows will offer to register with Microsoft. Select “No” and click “Next”.

Be sure to enter your name for the account.

Finishing the setup of Windows XP SP 3

Everything is ready Windows Xp is installed.

Preparing a disk with a distribution kit is the first stage of installing Windows XP. If you already have such a disk in your hands, you can skip this point, but if you downloaded a system image in ISO format from the Internet, you will need to use special programs (Nero Burning ROM, UltraISO and analogues) to burn it to a CD or DVD.
The Windows XP boot ISO file is a ready-made system image containing a complete set of installation data. It does not require any preliminary preparation, but is transferred to the CD unchanged.
Let's look at the process of burning a Windows distribution to DVD using UltraISO as an example.
- Launch the application.
- Press the key combination “Ctrl” + “O” and open the Windows ISO image that you have prepared to transfer to disk.
- Click on the “Burn CD image” icon in the toolbar at the top or press the F7 key.

- Place a blank or rewritable DVD in the optical drive.
- Make sure that the distribution you need is selected in the “Burn Image” window. Check the “Check” option if you want the disc quality to be checked after burning. Select the appropriate recording speed. Even if your laser drive can write at maximum speed, we recommend choosing medium or low speed. This will ensure good readability of your disk by any drive, including old ones.
- A rewritable disc must first be erased by clicking on the button of the same name, and you can immediately start writing to a blank disc by clicking “Record”.

After 20 - 30 minutes, depending on the speed of the drive, the preparation of the installation disk will be completed. You can move on to the next stage.
How to install Windows XP from a disc the traditional way
Traditional installation is a conventional system installation process that requires active user participation. Most often, Windows XP is installed in the traditional way.
At this stage, we have already prepared everything necessary. In order to install Windows from a disk, we only need the disk itself and a computer with an optical drive on which the system will be installed. If you don’t have a drive, you can use an external one that connects to a USB port.

BIOS setup
To boot your computer from a CD or DVD, you need to set the CD-ROM drive as the first boot device in the BIOS Setup settings. To do this, enter the settings menu by pressing the designated key (Del, F2 - F12, etc.) immediately after starting the computer. Which one you can read at the bottom of the motherboard splash screen (displayed on the screen almost immediately after turning on the PC).
Once in the settings, go to the “Boot” or “Advanced BIOS Features” tab - in older versions of Award BIOS. Use the arrow keys to navigate to select the laser drive from the list of devices. In our example it is listed as CD-ROM Drive, but sometimes this list only lists hardware models.

After selecting the desired device, press F10 (option to exit the BIOS menu and save the settings).
Booting from disk and installing Windows XP
- Place the laser disc in the drive and restart your PC. System installation begins by loading Windows XP files into the computer's RAM.

- Next, Windows will greet you and offer you the option to continue the installation, exit the program, or restore itself using the recovery console. The second and third points do not suit us.
- By pressing Enter you will continue the installation. The next step will ask you to accept the Microsoft license agreement for using Windows XP.
- Next, select a location on the hard drive for the system partition. Click “C”, which means “Create partition”.

- Let's determine the size of the future drive C. In our example, it is maximum, but you can set anything, preferably at least 10 Gb.

- Now let's look at the list of hard drive partitions and agree to install Windows in one of them by pressing Enter.

- Let's format the new partition in NTFS (quick formatting will suit us just fine).

- And wait until the installer copies the distribution files to the disk.

- Once the copying is complete, the computer will restart.

- The next boot of Windows XP will no longer be done from a CD or DVD, but from a hard drive. This means that the system bootloader has been successfully created and is working correctly.

- From now on, our participation will be required again. Here we will have to specify the default system language, our location and additional languages if needed (although language packs can be installed later).

- Next – your name and organization. The name is required; the organization can be skipped.

- Entering the serial number of the Windows distribution during the installation process is voluntary. You can always enter it later.
- The computer name and administrator password must also be specified now. The name will be suggested by default, but you can change it. The password can be left blank.

- The date, time and time zone are also set at this stage.

- We will not assign special network parameters; let them remain by default.
- Leave the workgroup name as it is. You can always change it after installation.

- The installation is almost complete. Next, the screen will be configured and one or more user accounts will be created, the first of which will be designated as the computer administrator. You will also be prompted to activate Windows XP right now.
But now it’s really almost everything. There are a minimum of settings left - and the system is ready to work.
Automatic installation of Windows XP
Creating a response file using Windows tools
Agree, installing the system for about an hour without leaving the computer and constantly clicking “Next” will get boring for anyone. To simplify this work for those who have to do this often and for a long time, they came up with a way to install Windows without user intervention. To do this, a script is created in advance - a response file, which contains all the information necessary for the installer program.
The time has come for you and me to figure out how to create such scenarios. The Windows XP distribution includes a utility Setupmgr.exe, which is in the archive deploy.cab, stored in the SUPPORTTOOLS folder on the installation disk. Let's extract this utility from the disk and run it.
- The “Installation Manager” wizard will help us create the answer file. With its help, we can either create a new or change an existing script. Since we don’t have any preparations, we’ll select “Create”.

- We will leave the installation type as default – “automatic installation”.

- Product version – Windows XP Professional.

- User experience – “Fully silent installation” (if we do not plan to change the parameters in the answer file).

- Next, select “Install from CD”.

- Let's accept the license agreement and proceed to filling out the same forms and fields that we filled out when installing Windows from disk. First window: “Name and Organization”.

- Screen options. They can be left as default (use Windows defaults).

- Timezone.

- Serial number (required!). Without entering the serial number here, you will not be able to proceed with creating the answer file and installing the system.

- The names of the computers on which Windows XP will be automatically installed using this scenario.

- And also: the administrator password, network components, the name of the workgroup or domain where this PC will belong, the country and city telephone code, locale standards, language support, Internet Explorer initial settings, Windows installation folder, printers and a number of other settings - in separate program windows.
Upon completion of the wizard, a file will be created unattend.txt- this is our script, thanks to which we can install Windows XP completely automatically.
If you install the system from a CD, you need to rename unattend.txt to winnt.sif.
After you create your answer file, you can add your own commands to it, which you can learn about in this article.
That's probably all. As you can see, there is nothing difficult about installing Windows XP according to a script without your own active participation. All that remains is to save the resulting file in the i386 folder of the distribution disk - in the same place where winnt32.exe - the Windows installer - is located.
If your PC has a floppy drive, you can place the answer file in the root directory of a floppy disk and insert it into the computer during system installation. In this case, the installer will prioritize executing the script from the floppy disk, even if there is another one on the CD, in the i386 folder.
Automation of installation by alternative means
Windows' own tools are not the only tool that allows you to install it “in one click.” There are also third-party applications for this, for example, Advanced Windows Unattended Installer. Creating scripts using this simple and free program is much faster and easier than using Windows. The only drawback of Advanced Windows Unattended Installer is the lack of a Russian-language interface.
To use this tool to create a disk that allows you to automatically install Windows XP on your computer, you need to perform only three steps:
- Copy the contents of the Windows distribution to a separate folder or mount its ISO image into a virtual drive.
Installing Windows XP is easy! In this article, we provide step-by-step instructions for installing the operating system for beginners.
An illustration of each step will help you quickly master the process of installing the Windows XP operating system from a disk.
What is Windows XP?
Windows XP is an operating system (OS) produced by Microsoft, released at the end of 2001. Windows XP can be called an improved version of Windows 2000 Professional. After XP came Vista (in 2007) and Windows 7 (at the end of 2009).
By the beginning of 2011, Windows XP is the most popular operating system in the world and in Russia.
Windows XP has 3 official add-ons, the so-called SP (Service Pack) 1,2,3,4. They added and improved the basic version of the program.
The largest number of different programs and utilities are compatible with the XP operating system.
Why install Windows XP?
Why do you need to install Windows at all? In what cases is this necessary?
Typically, Windows XP installation occurs for two reasons:
1. You bought a computer without a pre-installed operating system.
You won’t be able to work on such a computer, since you simply won’t find the folders, pictures and files that are familiar to our eyes, but only a blinking cursor, and the BIOS.
2. You are not satisfied with your current operating system.
- You want to install a clean system in order to get rid of system errors, all kinds of garbage, viruses, junk in the form of remnants of programs that have not been completely removed.
- You prefer Windows XP to all other operating systems due to its unique features.
How to install Windows XP?
Windows XP can be installed in several ways: from a floppy disk, from a CD/DVD disk, from a flash drive. We will look at the classic installation of an operating system from a disk.
Installing Windows XP is easy! Our step-by-step instructions will help you with this.
1. Preparation.
Prepare: a multiboot disk with Windows XP, a set of drivers for your equipment.
2. The installation process takes place in several stages:
First stage: BIOS
BIOS is the basic software that boots the computer.
How to enter BIOS: when you turn on the computer, press the DEL button (sometimes the F2, F10 or F12 keys, mainly on laptops)
BIOS setup: you need to boot from CD-ROM. BIOS language is English.
We find the Advanced Setup section, then set First Boot Device from CD-ROM(on the right are hints on which buttons to use to change the position of the devices)

Saving changes to BIOS: Press the F10 button and select Y (Yes). The computer will restart, but with the changed settings.

Press F8 to agree and continue installing licensed Windows XP
Select the partition on which you want to install Windows.

To create a new partition, use the C key and set the desired size (for XP, the optimal size is at least 15 GB.)
To delete the highlighted partition, use the D key.

Quickly format your partition by confirming your decision by pressing the F key. Formatting to NTFS will rid you of all records on the hard drive partition of your choice.
Warning! Formatting deletes ALL data from your disk.
Be careful and save the documents you need in advance.


After formatting the hard drive and copying files, the system components are unpacked and installed. During the installation process, the computer will restart several times.
At the 33rd minute you set language and regional standards, assign a name and name of the organization (any) 
enter from the sticker, case insensitive

Stage three: Complete the installation of Windows XP.
Let's set it up now workgroup and domain. 
Setting up Windows XP


