What is a Windows installer? Failed to access Windows Installer service
Sometimes, during the installation of a program, an error code 1719 may appear on the screen, which indicates that the Windows Installer service is unavailable. There may be several reasons for this problem. Let's understand them and try to solve them.
Windows 7, 8, 10 installer service is unavailable or not responding
Scan system files
So, when you see a similar message on the screen, you should immediately scan your system files. To run the scanning tool, you must run the command prompt as an administrator, click Start on the desktop - enter cmd in the search, right-click on the corresponding command line icon and select - Run with administrator rights. In the command line window that opens, enter the task sfc/scannow and click Enter. Once the check is completed, your problem may be resolved.
Availability of windows installer
Open Start - Run. In the window that opens, enter the task services.msc.
In the new window, find the Windows Installer item.
Double click on the icon. In the window, find the Startup type parameter and make sure that Automatic or Manual is selected next to it. After that, select Run and click OK. Next, you need to restart your computer for the changes to take effect and try to reinstall the required program.

You can also run the installer via the Command Line. In it you need to write net start MSIServer and click Enter. After this, you will see a corresponding notification that the service is running.
Deleting and re-registering a service
If after the above machinations the error still occurs, try re-registering the installer. This can be done in two ways: using the Command Line and using the Run service.
Let's consider the first option. Check which version of the operating system is installed on your computer, 32-bit or 64-bit. To do this, go to My Computer and right-click on an empty space. Select Properties. In the pop-up window you will find the required information.
Log in to the Command Prompt as an administrator (how to do this is described above). For a 32-bit system, type the command msiexec /unregister, which will deactivate the installer. Click Enter and then type msiexec /register which will log it back into the system.
If your system is 64-bit, then the commands will be as follows:
%windir%\system32\ msiexec.exe /unregister
%windir%\system32\ msiexec.exe /regserver
%windir%\system64\ msiexec.exe /unregister
%windir%\system64\ msiexec.exe /regserver
After this, reboot the machine.
The second option involves using the Run service, which can be opened through the Start menu. At the prompt, type msiexec /unregister and click OK. Then type msiexec /regserver. Don't worry if you don't see any changes on the screen. Your problem should, however, disappear after this.

Registry changes
A more radical method is to change settings in the registry. In the Run service, enter the command regedit. A Registry Editor window will open. In it you need to follow the branch:
HKEY_LOCAL_MACHINE\SYSTEM\CurrentControlSet\services\msiserver
Find ImagePath and make sure its value matches the following: %systemroot%\system32\msiexec.exe /V. If the indicator is different, double-click on the name of the item and enter the required parameters in the window that appears. After this, you need to start the services.msc service as described.

Hello. Today I want to raise a topic that has become sore. I don’t know about you, but lately at work I’ve been encountering Windows Installer problems quite often – errors msi. Moreover, this issue can be relevant both for the good old Windows XP and for the relatively “fresh” Windows 7 and Windows 8. Let’s look at this issue in detail, since the topic is very serious and if the problem arose once, then believe me, it will last a lifetime It will definitely complicate things.
What kind of files are these that have the msi extension?
This is the installation package file that installs the software and uses the Windows Installer service. Your extension name msi taken from "Microsoft Installer » , as the Windows Installer version used to be called. Such a file contains a complete installation script for the software product, auxiliary components, libraries and, in most cases, all installation files compressed into cab archives. We can discuss for a long time all the advantages and disadvantages of the Windows Installer, but we will still have to accept it “as is,” and we will respond competently and adequately to some problems in its operation. Errors can occur both in the operation of the service and due to the msi files.
This is what sometimes happens: and then the system asks me to verify whether there really was an installer file that I ran. At first it sounds at least strange. But, reading further the system message, I understand that I am being asked to verify not only the presence of the file itself, but also my rights to access it. As it turned out, it was not me, but Windows Installer was denied access to the file, hence the problem.
This issue is not resolved in a complicated way. Let's first make sure whether the system has full access to the file, for which in the “Properties” of the file, go to the “Security” tab and find the user “System”.
 I’m more than sure that you won’t find it there, so add it yourself - click on “Change”, then on “Add” and enter the name: “System” (or System, in the case of the English version of the system),

then click on “Check names” (the line becomes underlined).
Confirm – OK and check the “Full access” checkbox, confirm again.
Click on “Advanced”, then – “Change permissions” – “Add permissions” »,
inherited from parent objects and we confirm everything three times.
Thus, we got rid of this installer error, and it will no longer bother us during the installation process. Although it would be more reasonable and prudent to add full system access rights to the entire content folder from which the software is usually installed (as in my case, the “Install” folder).
If your computer has a Windows XP operating system and "simple file sharing" is enabled in Folder Options, you will not see the Security tab in the file properties. In this case, you should go to “Folder Options” and uncheck the “Use simple file sharing” checkbox. Also, you risk not finding this tab in different “builds” and “lite versions” of both Windows XP and Windows 7. To access this tab, you will have to boot into Safe mode and log in under an administrator account.
Another problem with Windows Installer can be avoided by running the installation of applications with the antivirus program disabled, with administrator rights, and also in compatibility mode (the “Compatibility” tab in the properties of the msi file, check the corresponding checkbox).
 There may also be problems when trying to install the program from removable media, a flash drive, for example (such actions can be prohibited in the operating system settings) - just copy the installation file to a convenient location on your hard drive. Another option to solve the problem is to create a new folder under any name you like and copy the installation package into it, from there and start the installation - it can be useful for errors number 1603, 214 728 7035, 2203 and 1723.
Be sure to ensure that the system has access to the temporary file directories. Open “System Properties” (Win+Pause or in the context menu by right-clicking on the My Computer icon, select the line Properties), in “Advanced system settings”,
![]() On the "Advanced" tab, click on the "Environment Variables" button.
On the "Advanced" tab, click on the "Environment Variables" button.
 We find the folders of temporary variables (they have the words TEMP, TMP in their names), check whether the system has access to them (using the algorithm already described above). I hope you remember, to find out the address of such a folder, you need to double-click on the variable
 and, having copied the specified path, paste the contents of the clipboard into the Explorer line and navigate to the folder. And at the same time, you can do something useful - clear all temporary folders from their contents.
 It would also be the right decision to check for access rights those directories in which you plan to install applications and a directory named Config.
Msi at the root of the system partition. Encryption must be disabled for all the directories indicated above, since the Windows Installer in this case does not have access to them, unlike the user.
It would also be the right decision to check for access rights those directories in which you plan to install applications and a directory named Config.
Msi at the root of the system partition. Encryption must be disabled for all the directories indicated above, since the Windows Installer in this case does not have access to them, unlike the user.
Well, of course, an installation error can occur due to a broken installation file (the so-called “broken” file, with a mismatch of checksums), in such a situation it is necessary to get hold of a known “working” normal installation file. Most likely, it will make sense to download it from another source or through another mirror.
Cause of Windows Installer Error
Now it’s worth considering a situation where installation of an application is impossible due to errors in the Windows Installer itself. If the installation process does not start, no matter what application you try to install, then most likely the problem is in the installer service itself. System error messages may appear containing phrases such as: Installer package error or Windows Installer Error. The reason for this may be errors in the system registry or a virus attack. Let's start by checking the status of the Windows Installer service and how it is started. For this purpose, in the Run line (Win + R) we enter the command services. msc, and in the console that opens we find the item we are looking for - “Windows Installer”.
 Let's see if it works and what its startup type is (must be set to Manual). If the service does not work and has a different startup type, then start it (click “Run”, you can click “Restart”), and change the startup type in the properties to "Manual". If the service is started, check the situation and enter the command in the “Run” line msiexec– if everything is OK, then instead of an error you will see a window with the Windows Installer launch parameters and its version number.
I see further elimination of the problem in correcting damaged operating system system files. To implement this, in the “Run” line, execute the command sfc/ scannow(prepare in advance the disk from which your operating system was installed, it may be needed in this process) and then reboot the computer. In theory, the problem should disappear.

If the “Status” column indicates that the installer is running, although this is not at all true, you can try to restart this service by clicking the corresponding item in the upper left corner. After this, all that remains is to restart the computer and test the functionality of the Windows Installer. If after such settings the program returns to normal, we can congratulate ourselves, the “torment” is over. Otherwise, you will have to “step” further.
Step #3: Re-registering the service via the command line
You can return the Windows installer on 7 to normal operation by re-registering such a service in the system. How do we act?
Go to the Start menu, enter cmd in the search box and press Enter. Next, enter the msiexec /unregister parameter into the console that appears, press Enter, and then after the command line responds, enter the msiexec /register value into it and press Enter again:

We repeat entering the commands if we are dealing with 64-bit Windows 7, and then reboot the computer. In principle, this is where all the difficulties with Windows Installer often end. However, if the working atmosphere for the Windows installer has not returned after this, before reinstalling it, you can try to revive it through the registry editor. But what if?
Step #4: Debugging via Registry Editor
You can try to resurrect Windows Installer through the registry editor in this way:

and delete all existing parameters in them:

If there is no data in the destination folders, right-click on the Installer folder, and then click “Permissions” in the list that appears. Next, in the window that opens, click System, check the “Full Control” option and click OK:

The installation of an application or program on a computer is not always successful.
When you try to install a software product on a computer running the Windows 7 operating system, a Windows Installer package error appears.
Reasons for the error
Read also: Everything about the NET Framework for Windows 10 Download methods, installation methods and common errors
Before you try to fix the problem, you need to find out the exact cause of its occurrence. The main reason for the error is the restriction of access rights.
In other words, when you run the installation file, the system cannot determine whether the user has sufficient rights to run it.
Often the message “Windows Installer package error” is accompanied by numbers and letters. This data indicates those folders to which the PC user does not have access.
The error may also be caused by the absence of several files in the installation program.
Some files can be destroyed by an antivirus program, mistaking them for malicious ones.
If the application was downloaded from a pirated resource, then it is quite possible that a number of files necessary for correct installation were initially missing.
When installing any application on your computer, you must disable or configure your antivirus program. It is recommended to perform these actions only when there is one hundred percent confidence that the installed file will not harm the computer.
When installing which programs do you most often receive an error message?
Read also: How to change the Windows network type: Instructions for all versions (7/8/10)
A Windows Installer package error appears when installing files with the MSI extension, as well as programs such as iTunes, and Java emulators.
In the message containing the error text when installing Java, there is a numeric code - 1721. It reports that there was a failure during the installation of the program.

The reason may be hidden either in the lack of rights for installation or in the antivirus program. In order for the installation of files to become feasible, they must be added to the exclusion list in the antivirus settings.
If after this, the error remains the same, the problem lies precisely in the system’s permission to install the file.
Installing the iTunes application has its own characteristics, which will be discussed below.
Unable to install iTunes - Windows Installer package error
Read also: iMyFone TunesFix: solving all kinds of errors and problems when working with iTunes without losing data!
This error may occur when you try to install iTunes on a computer running the Windows 7 operating system.
To fix it, you can reinstall the operating system. Or, install iTunes correctly.
Correct installation of the program is carried out in the following sequence:
- On your computer keyboard, you need to hold down the “Windows” + “S” keys.
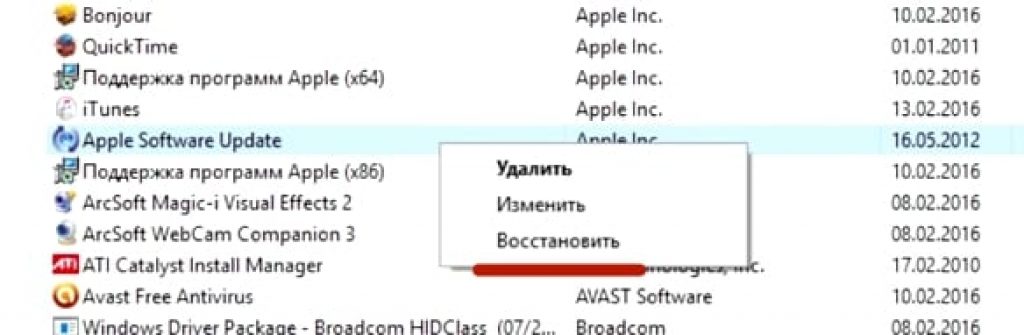
- In the program search window that appears, you need to enter the word “programs and components” and click on the result.

- In the list of programs, you need to find “Apple Software Update”.
- By right-clicking on the program, select the “Restore” sub-item of the context menu. If you click “delete”, then during uninstallation the message “Itunes Windows Installer package error” will appear. Then all you have to do is follow the on-screen prompts.

- After completing all steps to restore the program, it should be uninstalled. To do this, you need to return to the list of programs and click on the “delete” button.
- After uninstalling the program, the computer should be restarted.
- After rebooting, iTunes is installed again.
What to do if the problem persists?
Read also: TOP 3 Simple ways to clear RAM on a computer or laptop running Windows 7/10
However, the above actions do not always prevent a malfunction.
If after performing the above operations the error remains, then you should perform the following series of actions:
1 Right-click on the installation file and select the “open with” sub-item.
2 Select the archiver program from the list that appears.
3 In the window that opens, run the fourth file from the top.
4 Close the archive and try installing iTunes again.
5 The program can be easily installed on your computer.

The iTunes program must be downloaded from the official website.
When installing iTunes, the Windows Installer package error crashes. To resolve this issue, you should follow the steps above.
At the same time, you should not install system updates via the Internet. They must be downloaded from a flash drive or disk.
This will prevent Windows Installer package errors from appearing when installing iTunes on Windows 7.
Error when installing files with MSI extension
As mentioned above, the error can occur not only when installing iTunes, but also when trying to install any programs whose installation file has an MSI extension.
Files with the .exe extension are installed without any problems. This is because when working with MSI files, the download utility msiexec.exe is used.
Its failure to work may be the cause of the error.
If an error occurs during installation, then the reason lies in the installation file. The utility works as it should.
The error message can take two forms:


Before fixing the problem, it is necessary to diagnose the operation of the installation utility.
Diagnostics of the utility for installing files
Read also: [Instructions] How to enter Safe Mode in the Windows operating system (XP/7/8/10)
Diagnostics of the functioning of the installation utility is carried out as follows:
- Using the key combination “Win” + “R” you need to open a system window intended for executing commands;

- In the field you need to enter the command services.msc, and confirm with the OK button;
- In the service display window that opens, you need to find the Windows installation service (in this case, it is Windows 7);

- After double clicking on the service, the service configuration window should appear. All parameters must be set exactly as shown in the screenshot;

The above problems can be resolved by re-registering the installation utility in the Windows operating system. The re-registration process is carried out in the following way:
You need to open the command line, it can be opened in several ways: using the keyboard shortcut: “Windows” + “X”, or by launching the command line utility, which is located in the “standard programs” folder.
In addition to these methods, the command line can be launched using the cmd.exe command in the “Run” window.

The following commands fit into the 32-bit version of the operating system:

Commands for 32-bit version
In the 64-bit version of the system, you need to enter:

After completing entering commands, they must be confirmed by pressing the Enter key. After confirmation, the computer should be restarted.
The command line is launched as an administrator. Command Prompt not only scans your computer for damaged files, but also replaces them with intact ones. To do this, the PC must be connected to the Internet.
After scanning the files and replacing them has been completed, you should restart your computer. After rebooting, you need to try running the installation file with the MSI extension.
In addition to the installer recovery utilities built into the system, Microsoft offers a third-party utility. It can be downloaded from the official website of the corporation.
It is worth noting that it works on Windows 7, XP, Vista.
The vast majority of users working on home PCs of all types sometimes need to install a new program from Microsoft. Usually just a couple of clicks and you're ready to use it. But, like any sufficiently complex system, Windows can fail. As a rule, the problem is caused by the Windows Installer service, which unpacks programs from installation packages and registers values for work in the registry. All files packaged using the protocols of this installer come with the msi extension. Each package is made using OLE technology (a universal solution used for Microsoft software products) and is a clearly structured microdatabase of corresponding tables with the data necessary for installation. In addition, it is also a set of libraries, scripts and other files packed with a cab archiver. Installation packages from Microsoft for the Windows operating system since 2000 are characterized by the use of this particular service, which replaced ACME Setup, the standard installer for previous versions of the Windows system. The main differences from the installer of archaic versions and 9x) - return to the previous state of the system at any time, as well as the possibility It should be noted that there are a number of widely used alternative installers - Inno Setup, Nullsoft Installation System, Minstaller, Spinstall, Smart Install Maker, Rinstall Wizard and so on, but for obvious reasons, the Windows Installer takes the lead.
In this article, we will tell you how to troubleshoot possible problems with Windows Installer by performing a set of recovery procedures that will allow you to avoid reinstalling the OS again, which is what most users prefer to do. In the worst case, you will need to check and re-register a large number of libraries, check several registry keys, or reinstall the program. But it’s quite possible that everything will work out just by running an automated recovery utility that will do everything for you. We have tried to collect as much information as possible on this issue, which will allow you to save time.
So, typical errors when running installation packages running Windows Installer are “The Windows Installer service could not be started,” “There is no access to the Windows Installer service,” “The Windows Installer service could not be started on the local computer.” "Error 5: We are trying to launch an automated mode of fixing the problem through the Microsoft FixIt application, downloading the corresponding patch from the official website of the corporation. A link to the patch can be obtained in article 2438651 (for systems older than Windows 7, an automatic diagnostic service will be installed, for XP users Before installation you need to update to SP3).
If for some reason the patch did not help and the same error pops up, we try to deal with the problem in a different way. Run (Win + R > cmd.exe) in system administrator mode. Type sfc /scannow and wait until the system repairs the damaged libraries. Re-register the service using the msiexec /unregister and msiexec /regserver commands. After that, register the Windows Installer library using the regsvr32 msi.dll command. Then you need to try to run the installation file again. Most likely everything will work. If not, you need to reboot the system by typing the msiexec /regserver command there. Let's try again. If this does not help, then it’s time to reinstall the Windows Installer service itself. The easiest way to do this is to use the Windows Installer CleanUp Utility. You can download it from the official Microsoft support site, and at the same time “grab” the Windows 45 installer from the official site, which itself is the most current version for almost the entire modern line of Windows OS. Most likely, this version of the installer is more modern than the one that was installed on your machine. Unless you used the Windows 7 installer on a licensed copy. After all the work, run the installation file of the program. If you did everything correctly, then everything will be successful.
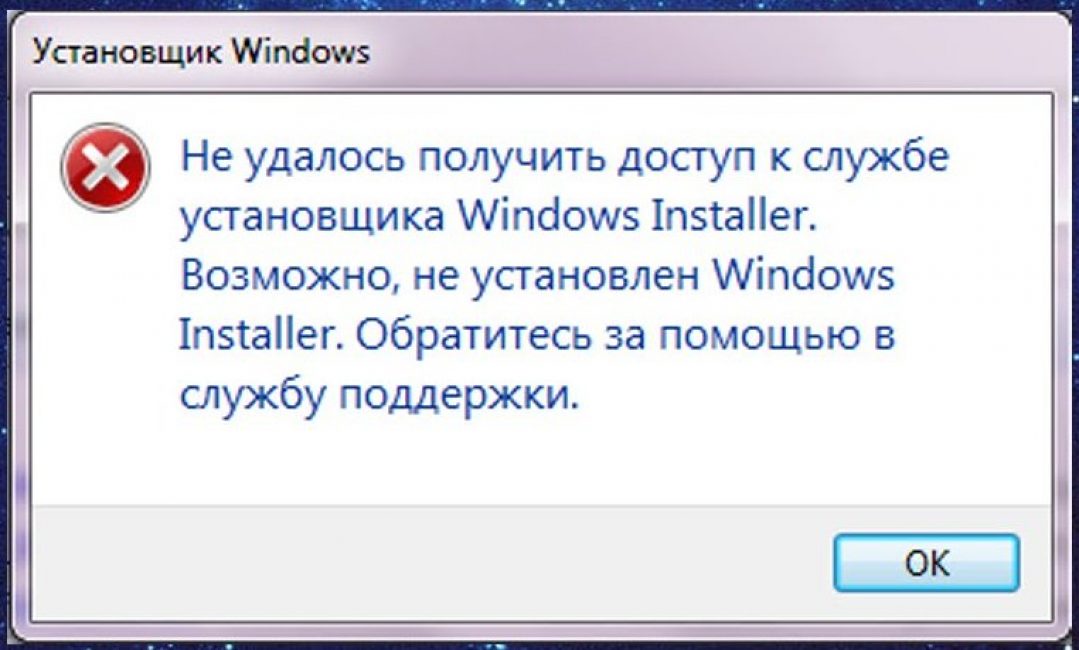
Sometimes it happens that when installing a program, you receive a Windows system message about the inability to access this service:
The Windows Installer service could not be accessed. The Windows Installer may not be installed. Contact support for assistance.
First, let's define what Windows Installer is. This is a system service that is responsible for installing, changing and uninstalling programs that have the .msi extension. There are several reasons why this problem occurs. Let's look at them below.
First reason The reason why this error may occur lies in the limitation of your user rights on this computer. In this case, you should try installing the program with administrator rights (this is done by right-clicking on the application icon).
The second reason may be hiding in system services settings, so check them. This is done like this: “Start” - “Control Panel” - “System and Security” - “Administration” - “Services”.

In the “Services (Local)” window that opens, at the very bottom of the list we find the “Windows Installer” section and double-click on this item with the left mouse button.

The installer service settings window will open, we need the “General” tab. The “Startup Type” line should be set to “Manual”. And make sure that the executable file is listed as:
C:\WINDOWS\system32\msiexec.exe /V
Instead of C, there may be, for example, the letter D - these are local drive letters.
Now go to the “Dependencies” tab. The large window This service depends on the following components should say “Remote Procedure Call (RPC)” as in the image below:

Third reason may be hidden in the program's association for files with the .msi extension. Open the “Start” menu - “Control Panel” - “Programs” - “Default Programs” - “Set Association”. If your mapping is not specified, or the Windows Installer is not specified there, you need to fix this, as shown in the picture below:

The installer program is called msiexec.exe and is located in the System32 system directory (it’s easier to find it by searching, as shown above).
1. Click the button Start | Start.
2. In the search field, enter services.msc.
3. In the list of results, right-click on services.msc.
4. In the menu that opens, select Run as administrator | Run as administrator.
5. In the window that opens, scroll down the list of services and find Windows Installer | Windows Installer. Double click on it.
6. On the tab Are common | General in Group State | Service status check if the service is running.
7. If the service is not running, click the button Launch | Start.

8. Make sure the service is now running.
9. Press the button OK.

Step 2: Re-register Windows Installer.
1. Click the button Start | Start.
2. In the search field, enter MSIEXEC/UNREGISTER and press Enter.

3. Press again Start | Start.
4. In the search field, enter MSIEXEC /REGSERVER and press Enter.

Disclaimer. The next steps involve editing the registry. Be very careful, as incorrectly configuring registry settings can lead to serious problems in the system, including system failure. You change these settings at your own risk.
Step 3: Clean up suspended installation processes.
1. Click the button Start | Start.
2. In the search field, enter the command regedit and press Enter.

3. Go to the registry key: HKEY_LOCAL_MACHINE\Software\Microsoft\Windows\CurrentVersion\Installer\InProgress. If section InProgress missing, go to step 5.
4. Remove all options in this section. If the section does not contain parameters, go to the next step.

5. Go to the registry key: HKEY_LOCAL_MACHINE\System\CurrentControlSet\Control\Session Manager\PendingFileRenameOperations. If section PendingFileRenameOperations missing, proceed to the next step.
6. Remove all options in this section. If the section does not contain parameters, proceed to the next step.

Step 4: Check access rights.
1. Go to the registry key: HKEY_LOCAL_MACHINE\Software\Microsoft\Windows\CurrentVersion\Installer.
2. Right-click on the section title and select the item in the menu that opens Permissions | Permissions.
3. In the dialog box that opens, in the category Groups or users | Group or user names click on the item SYSTEM.
4. In category Group Permissions | Permissions for Make sure the system has full control of the partition.

After completing all the steps, restart your computer.


