Block of tools “Subject Index”. Tool block “View modes”
All possibilities text editor It is not necessary to know or use Microsoft. You can successfully complete work tasks by occasionally switching between the Home and Insert tabs. But you will work even more efficiently if you equip yourself with even a few tricks from this review.
Here is a simple example familiar to webmasters. Some experts, before transferring text from Word document in the CMS editor, copy the content into Notepad. This clears the text from Word formatting, which may conflict with the template formats of the engine. So, you don't need Notepad. To solve the problem, just select the text in Word and click the “Remove All Formatting” button.
Please note that the review was written for the 2013 version of Word. Current stable version The program is MS Word 2016, released in September 2015. However, this version of the program has not yet become the main one.

How to create and save a MS Word document
To create a document, open working folder. Right-click and select the "New - Microsoft Word Document".

To easily find a document, name it.

You can also launch MS Word from the Start menu. Pay attention to the illustration.

When launched through the start menu, you created new document with default name. Give it a name and save it in a folder of your choice so you don’t lose it. To do this, click on the “Save” icon or use the key combination Shift+F12.


Name the document and save it to the selected folder.

You have created and saved the document. Get to work.
How to use the Home tab features
Tools in the MS Word control panel are combined using thematic tabs. This type of interface is called a ribbon. By default, the main toolbox opens, highlighted in the Home tab.

Below are the tasks that you can perform using the tools on the Home tab.
Tool block "Clipboard"
You can copy, cut and paste content. To use the Cut and Copy options, select the desired piece of text.

Please note the insert options. You can keep the original formatting, merge the formats, or save the text without formatting. You can also use special modes inserts.

Why do you need a special insert? For example, imagine that you need to work with text copied from another document or website. The original formatting may not match the formatting in your document.

This problem is solved using a special insert. Use the appropriate menu. In the window that opens, select the “Unformatted Text” option.

Now it will be more convenient for you to format the copied content.

Using the Clipboard menu, you can select previously copied content and paste it into a document. To open the clipboard, click on the arrow marked in the illustration. Select the desired item. Using the drop-down menu, select the "Insert" option. You can also delete the copied element from the clipboard.

You can customize the default paste options. To do this, use the “Insert – Default Insert” menu.

Specify the appropriate settings and save the changes. Pay attention to the options for pasting into another document. Most users can replace the default "Keep original formatting" with "Keep text only".

Font toolbox
To change the default font, use the drop-down menu marked in the illustration. Please note that in order to change existing text, the fragment must be selected before selecting the font.

Using the corresponding menu you can select suitable size font. Pay attention to the ability to increase or decrease the font of the selected fragment. Mark the text and use the buttons marked in the illustration.

You can select the appropriate register using the corresponding menu. Select the desired piece of text, use the button marked in the illustration and select the desired option.

You can highlight a piece of text with bold, italics, or underlining. To do this, select the content and use the marked buttons. Using the drop-down menu, you can choose how you want to underline your text.
To cross out a piece of text, select it and use the corresponding button.

Using the X 2 and X 2 buttons you can add subscript and superscript text.

Using the marked buttons, you can change the color, highlight the text with a marker, or apply effects to it.

Please note that advanced font settings can be configured. To enter the menu, press the button marked in the illustration.

On the Font tab, specify suitable parameters body text and headings. Using the “Default” button you can return the default settings, and using the “ Text effects" choose additional effects.
Paragraph tool block
To create a bulleted, numbered, or multilevel list, use the drop-down menus shown in the illustration.

To create a bulleted or numbered list, place the cursor on a new line and click on the appropriate button. Use the drop-down menu to select the appropriate marker symbol.

You can use additional characters using the Define New Marker menu.

To create a multi-level list, select the “Change List Level” option from the corresponding drop-down menu.

You can select the appropriate list style in the library. And the menu “Define a new multi-level list” and “Define a new style list" will help you create custom template list.

You can choose suitable way text alignment using the appropriate menu. To ensure text readability, use left alignment.

Change the line spacing if necessary. In most cases, the standard spacing of 1.15 will work for you. If you are preparing a document for children or older people, increase the spacing to 1.5 or 2.0. Further increase in spacing will reduce the readability of the text.

Using fill, you can highlight a piece of text with color. For example, you can highlight a paragraph or a table cell. To add a background, select a piece of text and choose a color from the Fill drop-down menu.

You can use the Borders menu to control the borders of cells in tables. Select the cells you are interested in. Use the drop-down menu to select the appropriate action.

Tool block "Styles"
Use the Styles menu to select the appropriate text style. If you want to apply it to existing content, select the appropriate fragment and define a style. To use the style for created content, place the cursor on a blank line and select the appropriate design option. For example, you can use the appropriate style for headings.

Editing tool block
Using the Find menu, you can quickly search for content that interests you. Note the drop-down menu access to advanced search settings.

The Replace function is convenient to use when editing text. For example, you can automatically replace the word “copyright” with “copywriting” in the text. To do this, use the “Replace” menu, specify the desired words in the “Find” and “Replace with” fields.

Click the Replace All button. After processing the request, the program will report the number of replacements performed.

Use the Highlight function to quick selection content. For example, you can select all text, select arbitrary objects, or select fragments with the same formatting in two clicks.

Using the Collapse Ribbon function, you can hide program management tools. Only tabs will remain on the panel.

To return the tools to the panel, expand any tab and use the “Pin the Ribbon” option.

How to use the Insert tab features
The "Insert" tab contains tools with which you can insert various objects into a MS Word document.
Toolbox "Pages"
On the menu " Front page» You can select a cover page template for the document.

Using the functions " Empty page" and "Page Break" you can create a blank page or go to new page. For example, if you need to insert a blank page between paragraphs, place the cursor between them and use the Blank Page function.

Toolbox "Tables"
Using the Table drop-down menu, you can insert or draw a table in your document. This can be done in several ways.
To quickly add a table, use graphical tool. Select with the mouse cursor required amount cells in the table. After this, place the cursor on the selected area and click left button mice.

The Insert Table feature allows you to manually specify the number of rows and columns. You can also choose how you want to define the width of the columns.

The “Draw Table” function allows you to perform the corresponding action. Use it to create custom tables. For example, you can draw a table with different numbers cells in rows.

To define the properties of the drawn table, use the appropriate menu.

Using the menu " Excel tables» can be inserted into MS document Word tables from MS Excel. In the Express Tables menu you will find table templates.

Tool block "Illustrations"
Using the Pictures feature, you can insert an image into a document with hard drive computer. The “Images from the Internet” menu allows you to find suitable photos on the Internet.

Search results give priority to photos distributed under a Creative Commons license.
The Shapes feature helps you add a template shape to your document, such as a heart, star, or arrow. To use the tool, use the drop-down menu to open the catalog and select the appropriate shape.

Use your mouse cursor to determine the size and location of the shape in your document.

Decorate the shape using the Fill, Outline, and Effects functions.

SmartArt allows you to insert into your document graphic objects. Use the drop-down menu to select the type and appropriate pattern.

Place the cursor on the elements of the picture and add text.

Note the ability to change the color of SmartArt objects.

Using the Chart menu, you can add charts to your document. Please note that you can select the graph type.

Insert the required values into the data table.

Using the Capture menu, you can take a snapshot of an area of the screen and insert it into a document. To do this, use the drop-down menu to select the “Screen Clipping” option, and use the mouse cursor to select the area you want to capture.

Tool block "Add-ins"
In add-ons you will find a store Office applications. It contains paid and free tools for solving special problems. To select the appropriate application, click on the “Store” button and use the search. You can also browse tools by category.

For example, with the MailChimp for MS Word application, you can create Email campaigns right in the document. To use the application, click the “Trust” button. The tool's capabilities will become available after authorization.

The My Applications menu displays a list installed applications. You can remove unused ones and add new ones.

The Wikipedia function allows you to search for information on a corresponding resource directly from a MS Word document. You can also quickly insert images from Wikipedia into a document.
To use the tool, click the button marked in the illustration and highlight the word or term whose meaning you want to find. Internet access is required for the tool to operate.

To insert an image, click on the plus sign marked in the illustration.

You can also insert a text quote from Wikipedia into the document. To do this, select the desired fragment and click the plus sign.

Multimedia Tools
Using the Internet Video tool, you can insert relevant objects into your document. To use the feature, click the "Internet Video" button, search for the video using YouTube or Bing, select and paste the item.

The video can now be viewed in a MS Word document. To do this you will need access to the Internet.

You can watch videos in Word
Links feature
Using the Links drop-down menu, you can insert hyperlinks, bookmarks, and cross-references into your document. To insert a hyperlink, copy the web page URL to your clipboard. Then select a piece of text that will become the anchor of the link.


The Bookmark feature allows you to quickly jump to marked sections of text. To add a bookmark, select the desired piece of text, and in the “Links” drop-down menu, select the “Bookmarks” option. Give the bookmark a name and click Add.

To quickly jump to bookmarked content, select the Bookmark menu, select the bookmark you want, and click Go.

Note function
The Notes function is convenient to use when working with a group on a document. To add a note to text, select a piece of text and click the marked button.

To edit, delete, or mark a note as ready, place the cursor on it and open the context menu with right button mice. Select the required option.

Header and Footer tool block
Using the tools in the "Header and Footer" group, you can add headers and footers, and also number the pages of the document.
To add a header, use the appropriate menu. Select a footer template.

Enter text. To save changes, close the Header and Footer window.

To remove or change a header, use the appropriate options in the Header menu.

You can work with the footer in a similar way.
Using the Page Number function, you can number the pages of a document. To do this, use the drop-down menu to select a location and numbering template.

Text tool block
Using the Text Box function, you can select a piece of text in a document. Use it if you need to create a sidebar, quote, or definition. To use the tool, use the drop-down menu to select a text field template.

Add text and save changes.

The View Quick Blocks feature allows you to insert autotext, document properties, or a field. For example, you can insert the date of publication, name, address and phone number of the organization and other data.

Using the Add WordArt menu, you can add visually appealing text to your document. To do this, use the menu marked in the illustration. Select the appropriate object and add text.

The “Add Drop Cap” feature allows you to design paragraphs using an eye-catching capital letter. Place the cursor at the beginning of the paragraph. Use the appropriate menu to select the location of the capital letter. Pay attention to the ability to change the parameters of the drop cap. You can choose the font, height and distance from the text.

Add a line to your document for digital signature. To do this, use the menu marked in the illustration. In the window that opens, specify necessary information and save the changes.

The Date and Time function will help you add the current date and time to your document. Click on the appropriate button, select the date display format and click OK.
The Object function allows you to insert objects or text from a file into a document. To paste text from a file, select the appropriate option from the drop-down menu. Find the file on your hard drive whose text you want to insert into the document and click “Insert.”

Toolbox "Symbols"
The “Equation” function will help you insert into a document mathematical formula. Use the drop-down menu to select a standard formula or go to the designer. Add the required values and save the changes.

Using the Symbol menu, you can insert symbols that are not available on your keyboard into your document. Note the option to insert additional characters from the dialog box.

How to use the Design tab features
Using the tools in the Design tab, you can change the design of your document. If you want to change the default settings, start by choosing a theme.

To undo changes, use the "Restore Template Theme" option or select the "Standard" theme.
In the styles menu, select the style that suits you.

The Colors feature allows you to manually adjust the font color of body text, headings, and hyperlinks. You can choose standard set colors or specify colors for different style elements yourself.

Using the Fonts menu, you can quickly customize the font for headings and body text. You can select standard pairs or specify the font manually.

You can use the Paragraph Spacing menu to change the related settings. It is possible to delete an interval, select standard ones, or set your own values.

Using the Effects menu, you can select additional design effects. The Default feature is useful if you want to apply design settings to new documents.
“Page Background” tool block
The Background feature allows you to select a standard or customize the background. To set the parameters manually, use the “Custom Underlay” option.

You can change the corresponding setting using the Page Color function. Pay attention to the “Fill methods” option. With it, you can add texture, pattern, and design to your pages.

The Page Borders feature allows you to add borders to pages. Use template or custom settings.
How to use the Page Layout tab features
Tab tools allow you to change the layout of document pages.
“Page Options” tool block
The "Margins" function allows you to choose standard or specify your own margin options. To set custom values, use the Custom Fields option.

The Orientation feature allows you to select portrait or landscape orientation document sheets. Using the "Size" menu, you can change the size of sheets. The default size is A4.

In the Columns menu, you can specify the number of columns per sheet. The Breaks and Line Numbers functions allow you to set page breaks and add line numbering accordingly. The “Hyphenation” menu allows you to enable hyphenation of words from line to line by syllable. By default this feature is disabled. Do not change this setting unless necessary.

Paragraph tool block
With the Indent feature, you can adjust the left or right margin of a paragraph. To use the function, place the cursor at the beginning of the selected paragraph and set the indent value.

You can use the Spacing feature to change the spacing between selected paragraphs. To do this, place the cursor in front of the selected paragraph and set the values.

Arrangement toolbox
The Position function allows you to set the position of an object in the text. To use the tool, select the selected picture and use the drop-down menu.

The Text Wrap feature lets you choose how text wraps around an object. To test the tool, select the drawing and use the drop-down menu.

Using the “Selection Area” button, you can display a list of objects in the task area. Using the Align, Group, and Rotate functions, you can perform appropriate actions on selected objects.
How to use the Links tab
Tool block "Table of Contents"

The Add Text function allows you to add or remove the current heading from the table. The Update Table function allows you to include new sections in the table of contents.
Footnotes tool block
Using the Insert Footnote menu, you can add a corresponding element. Select the fragment of text that the footnote refers to and click the button marked in the illustration.

The Insert Endnote feature allows you to add a footnote to the end of your document. Use the Next Footnote drop-down menu and the Show Footnotes feature to quickly navigate between footnotes.
Tool block “Links and references”
Using the Insert Link menu, you can link to a source of information, such as a book. Place the cursor next to the text fragments that the link refers to. Click the appropriate button, enter the required information in the window that opens and save the changes.

Using the "Manage Sources" function, you can edit the list, sort and delete sources.

The Style drop-down menu allows you to select a link style. Using the Bibliography function, you can insert relevant information into a document.

Tool block "Names"
The Insert Title feature lets you add a title or caption to images, tables, and formulas in your document. To use the tool, highlight desired object and press the button marked in the illustration. Add information and save changes.

Using the Illustration List feature, you can add relevant information to your document.

Tool block “Subject index”
The "Mark Item" function allows you to add objects to the index. To use the tool, select an object, such as a piece of text or a picture, use the appropriate menu and fill in the information.

Using the menu " Subject index» customize the display of the subject index in the document.
Tool block “Link table”

How to use the features of the "Mailouts" tab
The tab tools will help you organize physical and electronic mailings.
Create tool block
The “Envelopes” function allows you to correctly add information to paper envelopes. To use the tool, click the marked button and add the required information. Now you can print the information on the envelope. Pay attention to the "Feed" field. This shows how to feed the envelope into the printer.

The “Stickers” function will help you correctly print information on stickers for parcels, envelopes, and CDs.
Tool blocks “Start Merge”, “Compose Document and Field List”, “View Results” and “Complete”
The Start Merge feature allows you to send a message to multiple recipients. For example, you can send a letter or electronic message. To do this, click the “Start Merge” button and select the “ Step by step wizard mergers." Follow the prompts in the task pane.
The Step-by-Step Merge Wizard combines tools from the Start Merge, Build Document and Field List, View Results, and Finish groups.

Use the Review tab to edit and evaluate the document.
Spelling tool block
Using the button marked in the illustration, you can start standard remedy MS Word to find errors and typos. Please note that the program does not “see” all errors, and sometimes offers corrections where there are no errors.

The "Determine" function will help you determine the meaning of unknown words. Please note that to use the tool, you must select a dictionary from the app store and install it. The Thesaurus menu allows you to find synonyms for selected words. The Statistics function shows the number of words, characters, paragraphs and lines in a document or its fragment.

Toolbox "Language"
The Translation menu allows you to automatically translate a selected word or phrase. Select the content you are interested in and use the button marked in the illustration.

The Language feature allows you to select your spelling language and configure language settings.
Note tool block
Using block tools, you can add, view, edit, and delete notes. Please note that notes can also be created from the Insert tab.

“Write corrections” and “Changes” tool blocks
You can use the Revisions feature to track changes made to a document. Pay attention to the "Scanning Area" menu. It allows you to choose how to display the list of changes: at the bottom or to the side of the document.

Tools in the Changes block allow you to accept or reject changes, and move to the previous or next revision.
The Compare feature allows you to compare versions of documents and combine revisions from multiple users. The “Block Authors” and “Limit Editing” functions protect your document from unwanted actions of other users.
How to use the View tab features
Tools on the View tab allow you to customize the display of your document.
Tool block “View modes”
Using the block tools, you can select the page viewing mode. For example, you can view the document structure.

“Show” tool block
Using group tools, you can enable the display of the ruler, grid, and navigation pane. Last function allows you to quickly jump to the desired section of the document.

The New Window function opens the current document in a new window. This is useful if you are editing content and want to refer to the original. The Arrange All feature combines multiple documents into one window. The “Split” function is necessary to work with different parts of the document in one window.
With the Side by Side feature, you can place two documents next to each other in the same window. This is convenient when you need to compare content.

Using the "Go to another window" function, you can quickly move to other open documents.
The Macros feature automates frequently performed tasks. To use the tool, you need to create a macro. For example, imagine that you often need to highlight portions of text in bold italics. To perform this action automatically, create a macro. Proceed like this:
- Select a random piece of text. From the Macros drop-down menu, select the Record Macro option.

- Choose how to run the macro: using a button on the toolbar or a keyboard shortcut.
- Set the keyboard shortcut to activate the macro.

- Click the Assign button and run the commands you want to include in the macro. To do this, go to the “Home” tab, select bold and italic.
- Return to the Macros menu and stop recording.
- Check if the macro works. To do this, select a piece of text and press the specified key combination.

Additional Tricks to Improve Your MS Word Efficiency
Below you will find a list of life hacks that you can use to quickly solve standard tasks when working with MS Word:
- Use the context menu. It is called by right-clicking the mouse.

To select a paragraph, triple-click on any word with the left mouse button.
To insert placeholder text on a page, write the following characters: =lorem(2,2). Use the numbers in parentheses to determine the number of paragraphs and filler lines. If you replace "lorem" with "rand", random text will be used as a placeholder.

- To quickly create a superscript or subscript, select the right word and press the key combination “Ctrl +” or “ Ctrl Shift+" accordingly.
- To highlight a sentence, press Ctrl and place the cursor on any word.
- Select the type of file to save. For example, you can save data to PDF format. To do this, select the "Save As" option and select desired type file.

- To create horizontal line, type three consecutive hyphens and press Enter.
- To print a dash, use the combination Alt keys + 0151.
- To quickly move a piece of text, select it, press F2, place the cursor where you want to insert it, and press Enter.
We are studying the most popular text editor, Microsoft Word. In this material, you will learn how to create a new document, enter, edit and format text, create lists, apply styles and much more.
With this article we are opening a whole series of training materials with which you will learn how to create high-quality text documents in the most popular app in this area - Microsoft Word (Word). The presentation here will be in a rather primitive language, which may at first scare away readers who are already partially familiar with this editor. But, believe me, you will most likely find useful information in this series.
Microsoft Word is a text editor (processor) used to create professionally designed documents. Title Word, was not chosen by chance, because translated from English it means “Word”.
Thanks to the fact that Word combines the most modern means text formatting, it can be used to easily create documents of any complexity and organize them. In addition, with powerful editing and modification tools, this application provides a convenient environment for collaboration several users on one document.
In the first part of the Word tutorial series, you will learn how to create a new document, enter and edit text, and get acquainted with some basic types of formatting. Here we will begin our acquaintance with the newfangled ribbon interface of the editor. We'll also look at creating bulleted and untagged lists, changing document fields, and much more.
PROGRAM WINDOW
At opening Word the program window displays its two main parts: the ribbon located at the top (highlighted in red in the figure below) and blank document, occupying almost the entire program window.
The Ribbon includes a set of buttons and commands that can be used to perform various actions on a document and its content (for example, changing the size of text or printing it). The document window itself looks like a normal one White list paper and is intended for entering all kinds of test information.
There is also a menu above the ribbon on the left quick launch, in the middle is the name of the document, and in the upper right corner there are buttons for minimizing, resizing and closing the program window.
In the document that opens, in the upper left corner of the page you will see a cursor, that is, a small blinking vertical line. This feature indicates that, starting from this place, the characters you entered will appear.
ENTERING AND EDITING TEXT
After opening the program, simply start typing and the letters, words and sentences you entered will begin to appear on the document page. To start typing on the same page, but one line down, you must press the Enter key. The number of times you press Enter will correspond to the number of lines skipped. As you enter text, the cursor gradually moves to the right. Once you reach the end of the line, simply continue typing letters. The characters and insertion point will automatically move to the next line.
If you need to start new paragraph, to do this, press the Enter key. As a result, the cursor will automatically appear at the beginning new line. If you need to make the spacing between paragraphs a little larger, press the Enter key again before starting to enter a new paragraph.
If you need to correct an error in typed text, just place the cursor to the right of the unnecessary letter and press the Backspace key. In this case, the cursor will delete the character to the left of it. If you need to erase an entire word, press the indicated key as many times as possible until the word disappears. There is another option for deleting an error: place the cursor at the beginning of the word, that is, to the left of it and press the Del key the required number of times.
Practice your text entry and editing skills by typing a few random paragraphs, or type the version we suggested.
.jpg)
ERROR CORRECTION
As you enter text, Word warns you if there are grammatical or spelling errors by highlighting them with a wavy green or red line. A green underline indicates that grammar needs to be checked, and a red underline indicates possible spelling mistakes or that the word (for example, a proper name or geographical name) is not recognized, that is, it is not in the dictionary Word editor.
What to do with such underscores? To do this, you need to move the mouse cursor over the underlined word and press the right button. As a result, a small window will appear with suggested correction options. Select the required word and click on it with the left mouse button. The word will be replaced and the underline will be removed. If the word is not recognized, Word will not offer any options. Please note that if these underlines are not corrected, they will not appear on the printed pages of the document.
Similar actions can be done with green underlines. But keep in mind that Word is good at recognizing spelling errors, most of which are quite easy to correct and find on your own. grammatical errors and errors of word usage are much more difficult. If you think you're right and Word gives you the wrong options, simply skip the correction by selecting the appropriate option from the right-click menu and the underline will be removed.
If you don't feel comfortable paying attention to each underline, you can ignore them while typing, and once you're done typing, check the spelling and grammar of the entire document at once. To do this, open the tab Review at the top of the ribbon and select Spelling in Group Spelling.
If working with the tape still raises questions for you, return to this point later, as a description of working with it will be given below.
HIGHLIGHTING FRAGMENTS OF TEXT
In order to perform any actions with text in a document, you need to select it, and then apply the desired command to the selected area. To highlight a whole word or a preposition, it is enough to make double click mouse, after which the selected area will be highlighted in blue.
To select an arbitrary piece of text, you can use two methods. In the first case, place the blinking cursor at the beginning of the fragment that you want to select. Then click Shift key and, without releasing it, click at the end of the desired fragment. After this, the desired text will be highlighted with a blue background to indicate that it is selected. Click anywhere in the document to deselect.
In the second case, also place the blinking cursor at the beginning of the fragment, but this time hold down the left mouse button and move its pointer to the end of the desired fragment. After reaching desired result, the button must be released.
If you need to select several fragments in different parts text, use Ctrl key. Select the first section of text in any way, then press Ctrl and, without releasing it, select the next section, after which you can release the key. If you need to select another fragment, press the Ctrl key again and continue.
TEXT FORMATTING
To draw attention to important information, for example, you can make text bold, italic, or underlined. But these are minor things. You can change its size, style, color, background and apply animation elements to it. And even this is not the entire list of capabilities that Word provides to users when working with text.
Now is the time to remember the ribbon (ribbon interface), which was discussed at the very beginning of the article, and find out how you can use it.
There are several tabs at the top of the working window. Each of them contains specific set actions. We need to select the second tab - home(if it is not selected, you need to left-click on it).
Each tab contains several groups with commands that combine several elements. On the tab home find the group Font(the names of the groups are on the bottom line of the feed). This group contains several commands and buttons that allow you to make various changes to the text.
In our case, select an arbitrary section of text or an entire word, then click on the corresponding buttons in the above-mentioned group to change its style.
.png)
As can be seen from the figure, after pressing the button Bold, the selected text has changed its style. Now let's make it more slanted and underlined by clicking on the buttons Italics And Stressed.
In this case, the underline can be either ordinary solid or wavy, dotted, double, etc. Use the triangle button on the right to see the full list of possible options.
.png)
From our example you can see that you can apply several types of formatting to one selection.
As you may have already noticed, the group Font contains quite a lot of different useful buttons, giving the opportunity to change the font type and color, its size, strike out the font or convert it to superscript and subscripts, add animation or background. Select a piece of text and try to apply all these formatting options to it yourself by clicking on the appropriate buttons.
STYLES
The method of making changes discussed in the previous section is convenient only if you need to change the format of just a few characters, words or sentences. To apply several types of formatting to the entire document at once styles.
Different kinds of styles are available on the tab home in Group Styles. It is enough to select a style to automatically change the font, text size, attributes and paragraph formatting. For example, you can change the font style, make the text larger, and add bold formatting at the same time.
.png)
As you can see from the picture, after selecting a style called Heading 1, our first paragraph was transformed into a heading (the font size increased, its color and thickness changed).
To experiment, on the tab home in Group Styles Hover your mouse over the different styles one by one. This way, you can see the changes that will happen to the document after you want to apply any option. To finally apply the selected style, simply click on it with the left mouse button. To view other styles, you can open the collection by clicking the button in the lower right corner of the arrow block Other.
CREATING LISTS
If you need to create a list in a document, you can also do this on the tab home in Group Paragraph(which is to the right of the group Font).
Let's practice. First of all, separate the text that will be converted into a list into different paragraphs using the Enter key. At the same time, these can be either individual words or entire sentences.
In our example, we decided to format the last paragraph as a list.
.png)
Now select the text you want to convert into a list. In the Paragraph group, click the button Markers. The text will be converted to bulleted list. Without deselecting the list, press the button Numbering to create a numbered list.
.png)
.png)
PAGE FIELDS
Page margins are empty space along its edges. By default, the margin widths at the top, bottom, left and right of the page are 2 cm, 2 cm, 3 cm and 1.5 cm respectively. This is the most common margin width and is often used for most documents. But if you need fields of a different size, you need to know how to change them. Other margin sizes may be useful, for example, when creating short letters, recipes, invitations, or poems.
The ribbon is also used to change the size of the fields. Only this time use the tab Page layout. You must first click on it to select it, and then in the group Page settings select item Fields. Images (icons) of fields and their sizes will appear in front of you.
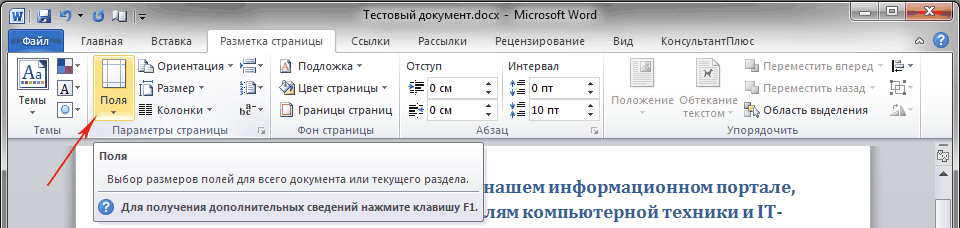
The first value of the list is a field Normal, which is active in this moment. To create narrower margins, you must click the button Narrow. If you want to make the left and right margins much wider, click Wide. When you select a margin type, it will automatically be applied to the entire document.
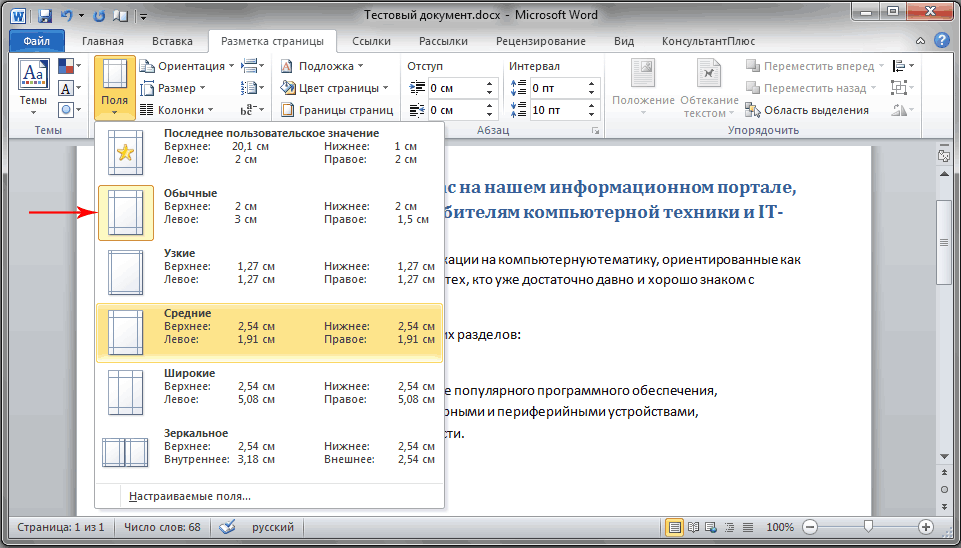
When you select fields, the background color of their icons will change. When you press the button again fields, Thanks to this change in background color, you can determine what size margins are set.
WINDOWBACKSTAGE
In order not to lose the changes made in your work, you need to save them, and the sooner you do this, the better. To do this, open the very first tab on the ribbon File. A large window called Backstage will appear in which you can make various operations, for example, save, open, print documents, and so on.
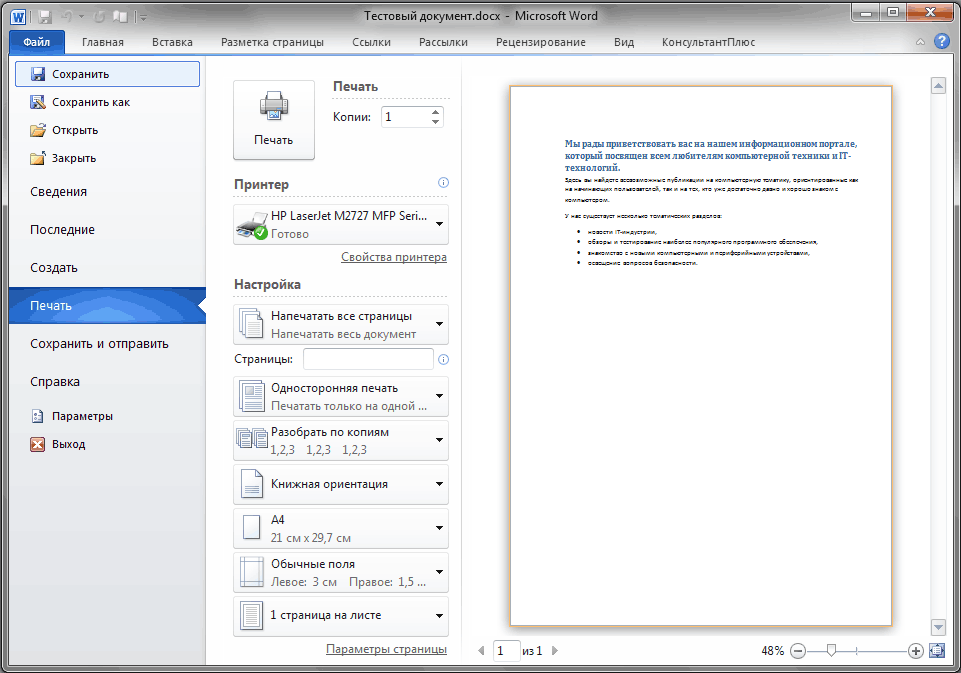
In the left area of the window that appears, select Save. A new window will appear smaller size. In this window you need to indicate where on the computer you want to save the document, as well as what name it will have. After saving the document, continue working by saving it periodically. It is also very convenient to save a document at any time by pressing the Ctrl+S key combination.
If the document is ready to be printed, open the tab again File. In the left area of the menu that opens, select the command Seal. A large window will appear in which you need to click on the line Seal. Of course, a printing device - a printer or MFP - must first be connected to the computer. As in many other cases, you can print a document using hot keys - in this case, the key combination is Ctrl + P.
After work on text document completed and the document is saved, close the file. To do this, open the tab File and in the left area click Close.
To find a document after you've closed it, view the list Latest documents . Click a document in the list and it will open.
To finish working in Word in the tab File select a team Exit at the very bottom of the menu or just click on the cross in the upper right corner of the program window.
CONCLUSION
With this, let me finish the first part of the training materials dedicated to the most popular text Microsoft editor Word.
To consolidate the acquired skills, be sure to practice your acquired knowledge by typing several short texts yourself and applying various formatting elements to them.
In the next part, we'll learn how to cut and paste chunks of text, change line spacing, do alignment, use formatting marks, and much more.
Read also:
Video Word lessons for those who want to deal with it on a professional level Word interface and make the most of all the possibilities of this office program. I wandered around YouTube and found a selection of good lessons.
It's not that Word is so difficult that you have to learn it. But sometimes, for example, I have problems with Word; changing the case of letters (from small to large) causes difficulties. Other little things. So I think training in Word can be useful for everyone. Of course, the main thing is to be able to type quickly, and also to be literate. Word helps in this matter, for example, spell checking is very helpful. useful feature.
There are 39 MS Word lessons in this playlist. The lessons go from simple to complex, there is a whole video course, I have never seen anything like this before. In any case, in free access absolutely not.
Watch Word video lessons
It might also be interesting to see This program is quite a complex thing and it’s not always easy to figure it out at random; for example, Excel has always bothered me.
Friends, subscribe to and receive useful, educational, educational and unique, sometimes exclusive content in your mail... I wrote so much, I wanted to subscribe myself.
A new version of the famous office suite Microsoft. The updates also included the powerful Word text editor. In this article, using the example of drawing up instructions, we will look at the main innovations and changes in this component.
The beginning of time
For those who are not yet accustomed to the ribbon menu of new Office versions, there's bad news: Microsoft intends to implement them everywhere. But as soon as you work with such a tape for a couple of days, you completely lose the habit of the old image of the office. In Office 2010, developers paid even more attention to the ribbon, significantly redesigning home page by making the "File" tab. It contains all the settings and parameters of Word.
The first item “Information” reflects all the properties of the document, as well as the parameters of its protection and restrictions on working with it. The second one is “The Last Ones”. All the latest open documents are collected here, and with right side there is a list of places where they are located, the so-called integrated fast access to the file location directories.
The third item is “Create”. This is a collection of templates that contains various blanks: envelopes, questionnaires, resumes and much more. In addition to the built-in templates, the user has the opportunity to find the blanks he needs on the company’s official website; a site search field is built in specifically for this purpose.
One of the most noticeable is the “Print” item, which greatly simplifies working with printers. All basic print management parameters are placed on this page, so the user does not have to dig through a bunch of dialog boxes to find “the same” settings. Everything is clearly laid out on the shelves. The number of copies, printer selection, print settings - all this is in plain sight.
The last "Save and Send" option is an innovation that was not present in Office 2007. Starting with new version Microsoft office decided to create the most favorable environment for transferring documents and creating documents with shared access. Now several people can work on one document - of course, this is not a new find, but it still deserves praise. And it has become easier to transfer files to colleagues: automatic conversion to PDF, sending via the specified address Email.
Text formatting options in Word 2010
The new version of Word 2010 has significantly expanded text formatting capabilities. A basic example is creating a glow on text, creating shadows and reflections. This module called “Animation Options”, it is very similar to everything familiar Word Art, who was present in previous versions, but has significant differences. Text to which one of the types of animation has been applied - glow, shadow, reflection - can be edited like any other text in the document. That is, the program recognizes it not as an image, but as regular text.
To apply one of these settings to text, you need to select a section of the text, go to “Home → Font” and open tab find the letter “A” highlighted in blue. In the drop-down menu you will be offered one of the design styles, as well as individual parameters shadows, glows and reflections. These effects are similar in function to the same effects that previously could only be applied to images.
The second improvement regarding text formatting is the ability to format OpenType fonts. These fonts were developed by Microsoft and Adobe and until recently were used only in professional applications. With their help, it became possible to work with ligatures (several characters connected to each other), as well as change existing fonts. For this purpose, a special section for setting up OpenType fonts has been created in the “Font” dialog box on the “Advanced” page.
Another concept called stylistic sets has been introduced. These are new features for editing fonts that affect the characteristics of characters - for example, their elongation. When choosing one of the stylistic options, you slightly change the font, thereby selecting the optimal one and the one you like best.
Let's shine
An example of preparing a document will be instructions for working with the Word text editor. In our case, the instructions were taken from the official Microsoft website and will consist of separate articles, which in total will make it up. First, let’s copy the text from the company’s website. In Word 2010, the insert function has been improved; when you click on the insert shortcut, the user can quickly select the options for the pasted object: keep the original formatting, combine formatting, save only text. If you press the Ctrl key after inserting, you can use the arrows to switch the insert mode, immediately observing the result. Enter key is confirmation of the choice.
All basic settings for text editing are located on the “Home” tab. The first thing we will do is change the text font in the “Font” section to Times New Roman, and set its size to 14.
Next, choose a one-and-a-half interval. The “spacing” button is located in the “Paragraph” section and is an icon with several lines and two vertical arrows. Select the text and click on this button, after which a list will appear consisting of numerical parameters for line spacing - set the value to 1.5.

To ensure that the text in the document is positioned beautifully and does not look torn, it needs to be aligned. To format abstracts, articles and other documents for the main text, “Width alignment” is most often used. To apply alignment to text, you need to select it and click on the “Width Alignment” button, which is located in the “Paragraph” section. In this case, our text will stretch across the width of the entire page, and it right part will be smooth.

To avoid having to do these steps multiple times in each section, the easiest way is to create a new style. To do this, select a fragment of text to which we have already applied the necessary formatting, go to “Styles” and, opening the entire list, find the option “Create selected fragment as a new express style”.

Click on it and in the window that appears, enter the name of our style; if necessary, you can immediately edit it by clicking on the “Edit” button.

After the name is specified, click the “OK” button, and our style will appear in the list of basic Microsoft Word styles. In the future, it can be quickly applied to various parts text.

To focus the reader's attention on a certain phrase or important word, they can be highlighted in the text using bold, italic and underlined text. These elements are located in the “Font” section; the text color is also edited here. Using bold text we highlight basic commands, which appear for the first time in the instructions, so that the user can easily find them in the text he has already read. We will mark in red the information from the “Attention!” category, that is, the main mistakes that the user may make.
But text editing is not finished yet. We need to create bulleted or numbered lists in the places where they are needed. To do this, select those lines that should subsequently become a list, and in the “Paragraph” section, click on the “Marker” or “Numbering” button, depending on what we need. At this point we will finish editing the text and move on to inserting graphic elements into our document.
Inserting graphic elements
Any instructions must be provided with explanatory pictures, and our instructions are no exception. Therefore, we go to the beginning of the document and, in order, begin to add images to it that illustrate the described actions. To insert an image into a document, go to the “Insert” tab, “Illustrations” section, here we click the “Drawing” button. A file explorer will open with which we must select images to insert. Find it on your computer and click the “OK” button. After this, the image will be inserted at the location where the cursor was located.

The parameters of the inserted image can be changed at any time. First, select the image by left-clicking on it once and align it to the center. When an image is selected, you will notice black cubes in its corners, indicating that it can be resized. If you pull the corners of the picture, it will change its size.
When an element is selected, a special tab “Working with Pictures (Format)” is open; all image settings are located in it. In the Text Wrapping section, you can select various options location of the picture in the text. In our case, you need to check “Top and Bottom”, and it is advisable to indent after the image by pressing the Enter key.
In Word 2010 another one appeared interesting feature, as “Crop Image”, you don’t have to use it to access graphic editors, and change the image on the fly, cutting off those parts that should not be displayed in the document.
Also, the new version of the popular text editor has a monitor screen capture function. It is located in the same section as “Drawing” and is called “Snapshot”. When you launch the function, you have to select the area of the screen that you want to capture. After you “cut out” part of the screen, this piece will be automatically inserted into the place where the cursor was located. This new feature is very useful when writing instructions or explanatory articles where you need to insert screenshots into the text. In our instructions we will actively use this function and take several such screenshots.
In addition to this, Microsoft has added interesting graphic elements and called them SmartArt. They represent ready-made blocks, diagrams, arrows made on high level. When grouped correctly, they can be used to create professional illustrations. We will use this function to emphasize the interaction of elements and add a closed circuit to our instructions.
To do this, go to “Insert → Illustrations → SmartArt” and select the design you like from the elements that appear. After clicking the "OK" button this picture will be automatically inserted onto the document page where the cursor was. There are editable fields for each individual block, which allows you to spend less effort on design and immediately start editing it. Let's enter text into each block, and this will complete the work with SmartArt elements.
Headers and footers. To be or not to be?
As with any article, instruction or other material, we must have footnotes organized and footers created. Footnotes are needed to indicate a description of a new term or an explanation of a statement. For example, in coursework and diploma projects for a student, the creation of footnotes and references is the main condition for the design of his scientific work. We will follow too this principle and create some footnotes in our text.
Let's say we have a quote indicating that the new version of Word has the ability to change individual parts of an image - for example, remove the background. First, we highlight the sentence in which we're talking about about this new feature, then go to the “Links” menu section and select “Insert footnote”. After this, a footnote in the form of the number “1” will appear at the end of the sheet; here you can describe the idea in detail or indicate the source. We will write that this function appeared only in the new version and has not been used anywhere before. Now in the text you will notice that at the end of the sentence, just above the letters, there is a small number “1”, which indicates the footnote number. If we hold down the Ctrl key and click on a sentence, we will automatically be redirected to the footnote. In a similar way, you can go back from a footnote to the text.

Headers and footers are designed to display brief information at the top or bottom of the page. Such information could be the title of a book, an article, the name of the author, etc. In our instructions, we will create headers and footers for even and odd pages. To do this, you need to double-click on the top empty area of the page, so we will switch to header-footer editing mode. On the settings panel, mark the item “ Miscellaneous headers and footers for even and odd pages." After that, in addition to the “header” text, Word will note which group it belongs to (even or odd). On even-numbered pages we indicate “ Brief instructions to work in Word 2010", and on odd numbers - "Taken from the Microsoft website." You can exit editing mode by clicking on any area outside the footer.

In addition to the settings for even and odd pages, you can create a special header and footer for the first page. Since it is almost always the title page, therefore, the footer should be empty. When the footnotes and headers are created, let's proceed to the important stage - creating a table of contents.
Everything is clear and on the shelves
Once the headings have been created, the text design and its main elements have been highlighted, you can begin creating a table of contents. It can be organized in just two clicks. Select the “Links” tab in the menu and find “Table of Contents” there.

From the proposed templates, choose the one you like or edit the style of the table of contents to suit the design of the document. After we have selected a template, the table of contents will be inserted at the location where the cursor was located.
In the same way it is created title page. So, open “Insert → Cover Page”. Here, as in the case of the table of contents, you can choose a template. Advantage ready-made templates the fact that they help save time and at the same time you don’t have to worry about formatting the text and its arrangement on the sheet, everything is done automatically. We indicate the name of our instructions, authorship and year. This completes our work - the instructions are ready for use.
conclusions
In this material we looked at some new Microsoft capabilities Word 2010, and also learned how to create a manual. Based on the experience gained, you can easily prepare a diploma, essay or book - everything is done by analogy with the example given. All you need is a Word 2010 text editor, available from 1Soft network partners.
Many users who have to write a lot do not know how to use Microsoft Word 2010, and do not even pay attention to it. Meanwhile, this is the most wonderful program for doing this kind of work.
What's good about it? First of all, this is a spell check. But that's not all. This program is practically the only one in which you can see that punctuation marks are placed incorrectly.
Those who know how to use it can also quickly format text (change font type, color, size, insert a hyperlink, select a background, align text, and much more). However.
Also, we must not forget that Microsoft Word 2010 has a very well developed system for replacing words with synonyms, only the dictionary installed in it is not the largest, but the benefits from it are enormous. So, let's get started with the instructions.
How to use Microsoft Word 2010
Learning to use Microsoft Word 2010 professionally will take time, so I will only focus on the main points, which are enough to write high-quality texts.
First, we'll learn how to insert text. To do this, copy it to the clipboard and click on the icon as shown in the figure:
As soon as you insert the text, and Microsoft Word 2010 detects an error in the word, it will immediately be underlined with a red wavy line.
If the sentence is underlined with a green line, then the punctuation marks are placed incorrectly (in 2013, 2016 the color is different).
If you click on a word (underlined in red), you will be given a choice of others. With punctuation marks it’s a little different, you’ll have to pick them up by trial and error.
I’ll note right away that Microsoft Office 2010 will not correct the error 100 percent, there is no such smart program yet.
Microsoft Word 2010 instructions (synonyms)
Using Microsoft Word 2010 to replace synonyms is simple and convenient. If you need to replace a word, just click on it right key mouse, find synonyms in the window that opens, move the cursor there, select the most suitable one and click on it.
This article covers only a few basic points. If you need to study Word in more detail, then you can use the link ahead for free.
If you need to change the font, text size or formatting (left, right, middle), see as shown in the picture.

Click on these options to select the options you want. This instruction is of course very small, but I think it will help beginners on how to use Microsoft Word 2010.
In conclusion, I would just like to say that the best program than Microsoft Word 2010, I have never seen it for writing text.
Those who disagree, please speak out in the comments, I think many will be grateful, not just me.
Category: Uncategorized


