Various headers and footers. Header and footer in Word is great
In my previous article, I talked about which can be useful to everyone, even the smallest novice users. But the size of the article is limited, and there were not enough space for a few more examples, which I think will be very useful - maybe not for everyone, but for those who work with Word on a more professional level.
Importantly, these are not spherical examples in a vacuum; the situations described are taken from real life, and I regularly have to explain to others how to correctly add a table of contents, number pages or figures (these are examples from this article). The question literally just arose of how to change the orientation for several pages to landscape so that the rest would be normal, portrait. We asked - we answer!
Comparing two versions of a document
Let's start with the last time announced method of comparing two versions of one document. Let's say that your colleague with whom you are collaborating on a document has not read my previous article (of course, this is difficult to imagine, but we will try!) and does not know how to enable the recording of corrections. So you received a letter from him with an edited version of the document and a note: “Well, I corrected it a little, look, everything is ok?” And you, cursing his stupidity, are already imagining the next two or three hours that you will have to spend reading a 40-page document.
But everything is not so gloomy. Hidden in the depths of Word secret function comparison of documents, with which you can immediately see all the differences between two versions of documents. Here's how it works.
Portrait and landscape pages in one document
Sometimes you need to rotate several pages of a document 90 degrees (in landscape orientation). For example, in our standard terms of reference There is a section “Page Thumbnails”, which provides schematic images of the site pages. It is more convenient to place them on landscape pages. But before and after the section with sketches there is regular text, in portrait orientation. Now I will explain how to do this.
- At the end of the previous page, before the thumbnails, you need to insert the end of the section (in the “Page Layout” panel, select “Breaks - Section Breaks - Next Page”).
- At the end of the page with sketches - the same thing.
- The document is now divided into 3 sections. Now they all have book orientation pages, but we need the second (middle) to be landscape. To do this, you need to place the cursor on any page from the second section and change its orientation (in the same “Page Layout” panel, select “Orientation - Landscape”).
Page numbers, logo, document title and all that stuff - headers and footers
In our official studio documents, we always include the title of the document and the name of our studio (as well as our logo) on each page. This is quite convenient: you can immediately see what it is you are reading.
We put all this information in headers and footers. A header and footer is an area of a document that contains supporting data that is repeated on every page. Headers and footers often contain the title of the chapter (this is usually found in books), page numbers, the date the document was created, or, for example, the full path to the file (a very convenient thing!).
Headers and footers are present in any Word document by default, only if there is no data in them, you don't see them.
There are only two headers and footers: header and footer. You can insert regular text into them (like ours - the name of the studio), pictures, tables, hyperlinks, as well as autotext (page numbers, date of creation or printing of the document, file name, etc.).
To add something to the header and footer, you need to open the header and footer editing panel (in the “Insert” tab, click the “Header” or “Footer” button). Word 2010 has a set of built-in header and footer templates; you can choose a ready-made one or take one of them as a sample and edit it to your liking.

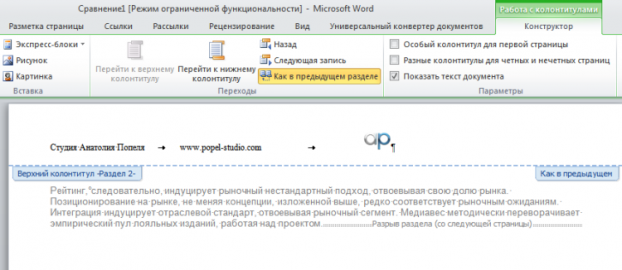
It is important to keep in mind that the headers and footers are always the same for the entire section (or, if you have not divided the document into sections, then for the entire text). Therefore, if you need different headers and footers for different pages, then the document must be divided into sections (how to do this is described in the previous example, with page orientation) and the “same as previous” feature, which is turned on by default, must be disabled. It sounds complicated, but it's actually not that scary. Once again: to get different headers and footers on different pages, you need to do this:
Heading numbering
In technical and especially legal documents, it is absolutely necessary to number all sections and subsections so that you can always refer to the desired point in the text, for example: “hosting parameters must meet the requirements specified in paragraphs. 4.3.3. and 4.3.4 of this TOR.” If you number manually, then with any change, addition or deletion of sections, the numbering will have to be corrected again manually. Imagine how fun it would be to edit our standard contract, which has 9 sections, each of them with about 5 subsections, and some of them also have third-level subsections. Plus then manually search for and correct links.
And it’s very easy to avoid this entertainment if you know that Word can number headings automatically. To do this, you need to slightly change the standard styles and build multi-level numbering headings (for sections and subsections nested within them). Here's how it's done.

Note to the hostess: according to GOST, there is no dot at the end of the section and subsection number (i.e., 2.5.1 General requirements- correct, 2.5.1. General requirements are wrong).
Now all that remains is to assign the correct style to each heading. And then, whenever the order of sections changes, the numbering will change automatically.
Headers and footers are the area at the top and bottom of each page of a Word document into which you can enter information, and it will be displayed on all other pages of this document as well. The headers and footers display information such as document title, date, page number, logo, etc. Let's figure out how to make headers and footers.
Making text footers
To start working with headers and footers, you need to double-click just above the main text or just below. As a result, “Working with headers and footers” will open in the toolbar. Constructor". On the right edge of the tab there is a red cross that says “Close Footer Window” in case you need to return to the main part of the document. The left edge of the “Working with headers and footers” tab. Designer offers a choice of templates for the header and footer, as well as options for templates for how to arrange page numbers in a Word document. Having selected one or another template, fill in the inscriptions that appear in the header and footer area: “enter text”, “enter date”, “enter document title”, “enter document subtitle”, etc. By clicking again on the drop-down list of the “Top (Bottom)” element Header", and scrolling to the very bottom, you will see two actions to choose from: "edit header (footer)" and "remove header (footer).
When designing headers and footers, you can add something non-standard and your own there. If you want to save your unique header, you need to select it in the text and in the drop-down list of the “Header (footer)” element, at the very bottom, select “save the selected object to the header (footer) collection.” In the new window, click "OK". In the group of “Insert” buttons you will find the “express blocks” element. Here you can choose what else needs to be added to the footer if it is not in the templates. In the same tab there is an automatic insertion of the date and time in the footer that are installed on your computer. There is also a “Clip” element and a “Drawing” element, which allow you to insert any image into the footer, including the logo of your company. Let's figure out how to make a header and footer with a picture in Word.
Insert an image into the footer
In order to insert a standard picture available in the database into the footer, you must select the “Clip” element. After a while, a message will appear to the right of the document. additional panel. By selecting everything you need in two drop-down lists and clicking the “start” button, you will receive thumbnail images. Choose any one by clicking your mouse. The image immediately appears in the document footer. In addition, the “Working with Drawings” tab opens. Format". The tab helps you edit the image added to the footer. In order to insert a picture available on your computer into the footer, you need to select the “picture” element. A window will open in which you need to specify the path to the file. After specifying the access path, select the “paste” button. Sometimes it is necessary to differentiate headers and footers on different pages of documents. So, let's find out in more detail how to make different headers and footers.
Making different headers and footers on different pages
The WORD program offers a choice of:
- make a special footer on the first page. To do this, select the “Options” element. In the list that opens, you must check the box next to “special header and footer for the first page”;
- make different headers and footers on even and odd pages. To do this, select the “Options” element. In the list that opens, you must check the box next to “different headers and footers for even and odd pages.” As you scroll through the pages, you will see the inscriptions: “Header (footer) for even pages” and “Header (footer) for odd pages.”
That, in fact, is all the work with headers and footers. Once you figure out how to make a header, you can easily design a footer because the design elements are very similar. The only difference is that usually the title of the document and the date are placed in the header, and page numbers are indicated in the footer. detailed instructions How to make a footer (header) will be useful to you only for the first two times, and then you will remember it once and for all.
Word 2007 headers and footers are graphic image or text that appears at the bottom and top of a document page. The text can be either on one page or the same for several pages.
Headers and footers are used to number pages, section titles, chapters, first names, last names, organization names, dates, times, and more. Depending on what you want to indicate in the header and footer. If you want it to be reflected on all pages, it is enough to make it on one of them. After that, it will automatically appear on all pages.
If the document does not have sections, then headers and footers can be deleted, inserted and changed. You can also use ready-made headers and footers in your document, which can be changed very easily. You can also create personal unique footers, for example, such as a company logo. You can save them in your own collection.
To add one header and footer for the entire document, in the “Insert” tab, select the “Header and Footer” group, then select the command you need by clicking on “Footer or Header”.
After this, the header and footer will appear on all pages of the document. In order to change the text format, you need to select the text and use the formatting options located in the mini-panel.
To switch between footer and header, you need to click on “Go to bottom” or “Go to header” in the group navigation.
To insert a page number, press the “Page Number” button. To insert a date or time, press the “Date and Time” button. After selecting what you need, double-click in the document area, and then the “Close Footer” button.

In order to insert text or graphics into the header and footer, and then save it in the collection, click the “Insert” tab, select the header and footer group. Then select the footer we need, header or footer. Then select “Change header or footer”, insert the text or image we need. To save the created header, select the text or image in the header, then click “Save selected fragment as a new header (footer).
To change the header, select the header or footer we need in the “Header and Footer” group, and click on the desired header option in the collection. After this, the header and footer changes throughout the document.
To remove a header and footer from title page, click the “Page Layout” tab, then select “Page Setup” and click the “Layout” tab. Then in the “Header and Footer” group, check the box for the first page. And the headers and footers on the title page will be removed.
In order to remove headers and footers from all pages of the document, select the “Header and Footers” group in the “Insert” tab. Next, select the header or footer that you want to change (header or footer), click “Delete header (footer).

In headers and footers, sometimes the document headings are indicated on odd-numbered pages, and the chapter heading on even-numbered pages. In order to create different headers and footers for these pages, you need to click on the “Insert” tab, select “Header and Footers”, then “Header (Footer)”. Click “Change footer” or “Change header” Then check the box for even and odd pages. And now you can insert a header and footer for odd and even pages.
The ability to work with headers and footers can be useful for a secretary, for example, when preparing local regulations, his own resume and other documents. In this article we will figure out how to make a footer in Word version 2007, namely, we will learn how to add to the document: your name, page numbers, as well as information about the document.
Why are headers and footers needed?
Let's understand the terms in order to speak competently: a footer is not information written in the margins. A header and footer is a line. Depending on the location, a distinction is made between a header, a footer, and a sidebar (a line above, below, or to the side of the main text, respectively). The text that is placed on this line can be anything and has its own name: page number, title, etc.
The point of a footer is to place permanent information on the top or bottom margin of the document and not subsequently waste time typing it and arranging the main text in relation to it. The header and footer perfectly saves paper space and the time of the document author. Headers and footers may include:
- surname, name, patronymic of the author of the document;
- document date;
- page numbers;
- name of company;
- name of the document, etc.
In terms of formatting, text in headers and footers is no different from regular text. All options from the tab top menu“Home” are also available here. You can customize the style, size, font, text color, insert pictures and autoshapes into the header, etc.
Header: Full name
Let's say you are writing a resume and in accordance with the most best recommendations strive to place all your glorious combat experience on one sheet. Since combat experience can be significant, this may not be an easy task. Some information can be placed in footers. And if the resume does turn out to be multi-page, then it is almost obligatory to place on each page at least the contact phone number of its author.
To open the header, double-click on the top margin of the document. The main text will immediately become inactive (pale), and the field, on the contrary, will turn on:

(all pictures are clickable)

Return to normal mode very simple: double click on the main text, and the headers and footers are inactive again. In this mode they look paler than the text, but don't worry: everything will look as it should on paper. To verify this, you can now switch to the mode preview and admire.
Switch to preview mode:

This is what the finished document will look like:

Footer: background information about the company
Information is entered into the footer in the same way: double clicking on the bottom field launches desired mode. Many organizations, when developing letterheads for letters, use the bottom margin to indicate their reference data. This does not comply with GOST 6.30-2003, but in practice it is very common. Looks like that:
How to remove a footer
Removing an unnecessary header and footer is very simple: to do this, click on the field that needs to be cleared, and then, making sure that it has become active, delete (or change) the text of the header and footer.
Page numbers
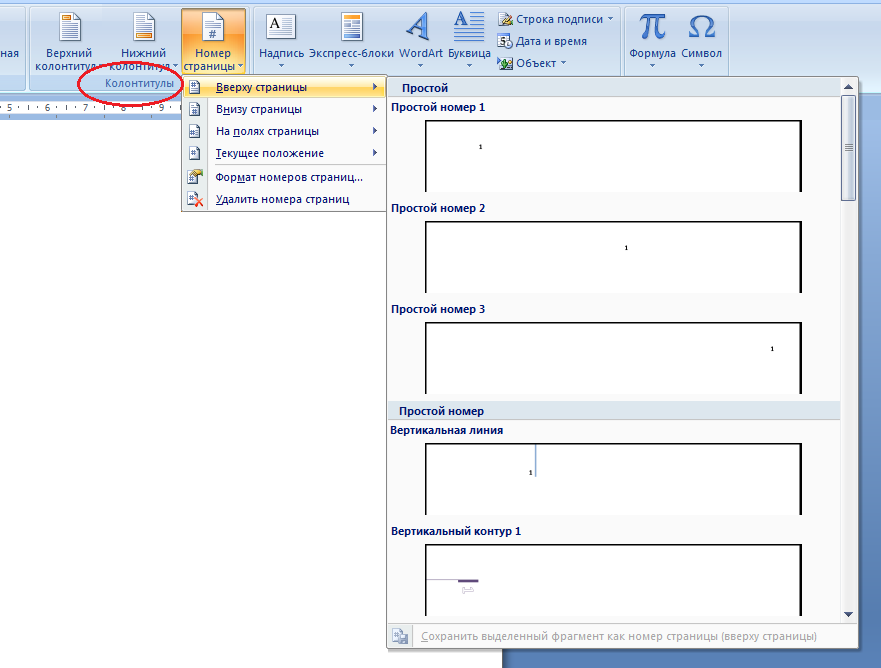
Perhaps the most common content in the footer is the page number. To quickly add it to our document, let’s go to the “Insert” tab of the top menu and find the “Header and Footer” group of commands in it. The third button in the group is called “Page Number”. Click on it and in the drop-down menu select the place in the document where we want to place the page number. We move the mouse, and they drop out on the right possible options placing the number in the selected line. We choose the one we consider necessary:
The pages are numbered.
This was the so-called educational program: the simplest options for adding headers and footers. Now let's dive deeper into the topic.
When trying to work with headers and footers, the most attentive users have already noticed that simultaneously with the line they select in the top menu, a special menu line “Working with headers and footers” is activated, under which there are several groups of commands (the picture is clickable):
The names of groups of commands and options are quite self-explanatory, and advanced user will understand them without difficulty. As an example, we will design the first page of the document.
How to remove a header and footer from the first page
It's very easy to remove a header (such as a page number) from the first page of a document. To do this you need:
- go to the menu bar “Working with headers and footers”,
- check the “special footer for the first page” checkbox,
- remove all headers and footers from the first page or change them.
How to make a footer for a local regulation
In practice, I have come across cases where organizations decorated their local regulations headers, occupying about a third of the sheet. They contained everything: the name of the company, and the name, number and date of the LNA, and the page number, and the version number of the LNA, and whatnot was there. It looks something like this:
How necessary this is is a big question (in my opinion, this is information ballast), but if the secretary is faced with the need to make such a cumbersome structure in a document, then we will do it.
At its core, a header and footer is the same line as everyone else, which means you can put anything in it, including a table. We have already discussed above how to enter information into the footer. The secretary, one might think, can also handle adding a table to a document and filling it out.
The difficulty is variable information: the name of our LNA remains the same throughout the entire document, but the page numbers change. Let's deal with it this way:
- when the entire table (or the necessary object) for the footer is ready, place the cursor in that part of the table that should contain the page number;
Sections in Word allow you to create a document within a document. For example, if there is a desire or need to place contents, explanatory notes and appendices in a text document, then they will require different headers and footers.
Word section break for different headers and footers
The fact is that the headers and footers contain frames, stamps, main and additional inscriptions presented for registration text documents design and working documentation in accordance with GOST 21.1101-2013. The graphs of the main and additional inscriptions will be different for the content, explanatory note and appendices, and therefore it will be necessary to make different headers and footers in the document. To solve this problem, Word provides a special tool - Section. A section is understood as a part of a document for which it is possible to individually customize its design.
Section breaks in Word. Miscellaneous headers and footers
Healthy. This article is devoted to how to make headers and footers in a document that has one section.
So, I think after doing a little practical work, there will be more benefit than from describing the functions of the buttons, and you will learn how to make section breaks in Word and different headers and footers.
Now in order:
1. Download the prepared file, click .
2. Open the document, with the design of the first and subsequent pages taking into account the requirements for text documents.
3. By double-clicking the left mouse button on the title block stamp, proceed to editing the footer. Or go to the top menu feed Insert → Footer → Edit Footer.
4. For clarity, on the first and second pages, change the inscription with the site to “Contents”.
5. Close the editing window double click in the sheet area, or by clicking the Close Header and Footer Window button on the Design tab.
6. Place the cursor at the end of the text on last page and insert a section break with next page passing Page Layout → Breaks → Next Page.

7. Thus, you have divided the document into two sections, the first will be used for the content, and the second section for the explanatory note. Place the cursor on the last page and go to the header and footer editing mode ().
8. Important point! Press the "Same as in the previous section" button in the top menu.

10. Go to the next page, the easiest way is to press the Ctrl+Enter key combination. Please note that the header inscription of the second section remains “Contents”.
11. Finish editing the inscription in the second section by doing. I remind you of the importance of pressing the “Same as in the previous section” button, otherwise the changes will apply to both the first and second sections in Word.
This is how the use of sections allows you to create a document with different page designs in one file.
How to remove sections in Word
I would like to pay special attention to how to remove (delete) sections in Word. The sequence of actions is important here, otherwise the result of the design of the section pages will ruin your mood.
Deleting a section in Word is done like this:
1. Turn on display hidden characters by clicking the corresponding button on the main tab of the top menu.

2. Find in the document the inscription “Section break (from the next page) and delete it. To delete, place the cursor in front of the inscription and press the Delete key.
Important! Removing partitions occurs from bottom to top, i.e. if there are two sections in the document, the last one will be deleted, but the page formatting will be transferred from the last section.
To correctly save the design of the pages of the first section, do the following before deleting:
Set the orientation of the pages of the second section as in the first.
Make the headers and footers of the second section as in the first. To do this, go to editing mode and hold down the corresponding button (see). Be careful, this must be done for the header and footer of both pages, if the first one is special.
Interesting. For complete happiness, page numbering is not enough, read how to do this.


