Secrets of Word. Create your own template with text fields
In case you need to create a Word document for other people to fill out, for example creating a conference participant form, to simplify the process, you can create a form to fill out in Microsoft Word. Form in Word allows you to create placeholders for various types of information such as text, date, yes-no questions, etc.
Enabling the Developer Tab
Before moving on creating a form in Word, you need to activate the "Developer" tab on the ribbon. To do this, click "File" --> "Options" to open the "Word Options" dialog box. Select "Customize Ribbon", then select the checkbox for the "Developer" tab.
Create a form in Word - Word Options
Now the “Developer” tab will appear on the ribbon.

Creating a form in Word - Developer tab
Adding form fields in Word
Now we're ready to move on to creating a form in Word. To do this, we will use a variety of fields that will be components of our future forms to fill out in Word.
To add a form field to fill out, place the cursor in the desired location, then select the required element from the " Controls" on the " Developer" tab. You can hover your mouse over the fields to see different options. In this example, we're adding a text field to allow users to enter their names.

Creating a form in Word - Controls for creating a form in Word
A test field will appear in the document:

Creating a Form in Word - Text Box
You can add multiple field types for creating a form in Word. For example, you could add a checkbox to select:

Creating a form in Word - Checkbox field
Or even a date picker:

Creating a Form in Word - Date Picker Field
Setting up form fields in Word
If you want even more control over how your fields are displayed forms in Word, you can enable " Design mode" in Group " Controls" on the " Developer" tab.

Creating a Form in Word - Design Mode
You can then change the properties for each field of your forms in Word, including the text that will appear in each field. If you're willing to spend a little time tweaking each field, you can create a pretty solid form. For example, you can create in your filling out form custom dropdown list like the example below:

Creating a Form in Word - Using a Dropdown List in a Form
As a result, in our example, we got the following form to fill out in Word:

Creating a form in Word - Example of a form to fill out in Word
In this article we covered the basics creating a form in Word. Now you can easily create your own form to fill out in Microsoft Word.
Few people know, but the MS Word text editor allows you to create such a useful thing as custom forms. How is it useful? Just one example - so, you need to receive several dozen questionnaires in electronic form. You send respondents a completed DOC file template, again receive completed questionnaires and...
Yes, you understand that something went wrong. Only half of the forms are filled out correctly, and in all other cases there is complete confusion - someone deleted important fields, someone added something, changed the formatting beyond recognition, etc. As a result, you have to spend time on standardization and corrections. Now I will tell you how to deal with this problem once and for all - our choice, custom forms.
Make sure the "developer" tab is enabled
Developer Tab in MS Word
First, make sure that in our MS Word there is a tab “ Developer", which is disabled by default. If there is no tab, the first thing you will have to do is activate it - open MS Word settings (“ File» → « Options") and look for the item " Customize your feed". On the right side of the list, check the box next to “Developer” and apply the changes by clicking “Ok.”

Enable the “developer” tab if it is disabled
The tab should now appear. let's go there.
Create a custom form in MS Word
We won’t complicate things, and our first “questionnaire” will have only one field: name. In the Controls group on the Developer tab, find the " Plain text" and click on it. Immediately a text field will appear on the sheet filled with the “space for entering text” blank.
Create a simple form in MS word
Great, now the magic begins. Click on the tool Restrict editing" and notice the panel that appears on the right. We want to achieve a simple result: the user filling out the document can enter text into the form field (in this case, their name), but cannot change the field itself, change the formatting or insert any additional text into the document.

A form field inserted into a text editor sheet
Protecting the form from changes
Now do the following:
- In the “Restrictions on formatting” item, check the box “Limit the set of allowed styles”
- In the “Editing restrictions” item, select “Entering data in form fields” from the drop-down list.
- In the “Enable protection” item, click the only button “Yes, enable protection”

We prohibit changes to the document
A window will appear on the screen asking you to enter a password - you can enter nothing and immediately click “OK”, or enter a simple password that you will not forget. That's all.

Protect the page from changes using a password
Try entering the name in the field we created earlier. It turns out? Now try entering text anywhere other than this field. Yeah! The page is protected from editing. You can safely save it and be sure that only the data entered in the appropriate field will be saved.
What if you need to make changes to the form, such as adding new fields? Look at the bottom of the Restrict Editing panel and click the Turn Off Protection button. By clicking it, the document will again be available for editing.

If you want to edit the page, restrictions can be removed
What other protected fields can be created in MS Word?
In addition to the already familiar field of the “Plain Text” type, MS Word offers at your service such “common” fields as:
- "Rich text" - you can apply formatting to the text in the field
- “Checkbox” - the ability to create a form with selection options
- “Drop-down list” - the ability to specify an element with predefined selection options
- “Date selection” - a drop-down list with a calendar for convenient selection of the desired date
With this set you can create forms with almost unlimited application possibilities in the Word text editor.

Creating forms in Microsoft Word is easy. The challenge starts when you decide to create fillable forms that you can send out to people to fill out. In this case, MS Word will help solve your problem: be it a form to collect information about people or a survey to get feedback from users about software or a new product.
Enable the “Developer” tab
To create fillable forms, you first need to activate the tab Developer(Developer). To do this, open the menu File(File) and click on the command Options(Options). In the dialog box that appears, open the tab Customize Ribbon(Customize Ribbon) and select Main Tabs(Main Tabs) from the drop-down list.

Check the box Developer(Developer) and click OK.

There is now a new tab on the ribbon.

To be or not to be a Pattern?
There are two options to start creating forms. The first one is easier, provided that you select a suitable template. To find templates, open the menu File(File) and click New(Create). You will see many templates ready for download. All you have to do is click on Forms(Forms) and find the desired template among those offered.

Once you find a suitable template, download it and edit the form as you wish.
This is the easiest way, but it may happen that you do not find a suitable template among those proposed. In this case, you can create a form from a draft. First, open the template settings, but instead of a ready-made form, select My Templates(My templates).

Select Template(Template) and click on OK to create a clean template. Finally, click Ctrl+S to save the document. Let's call him Form Template 1.

Filling the form with elements
Now you have an empty template, which means you can add information to the form. The form we'll create in this example is a simple questionnaire to collect information about the people who will fill it out. First, insert the main questions. In our case, we will find out the following information:
- Name(Name) – plain text
- Age(Age) – drop-down list
- D.O.B.(Birthday) – date selection
- Sex(Gender) – checkbox
- Zip Code(Postal code) – plain text
- Phone Number(Phone number) – plain text
- Favorite Primary Color and why(What is your favorite color and why) – combo box
- Best Pizza Toppings(Favorite pizza topping) – checkbox and plain text
- What is your dream job and why? Limit your answer to 200 words(What is your dream job and why) – formatted text
- What type of vehicle do you drive?(What car do you have) – regular text
To start creating different variations of controls, open the tab Developer(Developer), which you added earlier, and in the section Controls(Controls) select Design Mode(Design mode).
Text blocks
For any questions that require a text answer, you can insert text blocks. This is done using:
- Rich Text Content Control(Rich text content control) - user can customize formatting
- Plain Text Content Control(Plain Text Content Control) - Only plain text is allowed without formatting.
Let's create a rich text answer box for question 9, and then a plain text answer box for questions 1, 5, 6, and 10.

Don't forget that you can change the text in the content control field to match the question. To do this, click on the field and enter the text. The result is shown in the image above.
Adding a date picker
If you need to add a date, you can insert Date Picker Content Control(Date picker content control). Let's use this element for question 3.
Inserting a drop-down list
For questions that require a single answer (for example, question 2), it is convenient to use the drop-down list. Let's insert a simple list and fill it with age ranges. Place the content control field, right-click on it and select Properties(Properties). In the dialog box that appears Content Control Properties(Content Control Properties) click Add(Add) to add age ranges to the list.

When finished, you should have something similar to the image below. In this case, the design mode must be disabled!

You can also use Combo Box(Combo box) in which you can easily create a list of any desired items. If necessary, the user will be able to enter additional text. Let's insert a combo box for question 7. Since we'll be using this element, users will be able to select one of the given options and enter an answer as to why they like the color they chose.

Inserting check boxes
To answer the fourth question, let's insert check boxes. First you need to enter the answer options (male - man; female - woman). Then add a content control Check box(Checkbox) next to each answer option:

Repeat this step for any question that has one or more answer options. We will add a checkbox to the answer to question 8. In addition, to allow the user to specify a pizza topping option that is not listed, we will add a content control Plain Text(Plain text).
Finally
The finished empty form with design mode turned on and off should look like the pictures below.
Design mode enabled:

Design mode is disabled:

Congratulations! You've just mastered the basic techniques for creating interactive forms. You can send a DOTX file to people, and when they run it, it will automatically open as a regular Word document that they can fill out and send back.
The lesson was prepared for you by the team of the site office-guru.ru
I've described the process of creating a simple template using the function toolbar buttons FORMS.
I think it’s worth talking in more detail about this panel and the buttons on it. I will try to provide only the most necessary information, without going into details.
Toolbar Forms(Forms) is hidden from the user by default, like many other panels. To call it, right-click on an empty space in the toolbar area and select from the list that appears Forms(Forms). There is another way: in the menu View(View) select command Toolbars(Toolbars) and in the drop-down list of available panels, find and click on the panel Forms(Forms).
In this screenshot I have indicated the buttons that will be discussed further.
1. Text field. Use this button to insert various types of text fields into the document template. This can be the actual text itself, a number, date, time, or a formula (calculation) field.
By default, clicking this button will insert a text field like Plain text(Regular text), that is, any text data (text, numbers, spaces, symbols). In order to change the field type, you must either double-click on the field itself, or click on the button Form field options(Form Field Options). A dialog box will open, as in the screenshot:
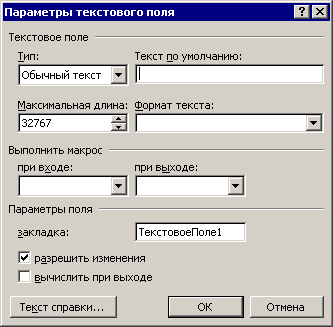
In field Default text(Default Text) you can enter sample text so that the user can immediately understand what exactly they should enter in this field.
Field Maximum length(Maximum length) allows you to limit the number of characters entered by the user.
Field Text Format(Text format) offers to set a specific formatting for the entered text.
It is very important not to forget to check the option allow changes(Fill-in Enabled) if you intend to enter or change data in this field.
And it would be nice if the user, when selecting or entering data into a text field, could receive a hint: what it is used for and what to enter into this field. Help for the text field partially solves this problem. True, the implementation of such a hint is quite inconvenient and not obvious to the user. Not everyone looks at the status bar (below) or thinks to press a key F1.
In the dialog box at the bottom you can see a button Help text(Add Help Text). By clicking on it, you will see another dialog box:
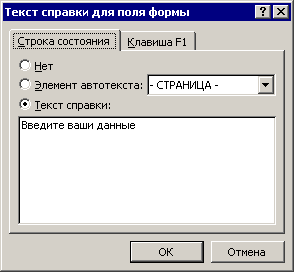
Here you can enter your help text, which will be displayed to the user in the status bar and/or on keystroke F1.
As I said above, you can choose another data type instead of text: number, date, time or formula. All this is available in the drop-down list Type(Type).
You may ask, how is the Plain Text field type different from the Numbers field type? After all, both types allow you to enter numbers.
This is true. But the Numbers field type allows only numbers to be entered. You can choose a special format for the number you enter, such as a currency format.
2. Checkbox. Element Checkbox(Check Box Form Field) is used mainly for all kinds of questionnaires and forms where you need to tick the appropriate options. Various options are also available for this field by clicking the button. Form field options(Form Field Options).
3. Combo box. Insert Combo boxes(Drop-Down Form Field) allows the user to select any data (pre-entered by you) from a drop-down list. To enter this data, you must either double-click the field or click the button Form field options(Form Field Options), which will open a dialog box with the available options for that field.
4. Draw a table And Add table. These buttons are similar in purpose to the commands of the same name in the menu Table(Table). These buttons are located on the FORMS toolbar for the convenience of the user if it is necessary to insert form fields into table cells.
5. Add a frame. This button allows you to insert a frame into your document template. A frame usually appears as a separate block on the page. It can be wrapped around the text on all sides or placed to the side of the text. This is a kind of container for text or for the same fields.
6. Shading Form Fields. Shading form fields (with a light gray background) makes it easy to find the fields you want to fill out on the screen. It does not appear when printed.
7. Clear form field. When you click this button, all entered data in the form fields is cleared (deleted).
8. Form protection. Once you've created your document template, you need to protect the immutable data in the document from being accidentally changed or deleted and prevent the user from making any changes to the document other than inserting data into certain fields. This special button is used for these purposes - Protect Form. Click on it. From now on, when creating a document based on this template, the user will only be able to enter data into shaded text fields.
Field codes are useful as placeholders for data that may change in a document, and they can be used to automate certain aspects of the document. Field codes are inserted when you use Word features such as page numbers or the table of contents, but you can insert field codes manually for other tasks, such as performing calculations or populating document content from a data source.
These steps allow you to insert any field code into Word. For a list of field codes with details about each, see List of field codes in Word.
Inserting a field
Notes:
To in the dialog box Field field codes are displayed, click the button Field codes. For some fields, codes are displayed automatically.
To nest one field within another, first insert the outer field (container) by following steps 1-4 above. Then, in your document, place the cursor in the field code where you want to insert the inner field and follow steps 2-4 above.
Change field
Safety Note: Because field codes are visible to everyone reading the document, you should not include sensitive information in them.
Displaying Field Codes
By default, field values in Word do not differ from the rest of the document content, so when reading, the user does not notice that part of the document content is located in the field. However, fields can also be displayed with shading to make them stand out in the document.
Field update control
By default, fields in Microsoft Word are updated automatically when you open a document. This way the data remains up to date. However, there are situations where using this function is not desirable. For example, you might want the title to display a specific date rather than the current date when you open a document.
You can also update a field by double-clicking it and choosing Update field or by selecting it and pressing F9
To manually update all fields in the document body, press Ctrl+A followed by F9. Fields in headers or headers must be updated individually. Click in the header, footer, or text field, press Ctrl+A, and then press F9.
To prevent fields from being updated automatically or unintentionally, you can lock them.
Lock or unlock a specific field
Do one of the following:
To lock a field (prevent its value from being updated), select the field and press CTRL+F11.
To unlock a field (allow its value to be updated), select it and press CTRL+SHIFT+F11.
Locking BOOKMARK, INCLUDETEXT, and REF field values
The value lock key (\!) prevents updating a field included in the value of a BOOKMARK, INCLUDETEXT, or REF field if the value of that field in the original location has not changed. Without this key, fields included in the value of a BOOKMARK, INCLUDETEXT, or REF field are automatically updated whenever that field is updated.
For example, field { INCLUDETEXT C:\\Sales\Sales_4_quarter.doc \! } inserts the contents of the document "Sales_4_quarter.doc" containing the DATE and EMBED fields. When updating an INCLUDETEXT field, the key "\!" will not allow you to update the DATE and EMBED fields in the pasted text if they were not updated in the source document ("Sales_4_quarter.doc"). This key ensures that the text inserted using the INCLUDETEXT field matches the text in the source document.
To update the DATE and EMBED fields in both locations, update them in the source document (Sales_Q4.doc) and then update the INCLUDETEXT field.
Preparing the form
Form is a document with blank areas into which data is entered. The forms resemble ordinary paper forms. On any form, except for permanent text, there are empty columns where you need to enter specific information. Similar columns - fields are provided in electronic forms: text field, checkbox field, list field.
The forms come in two types;
- printed - for use in printed form;
- electronic - for entering data in electronic form.
Advantages of electronic forms include automatic validation of entered data (for example, an employee's personnel number), updating of dependent fields (for example, city and state fields when entering a zip code), and the presence of hints that make it easier to fill out the form.
To create a form, sketch out its approximate appearance or use an already created form as a sample. It is better to use templates to develop a form.
Basic requirements for creating a form:
- definition of content, i.e. for what purposes the information will be entered into the form;
- choosing the type of form - printed or electronic:
- analysis and structuring of information intended for placement in the form. The form must have a permanent and a variable part.
- constant part - the original data is unchangeable during various uses of the form, for example, explanatory text;
- the variable part is the fields for entering specific data.
- the form title is usually located at the beginning of the document (an optional part of the form);
- The area of the immutable part of the data is intended to be placed in the form of permanent information;
- The editable part area is intended for different options for filling out the form;
- the form note is used to post instructions for completing the form;
- Headers and footers are used to provide consistent information on each form page.
After designing a form, follow these steps to implement it:
- Create a new template for the form.
- Place the basic structure of the form (constant text) in the template.
- Insert fields of the appropriate type. For each field, set the size, default value, and reference information.
- Protect your form.
- Save the template.
Create a new form template
From a new Word document (Command File => New, New File button on the Standard toolbar), which can be saved as a template by selecting the appropriate file type in the document saving window.
Based on existing templates by selecting the desired template in the dialog window (in the Create a document task area in the Templates => On my computer section and then set the switch to Template mode in the Create group)
Placement of the basic form structure in the template
The main part of the form's structural layout is a table-based form.
The following Word tools are used to develop and create forms:
- To create a form with a simple structure, click the button Add table on the toolbar Forms. If the form structure is more complex, insert multiple tables separated by blank lines.
- A complex shape can also be created by clicking the button Draw a table on the toolbar Forms and drawing its individual rows and columns. If there is an error, click Eraser on the toolbar Tables and borders and select the lines you want to delete by dragging.
- To draw a frame around a specific area of the form and then place a piece of text, a graphic, or a diagram inside it, click the Inscription on the toolbar Drawing. Then use the toolbar Drawing to change frame borders, background color, text color, etc.
- To make a form more attractive, borders and shading are added to key elements of the form. To add lines (borders) that print between cells or frame a table, or to shade the most important form elements, select the element you want, select Borders and Shading on the menu Format, and then set the required options on the tabs Border And Fill.
Inserting fields into a form
To insert form fields into a form that users view and fill out in Word, or as a printed form, use the toolbar Forms. The Forms toolbar is hidden from the user by default, like many other toolbars. To call it, right-click on an empty space in the toolbar area and select Forms from the list that appears. There is another way: in the View menu, select the Toolbars command and in the list of available panels that opens, find and click on the Forms panel.
Place the cursor in the document where you want to insert the form field and select the desired button.
Button |
Result |
|
Allows you to place a text field on a form that can be used to enter various types of data (text, numbers, date, time, calculated expression). It can be set to a default value. |
|
Used to add a checkbox next to an independent parameter that is either checked or cleared. Check boxes can also be added to a group of options that are not mutually exclusive (that is, more than one option can be selected). |
|
They are fields with a list of possible answers. If the list is large enough, the user will be able to scroll through it to view other answers. |
Form field options |
Allows you to change field parameters, for example, add items to the combo box, select a data type, etc. |
Create table |
Invokes Word table drawing mode. |
Add table |
Similar to Word's Insert Table command, allowing you to select the number of rows and columns. |
Add a frame |
Adds frames into which you can place various types of information or fields. |
Shading form fields |
Enables or disables field shading mode. |
Clear form field |
Allows you to return all values to default. |
Form protection |
After developing the form, it allows you to protect the fields from changes. |
In addition to elements of the Forms toolbar, you can add elements from the Controls toolbar to it.
Addition simple fields
For adding simple fields click button Text field on the toolbar Forms. A gray rectangle will appear on the screen at the cursor position. Use this button to insert various types of text fields into the document template. This can be the actual text itself, a number, date, time, or a formula (calculation) field. By default, clicking this button will insert a text field of type Plain text into the template, that is, any text data (text, numbers, spaces, symbols).
To change the field type, click the button Form field options or double-click on the field itself. The dialog box below will open, set the required field parameters in it:

Located in the dialog box Text Field Options drop-down list Type contains six field types designed to store various values in form text fields.
- Plain text to enter text, numbers, characters or spaces.
- Number to enter numbers. Allows only numbers to be entered. You can choose a special format for the number you enter, such as a currency format.
- date to enter the date .
- The current date to display the current date. This field cannot be changed.
- Current time to display the current time. This field cannot be changed.
- Calculation. Uses the "= (Formula)" field for calculations, such as calculating sales tax on subtotals. This field cannot be filled in or edited by users. If you selected a calculation field in the Type field, then the Text field by default turns into an Expression field. You must enter a formula in this field. The formula begins with the "=" (equals) sign and can contain constants, links to form fields (bookmarks), and operation signs.
In field Default text you can enter sample text so that the user can immediately understand what exactly they should enter in this field.
Field Maximum length allows you to limit the number of characters entered by the user.
Field Text Format offers to set a specific formatting for the entered text. Please note: the name of this list changes according to the form field view you select in the field Type.
If you plan to use this field in calculations, then in the field Bookmark enter the field name.
It is very important to remember to check the Allow changes option if you intend to enter or change data in this field.
Adding a Combo Box
The list field allows you to select the desired option from the list, rather than entering it manually. The first option in the list is the default option.
To create a combo box, follow these steps:

In field List item enter the option you want to add to the list. Click the button Add to include an option in the field List. To enter another value, repeat these steps. You can create a list of up to 25 options.
- To remove an element from List of elements select the element and click the button Delete.
- When forming a list, elements can be added in any order, because their rearrangement is allowed. To change the order, select an element in the field List and use the arrows in the section Order.
- To use the radio button field allow changes must be active.
- Click OK.
Create help text for form fields
To make it easier to fill out the form correctly, each field is supplemented with help text. Help can be organized in two ways:
- automatic display in the status bar when entering a form field;
- only when you press the F1 key.
In the latter case, help text is usually placed in the information window. To create help text for a form field:
Adding a Fields checkbox
Element Checkbox added to the form to select or reject the given answer option using the field Checkbox. It is used mainly for all kinds of questionnaires and forms where you need to tick the appropriate options.
Various options are also available for this field by clicking the button. Field Options forms.
- In chapter Checkbox size You can set the exact size of the checkbox field or enable the checkbox size to automatically adjust to the height of the surrounding text.
- To insert a blank radio button in a section Default activate value Take off, meaning Install- makes the switch enabled when creating the form.
- To allow the user to control the switch, leave the checkbox allow changes in an active state.
- Click OK.
Form protection
Once you have created an electronic form that is designed to be viewed and filled out in Word, it should be secured so that users can only enter data in the designated fields.
To establish protection:
- Execute menu commands Service =>Protect document. As a result, the task pane will switch to Document protection.
- Select in section Editing restrictions allow only Entering data into form fields;
- Click the button Yes, enable protection. Then a field for entering a password will appear.
- In field Password you can specify a password (when removing protection, the system will require you to specify a password);
- Once security is set, the user can only fill out form fields, but cannot change the form's persistent test.

To remove protection:
- Execute menu commands Service =>Remove protection;
- Specify the password if the protection was performed with a password.
To quickly protect or unprotect a form while you're designing or editing it, click Form protection on the toolbar Forms.
Saving data entered electronically for use in a database
- Open the completed electronic form.
- Select a team Options on the menu Service and then the tab Preservation.
- Check the box Save only form data.
- Select a team Save as on the menu File.
- Enter the file name in the field File name.
- Select Text only in field File type.
The contents of the form fields will be saved as a text file. Commas will be used as delimiters.
Printing data entered into an electronic form
- Select a team Options on the menu Service and then the tab Seal.
- Check the box Print only form data.
- Click the button Seal.
Word will only print the data entered into the form.
Note. If the electronic form was developed based on an existing form, for example a payment order, and the form fields are in the same places as on the form, then the above sequence of actions can be used to fill out the form.
Inserting ActiveX objects into a form
You can insert ActiveX objects into both Web forms and forms that are intended to be viewed and customized by users while working in Word.
- Inserting ActiveX objects is done using the toolbar Controls.
- To configure the properties of the selected control, click Properties on the toolbar Controls.
- To write a Visual Basic for Applications macro that controls the properties of a control, double-click the control. Enter the macro in the Visual Basic editor window.
Changing ActiveX Object Properties
The following procedure describes how to change the properties of ActiveX objects in forms.
- Open the template that contains the form you want to make changes to.
- Select the desired object.
- On the toolbar Controls click the button Properties.
- Make the necessary changes.
- Protect the form by clicking the button Form protection on the toolbar Forms.
Automation of work with the form
When you enter or exit a form field, the macros contained in the form template are automatically called. For example, if the user checked the checkbox Married, a macro called on exit can activate related fields such as Spouse's name.
- Create macros and save them in your form template. If the required macros are available in another template, copy them to the form template.
- Double-click the field to which the macro will be associated.
- To run a macro when you enter a form field, select it from the list Run macro at login.
To run a macro when exiting a form field, select it from the list Run macro on exit.
Note. If the form is used on other computers that do not contain such macros in the template Normal.dot, then they will not start automatically. Therefore, macros used in a form must be contained in the form template. In this case, they will be available for use on other computers.


