Spell checking is disabled in Word. To hide spelling and grammatical errors in a document. Rules for setting spelling in word
Publisher for Office 365 Publisher 2019 OneNote 2013 Publisher 2016 Visio 2013 Excel 2013 Word 2013 Outlook 2013 PowerPoint 2013 Publisher 2013 Access 2013 Excel 2010 Word 2010 Outlook 2010 PowerPoint 2010 OneNote 2010 Access 2010 Publisher 2010 Visio 20 10 Project 2010 Excel 2007 Word 2007 Outlook 2007 PowerPoint 2007 Publisher 2007 Access 2007 Visio 2007 OneNote 2007 Project 2007 Project Professional 2013 Project standard 2010 Project Standard 2013 Visio Professional 2013 Visio Standard 2010 Less
Make sure the text is in the correct language
If the spell checker does not check words entered in another language, or flags correctly entered foreign words as misspelled, the language for those words may be incorrectly defined.
To manually change the language of individual words or a piece of text in Word, follow these steps:
Make sure you are using the correct language version of the dictionary
Make sure the dictionary is set to the correct regional version of the text language, such as English (United States) rather than English (United Kingdom).
To change the dictionary for a specific language in Word, follow these steps:
To change the dictionary for selected text, follow these steps:
Make sure the "Detect language automatically" checkbox is checked
To check the box
Notes:
For proper operation functions automatic detection at least one sentence is required. If the phrases are too short, you may need to type several sentences, otherwise Word won't have enough context to automatically detect the language and apply the correct dictionary.
Same spelling of some words different languages(for example, center in English (United Kingdom) and French (France)) may cause the Detect Language feature to automatically detect the language of the text incorrectly. To resolve this issue, enter a few more words in the desired language or clear the Detect language automatically check box.
Make sure the "Automatically switch keyboard layout to match the language of surrounding text" checkbox is checked
If checked, this may cause typos when changing keyboard layouts while entering text. Type a few more words in the language you want, or clear the Automatically switch keyboard layout to match the language of the surrounding text check box.
To select the Automatically switch keyboard layout based on the language of surrounding text check box (in Office 2010, Office 2013, and Office 2016), follow these steps:
Make sure "Don't check spelling" is unchecked
If the Don't check spelling check box is selected, spelling in documents is not checked.
To clear the Detect language automatically in Word application, follow the steps below.
Make sure the misspelled word wasn't accidentally added to the custom dictionary
If a misspelled word has been added to the custom dictionary, you need to find and remove it. For information about how to check a custom dictionary for misspelled words, see Use custom dictionaries to add words to the spell checker. For information about how to remove a word from the dictionary, see Add or change words in the spell check dictionary.
Language dialog box is missing desired languageThe most common reason why a dictionary language is not listed in the Dictionary Language list in the Language dialog box is because given language not included as an editing language or missing from installed version Office suite and it requires installing language pack. For information about how to enable editing language, see the article
Text, click the familiar “Spelling” button, and in the window that appears, click the “Options” button. Next, in the settings window that opens, check the box next to “Automatically check spelling.” By clicking “OK”, automatic spell checking will be enabled.
If text Word editor does not highlight grammatical and spelling errors when entering text, which means that the automatic spell check function is disabled in the settings. In the 2003 and Office 2007 packages, the settings will be performed differently.

Instructions
If you are using office suite from Microsoft from 2003, open the “Tools” menu and select “Options”. Click "Spelling" and check the boxes next to the following items: "Automatically check" and "Automatically check grammar."
When choosing the last option, click in the context menu one of the spelling options that the program offers, or click “Skip”, and Word stops highlighting this word.
In addition to Word itself, you can also use special programs to check spelling. They work extremely simply, you need to enter a word or text into a special window, and the program will underline words that contain , and also suggest correct option writing.
Sources:
- how to find spelling errors in word in 2019
Computer techologies do not stand still, and now machines do everything more work per person. If earlier, due to the intense activity of office workers, spelling errors caused by inattention and typing speed could not be ruled out, now computer programs take the literacy test themselves. Internet browsers are no exception. However, what if the user is not satisfied with such exceptional service?

Instructions
In order to check in Opera, you need to perform the following combination of moves. On the toolbar, click "Menu", select the function "Settings", "General settings" (you can Ctrl keys+ F12). Select Advanced. On the left you will see the “Navigation” option, click on it. On the bottom line you will see the “Check Spelling” function. Uncheck standing nearby with this function, and click "OK". The settings menu will disappear and will no longer highlight misspelled words in red.
To disable checking Mozilla Firefox Click on the “Tools” button on the taskbar, then select the “Settings” function (you can use ALT keys+ O). In the main settings menu, click "Advanced", then open the "General" tab, "Site Viewer" section. Use the mouse to uncheck the box next to the “Check spelling when” field, confirm your action with the “OK” key.
Disable spell checking in the browser Google Chrome. Enter settings by clicking the Wrench icon on the toolbar Google browser Chrome. In the context menu that appears, select “Tools” (Settings), then click on the “Advanced” tab. Select the “Web Content” section, the Language Settings section and . The “Languages and Input” dialog box will open in front of you. Click on the “Enable spell checking” checkbox and click “OK”.
To disable spell checking in Safari browser Navigator on the toolbar, open the menu bar, select the "Edit" option, the "Spelling and Grammar" section. Uncheck the “Spell check” box and click on the “OK” button.
To turn off the spell check feature in Internet browser Explorer, click on the "Start" button located on the taskbar of your. In the window that appears, select Outlook Express. In the context menu, select “Service” and enter “Settings”. Find the “Always check spelling before sending” option and uncheck the box next to it.
When working with text, no one is immune from errors and typos. Some programs have a built-in spell checking function. To enable it, you need to perform several steps.

Instructions
To enable spell checking in Mozilla browser Firefox, launch your browser and select top line menu item “Tools”, in the context menu click on “Settings”. A new dialog box will open. Go to the “Advanced” tab and make the “General” mini-tab active. In the "Site Browsing" group, check the "Check spelling as you type" box. Click on the OK button for the new settings to take effect and close the window.
To enable spelling in text Microsoft editor Office Word, launch the application, click on the Office button on the left top corner window and click on the " Word Options" A new dialog box will open. Select the “Spelling” section on the left side.
When you go to the selected section, make sure that in the “When correcting in Word” group there is a marker in the “Automatically check spelling” field. You can also set in this window Extra options to check the text. When all changes have been made, click on the OK button.
Text you enter into your document will be automatically checked for errors. By default, punctuation errors are highlighted with a green wavy line, spelling errors are highlighted with a red line. To manually run a spell check in the text, go to the “Review” tab and click on the “Spelling” button in the section of the same name. You can also use the F7 key.
IN Microsoft program Office Excel spelling settings are set in a similar way, that is, through the Office button and the “ Excel Options" But there is also a difference: in books Excel text is not automatically checked when you type, so you must run this process yourself. Go to the “Review” tab and click in the “Spelling” section on the button of the same name with the left mouse button to begin checking the entered data.
Sources:
- Check spelling on the Internet online
Almost all browsers have a spell checking mode, and Opera is no exception. This feature can be used when filling out web forms, composing emails, communication in chats and forums. You can activate or disable the spell checking mode in two clicks of the mouse, however, if you do not have to download checking dictionaries.

You will need
- Opera browser.
Instructions
Launch your browser and load any page into it that has a text input field - for example, http://site. Right-click this field to bring up the context menu. In it you need the penultimate item - “Check spelling”. If there is no checkmark next to it, select this item. This will be enough to activate the verification mode, but its correct operation may require additional actions with dictionaries used in Opera.
Right-click the same field again, but this time expand the “Dictionaries” section at the very bottom line context menu. Select Russian from the list, and the operation will be completed. If it is not there, select “Add/remove dictionaries”. As a result, the Dictionary Installation Wizard should start.
In the first window of the wizard, a long list - more than fifty lines - will be placed with the name “Dictionaries for spell checking”. Scroll to the end, find the inscription “Russian” and check the checkbox of this line. In addition to the Russian language dictionary, here you can select one or more additional ones by placing marks in their lines. Once you're done, click the "Next" button.
In the next window of the wizard there will be no control elements, only a loading indicator under the inscription “Dictionary is loading” and numbers separately indicating the weight of already downloaded and remaining files. Wait for the download to complete and the text will appear on the screen license agreement. Read it and check the box next to “I agree to the terms of the license agreement.” After this, the “Next” button will become active again - click it. This operation will have to be repeated for each of the selected dictionaries.
When the licenses are finished, the wizard will show a list of downloaded dictionaries with a proposal to select the default one from among them. Specify the desired line and click the "Finish" button.
Sources:
- how to turn on spelling in opera in 2019
Word check helps if you have doubts about spelling or placement of commas. But sometimes they stand out Right words and sentences or, conversely, errors and typos are missed. How to enable and configure automatic check in Word?
Word - perhaps The best decision for typing and editing text documents. Among the many features of this program, one of the most useful is spelling and grammar checking.
But many users have problems with this function. In this article we will talk about how to enable spell checking in Word 2007, 2010, 2013 and 2016.
Turn on automatic spell checking in WordDefault, text editor Word always automatically checks spelling. If this does not happen for you, then most likely this function is simply turned off in the settings. In order to turn back spell checking in Word, you need to click on the “File” button in the upper left corner of the program and select “Options” in the menu that opens.
In the screenshots below we will demonstrate what the “File” menu looks like in Word 2007, 2010, 2013 and 2016.
File menu in Word 2007

File menu in Word 2010

File menu in Word 2013, 2016
After you have opened “Word Options”, you need to go to the “Spelling” section and enable functions there that are related to spell checking in Word.

- Check spelling while typing;
- Use contextual spell checking;
- Mark grammar errors while typing;
- When checking spelling, also check grammar;
It should be noted that these functions may be called slightly differently in your Word versions. Also, do not forget that settings changes must be saved using the “Ok” button.
Manually running spell check in WordYou can also manually enable spell checking in Word. To do this, you need to select the text for which you want to run a check, go to the “Review” tab and click on the “Spelling” button.

As a result, the “ Spelling” window should open, in which you can check the spelling of the text word by word. Words in which the Word text editor finds errors will be highlighted in red. In this case, several spelling options will be offered under the text. of this word. In order to correct this word, you need to select one of the replacement options and click on the “Replace” button.

If you think the word is spelled correctly, you can skip it. There is a “Skip” button for this.

Also, using the “Add” button, you can add a correctly spelled word to the dictionary.
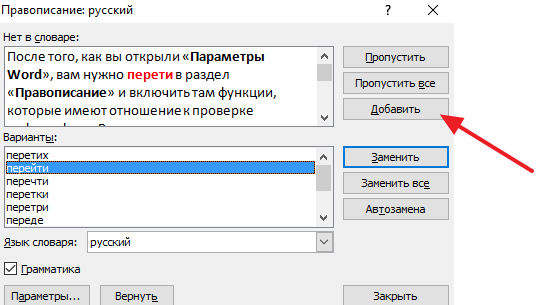
Words that have been added to the dictionary by the user Word more will not be marked as errors.
How to Change the Spell Check Language in WordIf the spell check is performed according to the rules of another language, then you need to change the language of the text. To do this, select the text that is not being checked correctly and click on the language name at the bottom of the Word window.

After this, a small “Language” window will appear. Here you need to select the language according to the rules of which the spell check should be performed, and click on the “Ok” button.

Also, using the “Language” window, you can completely disable spell checking for the selected part of the text. To do this, you need to select the text, click on the name of the language, and in the “Language” window turn on the “Do not check spelling” function.
During check Word spelling scans the document text (or selected area) and compares all words with words contained in several built-in dictionaries. If the document text contains a word that is not in dictionaries, Word marks it as containing it spelling mistake. Often, specific terms, people's names, geographical names, etc. fall under such words. If desired, such words can be included in the dictionary, and Word will “remember” them and will not mark them as erroneous in the future.
There is also back side medals. Word skips words that are spelled correctly but are used incorrectly in context. For example, "income deposit", instead of "income tax".
The spell check feature identifies and marks identical words in a document that follow one another.
Grammar checkerThis function checks the text for compliance with grammatical and stylistic rules. Checking grammar rules reveals errors such as incorrect use of prepositions, agreement of words in a sentence, etc.
Checking stylistics allows you to identify rarely used, colloquial words and expressions in a document.
By and large, you should not completely rely on the program’s ability to eliminate errors, but, if possible, check it yourself after typing the document.
Automatic spell checkWhen dialing Word text Underlines words containing spelling errors with a red wavy line, and grammatical and stylistic errors with a green line.
To correct a spelling error, right-click on the underlined word. In this case, a context menu will be displayed on the screen.
Can choose correct writing from among the suggested options, or open the Spelling..., AutoCorrect, or Language dialog box for additional options for the corresponding functions.

The "Not in dictionary" field displays a text fragment containing a misspelled word, and the "Options" field displays a list of replacement options. You can edit the error directly in the “Not in the dictionary” field or select one of the suggested replacement options. After processing the current Word errors resumes searching and displaying the next error.
The Ignore All button is used to skip the current error and all subsequent occurrences of it. The "Replace" button allows you to replace the error with the selected replacement option or accept corrections made in the "Not in dictionary" field.
The "Replace All" button allows you to replace all occurrences of the erroneous word with the selected replacement option. If the Grammar check box is cleared, Word does not check the text for grammatical errors. This allows you to focus solely on spell checking.
The Options button provides access to spell checking options.
The Revert button undoes the last correction you made.
When a grammatical or stylistic error is detected in the text of a document, Word displays the following window in the "Grammar..." dialog box.

The "Options" field displays a description of the fragment containing a grammatical error.
As with correcting spelling errors, when checking grammar, you can edit the text directly in the field with the erroneous fragment or use one of the replacement options.
The "Skip All" button is used to skip all similar errors found in the text.
The "Next" button allows you to skip the current error and move on to the next problematic fragment.
Inscription In a Word document, you can think of it as a container that houses subdocuments. You can perform joint operations on all objects located in such a container: deleting, moving, copying, etc.
To create a caption in a Word document, use the Caption command on the Insert menu.
The position of an inscription in the document can be adjusted by selecting it and selecting the Inscription Format option in the context menu called up at the inscription's border. The dialog box that appears contains several tabs with which you can change the size, position of the inscription relative to the text, color design of the inscription, etc.
Word document pages may contain headers and footers- areas located at the top and bottom of each page and containing certain text. The simplest header and footer consists of a page number. However, it may also include any information that appears at the top or bottom of the page. Headers and footers are created using the Header and Footers command on the View menu.
When you execute this command, the Header and Footer toolbar is displayed on the screen, the buttons of which allow you to create and edit header and footer.
Upper and footer usually located from the left to the right margin of the page horizontally, and their vertical position is determined by the size of the top and bottom margins and the distance from the edge of the page to the footer, specified in the Page Setup dialog box. If the data inserted into the header and footer requires more space, Word increases the size of the corresponding page margin to expand the area of the header and footer. In this case, the footer elements do not overlap the main text. However, part of the header and footer can be positioned outside the header and footer area. The following techniques are used for this:
To change the position of the top or bottom border of the footer, drag the handle on the vertical ruler. You can also adjust the position of the header and footer area on the Margins tab of the Page Setup dialog box;
To move header text to the left or right of the margins, set one or more header paragraphs to a negative left or right indent value. To do this, use a horizontal ruler or the Paragraph dialog box;
The header text can be partially or completely inserted into Word inscription and drag it anywhere on the page. Despite this, the resulting frame continues to remain part of the header and footer, so it can only be changed by executing the Header and Footer command in the View menu.
Typically, the same header and footer appears on each page of a document. However, there are several ways to achieve different headers and footers in your document. First of all, you can create a different footer for the first page of a document or section. You can set different headers and footers for even and odd pages of the document. These actions are specified by checking the appropriate boxes on the Layout tab of the Page Options dialog box on the File menu. It should be noted that the difference between the first page header and footer is set for a particular section of the document, but the difference between even and odd page header and footer is set for the entire document. Finally, if a document is divided into sections, their headers and footers may have different content. Initially, the headers and footers of each subsequent section are connected to the headers and footers of the previous section, i.e. they look exactly the same.
You can add a table of contents to a Word document that lists all the headings and the page numbers they are on. To create a table of contents, follow these steps:
Make sure that each heading included in the table of contents is assigned a style. The easiest way is to use the built-in styles Heading 1 - Heading 9,
place the cursor at the place in the document where the table of contents will be inserted;
execute the command Table of Contents and Indicators of the Insert menu;
select the Table of Contents tab;
If you want to use others instead of the built-in heading styles, click the Options button to open the Table of Contents Options dialog box. In this window, you can select the styles to include in the table of contents and associate specific levels in the table of contents with them;
for change appearance table of contents, select parameter values until approximate view The table of contents in the Sample field will not match what you want. You can set the table of contents format and alignment method page numbers, number of levels and placeholder character.
You can also allow or disable the display of page numbers.
To quickly move the cursor to the place marked with a bookmark, you should execute the Bookmark command of the Insert menu or press the key combination Ctrl+Shift+F5, in the Bookmark dialog box that opens, select its name assigned when marking the text, and click the Bookmark button. Word moves the cursor to the marked position. Executing the Goto command from the Edit menu will produce a similar result. In the command dialog box, select Bookmark from the Transition Target list.
MS Office package. Text editor Word. Functions for searching and replacing characters. Search and replace special characters(non-printable). Autocorrect as you type. Custom settings for auto-correction of entered characters.
When creating new documents, special templates can also be used - wizards, which provide customization of the created documents in the process of dialogue with the user.
In text Word processor there are three ways quick insert frequently used text or graphic information in a document, based on usage AutoText, AutoCorrect And Piggy banks.
Using the AutoCorrect command of the Tools menu, previously created elements (text fragments, pictures, tables, etc.) can be automatically inserted into the document many times. This command can also decipher abbreviations and automatic correction the most common typos. In the command dialog box you can:
create, apply, delete an autocorrect element;
use autocorrect while typing;
execute general setup text conversion using the appropriate checkboxes at the top of the dialog box.
Using the command Autotext Insert menu (or AutoText tab in the command dialog box AutoCorrect Tools menu), previously created elements (text fragments, pictures, tables, etc.) can be repeatedly inserted into the document at the user’s command. You can use the command dialog box to create and delete AutoText items.
Money box is a tool for accumulating and combining various blocks of information from different parts documents and inserting them into the document as a whole. The piggy bank is created based on autotext. The selected fragment of the document is transferred to the piggy bank when you press the key combination Ctrl+F3. This action can be performed on one or more documents opened in different windows. You can view the contents of the piggy bank using the AutoText command in the Insert menu by selecting Piggy Bank in the list of names. To insert the contents of a piggy bank, enter the word piggy bank into the text and press the key combination Ctrl+Shift+F3 to transfer the contents of the piggy bank or the F3 key to copy the contents.
The text of a Word document can be checked for correct spelling in several dozen languages. The list of languages is set by the Language command in the Tools menu. It is possible to check texts for spelling and grammatical errors. Spell checking can be done directly as you enter text or in previously entered texts. To automatically check spelling as you enter text, configure the Spelling tab of the Tools menu Options dialog box. Spell checking in a selected fragment of previously entered text is performed by the Spelling command of the Tools menu or by clicking on the corresponding button on the toolbar.
When checking spelling, Word highlights a possible spelling error with a red wavy line, and a possible grammatical error with a green wavy line.
The main work is done in the Spelling command dialog box using buttons. The user can skip a word, replace it with one of the words contained in the Suggestions field, add the word to the user dictionary, add it to the AutoCorrect list to automatically correct errors, etc.
Configuring spelling check options (checking the required checkboxes in the dialog box called up by clicking the Options button in the Spelling window and clicking the Settings button) allows you to achieve the optimal balance between rigor and speed of checking.
During the editing process, sometimes you need to search for text. Searching for text is often done to replace it. To search for text, click the Find in Document link in the panel Search in the task pane or select Find from the Edit menu or press Ctrl+F. In field Find Enter the text you are looking for and click the “Find Next” button. After this the search will be performed. To abort the search, press the Esc key.
Note. To display more search options in the window, click the More button. After this, the search window will display fields in which you can set the search direction, enable case sensitivity, and set the format. By clicking the Special button, you can search for special characters. If you do not need to specify additional parameters to describe the search image, then click the “Smaller” button to reduce the window to hide unnecessary fields.
To replace text, select Replace from the Edit menu. In field Find enter the search text, and in the field Replace Pa enter the text to replace. Click the Find Next button. If this text is found, the search will be stopped and the searched text will be highlighted in bold. Click the Replace button to replace the text. If you want to replace all occurrences of the search text, then click the “Replace all” button.
Microsoft Word automatically checks for spelling and grammatical errors as you write. Words spelled incorrectly, but contained in the program's dictionary, can be automatically replaced with the correct ones (if the autocorrect function is enabled), and the built-in dictionary also offers its own spelling options. Those words and phrases that are not in the dictionary are underlined with wavy red and blue lines, depending on the type of error.
It is worth saying that highlighting errors, as well as their automatic correction, are possible only if this parameter enabled in the program settings and, as mentioned above, it is enabled by default. However, for some reason this parameter may not be active, that is, it may not work. Below we will talk about how to enable spell checking in MS Word.
1. Open the “File” menu (in earlier versions program, you must click the “MS Office” button).

2. Find and open the “Options” item there (formerly “Word Options”).

3. In the window that appears in front of you, select the “Spelling” section.

4. Check all the boxes in the section “When correcting spelling in Word”, and also uncheck the boxes in the section “Exceptions for the file”, if any are installed there. Click “OK” to close the “Options” window.

Note: The checkbox next to “Show readability statistics” can be left unchecked.
5. Spell checking in Word (spelling and grammar) will be enabled for all documents, including those that you will create in the future.
Note: In addition to misspelled words and phrases, the text editor also underlines unknown words that are not in the built-in dictionary. This dictionary is common to all programs Microsoft package Office. In addition to unknown words, a red wavy line also underlines those words that are written in a language other than the main language of the text and/or the language active in this moment spelling pack.


That's all, from this short article you learned why Word does not highlight errors and how to fix it. Now all incorrectly written words and phrases will be underlined, which means you will see where you made a mistake and can correct it. Master Word and don't make mistakes.


