Download a program for burning flash drives. The basic capabilities of the WinToFlash program are: Burning a disk image to a USB flash drive
In this article I will tell you how to burn an image to a flash drive (in in this case Windows image) for subsequent installation of the system on a computer. Nowadays, many people have laptops and netbooks, where there is simply no optical drive, or there is no way to install windows from disk, this is where creating bootable flash drive windows 7. This article is primarily aimed at these tasks.
We will write the image to a flash drive in two ways. The first method will be implemented using a very good ultra iso program, and the second using WinSetup From USB. We will start by looking at the steps to work with ultra iso, since this method is less labor-intensive and the process of creating a bootable Windows 7 flash drive will be quite fast. The second method will remain for those who, for some reason, “didn’t work out” with the first option.
Method No. 1
So, let's go. First, download the program Ultra ISO. After the program has been downloaded, installed and launched (click trial period, if you don’t want to buy), you can start a fairly simple process of writing Windows to a flash drive:
1. You must specify the path to the image that should be placed on your hard drive:
Click “File” => Open (Fig. 1)
Fig.1

Rice. 2

Rice. 3
Method No. 2
This method will also tell you how to write windows to a flash drive. What you will need for this option:
1. A little free time;
2. Computer (with iron, which supports booting from a flash drive);
3. Program for preparing a flash drive ( download);
4. Actually the flash drive itself (even an SD card will do);
5. An image of the operating system that we want to install.
As an example, I will show how we will write an operating system image to a 4GB SD cardMicrosoft Windows 7Home Premium 64-bit. I would like to immediately draw your attention to the choice of operating system. If your computer has less than 4GB random access memory(RAM), then you should install a 32-bit (x86) version of the operating system, since the 64-bit version will simply clutter up the RAM with unnecessary processes.
Insert the flash drive into the USB port and format it to FAT32 or NTFS using Windows. To do this, you need to go to My Computer, find the flash drive there and right-click on its icon. In the context menu, select “Format...”. In the format window, select the file system FAT32 or NTFS (the latter will be better if the flash drive has a capacity of more than 4GB), and also select the cluster size " Standard size cluster" and click the "Start" button. Everything is shown in the picture:

Next, we download a small program in which we will do all the operations we need. There are several programs of this type, but I chose WinSetupFromUSB because it does not require installation and takes up almost no space on disk and easy to use.
Let's launch the program. First, we need to select the device on which we will burn the image. This is done in the drop-down menu at the top (if the flash drive is not displayed in this menu, click on the Refresh button). Next, we need to prepare the flash drive for recording the image, because if we simply copy the image, it will be impossible to enter the system installer, because there is no boot sector. To create it, click on the Bootice button.

In the Bootice utility window that opens, click the Process MBR button, then see if the Grub4Dos checkbox is checked (if not, check it) and click the Install/Config button. In the Config Grub window for DOS click on the “Save to disk” button, the program will display a window that boot record successfully written to the drive.

We return again to the Bootice utility window, where we click the “Process PBR” button and do everything the same, without changing anything in the last window, click OK.

That's it, now all we have to do is write the image to a flash drive, this is done in the main program window, which we saw immediately upon launch. You need to check the required box - if you are going to install Windows XP, then this is the first checkbox, but if Vista or Seven - the second. Next, click on the “…” button on the other side of the checkbox and set the path where our unpacked image is stored on the hard drive, or simply mounted in virtual drive using DaemonTools or Alcohol. Click on the “GO” button and wait until the process finishes.

Upon completion, the program will display the message “Job Done!” That's it, dear friends, you can reboot and start installing the operating system.
Also, I advise you to read the article regarding
In this article I want to tell you how to burn Windows 7,8,10 to a USB drive. Two methods will be described. However, all operating versions Windows systems are written almost identically. For this I needed the following programs: Torrent UltraISO Image operating system USB flash drive
Three ways to burn Windows to a USB flash drive
To carry out this procedure, you need a USB flash drive with a capacity of at least four gigabytes. In my case, an 8 GB drive was used. So, first we needed to format the media in NTFS format. This format I chose by going to My Computer first. When you see the flash drive in the list of connected drives, right-click on it. In the context menu, select “Format”
In the "Type" field file system"Select NTFS.

Burn Windows 7 to a USB flash drive using UltraISO
Having formatted the flash drive, download the desired Windows version(7,8,10) and program for UltraISO recordings. For the convenience of downloading the operating system, it is better to use a torrent; you can download it in any search engine.
Download UltraISO— http://ultraiso.ru.softonic.com/
First of all, install and run the UltraISO program. After full opening programs in top line menu, select the “File” command, then “Open”.

After opening the window with local disks, find the loaded Windows and double-click on it.

Before you start recording, make sure that the drive you want to record to is selected. To do this, look in the field “ Disk Drive" Also, in the “Recording method” field I had USB value HDD.

After the actions taken, a recording began, and, as a result, the creation bootable media. After recording is complete, the flash drive can be used to install Windows on a PC.
This method is also quite simple and to perform it you will need the winToBootic program. When opening the program, the flash drive immediately appeared. Next, we find the downloaded image of Windows 8 and by dragging with the mouse we moved the shortcut to the window open program. Then check the “Quick Format” box and click “Do it!”
Download winToBootic— http://www.softportal.com/get-38790-wintobootic.html

This program automatically formats the media after a preliminary warning. However, in my opinion, winToBootic is very easy to use and suitable for recording Windows 7,8 and 10 versions.
Burn Windows 10 to a USB flash drive using Windows USB/DVD Download Tool
I will burn Windows 10 to USB using a utility from Microsoft - Windows USB/DVD Download Tool. Download this utility can be found on the official Microsoft website.
Download Windows USB/DVD Download Tool— http://wudt.codeplex.com/
After launching the program, specify the location where the downloaded ISO image of Windows 10 is stored.
Then select the media type (USB).

The third stage is choosing the desired flash drive.

After selecting, click “Copy”. The program reported that all data on the USB will be deleted.
And finally, the fourth stage is the beginning of recording.

It’s quite simple to write Windows onto a flash drive, you only need to have the most minimum set programs. The UltraISO method works for almost all versions of Windows OS except 10. But there won’t be many problems with this version either, since Microsoft utility very easy to use and does not require special skills!
A program for installing Windows 7 from a flash drive eliminates the need to use a CD drive.
You only need to prepare the distribution kit in advance and set the Bios settings.
Important: The program to install should be selected as carefully as possible - you can accidentally download a virus or Trojan. The situation is similar with the Windows distribution. If possible, you should use the licensed version. Otherwise, scan all files with an antivirus.
UltraISO program
UltraISO software must be installed. There are no difficulties; all you need to do is run executable file and keep pressing the next button.
Important: During installation, the program should not ask for a phone number or other data - it is provided free of charge.
If something like this occurs, then you should remove it immediately. Most likely, the utility is infected with a virus.
Creating a bootable USB flash drive is as follows:
- after launch, a window immediately opens in which you need to click on “trial period” (Fig. No. 1);
- then the program will open the main working window, you must click on context menu“open” - you should select one previously prepared for installation Windows distribution;

- then the flash drive connector is inserted into the USB port;
- click on the menu under “boot” - select “burn hard disk image”;

- after installation, click on “format”;
- after formatting the flash drive is completed, you need to click on “write” (Fig. No. 4);

Advice: it is not necessary to use the utility from third party manufacturer- you can use standard means OS.
It is possible to use the official application to create a bootable USB flash drive.

For creating boot device again, you will need a distribution kit - preferably in ISO format. The operation itself looks like this:
- launch is carried out;
- by clicking on “Browse” we open the file with the distribution kit;

- We indicate " USB device»;

- To record to a USB drive, you must insert the media in advance;

- Click “Start over”.
After this, you need to wait 5-15 minutes until the creation of the bootable flash drive is completed.
WinToFlash program
You can also use the WinToFlash utility. You can download it for free on the official website - http://wintoflash.com/.
You only need to do two steps:
- run installed utility;
- select the appropriate menu - “transfer the Windows installation program to a drive”;
- Click start (Fig. No. 6).

WinSetupFromUSB program
Convenient utility to perform the task in question is WinSetupFromUSB. Required ISO image and a USB flash drive. After launch you need to do the following:
- format memory;
- run MasterBootRecord (MBR) in Bootice (Fig. No. 7);

- write down everything you need using WinSetupFromUSB (Fig. No. 8).

Bios settings
To install Windows 7 using this method, you will need to configure the BIOS accordingly.
If possible, you should read the manual; it can be downloaded for free on the manufacturer’s official website.
Bios settings may have their own characteristics, some specifics. It is purely individual for each model - even from the same manufacturer.
To go to settings, you usually just need to click Delete key even at the initial stage of loading the PC. As a result, a window with a menu will appear tabular view(Fig. No. 9).

After successful turning on Bios you need to find an option responsible for the boot order from devices various types.
In all Bios this menu is called differently. This is where the difficulty lies.
But, as a rule, all such items contain in their title word boot.
Boot settings are made as follows:
- open the boot priority selection menu (Boot);
- select USB-HDD.

Important: You must first insert the USB drive into the connector - only after that it will appear in the list of devices from which you can launch.
Operating system installation
All programs can be downloaded completely free of charge from the Internet.
But it’s worth familiarizing yourself with all the requirements in advance - the amount of free space on your hard drive, RAM and other characteristics.
When all preparatory work finished - you can start installing Windows. This operation carried out as follows:
- After setting up Bios and installing the drive into the port, you need to reboot, a window will appear asking you to press any key (Fig. No. 10);

- The OS installation window will open - you need to click on “next” (Fig. No. 11);

- then a window will open - you need to click on the “install” button (Fig. No. 12);

- you need to select the version of the operating system to be installed - almost all pirated distributions allow you to do this (Fig. No. 13);

- the system requires read license agreement, check the box next to “I accept the license terms” and click “next”;
- select “full installation” in the next window that opens (Fig. No. 14);

Introduction
At the time of buying Windows 7 in the shop Microsoft ( Microsoft Store) , you will be able to download the ISO image of this product. allows you to create copies of Windows 7 ISO files on disk, USB Flash or DVD. To create bootable dvd or USB Flash Drive, download the ISO file and then run Windows 7 USB/DVD Download Tool. After this, you can install Windows 7 directly from a USB flash drive or DVD.If you are not sure how much bit version Windows 7 (32 bit ( x86) or 64-bit ( x64)) you will need for the upcoming installation, then you can learn more about the difference between Windows 7 x32 and Windows 7 x64. An ISO file contains all the Windows 7 installation files combined into one uncompressed file. When you download an ISO file, you must save it on your hard drive to install Windows 7. To install Windows 7 on a USB Flash or DVD, all you need to do is insert the USB Flash into a free USB port or insert the DVD into your DVD drive and run Setup.exe Windows programs 7 USB/DVD Download Tool from the root folder on the disk.
Note: You will not be able to install Windows 7 with using Windows 7 USB/DVD Download Tool if the ISO file is saved on a USB disk or DVD.
A copy of an ISO file with Windows 7 created with via USB/DVD Download Tool is bootable. Boot disk allows you to install Windows 7 without first running the existing operating system on your computer. If you change the boot order of the disks in BIOS your computer, you will be able to run Windows 7 installation directly from a USB flash drive or DVD when you turn on your computer. Please refer to your computer's documentation for information on how to change the boot priority of drives through the BIOS.
Once you accept the Windows 7 license terms, you will only be allowed to make one copy of the ISO file onto a disk, USB flash drive, or other media as a backup for reinstallation on the licensed computer. If you don't delete the copy of the ISO file you made to install software on your computer, then this copy The ISO file will be your backup.
Installation
For installation Windows 7 USB/DVD Download Tool You need:
Step 1. Click here to download installation file Windows 7 USB/DVD Download Tool .
Step 2. When prompted to save the file to disk or run it, select Execute.
Step 3. Follow the installation instructions. You can determine where to install Windows tool 7 USB/DVD Download and whether to create shortcuts in the menu Start or at Desktop.
You must have administrator rights on the computer where you are installing Windows 7 USB / DVD Download Tool. This requires Microsoft NET Framework 2.0 or higher. If this tool is not on your computer, the program will install it for you. In this case, you may need to restart your computer to complete the installation.
System requirements
- Windows XP SP2, Windows Vista or Windows 7 (32-bit or 64-bit);
- recommended Pentium 233 MHz or higher ( 300 MHz);
- 50 MB free disk space on your hard drive;
- DVD-R disc or removable USB-Flash no less 4GB.
Burning an ISO Image
Before launch Windows 7 USB/DVD Download Tool make sure you have already purchased Windows 7 and downloaded Windows ISO file 7 to yours HDD. If you purchased Windows 7 but have not yet downloaded the ISO image, you can download the file from your account at Microsoft.To record ISO-file with Windows 7 you need:
Step 1. Click the button Start and select Windows 7 USB/DVD Download Tool from the list "All programs".
 Figure 1. Windows 7 USB / DVD Download Tool - program window
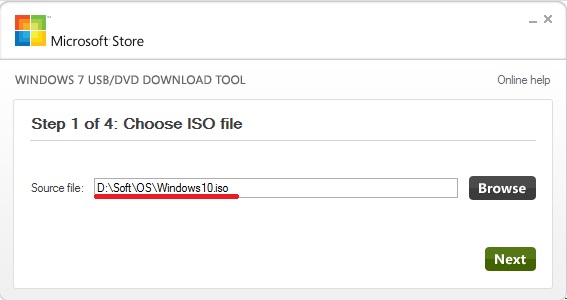
Step 2. Enter the name and path of your original Windows 7 ISO file or click the button "Review" and select the file in the dialog box "Open".
 Figure 2. Window for selecting a file with a Windows 7 image
Step 3. Select "USB device" to create a copy on a USB flash drive or "DVD" to create a copy on DVD disc and then click the button "Further".
 Figure 3. USB or DVD recording selection window
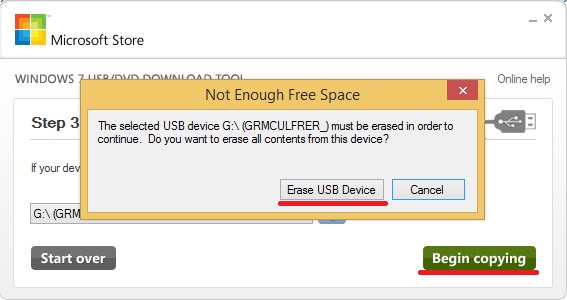
Step 4. If you are writing a file to USB flash drive, select a USB device from the drop-down list and click the button "Start copying".
If you are copying files to DVD, click the button "Begin" to start recording.
 Figure 4. Selecting a USB flash drive
After your ISO- the file with Windows 7 will be recorded on the selected media, you can start installing Windows 7, to do this, go to the root directory of your DVD or USB flash drive and run Setup.exe.
FAQ
Below are some of the most frequently asked questions about using Windows 7 USB/DVD Download Tool:- What size USB Flash Drive required?
You need Flash Drive USB with a minimum of 4 GB of free disk space. - Can I use my own disk or flash drive with an ISO file on it to install Windows 7 on someone else's computer?
No. The disk or flash drive with your burned ISO file is intended for installing Windows 7 only on own computer licensed user. - Can I backup to CD-R?
No. The Windows 7 ISO file is too large to fit on a regular CD. - Can I use Blu-ray DVD-disc for Reserve copy?
Yes, as long as your DVD drive can write to Blu-Ray DVD. - If I have some files on USB Flash disk So, will Windows 7 USB/DVD Download Tool remove them?
This program requires a completely empty USB Flash drive to copy files from Windows 7. This ensures that this device will be bootable after the copying is completed. - Is it possible to do backup copy With using iPod, camera or other device with enough free disk space?
Yes, but it's not recommended. The device must be formatted in order for the media on which recording will be made to become bootable. A USB Flash Drive specially dedicated for this purpose will be the best option. - Can I use Windows 7 USB/DVD Download Tool to backup other files?
This tool intended for recording only ISO files with Windows 7 from the Microsoft Store.
Troubleshooting
The following tips may help you if you encounter any problem while using this tool.- my USB devices not in the list of available devices.
If you don't see your USB Flash devices in the list of available devices, make sure the drive is inserted into the USB port, or click the Refresh button next to the list of available drives. - I inserted a blank DVD-R disc into my DVD drive, but Windows 7 USB/DVD Download Tool cannot recognize it.
If there are several DVD drives in the system, then select the first one that can burn DVD. If you have several DVD-R discs, try inserting a blank DVD-R into another DVD drive. If this does not help, please verify that your disc is not damaged and that your DVD-R disc is usable, or contact product support.
 Not every user has a DVD drive; moreover, Lately Rare PCs are equipped with them. But you still need to install the system, and for this it is most convenient to use a bootable USB flash drive. Let's figure out how to install Windows 7 from a flash drive - after all, you won't buy a DVD for this purpose.
Before proceeding with the installation, carefully study this article: various difficulties may arise during the process, which can be solved using one of the methods described below.
The installation process itself can be divided into the following stages:
- downloading the installation image;
- computer preparation;
- creating a bootable flash drive;
- setting up PC BIOS;
- Windows 7 installation.
Let's look at each stage in more detail.
Before you burn the image to a flash drive and install the system from it, you need to download it. Today there is great amount ready-made assemblies operating system, which are equipped with many applications and functions.
Very often in such distributions the default theme is changed or sound scheme. But not all users like such innovations. You only need to download original images created by Microsoft. A huge headquarters of the world's leading programmers does their job better than some artisanal modifier.
A little lower you will find a button where you can download a torrent file to download the Russian version of Windows 7 with 32 or 64-bit architecture. The file was taken from the official Microsoft website and is completely original. Proceed with the download, and when the download is complete, move on to the next step.
After the file is downloaded, open it using a torrent client. If you don't know how to work with such programs, follow our step by step instructions.
- First, download the torrent client itself. This will be the qBittoorent application.
- Install the program and use it to open the previously downloaded torrent file.


- Select the version of Windows 7 (in our case it is professional 64 bit) and click “OK”.


- After this, the operating system will begin loading at the maximum available speed.

Getting ready to install Windows 7
First of all, you need to copy to safe place all the information that is important to us is located on drive C. Each user stores data in their own way, so each user has their own choice of folders for backup. Most often these are folders: “Downloads”, “Desktop”, etc.
You can save files to another logical drive (the one on which the system will not be installed) or to external storage. You can also use cloud storage, if there is not too much data. For example, the Mail.ru cloud provides 100 GB of free space.
With an eye to the future, remember: while using your PC, you need to store your data on a disk other than the one on which the system is installed. Divide physical disk into partitions and save your files on any of them except the system one. For installing Windows 7, a comfortable volume of 70–100 GB will be (depending on the type and amount of software used).
Another important point that should be taken into account before the installation begins is the drivers for our network card. If, after installing Windows 7, it turns out that there is no driver for the network card, additional difficulties will arise that will have to be solved using a second computer by transferring files from it via a flash drive.
If you just bought a computer, no valuable information it is not and cannot be, feel free to move on to the next section, without copying the data.
Create a bootable USB flash drive
In order to create bootable media and begin the operating system installation procedure, we will need:
- USB flash drive with a capacity of 8 GB or more. Instead of a USB flash drive, you can use simple map memory with card reader;
- "Seven" installation distribution with .iso extension;
- a utility with which we will write an image to a flash drive;
Attention! Before you start creating installation media, remember that all data on it will be irretrievably destroyed.
Making installation media using Ultra ISO
Wide famous program for working with disk images can create boot drives. Let's look at the algorithm for recording Windows 7 to a USB device.
- Download and install the program Ultra ISO link .
- Run the resulting file and check the “I accept the license agreement” checkbox. Proceed to the next step by clicking “Next”.


- Using the “Browse” button, select the installation path, then click “Next”.

- We don’t change anything here and just move on.


- The program is being installed, we are waiting for it to finish.

The Ultra ISO installation is complete, you can run it and go straight to creating a flash drive for installing Windows 7.


- The Ultra ISO program can be launched in trial mode, so its functionality will not suffer at all. Click on the button marked in the picture.


- Go to the “File” menu and click on the “Open” item.


- Select the Windows 7 image we downloaded, and then “Open”.

- Go to the “Startup” section and click on the item that we marked in the screenshot.

- We make sure that the media we need is displayed in the devices at the top of the window and click on the “Format” button.
Attention! This will destroy all your data beyond recovery. If the USB storage device has necessary files, save them before doing this.


- In the next window, simply click “Start”.

- Ultra ISO will once again warn us that all information from the flash drive will be erased. Click "OK".

- After formatting is completed, click on “Burn”.


- The process of recording “Seven” onto a flash drive has begun. It will take about 5-10 minutes depending on the speed of the drive and the selected OS version.

The recording is complete, our media can be used.


Let's look at a few more options for creating bootable media with Windows 7.
Rufus
This is another program that can create a bootable USB flash drive with “Seven”. First, let's download it.
The application, unlike Ultra ISO, does not require installation, so you can run the downloaded file and immediately proceed to the process of burning the OS to a USB device. To do this we do the following:
- Select the recording device. This will be our flash drive, in this case – 16 GB. Then click on the disk icon.


- Select the distribution we downloaded in the PC folder.


- We begin the recording process with the “Start” button.

- Rufus will notify us that all files will be deleted from the flash drive. If you have already created a backup copy or there was no important information on the media, click “OK”.


As a result, it will begin Windows entry 7 onto a flash drive, upon completion of which you will have a full installation media.


Attention! Before you begin the process of writing the system to a flash drive, be sure to save all the data on it - otherwise they will be irretrievably lost.
As you can see, this method turned out to be much simpler than the previous one, but we will not dwell on this and will consider several more options for recording Windows 7 to a USB drive.
Making a bootable USB flash drive using WinSetupFromUSB
Another application focused solely on writing operating system files to an external drive. Let's take a look at the utility and look at the process of working with it.
- Select the path where the program will be unpacked (click on the button with the image of three dots) and click “Extract”.


- We are waiting for all the necessary files to be unzipped.

- We open the directory into which the unpacking was carried out and launch the program depending on the architecture on which your operating system is built. For us it is 64 bit, so we click on the marked file.


- We insert our flash drive into the USB port and make sure that it appears in WinSetupFromUSB. Next, check the box marked “2” in the screenshot. When the bird is placed, click on the icon with the image of three dots, marked with the number “3”.


- Select the image of our operating system and click on “Open”.


- All that remains is to press the “GO” key and Windows 7 recording will begin.

Windows 7 is being written to an external drive. Once the process is completed, the flash drive can be used to install the system.


We will not stop at WinSetupFromUSB and will tell you how to burn the OS to media via Windows 7 USB/DVD Download Tool from Microsoft.
Windows 7 USB/DVD Download Tool
This official application from Microsoft, so it should, in theory, do the best job of writing Windows 7 to a flash drive. Let's get started with the program.
- First, download the utility from the link from the official website. Then we launch it and click on the “Next” button.

- We are waiting for the program to install.


- We complete the installation process by clicking on the “Finish” button.


- Let's move on to working with the program. Initially, we need to specify the file that we will record. To do this, click the “Browse” button.


- After the path to the image file is registered, you can proceed to next step– click “Next”.

- Here we should select the type of media on which we will install the “Seven”. Since we have this flash drive, we click on “USB device”.


- We make sure that our drive is displayed in the field marked with the number “1” and click on the “Begin copying” button.


- After this, we will be warned that all information from the media will be erased and after confirmation the process will start Windows migration 7 to USB stick.


Upon completion, we will receive a bootable USB flash drive, with which you can easily install the OS on your computer.
For the program to work you need Microsoft library.NET Framework 2.0. If you do not have it, then download the program from the official Microsoft website.
We use the UNetBootin program
The UNetBootin utility is completely free. you can download it without registering or sending SMS. The program does not need to be installed - it works immediately after downloading. An application was created not only for recording on Windows flash drive, but also other operating systems such as Linux or Mac OS.
Let's move on to the instructions for using the application.
- First of all, check the “Disk Image” box and click on the button with the ellipsis. In the window that opens, we need a Windows distribution.


- In the drop-down list indicated by the number “1”, select a USB device, indicate our flash drive and click “OK”.


- The application will warn us that all data that is already on the flash drive will be irretrievably lost. If we don’t need them, click “Yes to All”.


The distribution package is being written to a USB device. Once it is completed, the flash drive can be used to install the OS.


Command line
You can create bootable media with “Seven” without using any programs using the system itself. For this we will use the command line.
The entire process is described in the form of detailed step-by-step instructions, each stage of which is accompanied by a screenshot for clarity.
- Initially, launch the command line. This must be done exclusively as an administrator. We will create bootable media at Windows example 10, but you can get the same result on Windows 7 - 8. Press the Win + R button combination and in the window that appears, press the “Browse” key.

- We follow the path indicated in the screenshot with the number “1” and find cmd app. Click on it right key our manipulator and select “Run as administrator”.


- We write the command diskpart in the command line and press Enter.


- To start recording to a disk, you must initially select it, and take this choice responsibly, because all data from it will be deleted. You can view a list of disks using the operators: “ list disk", "list volume" or "list partition". The first two show a list of disks, the third displays the number of partitions and their names. Insert the flash drive into the USB port and enter the “list disk” command in DISKPART. Next press Enter. You will see a list of all drives installed on this moment in PC.


- Select the disk that we need. To do this, enter select disk disk_number. The disk number can be viewed in the previous step; for us it is “1” since its size is 14 GB, which corresponds to our flash drive.


- We remove the disk with the clean command. Make sure you do it again right choice– all data on the media will be completely deleted.

- Now we need to create the main partition for the flash drive, from which we will boot in the future. Enter the command create partition primary and press Enter.


- We set the drive letter using the assign letter=drive_letter operator. Let's do that. We know that our PC has drives C, D and E - therefore, we specify F. The final command will look like this: assign letter=F.


- You can also specify the partition size. If you skip this step, it will take everything free place. Set size logical drive You can use the command create partition primary size=disk_size. The size must be specified in megabytes.


- Select our disk using the select partition 1 command (indicate your disk number) and press Enter.


- Now we need to make our section active. To do this, use the active operator.


- All that remains is to format the flash drive - write a command like this: format fs=fat32 quick.

- Exit DISKPART using the exit command. Now you need to prepare the files for recording. We unpack our Windows 7 image using any archiver (we will use the usual WinRAR) and extract all the files to our flash drive.

The installation media is ready and you can use it.
We use the WinToFlash program
Let's describe the process of working with another program for recording Windows 7 and other operating systems on a USB drive. To get started, download the utility from the link from the official website.
- Install the program and run it. In the window that opens, select the item marked with a red frame.


- At the very top, select “Windows”, then indicate Windows 7 and press the button indicated in the screenshot with the number “3”.

- Specify the path to Windows image 7, which we downloaded. To do this, click the “Select” button.


- Click on “Add”.


- We make sure that the flash drive we need is indicated as the target, and click “Run”.


After this, the process of creating bootable media with Windows 7 will begin, after which the device will be ready for use.
Burn a bootable USB flash drive using WinToBootic
This application is one of the most simple tools for recording operating systems on external media. To work with the utility, you do not need to install it, nor do you need administrator rights. It will work like with Windows files, and with her images. The interface here is simple, and the speed of the program is pleasing.
To burn Windows 7 to a USB flash drive via WinToBootic, do the following:
- First, download the program from the link and launch it. Check the box next to “Quick Format” and click “Do It!”


- We answer the request for formatting in the affirmative.


- We are again notified that all data on the flash drive will be deleted. Don't forget to save important information from the media, if it is there, and click “OK”.


- The preparation of the flash drive is completed, click “Thanks!”


- Next, select the files that will be written to our flash drive. To do this, click the icon indicated in the screenshot and select the image we need.

- Click the button to start the process again.

Windows 7 will begin recording to the USB flash drive. When it is finished, the device can be used to install the system.

How to boot from a flash drive
To successfully install Windows 7 from a flash drive, it is not enough for us to simply write operating system to the media, you also need to force the PC to boot from something other than hard drive, but from a USB drive. This can be done in two ways: either by modifying the BIOS, or through a special boot menu.
Regarding Boot Menu we can say that it is launched by different keys, depending on the model of the computer or laptop. You can see which button is responsible for this on your device in the instructions for it. We provide a list of combinations for the main brands of computers and laptops:
Launching Boot Menu on PC:


Launching Boot Menu on a laptop:

Below is a list of keys that launch the BIOS on different computers and laptops:

For clarity, we will show the process of installing a flash drive as the first boot device using the example of our PC with motherboard Asus:
- We turn off or restart the computer and after it starts, press the button to go to the BIOS (for us it’s Del).


- This is what the BIOS itself looks like.

- Go to the Boot tab.

- We install our USB drive as the first device.


The process is similar on different computers, although the names of the tabs and items may differ. To understand how to enter the BIOS of your PC, read the instructions for it.
Installing Windows 7 from a USB flash drive
Once the BIOS has been configured, you can go directly to Windows installation 7 from a flash drive. Let's get started.
- Immediately after the system starts, you will see the following window (data for installing Windows 7 is being preloaded).


- Set regional parameters. Select your system language, region of residence, and keyboard layout. If desired, all this data can be specified after Windows startup When the setup is complete, click “Next”.

- At the next stage, simply click “Install”.


- All you have to do is accept the license agreement and the installation will begin. Check the box as shown in the screenshot and click “Next”.


- Choosing a mode complete installation- This is the so-called clean option, when all old data on the system partition is deleted.

- We are in the section settings menu. Click on the entry outlined in red.


- If your disk is not partitioned, you can do this here (for Windows 7, it would be best to use about 100 GB of free space, the rest will become drive D). Don't forget to format system partition before installing Windows on it. When the operation is completed, click on the “Next” button.

- Finally started Windows installation. We are waiting for the process to be completed.


- Next, the system will reboot and we will be greeted with the Windows startup screen

- Initial optimization is underway. The system prepares all the necessary files.


- System services begin to start.

- After which we proceed to complete the Windows installation


- We are again informed that we need to restart the computer.

- The system will check how productive our video card is.


- Now we need to provide our details. We write an arbitrary name and computer name. Then click “Next”.


- If necessary, you can set a password that the system will request upon startup. We're missing out this step, since the computer will be at home.

- If you have Windows key 7, you can enter it here, however, you can do this even after the system starts. We are skipping this step.

- We choose the system protection option depending on our personal preferences. We will be installing another antivirus, so the regular one will not be needed.

- Enter the time and time zone. Then click “Next”.

- We decide on the type of network. It's pretty important step, because if we specify a home network, but are connected to a public one, our security will suffer greatly.


- Settings are being applied and automatic setting networks.


- Last minute of optimization before our Windows 7 launches.

As a result, we installed Windows 7 from a flash drive, the creation of which was described above.

Instead of an afterword
We've looked at a ton different programs and tools from Windows itself to answer the question: how to install Windows 7 from a flash drive. However, these are not all options. There are a lot of such programs on the Internet. They differ in their convenience and functionality. Some utilities are better suited for ordinary users, the second - for professionals.
Which method to choose and how to burn Windows 7 to a flash drive should be determined based on purely personal preferences. Use the option that you like, and if you have any questions, ask us in the comments. We are committed to the shortest possible time give a comprehensive answer.


