How to install windows program on mac. Running Windows applications using CrossOver. Installing Windows games on Mac OS X using WINE
Number of applications supported by the operating system macOS system, is growing every day. However, some software products only work on Windows. Exist various ways running this kind of software on a Mac. The most obvious involves installing a virtual machine and creating a new partition on the disk to install full-fledged Windows.
But if you only need one Windows program, then you do not need to install a full-fledged operating system on your computer. MacDigger suggests turning to one of two utilities that solve this problem.
WineBottler
It cannot be said that WineBottler can boast of supporting all Windows applications, but the program’s database contains over 23,000 items. With a high probability, among those that she knows and understands, you will most likely find what you need. Moreover, the advantage of WineBottler is that it is distributed completely free of charge.

WineBottler does not run Windows to operate, but packages applications so that they can run on OS X. All this happens using a special component. To find out if the application you are looking for is on the compatibility list, we recommend going through. There is sorting and convenient search here.
You can download WineBottler for Mac on the developers' website. The latest version of WineBottler is compatible with OS X El Capitan and macOS Sierra.
CrossOver
The CrossOver software emulator is considered the best option For Windows startup-programs in the macOS environment. A big plus of the program is support for the Russian language. Therefore, Russian users will not have any difficulties using it.

CrossOver is developed by CodeWeavers based on the source codes of its free counterpart. Moreover, it itself is a commercial product. Product creators add their own patches, as well as graphic utilities configurations. The company has hired several Wine developers, and is returning some of its work to the free project.
CrossOver differs from WineBottler in a narrower focus: it is aimed at supporting the most popular office, graphics and other applications. At the same time, compatibility with this software is carefully tested and debugged, so its operation is usually more stable than that of its free counterpart.
The cost is 40-60 dollars. There is also a version of CrossOver Games designed to run on Mac popular games for Windows.
It may well happen that you will need to run some Windows application on Mac OS X, for example WebMoney Keeper Classic. And such a launch is quite real. :) With help further the listed methods you will be able to run Windows programs on Mac computers.
There are 5 possible ways:
- Bootcamp
- Parallels
- VMWare Fusion
- Virtual Box

The basic idea of this method is that you will use Boot Camp to create a new partition on your Mac's hard drive and install Windows there. You will have to restart your computer to switch between Windows and Mac OS X. If this is a problem for you, then you may want to pay attention to paid applications, which allow you to run Windows and Mac OS X simultaneously, such as Parallels, Virtual Box and VMWare.
Advantages of installing Windows with using Apple BootCamp:
- maximum performance - the best choice if you want to play computer toys;
- maximum compatibility - your Mac becomes a full-fledged PC computer with Windows on board. It will be possible to run absolutely all programs and games that should run on Windows;
- independence of installed Windows from the Mac OS X operating system;
- the possibility of using the installed Windows image to load it into a virtual machine using the Parallels, Virtual Box and Vmware application.
Disadvantages of installing Windows using Apple BootCamp:
- the need to restart the computer to start working in a different operating system (the system to boot can be selected by holding down Alt keys when loading, but you can also set the system to boot “by default”). However, this drawback is eliminated by the ability to use installed Windows in a virtual machine;
- inaccessibility of data in Windows - Windows cannot read hard drive partitions in the format used by Mac OS X (HFS+ format). On the other hand, if you use the NTFS file system format for a Windows partition, then in Mac OS it will be read-only. However, both reading and writing operations are possible with FAT32 partitions (but FAT32 can only be used for hard drive partitions smaller than 32GB). In order for the mac partition to become accessible in Windows, you need to install the appropriate third party programs, for example - MacDrive.
Parallels Desktop, Vmware Fusion, Virtual Box
This method makes it possible to run a wide range of operating systems, including several versions of Windows: from 3.1 to 2000 with XP, as well as several Linux versions, at a very good speed, and without rebooting the computer.
All three programs have similar functionality, allowing you to create virtual machines without leaving Mac OS X. Part of your processing power and random access memory will be allocated for the virtual machine.
Advantages of using virtual machines:
- collaboration between Mac applications and Windows applications;
- no need to restart your computer to start the required Windows program. At the same time, this possibility exists if Windows installed using Apple BootCamp was used to create the virtual machine;
- easy access to files in both operating systems.
Disadvantages of using virtual machines:
- performance is lower compared to using Windows as the main operating system, since it is necessary to simultaneously run 2 operating systems: Mac OS X and Windows. It should be noted that Macintoshes are quite powerful computers in themselves, so using virtual machines for low-resource applications is quite comfortable - you will even forget that you are working in two operating systems at the same time, everything works so smoothly and clearly. Heavy modern games, for example, cannot be played normally this way. If only in games of the previous generation;
- continuation regarding games and applications that require direct access to hardware: not all of them will work normally in this mode. This is due to the fact that the virtual machine provides access only to virtual hardware, which can lead to some incompatibilities that affect the operation of applications;
- dependence on the “native” Mac OS X: for example, if the main one freezes while the virtual machine is running Mac system OS X, this may lead to data loss while running Windows.

CrossOver can run some Windows applications without the need for the Windows operating system itself. Programs run directly on Mac OS X.
Since it doesn't use Windows and you don't have to buy Windows, the overall cost of using this program is much less than virtual machines. CrossOver also does not use throughput processor and does not require a large amount of RAM.
Advantages of using CrossOver to run Windows applications:
- no need to have installation Windows distribution;
- better performance compared to using virtual machines.
Disadvantages of using CrossOver to run Windows applications:
- The application you need simply may not launch using CrossOver;
- There may be problems with fonts in the Windows application (however, these problems can be easily solved).
On Mac computers, you have many options for running not only Windows, but also several other operating systems.
Immediately after the introduction of the first Mac computers based on Intel processors Rumors began to circulate that they were capable of running Windows applications without additional modification. Some people have speculated that Windows will now become new classics, And Mac apps OS X and Windows will now coexist, running on the same computer. Those who held this point of view were not unconditionally right, but their ideas turned out to be prophetic. Soon after the introduction of Intel-based Macs, two leading virtualization software products, VMware Fusion and Parallels Desktop, implemented a “transparent” emulation mode, in which programs written for Mac OS X and Windows could special problems work within the same desktop.
However, there is another way to run Windows on a Mac, and you've no doubt heard about it. Boot Camp configures the hard drive space so that Windows can be installed on the freed partition, creating a dual-boot system where the user can choose which operating system to boot. Peaceful solution- yes, but does this approach really mean coexistence?
Virtualization software uses your computer's resources (hardware devices, CPU time, memory, disk space) and masks them. This software copes with this task so well that the operating system considers this allocated set of resources separate computer. This means that a copy of Windows running under an emulator (such as VMware or Parallels) treats the "virtual machine" as a standard PC - i.e. a combination of PC BIOS, CPU, memory, hard drive and others peripheral devices. The operating system starts and works perfectly, without even suspecting that all this hardware is virtual, not real.
Boot Camp or virtualization?
All users who want to install and run Windows on a Mac can choose one of two possible options. If you need to run simultaneously Mac programs and Windows, it is best to use emulation software - either Parallels or VMware. Both products cost approximately $79 (those looking to save money can search online for more profitable offer- for example, solutions from suppliers offering discounts). Here we note that it is quite difficult to give preference to one of the mentioned products over the other, since both products are excellent.
However, with this approach, you will still need to purchase a license-free copy of Windows, which costs about $200. If you purchased a computer that came with a Windows distribution, then most likely this distribution will be “tied” to this computer, so, in all likelihood, you will not be able to use this copy of Windows under VMware or Parallels.
If you are planning to install Linux, then I recommend choosing a VMware emulator as it provides better support this operating system. For example, at the time of this writing, the Parallels emulator does not allow data exchange between Linux and Mac OS X, such as copying to and pasting from the clipboard. At the same time, the VMware emulator provided such an opportunity.
Both VMware and Parallels allow you to transparently copy data between Windows and Mac OS X applications, so if you're only going to run Windows, either product is a great choice. If you don't need to run Windows and Mac OS X applications at the same time, and don't mind restarting your computer every time you need to switch to using the other operating system, you can use the Boot Camp utility included with Mac OS to start Windows X Leopard. In addition, Boot Camp can be used with any of the virtualization packages discussed. Both VMware and Parallels can boot from your Windows partition. So if you need to run your Windows applications while still working under Mac control OS X, you can do this at any time. If you need to run Windows at maximum speed, you can restart your computer under Windows control and run your Mac OS X applications from the emulator.
Boot Camp is a good choice for gamers and those users who need high speed working with 3D graphics. Since Parallels and VMware support 3D acceleration for some popular games and applications, they are also suitable for this purpose. However, if you have a Mac with integrated graphics, Boot Camp will provide the fastest speed. MacBook computers and Mac mini have slower integrated Intel graphics, while iMac, Mac Pro and MacBook Pro are equipped with powerful NVIDIA and AMD graphics adapters. Systems with integrated graphics are slow with most modern games or do not support them at all, so Boot Camp technology will help you achieve at least small savings on resources.
Installing Windows using Boot Camp
To install Windows using Boot Camp, you usually need to open Finder window, go to the /Applications/Utilities folder, and then launch the Boot Camp Assistant program. After this, you will be prompted to insert a bootable Windows distribution disk (only Windows XP/Vista is supported) and restart your computer. After the reboot, Windows Setup will launch. I suggest that you take on a slightly more active, but also a slightly more challenging role in this task, which will ultimately make your life much easier.
Operating systems from Windows family by default they “prefer” to be installed on partitions formatted under file system NTFS (Windows NT File System). Windows XP can also be installed on a partition formatted with the older FAT32 file system, but this installation option is less reliable and is more susceptible to file system corruption. Concerning Windows Vista, then by default it doesn't even provide an option to install it on a FAT32 partition.
Therefore, in order to achieve best results, you should immediately indicate Windows installer the need to format the Boot Camp partition for a file NTFS system. Unfortunately, on at this stage The problem immediately arises: Mac OS X does not support writing to NTFS partitions, which it treats as write-protected partitions. As for Windows itself, without installing additional software, it does not “see” Mac OS X partitions at all. Thus, if you want to install Windows on an NTFS partition, you will not be able to directly copy files from the Windows partition to the Mac OS X partition and back. It is for this reason that I recommend creating three sections:
- Your original Mac OS X partition (some of the space from this partition will be used for Windows partition).
- FAT32 partition, several GB in size, designed for exchanging files between Mac OS X and Windows.
- Another FAT32 partition with a large amount of free space - for installation (later, if actual Windows installation, you will instruct the Windows installer to format this partition as NTFS).
The only problem is that if you do this you won't be able to use Boot app Camp Assistant, because it only works with a drive that has a single Mac OS X partition. However, we don't really need the Boot Camp Assistant app. All you need is an Intel Mac, a distribution disk with Mac OS X Leopard, and a distribution CD or DVD with a copy of Windows. You will also need to launch the Terminal application and use it to prepare the disk.
We're going to take some of the free space from the Mac OS X partition and allocate it to create a Windows partition. Therefore, immediately after you open the Terminal application, you will need to estimate how much free space you have at your disposal and repartition your disk. There is inherent risk in this operation, so do not attempt it before you have created a full backup and are confident that it is secure. The diskutil command does everything you need, but first I recommend using its list option to see information about how your disk is organized. HDD at this moment. For example, this command allows you to find out that partition 2 on disk 0 is allocated for Mac OS X (listing below).
1234567//View information about organizing hard current disk $ diskutil list /dev/disk0 #: TYPE NAME SIZE IDENTIFIER 0: GUID_partition_scheme *298.1 Gi disk0 1: EFI 200.0 Mi disk0s1 2: Apple_HFS Macintosh HD 297.8 Gi disk0s2
Next, you should use the resizeVolume option to reallocate the disk space. In this case, you need to decide how much disk space Mac OS X should be left to decide how much space to allocate to the service partition for file sharing (let's call it Data), and how much space should be allocated to the Windows installation. Next command allocates 220 GB for Mac OS X, 12 GB for general data, and the rest for Windows installation:
12$ sudo diskutil resizeVolume disk0s2 220g “MS-DOS FAT32” Data 12g “MS-DOS FAT32” Windows 0b
If this command returns an error message, use the resizeVolume diskname limits option, which will indicate how much disk space can be taken from Mac OS X. It is possible that you will either have to free up some disk space or settle for smaller Windows partition sizes (which, however, should be sufficient to install this operating system). An example of the output of this command is shown in the listing below.
1234567//Example output of the diskutil command with the option resizeVolume diskname limits $ diskutil resizeVolume disk0s2 limits For device disk0s2 Macintosh HD: Current size: 319723962263 bytes Minimum size: 139510571008 bytes Maximum size: 319723962263 bytes
You may have to free up the required amount of disk space, or you may have to settle for less disk space that will be available to Windows. After completing this operation, run the diskutil command again to check the results (listing below).
123456789//Results of disk space reallocation to prepare for Windows installation $ diskutil list /dev/disk0 #: TYPE NAME SIZE IDENTIFIER 0: GUID_partition_scheme *298.1 Gi disk0 1: EFI 200.0 Mi disk0s1 2: Apple_HFS Macintosh HD 219.9 Gi disk0s2 3: Microsoft Basic Data Data 12.0 Gi disk0s3 4: Microsoft Basic Data 65.9 Gi disk0s4
So now there are three partitions on your drive: your old Mac OS X partition (now with less disk space), plus two new partitions formatted as FAT32. You can now insert the Windows distribution disc into the drive, turn off the computer, and then turn it on again while pressing and holding the Option/Alt key. Pressing the key will cause a list of drives (internal hard drives and CD/DVD media inserted into the drive) from which loading is possible.
To begin installing Windows, select boot from distribution media. Install Windows on a partition created for this purpose (you can determine which partition is intended for installing Windows by its size). When Windows Setup prompts you to select a file system, select the NTFS option. When you install Windows Vista, you will be warned that Vista cannot be installed on a FAT32 partition. When you receive this notification, click the Drive Options (Advanced) link to reformat the target partition.
Be careful! If you choose the wrong target hard section disk, you will destroy your copy of Mac OS X!
The Boot Camp utility does one thing that is missing from the manual configuration procedure discussed: it configures your Mac to run by default when you turn it on. Windows boot(This setting can be changed later). Since this manual procedure does not do this, but during the installation process Windows computer reboots several times, if you walk away from it while installing Windows, you may return to find it booting back into Mac OS X. To complete the Windows installation, turn off your computer, and then turn it on again while pressing the Option key/ Alt. When the list of boot partitions appears on the screen, select the Windows partition (this time you should select the partition on which you are installing, and not the distribution CD/DVD).
When running Mac OS X, you can set the option to make Windows boot by default by going to the Startup Disk panel in the System Preferences window. The same result can be achieved using the Boot Camp utility in Windows. You can also display the boot options menu by pressing and holding the Option/Alt key when you turn on the computer. As already mentioned, this may be necessary at this stage because the computer must reboot several times during the installation of Windows: at least once after installing the Boot Camp drivers and a couple more times after installation various drivers And Windows updates. After Windows installation is complete, you can use the Boot Camp utility again (its icon will be available in the system area Windows notifications) and reconfigure the system so that it boots Mac OS X by default.
Once Windows installation is complete, you will be able to boot the system in its original (pristine) configuration. Insert the distribution DVD with Mac OS X Leopard into the drive (if the key does not work, click on the Start button, launch the Windows Explorer application through the drop-down menu, find the DVD/CD drive, click right click mouse and select the Eject command from the menu that opens). The Boot Camp driver and the corresponding utility will launch - this is necessary so that the Windows operating system can work correctly on your Mac.
Installing Windows on a virtual machine
Although I've already mentioned that both VMware Fusion and Parallels Desktop are excellent products, you still have to make a choice in favor of one of these programs. I do not recommend installing both products on your computer at the same time. I tried this once, and when running both programs at the same time, the system began to become unstable (kernel panic errors). Therefore, it is best to still prefer one of these products, guided by the following considerations.
If you plan to run Linux under an emulator, choose VMware. In all other cases, the choice is not important - you can either make it randomly(for example, just take and throw a coin), or
rely on the recommendations of those of your friends and colleagues who have experience with emulators. Both VMware and Parallels offer demo versions of their products, so you can try them out one by one to see which one you like best (just don't do both at the same time to avoid system instability).
Using VMware or Parallels with Boot Camp
If you're already using Boot Camp, you can instruct VMware or Parallels to use the Boot Camp partition to run Windows. To do this you will need to do a little pre-setting VMware or Parallels, because from a Windows perspective, the virtual machine and your Macintosh computer are two different computers with slightly different hardware configurations. As a result, they will be identified differently when Windows activation XP and Vista.
Fortunately, both Parallels and VMware include program code, which works in background and solves most of these problems for you. If you use VMware or Parallels to boot an activated copy of Windows, then most likely this copy will require a restart Windows procedures Activation. But once you do initial setup and activation procedure, you can use Parallels or VMware to access the Boot Camp partition and run the same copy of Windows running Mac OS X. When you need to switch to Windows operation directly on the hardware Mac tools, you'll be able to shut down the virtual machine running Boot Camp, reboot your Mac while holding down the Option/Alt key, and select the Windows operating system from the boot menu. To boot from a Boot Camp partition running VMware, start VMware and find the entry for Boot Camp in the list of virtual machines, as shown in Figure. 8.5.

The VMware emulator should recognize your Boot Camp partition automatically (if it doesn't, contact the VMware website for technical support). To run Windows in the emulator environment, simply select the Boot Camp Partition option and click the Run button. VMware will make some changes to the Boot Camp partition configuration, which you will be asked to confirm by entering your password. In a few minutes, the virtual machine will start from your Boot Camp partition. In order for the virtual machine to function properly, you will need to install an add-on called VMware Tools (this add-on performs all the operations required to work comfortably in Windows in the background), after which you can use Windows the way you like - like in an emulator environment , and on the “native” hardware.

Parallels works in almost the same way, with the exception that this emulator cannot automatically detect and configure the Boot Camp partition. Instead, you will need to create a new virtual machine and select the Custom option (Figure 8.6). Specify Windows version that you need to run in the Boot Camp environment, select the amount of memory allocated to it, and when the window with the option to select a boot disk appears on the screen, select the Use Boot Camp option. After this, you will need to complete a few more configuration steps, after which Parallels will boot Windows, prompt you for a one-time configuration, and reboot the virtual machine.
Creating a virtual machine from scratch
In addition to the boot methods already described, you can create a new virtual machine that does not use either the Boot Camp partition or any other partition physical hard disk. In both Parallels and VMware, when creating a new virtual machine, you can create virtual hard disk, indicating its location (the default value can be left unchanged; if desired, the virtual hard disk can later be moved).
A virtual hard disk is a multi-GB file containing a complete copy of the operating system. Positive side The advantage of virtual hard disks is that it is very easy for you to back up virtual machines. However, this approach also has disadvantages - created images are huge, and if you use the app Time Machine, then created backups virtual disks(hourly, daily, weekly) will very quickly fill the entire disk allocated for Time Machine. If you don't have a lot of free space on your Time Machine disk, you should exclude virtual disk images from the files to be backup. You can do this through the system's preferred settings - open Time Machine, go to the Options tab and in the Not Back Up field, specify the path to the directory in which the images of your virtual machines are stored.
To create a new virtual machine, launch Parallels Workstation or VMware Fusion, select File → New from the menu, and then follow the on-screen instructions. To install Windows, you will need a distribution CD or DVD and a product key. Both Parallels and VMware Fusion can make your life a lot easier by allowing you to enter your login name, password, and product key before you even begin installing Windows. Thanks to this, the entire installation procedure can be carried out almost completely automatically. Once the Windows operating system is installed and running, try using VMware Unity (Figure 8.7) or Parallels Coherence modes. These modes allow you to integrate Mac and Windows desktops, thus providing virtually transparent virtualization.

If you are installing Windows Vista, I suggest not entering your product key during installation. The fact is that the Vista installer allows you to install the OS without entering a product key (you can simply leave the corresponding field empty), but still requires activation after the grace trial period has expired. The upside to this approach is that it prevents you from accidentally activating Windows before you're actually ready to do so. If you want to install Windows for quick testing or evaluation purposes, then there is absolutely no need to waste your precious activation attempts for this. If you plan to install Windows just for evaluation, take a closer look at Microsoft TechNet Plus - an annual subscription costs $349 and includes such bonuses as full versions all operating rooms Microsoft systems, licensed specifically for evaluation purposes.
Crossover Mac
There is another option available to you that does not require a copy of Windows. Crossover Mac is a software package based on software with open source WINE (http://www.winehq.com). The project name WINE is short for "WINE is Not an Emulator" - a clever recursive acronym that really indicates what WINE really is. Unlike VMware and Parallels, which are a combination of virtualization (abstracting physical devices your Mac) and emulation (using software components simulating the operation of physical devices), WINE does neither. In contrast, WINE is described as a clone of the software components that make up Windows.
Windows consists of a set executable programs(exe files), dynamically loaded libraries (dll files), as well as other software components. WINE duplicates the functionality of most components included with Windows. Since WINE is not a complete duplicate (in fact, a second implementation of Windows that performs all the functions of the original), Crossover Mac does not provide the same software compatibility Windows software, like VMware, Boot Camp and Parallels. But under Crossover Mac all programs work very quickly - almost as fast as with Boot installation Camp. This is achieved by eliminating the "middleman" between Windows applications and your Mac's hardware.
For example, if some code 3D games instructs Windows to draw the polygon, this operation takes several steps. When performing similar tasks, Crossover performs essentially the same operations as Windows, but without the additional overhead of hardware emulation or virtualization. In fact, this is Windows “ported” to Mac (although this porting is not complete).
No matter how much we love our Macs and OS X, we still cannot completely abandon Windows, and sometimes there are situations when you need to use one or another application. As an example, we can cite bank clients, various accounting and corporate specialized tools, as well as games (where would we be without them). There are several ways to run Windows applications on a Mac - using BootCamp or a virtual machine like Paralles or Virtualbox. But if you only need to work with applications, and not specifically with the operating system, there is a better way - this is Wineskin, a port of Wine, known to Linux users. I will tell and show you in detail about it and how to use it to launch Windows applications in OS X in this article.
Wineskin is a Mac adaptation of Wine, an emulator (although it is not entirely correct to call it that, because the acronym Wine stands for “Wine Is Not an Emulator”) or the so-called compatibility layer that allows you to run Windows applications on some POSIX-compliant operating systems, including Linux and Mac. Don't be scared, it's not as difficult as it seems and not scary at all.
Installing Wineskin
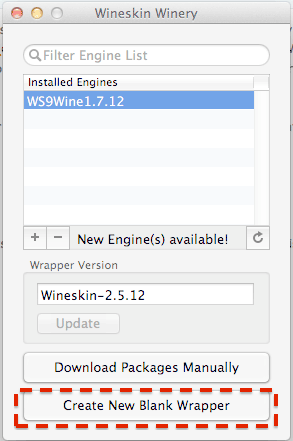
1. First of all, we need to download Wineskin from the official website. On this moment latest version 2.5.12.
2. Move the downloaded Wineskin.app to the Applications folder and launch it.
3. At the first launch, you will need to download the latest “WS9Wine” engine, which is a component necessary for the operation of Windows applications. Click “+” and select “Download and Install”.
 4. Next, install “Wrapper” by clicking on the “Update” button. After this, you will notice that the “Create New Blank Wrapper” button will become active.
Installing a Windows application
Before you begin, make sure you have the exe file of your desired application and that it is supported by Wineskin. At the moment, Wineskin does not work with all applications and you can check the compatibility of the applications you are interested in in the official Wine’s AppDB database.
 1. To create a new wrapper, click “Create New Blank Wrapper” and give it a name. For example, let's install the popular notepad Notepad++ on Mac.
 2. Wineskin will offer to download the “Mono” package, which will be needed to run .NET applications. We agree and install.
 3. In the same way, install the “Gecko” component, which is necessary to run HTML applications.

 4. After the wrapper has been created, open it in Finder, right-click and select “Show package contents”.
 5. Here we have two folders (“Contents” and “drive_c”) and Wineskin.app.
 6. Launch Wineskin.app and click “Install Software”.
 7. Next, click “Choose Setup executable” and select the installation file of our Windows application.
 8. The installation process is completely similar to that in Windows. We install our application following the prompts of the installation wizard.
Launching a Windows application
1. Now all we have to do is test the installed application. To do this, launch our wrapper again, but this time select the “Advanced” item.
 2. Specify the path to the folder with our installed application, click “Test Run”.
 3. The application will launch and you should see something like this.
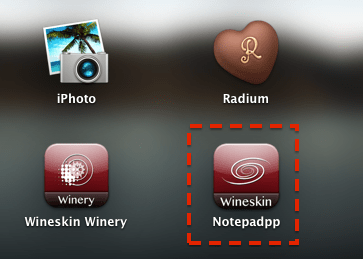 4. Everything. Now you can launch our application directly from Launchpad or the Applications folder. For example, for me it looks like this.

If you need a complete Windows environment, then the ideal option is still to use Bootcamp or a virtual machine. But if you just want to be able to launch applications, then you can get by little blood and use Wineskin. As you can see, it's not that difficult.
Do you have any questions, comments or suggestions? Welcome to the comments - I'm always happy to chat and help you, dear readers. Stay tuned, there is still a lot of interesting things to come!
You would probably like to install Windows programs on mac, but did it work? In this article we will look at one of the ways to do this.Most software is developed under Microsoft environment and are compatible with this operating system. Of course, there are analogues, but not for all applications, especially specialized ones. To install Windows programs on a Mac, special utilities have been developed that allow you to run them with almost no loss of power.
In this article we will look at one of the most popular free utilities for launching software for Microsoft - Wine. She has the following Main advantages:
- - widespread
- free
- ability to work with incompatible software in OS X
- performance comparable to installation separate Windows via Boot camp.
Did you like the video? Click Like!
The disadvantages include:
- - ability to run a small amount of software
- glitches and errors
- not very friendly interface compared to paid analogue.
Principle of operation- approximately like a translator with foreign language, i.e. commands from another operating system are translated into a language understandable for Mac. Of course, as with regular text translation, inaccuracies arise, because different languages inherent different meaning words, and some words have no translation at all. Similarly, when installing Windows applications on a Mac, errors may occur due to the impossibility of translating some commands. That is why, with the help of Wine and similar utilities, you can only run a small number of applications without glitches and errors.
How to launch:
In this article we will use the most popular free utility WineBottler, developed based on Wine to run on OS X.
What you will need:- WineBottler
- XQuartz (X11)
- OS X Lion
What to do:
We type WineBottler in the search engine and download it; at the time of writing, you could download it from here winebottler.kronenberg.org, install it.

Then you need to download and install X11(X Windows System) on mac, because it is not included in OS X Lion. X11 is part of the XQuartz software developed by Apple to support the X Windows System. So, type XQuartz in the search, and download or from here xquartz.macosforge.org.

Everything is almost ready. Go to the application with the .exe extension, right-click and select “Open in Wine”.

Upon startup, a window will appear showing the path to unpack the software, in our case, this is the folder "/Users/Alexandr/Wine Files/". This directory contains the "drive_c" folder - an analogue of the c: drive in Windows. Click "Go".

We get standard procedure installing software on Windows, we also do not forget that drive C: is located in the folder “/Users/Alexandr/Wine Files/”, in our case, this is where the files are copied during installation with standard parameters and from there they must be launched in the future.


