Program for copying data from a flash drive. Setting up the Exiland Backup utility to backup a flash drive. How to backup a flash drive to another location
Flash memory is reliable, but not 100% reliable. This especially applies to inexpensive media, on which even well-known and trusted manufacturers save money. In addition, flash drives almost always “go” with the owner, and getting caught in the rain or walking near a machine at a factory that creates powerful electromagnetic fields, anyone can. Not to mention the fact that the flash drive can simply be lost.
In short, periodically archiving data on a flash drive is a completely useful task. Especially in the case when the flash drive contains work files, documents or photographs about a memorable event. To organize backups of information from a flash drive, there are special utilities, which allow you to configure archiving parameters once and no longer have to remember about manual copying.
In particular, such utilities include Exiland Backup. On the official website of the program developer, you can download a free version of the utility and test it in action. The program also has a Portable version.
- Create a task
After installation on the computer, we begin to create a task: Click on the “Task” tab and select the “Create” item in it “New task”.

A wizard will open with extremely simple interface suggesting seven steps.
- Job name
In the first one, the name and comments for the task are entered.

Backup Type
Descriptions of these backup algorithms are given directly in the window; here you can also select the maximum number of primary and secondary copies. Their optimal number depends on the amount of space on the flash drive, as well as the importance of the data.
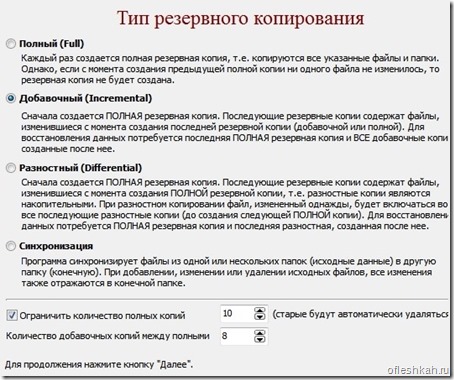
For documents and creative projects, it's useful to save more copies so you can refer back to previous ideas. For regular saving, created to prevent data loss if the flash drive is damaged, 2-3 copies are enough.
- ZIP compression
Then the user selects files and folders that will be included in the archive, sets archiving parameters (you can save not actual copies, but ZIP archives, including password-protected ones).

- Place to save backups
It’s simple, we specify the folder for saving backups and a template for naming the backups.

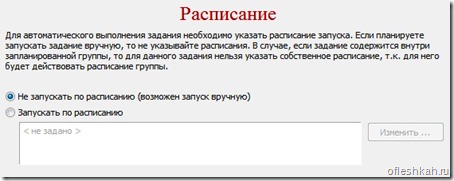
- Backup Schedule
Set a backup schedule. which may occur in certain time or every time you connect a flash drive.
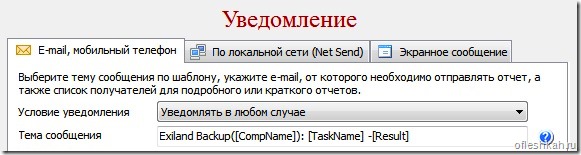
- Notifications
The program has a notification system implemented in several ways.
That's all the tricks for creating a backup copy of information from a flash drive using Exiland programs Backup. Happy backup!
Backup to USB device allows you to use a flash drive ( flash USB drive) as a data source for backup (USB backup) or as a backup storage (USB backup). Handy Backup works with backup flash drives via Computer plugin.
Basic functions of automatic backup to USB device
Backing up data to USB
The main function of a flash drive is data storage, so it is convenient to use a flash drive as a drive for storing backup copies of data on USB. Handy Backup allows you to use any USB storage device for backup as an external drive.
Backing up a USB device
On the contrary, sometimes you need to move backup copy data on a USB device to another location (for example, make a backup copy of a flash drive to a computer). In this case, Handy Backup allows you to make a backup USB devices as a regular local data source.
A USB backup copy of your data only makes sense if it can be restored at any time. Handy Backup offers tools to automatically restore and even clone USB from backup, as well as manually copy unencrypted USB backups.
Backing up Windows 10 data to a USB flash drive
A task different from all previous ones is solved by everyone professional versions Handy Backup or the included HBDR utility, which allows you to create a backup of Windows 10 (Windows 8.1, Windows 7, Linux...) onto a flash drive as an image boot disk VHD.
To solve the problems described above, Handy Backup provides the user with a number of effective tools that allow you to conveniently and quickly organize automatic backup to a USB flash drive and data recovery. Such tools include:
- Schedule tasks, with the task of backup to USB over time in the range from minutes to months.
Recommended solution for USB flash drive backup
Download
Buy!

Version 7.9.4 dated September 15, 2017. 66.1 MB
Backup program Handy Backup. 800 RUB for a license
With the Standard solution, you can always save a backup copy of your data to a flash drive, or make a USB backup to any popular storage medium.
How to backup a flash drive to a computer using Handy Backup?
The instructions below describe how to back up your data to USB. If you would like to learn more about how to make a backup copy of Windows to a flash drive, please refer to the relevant sections of the User Guide or the article on Windows backup.
- Open Handy Backup. Create a new task using the button on the main panel.
- In Step 1, select to create backup task data.
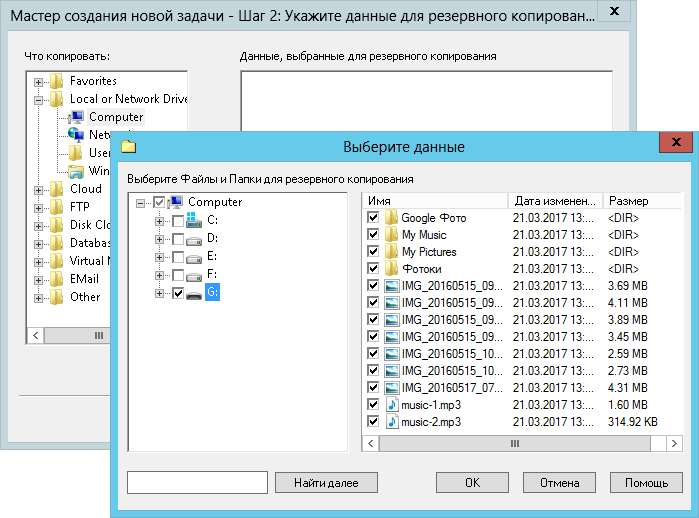
- Go to Step 2 and select the necessary data for backup to a USB flash drive.

- Make sure that your flash drive is inserted into a slot on your computer and is visible in the system.
- In Step 3, select a plugin Computer by using double click mice.
- Find your USB backup device in the list of drives.

- Check it with a checkmark and click OK. Proceed to Step 4 and beyond.
- In Step 6 you can configure automatic start backup when USB connection disk.

- Finish creating the task. Everything is ready: Handy Backup will automatically start your task of backing up files to a USB device.
How to backup a flash drive to another location?
You can store backups USB disk in another location, for example, on the hard drive of your PC or laptop, on FTP server, V cloud storage(for example, saving a backup copy of the flash drive to Yandex.Disk, Dropbox or Google Drive), as well as in a special storage HBDrive.
- To create a task to obtain a USB backup, open Handy Backup and run the wizard new task, as described above.
- In Step 2, open the list of data sources Local and Network Drives on the left panel and select the plugin Computer. Find your flash drive for backup in the plugin window.
- Then in Step 3, select the backup location USB copying and continue creating the task as described in the previous instructions.
Video tutorial: How to create an automatic backup when connecting a USB device
This video tutorial shows step-by-step instruction to create an automatic backup to a flash drive when you connect this USB device to a computer.
Attention: This video assumes that your machine already has installed Handy program Backup. Otherwise, please download Handy Backup and install it on your computer.
Automatic backup to a USB flash drive with Handy Backup is a convenient, simple and reliable data storage tool. Try its power for yourself by downloading and installing a 30-day free version of the program from full set features and plugins!
There are people who store all their most important data (documents, photographs, necessary utilities etc.) on flash drives. This is especially important when constantly moving from computer to computer. It is important for them that all the contents of their media are protected from accidental data loss. There are also people who take a lot of photographs and it is very important for them that their pictures, when connected to a PC, immediately go to the computer. To solve all of the above problems, you can use the USBFlashCopy program, which will make the process of copying data from portable storage to your computer in a simple and reliable way.
Program installation
There is no installation as such in USBFlashCopy, since the program is portable. Simply download executable file and place it, as the developers recommend, in the “C:\USBFlashCopy” or “C:\Program Files\USBFlashCopy” folder. When you first launch the application, you need to configure it a little and in the future you will not have to remember about the program while working on the computer. The application will launch automatically immediately after connecting the removable device.
First, let's determine which drives the USBFlashCopy program needs to monitor. For each logical device, we can leave the need to start copying at the discretion of the program (Auto), force it to start copying (Force), or ignore the device (Skip).
Also useful feature The utility is the ability to configure user profiles. It’s one thing when documents are supposed to be stored on a flash drive, and another thing when logical device The flash drive will appear from the camera. Each device can be customized with a variety of backup settings.

In the profile you can set the copy speed and the backup folder. You can even specify two folders for copying data. Copy speed control allows you to comfortable work during a flash drive backup, so as not to sit and wait for the program to release computer resources.
![]()
Using the filter, you can specify which types of files should be copied. Moreover, you can indicate the file type with a checkmark or specify a list of file extensions for some of your unique types of information.
In the profile you can also tell USBFlashCopy what to do when in the directory in which backup is in progress copying, there are already files with the same name as on the flash drive. You can overwrite files if they are older (Overwrite an old file) or keep a copy of an existing copy of a file (Keep a copy of an old file).
Example of using the program
Let's give a simple example to understand the value of USBFlashCopy. Let's say we have a camera (and more than one). We walk, take photos, which are saved on the camera’s memory card. After which we come home and connect the camera to the computer (or directly connect the flash drive from it to the computer via a card reader). At this moment, all our photos fly to a specially designated place on the computer disk.
You can use profiles so that photos from your daughter’s camera do not intersect with your father’s and vice versa. To do this, we will assign them different folders, where the files will be stored. It is extremely convenient for our example that in the folder where we will copy photos, you can also create subfolders by date. This will also be useful for storing backups. Each even has its own copy.
All this is possible thanks to flexible configuration destination folder templates, in which variables are implemented for literally all occasions.

Now all the problems of copying files, determining novelty and relevance are a headache for the USBFlashCopy program. It's quite convenient and makes life a lot easier.
Conclusion
USBFlashCopy is good and convenient utility for automatic backup of data from flash drives and memory cards. It seems to me that the authors of the program made the most of this task: they implemented fine settings copying with precision serial number flash drives (profiles), file type filters and much more. Completeness and striving for ideal are visible in the entire character of the program.
USBFlashCopy is free for non-commercial (home) use. Paid version allows you to use the utility also in the office, and also makes it possible to use the program in Silent mode. In this mode, you will not see the program at all, since it will perform all actions in the background without displaying any windows or messages.
USBFlashCopy also has competitors - cloud systems data storage (for example, Dropbox and Yandex.Disk), which have similar functionality, but cannot give the user the opportunity to configure the backup system so flexibly (although there is something like profiles there too). And the data is backed up on a remote server, which is simply unacceptable in some cases (for example, when backing up important documents), and sometimes it’s simply inconvenient.
Many of us in Everyday life use USB flash drives(flash drives) for transferring and storing files. A flash drive is also convenient for opening daily documents directly from it both at work and at home, and in general wherever you are, since everything necessary files always with you.
A flash drive is usually used in various weather conditions: rain, damp, frost, exposed mechanical damage, electromagnetic waves, may be lost or stolen, etc. The only one reliable way save your data - perform daily backups of the flash drive to HDD PC or laptop.
Flash drive backup options. Which to choose?
Fulfill backup files flash drives can be used both on the PC hard drive and on any other media: external USB HDD (hard drive), to another PC local network, on remote server via FTP, etc. Let's look at an example of how to organize automatic backup of USB disk (flash drive) to the PC hard drive every 3 hours.
To backup flash drives, you can create bat files or perform copying manually, which is an even worse option, since it is easy to forget to create a backup of flash drive files in time, and you often have to be distracted by creating backup copies.
Let’s not “reinvent the wheel,” since people have already invented and developed automatic backup programs, but let’s consider one of them, namely, the easy-to-use, reliable Exiland Backup utility, which, at a specified frequency, creates backups specified files and folders from one media to another and does this almost unnoticeably, without interfering with the operation of other programs.
Moreover, Exiland Backup has the ability to create a backup copy of a flash drive when it is connected to the USB port of a PC. This is very convenient - you plug the flash drive into your PC, within a few seconds a backup copy is created and then you work with the flash drive as usual.
Let's look at how, using Exiland Backup, you can easily and easily set up a backup of a flash drive to your PC's hard drive.
Setting up the Exiland Backup utility to backup a flash drive
In the window<Параметры выбранной папки>you can specify additional folder parameters: file masks, attributes, as well as excluding subfolders, for example, all folders of a flash drive, except folders
An excellent feature of this program is that it supports paths by volume name, for example, the source folder can be specified in the form <FLESHKA>:\Source\Folder, where FLESHKA is the name of the flash drive volume.
Thus, if the replacement disk is connected under a different drive letter, you will not have to reconfigure anything in the program. It is very comfortable.
In step 4 (ZIP compression options), you can leave the default settings and click “Next”.
For information: the Exiland Backup program allows you not only to simply copy folders and files, but also to create a backup copy by compressing the data into one ZIP file with a specified compression ratio, setting a password for the encrypted zip archive.
In step 5, tell the program where to save backups.
Click<Добавить - Локальная/сетевая папка>. A window will appear in which you should specify the path to the folder on the hard drive of your PC/laptop, for example C:\Backups.
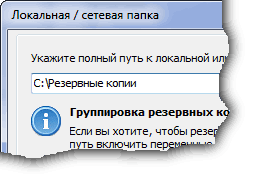
This can be done through the folder selection dialog (from the same dialog you can create the "Backups" folder).
As in the case of selecting source data, here the program also supports the ability to specify a path by volume name. This is especially useful when saving backup copies to replaceable disks, because Windows OS can assign different letters to the disk each time you connect a removable HDD or flash drive.
In step 6, specify the schedule for running the backup.
The recommended backup frequency depends on how often you use the flash drive. Typically, a normal backup frequency is once every 4 hours. Creating several backups during the working day is usually sufficient.
Moreover, if the data on the flash drive has not changed at all, Exiland Backup will not create a backup copy, but will simply write about it in the log (magazine). If, when starting the backup, the flash drive was not connected to USB port your PC - nothing bad will happen, Exiland Backup will simply skip the task. You can also tell the Exiland Backup program to “start backing up the flash drive when it is connected to the USB port of your PC,” which is undoubtedly another advantage of the program.

So, toggle the checkbox (o) Run on a schedule, select the Schedule Type “daily”, click the “Edit” button. To add a start time, click the “Add” button and select “Periodically”, select “Every 4 hours” and click OK. The selected value appears in the list.
Click the “Add” button again and select “When connecting a removable device (flash drive, removable HDD, etc.)”, tell the program whether to backup files every time you connect a flash drive or whether it’s enough to do it the first time you connect today, click OK, then OK again to return to the Schedule step and click Next.
Step 7: Notification
Here click "Done". Although, you can tell the program to send notifications and reports about backup results in case of various events (in case of errors, in case of warnings, in any case), but, in in this case (backup flash drive), That is unnecessary.
The flash drive backup task has been created! When the launch schedule occurs or when a flash drive is connected, the backup will begin. However, keep one fact in mind: running scheduled tasks is available only in the Standard and Professional versions (after purchasing a license to use the program), and in the free version Free is disabled! But on the other hand, nothing prevents you from running the task manually by clicking on the "Run" button on top panel or through context menu on the notification area icon.
Other features of the Exiland Backup utility
Exiland Backup differs from its analogues in that it is understandable Russian-language interface and combines good opportunities and flexibility of settings.
WITH automatic program With Exiland Backup you will once and for all protect your files from damage by a virus, flash drive failure, etc.
Backup utility copying Exiland Backup is universal and perfect for backing up home files (photos, videos, documents) and for use in organizations (documents, accounting databases). It is intended for both novice PC users and more experienced specialists (system administrators).
Michael,
chief developer of the Exiland Backup program.


