How to find out the name of the motherboard. How to find out your motherboard model How to find out your motherboard model using programs
Hi all! If you need to flash the BIOS or want to look, then you definitely need to know the motherboard model.
In most cases, the model of the motherboard is needed when updating the BIOS, because if the BIOS is from a different model, then you simply won’t be able to start it without a programmer. In this article I will show several ways to find out your motherboard model.
How to find out the motherboard model on a computer
I will show you how to find out the model (without opening the computer) in a free program that does not require installation. Download.
Let's launch. The folder contains 2 versions of the program for 32 and 64 bit systems. It runs on all popular operating systems Windows 7, 8, 10. If the interface is not Russian, you can select Russian in the settings. So, when launched, the program will begin to read the computer configuration.

The motherboard section will contain the name of your model.
How can I find out the model on the board itself and its revision?
There is also an important thing, this is a revision of the motherboard. After all, the BIOS is also undergoing revision. To find out the model and revision, just look at the motherboard itself.

The model is written approximately in the center of the motherboard. And just below or to the right is a revision of the motherboard.
Another way
The easiest way is to peek when you turn on the computer.

In most cases, when you turn on the computer, the motherboard model is written.
These are the 3 most popular ways to find out your motherboard model. The most correct one is the second one, because in this case you will not be mistaken and you will find out the revision.
PS: by the way, there is also a life hack with the command line.
If you enter “wmic baseboard get manufacturer”, you can find out the manufacturer of the motherboard.
And if you enter - wmic baseboard get product, then you will find out the model of the motherboard.

That's all)
After some time, the computer needs an upgrade. Some users prefer to upgrade by purchasing a new computer, others replace old components with new ones.
Before purchasing new PC components (video card, processor, RAM and others), you need to know the characteristics and model of the motherboard.
This is necessary to avoid component incompatibility.
To physically inspect the installed motherboard, it is necessary to disassemble the system unit.
In order to disassemble the system unit, you must:
This method is suitable for owners of desktop computers.
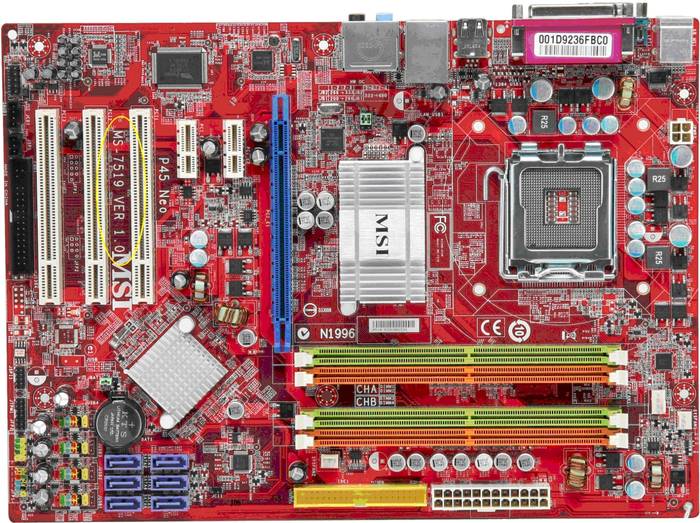
Important! Motherboard manufacturers "ASUS" write the model name near the "PCI-E" connector, the manufacturer "GIGABYTE" places information about the board near the RAM slot, the manufacturer "MSI" as well as "ASUS" most often place information near the "PCI-E" connector "


Windows Standard Tools
If the user, due to inexperience, cannot disassemble the system unit and see which motherboard is installed, then you can use standard tools of the Windows operating system, such as BIOS and command line.
You can also use the standard utilities of the operating system.
To use the System Information utility, you must complete the following steps:
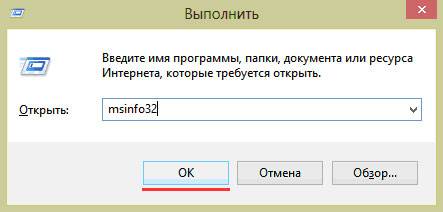
- to begin with, you need to use the hot keys “WIN + R” to open the “Run” window;

- then enter the command into the empty line "msinfo32" and click on the “OK” tab;
- Next, the “System Information” window will open, where the computer’s characteristics will be displayed.
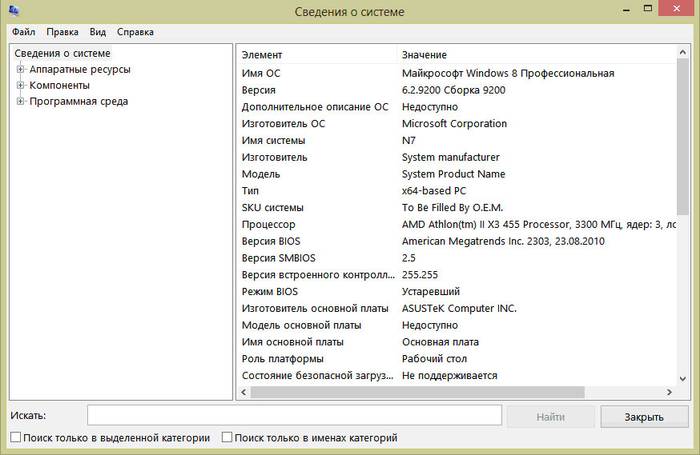
Important! The standard “System Information” utility may not display information about the motherboard.

You can also use the standard Windows utility “DirectX Diagnostic Tools” to establish the model.
To use the DirectX Diagnostic Tools utility, you must complete the following steps:

Important! Data may not be displayed. In this case, the “Computer Model” item will contain the “System Product Name” information.
Another standard method for determining a model is PostScreen checking. Post check occurs when the computer starts.
Important! Modern computers pass the Post check almost instantly, so such a screen may not appear when the PC starts.
Video: information about bios, motherboard and processor
Via Bios
You can find out the motherboard model through the BIOS.
In order to find out the motherboard model through the BIOS you need to:

Method two:
- as described in the first case, when starting the computer, you need to press the “Del/Delete” keys or the “F2” key on the keyboard several times, depending on the BIOS model;
- when entering the BIOS, you must select the tab using the “right arrow” keys on the keyboard "Advanced BIOS Features" and the name of the motherboard will be displayed at the top.

Command line
One of the easiest ways to find out what motherboard is on your computer is through the command line. The user is not required to install additional software; just call the command line window.
To determine the motherboard model via the command line you need to:

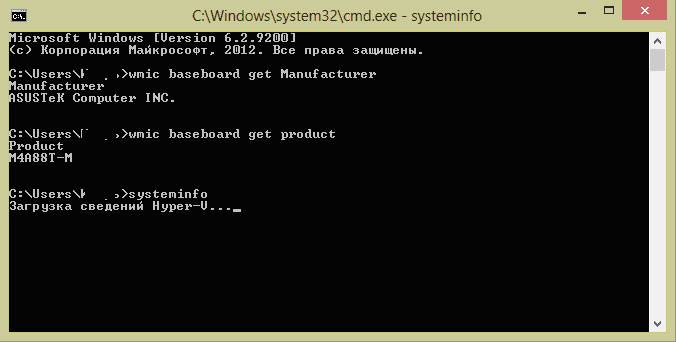
First team "wmic baseboard get Manufacturer". Using this command you can determine the manufacturer of the motherboard;
Second team "wmic baseboard get product". Using the command, you can directly determine the motherboard model;

- then all that remains is to enter the desired command.
The second method looks like this:
- using the key combination “WIN + R” you need to call the “Run” dialog box;

- on an empty line you need to enter the command "cmd" and click on “OK”;
- then in the command line window that opens you need to enter the command "systeminfo" and press the “Enter” key;
- After entering the command, complete technical information about the computer will be displayed.

The third way to define using the command line looks like this:

Let's find out what motherboard I have on my computer in Everest
You can find out the motherboard model using specialized software. Everest (today the program is called AIDA64) allows you to perform an in-depth analysis of a personal computer.
With the help of Everest, you can find out about the technical characteristics of your PC, test the processor (CPU), video card (GPU), and RAM. Everest allows you not only to find out the characteristics of your computer, but also to update system drivers, providing download links to the official pages of manufacturers.

Important! The program is distributed free of charge and has a trial period of 30 days.
The trial version of the program has significant functional limitations.

To find out the model and characteristics of the motherboard in the program you need to:
- First you need to download the program and install it on your computer;
- then you need to launch the program from a shortcut on the desktop;

- Next, you need to select the “Computer” tab in the left column;
- after that, the window will display the following tabs: “Summary Information”, “Computer Name”, “DMI”, “IPMI”, “Overclocking”, “Power Options”, “Laptop PC”, “Sensor”. In this list we need the first item “Summary Information”;

- Next, click on this item and the window will display information about the technical characteristics of the PC, where information about the motherboard will be displayed.

You can also determine the Everest board model:
- First you need to click on the “Motherboard” tab;

- after that, the window will display the following items “CPU”, “CPUID”, “System board”, “Memory”, “SPD”, “Chipset” and others. You must select “System board”;
- then information about the motherboard model will be presented at the top of the window.

The everest program is the most effective in determining the model and characteristics of the motherboard.
This article discussed ways to determine the motherboard model. You only need to choose the most convenient method.
Welcome to my blog!
Very often, when you need to install drivers on a system, you ask the question: “what model of motherboard is installed in this computer?” This question may be relevant when the computer was assembled in a store and after a while, you have already forgotten which motherboard you have installed, and the driver disk has been successfully lost.
Or you bought a computer secondhand, which is often sold without drivers; again, to install them, you need to know which “motherboard” is inside the case.
In addition to the name of the board itself, you also need to know the name of the company that manufactured it, since it is not always possible to immediately determine the manufacturer just by the name of the model. And the drivers will need to be downloaded from the motherboard manufacturer's website.
In this article, I want to tell you how to find out the model of your computer’s motherboard and its manufacturer, in case you suddenly need it.
The methods are completely different, from the simplest to the most complex, so every computer user will find a suitable option for themselves.
View the box or instructions for the motherboard.
The easiest way to find out which motherboard you have installed is to look at the box it came in; there will definitely be a product marking on it.
If you did not save the box, then the model name can be found by looking at the instructions for the box; the model name will also be written on it.
When you turn on the computer or in the system BIOS.
If you don’t have a box or a book with instructions, then you can find out the name of the motherboard by looking directly at the monitor screen when you turn on the computer.

Different motherboard manufacturers display their model name differently and in different corners of the screen, but you can see it, you just need to look carefully at the screen.
Another option is to find out the motherboard model by going into the BIOS of your computer.
For example, when entering the BIOS of a Gigabyte motherboard, you need to press the F9 key to open the system information panel.

Where you will see the markings of your motherboard.

And on new motherboards that use UEFI BIOS, the name of the motherboard model and the logo of the company itself are displayed at the top of the screen.
Look at the motherboard itself.
If you look closely at the motherboard itself, you will definitely see on it the name of the model and the name of the company that manufactured it.

Such markings can be applied in different places, but they are definitely there, you just need to look carefully at the motherboard.
Using special programs.
There are many programs that provide complete information to the user about the contents of the system unit. They show not only what model of motherboard is installed in the system, but also what processor, memory, hard drive and their characteristics are described.
For the purposes of this article, we are only interested in the motherboard and we will see what such programs tell us about it. For example, I have chosen four programs and one online service that will help us find out the markings of the motherboard of our computer.
It is not necessary to use several programs at once; it is enough to choose one or two that you like best or that will simply be at hand at the right time.
CPU-Z program.
The first program is the CPU-Z utility from CPUID, a very popular utility for checking the characteristics of a system unit. It works very quickly and does not need to be installed, and what’s important is that the program is free. A must have in any computer user's arsenal.

You can download the CPU-Z program from this link: http://www.cpuid.com/softwares/cpu-z.html
Speccy program.
The second program I want to introduce is the Speccy utility from Piriform, which is known to many for its .
This utility, like the previous one, shows all the information about the components of your computer. It is very convenient and easy to use, all information is divided into categories, there is a free version, which is enough to find out what is inside the system unit.

To find out what model of motherboard you have installed, go to the “Motherboard” tab, where you will see all the information about it.
In the “Manufacturer” line, you will see the name of the company that produced the “motherboard”, and in the “Model” line, its designation.
To get information about the motherboard, you need to go to the “Mainboard” tab, where you will see the name of the manufacturer and the marking of the motherboard model.
PC Wizard program.
The next program is called PC Wizard from the same author as CPU-Z. This program also shows which components are installed inside the system unit, but has a different graphical interface.

To find out which motherboard is installed in your computer, you need to select the icon with the motherboard in the “Hardware” tab, which is located on the left, and on the right side of the program you will see its characteristics, where its manufacturer and model name will be indicated.
You can download the PC Wizard program from the link: http://www.cpuid.com/downloads/pc-wizard/pc-wizard_2014.2.13.exe
AIDA program.
Another program that can be used to find out the motherboard markings is AIDA. This program is also known to computer users under the name Everest and allows you to test computer hardware.
The program is paid, so it is not suitable for me for regular use, because there is a whole bunch of free software.
But in order to find out the markings of the motherboard, the trial version of AIDA, which works for 30 days, is enough.

To do this, install and run the program and select “Motherboard” in the menu on the left, then you will see its markings on the right side of the program window.
Using the online service and Intel Detection program.
My list of programs that can be used to determine the motherboard model is completed by the Intel Detection program, which works in tandem with the Intel service.
This service scans the system using the Intel Detection utility and displays its characteristics on its website.
The procedure is as follows..
Visit the website:
http://www.intel.com/support/ru/siu.htm
You will see the following window with a description of the program.

Click on the “Identify software and hardware on your computer” button.
You will then be prompted to download the Intel Detection program, save it to your hard drive and then open it, after which it will analyze your system.

When you see such a window, close it, the analysis of your system is ready.

To see what motherboard is installed in your computer, go to the intel website again. In the same window where you downloaded the program, you will see information about your system. In the line “Computer Manufacturer” you will see the name of the motherboard manufacturer, and in the name “Computer Model” its marking. In the “Basic level” tab you will see short information about the system, and in the “Advanced level” tab, more detailed information.
To re-analyze using this service, you will need to download the program again and run system diagnostics.
How to find out your motherboard model using the Windows command line.
The next way to find out the motherboard markings is suitable for more advanced users who know how to use.
The difficulty of this option also lies in the fact that you need to remember the commands that need to be entered or you simply need to write them down somewhere, since after a while you simply forget them.
So, first we need to launch the command line console.

To do this, press the key combination WIN + R and enter three letters in the input window: cmd.
A Windows command line window will open, where we will enter commands. I will give two options for how you can find out the name of the company and the model of the motherboard.
The first option is simpler, the command is easier to remember, since it consists of only one word.
Enter the following command on the command line:
And complete information about your system will appear in the window.

We are interested in two lines in this information, these are “System Manufacturer” - the name of the company and “System Model” - the marking of the board.
The second option is a little more complicated; you will need to enter two commands in turn:
wmic baseboard get manufacturer
wmic baseboard get product

The first command will show us the name of the manufacturer, and the second the name of the “motherboard”.
As you can see, there is nothing complicated here, everything is extremely simple and no unnecessary information.
Using Windows information programs.
Windows OS has special utilities that can be used to obtain information about the system configuration; they will help us find out which “mother” is inside the system unit.
The first program is Dxdiag, a diagnostic tool for DirectX components and drivers.
To open it, click:
1. On the “Start” button and in the search box, enter the name of the program.
2. Press the WIN+R key combination and in the “Run” window enter the name of the program.

The Dxdiag program window will open, where in the “System” tab we will see the information we need. In the line “Computer Manufacturer” and “Computer Model” the name of the company and the marking of the motherboard model will be written.
The second utility is called “System Information,” which can be opened in three quick ways.
1. Go through the menu:
Start – All Programs – Accessories – System Tools – System Information
2. Click on the “Start” button and enter the name of the program in the search window.
3. Press the WIN+R key combination and in the “Run” window enter the name of the program.

As a result of these actions, a program window will open, where you will immediately see the main characteristics of your system, including the motherboard. In the line “Manufacturer” you will see the name of the company, and in the line “Model”, its designation.
Using the Windows registry.
This method is suitable for more advanced computer users who know how to use. But beginners should not be afraid either, since there is no need to edit the registry here, you just need to look at it in the right place.
Open the registry window by pressing the WIN+R key combination and enter the command in the program window:
Then open the registry key:
HKEY_LOCAL_MACHINE\HARDWARE\DESCRIPTION\System\BIOS

And in the BIOS section you will see two options:
1. BaseBoardManufacturer – Name of the manufacturer;
2. BaseBoardProduct – Board model name;
Write down the company name and motherboard model on a piece of paper and simply close the register.
How to find out the motherboard model in Ubuntu.
In Linux there are also many options for how you can find out the name of the motherboard; in this article I will give only one example of how this can be done in Ubuntu.
The user’s question about how to accurately find out the model (revision) of the motherboard of a computer with Windows 7 arises for many reasonable reasons. Most often, this information is required to correctly update hardware software, fix problems, use additional devices, etc.
The easiest method
 If for some reason the owner does not have the box, then the necessary information is often indicated by the manufacturer in the documentation for the computer.
However, unfortunately, often PC owners cannot find the included instructions for the devices they purchased, or they are simply too lazy to get up from the couch and dig through the papers. In this case, the following step-by-step software guides will help solve the problem.
Using the built-in tools of Windows 7
You only need to perform a few sequential steps:

Using the console
In order to resolve the issue posed quickly and effectively, the “almighty” command line will help.
The following steps are required:


Through a special utility “Speccy”
For beginners and for users who have difficulty with the above methods, special applications have been developed that determine motherboard models. Below is an example of using one of the most convenient utilities.
You will need to complete the following steps:

AIDA
It has expanded functionality compared to the above utility, but is not free. If you plan to use the program only once, then you can use the demo version for free, which is also available on the official website of the application creator.
The algorithm of actions is similar to the previous utility and all the data of interest is located in the “Motherboard” tab. 
Visual method
If none of the above methods help, the most reliable option to accurately find out the answer to the question posed is a visual inspection of the board itself. To do this, you just need to open the PC system case and look inside.
The model of the motherboard is always marked.
 This method allows you to accurately determine the model of the component equipment, but it is easy to implement only if you have a stationary PC. If you need to find out the model of the motherboard of a netbook or laptop, then the process is quite labor intensive when disassembling and then reassembling the device.
The most complex, expensive and irreplaceable part of a computer or laptop is the motherboard. The video card and hard drive are connected to it, the processor, RAM, etc. “connect” to it. Therefore, it is necessary to closely monitor the updates of the motherboard drivers. After all, the performance of a PC or laptop depends 90% on this.
At the same time, there are situations when you need to find out which model of motherboard is installed in the device. And not only to download the correct drivers, but also to replace it. You also often have to find out what kind of motherboard is in a laptop or PC when purchasing new components. Because they may be incompatible with it. Therefore, each user should be able to determine which motherboard is installed on the computer.
We will not talk about the fact that you can find out which motherboard is on your computer from the accompanying documentation or from a special marking sticker next to the laptop keyboard, or simply by looking inside the system unit. It's obvious.
Our goal is to teach you how to identify your motherboard programmatically. To do this, we recommend that you use Windows OS diagnostic utilities. All you need:
- Press the Win+R key combination on your keyboard. This will launch the “Run” window.
- Next, in a special line you need to enter the command “msinfo32”.
- The System Information panel opens. There is no need to select anything on the left side. We look at the right side of the window and find the items “Manufacturer...” and “Main board model”.

Agree, everything is quite simple. However, there is one caveat. This method does not always help to find out the manufacturer of the motherboard and its name. Sometimes “Not available” is written next to the lines we are interested in. What then to do? It is best to use the following method:
- Again, use the command line (Win + R).
- In the “Run” line, enter dxdiag and click OK.
- Most likely, a warning window will pop up in which the system will ask if you really want to find out information about installed drivers, components, etc. Naturally, click yes.
- The DirectX Diagnostic Tool panel opens. On the very first tab “System” you need to find the fields “Computer Manufacturer” and “Computer Model”. This will contain all the necessary information about the motherboard.

That's not all. There is another way to find out what motherboard your computer is equipped with. You also need to open the command line (Win+R) and enter “cmd” there. Then a window will appear on the display. In it we enter the following commands one by one:
- “wmic baseboard get Manufacturer” – to clarify the company that produced the motherboard;
- “wmic baseboard get product” – to determine its model.
An alternative option is to simply enter “systeminfo” in the command line and press the “Enter” key. The user will see a window with detailed technical information about this device. Including, here you can find information about what motherboard is installed on this PC or laptop.
Using additional software
Regardless of the OS, be it Windows 7, 8 or the latest version of Windows 10, you can find out what motherboard is on your computer or laptop using special free or paid utilities. The only caveat is that such programs must be downloaded. That is, you will need Internet access.

Among the highest quality and proven utilities is CPU-Z. It can be downloaded for free from many Internet resources. However, this program does not require installation. Just run the file with the exe extension.
Once the CPU-Z utility has started working, you need to switch to the “Mainboard” tab. Next, in the “Manufactured” and “Model” paragraphs (“Manufacturer” and “Model”) you will find all the necessary information about the motherboard.
A utility called AIDA64 also copes well with its tasks of identifying the motherboard. By launching it, you will see detailed parameters and characteristics of all equipment included with this PC or laptop. If you do not know how to use this program, then follow the following procedure:
- Download the utility from https://www.aida64.com
- Install it (it will take less than a minute).
- Then open the program. You will immediately be greeted by a window that will warn you that AIDA64 is not a free utility. But there is no need to be upset. After all, you have 30 days to try out the trial version. So just click OK.
- Select the “Motherboard” section on the left. Now on the right you can see the model and name of the motherboard.

If the AIDA64 utility still seems complicated to you, then download another similar program. It's called Speccy and has a clearer and simpler interface. Moreover, its capabilities are completely identical to the AIDA64 utility. Using Speccy, you can find out a lot of useful information about the motherboard - number of slots, serial number, chipset model, etc.
Via BIOS
If you don’t like any of the above methods, you can try to find out the motherboard model through the BIOS. To do this you need:
- When loading/turning on a PC or laptop, press the “Del/Delete” or “F2” key repeatedly on the keyboard (depending on what BIOS version);
- As soon as the main window opens, just look up - the motherboard will be indicated there;
- Otherwise, use the buttons on the keyboard (down, up, right and left arrows) to select the “Advanced BIOS Features” section. Again, pay attention to the top of the window, because the name of the motherboard should be displayed there.
- If the computer or laptop does not work, then it will not be possible to programmatically determine the motherboard. You will have to do this manually - turn off the device, remove the back or side cover, and then carefully examine the motherboard. Basically, manufacturers (asus, lenovo, packard bell, etc.) indicate its model near the PCI-E connector or near the processor slot.
- Is it possible to find out what kind of motherboard is installed from the driver disk that came with the laptop or PC? As a rule, you can't. The fact is that the same disks go directly to the line of motherboards, and on them you can only see the name of the series, but not the model itself.
- On some computers, when the system boots, information about the motherboard appears on the screen for a couple of seconds (or even less). Her model is even displayed. True, not all users can read so quickly. In addition, in order to see the necessary information, sometimes you have to restart the PC several times, and this can damage the device.


