How to enable wireless communication in Windows 7. Updating the driver using Windows. Enabling on the keyboard
Hello, dear friends. As you probably already understood from the title, today I decided to touch on a very serious and painful topic, and try to figure out what to do when Wi-Fi on a laptop or netbook does not work and how to still connect a laptop to a Wi-Fi router. By the way, this can be not only a laptop or netbook, it can also be an ordinary desktop computer with a Wi-Fi receiver. A lot of similar questions have been popping up lately, mostly related to the article.
Now we will try to figure out step by step what and why problems may arise when connecting a laptop to a wireless Wi-Fi network. We will also try to find a solution to this very popular and unpleasant problem with connecting to Wi-Fi, or rather, an unsuccessful connection.
Most often, problems arise when it is not possible to turn on the Wi-Fi module itself on the laptop. And when Wi-Fi turns on, the laptop finds all available networks, but when trying to connect it writes . You need to check whether the drivers are installed on the Wi-Fi adapter, whether Wi-Fi is turned on on the laptop, etc. Now we will do this.
I noticed that most often problems with connecting to Wi-Fi occur in Windows 7. It is on this OS that the network without Internet access error very often appears; I wrote how to solve this problem in the article linked above. In fact, as practice shows, there can be many reasons for this problem. And if there are many reasons, then there are many ways in which you can force a laptop to connect to a Wi-Fi router.
But it’s not always the laptop, netbook, etc. that is to blame. There may also be a problem with the access point, that is, with the Wi-Fi router. And the first thing we need to do when a problem arises with connecting to Wi-Fi is to determine what the reason is, in the laptop or in the Wi-Fi router. Now I will consider the problem with connecting to my own router. Because if you can’t establish a connection with someone else’s Wi-Fi, then all the complaints are against your neighbor, it’s most likely his problem :).
Who is to blame, the laptop or the Wi-Fi router?
As I wrote above, you first need to find the culprit. Before you make any settings on your laptop or Wi-Fi router, you need to understand what the problem is, which is why you can’t connect your laptop to Wi-Fi. You can just set it up in such a way that then you have to do it and set everything up again. The best way to determine which device is causing the problem is to try connecting another device to the router, such as another laptop, tablet, or phone. If you have a laptop that has problems connecting to Wi-Fi, you should try connecting it to a different wireless network.
I think that you understood my point. If there are other devices connected to your router (best with a similar operating system) will connect without problems, then the problem is in the laptop. Read this article further, now let’s try to solve it.
Well, if problems connecting to your network also occur on other devices, and the “problematic” laptop connects to other networks without problems, then the problem is in setting up the Wi-Fi router. See the article on, it might come in handy.
I will show the example of a laptop that runs on Windows 7. This is currently the most popular operating system.
I advise you to immediately pay attention to the icon that displays the status of your Internet connection. It's located in the notification panel.
If the Internet connection status looks like this:
![]()
First you need to check whether the drivers for Wi-Fi are installed and whether the Wi-Fi adapter is turned on.
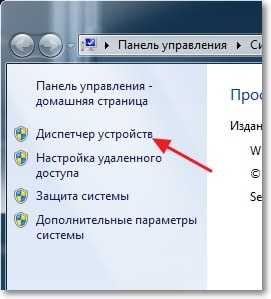
Right click on "My computer" and select “Properties”. On the left select "Device Manager".
Open a tab in a new window "Network adapters" and see if there is a device like Wireless Network Adapter (You may have a different name for it). If you have such a device, then right-click on it and select “Properties”. Another window will open, make sure it says “The device is working normally.”
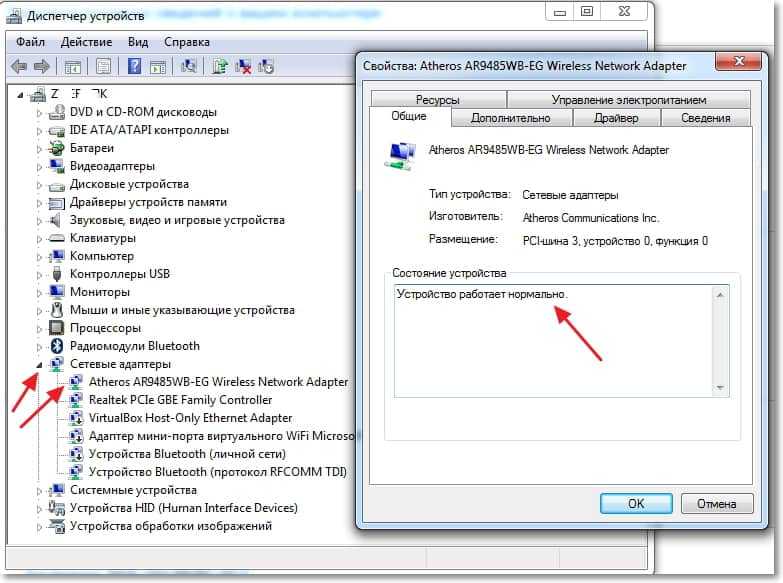
If everything is approximately the same as mine above in the screenshot, then everything is fine, the driver is installed. And if there is no Wireless Network Adapter device and you have unidentified devices, go to the website of your laptop manufacturer, download and install the Wireless Network Adapter driver for your model.
Learn more about installing and updating the driver for the wireless adapter.
We sorted out the drivers.
Checking whether Wi-Fi is turned on on the laptop
If the driver is installed, but the Wi-Fi module is disabled, the connection status will be the same:
Usually the wireless adapter on your laptop is turned on, but it doesn't hurt to check. Wi-Fi on laptops (netbooks) is usually turned on and off using a keyboard shortcut. On my ASUS K56cm, these are the keys FN+F2. But although when I press these keys I get a message that the wireless adapters are enabled/disabled, nothing happens. Look for the key on your laptop FN and a key with a picture of a wireless network. Press them at the same time.

Some laptops may have a special switch on the case that can be used to enable or disable Wi-Fi. For example on Toshiba Satellite L300 it looks like this:

Enable or disable the Wi-Fi wireless adapter in Windows 7
But the best way to check whether the wireless network adapter is working or not is to go to the network control center and take a look.
So, on the notification panel, right-click on the Internet connection status icon and select “Network and Sharing Center”.
Then select on the left.

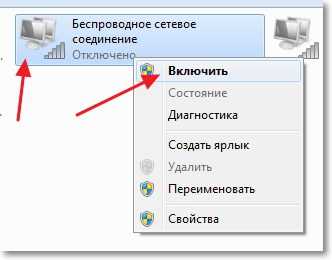
Among the connections we are looking for “Wireless network connection”. If everything is fine and the Wi-Fi adapter is turned on, then it should look like this:

If the adapter is disabled, it will look like the screenshot below. Right-click on it and select “Enable”.
Using the methods described above, we must make sure that the status of the Internet connection in the notification panel is like this:

This status means “No connection – There are connections available”- this means that the Wi-Fi adapter is turned on and there are available wireless networks to connect to.
If the connection status is like this:

This means that Wi-Fi is turned on, but the laptop simply does not see the networks available for connection.
Error “Windows could not connect to...”
We have sorted out the problem when the wireless network module is disabled or does not work at all. Now consider the case when the laptop finds available Wi-Fi networks, but when trying to connect to Wi-Fi it writes: “Windows was unable to connect to...”, where instead of dots is the name of the network you want to connect to.
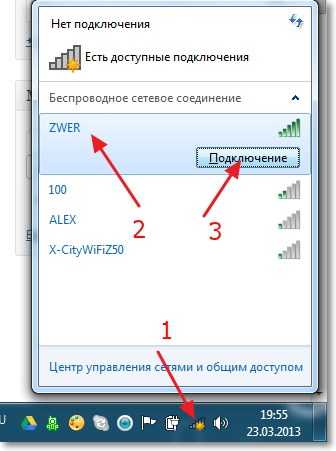
If your network connection status is the same as in the screenshot above (via one, network with yellow icon), then click on it and you will see a list of networks available for connection.
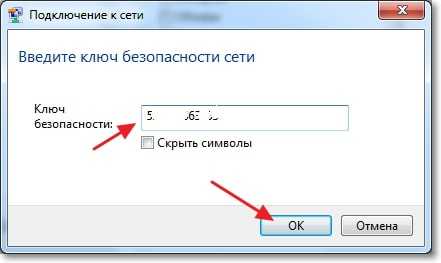
Select the desired network, click on it, then click the “Connect” button.
If the set is password protected, Windows will ask you to provide the password. Enter your network password and click “Ok”.
And if everything is fine, then your laptop should connect to the Internet via a wireless connection. And the Internet connection status should look like this:

But it is at the moment of connection that the error “Windows could not connect to...” very often appears. She looks like this:
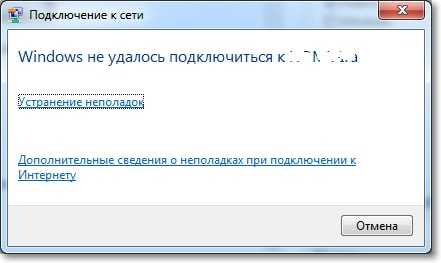
Unfortunately, friends, there is no definite solution to this problem. But I can download that very often the problem with such an error appears due to the settings of the Wi-Fi router. It may be through the type of security and encryption that is installed on the Wi-Fi router, read more about this in the article. There may also be a problem with the distribution of IP addresses.
If you notice that in the window with the error “Windows was unable to connect to...” you can run “Troubleshooting”, it would be a sin not to take advantage. Try running it, I heard somewhere that there are cases in which it helps :). But seriously, sometimes it really helps. Windows will check the readiness of the wireless adapter, check the settings, etc. And if it can, it will fix the problem that is preventing you from connecting to Wi-Fi.
Just reboot your router and then your laptop. Very often this helps.
Update
I noticed that in Windows this error appears when the settings that are saved on the computer for your network do not match the current network settings. I'll explain now.
For example, your laptop was connected to Wi-Fi, it automatically connected to the network. But you went and changed the password, or the type of network encryption. Now the laptop is trying to connect to the network, but the parameters no longer match, and that’s the error.
It is enough to simply delete the network on your computer and re-establish the connection. I wrote about this in an article
Conclusion
It’s a great article, and I hope it’s useful. I wrote it for half a day, with interruptions of course, there were still problems with adding screenshots to the site, but I seemed to have solved it.
I tried to collect all the necessary information that should help you solve the problem that arises when connecting a laptop or netbook to Wi-Fi. If I forgot to write something, I will definitely add to the article in the future, and I will also be very grateful if you share in the comments the information that helped you solve the problem with connecting to a wireless network.
If you have any questions, ask them in the comments, we will try to figure it out. Best wishes!
Also on the site:
Why doesn't Wi-Fi work on a laptop (netbook)? How to connect a laptop to a Wi-Fi router? Error “Windows could not connect to...” updated: February 7, 2018 by: admin
When a user purchases a laptop, of course he wants to use all the features it provides. I chose the topic of today’s article, how to enable WiFi on a laptop in Windows 7 or 8, for a reason. It would seem that there is nothing complicated here, but if you do not know some of the nuances, then this procedure will not seem so trivial.
Problems can arise and, fortunately, they can be solved quickly and easily, you just need to know exactly how. In this article we’ll talk about some of the pitfalls that may arise when turning on Wi-Fi.
Is there wifi at all
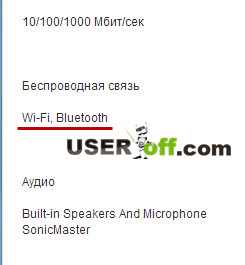
The first thing we need to do is find out if your computer or laptop has Wi-Fi. Modern laptops, laptops, netbooks, phones and other devices have Wi-Fi. You can check whether your device has one on Google, but I can assure you right away that if you purchased it a long time ago, then the built-in receiver simply may not be there.
When you look for the technical characteristics of your device, look for the Wi-Fi inscription of the same name. For example, description of an Asus laptop:
Physically turning on Wi-Fi
Some laptops have a special slider that you move to turn Wi-Fi on or off. So that you understand what I'm talking about now, look at the image:

Next to it there may be the following inscriptions: “OFF” or “0” - turn off/off, as well as “On” or “1” - on/off. It is usually located on the right or left side of the laptop, and can also be on the front of it.
There are laptop models where to turn Wi-Fi on or off you need to click on the corresponding button, which is in the image below (button on the left):


Often, laptop manufacturers make this button backlit: for example, when Wi-Fi is on, it lights up; if it’s off, the laptop will not light up this button.

Although this is not always the case, that is, this button is not illuminated when turned on, so you must determine for yourself whether Wi-Fi is turned on. To do this, pay attention to the indicators on the front of the laptop. If you turn on Wi-Fi, the indicator that is responsible for this device should light up, thus letting the user know that they can now use it.

Function keys (Fn +)
On laptops from different manufacturers, this procedure is slightly different. Let's look at the hotkey combinations that may be on your laptop:
- Acer. Press and hold the keys: “Fn+F3”.
- Asus. Combination "Fn+F2".
- HP. Here we press “Fn+F12”.
- Lenovo. Required buttons: “Fn+F5”.
- Samsung. Either "Fn+F12" or "Fn+F9".
Listed above are ways to enable WiFi on the most popular laptop models. However, there is no guarantee that you have one of these laptops.
The Fn button may simply be missing. Then carefully examine all the keys on the keyboard. The WiFi network icon should be drawn on one of them, click it and the network will turn on.
Below you can see what the Wi-Fi icon looks like:

In the screenshot you can see that on this laptop you need to press “Fn” + “F2”.
Turn on Wi-Fi in Windows
If you did the methods described above, but did not succeed in connecting to Wi-Fi, do the following: go to the “Start” menu - “Control Panel” - “Network and Internet” - “Network and Sharing Center”. On the left, click on the item: “Change adapter settings.”

Right-click on: “Wireless Network Connection” and select “Enable”.

If there is no such item, but “Disable” is available, then Wi-Fi is enabled in Windows.

After this, Wi-Fi should work, but if it doesn’t help, or some error has occurred, or there is no network with that name, the question arises: “How to turn on WiFi on a laptop then?” Read on!
If our laptop is not automatically able to connect to the desired network, then the problem may be that the signal receiver device is disabled in the device manager. Now I will show you how to fix this using Windows 7 as an example.
Go to the Start menu, right-click on Computer and select Properties.

In the window that opens, click on “Device Manager” on the left.
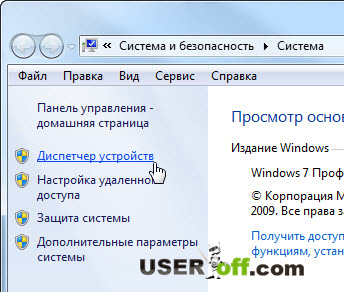
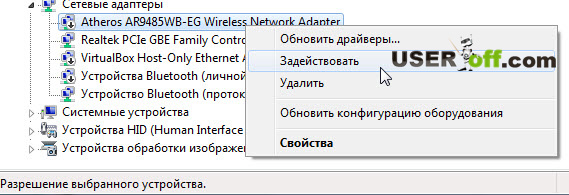
From here you can see which components in the laptop can be controlled - activate or disable the necessary device. We find something that has the word in its name Wireless. Right-click on it and select “Engage”.
By the way, if there is a yellow triangle with an exclamation mark next to the service icon, this means that the driver for this device is not installed on the laptop. In this situation, use another device (computer, laptop, netbook, tablet, etc.) through which you download Wi-Fi drivers, transfer them to the laptop and install them.
Other nuances of turning on Wi-Fi
Above, I described in detail how to enable WiFi on a laptop. But so that you can see the full picture of how to turn it on and how to connect to Wi-Fi, please follow the link further, since in this article I talk about other nuances that may arise in your case. The article “” was written using a “live” example, so it will be extremely useful for you.
If you are not familiar with installing drivers, then read: “”. To find the driver, go to the official website of your laptop manufacturer and enter the model in the site search. Then look for the Wireless driver in the list.
I do not rule out that users who read this article do not know the Wi-Fi password. If you don’t know it, then you won’t be able to log into the secure network. To find out how to view the Wi-Fi password, I recommend reading: “”. I also assume that some will ask about hacking, yes, it is possible to hack, but I won’t write about it.
Situations are different and there is no need to exclude the possibility that none of the above tips will help you. What to do then? Luckily for you, there is third-party software that you can safely use. Its meaning is that after installation, this program will automatically turn on every time you start Windows and, when you press a certain key combination, perform certain actions. For example, turn on Bluetooth or WiFi.
There are a huge number of such utilities; I can give SoftSwitch as an example. In addition to the above functions, it can also turn on the camera and TouchScreen. For each of these functions there is a specific combination of keyboard buttons, which you can familiarize yourself with if you decide to download this creation of programmers. Finding this program on Google will not be difficult for you, since it has a Free Soft license (free license). Download it, install it and enjoy!
And that’s probably all I have on this issue. Thanks for reading and I sincerely hope I helped you.
For clarity, watch the video:
There is a built-in connector that connects to Wi-Fi. But what to do if, after turning on a brand new laptop with an operating system installed on it, connecting to the router to receive communication does not work? You need to “rummage through” the settings by connecting Wi-Fi itself. We will look at classic methods for checking the ability of an adapter built into a laptop to connect and present methods that help you change Wi-Fi settings and configure it in versions of Windows 7-10.
We enable Wi-Fi in the laptop by hardware
Hardware-type tools will help you enable the connection. To do this, you should use buttons designed for connecting to wi-fi - this is the simplest option. If it doesn’t work, it’s worth checking to see if the driver on the laptop has failed.
Turn on wireless connections using laptop buttons
Some versions of equipment equipped with an element that makes it possible to use wi-fi require its separate activation: not every device automatically starts a wireless network. Some devices require the use of two keyboard buttons, some are equipped with one key for adapter launch. On older versions of laptops there is an independent button on the body, and not on the keyboard, made in the form of a slider.
If the user examined the laptop's casing but did not find a stand-alone slider, he should. As a rule, to turn on the transmitter, allowing you to join a wireless type of network, use the function buttons F (from the first to the twelfth).
You need to look at the symbols drawn on these keys. One of these keyboard elements has a Wi-Fi icon embossed in the form of an antenna.
Important: To connect to the Internet, which is a wireless type, the Fn+F5 combination is often used, so you should first look at these keyboard elements.
Checking and installing drivers for Wi-Fi
If the methods described above failed to enable an element designed to connect to a network wirelessly, the adapter may have been disabled by software - it was disabled in the operating system options. The user can launch the adapter using the classic Windows settings using two methods.
Method 1
This method involves using a center designed to manage network access. To start the device that connects the laptop to Wi-Fi, the user should use the combination Win + R, and then, when the window opens, type “ncpa.cpl”.

This request will bring up a section that allows you to change connector parameters.
Attention! In older XP versions, this item is indicated differently: you will need to find a section for a network type connection.
In the section, the user needs to find a column/option that provides information about the connection to the network, which is a wireless type. If this column is gray, the element connecting to WiFi is turned off. To start its operation, you need to click the button on the right and assign the option to be enabled. After this, you should try to connect to an available network.
Method 2
This method involves using a manager, which is designed to monitor the operation of devices. In the manager, connectors are disabled infrequently: usually the termination of the connector’s functioning is caused by a malfunction of the laptop (especially inexpensive but convenient models like).
Important: If the Wi-Fi connector built into the laptop is turned off, then in the graph displaying connections related to the network type, the icon corresponding to wireless connectors will not be visible.
To enter the dispatcher, the user should press Win + R on the keyboard that is built into his laptop. In the window that opens, to execute it, you need to enter devmgmt.msc and confirm the request.
When the dispatch window opens, in the column displaying adapters, look for the one whose name suggests “Wi-Fi” or “Wireless”.
Then you need to select the option in the menu that enables the connector: it is called up by right-clicking the touchpad on the device name.
Attention! If you get an error at startup, check the drivers: they will have to be reconnected, updated or reinstalled.
Additional method
Setting up WiFi on a laptop with Windows 10
Unlike the eighth option, the tenth (for example, ) does not have a panel that drops down on the right, namely, it cannot be “summoned” by clicking on the “network column” located in the system type tray (it is located next to the clock and date).
Because of this, users who used a different version of Windows may get confused when setting up Wi-fi. This is also due to the fact that in the tenth version of the operating system the user receives only a list of connections that are accessible to the connector built into the laptop and are within its accessible radius.
In order to correctly configure Wi-Fi in the tenth version of the operating system created by Microsoft, and not mess up other settings, the first thing you should do is find a shortcut in the system tray. The icon will display a list of those networks that are open for connection.

Attention!If after clicking on the network list icon is not visible, click on the line that can show available connections. After the user clicks on the inscription, a panel will appear on the right.
When the network is found, click on it: if it is protected, enter the password and confirm. After this, a message indicating a successful connection will appear. In order not to enter the password every time, you should tinker a little with the settings.
Select the option that gives access to additional options. When the window opens, click on the section leading to the center, which is intended to indicate grid parameters. Find the connection in the center, click on it and select the option that leads to its network properties.
Important: After completing the steps, you should note those functions that the user considers necessary in order to work comfortably with Wi-Fi.
Thus, the user is free to connect to any non-password-protected network visible to the device. This column is located in a tab designed to control connections that are of the wireless variety.
Also, the owner of a laptop that runs on “ten” has the opportunity to open automatically triggered access for . This section is located in the tab that displays network connectors.
To start automatic access, the laptop user will need to click on the section for network connections, go to properties and check the corresponding box.
Interesting:The same column displays other options regarding network settings.
In the center, where it is possible to work with connected network devices, the laptop user has the opportunity to program the router and “create” a new connection, which belongs to the category of those that connect wirelessly. There you can also set up a network VPN designed for accessing work data from a distance.
The user can also create a local group and enable/disable the Firewall.

Setting up Wi-Fi on Windows 8-8.1
To make the settings on a laptop that runs on the eighth version of Windows (for example), you need to find the network shortcut in the tray and click on it using the left button of the touchpad (a double short press on the paddle built into the laptop will also work).
This action will “announce” the list of connections available for the laptop connector, which belong to the wireless variety. Afterwards, you need to click on the Hotspot to which the user wants to connect, and then confirm the action by clicking on the line with the same name. A field will appear in which you need to enter a password that gives access to the network point.
Attention! In order for the laptop user to be able to see the text of the password that he wrote, he will need to click on the icon made in the form of an eye, which is located on the right side of the field. It should be remembered that the printed text is visible only if you “pinch” your “eye”.

When the password is printed, the user will need to click on “next”. If the password characters are entered correctly, the connection will be established in a maximum of a minute. Connecting to the network takes longer only when the Internet is slow.
A sign that everything is connected is the changed appearance of the network shortcut, which is located in the tray. It’s convenient that Windows 8 (for example,) sets all the configurable parameters that are necessary for a new connection “automatically,” excluding the password.
When the system comes online, it will “ask” you to determine the network type. The request concerns whether the user wants a printer or other peripheral device to be connected immediately, without requesting access. The user will also need to indicate whether he wants the information on his laptop to be available to others.
Attention! If you click “yes,” then information exchange between connected PCs and MFPs (wireless printing) will be available on the network under the user-selected name. It's convenient for the office. If you click on “no”, the network will only work with the Internet.
Changing indicators
All in the same tray, on the “network” shortcut, you need to use the right key of the touchpad, and in the optional window that pops up, click on the section, which is the center that allows you to interact with network settings.
In the center you will need to find the name of the “hotspot” and click on it to bring up an option displaying its status. In this window, click on properties related to the network connection. There you need to check the necessary boxes regarding the settings.
A wireless or WiFi network, in addition to all the features of a typical wired network, allows the user to move freely within the range of a radio signal. The user can stay connected to the printer, access the Internet, share network resources with other computers, and work with the laptop as a mobile device.
This document assumes that the user has already created a wireless home network, as discussed in Creating a Wireless Home Network (Windows Vista), or is attempting to connect to a known working wireless network at a WIFI service point.
Before use
Before connecting to a wireless network for the first time, make sure you have the following:
Initial setup of a wireless WiFi network
The first time you connect to the selected WiFi network, you must enter all the information to set up the connection. You can set your computer to automatically connect when it is within range of a network. Follow the instructions below to set up your WiFi connection.
Note.The original factory image of your HP computer contains all the necessary drivers for the built-in wireless device and the HP Wireless Assistant software. If you upgraded your operating system, you must download and install the latest wireless device driver and HP Wireless Assistant for your computer model and operating system. Not all computers have built-in wireless capabilities.
If your computer does not have a factory image of the HP system, search www.google.com or www.youtube.com for information on setting up a wireless network.
-
Enter the required network security information. This information was used when setting up your home network.
Rice. : Connect to a wireless network manually

Network name (SSID)
Security type(usually WEP and WPA)
Encryption type (Optional in some security types)
Security key or passphrase
Start this connection automatically Select this option if you want to automatically sign in to the network when your computer is within range of a wireless network.
Start your computer and turn on your wireless device.
To turn on your wireless device, slide its switch to the On position. The power switch for the wireless LAN device, as well as the Bluetooth device (if installed), is located on the side of the case or above the keyboard, depending on the model. On some computers, the switch is a button on the panel above the keyboard or one of the function keys on the keyboard.
The active state of a wireless device on most computer models is indicated by a lit blue light indicator. This indicator is orange to indicate that the device is inactive or disabled. Some newer models use a different color scheme and have an indicator light built into the corresponding function key.
In the notification area of the toolbar, find the HP Wireless Assistant icon.
Once your wireless device is turned on and active, look for the Search for Available Wireless Networks icon in the notification area of your toolbar. If there is no wireless device icon even though the network cable is connected, unplug the network cable. The wireless network icon should appear.
Right-click on the wireless network icon, click Network and Sharing Center, Setting up a new connection or network, then select Connecting to a wireless network manually.
Rice. : Setting up a new connection or network
To check if you are connected to a wireless network, click the search available networks icon to display a list of available wireless networks.
Currently, wireless technologies are becoming more widespread. Even public transport provides the opportunity to connect to the global network. Turning on Wi-Fi on a laptop is the first thing its owner should learn.
This is interesting! WiFi(fromEnglish. WirelessFidelity - quality without wires) is the logo of the Wi-Fi company Alliance. A fairly common practice is the transition from a proper name to a common noun. Similar transitions are brandsJeep, limousine and the like.
There are two main methods:
- Hardware enable.
- Software enablement.
Important! For normal operation of the wireless network card, update the drivers through the manufacturers' official pages.
To activate the module, as a rule, a special key combination is used. In the case described, this combination is Fn+F2. On older laptop models, activation is carried out using a special button with an image of an antenna, or using a switch.


On a note! When using outdated drivers, key combinations may not work at all, or may work incorrectly. Try to stay tuned for updates.
Enable via network management
The method is standard and included in official builds of operating systems.
Step 1. On the taskbar, turn on the display of hidden icons, find the network connection icon. Open the context menu by right-clicking and click on the “Network and Sharing Center” link.

Step 2. In the left frame, activate the “Change adapter settings” link.

Step 3. Highlight the wireless network adapter, bring up the menu and turn it on.

Important! You can also turn it on by double-clicking the left mouse button. Please note that you must have administrator rights to activate and deactivate individual network connections.You can get to the network connections section
Step 4. Enter the “Control Panel” through the “Start” button.
Step 5. Find the Connection Center icon and launch it. Then return to step 2 and follow the instructions described above.

If you are used to working with a keyboard more than a mouse, use another way to open the control center.
Step 6. Use the Win+R key combination.

Step 7 In the box that opens, enter the line “ncpa.cpl” and press the “Enter” key.

Then return to step 3.
Enabling via Device Manager
Step 1. To enable the wireless module, open “Start” and right-click on the “Computer” option. In the menu that opens, go to “Properties”.

Step 2. The window that opens contains various information about your system. In the left frame, find the “Device Manager” link and follow it.

Step 3. Find and expand the list of network adapters.

Step 4. Find the adapter you need, call up its menu and use the “Engage” option.

Important! To change network card settings, you must have administrator rights. You can view devices without them.
InclusionWi-Fi via command handler "cmd"
Step 1. To launch the command processor through “Start”, use the “Search programs and files” dialog box. Set the search parameter to the keyword “cmd” and run the handler as an administrator.

Step 2. To view information about connection interfaces, use the "netsh interface show interface" command.

Important! Pay attention to the parameters indicated in the “Admin Status” table. informs you whether the network card you need is enabled or not. The “Forbidden” state indicates inactivity.
Step 3. To activate the wireless network module, enter the command “netsh interface set interface name=”wlan” admin=ENABLED”, where name is the name of your network card from the table described above, and run the command.
On a note! Try to give network modules names in English, and at the same time single-part ones. In the case of multi-part names, use the “_” symbol instead of spaces between words - otherwise the command interpreter may not recognize the required module, or the command simply will not be executed.

Step 4. Once the activation process is complete, check the status by calling up the interface details again.

Find out how to enable Wi-Fi on a Lenovo laptop in the article -
Video - No Wi-Fi button and cannot find wireless devices
Conclusion
We have described four different methods for enabling a wireless network card. One method is hardware, three are software. All software is supplied with the operating system and does not require the installation of additional software packages.
Important! In the event that yourWi-Fi does not turn on in any of the ways; perhaps the network card is burned out. In this case, it is recommended to use specialusb-wifiadapters, as this is usually cheaper than replacing the motherboard's integrated Wi-Fi-module.
The evaluation of each of the software methods is displayed in the summary table.
| Information\Name | Network management | device Manager | Command line |
|---|---|---|---|
| License | Delivery with operating system | Delivery with operating system | |
| Russian language | Depending on Windows version | Depending on Windows version | |
| View driver information | No | Yes | No |
| Viewing network address information | Yes | No | Yes |
| Interface convenience (from 1 to 5) | 4 | 5 | 4 |


