A guide to working with the word program. Video lessons Microsoft Word for Beginners from Andrey Sukhovoy
We are studying the most popular text editor, Microsoft Word. In this material you will learn how to create new document, enter, edit and format text, create lists, apply styles and much more.
With this article we are opening a whole series of training materials with which you will learn how to create high-quality text documents in the very popular app in this area - Microsoft Word (Word). The presentation here will be in a rather primitive language, which may at first scare away readers who are already partially familiar with this editor. But, believe me, you will most likely find useful information in this series.
Microsoft Word is a text editor (processor) used to create professionally designed documents. Title Word, was not chosen by chance, because translated from English it means “Word”.
Thanks to the fact that Word combines the most modern means text formatting, it can be used to easily create documents of any complexity and organize them. In addition, with powerful editing and modification tools, this application provides a convenient environment for collaboration several users on one document.
In the first part of the Word tutorial series, you will learn how to create a new document, enter and edit text, and get acquainted with some basic types of formatting. Here we will begin our acquaintance with the newfangled ribbon interface of the editor. We'll also look at creating bulleted and untagged lists, changing document fields, and much more.
PROGRAM WINDOW
At opening Word the program window displays its two main parts: the ribbon located at the top (highlighted in red in the figure below) and blank document, occupying almost the entire program window.
The Ribbon includes a set of buttons and commands that can be used to perform various actions on a document and its content (for example, changing the size of text or printing it). The document window itself looks like a normal one White list paper and is intended for entering all kinds of test information.
There is also a menu above the ribbon on the left quick launch, in the middle is the name of the document, and in the right top corner There are buttons for minimizing, resizing and closing the program window.
In the document that opens, in the upper left corner of the page you will see a cursor, that is, a small blinking vertical line. This feature indicates that, starting from this place, the characters you entered will appear.
ENTERING AND EDITING TEXT
After opening the program, simply start typing and the letters, words and sentences you entered will begin to appear on the document page. To start typing on the same page, but one line down, you must press the Enter key. The number of times you press Enter will correspond to the number of lines skipped. As you enter text, the cursor gradually moves to the right. Once you reach the end of the line, simply continue typing letters. The characters and insertion point will automatically move to the next line.
If you need to start new paragraph, to do this, press the Enter key. As a result, the cursor will automatically appear at the beginning new line. If you need to make the spacing between paragraphs a little larger, press the Enter key again before starting to enter a new paragraph.
If you need to correct an error in typed text, just place the cursor to the right of the unnecessary letter and press the Backspace key. In this case, the cursor will delete the character to the left of it. If you need to erase an entire word, press the indicated key as many times as possible until the word disappears. There is another option for deleting an error: place the cursor at the beginning of the word, that is, to the left of it and click required amount times the Del key.
Practice your text entry and editing skills by typing a few random paragraphs, or type the version we suggested.
.jpg)
ERROR CORRECTION
When entering text Word editor warns of grammatical or spelling errors by highlighting them with a wavy green or red line. A green underline indicates that grammar needs to be checked, and a red underline indicates possible spelling mistakes or that the word (for example, a proper name or geographical names) are not recognized, that is, they are not in the Word editor dictionary.
What to do with such underscores? To do this, you need to move the mouse cursor over the underlined word and press the right button. As a result, a small window will appear with suggested correction options. Select the required word and click on it with the left mouse button. The word will be replaced and the underline will be removed. If the word is not recognized, Word will not offer any options. Please note that if these underlines are not corrected, they will not appear on the printed pages of the document.
Similar actions can be done with green underlines. But keep in mind that Word is good at recognizing spelling errors, most of which are quite easy to correct and find on your own. grammatical errors and errors of word usage are much more difficult. If you think you're right and Word gives you the wrong options, simply skip the correction by selecting the appropriate option from the right-click menu and the underline will be removed.
If you don't feel comfortable paying attention to each underline, you can ignore them while typing, and once you're done typing, check the spelling and grammar of the entire document at once. To do this, open the tab Review at the top of the ribbon and select Spelling in Group Spelling.
If working with the tape still raises questions for you, return to this point later, as a description of working with it will be given below.
HIGHLIGHTING FRAGMENTS OF TEXT
In order to perform any actions with text in a document, you need to select it, and then apply the desired command to the selected area. To highlight a whole word or a preposition, it is enough to make double click mouse, after which the selected area will be highlighted in blue.
To select an arbitrary piece of text, you can use two methods. In the first case, place the blinking cursor at the beginning of the fragment that you want to select. Then click Shift key and, without releasing it, click at the end of the desired fragment. After this, the desired text will be highlighted with a blue background to indicate that it is selected. Click anywhere in the document to deselect.
In the second case, also set the blinking cursor to the beginning of the fragment, but this time hold down left button mouse and move its pointer to the end of the desired fragment. After reaching desired result, the button must be released.
If you need to select several fragments in different parts text, use Ctrl key. Select the first section of text in any way, then press Ctrl and, without releasing it, select the next section, after which you can release the key. If you need to select another fragment, press the Ctrl key again and continue.
TEXT FORMATTING
To draw attention to important information For example, you can make text bold, italic, or underlined. But these are minor things. You can change its size, style, color, background and apply animation elements to it. And even this is not the entire list of capabilities that Word provides to users when working with text.
Now is the time to remember the ribbon (ribbon interface), which was discussed at the very beginning of the article, and find out how you can use it.
There are several tabs at the top of the working window. Each of them contains specific set actions. We need to select the second tab - home(if it is not selected, you need to left-click on it).
Each tab contains several groups with commands that combine several elements. On the tab home find the group Font(the names of the groups are on the bottom line of the feed). This group contains several commands and buttons that allow you to make various changes to the text.
In our case, select an arbitrary section of text or an entire word, then click on the corresponding buttons in the above-mentioned group to change its style.
.png)
As can be seen from the figure, after pressing the button Bold, the selected text has changed its style. Now let's make it more slanted and underlined by clicking on the buttons Italics And Stressed.
In this case, the underline can be either ordinary solid or wavy, dotted, double, etc. Use the triangle button on the right to see the full list of possible options.
.png)
From our example you can see that you can apply several types of formatting to one selection.
As you may have already noticed, the group Font contains quite a lot of different useful buttons, making it possible to change the font type and color, its size, strike out the font or convert it to superscript and subscripts, add animation or background. Select a piece of text and try to apply all these formatting options to it yourself by clicking on the appropriate buttons.
STYLES
The method of making changes discussed in the previous section is convenient only if you need to change the format of just a few characters, words or sentences. To apply several types of formatting to the entire document at once styles.
Different kinds of styles are available on the tab home in Group Styles. It is enough to select a style to automatically change the font, text size, attributes and paragraph formatting. For example, you can change the font style, make the text larger, and add bold formatting at the same time.
.png)
As you can see from the picture, after selecting a style called Heading 1, our first paragraph was transformed into a heading (the font size increased, its color and thickness changed).
To experiment, on the tab home in Group Styles Hover your mouse over the different styles one by one. This way, you can see the changes that will happen to the document after you want to apply any option. To finally apply the selected style, simply click on it with the left mouse button. To view other styles, you can open the collection by clicking the button in the lower right corner of the arrow block Other.
CREATING LISTS
If you need to create a list in a document, you can also do this on the tab home in Group Paragraph(which is to the right of the group Font).
Let's practice. First of all, split the text that will be converted into a list into different paragraphs using Enter keys. At the same time, these can be either individual words or entire sentences.
In our example, we decided to format the last paragraph as a list.
.png)
Now select the text you want to convert into a list. In the Paragraph group, click the button Markers. The text will be converted to bulleted list. Without deselecting the list, press the button Numbering to create a numbered list.
.png)
.png)
PAGE FIELDS
Page margins are empty space along its edges. By default, the margin widths at the top, bottom, left and right of the page are 2 cm, 2 cm, 3 cm and 1.5 cm respectively. This is the most common margin width and is often used for most documents. But if you need fields of a different size, you need to know how to change them. Other margin sizes may be useful, for example, when creating short letters, recipes, invitations, or poems.
The ribbon is also used to change the size of the fields. Only this time use the tab Page layout. You must first click on it to select it, and then in the group Page settings select item Fields. Images (icons) of fields and their sizes will appear in front of you.
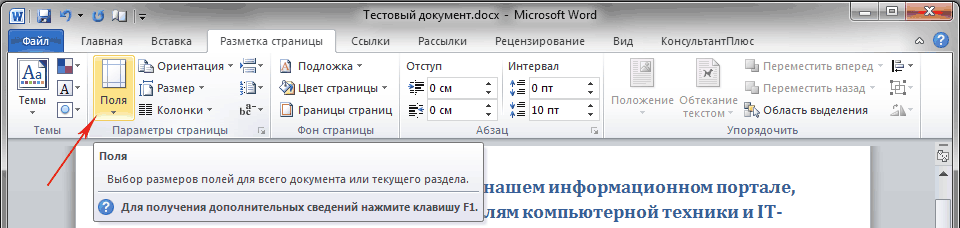
The first value of the list is a field Normal, which is active in this moment. To create narrower margins, you must click the button Narrow. If you want to make the left and right margins much wider, click Wide. When you select a margin type, it will automatically be applied to the entire document.
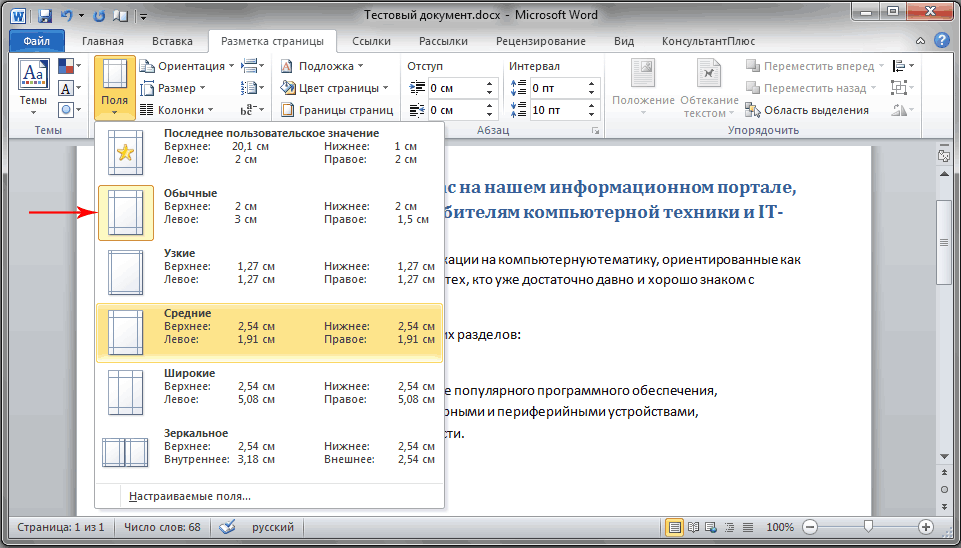
When you select fields, the background color of their icons will change. When you press the button again fields, Thanks to this change in background color, you can determine what size margins are set.
WINDOWBACKSTAGE
In order not to lose the changes made in your work, you need to save them, and the sooner you do this, the better. To do this, open the very first tab on the ribbon File. A large window called Backstage will appear in which you can make various operations, for example, save, open, print documents, and so on.

In the left area of the window that appears, select Save. A new window will appear smaller size. In this window you need to indicate where on the computer you want to save the document, as well as what name it will have. After saving the document, continue working by saving it periodically. It is also very convenient to save a document at any time by pressing the Ctrl+S key combination.
If the document is ready to be printed, open the tab again File. In the left area of the menu that opens, select the command Seal. A large window will appear in which you need to click on the line Seal. Of course, a printing device - a printer or MFP - must first be connected to the computer. As in many other cases, you can print a document using hot keys - in this case, the key combination is Ctrl + P.
After work on the text document is completed and the document is saved, close the file. To do this, open the tab File and in the left area click Close.
To find a document after you've closed it, view the list Latest documents . Click a document in the list and it will open.
To finish working in Word in the tab File select a team Exit at the very bottom of the menu or just click on the cross in the upper right corner of the program window.
CONCLUSION
With this, let me finish the first part of the training materials dedicated to the most popular text editor, Microsoft Word.
To consolidate the acquired skills, be sure to practice your acquired knowledge by typing several short texts yourself and applying various formatting elements in them.
In the next part we will learn how to cut and paste pieces of text, change line spacing, do alignment, use formatting marks and much more.
Read also:
This program is used a large number of of people. Andrey Sukhov decided to record a series of training video lessons “Microsoft Word for Beginners” for novice users and we invite you to familiarize yourself with the basics of this program.
Lesson 1. Video review of the appearance of the Word program window
In the first lesson I will talk about the interface of the Word program, that is, about its main elements. Then we will learn how to enter text and perform simple manipulations with it:
Lesson 2. How to properly format text in Word
Word allows you to format text. Formatting is changing the appearance of text, i.e. changing the font, style, color, alignment, etc.
Word's formatting tools are quite varied and allow you to format text according to your wishes and tastes.
Continuing the topic of working in Word that I started in the first video tutorial in the Word for Beginners series, I want to talk about the main formatting tools of this program.
Lesson 3. How to create a numbered or bulleted list in Word
Continuing the series of video lessons dedicated to the Microsoft Word program, I present the next lesson.
This video tutorial is dedicated to the topic of creating bulleted and numbered lists in Word. In this tutorial you will learn how to create a numbered, labeled or multilevel list by pressing one button in the program, as well as how to work with these lists - adding new items or changing the nesting level of an item in a multi-level list.
At the end of the video tutorial, I will show you how easy it is to create a red line in a paragraph of text.
Lesson 4. How to insert and edit images in Word
In the fourth video tutorial, dedicated to the Microsoft Word text editor, I will talk about inserting images into a document.
In this video tutorial, I will show you how you can insert any pre-prepared images and photographs into a text document, how you can easily and quickly resize an image, apply various artistic effects to photographs, or crop an image as you wish directly in Word.
At the end of the video tutorial, I will show how you can get complete statistics on the created text document, i.e. how you can quickly get information about the number of words or characters in the text.
Lesson 5. How to create a table in a Word document
In the fifth video tutorial, dedicated to the Microsoft Word program, I will talk about inserting tables into a text document.
In this video tutorial, I will show how you can insert tables with an arbitrary number of rows and columns, add or delete rows anywhere in the table, and also how to merge or split table cells as needed.
We'll also look at the process of inserting text into table cells and formatting text in a simple table.
Lesson 6. How to write a statement using Word
IN Everyday life We periodically have to write various statements, reports, reports and other similar documents.
Of course, you can write such documents manually, or you can type the application on a computer, for example, in Microsoft Word, in a matter of minutes.
This is exactly what will be discussed in the video tutorial:
Lesson 7. How to create an ad using Word
Using the Word program, you can create any text documents, sometimes even not quite ordinary ones.
So, if you need to create a simple advertisement for the sale-purchase-rent-lease of something, then you can create it in a matter of minutes in Word, and then print it in the required quantity.
Watch the video on how to do this:
Microsoft Word is by far the most used word processing program. Its popularity can be explained by the fact that it has a well-thought-out architecture, ample opportunities and is relatively easy to learn. It is suitable for both typing and printing text and for more difficult tasks, for example, decorating text with pictures, inserting tables.
The book you are holding in your hands will help you understand the intricacies of the newest version of the popular text editor– Microsoft Word 2007. With its help, you will learn how to perform tasks of varying complexity and learn about new work techniques.
Book structure
The book consists of 11 chapters. Each chapter is dedicated to a specific task and contains step by step instructions by her decision. Thus, training is based on repeating the examples described in the book, which allows you to consolidate the stated theoretical material. Much attention is paid Microsoft settings Word, useful functions, which are contained in numerous program menus and therefore are not always obvious to the user.
It is better to start studying the book from the first chapter, since the presentation of the material is built on the principle of “from simple to complex.” Therefore, having opened the publication in the middle, you may, for example, not understand the meaning of this or that term, which the authors freely use, knowing that this material has already been covered. On the other hand, in this case, you can always return to the chapter in which attention was paid to material that was incomprehensible to you.
The book is adapted for self-study and in addition detailed descriptions of the actions performed contains a large number of illustrations, as well as explanations and useful tips.
The first chapter is about installation Microsoft package Office, and in particular Word programs. It is necessary to pay attention to this topic, since the ability to install the program correctly is a necessary condition successful work with her in the future. Such complex program, like Microsoft Word, contains a large number of components, and if during the process it turns out that any of them is missing, you can always install it additionally in order to work with the program most effectively.
In the first chapter you will also find basic information about the Word interface and how to customize it.
Chapters 2–4 cover the basics of working with documents. After studying them, you will learn how to quickly perform basic operations with text, enter and edit data, and give documents a neat appearance using proper formatting.
Chapters 5–8 focus on special Microsoft capabilities Word. They tell you how to work with tables, graphic elements, hyperlinks. These chapters, unlike the first four, are optional. The capabilities described in them are needed to perform specific tasks. You can decide for yourself whether these topics are worth studying in detail or whether it is enough to just become familiar with them superficially.
Chapter 9 is about macros, which are a powerful tool for automating work in Microsoft Word, so mastering this topic will help you work in the program much more efficiently and feel like a real professional.
Chapter 10 covers preparing documents for printing and printing them.
After studying it, you will learn not only how to work with documents on the monitor screen, but also how to print them. The documents you create will not need to be printed again due to the inability to read text or numeric data, because you will learn how to achieve the required position of the document on a sheet of paper in a few simple steps.
Chapter 11 describes reference system Microsoft Word and provides answers to questions that Word users often have.
Who is the book intended for?
The book is intended primarily for users who have experience in operating system Windows and its core applications, but are not yet familiar with Microsoft program Word. The publication will be for you faithful assistant in studying the application and will allow you to pass full course learning Word, starting from elementary concepts and ending with complex tasks. For the most effective assimilation of the material, it is recommended to work with the book sequentially, from the first chapter to the last, and be sure to complete all the exercises. Each exercise helps you acquire new skills, as well as consolidate those acquired.
At the same time, the book will also be useful to those users who are already familiar with Microsoft environment Office, and Word in particular, but would like to deepen their knowledge or study new version applications. They may be interested in theoretical material and useful tips, and such readers are not required to complete the exercises.
From the publisher
Send your comments, suggestions and questions to: [email protected](Peter publishing house, computer edition).
We'd love to hear your opinion!
Kultin N. B.
K90 Word 2007. The essentials. - St. Petersburg: BHV-Petersburg, 2007. - 176 p.: ill. + Video course (on CD-ROM)
ISBN 978-5-94157-993-8
The book is practical guide for beginners on solving common problems in Microsoft Office Word 2007: typing and formatting text, working with tables, illustrations, business graphics. Attention is paid to working with templates and forms, and collective work with the document. The book is distinguished by its accessible presentation, practical orientation, and a large number of illustrative examples. The included CD contains a video tutorial on the basics of Microsoft Office Word 2007.
For Beginner Word Users
UDC 681.3.06 BBK 32.973.26-018.2
Publication preparation group:
License ID No. 02429 dated July 24, 2000. Signed for publication on March 23, 2007.
Format 70 1001 /16. Offset printing. Conditional oven l. 14.19. Circulation 3000 copies. Order no.
"BHV-Petersburg", 194354, St. Petersburg, st. Yesenina, 5B.
Printed from ready-made transparencies at the State Unitary Enterprise "Printing House "Nauka"
199034, St. Petersburg, 9 line, 12
ISBN 978-5-94157-993-8
© Kultin N. B., 2007
© Design, publishing"BHV-Petersburg", 2007
Preface........................................................ ........................................................ ........ | |
Chapter 1. New document................................................... ....................................... | |
Launching Word .................................................... ........................................................ .......... | |
New document................................................ ........................................................ .... | |
Reference Information................................................ ........................................ | |
Typing................................................ ........................................................ ........ | |
Letters................................................. ........................................................ ............... | |
Uppercase and lowercase letters.................................................... ............................ | |
Deleting an erroneously entered character.................................................... ......... | |
Space................................................. ........................................................ ............. | |
Numbers and special characters.................................................................... ......................... | |
Full stop and comma........................................................ ........................................................ . | |
Dash and hyphen......................................................... ........................................................ ..... | |
Go to new line................................................................... ...................................... | |
Symbols........................................................ ........................................................ .......... | |
Spell check................................................................ .................................... | |
Error correction................................................ ......................................... | |
Text input mode................................................................... ............................................ | |
Scrolling text........................................................ ............................................... | |
Typing rules................................................................... ....................................... | |
Saving a document........................................................ ......................................... | |
Shutting down......................................................... ............................................... | |
Chapter 2. Editing a document.................................................... ............... | |
Beginning of work................................................ ........................................................ ..... | |
Editing........................................................ ........................................................ ............... | |
Inserting a letter, word.................................................... ........................................... | |
Adding a paragraph................................................... ........................................... | |
Removal........................................................ ........................................................ .......... | |
Replacement................................................. ........................................................ .............. |
Operations on fragments......................................................... ........................................ | |
Selecting a fragment................................................... ....................................... | |
Moving a fragment................................................... ................................... | |
Copying................................................... ........................................................ .... | |
Saving a modified document................................................................... .................... | |
Chapter 3. Document Formatting.................................................... ................ | |
Font................................................. ........................................................ ............. | |
Paragraph................................................. ........................................................ ................... | |
Characteristics of a paragraph................................................... .................................... | |
Formatting........................................................ ............................................... | |
List................................................. ........................................................ ............. | |
Numbered list................................................... ....................................... | |
Bulleted list........................................................ .................................... | |
Style................................................. ........................................................ ................... | |
Style Sets........................................................ ........................................................ . | |
Paragraph style (formatting paragraphs)................................................................. ............. | |
Text style................................................... ........................................................ ..... | |
Cancel formatting................................................... ................................... | |
User style................................................... ........................................... | |
Changing the style................................................... ................................................... | |
Pagination of a document................................................................. ........................... | |
Pagination................................................ ............................................... | |
Chapter 4. Printing................................................... ........................................................ .... | |
Page settings................................................ ............................................ | |
Page size........................................................ ................................................... | |
Page orientation................................................... ....................................... | |
Fields........................................................ ........................................................ ............. | |
Preview................................................................................. | |
Printing a document........................................................ ........................................................ | |
Chapter 5. Tables......................................................... ........................................................ | |
Inserting a table........................................................ ........................................................ .. | |
Entering text into cells.................................................... ............................................... | |
Column width................................................... ................................................... | |
Formatting the table................................................... .................................... | |
Changing the font........................................................ ............................................ | |
Horizontal alignment................................................................... ........................... | |
Vertical alignment................................................................... ............................... |
Text direction................................................... ........................................... | |
Boundaries........................................................ ........................................................ .......... | |
Shading......................................................... ........................................................ .......... | |
Design template................................................... ......................................... | |
Changing the table structure........................................................ ............................ | |
Adding Rows and Columns................................................................. ............................ | |
Deleting rows and columns................................................................. ................................... | |
Merging cells................................................... ............................................ | |
Sorting................................................. ........................................................ .......... | |
Deleting a table........................................................ ................................................... | |
Diagrams........................................................ ........................................................ .......... | |
Constructing a diagram................................................... .................................... | |
Chart setup................................................... ....................................... | |
Changing data........................................................ ........................................... | |
Changing the chart type................................................................... ............................... | |
Chapter 6. Graphics................................................... ........................................................ . | |
Drawings........................................................ ........................................................ ............... | |
Inserting a picture from Microsoft collections........................................................ | |
Inserting a picture from a file................................................................... ................................... | |
Image settings................................................................... .................................... | |
Creating a drawing................................................... ............................................ | |
Start................................................. ........................................................ ............ | |
Drawing a figure................................................... ........................................... | |
Changing the size of a figure................................................... ............................ | |
Moving a figure................................................... .................................... | |
Deleting an element................................................... ........................................... | |
Changing an element................................................... ........................................ | |
Circuit................................................. ........................................................ ............ | |
Filling......................................................... ........................................................ .......... | |
Text................................................. ........................................................ .............. | |
Overlaying elements................................................... .................................... | |
Grouping................................................. ................................................... | |
Net................................................. ........................................................ .............. | |
WordArt......................................................... ........................................................ ............. | |
SmartArt................................................... ........................................................ ............. | |
Chapter 7. Templates and forms.................................................... ................................ | |
User templates........................................................ ....................................... | |
Creating a template........................................................ ........................................... | |
Creating a document based on a template................................................... .......... |
Form................................................. ........................................................ ............. | |
Word Templates................................................... ........................................................ .. | |
Chapter 8. Reviewing.................................................... ................................... | |
Change fixation mode................................................................... ................................ | |
Review......................................................... ........................................................ | |
Committing changes........................................................ ........................................... | |
Displaying changes................................................... .................................... | |
Chapter 9. Subject index.................................................... ....................... | |
Footnotes........................................................ ........................................................ ............... | |
Conclusion................................................. ........................................................ ...... | |
Subject index................................................ .................................... |
Preface
The rapid development of information and communication technologies has led to the fact that everything large quantity people use computers not only to perform their official duties at work, but also at home, in everyday life. Computers are used by everyone: schoolchildren, students, scientists, employees and managers of firms and enterprises.
Computers are most widely used to solve office tasks: typing and printing texts (from simple letters and abstracts to serious scientific works, consisting of hundreds of pages containing tables, graphs, illustrations), calculations, and work with databases.
Historically, most users work on an operating system Microsoft Windows and uses the Microsoft Office package to solve office tasks. And this is not surprising, because the programs included in the package allow you to solve almost any problem.
Microsoft is constantly working to improve its software products, expands their capabilities, makes them more convenient and friendly.
Microsoft Office 2007 is latest version Microsoft Office package. The package is based on:
Microsoft Office Word 2007 - text editor;
Microsoft Office Excel 2007 - table processor;
Microsoft Office Access 2007 - database management system;
Microsoft Office PowerPoint 2007 - a program for preparing and conducting presentations;
Microsoft Office Outlook 2007 is an email program.
Introduction |
|
Microsoft Office Word 2007 is word processor(which is often called simply a text editor), in other words - computer program, designed for working with documents (this is what the texts the user works with are called). Using Microsoft Office Word 2007 you can quickly type and print required document(for example, a letter, article or report). Microsoft Document Word can contain illustrations, tables, and charts.
Microsoft Office Word 2007 is designed for use in the operating room Microsoft system Windows Vista, but can also work in Microsoft Windows XP.
The book you hold in your hands is not Microsoft description Word 2002 and not a reference book. This is a guide to solving common problems that arise while working with Microsoft Word. The purpose of this book is to teach you how to effectively use Microsoft Office Word 2007 to solve common problems.
The book is addressed to beginners Microsoft users Word (namely Word, not personal computer). This assumes that the reader already has basic computer skills, knowing, for example, how to open a folder and run a program.
In order to learn how to work with Microsoft Word and make the most of its capabilities, you need to decide specific tasks. Work actively with the book. Apply the acquired knowledge in practice. Enter examples into the computer. Don't be afraid to experiment and make changes to the examples. The more you do on your own, the more you will learn.

new document
To receive a document printed on a printer (for example, a letter, article or abstract), you need to launch Microsoft Office Word 2007, create a document (in the simplest case, type text), save the document on disk and then print it.
Launching Word
In order to launch Microsoft Word 2007, you need to click on the Start button (a list of programs that the user has worked with in Lately) and in the menu that appears, select the Microsoft Office Word 2007 command (Fig. 1.1).
If the Microsoft Office Word 2007 command is not in the list of programs, then you need to click in the All programs line, expand Microsoft group Office (click on this line) and select the launch command there (Fig. 1.2). Please note that Windows analyzes the user's actions and adds the names of programs that the user frequently works with to the list that appears as a result of clicking the Start button. Therefore, the next time Word can be launched by selecting the appropriate command from the Start menu.
ADVICE
The Microsoft Office Word icon can be placed in top part Start menu and Quick Launch bar. For the Microsoft Office Word icon to appear at the top of the Start menu, you need to click on the Start button, expand Microsoft list Office, set the mouse pointer to Microsoft string Office Word 2007, click right click mouse and select from the menu that appears
This article introduces the basic concepts used in Microsoft Word to help new users get started creating complex, professional-looking documents.

Heading 1
On the panel quick access 2 Preservation, Cancel, And Return
File tab 3 New, Open, Preservation, Seal And Close.
Ribbon 4
Edit window 5
Scroll bar 6
Status bar 7
8
In Word, you need to save the document in order to exit the program without losing data. When you save a document, it is stored as a file on local computer or in network folder. More later version you can open the file, edit it and print it.
Open File Explorer and select documentation. A list of documents will appear.
If the document you want to work on is in the list, click the file name to open the document. If the document is not listed, navigate to the location where the file is stored and double-click the file. The Word splash screen appears, and then the document displays.
Advice: file and selecting the command Open. To open a recently saved document, click latest.
Most text formatting tools can be found by clicking on the tab home, and then selecting in the group “ Font ».

1 this is on the tab home.
2 this group " Font"on tab" home ".
3 Font ».
|
Changing the font. |
||
|
Font size |
Change text size. |
|
|
Font enlargement |
Increase text size. |
|
|
Reducing the font |
Reduce text size. |
|
|
Change case |
Change selected text to uppercase, lowercase, or other common word styles. |
|
|
Removes all formatting from selected text, leaving only plain text. |
||
|
Bold |
Changes the selected text to bold. |
|
|
Italicizes the selected text. |
||
|
Stressed |
Draws a line under the selected text. Click the drop-down arrow to select an underline type. |
|
|
Crossed out |
Draws a centered line over the selected text. |
|
|
Interlinear |
Creates subscript characters. |
|
|
Superscript |
Creates superscript characters. |
|
|
Apply visual effects such as shadows, glows, and reflections to selected text. |
||
|
Text highlight color |
Transforming text marked with a marker into an attractive one. |
|
|
Font color |
Change text color. |
Using Styles
Styles let you quickly format key elements in your document, such as headings, headings, and subheadings. Follow these steps to apply styles to text in your document.
Select the text you want to change.
On the tab home in Group Styles Hover over any style to view dynamically directly in the document. To view full list styles, click the arrow Additionally to open the area styles.
To apply the style that best suits the text, click it.
Once you're ready to apply styles to individual elements, Word allows you to use a set of styles to simultaneously change the appearance of the entire document.
On the "tab" Constructor" in Group Formatting a Document select one of the predefined style sets, for example Regular authentication or ordinary. Hover over any style assigned to view it dynamically directly in the document. To view preset style sets, click the down arrow to the right of the group Formatting a Document.
To apply a style set that best suits the text, click it.
Change line spacing in a document
WITH using Word You can easily change the spacing between lines and paragraphs in your document.
On the "tab" Constructor" select Paragraph spacing to view a drop-down list of paragraph spacing options. Hover over any paragraph spacing style to view it dynamically directly in the document.
When you find the right type, click it.
Advice: To set your own paragraph spacing, select Custom spacing between paragraphs.
Preview and Print
Short review user interface Word

Heading 1 : Displays the file name of the document being edited and the name of the program you are using. It also includes the standard minimize, restore, and close buttons.
On the Quick Access Toolbar 2 : commands that are often used, e.g. Preservation, Cancel, And Return They are here. At the end of the Quick Access Toolbar is a drop-down menu where you can add other commonly used or commonly used commands.
File tab 3 : Click this button to find commands that are executed by the document itself instead of the document content, such as New, Open, Preservation, Seal And Close.
Ribbon 4 : The commands that are needed to work are located here. Appearance on the tape will change depending on the size on the monitor. Word will compress the ribbons by rearranging their control order to fit smaller monitors.
Edit window 5 : Shows the contents of the document you are changing.
Scroll bar 6 : Allows you to change the position of the screen you are editing a document.
Status bar 7 : You change the display of document information.
View buttons 8 : Allows you to change the display mode you edit the document according to your needs.
Slide zoom control 9 : Allows you to change the zoom settings of the document you are resizing.
Saving and opening a document
Specify a location to save the document in the field Save to. When you save a document for the first time, it is pre-filled as the file name in the field file name Enter the first line of text in the document. To change the file name, enter a new file name.
The document is saved in . Change the file name in the title bar to match the name of the saved file.
Can be opened Word document to continue working. To open a document, do the following:
Click the Start button and select documentation.
Browse to the location where the file is stored and double-click the file. The Word splash screen appears, and then the document displays.
Advice: You can also open the document in Word by going to the tab file and selecting the command Open. To open a recently saved document, select Recent
Editing and formatting text
Before you can edit or format text, you must first select the text. Follow the steps below to select text.
Place the cursor at the beginning of the text you want to edit or format and click the left mouse button.
While holding down the left mouse button, move it to the right (called "dragging") to select text. A background color will be added at the location to indicate the selection range of the selected text.
Most text formatting tools are found by clicking on the tab home, and then selecting in the group “ Font ».
1 this is on the tab home.
2 this group " Font"on tab" home ".
3 This is the Bold button. In the table below for the names and functions of the buttons "" in the "" group Font ».
|
Changing the font. |
||
|
Font size |
Change text size. |
|


