Installing and configuring Microsoft Virtual PC. How to create a virtual computer in Virtual PC Microsoft virtual pc installation
There is a fairly wide range of programs that are still very actively used at the moment, but on modern versions of the operating system they work incorrectly or do not work at all. What should you do if you have software installed on your computer that works well on Windows XP, but crashes on the newer Windows 7? The most rational way in this situation is to use the virtual OS Windows XP, which can be installed on Windows 7. Sometimes this can even be called the only way out, because modern drivers sometimes do not support the operation of old equipment.
So what is virtual mechanism mode? In short, using this mode on a computer with Windows 7 installed, you can run an earlier version of the product. It is part of the Microsoft Enterprise Desktop Virtualization technology (MEDV for short) and comes in the form of the Microsoft Desktop Optimization Pack.
A distinctive feature of using such a virtual machine is full integration with the parent system - the user will be able to distinguish Windows XP from the installed main seven only by different window designs. Therefore, it will not be confused with the desktops of two operating systems, switching from one system to another, which is very convenient. In addition, there will be no problems running applications written exclusively for Windows XP or earlier versions - they will run in an environment that is “familiar” to them. If you intend to actively use Windows XP, but do not intend to install it as a guest OS, you will simply need to use a virtual machine. In this case we are talking about a machine called Virtual PC.
Before installation
Before installing the Virtual PC virtual machine on your computer, you should make sure that your central processor supports visualization technology. Although the vast majority of modern microprocessors support this function, it would be a good idea to check it again. After all, without the support of visualization instructions, it is simply impossible to install the machine.
You should also be aware that only 32-bit systems can be installed on the machine (even if the main OS is 64-bit).
System updates may be required for the virtual machine to function correctly. Without some updates, the program will not work, and installing all the latest versions significantly increases the level of security.
Program installation
Installation of Virtual PC is carried out using the wizard for creating the appropriate devices. Thanks to it, you can configure the basic parameters of Windows XP the way you personally need it. For example, you can set a certain amount of RAM that will be available to your machine.
Let's move directly to the installation algorithm:
- Click on the Start menu button and open the Windows Virtual PC folder;
- A folder called “Virtual Machines” opens, where all machines installed on the computer are displayed (if there were any previously). Select the item “Create a virtual machine”;
- A wizard opens where you can select the desired configuration, namely: determine the name and location of the system, determine the available memory, and create a virtual HDD device.


When the wizard completes, the newly created Virtual PC virtual machine will appear in the above folder. If necessary, you can set access restrictions for certain users. This is done using the “Sharing” item.
That's it, the Virtual PC virtual machine is installed. In order to launch it, you need to select the desired machine from the list of available ones and click “Open”. The OS installer program will open. Installing an operating system on a machine involves using an installation disk with an XP system. Virtual Windows XP is installed in the same way as a regular operating system.
As soon as the installation is complete, in the same folder you need to select “Service/Install integration components”. Installation of integration components is also carried out using the corresponding wizard. After it is completed, the computer will need to be restarted, and only then the machine with XP installed on it will be ready for use.
(Visited 1,402 times, 1 visits today)
To have several operating systems with separate workspace and applications at hand, you don’t need to buy a second (third, fourth, etc.) computer. Because it all fits into your single PC. How? Thanks to virtual machines (VMs) - special programs that create (emulate) imaginary (virtual) computers inside the main operating system.
A virtual PC is almost like a real one. It has its own processor, memory, hard drive, network adapter and everything else. Of course, these are not physical devices, but they are made in such a way that operating systems consider them to be just that - real.
Several virtual computers can work simultaneously on one physical computer. Exactly how much depends on the hardware resources: the faster the processor, the larger the RAM, the more spacious the storage, the more. A typical average-performance home PC running Windows 10 can handle three to five lightweight operating systems simultaneously (for example, Windows XP, Android and Lubuntu + the main system). Or two or three relatively heavy ones (for example, the main Windows 10 + virtual Windows 7 and Mac OS X). As you already understand, virtual computer emulator applications allow you to install and run a variety of operating systems on them.
General purpose virtual machines (as opposed to specialized ones, such as the Java VM) use:
- To run applications that the main system does not support.
- To protect the system from potential harm from untested programs.
- As an additional barrier against viruses when visiting dubious web resources.
- To create an isolated environment for studying the activities of malware.
- As a testing ground for debugging your own developments.
- To master network construction technologies.
- For double authorization on some gaming portals and much more.
And of course, virtual machines are widely used to distribute server work resources.
Today we will not touch on the industrial use of VMs, but will only consider what can be useful to home users of Windows OS.
Oracle Virtualbox
Let's look at the process of creating a new virtual machine and starting to install Windows 10 on it.
- Click the “Create” button in the top panel.

- In the first window of the VM creation wizard, we will indicate the name of the OS (it will be displayed in the list of guest systems), its type (Windows, Linux, etc.) and version. In our example, this is Windows 10 32 bit (you can also install 64 bit, but it will require more resources). To move to the next step, click Next.

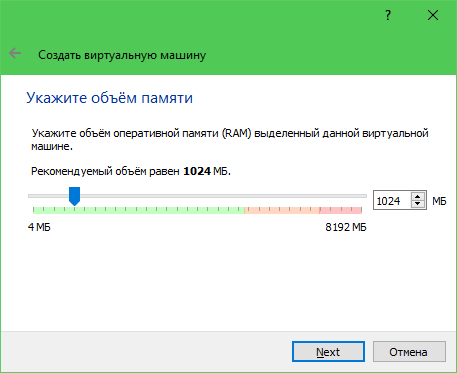
- Next, we will indicate the size of the VM RAM. By default, Windows 10 x86 is allocated 1 GB, but you can increase this amount by moving the slider to the right. If your PC does not have a lot of RAM, do not give the VM more than 2-3 GB, otherwise the main system will slow down due to lack of memory.
- Next we create a virtual hard disk. If you are installing the system for the first time, select the “Create new” option.

- Leave the virtual disk type as default.
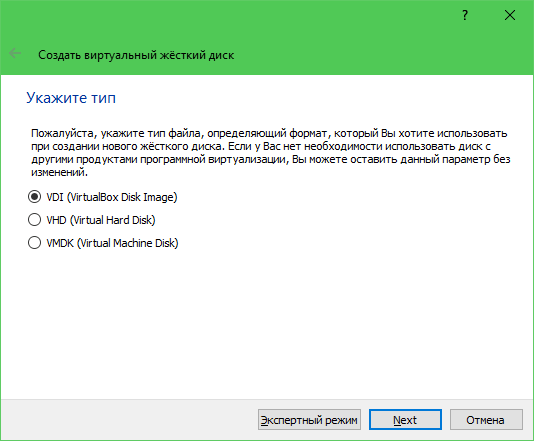
- A storage format is an area on your computer's physical drive that is allocated to a VM. It can have a constant or dynamically expanding volume within the limits that you define further. To save space, we will choose a dynamic format.

- Next we indicate the name of the volume (virtual disk C) and its size. The default is 32 GB.

- After clicking the “Create” button in the last window, a new virtual machine will appear in the list. Its parameters are shown in the frame on the right.
- To proceed to installing Windows, click the “Run” button in the top panel.

- In the window that opens after this, the “Select boot disk” window will appear. Click on the folder icon and specify the path to the system distribution. This can be an image in .iso format or physical media (DVD, flash drive). After selecting your distribution, click Continue.

- The further course of installing the OS into a virtual machine is no different from installing it on a physical computer.

Some VM and guest system settings
Clicking on the virtual machine window will capture the mouse cursor (i.e. it will only move within the virtual screen). To return the cursor to the main OS, press the Ctrl+Alt combination.
To access the full range of features of the guest OS, you need to install special add-ons. Go to the "Devices" menu, click "Mount Guest Additions Disk Image" and follow the further instructions.

To connect a folder to the guest system for exchanging files with the main one, click the “Shared Folders” item in the “Devices” menu. Click on the “folder+” icon in the window that opens and use the “path to folder” field to specify it in Explorer (it shows the directories of the main system).
If you want the setting to work permanently, check “Auto-connect” and “Create permanent folder”. The shared folder will be accessible from the virtual machine explorer as a network folder.


To change the order in which boot devices are polled (for example, to boot a virtual machine from a DVD), shut down the guest OS, open its settings (in the main Virtualbox window) and go to the first tab of the “System” section. In the "Load Order" list, select the desired media and press the arrow buttons to move it to the top.

VMware Workstation Pro
Some Hyper-V virtual machine options
To take a snapshot of a running guest OS, open the top menu of its Action window and click Checkpoint. Or press the combination Ctrl+N.
Access to the settings of an individual virtual machine is opened from its context menu in the list of the main manager window and hidden behind the “Settings” button.
Other features of the program are also very simple and can be mastered without much difficulty.
The release of a new version of the operating system is stressful for most users. Therefore, one of the main tasks of developers is to make the transition as smooth as possible. This doesn’t always work out, but the creators of Windows 7 turned out to be understanding people, and therefore introduced a virtualization package into the system that was new at that time, allowing you to run XP inside the “seven”.
General information
A virtual machine emulates hardware, creating an isolated environment within the system in which any OS can be installed. This allows you to solve many problems with software compatibility, and also makes it possible to “try” another system without deleting the current one. You will be able to work with physical drives, install games and programs for Windows XP without giving up the “seven”, save files and perform other tasks. Let's see how to install a virtual machine on Windows 7 to take advantage of all its useful features.
Checking for Virtual PC
If you installed Windows 7 Ultimate, Enterprise or Professional versions, then you have the Virtual PC feature by default. You just need to make sure that the processor supports hardware virtualization. This can be done using the utility from Microsoft Hardware-Assisted Virtualization Detection Tool.
Download the utility and run it. Depending on the results of the processor test, the following messages may appear on the screen.

Enabling/disabling virtualization is done in the BIOS settings, so before installing Virtual PC manually, make sure that the option is activated.
The option may be called Intel_Virtualization Technology, AMD-V, Virtualization Extensions, etc. Find this feature in the BIOS and change the value from “Disabled” to “Enabled”.  If after this you cannot start the virtual machine, Windows offers to install a special patch. At this stage, it is important to choose the correct system bit size – x32 or x64.
Manual installation
Installing a virtual machine on Windows 7 includes two steps:
- Installing Windows Virtual PC;
- Installing a Windows XP Mode virtual disk.
First, let's deal with Virtual PC:

Then you can proceed to installing the Windows XP Mode virtual disk:

First start
After installing XP Mode, the "seven" must further configure it to create a virtual disk. Therefore, after clicking the “Finish” button, the following window will appear on the screen, in which there will be another license agreement, the terms of which you must accept.  Specify the folder where the virtual disk will be located and create the first user.
  Enable security features of the system you are creating. This is not necessary. Click "Start Installation".
  The installation process will start; you just have to wait for it to end.
New virtual machine
The system is prepared, the virtual disk is installed. All that remains is to create a new environment and run Windows XP in it.

The newly created sandbox will appear in the XP Mode main window. Right-click on it and select “Open”. Select the “DVD drive” option and specify the path to the physical drive (if you have a disk with the Windows XP distribution) or a pre-downloaded ISO image. The system installation wizard will launch.

All you have to do is install Windows XP as usual to start using this system in an isolated environment created using the hardware virtualization feature.
After the installation is complete, you can use all the features of the Microsoft OS: install gadgets for Windows XP, install games that do not run on the “seven”, run outdated programs, etc. – to do this, just run XP mode through the emulator. 
Alternative virtual machines
In addition to the built-in hardware virtualization feature, Windows 7 supports third-party programs that help you create an isolated environment and install any operating system into it.
First of all, it is necessary to note such virtualization systems as VMWare Workstation and Oracle VM VirtualBox. Let's look at the example of Virtualbox to see how such programs work.
Oracle VM Virtualbox
Download and install Virtualbox. It is installed in the same way as any other program, so you should not have any problems.
- Launch Oracle VM VirtualBox and click Create. The Create Sandboxed Environment Wizard opens.

- Specify the name of the new machine, system type and bitness, and then click “Next”.

- Set the amount of RAM that will be automatically allocated when the virtual machine starts for its operation.

- Create a new hard drive and click Next.

- Specify the disk type. If you don't know which is better, leave the first item on the list checked.

- Select the storage format – it is recommended to select “Dynamic image”.

- Specify the name and size of the new virtual hard disk, and then complete the wizard by clicking the Create button.

The isolated environment is ready. To start working with it, mark it with the left mouse button and click the “Run” button in the top menu.  A new window will appear on the screen through which you will first install and then interact with Windows 7 or another installed operating system. Specify the path to the physical disk or ISO image with the Windows distribution and click “Continue.”
  We will not consider the Windows 7 installation process in detail here, since it is no different from a regular installation on a physical hard drive. You just need to wait until the system installation is completed.
The virtual machine is launched through the Oracle VM VirtualBox program. You will need to open this utility and select the desired virtual system image from the main menu on the left.
As for other utilities, in VMWare Workstation the process of creating a virtual machine almost completely repeats the procedure described above.  Some other programs may require additional configuration, so for beginners they may seem somewhat complicated.
Conclusion
Creating a virtual machine and installing a system on it is quite simple, but you need to be careful - since April 2014, Windows XP is not supported by Microsoft, therefore, even by emulating the mode of this OS, you make your system vulnerable.
In addition, XP mode is not supported on machines with Windows 8 installed, and there is no way to fix this. The Virtual PC feature was originally created for a smooth transition between systems, so skipping versions will not work.
But you can try installing a system other than Microsoft Windows - for example, Linux.  It’s quite difficult to switch to it right away; besides, you have to give up most of the Windows programs you’re used to. In emulation mode, you will gradually get used to the peculiarities of interaction with the new system and decide whether you need to completely switch to it.
With Microsoft Virtual PC you can create an unlimited number of virtual operating systems (OS).
More precisely, their number is limited only by the capacity of your hard drive.
Note: the program is useful for testing software, or for compatibility of old programs (then a virtual OS with Windows XP will come in handy).
To fully understand the installation process, I offer you instructions for installing two virtual OSes on one computer. Let's take Windows XP and Windows 7 as an example.
1. Download and install Microsoft Virtual PC on your computer.
If during installation you receive a message that this update is not applicable to this computer, then most likely it was already installed by automatic updating of your Windows 7.
2. Go to “Start” - “All Programs”, find a folder called Windows Virtual PC, open it and run the program with the same name.
3. A window with no content will open. Click on the “Create virtual machine” button in the top menu.
4. In the next window, enter the name of the virtual machine and, if desired, indicate the location of its future data (it is desirable that there is more free space on the disk on which we are going to install the virtual OS). Click "Next".
5. We indicate the allocated RAM to the virtual machine and leave the item about network connections checked, this will allow the virtual OS to access the Internet using the connection of the main operating system.
6. We choose to create a dynamic hard disk, since now the machine will take up less space on our hard disk. Click "Create".
7. Now we see that the virtual machine has been created. It is displayed in one image file with the extension "*.vmcx". But it does not contain an operating system. So we take the Windows XP disc and insert it into our CD/DVD drive.
8. Double clicking on the file will launch the virtual machine and the installation of Windows XP will begin.
9. Having installed the OS, we can already work in it.
10. But we still need one “OS” - Windows 7. In order to install it, we repeat steps 2 to 8, having first completed the installed virtual OS. Accordingly, we give it a different name and change the disk in the drive to Windows 7.
11. As you can see, the installation of another virtual OS has begun.
12. Having opened virtual machines, we see two operating systems, each of which we can use.
13. Now we have 3 operating systems on our computer:
a) basic Windows 7;
b) virtual Windows XP;
c) virtual test Windows 7.
You can read about how to create shared folders in the main and virtual OS in the answer to the question "
Virtualization is currently one of the most promising computer technologies. According to many experts, virtualization technologies have enormous potential and are among the three fastest growing ones. Many manufacturers of both software and hardware are focusing on supporting virtualization in their products, and this is not surprising: after all, according to the forecasts of leading IT analysts, by 2015 half of all computer systems will be virtual. Today, special attention is paid to the virtualization of operating systems, both in the context of virtualization of enterprise server infrastructure and in relation to the virtualization of user desktops. A virtual server infrastructure has much more capabilities than a real one: it is more flexible, has many features to ensure high availability, and is much easier to manage and deploy. Desktop systems are virtualized for a wide variety of user tasks: from creating secure virtual environments for software isolation, to portable virtual machines used at work and at home.
Microsoft, of course, could not help but pay attention to virtualization technologies in both of these aspects. Back in 2003, it purchased the Connectix company along with the Virtual PC product, which began the history of Microsoft virtualization.
At the time, it was not yet clear how virtualization would enable more efficient use of computer systems, and Microsoft did not give much priority to the development of the Connectix Virtual PC product, releasing only the Virtual PC 2004 version, while VMware aggressively promoted the similar product VMware Workstation. Time has shown that virtualization is of great interest among home and corporate users, and Microsoft had to act as a catching up party in the competition with VMware, which made a big bet on virtualization. By releasing the Virtual Server 2005 product, based on the Virtual PC kernel, Microsoft somewhat rehabilitated itself in the eyes of users, but the Standard and Enterprise editions of the Virtual Server product that existed at that time were not free and did not arouse much interest. In 2006, Virtual Server 2005 R2 was released, which Microsoft had to make free due to the fact that VMware announced a free VMware Server product for the SMB (Small and Medium Business) sector, which was superior to Virtual Server in its capabilities.
At the moment, the efforts of both companies are aimed at creating powerful tools for managing virtualization servers, the capabilities of which will determine the effectiveness of the virtual infrastructure as a whole. Not long ago, Microsoft released the first update package for Virtual Server R2, which allows us to take seriously the possibility of using this platform in an enterprise production environment. In 2007, Virtual PC 2007 was released - a desktop virtualization platform that supports Windows Vista and is noticeably faster than the previous version.
In light of the rapid growth in computer hardware power, home users often support several simultaneously running virtual systems, connected by a network for various kinds of experiments, as well as secure Internet browsing. On the Virtual Server platform, maintaining a virtual network is one of the key tasks of system administrators when deploying a virtual infrastructure. In this article we will reveal all the details of network configuration on Microsoft virtualization platforms.
About organizing virtual networks on Microsoft virtualization platforms
When using several simultaneously running virtual machines on one physical computer, it becomes necessary to configure various types of network interaction between the guest and host OS, depending on the tasks assigned to them. These are the main use cases for virtual networks on a virtualization platform:
- creating a virtual machine whose network adapter is in the mode of sharing the resources of the physical network card, as a result of which the virtual machine behaves in relation to the external network as an independent computer
- creating isolated networks of several virtual machines for the purpose of software testing, training and using servers “in conjunction” within their own subnet
- working with an external network from a virtual machine, requiring only connections initiated from it to the external network
For each of the listed use cases, Microsoft virtualization platforms implement a separate type of network interaction.
Physical network adapter resource sharing (Virtual Networking)
In order for a virtual machine to provide services to a network external to the host system, Microsoft suggests using this type of network interaction. In this case, the virtual machine behaves like an independent computer on the network to which the physical computer is connected. If there is a DHCP (Dynamic Host Configuration Protocol) server on this network that assigns IP addresses, the virtual machine will receive it and will be able to work as an independent system on the network (otherwise, you will need to assign an external IP yourself). This network interaction scheme can be visually represented as follows: 
This networking type is assigned to the virtual machine by default because it is suitable for most use cases. It should be noted that with this type of virtual network, network interaction is also carried out between the host and guest systems.
Local Only Networking
This type of networking allows you to combine multiple virtual machines into an isolated network within the host system, while components of the network external to the host do not have access to them. This can be visualized like this: 
This type of networking prevents virtual machines from communicating with the host system.
Network using NAT (Network Address Translation) - Shared Network
Security is one of the most important considerations when planning to use virtual machines to work with an external network. If the use of a virtual machine is planned only for the user and software to work with external network services, without providing their own services to the external network, the Shared Networking type of network interaction is ideal. 
In this case, the host operating system runs an independent DHCP server that assigns internal IP addresses to virtual machines within the host network. A virtual machine can initiate a connection to an external network using a special Network Address Translator service, which converts IP addresses. With this type of network interaction, virtual machines use one IP address of the host system (Shared IP) and are not visible from the external network.
Setting up a Virtual PC network
When planning to deploy several virtual machines on one physical host, you need to think in advance about the structure of their network interaction. The most common use of the Virtual PC product is to create a virtual work environment for testing software or to create a portable user environment. At the same time, it is often necessary to provide both access to the external network from virtual machines and their interaction with each other. For each use case for a virtual machine, you can create a separate networking model by attaching one or more virtual network interfaces to the appropriate network type. Virtual PC allows you to create up to four virtual network adapters for one virtual machine. In the guest system, the emulated adapters are seen as DEC / Intel 21140 Based PCI Fast Ethernet adapter. They fully support the IPv6 protocol, as well as the ability to boot over the network (PXE, Preboot eXecution Environment). It should be noted that Microsoft virtualization platforms do not support Token Ring topology networks.
Even when installing a virtual machine in Virtual PC, in the lower left corner of the console you can see a network connection icon that blinks while the virtual machine is accessing the virtual network adapter. By right-clicking on it and selecting “Networking Settings”, you can proceed to setting up the network for the virtual machine. You can also call up network settings by selecting “Edit” -> “Settings” -> “Networking” in the main console window: 
Note
Changes in network settings, in most cases, are picked up by the virtual machine on the fly, and no reboot of the virtual machine is required to apply them.
Not Connected
To ensure that the virtual machine does not have a virtual network adapter and does not have access to the network resources of the host and other guest systems, in the virtual machine settings, select the “Networking” category, and select “Not Connected” for the first network adapter: 
Keep in mind that if you don't need networking in the virtual machine, it's better to choose this option as it can speed up applications that check the network connection (due to the lack of latency).
Virtual Networking
Very often, Virtual PC users need to access the Internet from the guest system, and it is required that the guest system also provide some services to the external network (for example, network folders). In this case, the “Virtual Networking” type of network connection is suitable, when virtual machines within the host interact both with each other and with the external network.
To assign this interaction model to a virtual network adapter, select the “Networking” category in the virtual machine settings and select your physical network adapter: 
Note
A virtual machine on the Virtual PC platform can be launched without the ability to interact with other guest systems on the same host. To do this, you can start the virtual machine using the command line interface. Click "Start" -> "Run" -> type "cmd" and press "Enter". Next run the command:
“Virtual PC.exe” -pc -extnetworking -launch
(the -extnetworking parameter does not affect the “Shared” network communication type).
Local Only
If you set this type of network communication for guest systems, then the virtual machines will communicate only with each other, without affecting the external network of the host system. In this case, network traffic between virtual machines does not reach the host system, being localized in the internal network of the platform. Remember that Virtual PC does not use a DHCP server in this communication model, and you will need to manually configure the IP addresses of the virtual machines. It is worth noting that within such a virtual network, the network adapter of one of the guest systems, operating in promiscuous-mode (a mode when the network card accepts all packets, and not just those intended for it), can intercept traffic from other virtual machines.
To assign this interaction model to a virtual network adapter, in the virtual machine settings, select the “Networking” category and select “Local Only”: 
Shared
This networking model, as already mentioned, “hides” the virtual machine behind the host operating system, allowing the guest system to initiate connections to the external network via a modem or LAN connection (however, Microsoft does not recommend using a modem in virtual machines). Access to virtual machines from the outside will not be possible (this must be taken into account when working on the network from a virtual machine). In this case, a DHCP server operates within the virtual network, which assigns internal addresses to virtual machines from the range 192.168.131.x, where x is a number from 1 to 253 (unfortunately, Virtual PC does not allow changing this range). Keep in mind that this type of network does not support communication between virtual machines, nor does it support communication from the host to the guest system. It should be noted that only the first virtual network adapter can be used for a Shared Networking network connection.
To assign this interaction model to a virtual network adapter, in the virtual machine settings, select the “Networking” category and select “Shared Networking (NAT)”: 
Remember that if you are not a member of the Administrators group on the host system, you will not be able to communicate with the external network using Internet Control Messages Protocol (ICMP).
Creating multiple virtual networks within a host
When deploying virtual machines on desktop computers, it is often necessary to configure a network between the virtual machines and the physical host, in the absence of a connection to an external network. Sometimes a physical computer does not have a network adapter at all, but even in this case it is possible to configure network interaction between the host OS and virtual machines. In addition, in some cases it is necessary to create several isolated virtual networks of the “Local Only” type, within which guest systems will interact. Microsoft offers a simple and elegant solution: the connection of virtual machines to the host system through a virtual device “Loopback Adapter”, which allows you to combine virtual machines and the host system into a single isolated network. When adding this interface, in the host system you can set it in the settings of virtual machines as a network adapter, which will allow them to interact within the same virtual network as the host. In this case, the loopback adapter can be thought of, relatively speaking, as a virtual switch or hub to which the network adapters of the host and guest systems are connected. Moreover, adding several such adapters will allow you to create several virtual isolated networks. These networks can be interconnected through a virtual machine with two virtual network adapters, setting the parameters of each adapter to bind to the corresponding loopback adapter of the host system. When accessing the Internet from a virtual machine on such a network, be sure to enable Internet Connection Sharing on the host system.
To add a loopback adapter, on the host system, do the following:

After that, click “Next” and then “Finish”, and in the list of equipment, in the “Network Adapters” category, you will have a loopback adapter to which we can “attach” virtual network interfaces, like a switch.
Open the network settings of the virtual machine (“Virtual PC Console” -> “Settings”), go to the “Networking” category and bind the virtual network adapter to the Loopback Adapter: 
After this, in the network adapter settings you need to set the IP address and subnet mask. It is recommended to select an IP address from the range 192.168.x.y (where x is a number from 0 to 255, y is from 1 to 254) to avoid conflicts with other addresses on the external network. Then, in the guest system, you need to configure the IP address of the network adapter according to the host's subnet (the x number should be the same as the host, using the mask 255.255.255.0).
For other adapters, you can bind to other interfaces, thus combining virtual networks with each other.
Using Wi-Fi network adapters in Virtual PC 2007
Some users of the Virtual PC 2007 desktop virtualization platform feel the need to use the Wireless Network from a virtual machine via a Wi-Fi adapter on the host system. However, recognition of this type of network adapter is not always successful. Often, during installation the following problem occurs: 
In this case, access to the external network and host resources from virtual machines will be impossible when using this Wi-Fi card in the mode of sharing the resources of a physical network card (Virtual Networking) due to the fact that Virtual Machine Network Services are disabled for this connection. To make virtual machines work with a Wireless adapter, you need to select a Wi-Fi network connection in the host system, right-click on it and select “Properties”. In the window that appears, check the “Virtual Machine Network Services” checkbox: 
Setting up a Virtual Server R2 network
Unlike Virtual PC, the Virtual Server R2 platform has more options for setting up network communication between virtual machines, but the principles of network operation are the same. Virtual Server operates in terms of two types of networks:
- Internal Network (interaction within the host, analogous to Local Only in Virtual PC)
- External Network (interaction with an external network via a physical network adapter of the host system)
After installing the Microsoft Virtual Server product, one internal (Internal) network and several external (External) networks are automatically created according to the number of physical network adapters of the host system.
To view the list of available networks in Virtual Server, on the virtualization server management page, in the “Virtual Networks” category, click “Configure” -> “View All”: 
As can be seen from the figure, to build virtual networks we can use the virtual device “Loopback Adapter” according to the same principles as on the Virtual PC platform. To edit the properties of a virtual network, hover over the virtual network name and select Edit Configuration. 
Here we can edit the properties of the virtual network (Network Settings) or the DHCP server settings for it. When you click on “Network Setting”, the virtual network editor will open: 
On this page you can change the virtual network name in the “Virtual Network Name” field. The “Network adapter” field specifies the type of virtual network. If the “None (Guest Only)” value is selected, then virtual machines whose network adapters are connected to this network will interact only with each other, without affecting the network interaction of the host system (analogous to the Local Only network in Virtual PC). If you select a physical host system adapter, the type of network communication will be similar to Virtual Networking in Virtual PC.
In the “Disconnected virtual network adapters” field you can connect the virtual network adapter of the virtual machine to the edited network, and in the “Virtual network notes” field you can edit the network description.
The DHCP server settings include all the necessary settings of the network adapter assigned to it when the virtual machine starts (start and end IP addresses, default gateway, subnet, DNS and WINS servers, etc.). When configuring a DHCP server, you need to take into account that the first 16 addresses of a given range are reserved by the server and are never assigned to virtual machines. For networks of the External type, the DHCP server is disabled by default so that virtual machines can receive network settings from the external network.
Once the virtual network is configured, you can proceed to configuring the network adapters of the virtual machines. You can also create your own virtual network by clicking the "Add" link in the "Virtual Networks" category. Virtual Server allows you to create an unlimited number of virtual networks, to which any number of virtual machines can be connected. When creating a virtual network, a .vnc file with network settings is created in the “Documents and SettingsAll UsersDocumentsShared Virtual Networks” folder, which can then be imported into the Virtual Server. Remember that virtual networks are not portable to another physical host, since their settings depend on the specific hardware installed on the host system.
To configure one or more virtual network adapters for a virtual machine, in the main Virtual Server window, hover over the name of the virtual machine and click “Edit Configuration”, then click on the “Network adapters” link. 
On this page, you can select the virtual network to which the virtual network interface will be attached, add another one (up to four for one virtual machine) and assign a static or dynamic MAC address (MAC, Media Access Control) to the network adapter. Microsoft recommends assigning dynamic MAC addresses to prevent network conflicts between virtual machines. If you use static addresses for any reason, make sure they are unique for each machine (especially be careful when deploying virtual machines from the same template on different servers). If a MAC address conflict does occur, replace the line in the .vmc file:
0003FFxxxxxx
and reboot the guest so that Virtual Server assigns a unique MAC to the network adapter.
Just like in Virtual PC, you can completely disable virtual machine networking by selecting the “Not Connected” option in the “Connected to” field. Virtual Server does not have a separate Shared Networking type of networking, but it can be easily achieved by binding virtual machines to a loopback adapter and enabling Internet Connection Sharing to connect to the Internet.
Conclusion
The Virtual PC and Virtual Server platforms enable users to create virtual networks with different types of interaction. Although they are not as configurable as, for example, VMware products, they allow you to implement all the basic use cases of multiple virtual machines on a single host, running on one or more isolated or interconnected networks. Since both Microsoft platforms are free, their use is quite acceptable for enthusiasts, home users and small businesses. The Virtual Server and Virtual PC products represent a huge field for experimentation when creating virtual networks for training purposes, in the absence of the physical ability to build real network interaction between several computers.


