What is a network folder for? How to connect a network folder in Windows? Logging into your local home network
Shared folder on a network drive Windows 10
So, how to map a network drive on Windows 10? We already know how to create it, but it’s not very convenient to search for the required shared folder in the network environment, especially if there are a lot of computers. It is much easier to have it appear as a separate drive that appears along with your “C” drive when the system boots.
To connect a network hard drive on Windows 10, the first thing you need to do is allow sharing of files and folders on your computer. To do this, right-click on the “Start” menu and go to “Network Connections”

Here in the left column click on “Change sharing settings”

- Enable network discovery
- Enable file and printer sharing
- Let Windows manage your homegroup connection

Mapping a network drive Windows 10
This was the preparatory stage - now let’s move on to the main question, how to connect a network drive in Windows 10?
To do this, you need to open Explorer and in the left column, where the tree of drives and folders is, find the “My Computer” link - right-click on it and select “Map network drive...”.

In the window that pops up after this, select a letter for our future Windows network drive, for example “X”.


After selecting the folder, leave the “Restore at logon” checkbox so that you don’t have to create it again every time you turn off the computer. And click “OK”.
Now, when we go to “Computer” in Explorer, among other system hard drives, we will be able to see the “Z” drive in the “Network storage” section. You can get to it provided that the computer on which this network drive-folder is located is turned on.

Mapping a network drive on Windows XP
The technique for connecting a network drive on Windows XP is similar to that already described above. Therefore, we will describe here the connection method directly from the “Network Neighborhood” section.
Go to “Start > Network Places” and find the shared folder we need on one of the computers on the local network. Right-click on it and select the “Map network drive” menu item. You can also simply select “Service” in the top menu and select the same section.


Now if you go to “My Computer”, hard drives will be displayed, as well as network folders connected as network drives, indicated by separate icons.

That's all. For those who have not yet understood what it’s like, here’s a video:
Public folders in Outlook provide a great way to collect, organize, and share information about specific topics and projects across your organization. In this case, "public" means visible to employees in the organization, not to all users. By adding a message to a public folder, you're not sending it as an email, so it doesn't end up in someone's inbox. Instead, users can access the public folder at any time to view posts of interest.
Important: To use public folders with Outlook, you need Microsoft Exchange Server and an Exchange email account. Many home and personal email accounts don't use Exchange.
Step 1: Collaborate with your Exchange administrator
Your organization may prohibit the use of public folders or have specific policies regarding their use. This can be obtained from the administrator. If your organization allows and supports public folders, but does not have a top-level public folder, ask your Exchange administrator to create one.
If you have access to a top-level public folder, press CONTROL+6 to display its contents in the Outlook folder pane.
Step 2: Create a folder
Adviсe:
Step 3: Assign folder permissions to users and groups
Getting started with public folders
The following are common examples of using public folders within an organization.
Interactive discussions
Keep each discussion topic in a separate subfolder. If necessary, assign permissions to each subfolder (if you want to limit access to folders that contain sensitive information). You can also assign a moderator to each topic to control the addition of posts and remove posts that do not meet corporate standards or violate organizational policies.
Sharing calendars, contact lists, and task lists
Differences between mail and public folders
When switching from a mail folder to a public folder, the button Create a message above the folder area changes to a button Create an entry, because they create posts in the public folder rather than send messages.
There is no button when creating a reply to a post in a public folder Reply All, because your entry is visible to all users viewing the contents of the folder.
Learn more about Outlook folders
Create a shared folder and specify permissions, views, forms, and rules
To create a shared folder, you must have permission to create a folder in a shared folder on an existing one. For more information about how to obtain permission, contact your administrator.
Step 1: Create a shared folder
In the list of folders, in the navigation pane, click the folder you want to copy.
On the menu file select item Folder and click folder name Copy.
From the list, select the desired location to copy the folder.
On the menu file select team Create and select Folder.
In field Name enter a folder name.
In field Folder select the desired folder you want to create.
On the list Place folder in select the folder location.
To quickly launch into a shared folder with existing items:
Step 2: Configure Permission Levels
You must have owner permission for the shared folder to set permissions for the shared folder. You can only set permissions for one folder at a time.
Open the tab permissions.
Click the button Add.
In field search Enter the name of the person you want to grant sharing permissions to.
Click the button Add, and then the button OK.
On the list Name select the name of the person you just added.
In chapter permissions select the options you want.
Note: You can assign everyone who has access to the folder the same permissions by clicking default on the list Name.
Step 3: Create views to organize and find information
On the menu View Current view and select a team Define Views.
Select a team Create.
In field View name Enter your name.
In field Presentation type select the desired view type.
To specify where the view will be available, select an option in the group can be used.
Click the button OK.
To further customize the view, in the field Description, click the button and select the desired options you want to use.
When you have finished selecting your options, click OK.
To immediately use the created view, click the button Apply.
Go to view will create a new view on.
On the menu View hover over element Current view and select Setting the current view.
For each type of change that needs to be made to a field Description click the button and select the options you want.
After making changes, click close dialog box Setting up the view.
On the menu View hover over element Current view and select a team Define Views.
In field views for folder folder_name select item Current view.
Click the button Copy.
In field View name Enter your name.
To specify where the view will be available, select the appropriate radio button under Can be used.
Note: New views are added to Current view submenu (in the menu View select item Sort by).
Creating a View from Scratch
Creating a new view based on a standard one
Step 4: Change the default view of a folder
To change the default view for a public folder, you must have permission from the owner of the folder and there must be at least one custom view defined for the folder that will be visible to everyone.
Properties.
Go to the tab Administration.
If the tab " Administration" is not displayed, you do not have owner permission.
On the list original representation Select the view that will appear whenever you open a folder.
Microsoft Outlook default view for items of this type display ordinary mode in the folder.
Step 5: Specify forms that other users can submit information on the public folder
You must have Editor, Contributing Editor, or Owner permission to add a form to a private public folder or to a public folder. If the folder is in a shared folder and you have owner permissions, you can limit the forms that are available to other users who use the folder.
In the Folder List, in the Navigation Pane, right-click a folder and select Properties.
Go to the tab forms.
To add a form to the list related forms from this folder, select item Control, and then specify the form.
Click the button Close.
To limit the list of forms that should be available to other users using the folder, select an option in the group Allow these forms in this folder.
Step 6: Create Rules to Process Sent to Folder
You must have owner permission for the public folder to create or edit rules for it.
To create a rule, click the button Add a rule.
To edit an existing rule, click the rule in the list and click Change rule.
In the Folder List, in the Navigation Pane, right-click the shared folder that you want to create or change rules and select from the context menu Properties.
Go to the tab Administration.
Click assistant folder.
Do one of the following:
Enter the conditions that the element's action must satisfy. Multiple conditions click Additionally. and press the button OK.
Adding contacts to a folder.
Note: The general list of contacts is displayed in Outlook or Address Book.
Sharing a task list
Create a new folder and select from the list folder contentstask elements.
On the list Place folder in select item tasks and press the button OK.
Adding tasks to a folder.
Note: When copying a task list to a public folder, you cannot Copy an assignment to a public folder or create an assignment from a public folder.
Post information to a shared folder
Open the shared folder that you want to place the data in.
Use the default form to post information, select from the menu file, select a command Create and select a team Note in a folder.
In the form, enter the information you want to publish.
Create a managed shared folder
To designate a managed folder, you must have owner permission on the public folder.
Normal response
“Thank you sent. Please note that messages posted to some folders or topic groups are checked to determine whether they should be publicly accessible. In such a case, there will be a delay before authorized submissions can be viewed by other users."
Custom response
Click the button custom response and select sample. Enter your response text.
In the Folder List, in the Navigation Pane, right-click the shared folder and select Properties.
On the "tab" Administration" press the button Managed Folder.
Check the box set the folder as a managed folder.
In the dialog box Forward new messages Enter the name of the user who receives incoming messages or the name of another shared folder where messages to be scanned are stored. The manager who is viewing is indicated in step 6.
Optional: To automatically send a reply when a moderator receives a new message, select an option in the section reply to new messages.
Select one of the options below.
Moderators will not receive these message replies.
To add or remove usernames that are moderators, click Add or Delete.
Optional: To view the properties of the selected moderator, click the button Properties.
In order to make a network folder in Windows XP, create a folder, for example "Network Folder", right-click on it and select " Properties".
In the properties window, go to the " tab Access" and check the boxes next to " Share this folder", if it is necessary that network users can change (add, delete) files in this folder, check the box - " Allow modification of files over the network".

At this point, the creation of a network folder (called a “share”) can be considered complete. As you can see, a hand has appeared at the bottom of the folder, this means that the folder is network.

In order for other users to see it on the network, you need to go to network , choose " Show workgroup computers", find the computer on which the network (shared) folder is located, click on it and see the network shared folder there.

You can click "Start" - "Run" or keyboard shortcut "Win" + "R", enter //<имя или IP компьютера> , For example //comp, press the Enter key, all shared folders on the computer will open.

network drive .
How to make a network folder in Windows 7.
Properties".

In the properties window, go to the "tab" Access" and press " General access".

Now you need to add the necessary users and give them the appropriate access; in this example, everyone will have full access (the ability to change and delete files) to the folder. In the Add field select " All", in column Permission level select " Read and Write", press " General access".

Ready".

After that, go to " Start" - "Control Panel" -" or click on the button Network connection on the taskbar and select "Network and Sharing Center".

In the window that opens Network and Sharing Center look at what network is being used (in this example - Work) click on "".
 In the profile you are using (home, work or general), make the necessary changes, namely:

Scroll down and:
Save your changes.

At this point, setting up a network folder in Windows 7 can be considered complete.
Computer, on the right click " Net", select the computer on which the network folder is located, all shared folders on the computer will open on the right.

Another way is to click "Start" or keyboard shortcut "Win" + "R" and enter //<имя или IP компьютера> , For example //User-PC.

For ease of use, you can connect a network folder network drive .
How to make a network folder in Windows 8.
In order to make a network folder in Windows 7, create a folder, right-click on it and select " Properties".

In the properties window, go to the "tab" Access" and press " General access".

Now you need to add the necessary users and give them the appropriate access; in this example, everyone will have full access to the folder (the right to change and delete files). In the Add field select " All" and in the column Permission level select " Read and Write", press " General access".

A message window will open indicating that the pack has become online. Click " Ready".

After that, go to "Control Panel" - "Network and Sharing Center""or click on the Network Connection button on the Taskbar and select "Network and Sharing Center".

In the window that opens, look at what network is being used (in this example - Public) click on " Change advanced sharing options".
 In the profile you are using (private, guest or public), make the necessary changes, namely:
Enable network discovery;
Turn on file and printer sharing;

Go to the "tab" All networks":
Enable sharing to allow network users to read and write files in shared folders.

Disable password protected sharing.

Save your changes.
At this point, setting up a network folder in Windows 8 can be considered complete.
To use the network folder, go to Computer, on the right click " Net", select the computer on which the network folder is located, by clicking on the required computer, all its shared folders will open on the right.

Another way is to press the keyboard shortcut "Win" + "R", enter //<имя или IP адрес компьютера> , For example //pk2. By pressing Enter, a window with shared computer folders will open.

For convenience, the shared folder can be connected network drive .
I hope now you, regardless of the operating system Windows XP/Windows 7/Windows 8, can share the folder without any problems.
A shared folder in Windows 7 is one of the system directories that can be accessed by several user accounts, both locally and over the network. Most often, shared folders are used for sharing files, since everything that is placed inside them becomes available to all users who have rights to connect to this folder.
By default, only one folder is created as a public folder in Windows 7 – C:UsersPublic (System drive >> “Users” directory >> “General”). Inside it there are thematic subdirectories: “General Music”, “General Documents”, “General Downloaded Files”, “TV Recordings”, “Images”, “Videos”, etc., as well as folders created by users and programs.

All accounts on this computer have equal rights to access the shared folder. You can verify this if you expand its properties and go to the “Access” tab. At the top of the window, where sharing of network resources (files and folders) is mentioned, it says “Shared access available” and the button of the same name is active.

Clicking on this button opens a window with a list of accounts and groups. Among them there is a group “Everyone” with rights to read and write to this folder.

The owner, the Administrators group of this computer, can edit the list of users (delete and add) and change their permission level - read only or read and write.
Opening access to shared folders over the network
In addition to “Public” on Windows 7, you can open public access to any other folder. But in order for users from the network to connect to it, you need to enable the appropriate permissions for them.
- From the control panel, as well as the context menu of the network tray icon, go to “Network and Sharing Center”. Click “Edit additional” in the transition bar. sharing options."

- Expand the local network profile tab - “Work or Home” or “General” - depending on your settings.

- In the “Printer and File Sharing” and “Shared Folder Sharing” items, check the “Enable” checkbox and click “Save Changes”.

After this, other users on your network will be able to see all shared resources in their network environment. To view your network environment on Windows 7, you need to go to the “Computer” folder and in the transition area click on the “Network” shortcut. By double-clicking on a computer from this list, you can see all its shared folders, that is, folders that are publicly accessible.

Share any folder on your computer
A user with administrative privileges can make almost any folder public if they wish. To do this you need to change its settings a little.
- Open Properties and go to the “Access” tab of the selected folder. As you can see, in our example there is no public access to it yet. Click the “Advanced Setup” button.

- Check the box next to “Share…”, limit, if necessary, the number of simultaneous user connections and open “Permissions”.

- In the permission settings, as we can see, only one group is specified - “Everyone”. Here we can assign this group the desired access rights to our folder or, for example, delete it and add other accounts to the list. To do this, click the “Add” button.

- In the user selection window, you need to enter an account name. Usually Windows 7 itself finds the user by name, but if this does not happen, click “Check names”.

- In the next window, click “Location” to tell the system where to look for an account with the same name.

- Select the desired location from the list of available ones. In our example, there is only one – the local computer.

- If a user with this name is not found, the system will display a corresponding notification; if so, it will appear in the list of groups and users of the shared folder. All that remains is to give him the necessary access permissions, and then save all the changes.

- After these steps, the folder will become public (shared), and the network path to it will appear on the “Access” tab.

- You can find out that a folder is shared without looking at its properties: if you select it with the cursor, the “Sharing” icon and the corresponding inscription will appear on the bottom panel of the parent folder.

In addition to the above, in Windows 7 there is also quick access to permission settings for shared directories. This is the “Sharing” button in the top horizontal menu. By clicking here, you can quickly select which users are allowed to use the folder and with what rights.

How to open a shared folder in Windows 7
As already mentioned, you can get to a public folder on another PC by clicking on the “Network” icon in the transition area of the “Computer” folder. If you need to use the folder often, you can create a shortcut to it on your desktop. In addition, the folder can be connected to the computer as a network drive.
To do this, go to the “Computer” directory on your PC and click “Map network drive” in the top menu.

Assign a letter to the new drive, click “Browse” and use File Explorer to navigate to the desired location. You can also manually enter the network path to it in the “Folder” line. The path is written like this: \Computer_name\Folder_name. If you do not remember this data, they are indicated in the properties of the shared directory on the “Access” tab.
To connect a network drive, click “Finish”.

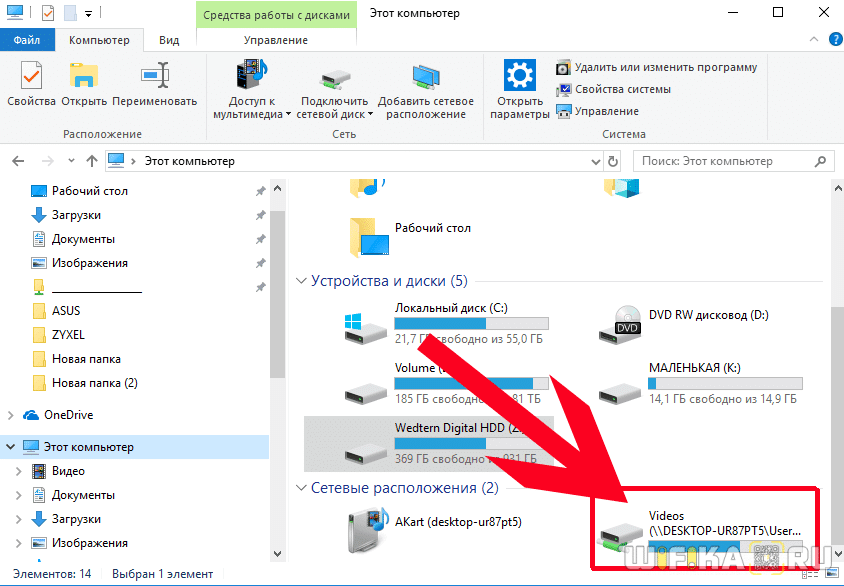
After this, the disk will appear in the “Network location” section of the “Computer” folder.

You can log into a network drive under the user account of that computer or as a guest. If you log in as a user, enter your account name and password in the window that opens, and to be able to log in as an anonymous guest, you need to:
- so that the guest account on the PC whose folder you are connecting to is activated;
- so that the guest has the appropriate permissions in the security and sharing settings of this folder.
Instead of a guest, you can set permission for the Everyone group. If this condition is not met, the operating system of the remote computer will deny you access.
Enabling a guest account
To enable a guest account, open the control panel, select the “User Accounts” applet and then “Manage another account.”

Select a guest from the list and in the next window click “Enable”.

Setting folder permissions
Open the properties of the shared folder and go to the “Security” tab. Here, in the list of groups and users, you need to add a guest. To do this, click the “Change” button under the list, in the next window click “Add” and then in the user selection window, in the field for entering names, enter “Guest”.

After saving the changes, on the “Security” tab in the folder properties, assign the desired rights to the guest. After this, it will be possible to remotely connect to the shared folder without entering a password.


