How to adjust performance settings. Boot optimization for computers with multi-core processors. This will highlight what is needed for work.
It is possible to increase computer performance by optimizing Windows operation 7. Lots existing functions in Windows, affecting the speed and performance of the PC, ordinary users do not use. Most people use the default settings, and they are not the best for PC performance. Below are the top speed boosting methods to improve your Windows 7 PC experience.
Optimizing visual effects
Task
Windows 7 has a lot of beautiful visual effects, which increases the load on components and reduces PC performance. This reduces the performance of the computer, especially if the hardware is not up-to-date.
Answer
It is necessary to turn off visual effects, leaving only standard ones. This will immediately increase the speed and performance of your computer. In Windows 7, you need to type in the Start window in the search "Visual effects".

Next click on "Tuning System Presentation and Performance". In order to speed up the process, you need to activate the option "Provide best performance»
.
- Increase the clarity of font display;
- Using types of displaying windows and buttons;
- Connect desktop composition;
- Show thumbnails instead of labels.
 Then click “Ok” and reboot.
Check and debug the hard drive in Windows 7
Task
Data is transferred to the hard drive in parts for optimization disk space. As a result, the PC, when opening files, spends a significant amount of time searching for them, and if there is a large number of junk files, then the process slows down even more.
Answer
It is necessary to periodically check for and delete unnecessary files and defragment the disk. At the first stage, you need to manually delete unnecessary data from the computer’s memory, for example, unused programs, old movies, music, etc. In order to delete applications, you must enter through “Start” in "Control Panel" and further in .
 Next you need to perform defragmentation. You need to log into “My Computer”, in context menu disk select sequentially: “Properties” - “Service” - "Run defragmentation". Click on .
Cleaning the Startup directory
Task
Often, computer boot speed can be increased by simply getting rid of unnecessary programs in startup, for example, social network messaging services, updates various programs, antivirus, etc. In fact, everything except the antivirus can be removed.
Answer
It is recommended to use CCleaner application. It will help clean the registry and optimize startup speed. The application requires you to enter a bookmark. By clicking on “Turn off”, go through all the applications that you do not use regularly. 
Cleaning the registry and RAM
Task
When you uninstall programs, “garbage” accumulates on your computer (program settings, links, unnecessary shortcuts, erroneous extensions). On optimal performance random access memory affected by possible defects in its manufacture, incorrect operation of the power supply and changes in network voltage.
Solution
Cleaning the registry is very easy using the CCleaner application. Analysis of RAM operation is performed using built-in Windows functions 7. In order to perform RAM analysis, you need to use the search bar through “Start”, where to type “Diagnostics of computer RAM problems”.
 After this, a menu will be displayed where you need to click on the 1st diagnostic method.
 The PC will reboot and begin analyzing the RAM. The process takes considerable time. After completing the process, the PC will reboot again and the user will have access to information about the analysis performed.
Connecting all processor cores
Task
To effectively increase computer performance, you must perform Windows optimization for multi-core processors.
Answer
You need to tell the OS to boot using the resources of all cores. Through “Start” - “All Programs” - “Accessories” - “Run” you need to type “msconfig” and click on “OK”.
 In the menu that appears, enter - « Extra options…»
. Check mark "Number of processors"(to improve PC performance and speed, it is recommended to mark the maximum possible number). Click on "OK".
In the menu that appears, enter - « Extra options…»
. Check mark "Number of processors"(to improve PC performance and speed, it is recommended to mark the maximum possible number). Click on "OK". 
Disabling unused gadgets
Gadgets reduce PC performance. For maximum effect It is recommended to disable them all.
Conclusion
The article discusses only the basic methods of increasing the speed and performance of a computer.
This topic is very extensive and it is impossible to cover it entirely in one publication, therefore additional methods Windows 7 optimizations are described in a separate section.
One of the most important criteria, which characterizes computer system, is its performance. Let's figure out how to increase this basic figure of a desktop PC or laptop with Windows 7.
Before we get down to the question of how to increase productivity, let's figure out what it is and what, in fact, we are going to improve. In Windows 7 there is such a system indicator as "Performance Index". It is based on an assessment of individual PC components: processor, RAM, graphics, game graphics and hard drive. The overall index is set according to the weakest link. But for a number of reasons this assessment cannot be called unambiguous and many experts are quite critical of it.

Undoubtedly, the power of the above components directly affects the performance of the PC, that is, the volume of processes that the computer can process per unit of time. Next, we will take a closer look at ways to increase the impact of these components to improve the performance of the OS as a whole.
Method 1: Improve Hard Drive Performance
One of important factors increase productivity operating system is hard drive optimization. Many users pay minor attention to this factor, believing that for Windows performance What is important, first of all, is the amount of RAM and processor power. But in vain, because a slow hard drive slows down the computer as a whole, since other OS components constantly access it to process files and other objects located on it.
First of all, you can make cleaning hard debris disk and unnecessary files, which will speed up its work. This can be done both through the system and using third-party specialized programs, such as, for example.

Increase a speed HDD operation, and therefore the performance of the system as a whole, is helped by the operation of defragmenting the hard drive. It can be done using a special system utility or third parties.


In addition, you can increase the performance of the HDD by properly configuring it in "Device Manager".
- Click "Start" and go to "Control Panel".
- Go to the section "System and safety".
- In the block "System" click on the inscription "Device Manager".
- In the interface that opens "Device Manager" click on the item « Disk devices» .
- A list of physical devices connected to the PC will open. hard drives. This can be one device or several. Produce double click left mouse button ( LMB) by the name of one of them.
- The hard drive properties window opens. Move to section "Policy".
- The performance policy is specified here. For hard drives different manufacturers items in this section may vary. But, based on general logic, look for the position that should help increase performance. For example, "Allow caching" or " Optimal performance» . After checking this item, click "OK" in the current window.


Method 2: Increasing the amount of RAM
You can also increase system performance by increasing the size of RAM. The most elementary and at the same time effective method to achieve this result is to purchase an additional or larger RAM stick. But unfortunately, this is not always possible, both for financial and technical reasons, because 32-bit Windows 7 supports a RAM size of no more than 4 GB. But there is a way to bypass this limitation.
In order to increase the amount of RAM without changing the hardware configuration, a paging file is created on the hard drive, which forms the so-called virtual memory. When there is a shortage of resources RAM system accesses this allocated area on the hard drive. Therefore, to increase PC performance, you need to enable the specified file if you have it disabled.
- Click "Start", and then right-click on the item "Computer". In the menu that opens, select "Properties".
- The OS properties window will open. On the left side, click "Extra options…".
- In the shell that opens, click on the button "Options…" in the block "Performance".
- The performance settings window will open. Here move to the section "Additionally".
- In the block "Virtual Memory" click the button "Change…".
- The regulation window opens virtual memory. At the top of it you can check the box next to the parameter "Automatically select..." and the system itself will select the settings for the paging file.
But we advise you to set the parameters manually. To do this, first of all, uncheck the checkbox "Automatically select...", if it is installed there. Then, in the partition selection window, select the logical drive where you want to locate the paging file. Move the switch below to position "Specify size". After this field « Original size» And « Maximum size» will become active. Put it there same value the desired amount of virtual memory in megabytes. Then click on the button "Set" And "OK".
- In order for the entered settings to take effect, you need to restart the computer.


It must be remembered that too large file swaps should not be created either. Firstly, you thus lose working space, which could be used to store files. Secondly, the speed of access to hard drive much slower than hardware RAM. Therefore, when increasing virtual memory, it is possible to process a larger volume of processes simultaneously, but the performance decreases, which negatively affects the performance of the system as a whole. It is believed that optimal size is a value one and a half times greater than the amount of hardware RAM of a PC. We recommend setting the size of the paging file based on this calculation. If you already have it installed, we recommend changing its size to the optimal one.
Method 3: Disable graphic effects
It's no secret that graphic effects consume a significant part of the power of the video card, processor and use a considerable amount of RAM. To free up the resources of these objects to perform other tasks and thereby improve overall system performance, you can disable some visual effects.

In addition, you can also optimize the consumption of graphics resources using the video adapter control panel. Installation algorithm required parameters differs depending on the manufacturer and model of the video card, but the essence comes down to choosing between performance and quality, or at least establishing the optimal balance between these two criteria for you.

Timely updating of its drivers and installation will also help improve the performance of the video adapter special software, designed to optimize the performance of the video card.
Method 4: Disable applications in startup
Quite often, during installation, programs are added to autorun, thereby not only slowing down the system boot, but also consuming resources throughout the entire working session. But at the same time, the user does not always need these applications to work, that is, they often consume OS resources in vain. In this case, you need to remove such items from startup.
- Dial combination Win+R. In the window that opens, enter:
Apply button click "OK".
- The system configuration editing window opens. Move to the section.
- The startup section will open. Further actions depends on whether you want to disable automatic start all elements or just some of them. The first option will bring greater effect, but you need to keep in mind that there are programs that, to solve your specific problems, it is preferable to leave them in autorun. So the decision is yours.
- In the first case, just click on the button "Disable everything". After this, the checkboxes next to all list items will be removed, then click "Apply" And "OK".

In the second case, uncheck the boxes next to those items that you are going to remove from startup, but do not touch the checkboxes next to the names of programs left in startup. Next, as before, press "Apply" And "OK".
- After this, a dialog box will open asking you to restart the PC. Close everything active programs and press .
- After the restart, the selected applications will be removed from startup, which will free up system resources and improve its performance.


Method 5: Disable services
The load on the system is also carried out by various running services. Moreover, not all of them are needed by the user, and the actions of some of these objects have even more negative consequences than positive ones. It is advisable to disable such elements to improve PC performance. The principle of deactivation is approximately the same as the principle of removing programs from startup. But there is one important caveat: disabling services must be treated more carefully, since deactivating an important element can lead to incorrect operation systems.
- Click "Start" go to "Control Panel".
- Next, go to "System and safety".
- Click "Administration".
- Select from the list that opens "Services".
- Opens "Service Manager". Highlight the service you want to deactivate, and then on the left side of the window click "Stop".
- The deactivation procedure will be performed.
- After that double click LMB by the name of the same service.
- The service properties window will open. In the dropdown list "Startup type" choose a position "Disabled". Then press the buttons "Apply" And "OK".
- You will be returned to the main window "Dispatcher", and the service itself will be completely deactivated. This will be evidenced by the lack of status "Works" in the column "State" opposite the disabled element, as well as the status "Disabled" in a collumn "Startup type".


After performing the specified manipulations to disable all unnecessary services The speed of the system should increase due to the release of resources. But, we repeat, be very careful about which service you disable. Before performing the procedure, read our separate material, which tells you which services can be disabled without significant negative consequences for the OS.
Method 6: Cleaning the registry
Another way to speed up your PC is by cleaning system registry from outdated and erroneous records. Thus, the system will not access the specified elements, which will increase not only the speed of its operation, but also the correct functioning. For these purposes, special ones are used. One of the most popular applications for performing this task is the one already familiar to us from Method 1 CCleaner.

Method 7: Setting up the power supply
The next option to increase the speed of the OS is correct setting power supply


This method is especially suitable for desktop PCs, as it has virtually no negative consequences. But if you use a laptop, you need to consider whether to use it, as it can significantly increase the rate at which your battery drains.
Method 8: Overclocking the CPU
By default, the processor is not configured to use its capabilities to the maximum. It always has a reserve of power, and therefore there are ways to free up this power to improve OS performance. As a rule, they are carried out using special software. But it is worth remembering that overclocking a processor is a rather dangerous procedure, which, if done incorrectly, can lead to PC failure. In any case, overclocking the processor leads to increased wear and tear, and if done incorrectly, even to failure in the shortest possible time.

As you can see, increasing system performance in Windows 7 is carried out mainly by reducing the load on individual components. At the same time, you often need to choose what is for you speed is more important work or visual appearance. Although there are also methods where such a dilemma does not arise, for example, cleaning your PC from garbage. In this case, optimization has only a positive nature, provided that you do everything correctly.
Step-by-step instructions for improving performance and optimizing Windows 7
Optimizing the operation of Windows 7 is extremely relevant today and is available not only professional engineers specialized centers, but also for ordinary users.
Since release by the company Microsoft operating systems Windows 8, the popularity of her predecessor, Windows7, doesn't get smaller.
Prevalence Windows versions as of March 2014 (according to http://www.netmarketshare.com/)
Windows 8/8.1 - 12.54%
Windows 7 - 50.55%
Windows7 proved to be the most successful and user-friendly version of the OS on Windows platform, especially in comparison with its predecessor - Windows Vista.
Currently, the objectives set by software manufacturers and user expectations regarding system speed and performance in to a large extent have increased.
The number of programs has also increased preinstalled by manufacturers on new laptops and personal computers, which often only take away the performance of the system. In addition, over time it accumulates great amount temporary and unnecessary files generated by programs and Internet browsers.
In connection with the above, an increasing number of companies are engaged in both the development specialized utilities to optimize the performance of Windows 7, and by creating multitasking programs that clean and configure the system, optimizing its operation based on the needs of a specific user, along with a set of other software (for example, all-in-one antivirus software, CCleaner, RegOptimazer and others).
But let’s not forget that all cleaning and optimization programs act superficially, without affecting the depths of the system. Thanks to simple steps, any user can safely and effectively optimize Windows 7 performance without resorting to deep analysis and practical study her work.
To optimize Windows7 performance, follow these steps:
1. Completely disabling UAC (User Account Control)
First of all, it is worth drawing your attention to the fact that this tool is one of the most important regarding the security of the system and disabling it will inevitably reduce the overall level of its protection from external threats. However, many users have greater confidence in high-quality antivirus software.
In this article we offer you the ability to either completely disable UAC or change the protection level.
Before performing the suggested actions, you should log in with your account. Administrator.
1. Click the Start button
3. Go to Accounts users
4. Change User Account Control (UAC) settings
5. Select the required degree of protection by changing the position of the slider.
6. Click “OK”
7. Reboot the computer.
2. Setting the standby mode (“Sleep mode”) 
In the default settings, using sleep mode is inconvenient: the computer wakes up at the slightest movement of the mouse.
To this to correct, needs to be done the following actions:
1. Click the Start button
2. Open the Control Panel
3. Go to Device Manager
4. Open the “Mice and other pointing devices” tab
5. Find the “Power Management” tab 
6. Uncheck the option “Allow the device to wake the computer from standby mode”
7. Click “OK”
In the future, for exit from standby mode, use the keyboard (by pressing any key).
3. Speed up the Start menu 
One of the most commonly used controls in operating systems Windows is definitely the menu "Start", functionality which grows with each new version OS.
If you use a “non-classic” design mode, it is possible to significantly speed up the operation of this indispensable control.
So let's get started:
1. Right-click on the Start menu icon or on the panel  tasks
tasks
2. In the context menu, select “Properties”
3. Open the “Start” tab
4. Click “Configure”
5. In the “Customize the Start Menu” window that opens, find the “Select recently” option. installed programs"and uncheck it
7. Click “OK”
4. Aero Visual Effects
Problems with Aero interface most often occur if the computer has a video card integrated into the motherboard or a weak video card is installed - problems are very likely to occur when using the Aero interface. Also difficult to process graphic elements Windows 7 low-cost laptops and netbooks are often tested.
However, it is possible to reduce the Aero interface's consumption of PC resources by without turning it off completely. By disabling some elements, you will relieve computing power computer and video card, practically without losing the beauty of the Aero interface.
To do this you need to do the following:
1. Click the Start button 
2. Open the Control Panel
3. Login to the System
4. Open Advanced system settings
5. Go to the “Advanced” tab
6. Click the “Options” button in the “Performance” section
7. Disable the following parameters:
7.1 Animated controls and elements inside a window
7.2 Menu fades after calling a command
7.3 Casting shadows on desktop icons
7.4 Displaying window contents when dragging
7.5 Displaying shadows cast by windows
7.6 Displaying samples and filters in this folder
7.7 Displaying a transparent selection rectangle
7.8 Displaying a shadow under the mouse pointer
8. Click “Apply”.
You can disable some other options, but the effect will be more noticeable.
Attention! If after saving the changes the “transparent” Aero interface disappears, right-click on the desktop and select “Personalization” » “Color and appearance windows" » Check the box next to "Enable transparency" and click "OK".
5. Changing the display of Service Pack
There are times when we are unable to completely install all elements of the game, or after installing it we see a notification about installed in Windows 7 Service Pack 2. In order to correct the situation, we need: 
1. Press the Win+R keys simultaneously (or Start » Run)
2. In the “Run” window that opens, enter the command: “regedit” and click “OK”
3. A Registry Editor window will open.
4. Find the folder  "HKEY_LOCAL_MACHINE\SYSTEM\CurrentControlSet\Control\Windows"
5. Change the “CSDVersion” value from “0” to “100” ( SP1). Click “OK” and exit the Registry Editor. If you set the parameter value “CSDVersion” = “300”, then the system will display that  Service Pack 3, and if the value “CSDVersion” is = “0”, then the system will display that the Service Pack is not installed
6. Reboot the computer.
6. Disabling services 
Shutdown rarely used services will free up some of the computer's RAM, and will also allow the system to access virtual memory less frequently, which will result in faster system performance.
Although unforeseen complications as a result of service outages are unlikely, we nevertheless suggest that you create restore point, which, if necessary, will allow us to roll back the system to the required time (control panel » system » system protection » create). To ensure maximum stability of the system and applications, we recommend that you use the “Manual” option when disabling services.
For disabling services perform the following actions:
1. Click the Start button
2. Open the Control Panel
3. Select Administration 
4. Select Services
To disable a service, double-click on its name with the left mouse button. The service control panel will open. In the “Startup type” drop-down menu, select “Manual” and click on the “Stop” button. Save changes by clicking "OK"
Absolutely safe You can disable the following services:
Service entry Tablet PC
Auxiliary service IP (Support IP Service)
Remote registry 
Disabling other services may result in unstable work operating system and should only be executed while absolutely confident is that you know what result it will lead to. Be extremely careful and careful when handling this tool.
7. ReadyBoost function
In the operating system Windows implemented the ability to use USB flash memory devices as additional to the resource's RAM for data caching, which speeds up the execution time of data read-write operations and increases system performance. Expensive RAM modules or lack of free slots in motherboard Often they do not allow you to physically increase the amount of memory.
Using USB drives or Flash cards as additional RAM using ReadyBoost technology
makes it possible to virtually expand memory and increase computer performance. The system writes to the media memory  data from the most frequently used programs, which can significantly reduce their launch time.
To activate ReadyBoost functions You need to do the following:
1. Insert the USB drive into the port.
2. In the Autorun window that appears, select “Speed up the system using Windows ReadyBoost»
3. Activate the “Use this device” option
4. By moving the slider, set the limit of used space on the media
5. Save the changes by clicking on the OK button.
After performing these operations, the ReadyBoost.sfcache file will be automatically created on the flash card. Don't take it out flash drive from your computer!
8. Performance Tuning
When installing the operating system, the default power plan is “Balanced,” which reduces system performance and responsiveness.
Total in operating room Windows system 7 provides three main power plans:
Balanced (system performance when necessary and energy saving when inactive).
Energy saving (reduced system performance). This scheme helps mobile PC users make the most of a single battery charge. but for a desktop system it is not relevant.
With high performance (increases system performance and responsiveness). 
Your computer may also have other energy saving settings configured by the PC or laptop manufacturer. In this case, we do not recommend changing their settings, because the manufacturer has already selected the most optimal values all parameters.
To change the plan, do the following:
1. Click the Start button
2. Open the Control Panel
3. Go to Power Options
4. Choose a plan that meets the needs of our system and device.
9.Customizing the Taskbar and Superbar
Superbar Windows 7 has wide possibilities for personalization and customization for a specific user. To optimize the panel, follow these steps:
1. Place the mouse cursor on the taskbar and press the right mouse button. The taskbar context menu will open. Uncheck the “Lock the taskbar” checkbox.
2. Now move the cursor over the edge of the taskbar until it turns into  double arrow. Click and hold the cursor with the left mouse button. Move the cursor up, the dotted line will show the location of the taskbar. Release the mouse button.
3. Now we fix the Panel again by checking the “Lock taskbar” item in the context menu. This is necessary for the normal display of tabs and panels. If this is not enough for you, the size of the taskbar can be increased to suit your needs up to half the screen. Ease of navigation can also be improved by opening the taskbar's Properties context menu and changing the way the taskbar buttons are grouped from "Do not group" to "Always group, hiding labels."
10. Memory diagnostics
If your operating system is prone to failures and is unstable, we recommend diagnosing your RAM. This also applies to users who overclock system components.
Settings for OS Windows 7:
1. Open the Start menu
2. In the Search column, enter “Memory”
3. In the search box, select "Verifier Windows memory»
4. In the window that appears, select one of the options: 
- Reboot and check (recommended)
— Run the scan the next time you turn on the computer
5. After restarting the computer, wait for the RAM test to complete. This process can be quite lengthy.
After the diagnostics are completed, the computer will automatically restart.
You will see the results of the scan when you log into the operating system.
11. Defragment hard drives
Built-in Disk defragmenter organizes fragmented information for more efficient and fast work systems.
The disk defragmentation program works according to a specified schedule, but you can also start fragmentation manually.
To run the built-in disk defragmenter, you must perform the following steps:
1. Click the Start button
2. Select Computer
3. Select drive C
4. By clicking the right mouse button, call up the context menu and select  "Properties"
5. Open the “Service” tab
6. Select a section "Run defragmentation". You can also run a disk analysis, after which the system will make a recommendation whether there is a need to defragment the selected disk and indicate the percentage of fragmentation.
Depending on the hard size disk and the degree of file fragmentation, defragmentation may take from several minutes to several hours. During defragmentation, work with the PC can not be interrupted, however, the system may slow down significantly.
12. Startup control
Many programs installed on a PC are automatically registered in the startup of your computer, even when there is no urgent need for it.  Being constantly in RAM, they significantly reduce system performance.
Ideally, the startup list should contain no more than two or three programs that you urgently need. As a rule, this is an antivirus and mail client.
The easiest way to clear the startup list is to use free program CCleaner, open the Tools section, then click on Startup and manually set the launch parameters for the programs you need.
Don't delete from the list system programs Windows. They can be distinguished by their location in the \system32 folder.
13. Cleaning and defragmenting the registry
System registry is a database for storing information about the computer configuration, operating system settings and program settings to which the system  accesses hundreds of times per second during system boot and operation. A cluttered and fragmented registry can seriously slow down your computer.
When installing and uninstalling various programs, various “garbage” may remain in the registry: program settings, links to shortcuts, incorrect file extensions, and much more.
Over time, a large number of such erroneous registry settings can significantly slow down the operating system, leading to crashes and various problems, interfering normal functioning OS. 
To optimize the registry Let's do the following:
1. Open the CCleaner program and go to the “Registry” menu
2. Click on the “Search for problems” button
3. After completing the search, click on “Fix”
4. The program will offer to save backups changes made, if you are not sure, save
5. In the window that appears, click “Correct marked” and confirm your choice.
Follow this operation once every two to three weeks. 
Windows 7 Registry subject to fragmentation, which causes the system to gradually slow down. System defragmenters do not work with registry files, so for these purposes you will need to install specialized program.
One of best solutions to defragment the registry is a utility Auslogics Registry Defrag.
14. Disabling the autorun function from removable media and CD drives.
Disabling autorun is not only speed up work With external media information, but also will protect protect you from a number of viruses entering your computer.
Launch Notepad (in the Start menu, in the Search line, enter the word “Notepad”).
After launching the Notepad program, copy there next text:
"HonorAutoRunSetting"=dword:00000001
"NoDriveTypeAutoRun"=dword:000000ff
3. Next, select the menu item “File” - “Save As”.
4. Select the file type “All files”
5. Specify the file name and extension for it “*.reg”
6. Close the Notepad program. 
7. Run the newly created file and agree to make changes.
If the autorun function is still present, do the following:
1. Open Notepad
2. After launching Notepad, copy the following text there:
Code:
Windows Registry Editor Version 5.00
"AutoRun"=dword:0000001
"allocatecdromes"="0"
"NoDriveTypeAutoRun"=dword:00000091
"NoSaveSettings"=dword:00000000
3. Next, select the menu item “File” - “Save As”.
4. Select the file type "All files"
5. Specify the file name and extension for it “*.reg”
6. Then exit the Notepad program.
7. Run the newly created file and agree to make changes
8. Restart the Computer and check for autorun on the media.
Attention this method will disable autorun for you from all storage media:
Flash and portable drives;
CD, DVD, BD discs;
Network drives;
Local disks.
15. Move the recycle bin from the desktop to the taskbar
If you feel like it fully free your desktop from icons, then you can do this. After all, in Windows 7 not only is it possible remove the Recycle Bin from the desktop, but even pin it to the taskbar.
1. Right-click on empty space on the desktop.
2. In the context menu, select Create - Shortcut. 
3. In the Object location field, insert:
%SystemRoot%\explorer.exe shell:RecycleBinFolder
4. Click Next.
5. In the window that opens, in the Shortcut name field, enter Trash and click Finish.
6. A shortcut has appeared on the Desktop (to make sure it is the Recycle Bin, open it double click), but it looks like an Explorer shortcut, not  Baskets. To fix this, right-click on it and select Properties, then click the button Change icon.
7. In the Look for icons in field next file enter:
%SystemRoot%\system32\imageres.dll
and press Enter.
8. From the proposed collection of Windows 7 icons, select the Recycle Bin icon and click OK twice.
9. Now our Recycle Bin icon looks authentic. Drag it with the right or left mouse button somewhere on the taskbar.
10. Right-click on the desktop, select Personalization, then Change desktop icons and uncheck the Recycle Bin.
16. What to do if your hard drive partition disappears after installing Windows 7
Let's assume that your computer's hard drive contains two partitions (C and D) and after installing another OS on the second partition, the first partition disappeared. In reality, the section remained where it was, but Windows 7 did not assign a letter to it. Therefore, we do not have access to the data stored on this disk. 
To assign a drive letter, go to Control Panel -> Administrative Tools -> Computer Management.
In the left menu, select Storage Devices -> Disk Management. This displays information about all drives connected to the computer, including logical drives(sections), drives and removable drives. Our lost partition is located here - it is displayed in the list and has neither a letter nor a volume label, but is recognized by the system as a hard drive. 
1. Right-click on it and in the menu that appears, select Change drive letter or drive path.
2. In the window that opens, click the Add button.
3. In the window that opens, in the Assign a drive letter line, all free letters are presented in the form of a drop-down list; we can assign any of them to our “unidentified” partition.
4. Select a letter and press the OK button.
As you can see, setting up and optimizing the operation of Windows 7 with the proper approach is an easy and quick way to both improve the process of using your computer and increase its performance and speed.
Important!
If, after optimizing Windows operation, you have not achieved desired result, or your actions led to disruption of the system, UService specialists will help you.
Hi all! Today we'll look at current topic How to increase computer speed in Windows 7.
This question is asked by a person who The computer slows down a lot, freezes and so on. Many people are thinking about purchasing a new computer because this one does not work properly, but buying a computer good idea, but it’s better to leave it for last, when you find out for sure that your computer can no longer meet your requirements.
So, let's begin speed up your computer.
First of all, you need to configure startup programs. Startup programs slow down the system when launched. . This is one way to improve the performance of your system.
Click Start choose Control Panel. Click on the link System. Then on the right side of the window select Advanced System Settings. In the additional tab in the block Performance press the button Options…

In the window that opens Performance Options in the tab Visual effects put the radio button in the field ensure the best performance. This option disables all visual effects on your computer. But if you cannot do without any component, then you can include it, but not more than two. After adjusting your performance settings, click OK. And then again OK.

It is also important for the speed of your computer to have good antivirus
, which is capable of finding various types of threats and viruses. And also do not overload the system. I use antivirus Kaspersky Internet Security 2012. It has an option that allows you to avoid conflicts with other programs and slow down your computer.
To enable this function in the main window Kaspersky antivirus Internet Security 2012 click on the link Settings then go to the tab Extra options(fourth in a row) and select Compatibility.
In the window Compatibility Options check the box Give up resources to other programs.
Another way increase performance This . The program copes with this action perfectly CCleaner. In the main window of the program, you can analyze the system, and the program will advise you what needs to be removed for more efficient work your computer.
Shutdown unused services. In order to disable services you need to click Start and select Control Panel. Next, select Administration and in the window that opens, double-click on the word Services.
In the window that opens, you can disable the following services:
—Automatic update.
- Windows firewall.
— Print spooler (if there is no printer).
— Infrared communication monitor.
— Time service.
— Help and support.
— Security Center.
In order to disable the service double click on it. In the window that appears, in the tab Are common in field Startup type set it to Disabled and click OK. After this, we reboot the system.
Another way is
I advise you to use the program.
I optimize the system with various settings. But still, in some places there are still systems that need this kind optimization, because Windows 7, to put it mildly It doesn’t “fly” everywhere. Yes, even on modern ones, powerful systems, this kind of action will come in handy.
So, we can begin the process step by step: windows optimization 7, we will try to talk about all aspects: starting with registration and ending with disabling services. I want to say right away that the tips given here are not a panacea and will not suit absolutely all users.
So whether to use it or not is up to you, but I recommend everyone to read it.
Optimizing the design of Windows 7
If you look at Windows decoration 7, then it looks very attractive, well, at least in comparison with the same “ XP yushey." True, after a couple of months, for me personally, it became very boring: everything seems to be good and beautiful, the windows smoothly unfold and collapse, but this is precisely why it is created slowdown effect and system braking. No, Windows has quite impressive hardware resources at its disposal, but it is the abundance of animation that creates this effect. For those who are also not satisfied with this effect, I suggest installing the classic theme, which in my opinion is simple and tasteful. When this theme is installed, everything visually begins to work much faster, given the fact that there is practically no extra “drawing” left. And on weak systems disabling Aero(beautiful GUI Win 7), will give an unprecedented performance boost.
For those who really don’t like the classic theme and don’t want to remember the 98 old lady, I offer an alternative in the form of “Windows 7 - simplified style” (Fig. 1). I would call this theme a compromise between the classic design and the most rich in various animation effects.

Fig.1
Also, if we continue the conversation regarding the optimization of Windows 7, namely the design, then you can configure it more finely. This method was very often used when configuring and optimizing Win XP. You need to go to: Start => Control Panel => System and Security => System => Advanced system settings => In the “Performance” section, select “Settings”.
The “Performance Options” window will open in front of you (Fig. 2). In this window, you can configure each of the design parameters in more detail.
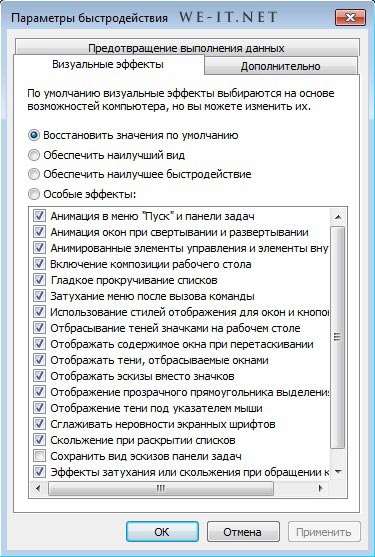
Fig.2
So we figured out a little about the design. Here, again, everyone decides for themselves what they need from the system: various “cutes” or a strict working style. Now we move on to the next point of our “grand” optimization of Windows 7.
Optimizing your hard drive in Win 7
1. Options hard optimization disk were enabled by default in Windows Xp, but for some reason these options were disabled in Windows 7. I suggest enabling them to provide better performance.
To do this, go to: Start => Control Panel => Device Manager. In the device manager window, select Disk devices and right-click on the item where the name is indicated hard drive, and select “Properties”. Then, in the window that opens, go to the “Policies” tab and check the box next to “Disable cache buffer clearing” Windows entries for this device" (Fig. 3).

Fig.3
2. Also, in the device manager, in the IDE/ATA ATAPI controllers item, it is advisable to check all channels and install them in the “ Additional devices", checkbox "Enable DMA" (where this item is present) (Fig. 4)

Rice. 4
3. Optimizing Windows 7 is a rather labor-intensive process, but this is done only once, so we continue . For now, I suggest disabling the indexing feature for quick search. So we will keep overall performance, since the system will not index HDD when contacting him. To do this, go to My Computer, then right-click and go to local disk properties. Then, in the properties window, you need to go to the general tab and uncheck the box next to “Allow the contents of files on this disk to be indexed in addition to file properties.” After all these actions, you click the “Apply” button, and a window appears as in Fig. 5. Click OK.

Fig.5
Optimizing services (disabling unnecessary ones) in Windows 7
Now we move on to Windows services. Services in Windows are special programs that start and work without the user’s knowledge, performing useful and useless actions. So, some of these useless services can be disabled, because extra load there is no need for the system.
In order to disable any service, you must follow the following steps:
Start => Control Panel => Administrative Tools => Services
Here is a small list of services that can be disabled:
- Offline files
- Network Access Protection Agent
- Adaptive Brightness Control
- IP Ancillary Service
- Secondary login
- Grouping of network participants
- Disk Defragmenter
- Dispatcher automatic connections remote access
- Network Member Identity Manager
- Performance Logs and Alerts
- Windows Defender (if you are not using the built-in antivirus)
- Secure storage
- Setting up a Remote Desktop Server
- Smart Card Removal Policy
- Homegroup Listener
- Network login
- Tablet PC input service
- Smart card
- Diagnostic Service Node
There are other services that you may not need. But this can only be determined experimentally, but be careful with this.
Removing “extra” from startup
I would like to remind you about this routine action. Unused programs, which are automatically launched when Windows startup, can significantly slow down the initialization time of the operating system, so it is advisable to remove these programs from startup.
There are many ways to exclude programs from startup. third party software but we're in in this case Let's implement this using built-in Windows tools.
To do this we press the combination Win keys+ R, and in the window that opens, enter msconfig. A window appears before our eyes as in Fig. 6; we immediately go to the Startup tab. Now you just need to uncheck the boxes next to those programs that are not “vital” for you.

Rice. 6
That's it, Windows 7 optimization is complete. With the above simple steps, we have speeded up our system a little. To clean the operating system, there are many third-party software, but this is a topic for another article. That's all for now :)


