A utility for removing drivers and other programs. How to completely remove NVIDIA, AMD and Intel video card drivers. Removing unused drivers with Driver Genius
DriverHub – drivers for Windows
A free program that offers drivers for most popular devices, sorted by groups and operating systems. The program finds missing drivers, and also helps to update existing ones, when possible failures, allows you to correctly roll back to the previous state.
Driver Extractor – backup copy of installed drivers
The program helps to save already installed drivers on a Windows system to create a backup copy. The program will find all drivers that are installed on your Windows XP, Vista, 7, 8 or 10 system. At startup, the system is scanned, and after a while all found drivers are displayed in the window, displaying the date and device manufacturer.
Driver Talent for Network Card – driver database for network...
A free program that will help you find and install missing drivers network cards for your computer or laptop, running operating system Windows systems. The application will scan the entire system and install the most latest versions necessary network drivers.
Double Driver – driver backup
Very useful and simple program, which, in addition to viewing the drivers installed on the system, allows you to backup, restore, save and print selected drivers. The program analyzes the system and displays the most important details about the drivers, such as version, date, vendor, etc.
DevID Agent – driver for an unknown device
DevID Agent is a utility for updating installed drivers and installing missing ones for the operation of computer hardware. Every device in Windows requires a driver and it is advisable current version, the program is useful precisely for such purposes.
Driver Talent – program for windows drivers
Driver Talent is a program for installing missing drivers in the system. Offers to create backup copy installed drivers, and also scans the system, identifies devices that require driver installation, automatically finds the ones you need, update or install them.
Display Driver Uninstaller is a program for removing video driver...
The utility is capable of “clean” removing the video adapter driver, including all folders, files and registry keys that were created during its installation. The developers recommend that before using the program, create a system restore point to avoid troubles due to a possible system failure.
DriverPack Solution Lite – installing drivers
Program for installing drivers on unknown devices, light version, there are no drivers in the program database, installation takes place online. The program scans the system for devices for which drivers are not installed and offers to download them from the Internet.
GeForce Experience - driver updates and optimization...
GeForce Experience free application, will automatically remind you about driver updates for your video card from NVIDIA. The program allows you to install best videos settings for games. Now you can update the driver with one click.
It arises from the system quite rarely. For example, such a need may arise when replacing components or installing a new version of drivers from scratch. In this material we will look at several ways to remove old drivers.
Method No. 1. Uninstalling the driver through the Control Panel.
Some drivers can be removed through the Control Panel. To do this, open Control Panel and go to the “Uninstall programs” section.
After this, a list will open in front of you installed programs. Some drivers may also appear in this list. For example, here you can find AMD. In order to remove a found driver, select it in the list and click on the “Change” button (in some cases this button may be called “Delete”).

After this, the installer will launch, with which you can remove old driver from the system.
note that this method works, but not for all drivers. Therefore, if the driver you need is not in the list of installed programs, then you should use another uninstallation method.
Method number 2. Removing old drivers through Device Manager.
The second way to remove drivers is through Device Manager. To do this, you need to find there the device whose driver you want to remove and open its properties.

After this, a window with the properties of this device will open in front of you.

Here you need to go to the “Drivers” tab and click on the “Delete” button.

Method number 3. Removing old drivers using the Driver Sweeper program.
If previous methods removing drivers is not suitable for you, then you can use Driver program Sweeper. This program allows you to perform complete removal drivers from the system. This removes not only the drivers themselves, but also all traces of their operation. Keys in, temporary files etc.
After starting the program, it is better to immediately turn on the Russian language. To do this, click on “Language”, select “Russian” and click on the “Apply” button.

After this, go to the “Analysis and Cleaning” section. This will display a list of drivers that Driver Sweeper has detected. In order to remove a driver, you must check the box next to it and click on the “Cleanup” button.

You can also select the driver and click on the “Analyze” button. In this case, the program will show a list of files that are related to the selected driver.

From this list you can select which files you want to delete and which not. Then click on the “Cleanup” button to delete the selected files.
Free Driver utility Sweeper will help you completely remove unnecessary drivers or their remnants from the Windows operating system. Moreover, in case of system failures due to the removal of any driver, it will help restore it in a matter of seconds.
It often happens that after installing new drivers on the system, it stops working normally. This happens especially often among beginners who are just beginning to learn the basics. computer literacy. The reason for system failure is most often the remaining traces after removing the drivers, or a conflict between the new version and the old one.
It is not at all easy to correct this situation by removing the remnants of drivers, especially if unofficial or very “ancient” versions of specialized software were installed. In addition, when changing a video card, for example, from NVIDIA to ATI, incompatibility problems may also arise; they not only can, but will arise in 90% of cases. When replacing a graphics video adapter, you must install the appropriate drivers for it. If you do not remove drivers, they will clog Windows, possibly conflict with it and slow down its operation. Decide this problem will help free program for removing drivers Sweeper. Today we will talk about no, and how to remove Windows drivers using it.
Completely remove drivers using Driver Sweeper
The Driver Sweeper program is distributed by the developer completely free of charge. You can download the driver removal program from our website using the link above, or from the official website of the utility, the address of which is indicated in the table. When installing the utility, please note that along with it you are asked to download and install another program; it is paid, so if you do not need it, then do not download it. This is done like this: In the program installation wizard, carefully review each step and, where necessary, uncheck the “I accept” checkbox License agreement With end user and Privacy Policy and want to install Mobogenie for free.”

After you download and install the program, you can begin removing drivers from the system. By default Driver Sweeper has English language interface, to make it more convenient to work with it, it needs to be changed to Russian. To do this, click in the “Options” section of the “Navigation” menu on the “Language” item and then select Russian from the drop-down list (see the figure below). Click the “Apply” button to localize the program interface.

To detect all remnants of previously installed Windows drivers, click on the “Analysis and Cleaning” link, tick the driver checkboxes according to their developers. We recommend checking all checkboxes. Click the “Analyze” button.

The utility will find all specials. programs and their traces, and displays them as a list in the next window. Mark the ones you don't need. If the program has found a lot of garbage and you decide to delete everything, then for easier selection, click on the button with an asterisk located at the very bottom of the list and select “All”. To begin the driver removal procedure in Window, click on the “Cleanup” button.

The program will ask you Security Question– “Are you sure you want to continue?” click “Ok” in the dialog box that opens to confirm your intentions. After the utility completes the process of removing drivers from the system, you will need to restart your computer.
If after uninstalling the drivers and rebooting Windows computer will malfunction, then you will be able to recover all deleted files. This is done simply. Launch the Driver Sweeper program again and in the “Navigation” menu, click on the “Recovery” item in the “Tasks” section. On the list deleted files, which the utility will display, select the ones you need and click “Restore”.
That's all. Good luck!
Similar materials


Hello everyone, my dear readers!
Glad to see you again on my blog! Yesterday I changed software to newer versions and was faced with the fact that sometimes you have to demolish old software. The question immediately arose - how to remove installed drivers? After all, sometimes a simple rollback is not enough. In this article, I will tell you all the ways you can do this safely and without damaging your PC.
What is it for?
Sometimes removing drivers is not just desirable, but necessary. If, when updating programs, only a few files are added to them, then with system software the situation is completely different. Manufacturers sometimes completely change the driver structure, for example, for audio devices.
Especially with the advent of the new DierctX. And in this case, you need to remove all old versions of drivers. This can be done in several ways and programs, which I will discuss below. By the way, this applies not only to primary hardware and a certain OS. This may even be necessary modern windows 10.
I want to immediately give an important clarification: do not uninstall if you do not have a new driver. Remember, as soon as you uninstall the software, the operating system will simply stop working with it, or even turn it off altogether. Therefore, it is important to have in advance new version, or software with which you can find and install it.
Removing the driver using special software
The good thing about this option is that everything is done quickly. However, quality program, and even a free one, is quite difficult to find. Driver Sweeper is a software that I tried myself. You can download from here. Download and install. After launching on Windows 7, or on any other system, it is advisable that you immediately activate the Russian language. This is done in the Language tab.
On the left side you need to click " analysis and purification" You will have all the devices for which the OS has drivers, even the printer. Choose the hardware that needs to be rid of old software. Then click on the button Analysis. The system will display all files that are associated with this device. Also, parts of the registry that are related to it will be shown.

Then you should click the button Cleaning" Once the process is complete, close the program and restart your PC. This is how it is done on desktop computer, and on a laptop. Only after this you can install new software.
There is another program that will help you with this. It's called Driver Genius. Download it you can from here. Download, install and run it. A window like this will open.

As shown in the picture, click Driver Cleanup and select the device. Then click the button " Next" The program itself will remove everything you need, and all you have to do is restart your PC.
Removal through the operating system device manager
First you need to open the task manager. Click right click mouse on panel quick launch, on some free space, not occupied by shortcuts and in the menu that appears, select the line with this name. You need to end all processes associated with the driver you want to remove. For example, you want to remove the software on your laptop that is responsible for the video card, close all processes related to the image.

Now you need to go to the control panel and open device Manager. You will see a window like the image below.

In it, select the desired device, right-click and select the “ driver" Next, click " Delete».

The following will appear.
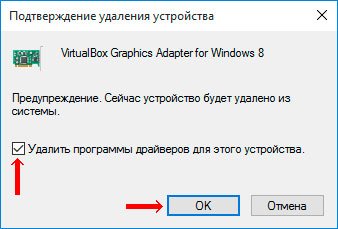
Check the box where indicated and click " Delete».
In principle, all this is enough, however, this method does not completely delete all files associated with the device. For example, there will still be entries in the registry. This is not dangerous, but in the future, without cleaning the registry, it can slow down the system.
Precautionary measures
Installing new drivers while uninstalling old ones can cause problems. For example, you will remove the driver, but the new one will simply not be installed, causing an error digital signature. This especially happens with software for a printer or scanner. In this case, reboot to safe mode. To do this, restart your machine and click F8, and select the first line.

Only after loading the operating system in this mode can you begin to take action. In this case, the OS simply disables some functions that block some actions related to confirming the quality of the software. And for operating systems installing new versions of software without driver signature is simply a potentially dangerous action. Therefore, we have to use this method.
Conclusion
At the end of the article, I want to warn you that any operation described here must be carried out to the end. Do not interrupt the process associated with software removal. Otherwise, your system will slow down. The worst thing that can happen is errors in the registry. It will be very difficult to correct them manually, so it is important to complete all procedures. By the way, there is an excellent video on this topic.
On my own behalf I can recommend you to use special programs. They will not harm the system, and will definitely delete all files associated with drivers. All software is free, I tested it myself. The programs work on all versions and are visible. By the way, some actions may require permissions from the system itself, so it is better to always run the software only as an administrator, otherwise nothing will work.
With this I say goodbye to you! Hope. my article helped you, share it with your friends on in social networks, because they may need help too! Also, subscribe to my blog updates, because I only collect here useful information! All the best to you, I wish you not to meet with computer problems and see you in new articles!
In Windows, when installing or updating device drivers, older versions of drivers are saved in the system. This gives the user the opportunity to return the old version drivers if new driver works unstable ( useful opportunity, as the case with which had to show). However, Windows does not automatically clean or remove older versions of drivers, so over time, the amount of space taken up by drivers on system disk gets quite big. In this article we will talk about ways to remove old versions of drivers (duplicates) using internal funds systems (without using third-party software).
Windows stores all driver files in its driver repository (), located in the directory %WINDIR%\System32\DriverStore\FileRepository.
In my case on home laptop with Windows 7 (the system was installed almost 8 years ago), the FileRepository directory takes up about 11 GB and contains >5000 files. Quite a lot! In particular, this directory stores more than 20 different versions Nvidia video drivers.

Important!
- Under no circumstances should you manually delete driver files from the DriverStore directory.
- Before cleaning drivers, it is strongly recommended to create a system restore point (Checkpoint-Computer -Description "BeforeDriversDelete") or .
- After clearing the storage, when connecting new devices, you may have to download and install drivers manually.
Finding and removing old driver versions in Windows 7
Let's look at how to search and delete outdated drivers for Windows 7 (Windows 8 and Windows 10 have more simple methods removing old drivers (they are described below).
Let's get a list of everyone third party drivers, available in the system, and upload them to text file. To do this in command line With administrator rights, run the command:
dism /online /get-drivers /format:table > c:\tmp\drivers.txt
We import the resulting file into Excel and delete all unnecessary data so that only a table remains with the lists of repository drivers in the format: driver number in the system ( oemXXX.inf), name of the original inf file a, device class, manufacturer, installation date and driver version.
We sort the resulting table by column B (contains the name of the original inf file) and column F (driver installation date). Among the groups of drivers of the same name, we mark all driver versions except the latest one for removal. In my case, it can be seen that most of the older driver versions belong to NVIDIA.
To remove the driver, you can use the pnputil command:
pnputil.exe -d oemxxx.inf
Note. In some cases, you can remove the driver only with the key –f: pnputil -f -d oemxxx.inf
For convenience, we will form in empty column commands to remove each driver using the formula =CONCATENATE("pnputil.exe -d ";A21)
 All that remains is to copy the generated commands and execute them in the command line or bat file.
 Thus, I removed about 40 old versions of drivers from the system, thereby freeing up about 8 GB of space (mainly due to NVIDEA video drivers).
Removing old drivers in Windows 10/8 using Disk Cleanup utility
Windows 10/8.1 has more handy tool to remove old versions of drivers - the familiar disk cleanup utility cleanmgr.exe, which also allows you to clean the disk from .
Note. In Windows 10 and Windows 8 Upd 1 there is an option available in the system in a separate directory.

The cleanmgr utility will remove all old unused driver versions. However, at the same time, you need to understand that in the driver properties in the device manager, the “Roll back driver” button will become inactive.


