Install windows 10 on a clean hard drive
It showed a very successful start in the first three days after its release. Currently, there is already evidence that at least 67 million computers have been updated to it. Now, if you are an advanced user, or have just been using the OS for a while, you probably want to do a clean install of a new operating system.
Clean installation of the operating system, in in this case Windows 10, includes hard formatting disk. This process will delete all data on your PC, so you will have to do everything from scratch, basically you will be starting from scratch. This process also means that you will have to restore your personal files from backup, as well as reinstall all of your applications.
In general, the clean installation process gives confidence that everything will work as it should. At the same time, it is also the most labor-intensive.
Let's see how to complete the entire process.
Attention! The most the best way make the transition to Windows 10 is a reservation free update using the Get Windows 10 app. This process ensures that every component in the system is compatible with the new operating system.
Before we start talking about clean install further, it is recommended to complete backup systems. This is necessary so that you can return to previous installation, if something goes wrong.
It is important to note that in addition to the free update for licensed users copies of Windows 7 and Windows 8.1, Microsoft also allows users to perform a clean install. However, there is very important point. First you need to upgrade your current operating system to Windows 10 from using Windows Update, and only then do a clean installation. This is necessary to convert your current product key to Windows 10 so that your copy of the operating system remains activated.
If you try to do a clean install, bypassing the update process, then there is a chance that you will experience problems when trying to activate Windows 10.
Find out your product key for Windows 10
To perform a clean installation of Windows 10, you will need a product key for activation. There are various tools and methods to find your product key. The Magical tool is quite suitable for this. Jelly Bean Keyfinder. This free tool, which can be easily downloaded and used. (When installing the tool, make sure you select Custom Installation to prevent additional settings from being installed.)
Upgrade to Windows 10
There are two ways to upgrade to Windows 10: Reserve free copy using the Get Windows 10 app and you'll be notified when the operating system is ready to install. Or you can manually download the installation files with help from Microsoft. It's called Windows 10 Media Creation Tool.
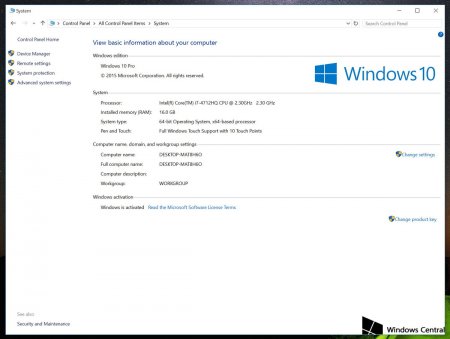
If you download Windows 10 manually, when using the utility, make sure you select correct version(32-bit or 64-bit). If you do not know your edition, then go to Control Panel> System and Security> System> There you will see your edition.
When you run the installation tool, you will see two options, but we want the option called Upgrade this PC now, then follow the instructions on the screen. The update process will only take about 20-30 minutes, but the time will depend on your internet connection and hardware.

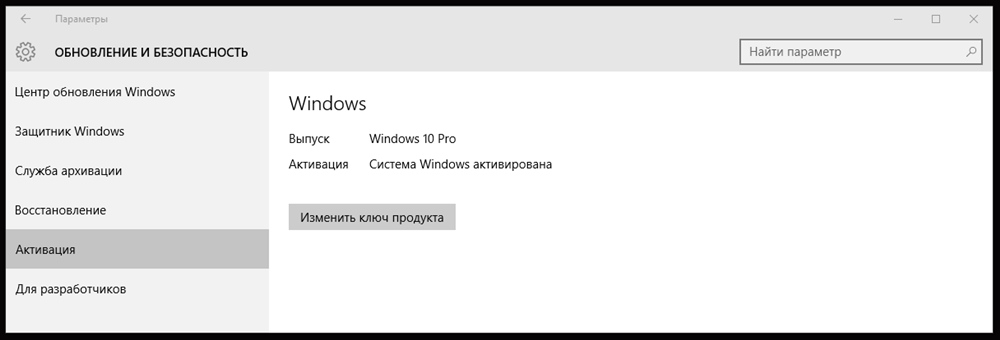
If everything went well, then your system should be activated. To check your system activation, open the Settings app and go to Update & Security > Activation. There you should see the following message: Activation: Windows is activated.

Making a clean installation of Windows 10
Now that you have updated your system and are confident that everything will go correctly, you can do a clean installation.
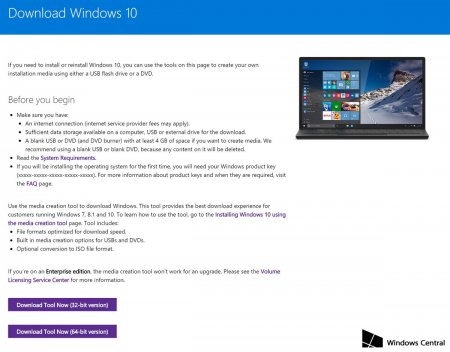
Open your web browser and go to the tool page again to download Windows 10. Once you are in the Download Tools section, select New installation media for another PC or bootable media USB, or ISO file that you can burn to DVD. If you decide to make a USB drive, you will need at least 3 GB of memory.
During this process, you must ensure that you select the correct language, architecture (32-bit or 64-bit), and edition.
After creating the installation media, reboot your computer from the USB or DVD. During the reboot, go into the BIOS to make sure you are booting from the correct media
If everything goes according to plan, you should see Windows installing. Click Next and then Install Now. At this point, you must enter your product key, but this step you can skip it. However, its input to at this stage guarantees you the installation of the desired edition of Windows 10.
Select and delete any partition on your hard drive that includes the installed OS. After removing all partitions, select the empty drive and click Next.

After completing the entire installation, you can check the system for activation.
Many experienced computer users believe that for better performance and more quality work The operating system must be cleaned periodically. It is clear that such users would prefer to install “zero” ten rather than install it on top of the old operating system. Let us leave aside discussions about how correct this opinion is and to what extent it is justified to spend time on clean installation of Windows 10 from the official Microsoft website instead of simply setting the “ten” on top of the “seven” or “eight” - after all, as they say, there are so many people, so many opinions. There is no single correct answer, so everyone does what they think is right. And if someone foams at the mouth to prove that it is right or wrong, then, in my opinion, this does not mean that this person is right. If it seems to you that a clean image installed on a formatted hard drive works faster and more stable, then why look for other ways. Let me add that I myself think so. I don’t have logical evidence of the benefits of a clean installation of Windows 10, like many other Windows OS users - only many years of experience, intuition and subjective feeling.
So, what should you do if you don’t want to upgrade your Windows 7 or 8.1 to Windows 10, but want to clean and format your hard drive and then install a clean Windows 10 on it?
To ensure that all users can safely install Windows 10 completely, Microsoft has created a tool that allows you to burn an operating system image to DVD disc or USB drive. Download this free program may with official website companies.
But be careful! If on this page you select the blue “Update now” button at the top, the program for Windows updates 7 or 8.1 on Windows 10. In order to download a program for recording a clean image of “tens” you will have to go down and select the blue button “ Download the tool now ».
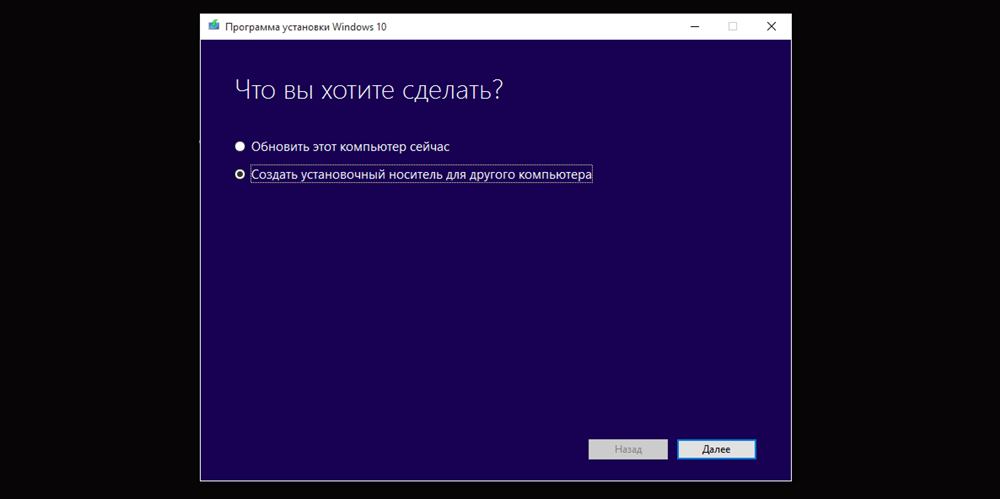
The MediaCreatorTool.exe file will load. After downloading is complete, you need to launch it like any other program and select “ Create installation media for another computer." We choose it even if we need to completely install Windows 10 on the same computer. Otherwise, if you select “Update this PC now,” the new OS will be written over the old one, and not completely. (In general, it would be more logical to name these items “Update the operating system” and “Create Windows image 10", but here, apparently, as often happens with software, incorrect literal translation from English into Russian).
At one time, when launching the MediaCreationTool utility, it was observed error 80072f76 0x20017. It was associated with “jambs” exclusively on the Microsoft side and arose everywhere around the world from September to December 2017. On this moment the problem has been resolved, but in such cases, you can use a “crutch” to download the Windows 10 image from the official website. You can download the top ten directly by replacing the user agent in the browser with Apple Safari. Everything is simple there: press F12 in the Edge browser - then go to the “Emulation” tab - change the user agent line to “Apple Safari (iPad)” - download necessary images With Microsoft official website(described in more detail here in English). If access to Edge browser you don’t have it due to the lack of Windows 10 anywhere and you decide to trust me (by the way, completely in vain - because you can’t trust anyone on the Internet), then here I have links to ISO files V cloud storage Mega with the latest versions of Windows 10 as of December 2017: 32 bit and 64 bit. I will say right away that downloading from there will most likely be slow. It’s faster to use the method with the official website and change the agent in the browser. After downloading ISO image with Windows 10, using any of the described methods, you need to create bootable USB flash drive from this installation image. This can be done using the utility Rufus.
The Windows 10 clean image burning program provides the ability to create it both on a USB drive and on a DVD.
But first you need to select some parameters created image Windows 10 operating system (this must be done if the default settings do not suit you, since you are going to install a clean image of Windows 10 on another computer).

The first is the edition (Windows 10 Home or Windows 10 Professional) and then the architecture (32-bit, 64-bit, or both). Regarding the release, I’ll say this: choose Windows 10 Home if you don’t understand what the difference is.
As for the 32- or 64-bit version, then you need to know the bit capacity of the computer you want to use. install a clean image of Windows 10. How to determine this, read the article "". If you need a disk from which you can install different versions Windows 10 on several computers at once, then feel free to select the “Both” option. If there is no need for both images, then you should not choose the double option, since the weight installation disk will increase exactly twice and will be about 8 GB instead of 4 GB.

After everything required parameters installed, you need to select which media you want burn a clean image of Windows 10. If it is a USB drive (flash drive), then the image will be written directly to it.

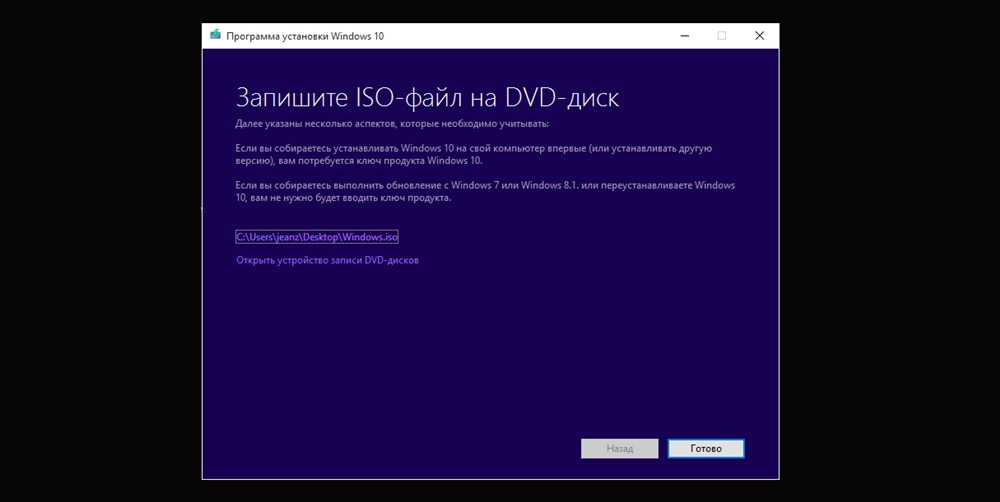
If you select a DVD disc, the program will first ask you to select a location to save the program on your computer or laptop - for convenience, you can place it directly on your desktop. Only then can you burn the created image of clean Windows 10 to a DVD. One of the ways to do this is discussed in detail in my article “ How to burn an image to a DVD in Windows 10».
Installing a clean image of Windows 10
Consider the question of how exactly you can install further clean Windows 10 on your computer I don’t see the point. If you are at all wondering about a clean installation of Windows 10, then you obviously know how this process occurs when installing Windows 7 or 8. With version 10 of Windows, nothing new has appeared in this process. As for choosing individual parameters, I personally prefer to install “top ten” with the default settings, and only then, if necessary, change something on a running operating system.
According to comments and personal messages I realized that many people still have questions about installing Windows 10. Wrote a very detailed article "".
I foresee a question about Windows activation 10. I will not advertise pirate methods - if you wish, you can easily find a great variety of them. I assume that you are planning to install a clean Windows 10, already having a license for it. If the licensed “ten” was installed on the computer at least once, then the key is already linked to it and after a clean installation of the operating system it will be activated automatically. If you do not have a license and you (quite rightly) do not want to use pirated activation methods, then I advise you to read my article “ How to get a licensed version of Windows 10 for free and legally after July 2016».
P.S.: Just in case, I’ll add that to find the item activation in the parameters you can use the search (magnifying glass on the control panel). When you start typing the words “Activation...” in the search bar, you will see the item “Activation. System parameters". This is what you need to launch by simply pressing Enter.
Technical level : Basic
Summary
In this article I will tell you how to clean install Windows 10 using bootable flash drive or disk.
Details
Windows installation consists of three steps:
Let's look at them one by one.
There are two ways to boot from any media.
First way the one I recommend using is selecting the media you need from the boot menu. The advantages of this method are its simplicity, as well as the absence of the need to change anything back after installing Windows. This method is suitable for all modern computers. But on older computers this method may not work.
Second way - changing boot order in BIOS. Pros - works on all computers. Disadvantages - it is more difficult for ordinary users. In addition, after installing Windows, you will need to put everything back.
Boot menu
To enter the boot menu, when you start the computer (namely, when the manufacturer’s logo appears or when a window appears with information about the motherboard, processor, etc.), you need to press specific key on keyboard. It is optimal to constantly press this key from the moment you turn it on until the menu opens.
There is no universal key; it depends on the computer/motherboard manufacturer. Here I will list the most common keys for the most common computer manufacturers.
If your manufacturer is not here, or the key does not work, look for it on the Internet. Enter similar search query: "HP Probook 450 G1 how to enter the boot menu" or "Asus ZenBook 4567N how to enter the boot menu." It is not necessary to specify specific model computer (for example, HP Probook 450 G1 F7Z37ES), since in one model range the keys will be the same.
PLEASE NOTE:
To switch off fast loading , go to Control Panel (in Windows 10, press Win + S, enter this search term). Go to the point system and safety, further in Power supplye, in the list on the left, click What the power buttons do. Disable the item Turn on quick start . To do this you may need to click Change settings that are currently unavailable at the top of the window.
So, usually the keys to enter the boot menu are:
| Acer | Esc/F9/F12 |
| Asrock | F11 |
| Asus | ESC/F8 |
| Compaq | ESC/F9 |
| Dell | F12 |
| ESC | F11 |
| Fujitsu | F12 |
| Gigabyte | F12 |
| HP | ESC/F9 |
| Intel | F10 |
| Lenovo | F12 |
| MSI | F11 |
| Packard Bell | F8 |
| Samsung | Esc |
| Sony Vaio | F11 |
| Toshiba | F12 |
If this information does not help you, check the keys for your computer on the Internet. Also, information about them may be displayed during system boot. They are often mentioned in the computer instructions.
To boot from a flash drive or disk through the boot menu:
- Insert the media into your computer. If it's a flash drive, be sure to use USB-2 ports if available!
- Restart your computer, while it is loading go to boot menu.
- Select the device you need using the up/down keys. If it's a disk, the device will probably be signed as CDROM/DVDROM. If it's a flash drive, then it will be a device USB. After selection desired device press Enter. Proceed to installing the OS.
You may need to press a key, such as Enter, if you see Press any key to boot from CD/USB.
First, insert the flash drive/disk into the computer.
The beginning of the method is the same as in the case of boot menu. To enter the BIOS, you need to press a key during boot. Again, a list of the most common options:
| ABIT | Delete |
| Acer (Aspire, Altos, Extensa, Ferrari, Power, Veriton, TravelMate) | F2/Delete |
| Acer (older models) | F1 / Ctrl + Alt + Esc |
| ASRock | F2/Delete |
| Asus | Delete |
| Biostar | Delete |
| Chaintech | Delete |
| Compaq (Deskpro, Portable, Presario, Prolinea, Systempro) | F10 |
| Compaq (older models) | F1/F2/F10/Delete |
| Dell (Dimension, Inspiron, Latitude, OptiPlex, Precision, Vostro, XPS) | F2 |
| Dell (older or different models) | Ctrl + Alt + Enter / Fn + Esc / Fn + F1 / Delete / Reset twice |
| ESC | Del/F1 |
| eMachines (eMonster, eTower, eOne, S-Series, T-Series) | Tab/Delete |
| eMachines (older models) | F2 |
| Foxconn | Delete |
| Fujitsu | F2 |
| Gigabyte | Delete |
| HP (Alternative, Tablet PC) | Esc / F2 / F10 / F12 |
| HP (OmniBook, Pavilion, Tablet, TouchSmart, Vectra) | F1 |
| Intel | F2 |
| Lenovo (3000 Series, IdeaPad, ThinkCentre, ThinkPad, ThinkStation) | F1/F2 |
| Lenovo (older models) | Ctrl + Alt + F3 / Ctrl + Alt + Ins / Fn + F1 |
| MSI | Delete |
| Pegatron | F2/F10/Delete |
| Samsung | F2 |
| Sony | F1/F2/F3 |
| Toshiba | F1/Esc |
BIOSes come in many different types, and universal instructions no for them. I can only describe the process in general outline. It is advisable to have at least a little knowledge of English or an English-Russian dictionary nearby. Be careful, don’t go where you shouldn’t, because incorrect settings BIOS can be disabled motherboard, processor and other computer hardware.
- Find a place somewhere Boot, Boot Options or Boot Priority.
- Go to the column First, press Enter, select the device from which you need to boot ( CDROM/USB), press Enter.
- Make sure that in any other column ( Second, Third...) device left Hard Disk. Otherwise, expose it yourself.
- Save changes and exit the BIOS.
More detailed instructions search the Internet, indicating your device, since, again, all BIOS are very different.
At the first reboot Windows(right during installation) go into the BIOS and return everything back!
Windows installation
WARNING: During the installation process, drive C will be formatted! Copy everything from it in advance necessary information to other drives!
1) Select the OS bit depth you need
This step must be performed only if the media contains a Windows image with 2 bits. If you have an image of only one bit size, skip it.
You will see the following Windows Boot Manager screen:
You can select the required bit depth (32- or 64-bit) using the up/down keys on the keyboard. Once selected, press Enter.
Note that if you don't click anything within (usually) 30 seconds, the download manager will automatically select the first option. So think about which OS you need to install in advance. You can read a little more about bit depths approximately in the middle of the article "".
2) Wait a while
will appear in front of you Windows logo, and at first the loading circle will not spin under it. This is fine. At this time, the boot manager examines the files on the boot media. Then the circle will appear, spin a little and the next window will open.
3) Select the language and desired options
In this window you can select the language, time format and keyboard layout. Please note that at this stage the language most often cannot be changed - it depends on the image that you recorded.
In almost all editions of Windows, except for Home Single Language, the language can be changed after installing the system. Regional settings can also be edited.
After selection required parameters(it’s better to leave everything as it is) press the button Further.
4) Click "Install"
5) Enter license key or skip this step
At this point, you will be asked to enter your product license key in field (1). There are several options:
After completing these steps, click Further (3).
6) Select the correct one Windows edition
In this window you will be asked to select your Windows edition. The available editions depend on the image you burned to the bootable media. When using official images in our region, these may be:
Choose the edition for which you have a license! The Home edition key will not work for Pro edition and vice versa - the key from the Pro edition is not suitable for the Home edition.
7) Carefully read and accept the Windows License Agreement
If you agree with it, accept it. To do this, check the box I accept the license terms, then click Further.
If you do not agree with the document, you do not have the right to install the OS.
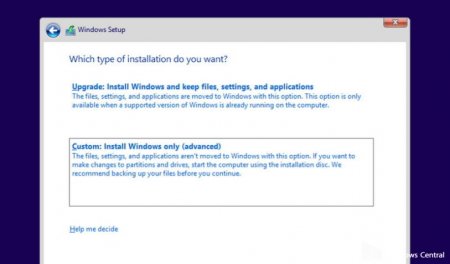
8) Select Windows installation type
You can simply update Windows, however, we are discussing a clean install here. So click Custom installation, as it shown on the picture.
9) Select the drive where you will install Windows.
You will see a list and properties of all disks on the computer. Numbering starts from 0.
If you are installing Windows on this device first, you will have unallocated space available. You will need to partition the hard drive.
Click Create, enter partition size and click on the button Apply. Do this as many times as you want to create partitions.
Please note that Windows may create system reserved chapter. There is no need to touch him.
For section which you take directly under Windows system (this will be drive C), you need to free at least 30 GB(if you have that much space).
In the picture below you can see that I created a partition of exactly this size. 500 MB has been reserved by the system.
If you have already used Windows on this device, you probably already have partitions, and they are stored on the hard drive various files. You need to do the following:
- Highlight reserved old system space. Format his. After that delete his.
- Now highlight your current disk WITH. Likewise - first format, and then delete his.
- After this you will have unoccupied space. Select his, create new section , and indicate the maximum possible place so that new disk C was no less than the old one. Click Apply. This will be a new drive C. A new reserved space will also appear.
I do not recommend performing any operations with the remaining disks, as you may lose all the files on them!If you want to expand some disks or do something else, I recommend using special programs for this!
Now select your new drive C, on which you will install the system, and click Further.
10) Wait for the OS installation process to complete.
The installation process may take quite a while big time. The device may reboot itself several times, and the screen may blink periodically. Anyway, don't do anything with it until the first system setup screen appears.
If you changed the boot sequence in the BIOS, immediately after the first shutdown, go into it and change everything back! Otherwise, after a reboot, the computer may boot from the flash drive/disk again and start the installation process all over again.
First Windows setup
Process first Windows settings 10 is different for different versions.
We will consider 2 versions:
- Anniversary update, version 1607, build 14393.xxx.
- Creators Update, version 1703 (presumably), builds are still unknown.
You can get detailed information about the Creators Update, which should be released in March-April 2017, in the article "".
Version 1607
1) Configure basic OS settings
The following screen will appear in front of you:
If you want to customize (enable/disable) various parameters, like sending personalized data to Microsoft, saving your location, enabling some prediction and protection mechanisms, etc., click the button Settings. You can change these settings at any time in Windows 10's privacy settings.
If you want to leave everything up to Windows, click Use standard parameters .
2) Configure administrator account settings
2.1) If you are connected to the Internet and Windows recognizes the connection, you will see a Microsoft account login screen.
My personal advice: Don't sign in to your Microsoft account right now. It is better to do this after the installation of the system is completed. Logging in now may result in some consequences, such as a mangled computer username that cannot be changed later.
If you really do not want to log into your account now, then click on the inscription Skip this step bottom left and go to point 2.2.
2.2) If you are not connected to the Internet, Windows did not recognize the connection, or you decided to skip logging into your Microsoft account, the following screen will appear in front of you.
Enter your username. If you do not want to password protect this account, simply do not enter anything in the appropriate field. All these parameters, including the password, can be changed later.
3) Wait
Windows installation will continue. They will tell you about many amazing features. Do not turn off the device during this process under any circumstances!
4) Use a clean system
Version 1703 (?)
1) Select region
A list will appear in front of you available regions. The functionality of the system and some applications depends on the selected country, so it is better to set your actual location.
You can change these settings later in Settings - Time and language - Region.
2) Select your keyboard layout
You will see a list of available layouts. Choose the main one for yourself. Let me remind you that English layout will be present by default.
3) Add a second keyboard layout (optional)
Already at this stage you can add a second keyboard layout. If you need it, click the button Adding a Layout, then select required language. If English and the previously selected keyboard are enough for you, click Skip.
4) Windows will try to connect to the network
If the system manages to install special drivers, she will be able to connect. Otherwise you will have to install necessary drivers after installing the system manually.
5) Select setting method
Since this article is intended for regular users and they are unlikely to use production services, select Customize for personal use.
6) Configure your main account settings
6.1) If you are connected to the Internet, a screen will appear in front of you Microsoft account login.
I strongly advise against logging in right now. This can lead to bad consequences. For example, a mangled username that cannot be changed. Click Offline account bottom left and go to point 6.2.
6.2) Enter your username
Better to use letters . You should not use spaces - some programs may not work correctly later because of this. If you need to switch keyboard layout, use the keyboard shortcut Shift + Alt.
7) Enter user password
If you don't want to use a password or want to set this up later, just click right away Further.
8) Configure your privacy settings
Windows 10 collects some data about user activity. From this screen, you can read what information is sent to Microsoft by default and turn off the data you don't want shared.
You can read about how the collected data is used directly under the corresponding checkboxes.
Check or uncheck the items you need and click Accept. These settings can be changed later.
9) Wait for the installation process to complete
Do not turn off the device under any circumstances!
10) Use a clean system
A desktop will appear in front of you.
Install drivers and programs, configure the system for yourself and work with it.
Windows 10, the newest of this family at the moment operating systems, appeared as a test version in 2014. Release full-fledged system took place in 2015, and for some categories of users it is provided free of charge. This applies to those who have legal Windows 7 or 8.1 installed - these are updated through the Update Center within a year after release, and then new system and its files can be reinstalled as many times as you like on this computer.
Updating to version 10 occurs almost automatically; the user only needs to confirm the installation and press a couple of buttons, the files will be downloaded and the installation will be completed. But if you bought new computer without the OS installed, changed the hard drive, or simply decided to combine all the partitions on the old disk, you need to be able to install Windows 10 on clean computer.
The first thing you need for version 10 is media with installation files. You can download the image from torrent trackers or other sites, but it is safer to take it from the official site Microsoft. For this there is special program“Windows 10 Media Creation”, by downloading which you can download the image to your computer (for further recording on a DVD) or create a bootable USB flash drive without saving the image and using additional programs.
After launching the download tool, you must select the option “Create installation media for another computer.” On the next screen you select the language, edition and architecture. When choosing Windows release 10 N will record a version without additional programs for multimedia and Skype. The x86 or x64 architecture is selected depending on the user's needs, but you can record both versions to the media, and select the one you need during installation.
Almost everything modern computers support installing the OS from a USB drive, so it will be more convenient to use a flash drive. To create it, just select on the next screen desired type media and recording device, then everything will be done automatically. If you need to burn the system to a DVD, then select the ISO file as the media, specify the save location, and then burn the downloaded image to disk.
When the media is ready, you need to configure booting from USB or DVD. Insert the disk and enter the BIOS. On desktop computers login in progress by pressing Delete after switching on. The login key on a laptop depends on the manufacturer: some also use Delete, others use some kind function key(most often F2 or F9, sometimes in combination with Fn). More details can be found online. In the BIOS you need to go to the Boot tab and put your media first in the boot list. After that, select the Exit tab and Exit Saving Changes to save the settings and reboot the device.
After rebooting, a black screen will appear asking you to press any button to boot via USB/DVD. The computer will then detect boot device and a window with language settings will appear. Select the required parameters and click Next. On the next screen there will be an “Install” button and a small “System Restore” inscription in the corner. For a clean installation, click Install.
A screen will appear with license agreement. You can skip it, but you better read it - there will be several interesting points regarding the collection of user data. Check the box below and click Next. Then select the installation method “Custom: only Windows installation(For knowledgeable users)". A screen will appear asking you to select a partition.
You can create several user partitions - this method was popular when installing older operating systems, up to and including Windows XP. But in newer releases, it became possible to install a system with files saved on a partition, so you can often do without partitioning the disk. Allocation of partitions may be necessary if you plan to install several operating systems or create a recovery partition with backup copy systems.
For system needs, several are usually created additional sections, even if you do not divide the disk and allocate all unallocated space to one partition. After selection required disk click Next. The installation of the system will begin, you will have to wait a little. At this time there may be automatic reboot or the screen will go dark for a few seconds - no need to worry, this is normal.
When all files are unpacked and Windows installation ends, Windows 10 will no longer boot from USB or DVD, but from hard drive. All that remains is to execute initial settings Windows.
Settings
The system will first display a screen with the title “Improve speed”, where you can configure or select standard settings related to location, personalization, error reporting. Then choose who owns the computer - you personally or the organization. After this you will be asked to log in account Microsoft or create one. Using just such an entry will allow you to download applications from “ Windows Store", sign in to Skype, watch videos on excellent speed and enjoy many other benefits.
If you do not have an Internet connection, you will have to create local recording. Click "Skip this step" and in the next window enter your name, password (if needed) and hint. You can sign in to your Microsoft account later.
Further settings are available only for those logged in with an account Microsoft entry, they relate to the PIN code and synchronization with cloud service OneDrive. A PIN code made of numbers replaces the usual password; it can be used to quickly log into the system when turning on the computer or exiting sleep mode. OneDrive allows you to store files in special storage for free, without the fear of losing them due to hard drive failure. Both the pin code and storage can be disabled in settings.
Completion
The installation of Windows 10 on a clean computer is complete, all that remains is to run the Update Center, which itself will download from the Internet necessary files- drivers and packages for version 10 of the system, and when he manages to successfully install them, he can begin work, which is worth doing to enjoy the new features!


