Formatting a hard drive from a boot drive. Formatting a hard drive at a low level
As various statistics show, not all users know how to perform the specified action. The biggest problems arise if you need to format the C drive in Windows 7 or 8, i.e. system hard drive.
In this instruction we will talk about how to perform this, in fact, a simple action - format drive C (or, rather, the drive on which Windows is installed) and any other hard drive. Well, I'll start with the simplest thing.

Formatting a non-system hard drive or partition in Windows
In order to format a disk or its logical partition in Windows 7 or Windows 8 (relatively speaking, drive D), just open Explorer (or “My Computer”), right-click on the disk and select “Format”.
After this, simply specify, if desired, the volume label, the file system (although it is better to leave NTFS here) and the formatting method (it makes sense to leave “Quick Format”). Click "Start" and wait until the disk is completely formatted. Sometimes, if the hard drive is large enough, this may take a long time and you may even think that the computer has frozen. There is a 95% chance that this is not the case, just wait.

Another way to format a non-system hard drive is to use the format command in a Command Prompt running as an administrator. In general, a command that quickly formats a disk in NTFS will look like this:
Format /FS:NTFS D: /q
Where D: is the drive letter of the drive being formatted.

How to format C drive in Windows 7 and Windows 8

In general, this guide is also suitable for previous versions of Windows. So, if you try to format the system hard drive in Windows 7 or 8, you will see a message that:
- You cannot format this volume. It contains the version of the Windows operating system currently in use. Formatting this volume may cause your computer to stop working. (Windows 8 and 8.1)
- This disk is in use. The disk is in use by another program or process. Format it? And after clicking “Yes”, the message “Windows cannot format this disk. Quit any other programs that are using the drive, make sure no windows are displaying its contents, and then try again.
What is happening is easily explained - Windows cannot format the disk on which it itself is located. Moreover, even if the operating system is installed on drive D or any other, the first partition (i.e., drive C) will still contain the files necessary to load the operating system, since when you turn on the computer, the BIOS will first start loading from there.
Some notes
Thus, when formatting drive C, you should remember that this action implies the subsequent installation of Windows (or another OS) or, if Windows is installed on another partition, the OS boot configuration after formatting, which is not the most trivial task and, if you are not too If you're an experienced user (and apparently you are, since you're here), I wouldn't recommend trying this.
Formatting
If you are confident in what you are doing, then continue. In order to format drive C or the Windows system partition, you will need to boot from some other media:
- Bootable Windows or Linux flash drive, boot disk.
- Any other bootable media - LiveCD, Hiren’s Boot CD, Bart PE and others.
There are also special solutions such as Acronis Disk Director, Paragon Partition Magic or Manager and others. But we will not consider them: firstly, these products are paid, and secondly, for the purposes of simple formatting they are unnecessary.
Formatting using a bootable USB flash drive or disk Windows 7 and 8
In order to format the system disk using this method, boot from the appropriate installation media and select “Full installation” when selecting the installation type. The next thing you will see is the selection of the partition for installation.

Another way is to press Shift + F10 at any time during installation, the command line will open. From which you can also format (how to do this was written above). Here you need to take into account that in the installation program the drive letter C may be different; in order to find it out, first use the command:
Wmic logicaldisk get deviceid, volumename, description
And, to clarify whether something was mixed up, use the DIR D: command, where D: is the drive letter. (Using this command you will see the contents of the folders on the disk).
After this, you can already apply format to the desired section.
How to format a drive using LiveCD
Formatting a hard drive using various types of LiveCD is not much different from simply formatting it in Windows. Since when booting from a LiveCD, all the really necessary data is located in the computer’s RAM, you can use various BartPE options to format the system hard drive simply through Explorer. And, just like in the options already described, use the format command on the command line.

There are other formatting nuances, but I will describe them in one of the following articles. And in order for a novice user to know how to format the C drive, this article, I think, will be enough. If anything, ask questions in the comments.
Nowadays, many modern PC users have no idea how often any program for formatting a hard drive has helped in the past. .
After all, hard drives had to be formatted regularly.
This is all due to the imperfection of software products - both those that were used for basic user purposes and those that were used to perform maintenance operations on installed systems.
Background
Another aspect of the need for the once frequent use of programs to format hard drives is problems with the hardware. Small media volume, frequent hardware errors and the like.
But oddly enough, over time, the need to format disks still remained, even with the advent of modern solid-state drives. At the same time, the formatting operation has ceased to be an everyday norm, and if it is necessary to format a hard drive, many users are at a loss as to how and in what way it can be done.
Fortunately, over time, both the quality of software products designed for formatting hard drives and their number have increased noticeably. And now the user is not limited to built-in system utilities, but has access not just to third-party software products, but to entire sets of software tools that allow you to perform not only formatting, but also several other useful operations, in particular, improving the condition of the hard drive and the lifespan its operation.
Some of these tools are classified as shareware, some come with a free license, and the rest are only available upon purchase. Each of them has its own advantages and we propose to consider several of the most commonly used and popular tools with sufficient functionality.
Paragon Partition Manager Free Edition
A program for formatting a hard drive called Paragon Partition Manager Free Edition stands out from other similar software products in its ability to perform operations on virtual storage media. In addition, for those who still cannot give up using Windows XP, it will provide the ability to support high-capacity disks of the order of 2 TB or more. But it also works on modern Windows 7 and 8 operating systems.
An additional advantage of this complex is its support for multi-boot management functions. This option will be useful for those who use several operating systems in test mode or simply require their parallel use.
The program interface is quite simple and understandable, and in some cases it is simply irreplaceable. An example of this is the function of merging partitions without losing data, which is especially important when formatting partitions. In this case, the user is given the opportunity to even convert partitions.
As for file systems, the number of them supported is quite large. They can be converted from one to another using this program, in particular, NTFS to HFS.
Among other functionality, there is copying and restoring disks, merging them, moving them and resizing them. And all this with a Russified shell.
Some may find the defragmentation function superfluous, but absolutely everyone will like protection against system failures and detection of bad sectors.
Rice. 1 – Paragon Partition Manager window fragment
EASEUS Partition Master
This program for formatting a hard drive has the advantage of having several versions with different functionality. Some of them are free, but the Home Edition and Master Free versions deserve special attention from ordinary users.
The program has excellent functionality, accessible through the Russian-language software shell. It can run under the Windows operating system family, in particular, versions 7, 8 and 10, both 32-bit and 64-bit, and some versions allow you to work through Linux.
The software product provides work with a wide range of heterogeneous drives, the most important of which are:
- HDDs;
- SSD solid state drives;
- USB flash drives;
- memory cards in various designs.
You can not only format them, but also create or change sections, for example, merging, deleting, copying and resizing.
The program has access to work with RAID arrays and provides user interaction with MBR and GPT. Some operations can be performed using built-in wizards, which greatly facilitates the user’s work.
It is worth paying attention to the fact that each version of the product has its own restrictions, in particular, on the maximum storage size. For example, in the Home Edition it is 8 TB, and in Master Free it is only 4 TB. The user is also advised to pay attention to the installation process, since unnecessary utilities can be installed along the way.
Rice. 2 – EASEUS Partition Master window fragment
Aomei Partition Assistant
A program for formatting a hard drive called Aomei Partition Assistant is a product that is distributed free of charge, but has decent functionality. It provides a number of functions that are not available in other free products and therefore belongs to a completely different class.
This software package, like the previous product, has a Russian-language shell and supports modern operating systems of the Windows and Linux families and, accordingly, file systems running under their control: FAT 12/16/32, NTFS, Ext2/3/4, exFAT/ReFS.
In parallel with work on physical media, the program also performs operations on virtual disks.
As for the special functionality, it is implemented in the form of access to disks invisible to other software. The program allows you to check them, test them and a number of other useful operations. All this against the backdrop of minimum system requirements, ranging from the processor version to the amount of available disk memory.
This software product is able to work even under such conditions when the device has 128 disks installed and the volume size is 16 TB. It is also one of the few products that can work with SSHD, flash drives and flash cards. Is it worth mentioning that it supports UEFI Boot, and all operations performed are performed without damaging user information, according to the creators?
Rice. 3 – Aomei Partition Assistant Window
MiniTool Partition Wizard
This program for formatting a hard drive is more modest, but much more popular, not only in the domestic space, but throughout the world. It is free and provides interaction under operating systems of the Windows family, including the latest versions of various bits, while also processing EXT disk partitions, as well as Linux Swap.
The software interface has a Russified shell and provides work with partitions with a capacity of more than 2 TB. It is quite simple and will be understandable even for a novice user. The functionality of the interface is quite wide and even includes the new-fangled migration from HDD to SSD.
The software product also performs a number of basic operations with disks and their partitions, including their cloning, creation and modification. An additional operation can be considered the conversion of FAT/FAT32 file systems to NTFS while maintaining the integrity of user data, which is complemented by the functionality of backing up stored information and a data recovery utility after failures. If desired, the user can test their disks by testing their performance.
Like some of the programs described above, this one can convert disks from MBR to GPT, and this is important when a frequently used system partition is worn out. In parallel with this, it is possible to assign active sections and interact with them.
Rice. 4 – MiniTool Partition Wizard window
HDD Low Level Format Tool
This hard drive formatting program falls into a different category than the software tools discussed above. Therefore, it deserves special attention. This is not a large software package with wide functionality, but a small program that only has the ability to low-level formatting in its set of functions.
This option provides, with the given settings, the ability to restore the functionality of storage media. Moreover, this functionality applies to both hard drives and flash drives. The only problem for the user in this case is the complete destruction of the data on the media without the possibility of further recovery.
Unfortunately, there are no other operations that this product can perform with media.
Rice. 5 – HDD Low Level Format Tool window
Acronis Disk Director
This program for formatting a hard drive is also quite interesting. Its peculiarity is that it can be launched from any media. So, you can install it on a boot disk or flash drive and even without a full-fledged operating system be able to work with disk partitions.
This functionality is especially important in emergency situations, when it is more important for the user to restore the system’s functionality, and not just create an additional partition for more convenient storage of data or installation of a game. The program's functionality is suitable for working with disks running both Windows and Linux. However, this product has one significant drawback, which is noticeable when compared with the above programs - its cost.
In fact, this application belongs to the category of shareware products. After the specified trial period has expired, the user is offered two options - purchase a license or remove the software product. Therefore, it can be safely used and compared with other programs on a free basis, but for a limited period.
Otherwise, this is a full-fledged tool for working with disks and their partitions with wide functionality. It includes all the basic operations for working with partitions, including formatting, and also allows the PC owner to view the information stored on these partitions in a general way.
Rice. 6 – Acronis Disk Director window
Standard Windows OS Tools
When describing programs for formatting disks, one cannot fail to mention standard operating system tools that are available to users without downloading third-party software products. This can be done using the example of operating systems of the Windows family. A special feature of these systems is that they have several tools for working with hard drives and their partitions.
The first tool is quite simple and this utility is available to the user from the Explorer program. In order to use it, you can call up the context menu for the logical partition of the hard drive, and select “Format” from it. After this, a form will become available in which you can specify the desired parameters of the formatting operation.
This functionality will be available for all logical disk partitions, with the exception of the active system disk. In this case, you need to use a slightly different tool, accessible exclusively from the command line. Working with it requires special skills that are only available to experienced users.
Important! To have access to them, you need to have a boot disk, as well as settings in the BIOS that force the PC to boot from removable media, and not from the hard drive, in order to provide the functionality the system needs. This is provided by a small utility called diskpart. But its main problem is that the user does not receive high-quality visualization of the actions being performed, and any error in their execution can cost the functionality of the system.
This state of affairs forces users to resort to using third-party software products.
Rice. 7 – Formatting utility window
Formatting your hard drive before installing Windows
In the video I will show you how to format a hard drive. This may come in handy when you reinstall the Windows operating system.
Formatting is the process of completely cleaning and partitioning a local disk. The majority of owners of computers, and any other digital equipment, have resorted to a similar procedure more than once. Basically, a similar procedure is carried out to remove unnecessary data from the hard drive or change the file system (NTFS, FAT, FAT32). But the most common option, without a doubt, is formatting, as preparation of a place for reinstalling the operating system. If you look at it, formatting hard drive D doesn’t require much intelligence. Another thing is system C. Inexperienced users will have to tinker with it. The problem is that it is impossible to delete all data from drive C while in the Windows XP, 7, 8, 10 interface.
But don't worry, the procedure is not as scary as it seems. After all, in fact, “breaking does not build.” Therefore, move all important files first. CDs, flash drives, even local screw D are perfect for these purposes. If he doesn't, the same fate won't await him. While dummies are wondering how a non-system hard drive is formatted, let’s remind them of this.
In order not to get confused in this complex process, we will analyze everything point by point.

In this way, you can easily clean up any removable drive, as well as already half-forgotten CD-RW blanks. Four simple steps and the mission is completed. Believe me, you shouldn’t download unnecessary programs, this method is quite reliable and effective. But let’s take a closer look at formatting methods.
Cleaning the system local disk
Cleaning the system hard drive (C) will remove your operating system. In other words, you will not be able to go to your usual desktop. Therefore, it is necessary to carry out such a process only if you know what to do next. But today is not about that.
To clean the host OS, you will need:
- Bootable USB flash drive or CD;
- Superficial knowledge of the bios environment;
- Smooth hands.
If all of the above is present, say goodbye to the old Windows XP, 7, 8, 10 and reboot the computer. At the very beginning of the computer boot, press the Delete key, after which we get into the BIOS. In different operating systems, this environment may differ slightly, but if you wish, you can figure it out (see the third point). Go to the Boot tab, then press Enter in the Boot Device Priority line.

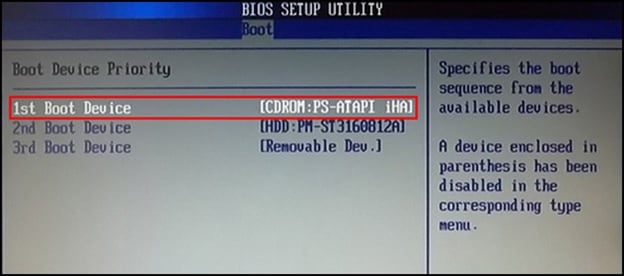
The order in which they are located determines when your computer accesses them. That is, in the first line, you need to select from the devices the one that has a boot cloud and through it the system will try to boot. In our case, this is a CD-ROM. After completing this simple action, look for F10 on the keyboard and exit the BIOS, saving the changes made.
Now you know how to set BIOS parameters to boot your computer from a hard disk image that is installed on removable media. Please note that these steps are equally effective in all versions of Windows, including the new 10.
After exiting the BIOS, booting through the removable drive will begin automatically; the next steps depend on which method described below you choose.
Acronis Disk Director
By booting through such a utility, you won’t be able to install Windows XP, 7, 8, or 10, but you can format your hard drive without any problems. But there are also exceptions. Basically, the Windows boot disk of all versions (even 10) contains an extensive list of various utilities. Acronis Disk Director can easily be in it.

One way or another, after launching the application, select the line “Launch management console”.
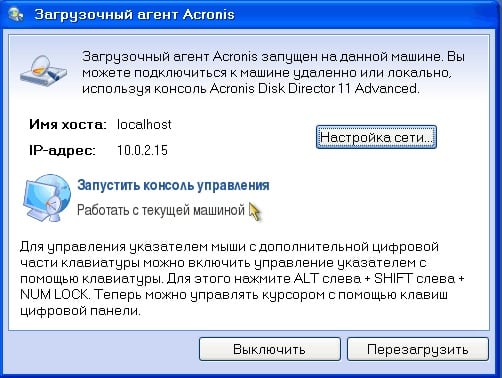
After which, the contents of our computer will appear with all the available screws.
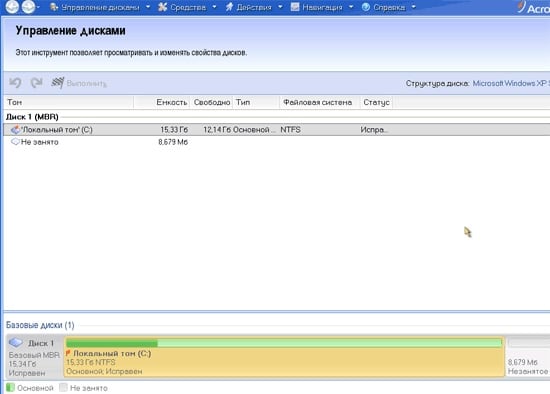
Next, nothing new! By hovering the cursor over the drive of interest and right-clicking, an extensive context menu will appear. Here we have cutting, renaming, and much more, but we select what we were looking for – “Formatting”. And we see the following.

The parameters are familiar, aren't they? Having set the settings as in the picture, click “ok”. To start formatting, you need two more clicks. Apply scheduled operations first.

Second, actually start formatting by clicking on “Continue”.

After a few minutes, the disk will be cleared. And once the job is done, then we say goodbye to the utility.
Formatting using OS pseudo-installation
If you do not know how to reinstall the operating systems Windows XP, 7, 8, 10, then you will have to explain this in several stages of the procedure. After all, this is where you can cheat and achieve the same goal - clean up drive C.
In fact, such a process requires a minimum of actions. We boot through the cloud hard drive and see the following.

If you hold down the “Shift+F10” combination at this stage, you will have access to the command line. And here some commands will come to the rescue:
- “format/FS:NTFS X: /q”;
- “format/FS:FAT32 X:/q”.
The first one will perform a quick format in the NTFS system. The second, respectively, in FAT32, instead of X, enter the drive letter and press “Enter”. However, be careful, because the BIOS environment may produce incorrect disk identifications. By entering the following command, this problem will be solved - “wmic logicaldisc get deviceid, volumename, size, description”.

If this method is too problematic, then when choosing the language of the installed OS, click “Next”. Then “Full installation” and we get to the final destination.

By selecting the required hard drive and clicking on the “Disk Setup” line, some options will appear that apply to it. Here you can either format or delete the disk, or expand its capacity.
ERD Commander
Another tool with which you can quickly clean your system hard drive. To do this, boot through the hard disk image and go to the MicroSoft Diagnostic and Recovery Toolset section. Next, in the windows that appear, click “next” (2-3 times) and get into this menu.

By selecting “Disk Cleanup”, select the disk, after which it is formatted.
That's basically it. In addition to those listed, there are many more utilities of this specialization, but the principle of their operation will not change much. The main thing to understand is that the next step after formatting the system hard drive is to install Windows XP, 7, 8, or even version 10. Therefore, make sure in advance that it is available on the bootable media, because you cannot install the OS through a formatting utility.
In contact with
Any hard drive, before at least one file appears on it, must be formatted, without this there is no way! In general, formatting a hard drive is done in many cases: not only at the very beginning, when it is new, but also commonplace when you need quickly all the files from the disk, when you want to change, etc.
In this article I would like to touch on several of the most commonly used methods of formatting a hard drive. First, a short introduction about what formatting is and which file systems are the most popular today.
A little theory
At all formatting means the process of partitioning a hard drive, during which a certain file system (table) is created. Using this logical table, in the future, all information with which it will work will be written and read from the surface of the disk.
These tables can be different, which is completely logical, because information can be organized in completely different ways. What kind of table you have will depend on file system.
When formatting the disk, you will have to specify the file system (required). Today, the most popular file systems are FAT 32 and NTFS. They each have their own characteristics. For the user, perhaps the main thing is that FAT 32 does not support files larger than 4 GB. For modern films and games - this is not enough, if you install Windows 7, Vista, 8 - format the disk to NTFS.
Most frequently asked questions
1) Quick and full formatting... what's the difference?
With fast formatting, everything is extremely simple: the computer thinks that the disk is clean and creates a new table. Those. physically, the data has not gone anywhere, it’s just that those parts of the disk on which they were written are no longer perceived by the system as occupied... By the way, this is what many software programs are based on.
When fully formatting, hard disk sectors are checked for bad blocks. Such formatting can take a long time, especially if the hard drive is not small. Data is not physically deleted from the hard drive either.
2) Is frequent formatting harmful for the HDD?
No, it's not harmful. With the same success, sabotage can be said about writing and reading files.
3) How can I physically delete files from my hard drive?
It’s trivial to write down other information. There is also special software that deletes all information so that it cannot be restored by any utilities.
Formatting HDD in PartitionMagic
PartitionMagic is an excellent program for working with disks and partitions. It will be able to cope even with those tasks that many other utilities cannot cope with. For example, maybe without formatting and data loss!
The program is very easy to use. After it boots, simply select the drive you need, click on it and select Format. Next, the program will ask you to specify the file system, disk name, volume label, in general, nothing complicated. Even if some terms are not familiar, you can leave them by default, selecting only the required file system - NTFS.
Formatting a hard drive using Windows
In the WIndows operating system, a hard drive can be formatted in three ways, at least they are the most common.
Via "my computer"
This is the easiest and most famous way. First, go to “my computer”. Next, right-click on the desired partition of your hard drive or flash drive or any other device and select “format”.
Via Disk Control Panel
Let's show the example of Windows 7, 8. Go to the “control panel” and enter the word “disk” in the search menu (on the right, top line). We look for the “Administration” heading and select “Create and format hard disk partitions.”
Using the command line
To begin with, logically, launch this command line. The easiest way to do this is through the start menu. For users of Windows 8 (with “tricky startup”) we will show it with an example.
Partitioning and formatting a disk when installing Windows
When installing Windows OS, it is very convenient to immediately “split” the hard drive into partitions, immediately formatting them along the way. In addition, for example, the system partition of the disk on which you have the system installed is different and cannot be formatted only using boot disks and flash drives.
Useful installation materials:
An article about how you can burn a boot disk with Windows.
This article describes how you can burn an image to a flash drive, including the installation one.
The article will help you set Bios to boot from a CD or flash drive. In general, change the boot priority.
In general, when installing Windows, when you get to the disk partitioning step, you will have the following picture:

Installation of OS Windows.
Instead of “next”, click on “disk setup”. Next, you will see buttons for editing the HDD. You can split the disk into 2-3 partitions, format them into the desired file system, and then select the partition in which to install Windows.
Afterword
Despite the many formatting methods, do not forget that there may be valuable information on the disk. It is much easier before any “serious procedures with HDD” to do everything on other media. Often, many users only later, having come to their senses after a day or two, begin to scold themselves for their careless and hasty actions...
In any case, until you have written new data to the disk, in most cases, and the sooner you start the recovery procedure, the higher the chance of success.


