Setting up and installing open server. Configuring local server settings, installing WordPress. How to create a local server on your computer
Hello friends.
In this article, we will install a local server on our computer for subsequent development and configuration of sites on it.
To do this, we will use a program called Denwer. Its installation is simple and does not require any technical knowledge. Moreover, the installation process is accompanied by prompts.
How to install a local server and whether it is needed at all, read on. Let's start by considering the importance local server.
Do I need a local server?
For beginners, I’ll start by defining the concept of “local server” - this is a server (hosting) that is located on your computer (not on the Internet) and allows you to create and configure websites on it.
I believe that it is necessary to create and further configure the site on a local server, so that then in one fell swoop you can place a fully functional site with all the settings on the Internet. And then immediately fill it with content.
This is what truly professionals in website creation do. Even if we look at people who constantly work with creating websites on various engines, we will see that almost every one of them first installs the site on a local server, then configures it, and only then transfers it to real hosting.
As an example, I’ll show you the menu from Sergei Patin’s course "Joomla 3 - professional website in one day". Look at the sequence in which the website is created.
As you can see, from the very beginning the site is installed locally, configured, and at the end the completely finished resource is transferred to hosting.
Placing a website on the Internet and then setting it up when you need to promote it is unwise.
What if you already have a website? Do you need a local server?
Let's imagine the situation that you already have a website and you are a very avid techie, that is, you like to always delve into all sorts of technical issues and constantly experiment with something.
So, you already have a website and there are already some visitors on it. Although not a large number, they exist. Put yourself in their shoes.
You go to a website and constantly see that the owner of the site or blog is constantly changing something. It changes the location of blocks on the site, the structure, and sometimes the design is new every day. Would you like this? So visitors wouldn’t really like this situation.
Developing, setting up websites, as well as creating designs on a website that is already posted on the Internet is, at a minimum, not professional. Not to mention the fact that it has a very adverse effect on his development and approval in the eyes of search engines and your audience.
Therefore, you need to do all such things on your local computer.
Now we will start installing it, after which you can install it on local computer your website and do whatever you want with it. Visitors will not see these frauds, because... This is your personal computer and no one has access to it. And after you bring everything to its final state, you can easily transfer it in a completely finished form to a real website.
By the way, I also talk about the importance of a local server when creating a blog in my mind map “Plan for creating a quality blog from Konstantin Khmelev,” which you can get by leaving your 1st comment.
Let's move on to the installation process itself.
Install a local server on your computer
The local server is a program. Therefore, you need to download it. We will use the Denwer web server for this.
Go to the official website program and click on the big button.

After clicking, you are prompted to select the program version. Choosing a version old PHP 5.2 and press the button Download.

In the next window we need to enter the data where the link to download Denwer will be sent. Enter your real data and click on the “Get download link” button.

After clicking the button, you will immediately receive an email with a link to download the program. The sender and subject lines of the letter will be as follows (see screenshot below).

After downloading, in the location where you saved the program you will have an installer that will look like this.

To start installing the local server, run the installer.

It asks us if we want to install basic package? We agree.

The unarchiving of the data will begin and will proceed very quickly.

After unpacking the data, the installation of the local server will begin, which will be carried out on the command line. Immediately when it starts, we will be asked to close the browser.

Automatically, when the command line appears, the browser will open with a message that you must close the browser to continue or cancel the installation.

You should also close other browsers if the command line installation will not continue.
After closing all Internet browsers, installation will continue. You just need to follow the prompts that the command line gives.
To continue the installation, press Enter.

I'll install it in another place. In my case it's a disk E folder host.


In the next step, press Enter again.

The next step is to select a virtual disk letter. By default, the program prompts you to select drive Z, since this letter is the last in the English alphabet and it is unlikely that any drive is occupied by it.
I'll leave it like that. You can enter another letter, but make sure that no drive is occupied by it.
After selecting and entering the letter, press Enter to continue installing the local server.


After copying is complete, you must select the Denwer launch option.
There are 2 launch modes, but the program itself recommends choosing option 1. That’s what we do. Enter the number 1 into the command line and press Enter.

- launch;
- stops;
- reboot.
We need these labels. Therefore, enter the letter Y and press Enter.

This was the last step in installing the local server, after which the browser will automatically open with the message “Denwer installed successfully”, and it will also be written that Denwer works with the same ports as Skype.
Therefore, if you have Skype installed, then do what is written in the browser window.

It will also create the desktop shortcuts that we wanted so much.

- Start Denwer - start Denver;
- Stop Denwer - stop;
All. Our local server is installed. Now all that's left to do is check it out a little. Launch and see if our virtual disk, which will act as a local server, actually starts.
Before we launch, let's go to the directory where we installed Denver and see what's there.
Since I installed on drive E in the host folder, now there should be such a folder on my drive.

The way it is. And inside the folder there should be the Denver files themselves. We go inside the folder, where we should see the following picture.

There are files. This means everything was successfully copied during installation.
Now let's check whether Denwer itself starts. Let's use the shortcut to launch.

After launching the shortcut, 2 command lines will quickly flash. When they disappear, 2 shortcuts will appear on the taskbar.
If such shortcuts appear, then Denwer is running. A virtual disk with the letter Z should also appear in my case. In your case, with the letter you assigned. Also, this disk should be named similarly to the disk in which you installed Denver itself.

As you can see, there is drive "E", which I installed in, as well as drive "Z", which appeared after launching Denver. They have the same names. Both discs are titled " Local disk". Only the letters are different.
If we go to the virtual disk (Z), we should see the same files and folders in Denver that we looked at earlier.

All friends. This completes the installation of the local server. Now you can start creating a website on it and do any manipulations with the site.
In the next article I will show. You will also find a detailed article with images and a video tutorial there.
By the way, about the video lesson. If someone doesn’t understand something from the text version, then here’s a video lesson that I specially recorded for you.
With this I will say goodbye to you. I look forward to your comments and any ideas for new blog articles. If something doesn’t work out or you have any questions, write them in the comments.
All the best.
Best regards, Konstantin Khmelev.
 The architecture of the directory layout of the software package implies a clear separation of two different types of data: dynamic user data (settings, temporary files, logs, etc.) and static data (modules, programs, service files).
 In simple terms, in the modules folder no files are ever changed, created or deleted, but in the domains and userdata folders, on the contrary, the data is constantly changing. This architecture was created specifically to simplify data synchronization between different copies of the complex and save space during backup.
Installation and launch
Installation
OSPanel is a portable software package and does not require installation. The assembly can be placed on an external hard drive or flash drive, this will allow you to use OSPanel on any computer that meets the system requirements.The distribution is a self-extracting archive in 7ZIP format (.exe extension). Run the distribution executable file and select the path to unpack the files.
System requirements
- Minimum Required system resources: 200 MB RAM and 1 GB HDD;
- Windows (32-bit or 64-bit): Windows 8 / Windows 7 / Windows Server 2008 / Windows Vista / Windows XP SP3;
- Installed set of libraries Microsoft Visual C++ 2005-2008-2010 Redistributable Package x86;
Launch
To launch OSPanel use the file OSPanel.exe. If possible, the program should only be run as an administrator. After starting the program, you will see a red flag in the Windows tray (the area near the system clock). To enable the web server itself, click on the checkbox, then select the menu item [Menu → Start].If the server does not start, go to the section in this reference guide.
Attention
Before you start using OSPanel, perform [Menu → Advanced → First launch]. Having an installed set of Microsoft Visual C++ 2005-2008-2010 Redistributable Package x86 libraries is a mandatory system requirement; OSPanel will not work without them.Run from CD/DVD
OSPanel can run from CD/DVD discs as well as from regular HDD disk or flash drive with the only difference that when working from an optical disk, no changes or files will be saved after exiting the program.As you know, a CD/DVD disc is available only in read mode, which makes it impossible to launch and use a server on such media in the usual way. OSPanel has a fairly simple mechanism built into it to get out of this situation: when starting, the server is copied to a temporary folder on the computer, and when the program exits, this folder is completely deleted. Thus, all OSPanel work occurs on the user's computer, and not on the optical disk.
Installing updates
OSPanel is a fairly complex software package with a constantly improving architecture. There is no update procedure as such. When a new version of OSPanel is released, you need to re-do all the settings, copy your sites folders and transfer databases. Do not unpack distribution files over an existing version, and do not try to copy configuration and profile files from old version programs to a new one! Since new versions of OSPanel can sometimes be released quite frequently, it is not worth updating your build every time, it is better to skip several versions.If possible to update simple copying files, then a link to the patch is always published in the news on the site along with an annotation for the new version.
Compatibility
Some new OSPanel modules (PHP 5.5, MongoDB, Apache 2.4) are incompatible with outdated operating systems such as Windows XP, Windows 2003, Windows Vista. When using such modules and running the server on legacy systems, you will receive an error message. You should also know that some modules can only work together, for example Apache 2.4 and PHP 5.5.Connection
Below are the default parameters for connecting to modules in OSPanel. You can always change these settings yourself at your discretion.Connecting to MySQL
- Address: your website domain*
- Port: 3306
- User: mysql
- Password: mysql
ROOT connection to MySQL
- User: root
- Password: (blank)
Information
The default encoding in the MySQL server settings does not affect the ROOT user. The encoding will need to be explicitly specified in database connection scripts, so using the ROOT user is not recommended.Connecting to PostgreSQL
- Address: your website domain*
- Port: 5432
- User: postgres
- Password: (blank)
Connecting to MongoDB
- Address: your website domain*
- Port: 27017
- User: (blank)
- Password: (blank)
Connecting to Memcache
- Address: your website domain*
- Port: 11211
Connecting to FTP
- Address: your website domain*
- Port: 21 (990 for FTPS)
- User: ftp
- Password: ftp
Domain localhost
If you want to use the usual localhost address to connect to a MySQL, PostgreSQL, FTP or Memcache server, then just create a standard domain or alias named localhost.Connection automation
When you work with local copies of existing web projects, difficulties arise with constant editing of configuration files, mainly related to database connection settings. To avoid this it is recommended:- Create a database user locally with the same name, password, and privileges as those used on the remote server.
- Create an alias with the same name that is used as the database host on the remote server.
* For example, if your script is located at test.server.loc/mysql.php, then the host (address) of the MySQL, PostgreSQL, FTP and Memcache server will be the domain: test.server.loc
Domains and aliases
Domain management modes
OSPanel has three domain list management modes: autosearch, manual management, and manual+autosearch. By default, the first mode is used to automatically connect folders from the root directory specified in the settings.How does auto search work?
The program scans the specified web directory for the presence of folders with domains, after which each folder found is searched for subfolders (domain root folder) that are specified in the auto-scan settings. If none of the expected root subfolders are found, then the domain folder itself becomes the domain root.How combined control works (manual + auto search)
When using the combined domain management mode, the program first connects manually created domains, after which it automatically scans according to the procedure described above.Create a domain automatically
To create a domain or subdomain, open [Menu → Sites folder] and create a folder with the name of the future domain. After creating the domain, restart the server.Creating a domain manually
To create a domain or subdomain, go to the [Menu → Settings → Domains] section and create an entry like: domain => folder. You can select already as the domain folder existing folder on disk or create it directly in the directory selection window. After creating the domain, save the settings.Creating a Cyrillic domain
OSPanel supports Cyrillic domains, but be careful, the folder with the domain must be named by its real name, and not a pseudo name in Cyrillic. For beer.rf, the real name (punycode format) will be xn--b1altb.xn--p1ai and by creating such a domain you will get access to http://pivo.rf. To convert domain names to punycode format and back, use [Menu → Advanced → IDN converter].Creating a subdomain
The process of creating a subdomain is similar to the procedure for creating a regular domain. When creating only a subdomain, the availability of the main domain existing on the Internet is not lost, i.e. you will be able to work with a local subdomain while having access to a working domain on the Internet.Creating an alias
To create an alias, go to the [Menu → Settings → Aliases] section and create an entry like: source domain => destination domain. After creating the alias, save the settings.Please note that creating an alias like *.xxx.xx does not mean that any domains like test.xxx.xx, mail.xxx.xx, etc. will become available to you. You still need to create a specific alias or domain for it to become available, this is a feature operating system Windows.
Website icon in the domain menu
In the presence of correct file favicon.ico in the root folder of the domain, the site icon will be displayed in the program menu.Limited operation
In some cases, managing domains and aliases is not available (see).Web tools
You can open the start page with links to domains and a list of tools by adding the /openserver/ prefix to any existing local domain. For example: http://localhost/openserver/Working with MySQL
Creating a MySQL User
- Enter your name user root no password (default)
- In PHPMyAdmin, open the [Privileges] section
- Click the [Add new user] link
- Fill out the form and click the [Create user] button
Information
If, in addition to other privileges, the user has the SUPER privilege, the encoding set by default in the MySQL server settings will not apply to him. The encoding will need to be specified in your scripts individually for each connection to MySQL, therefore it is not recommended to mark the SUPER privilege.Creating a MySQL Database
- Open [Menu → Advanced → PHPMyAdmin]
- Use root to login without password (default)
- In PHPMyAdmin, open the [Databases] section
- Enter the name of the new database and select its encoding
- Click the [Create] button
How to login to PHPMyAdmin / MySQL manager
- Open [Menu → Advanced → PHPMyAdmin / MySQL Manager]
- Enter username root without password
- Click the [Login] button
Specifying the connection encoding to the MySQL server
The cp1251 encoding is Russian, it can be replaced with the name of any encoding you need.Switching database modules
Be careful when changing the active database module. Each module has its own separate storage of databases and settings; they are not connected with each other in any way, so you will not see the databases you created when switching to another module.Long connection to MySQL (more than 1 second)
Before you start using OSPanel, you should disable the IPv6 protocol via [Menu → Bookmarks → Registry Fixes → Disable IPv6]. If this is not done, then the connection process to the MySQL server can take a very long time (more than 1 second) and the speed php execution scripts will not please you.Working with Path
To add your own paths to the PATH environment variable, you can use the file ./userdata/config/path.txtPaths must be added one at a time, each on a new line, for example: C:\Windows D:\My Programs %realprogdir%\data\dll C:\Windows\System32
Information
By default, the path.txt file is not included. See [Menu → Settings → Server].| Variable | Variable description |
|---|---|
| %realprogdir% | |
| %progdir% | |
| %sprogdir% | |
| %dprogdir% | |
| %dsprogdir% | |
| %realsitedir% | |
| %sitedir% | |
| %ssitedir% | |
| %httpport% | HTTP server port |
| %httpsport% | HTTPS server port |
| %postgresqlport% | PostgreSQL server port |
| %mysqlport% | MySQL server port |
| %mongodbport% | MongoDB server port |
| %memcacheport% | Memcache server port |
| %ftpport% | FTP Port servers |
| %httpdriver% | HTTP module name |
| %phpdriver% | PHP module name |
| %mysql_driver% | |
| %pg_driver% | PostgreSQL module name |
| %mongo_driver% | MongoDB module name |
| %memcachedriver% | Memchache module name |
| %dnsdriver% | DNS module name |
| %ip% | Server IP address |
| %disk% | |
| %osdisk% | |
| %sysdisk% |
DNS server
The built-in DNS server is intended for use in local networks or for debugging web applications. For detailed settings General server configuration is available, as well as domain configuration.To use the built-in DNS server, you need to configure network interface on each computer BEFORE starting the server itself. You need to perform the setup both on the local machine and on other computers in local network who want to access your domains. Without specifying a local DNS server in the network connection settings, starting the server will not be possible (if the DNS module is activated in the OSPanel settings).
By default, the TTL parameter is set to 60 (seconds), you can change this value in the ./userdata/init.ini file, however, be aware that thoughtlessly changing the TTL may cause other computers on your network to cache irrelevant entries. Change this setting only if you truly understand its purpose.
- For the server IP address, select the IP address of your computer on the local network or the Internet in the OSPanel settings (do not select the All available IP option).
- Open the properties of the desired network connection:
Network and Sharing Center → Connection xxx → Properties → Internet Protocol Version 4 → Properties → General → Use the following DNS server addresses.
Enter the following NS server addresses: xxx.xxx.xxx.xxx 8.8.8.8 (or any other real backup DNS) Instead of xxx.xxx.xxx.xxx, enter the IP address of your computer on the local network or the Internet.
- Repeat the setup procedure on other computers on the local network.
- Do not configure aliases from the instructions in this section this manual. Such configuration is not required, since remote computers will work directly with your DNS server and will have access to all domains.
- Save the settings and launch the OSPanel server.
Serving real domains
To serve real domains on the Internet with a local DNS server, make the following entry in the DNS settings of each domain (the domain.ru and ip parameters must be replaced with the domain name and IP address of the server with OSPanel, respectively): # Settings are made in the control panel of the registrar company domain # For DNS based on ns1.domain.ru registrar servers. 3600 IN A ip # For DNS based on the OSPanelns1.domain.ru server → ipTask Scheduler
Using the Task Scheduler (Cron)
Time values are entered as numbers, a combination of numbers, or *.You can specify times using commas as delimiters: For example: 1,2,3 Result: the task is executed 3 times, at the 1st, 2nd and 3rd minutes of the hour. You can specify a range using a hyphen: For example: 5-7 Result: The task is executed 3 times, at the 5th, 6th and 7th minutes of the hour. You can specify the execution frequency using an asterisk (*) and a slash (/): For example: */2 Result: the task is executed every 2 minutes. You can combine methods to create an accurate schedule: For example: 1,5,11-15,30-59/2 Result: the task runs at 1,5, from 11 to 15 and every 2 minutes from 30 to 59. The above time specification scheme relevant for all time periods (minute, hour, day, month, day of the week). To request a URL in the scheduler, you need to use the Wget helper utility (see examples). You can use substitutions in the command line.
Using Variables as Substitutions
| Variable | Variable description |
|---|---|
| %realprogdir% | Real path to the OSPanel folder (backslash "\") |
| %progdir% | Generated path to the OSPanel folder, taking into account the virtual disk (backslash "\") |
| %sprogdir% | Generated path to the OSPanel folder, taking into account the virtual disk (slash "/") |
| %dprogdir% | Generated path to the OSPanel folder, taking into account the virtual disk (double backslash "\\") |
| %dsprogdir% | Generated path to the OSPanel folder, taking into account the virtual disk (double slash "//") |
| %realsitedir% | Real path to the root domain folder (backslash "\") |
| %sitedir% | Generated path to the root folder of domains, taking into account the virtual disk (backslash "\") |
| %ssitedir% | Generated path to the root folder of domains, taking into account the virtual disk (slash "/") |
| %httpport% | HTTP server port |
| %httpsport% | HTTPS server port |
| %postgresqlport% | PostgreSQL server port |
| %mysqlport% | MySQL server port |
| %mongodbport% | MongoDB server port |
| %memcacheport% | Memcache server port |
| %ftpport% | FTP server port |
| %httpdriver% | HTTP module name |
| %phpdriver% | PHP module name |
| %mysql_driver% | MySQL/MariaDB module name |
| %pg_driver% | PostgreSQL module name |
| %mongo_driver% | MongoDB module name |
| %memcachedriver% | Memchache module name |
| %dnsdriver% | DNS module name |
| %ip% | Server IP address |
| %disk% | Drive letter from the generated path to the OSPanel folder, taking into account the virtual disk (letter only) |
| %osdisk% | Drive letter from the real path to the OSPanel folder (letter only) |
| %sysdisk% | System Windows disk(letter only) |
Example of a scheduled task (requesting a cron.php file via HTTP and saving the response to a temporary file to prevent garbage from accumulating): Time: */30 * * * * Execute: %progdir%\modules\wget\bin\wget.exe -q - -no-cache http://xxx.ru/cron.php -O %progdir%\userdata\temp\temp.txt Example of a scheduled task (requesting the cron.php file via HTTPS and saving the response to a temporary file to prevent garbage from accumulating) : Time: */30 * * * * Execute: %progdir%\modules\wget\bin\wget.exe --secure-protocol=TLSv1 --no-check-certificate -q --no-cache https:// xxx.ru/cron.php -O %progdir%\userdata\temp\temp.txt Example of a scheduled task (execution of cron.php by the PHP interpreter): Time: */30 * * * * Execute: %progdir%\modules\php \%phpdriver%\php-win.exe -c %progdir%\modules\php\%phpdriver%\php.ini -q -f %sitedir%\xxx.ru\cron.php
Predefined Scheduler Variables
In addition, you can use any of the following as scheduler variables. Environment Variables environment variables, for example %COMSPEC%.
Call the command interpreter to execute the command: Time: 0 * * * * Execute: %COMSPEC% /c del /S /Q c:\temp\* Variable %COMSPEC% V in this case will be deployed in C:\Windows\system32\cmd.exe
Job Scheduler Features
It is very important to understand that the task scheduler (cron) is not a command line or a console. The scheduler only launches the program with the parameters specified in the task. Thus, those programs that can only run in the console must also be launched through the console in the scheduler itself.For example, such a task will not be completed ( incorrect entry): %realprogdir%\modules\database\%mysql_driver%\bin\mysqldump.exe -A -a --add-drop-database --opt --host=%ip% --user=root > %realprogdir%\ %DD%_%MM%_%YYYY%_%hh%_%mm%_dump.sql Now look at correct option job entries: %COMSPEC% /c %realprogdir%\modules\database\%mysql_driver%\bin\mysqldump.exe -A -a --add-drop-database --opt --host=%ip% --user= root > %realprogdir%\%DD%_%MM%_%YYYY%_%hh%_%mm%_dump.sql The above correct task, when executed by the scheduler, will be expanded into the following command: C:\Windows\system32\cmd.exe /c C:\OpenServer\modules\database\MySQL-5.3.1\bin\mysqldump.exe -A -a --add-drop-database --opt --host=127.0.0.1 --user=root > C :\OpenServer\09_01_2013_14_25_dump.sql
Information
You should take into account the fact that tasks are completed without switching to working folder the program specified in the task. Some PHP scripts may not work correctly if the definition of the root folder is not implemented correctly.Bookmarks menu
To quickly access the necessary pages on sites and work folders, to launch and execute any programs and commands in OSPanel, it is possible to create bookmarks.Types of bookmarks
- Link
- Folder
- Program (can be launched with parameters)
- Command in Windows command line format
Using Variables as Substitutions
| Variable | Variable description |
|---|---|
| %realprogdir% | Real path to the OSPanel folder (backslash "\") |
| %progdir% | Generated path to the OSPanel folder, taking into account the virtual disk (backslash "\") |
| %sprogdir% | Generated path to the OSPanel folder, taking into account the virtual disk (slash "/") |
| %dprogdir% | Generated path to the OSPanel folder, taking into account the virtual disk (double backslash "\\") |
| %dsprogdir% | Generated path to the OSPanel folder, taking into account the virtual disk (double slash "//") |
| %realsitedir% | Real path to the root domain folder (backslash "\") |
| %sitedir% | Generated path to the root folder of domains, taking into account the virtual disk (backslash "\") |
| %ssitedir% | Generated path to the root folder of domains, taking into account the virtual disk (slash "/") |
| %httpport% | HTTP server port |
| %httpsport% | HTTPS server port |
| %postgresqlport% | PostgreSQL server port |
| %mysqlport% | MySQL server port |
| %mongodbport% | MongoDB server port |
| %memcacheport% | Memcache server port |
| %ftpport% | FTP server port |
| %httpdriver% | HTTP module name |
| %phpdriver% | PHP module name |
| %mysql_driver% | MySQL/MariaDB module name |
| %pg_driver% | PostgreSQL module name |
| %mongo_driver% | MongoDB module name |
| %memcachedriver% | Memchache module name |
| %dnsdriver% | DNS module name |
| %ip% | Server IP address |
| %disk% | Drive letter from the generated path to the OSPanel folder, taking into account the virtual disk (letter only) |
| %osdisk% | Drive letter from the real path to the OSPanel folder (letter only) |
| %sysdisk% | Windows system drive (letter only) |
When creating bookmarks on [launch programs with parameters], the separator between the path to the program and the launch parameters is the # sign, otherwise the bookmark will be executed through the command line!
Examples of creating a bookmark: # Example 1 (link) Name: My site Run: http://xxx.ru # Example 2 (running a program with parameters) Name: MySQL manager Run: %realprogdir%\modules\heidisql\heidisql.exe# -h=%firstsite% -u=root -P=%mysqlport%
Program menu
Adding a portable program
When using the Full version of OSPanel, it is possible to add your own portable program to the menu. To do this you need to do the following:- Open the folder with the category of programs you need in the subfolder ./progs/ and create a folder in it with the name of your portable program
- Copy your portable program along with its folders and files to the directory you created
- Restart OSPanel (not the server)
Attention
The name of the folder with the program and the name of the portable program (without extension) must be identical!Adding a program category
To add your own category to the program menu, you should create a folder of the same name in the directory ./progs/. Programs added to the Default folder are displayed immediately in the program menu, without a category.Adding a program shortcut
Besides portable software You can add shortcuts to locally installed programs in the programs menu. Such a pointer to the program will be displayed in the menu along with other programs and will work like a regular shortcut in the menu. To add a shortcut locally installed program just copy it to a folder ./progs/program_category you need/.Attention! Don't try to copy into the menu portable programs non-program shortcuts to folders, sites, etc. Such shortcuts will not appear in the menu and therefore will not work. To create shortcuts to sites, folders, etc. use [Menu → Settings → Bookmarks] (see).
Start/stop scripts
Addition of server start and stop scripts
In OSPanel, it is possible to supplement server startup and shutdown scripts with your own .bat files (bat files).To complete the launch script, you need to create a template file /userdata/start.tpl.bat, to supplement the stopping script, you need to create a template file accordingly /userdata/stop.tpl.bat. You can write arbitrary sequences of commands intended for execution into such files. command interpreter Windows.
Before launch
Executing the file /userdata/pre_start.bat (template: /userdata/pre_start.tpl.bat) happens BEFORE launch all modules. The file must process correctly and complete, otherwise the server will wait for it to complete indefinitely.After launch
Executing the file /userdata/start.bat (pattern: /userdata/start.tpl.bat) happens AFTER starting all modules, but before the status flag turns green. The file must process correctly and complete, otherwise the server will wait for it to complete indefinitely.Before stopping
Executing the file /userdata/stop.bat (pattern: /userdata/stop.tpl.bat) happens BEFORE stopping modules. The file must process correctly and complete, otherwise the server will wait for it to complete indefinitely.After stopping
Executing the file /userdata/post_stop.bat (template: /userdata/post_stop.tpl.bat) happens AFTER stopping the modules, but before the status flag turns red. The file must process correctly and complete, otherwise the server will wait for it to complete indefinitely.Using Variables as Substitutions
In template files with the extension .tpl.bat you can use substitutions. Available options for substituting program variables:| Variable | Variable description |
|---|---|
| %realprogdir% | Real path to the OSPanel folder (backslash "\") |
| %progdir% | Generated path to the OSPanel folder, taking into account the virtual disk (backslash "\") |
| %sprogdir% | Generated path to the OSPanel folder, taking into account the virtual disk (slash "/") |
| %dprogdir% | Generated path to the OSPanel folder, taking into account the virtual disk (double backslash "\\") |
| %dsprogdir% | Generated path to the OSPanel folder, taking into account the virtual disk (double slash "//") |
| %realsitedir% | Real path to the root domain folder (backslash "\") |
| %sitedir% | Generated path to the root folder of domains, taking into account the virtual disk (backslash "\") |
| %ssitedir% | Generated path to the root folder of domains, taking into account the virtual disk (slash "/") |
| %httpport% | HTTP server port |
| %httpsport% | HTTPS server port |
| %postgresqlport% | PostgreSQL server port |
| %mysqlport% | MySQL server port |
| %mongodbport% | MongoDB server port |
| %memcacheport% | Memcache server port |
| %ftpport% | FTP server port |
| %httpdriver% | HTTP module name |
| %phpdriver% | PHP module name |
| %mysql_driver% | MySQL/MariaDB module name |
| %pg_driver% | PostgreSQL module name |
| %mongo_driver% | MongoDB module name |
| %memcachedriver% | Memchache module name |
| %dnsdriver% | DNS module name |
| %ip% | Server IP address |
| %disk% | Drive letter from the generated path to the OSPanel folder, taking into account the virtual disk (letter only) |
| %osdisk% | Drive letter from the real path to the OSPanel folder (letter only) |
| %sysdisk% | Windows system drive (letter only) |
In addition to writing commands, the listed substitutions can be used to specify real environment variables, for example: setx DIR_PHP "%realprogdir%\modules\php\%phpdriver%" You need to understand that files with the extension .tpl.bat are only templates.bat files and will not be executed. During the process of starting or stopping the server, template files will be converted into executable .bat files in the same folder with replacement of substitution variables, and these ready-made .bat files will be sent for execution.
Attention
After starting the completion procedure Windows operation starting any new processes is impossible, so STOP scripts ( stop.bat And post_stop.bat) are not fulfilled. If you require mandatory execution of shutdown scripts, you must manually shut down OSPanel immediately before you want to shut down your computer.Limited mode
If the HOSTS file is not writable (as a rule, this happens when the program is launched without administrator rights), the program goes into a limited operating mode with reduced functionality.IN limited mode The following functionality will not be available to you:
- Using your own aliases and domains (except for the localhost domain);
- Specifying the server IP address (except for addresses 127.0.0.1 and *);
Work in limited mode is only possible when complete absence administrator rights. If you have the opportunity to run the program with the necessary rights, then it is recommended that you take advantage of this. In case you constantly forget to run the program with the necessary rights, enable the [Require Administrator account] option.
If in the startup logs you see a message that the Hosts file is not writable and OSPanel is running with administrator rights, this means that access to this file is blocked by antiviruses/firewalls (even for trusted programs) or Windows access rights restrictions apply.
Add OSPanel, as well as all other components that the antivirus/firewall will ask about, to trusted programs . Disable HOSTS file (or system files) protection in your antivirus/firewall settings, if such protection is present. Try deleting the file C:\Windows\System32\Drivers\etc\hosts and re-create with the following content: 127.0.0.1 localhost If you work without administrator rights, but with a writable HOSTS file, the program works in normal mode without any restrictions. You can allow writing to the HOSTS file for all users by running the following command through the console (run as Administrator): attrib -s -r -h -a C:\Windows\system32\drivers\etc\hosts
Attention
When User Account Control (UAC) is enabled and launched without administrator rights, OSPanel will not have access to the HOSTS file and will automatically switch to restricted mode.Launch without making entries in the HOSTS file
OSPanel implements the ability to fully launch without making entries in the HOSTS file. This feature will be useful for users of office networks and terminals, where only a senior administrator has access to the HOSTS file. If the [Do not make changes to the HOSTS file] option is enabled, then the server starts without editing the HOSTS file, i.e. Access to this file is not required at all.You should know and understand that during startup the program makes a DNS request to each domain you created, and if there is no entry for any of the domains in the HOSTS file, this will lead to the [Startup failure] error. Don't forget to contact your network administrator after each domain creation; the administrator must make the necessary entries in the HOSTS file, otherwise you will not be able to start the server.
The format for making entries in the HOSTS file is standard - ip space domain, for example: 192.168.5.10 rhino.acme.com 192.168.5.10 x.acme.com
Sending mail via SMTP
Yandex Mail

Mail.ru mail
Below are typical settings for sending mail through the SMTP server of the selected mail provider.
Gmail mail
Below are typical settings for sending mail through the SMTP server of the selected mail provider.
By default, Gmail does not allow you to use SMTP, so access must be activated separately. You need to complete next steps upon activation:
1. Log in to your Gmail account
2. In the same browser tab, go to https://www.google.com/settings/security/lesssecureapps
3. Activate account access for “unverified applications” (see picture below)
4. Test sending a letter through your script on the OSPanel server
5. Refresh the page https://www.google.com/settings/security/lesssecureapps and re-activate account access for “unverified applications” (you can ignore the email you received about an attempt to access your account)
Now try sending the email again, this time it should work.

External access
Working with external networks
OSPanel can work on local networks and the Internet as a web server. To work on the Internet you need a static (white) IP address. To open access to the server from the outside, you need to specify * as the IP address in the OSPanel settings, in this case access will be opened immediately for all networks to which your computer is connected. If you want to give access to only one specific network(for example, local), then specify in the program settings the IP address issued to your computer on this network.Information
When working through a router or other gateway, you may need to additional customization. See the documentation for the equipment you are using, contact your network administrator.External access to local domains
After you set up remote access to your server, all local domains will become accessible remotely. But how to open them? To open the desired site from a remote machine, you will need to make an entry in the HOSTS file of such a computer with the address of your local domain, for example: 64.55.96.24 supersite (where 64.55.96.24 is the address of your computer, and supersite is the name of the local domain). After making such an entry in the HOSTS file on the remote computer, the supersite domain will be available by typing it into the browser as usual.Please note that simply typing the IP address of your computer http://64.55.96.24/ or trying to access a non-existent local domain will open a blank page.
So that when you type the IP address of your computer, a specific local site opens, you can create an alias of the form your_external_ip => your_local_domain. After these steps, the local domain you specified, for which you created an alias, will become accessible via a local network or the Internet at http://your_external_ip/ (for example http://64.55.96.24/). If your computer is connected to several networks and IP=* is set in the server settings, then such an alias must be created for each IP address issued to your computer in each of the networks.
Computer security
When working with external networks, there is no guarantee of your computer's security. The server runs with Administrator rights, which means that scripts running under its control can do whatever they want on the computer. Security holes in scripts can give hackers access to your computer. We do not recommend this use of OSPanel! Before setting up remote access to the server, be sure to read the section of this reference guide.External control
OSPanel can receive some commands over the Internet; for this there is a built-in control panel that runs on a dedicated port. The program can also be controlled via the command line.Internet control
To access the control panel you need to type http://localhost:1515/ (default). The port, login and password for the control panel can be specified directly in the OSPanel settings [Menu → Settings → Miscellaneous]. The control panel is available on any IP address from which your computer is accessible, as well as on any local domain created on the server. To manage the program via the Internet, your external IP address must be “white”, i.e. accessible from the Internet.Commands to use on the command line
"C:\openserver\OSPanel.exe" # start the program "C:\openserver\OSPanel.exe" /start # start the server "C:\openserver\OSPanel.exe" /restart # restart the server "C:\openserver\OSPanel .exe" /stop # stopping the server "C:\openserver\OSPanel.exe" /exit # exiting the programServer protection
Setting up protection
When a server is open to access from the Internet, it becomes extremely vulnerable, especially with the default settings. Many spiders and viruses constantly scan the Internet for open ports and, as a rule, an unprotected server is hacked within a few hours of appearing on the network.Several steps to protect your web server from unauthorized access:
- Change the default FTP user passwords [Menu → Settings → FTP server];
- Install own passwords for root (and other) users of all DBMS modules;
- Enable protection of web tools and disk from access from external networks in the program settings [Menu → Settings → Server];
- Now restart yourself control program(not server);
- Configure the firewall by blocking ALL ports from outside access except those that you plan to use (for example: 80,443,21,990,53);
Attention
The web server runs on behalf of the administrator of your computer, when working on external IP addresses or IP = * the security of your computer will be at risk! Avoid using vulnerable scripts, incorrect module configurations, and simple passwords.Built-in protection against external access
Selecting the [Protect server from external access] will disable some of the dangerous PHP functions, access to web tools from outside will be blocked, and disk access for PHP scripts will be limited to the root folder of domains. This option reduces the performance of PHP scripts by 3-4 times.Working with Pear and Composer
Installing Pear
To install Pear, start the server and go to [Menu → Advanced → Console], then type the command in the console go-pear and follow the installer's further commands.Installing Composer
Composer is compatible with all PHP modules since version 5.3. To install Composer, start the server and execute [Menu → Advanced → Console], then go to the folder with the site where you plan to install Composer (for example: cd C:\openserver\domains\localhost). Once you are in the folder with the desired site, type the command in the console composer init and generate a Composer configuration file (composer.json). When the composer.json file is generated, type the command in the console composer install and wait for the installation of the selected projects, as well as their dependencies. In the future, you can update installed projects with the composer update command, for example: cd C:\openserver\domains\localhost & composer update -vInstalling Composer projects
- Execute [Menu → Advanced → Console];
- Go to the folder with the site where you plan to install the project;
- Install any project you need, for example:
Working in the console
To launch the built-in console, you need to start the server and execute [Menu → Advanced → Console]. The environment is formed at the moment the server starts and is passed on to all launched modules. Any other programs, be it a console or an IDE, can also get the correct environment; just launch these programs from the OSPanel menu. To do this, you can either make a bookmark or add a shortcut to the program menu (see sections and).You need to know that if you launch the console or any other program from the standard Start menu or from a shortcut on the desktop, and not from the OSPanel menu, then they will not be able to work with the virtual environment created in OSPanel.
The built-in console can be launched even if the server is turned off; in the Full version, go to [Menu → Programs → Internet → Console]. However, when the server is turned off, the environment is not formed and therefore it will be impossible to work from the console with PHP and other modules or programs (Pear, Composer, scripts, etc.).
Important Features
If you start the console first and only then start the server, the environment will NOT be available in the console. To begin full work with modules after starting the server, you need to close and reopen the console, since only when the server is active does the console receive a correctly formed environment at the time of launch from the menu. Likewise, the environment will not be updated in the console if you switched to another PHP or MySQL module and restarted the server, but did not restart the console!Registry fixes
Fixes are offered for self-installation from the OSPanel menu among the bookmarks created by default. You can also find fixes in the folder ./modules/system/ and apply them yourself.Registry fix to disable IPv6
This fix allows you to disable all IPv6 components except the loopback interface. The fix also tells Windows to prefer IPv4 over IPv6 by changing entries in the prefix policy table. It is recommended to use this fix only for those users who use the localhost domain and OSPanel does not have permission to write to the file Windows\System32\Drivers\etc\hosts.Registry fix to customize system behavior
This fix allows you to customize the behavior of the system during Windows shutdown. The fix disables automatic process termination and increases the waiting timeout (after which the process is considered hung) to 30 seconds.Registry fix to optimize SSD performance
This fix allows you to disable Link Power Management (LPM) and DIPM in SATA AHCI drivers. Using LPM with SSD drives often leads to the possibility of “freezes” in the operation of the operating system, from small freezes to a complete system freeze. To prevent wear SSD given fix disables Superfetch services and Prefetch, as well as updating the time of last access to files in NTFS.You should not apply the fix if the system does not use SSD drives. Laptop users should use the fix wisely, since the power consumption of the drives will increase slightly, which will reduce the battery life of the laptop.
Registry fix for TCP tuning
This fix will optimize the TcpTimedWaitDelay and MaxUserPort values so your system can run faster and with big amount TCP connections. In particular, the problem with torrents will disappear: it is impossible to perform an operation on the socket because the buffer is too small or the queue is full. Other programs that create a large number of simultaneous TCP connections will also be able to work normally.Fix TCPIP driver for Windows XP
Half-open limit fix is designed to change the maximum number of simultaneous half-open outgoing TCP connections (half-open connections or connection attempts) in the tcpip.sys system file. The limitation is that a computer is not allowed to have more than 10 simultaneous half-open outgoing connections. Thus, the connection speed to other computers is actually limited. The patch allows you to remove this limitation, that is, increase the maximum limit of half-open connections. For the vast majority of users, a limit of 100 will be sufficient. The patch is applicable for outdated versions of Windows x32 and x64: XP, 2003 Server, Vista. Starting from versions of Windows Vista SP2 and Windows 7, there is no need to apply the patch and if it starts, it will inform you that installation is impossible.Attention
After applying the fixes, you should be sure to restart your computer.Questions and answers
Nothing starts?
Don’t despair, look at the general program log and other component logs [Menu → View logs]. In the vast majority of cases, you will find the reason for the unsuccessful start there. In more complex cases, enable the [Run server in debug mode] option; this will allow you to see debugging information at startup. Also add OSPanel to trusted programs your firewall or antivirus, if you have one.It says port 80, 3306, etc. already taken!
Enable the [Start server in aggressive mode] option in the OSPanel settings; in this mode, all programs occupying the required ports will be forcibly closed. Add OSPanel to trusted programs your antivirus/firewall/proxy server or disable monitoring of ports 80/443/21/90xx/3306 if it exists. Individual antiviruses/firewalls may have their own additional ones. settings related to intercepting program connections to the network.It says that there are no access rights to work in this folder!
You are trying to run OSPanel from a folder that belongs to another user, or OSPanel files were written to the computer by another user. If OSPanel will be launched by the user Pavel (for example), then log in under the Pavel account and copy OSPanel to a folder that belongs to the user Pavel (has write rights), after which it will be possible to start the server for this user. Instead of copying, you can set special access rights to the folder with OSPanel, contact your computer administrator.Why are the buttons gray and not pressable?!
At any given time, only those buttons and menu sections are active that can perform the action assigned to them. For example: if the server is not running, the PHPMyAdmin menu item will be inactive; if the server is running, the buttons for clearing logs will be unavailable, etc.I can't open the menu when the flag is yellow!
A yellow flag indicates that a command is executing (for example, starting, stopping, or saving settings). While commands are being executed, the program menu is not available.I created 3000 domains and now the server won’t start!
Increase the number of server status checks to 20-30 or higher in the program settings [Menu → Settings → Miscellaneous]. Switch to using the Apache HTTP module if you are using the Nginx module.I want to test the site taking into account different Internet speeds (mobile devices for example)!
OSPanel has the ability to limit the data transfer rate to simulate slow site loading. To limit the speed, use the OSPanel menu: [Menu → Settings → Miscellaneous]. The speed can be limited between 1-40 KB per second, setting the value to 0 or more than 40 cancels the limit. A speed limit is set for each request, so if a client simultaneously opens 4 images on the site (4 connections), then each of them will be loaded at a given speed.Where can I edit module settings?
To edit module settings, use the OSPanel menu: [Menu → Advanced → Configuration].Where are my emails saved?
By default, all emails are saved to a temporary folder userdata/tmp/email/, when the server is stopped, this folder is not cleared. You can configure sending emails via a remote SMTP server: [Menu → Settings → Mail].I click on the desired site in the program menu, but nothing opens!
For many menu items to work, you must have a correctly installed and working default browser. You can also directly specify your browser in the program settings: [Menu → Settings → Menu].I created a local_site.loc domain, but it doesn't work!
An underscore cannot be in a domain name, so the domain will not connect. Allowed characters: .The server does not start with ip 192.168.0.1 and says that localhost only works on ip 127.0.0.1!
Indeed, the localhost domain can only be used with an IP address of 127.0.0.1, so either rename this domain or delete it if you do not need it.I want to work without a virtual disk!
Select in the OSPanel settings to work without a virtual disk and copy the server folder to a directory the path to which contains only Latin characters or numbers, otherwise work without virtual. disk will not be possible.I don't see the virtual disk!
If you are not running under an administrator account, but OSPanel is running with administrator rights, then the virtual disk (if used) will not be available to you. OSPanel will work fine in this case. You can disable the use of a virtual disk in the settings, but take into account the absolute path requirements described in the previous answer.The server starts, but the browser says that the domain was not found!
If your browser is configured to work through a proxy server, then local sites will not be available to it. To remedy the situation, stop using proxies in your browser or add local domains and the server's IP address to the list of proxy exceptions in your browser settings. In some cases, you need to recreate the HOSTS file (see).Why do you need to configure the display of bookmarks instead of sites?
In this mode, the created bookmarks are displayed instead of a list of domains; this will be useful when creating demo assemblies with installed scripts (see).I have a hard time re-creating bookmarks, FTP users etc, I just need to edit them!
There is no need to re-create records again, just double-click on the record you are interested in in the table, after which this record will immediately be removed from the list and placed back in the edit fields. Don't forget to add the edited entry back to the table!Connecting to the database takes more than 1 second!
Disable the use of the IPv6 protocol using the instructions from the section of this manual.I copied my script to the domain folder, after restarting the server does not see the files and shows an error!
Most likely you copied or created such a subfolder in a folder with a domain whose name matches the conditions automatic search domain root folder (see).The server gradually took up all the disk space!
The gradual disappearance of free space indicates that you have disabled auto-cleaning of logs when starting the server. As a result, when active use server log files grow to enormous sizes and take up all the free space on the disk. Clear log entries in the log viewing window and enable auto-clearing of logs at startup in the OSPanel settings. Empty folder .\userdata\tmp from temporary files.How do I create my own host configuration for a domain?
Use the virtual host configuration template in the folder with the required domain to create a specific domain configuration. When creating/changing a file, a server restart is required. The configuration template for the required module can be found in the folder ./userdata/config/.For example, if you want to create your own xxx.ru domain configuration for the Apache-2.4.2 module, then copy the file ./userdata/config/Apache-2.4.3_vhost.conf to the folder with the desired domain, edit this file to suit your needs and restart the server.
Or another example, when using the Apache+Nginx module, you can copy both configuration files for each server to the domain folder: Apache-2.2.23+Nginx-1.2.4_vhosta.conf And Apache-2.2.23+Nginx-1.2.4_vhostn.conf.
Please note - when editing the host configuration, you cannot delete or replace system variables %...%, you can only make new entries that supplement the configuration.
How and where are component configs edited?
OSPanel uses configuration template files that are accessible through the general program menu. Do not try to edit temporary config files that are created when the server starts, it makes no sense. Configuration templates are individual for each module, i.e. If you select any of the modules as active, the settings templates for that particular module will be activated. For example: you configured a php.ini file template with the PHP 5.2 module active, and then selected the PHP 5.3 module as the active one. In this case, you need to configure the php.ini file template again for the PHP 5.3 module.The settings templates themselves for all modules and tools are stored in the folder ./userdata/config/, they cannot be used as real configs and cannot be specified when launching modules, consoles and scripts. During the startup process, configuration templates pass through a parser, which replaces all substitution variables with real data and saves ready-made configuration files to a folder ./userdata/temp/config/.
How to specify special settings for connecting to an SMTP server for a selected domain?
In OSPanel, it is possible to send mail through a third-party SMTP server, while all domains use the connection parameters that were specified by the user in the OSPanel settings window. In order for a specific domain to use its own connection settings to the SMTP server, you need to specify them in the configuration template for this host. Open the virtual host configuration template (how to create it is described in the previous answer) in the folder with the desired domain and add the following content (in one line) to the host description: php_admin_value sendmail_path "%mailway% -t --smtp-ssl=none --smtp- server=smtp.xxx.xx --smtp-port=xx [email protected] [email protected]--smtp-pass=xxxxxx --pop3-server=pop3.xxx.xx [email protected]--pop3-pass=xxxxxx" For example:Please remember that when you specify your own settings for connecting to an SMTP server, sending mail for the selected domain will work regardless of the main OSPanel settings. Please also note that all data SMTP servers including login and password will be available in php scripts and are visible in the phpinfo() information, therefore, for security reasons, it is not recommended to use the described option of specifying mail sending settings in the host config.
Problem solving
Below is the procedure necessary to solve problems with starting the server. After completing each action, you must repeat a test run of the server, and if the launch fails, you can proceed to the next step.- Execute [Menu → Advanced → First run]. If you wish, you can agree to make changes to the register.
- Make sure that the IP address specified in the settings exists (except for [*]). Also make sure that all other program settings are correct.
- Add OSPanel to trusted programs your firewall/antivirus or configure them properly, if any.
- Run [Menu → View logs], try to find the cause of the problem and fix it (if possible).
- Enable the [Run server in debug mode] option in the OSPanel settings and try to find the cause of the problem and fix it (if possible).
- Run the following command through the console (run as Administrator): attrib -s -r -h -a C:\Windows\system32\drivers\etc\hosts
- Activate the DNS service if it is disabled and start it, disable all services that have IIS in the name.
- Disable global proxies and proxies if they are installed on your computer.
Information
A very common problem is busy port 80, it is usually occupied by the Skype program. To fix the problem, go to [Skype Settings → Advanced → Connection] and uncheck the [Use ports 80 and 443 as alternative] checkbox.User Account Control (UAC)
When User Account Control (UAC) is enabled and launched without administrator rights, OSPanel will not have access to the HOSTS file and will automatically switch to restricted mode. As a rule, limited mode is signaled by the presence of only one localhost domain in the program menu, while other domains were previously created. To correct the situation, enable the [Require Administrator account] option in OSPanel settings and restart the program, or disable User Account Control (UAC).If you don't have the opportunity disabling UAC or running the program with administrator rights, there are several options for solving this problem:
- Using the built-in DNS server (configuration according to the Guide);
- Activating the option [Do not make changes to the HOSTS file] + manual editing this file;
- Set write permissions to the HOSTS file for everyone Windows users;
- Refusal of the ability to manage domains and work with a single localhost domain;
Creating assemblies
What is it and why is it needed?
For example: you have your own website, script or your own CMS, which you need to present to future clients for review, show to the customer, or simply make a demo package for your software product. It is necessary that your software product works equally well for everyone, in the same configuration, and is already installed and ready for use or evaluation. OSPanel will help you with this!You can create a ready-made mini-server with installed script, CMS system, website, project, etc., and future users or clients will only have to download it and run it! Your product will be operational from the very beginning, you will not need to look for a server for it, you will not need to install, configure, etc. Moreover, demo materials can be distributed to clients on a CD/DVD. OSPanel can be launched from such media as well as from regular media HDD drive or a flash drive with the only difference that when working from an optical disk, no changes or files will be saved after exiting the program.
How to create a demo build
- Download OSPanel Mini distribution latest version and unpack it into a temporary folder. Go to the folder where the distribution was unpacked and run the program OSPanel.exe.
- Remove unnecessary modules in the folder ./modules/php/*, ./modules/database/* And ./modules/http/* leaving only one module in the folders that will be used for your software product. If you don't plan to use DNS modules and Memcached, then the folders with these modules can also be deleted: ./modules/dns/* And ./modules/memcached/* respectively.
- Click [Menu → Settings] and select to use those modules that you have not removed. Set the server IP address to 127.0.0.1 , disable [Automatic check for updates], do not disable the [Automatically detect the need for a virtual disk] option. Set all other settings you need.
- Click [Menu → Advanced → Configuration] and configure configuration templates required modules for your product (script/website/cms), if necessary.
- Start the server and install your software product (script/website/cms) on the domain localhost, which is present in OSPanel by default. Complete the necessary steps to configure the script and then exit all authorization forms where you are logged in (for example: personal account, administration, etc.).
- Click [Menu → Settings] and create bookmarks for the main pages of your software product (for example: Admin panel, Personal account, Home page). Enable the [Show bookmarks instead of websites] option in OSPanel settings. Now stop the server and save the settings.
- Click [Menu → Exit] and rename the program file according to your product name, for example ./temp folder/OSPanel.exe V ./temporary folder/MegaCMS Server.exe.
- Now you can add documentation for your product to the assembly in the form of a .chm file. The file must be copied to a folder ./modules/system/docs/, it will later be displayed in the [Advanced → Documentation] menu.
- Now pack the contents of the temporary folder into a self-extracting archive or burn its contents to a CD/DVD disc. The choice depends only on the intended form of distribution of the assembly.
Using the method described above, you can prepare not only demo builds, but also dev packages for developers, website presentations, portal archives, interactive materials on CD, etc.
Hi all! In today's article I will tell you about installing and configuring a local Open Server server on your computer.
Using Open server, you can test on your local machine (i.e. on your computer) any changes related to the creation of websites in Php (home-written websites).
If you're a Denver fan, I have an article.
Beginning of work
The very first thing we need to do is visit the official website of the local server developer, which is located at this address - http://open-server.ru

In principle, we do not need to download the maximum edition package (504 MB). The second, more compact option with necessary settings to create a local server on your computer. That's why I choose him.
Enter the “Code from the image” in the field and click on the “Download” button


I want to warn you to remain patient, because if you choose the second option, your files will download extremely slowly. It took me about 2 hours with a dedicated Internet connection. In principle, you can be even more cunning and upload all the files through RuTracker. A cunning marketing ploy by the developers :) Well, okay, let's move on.
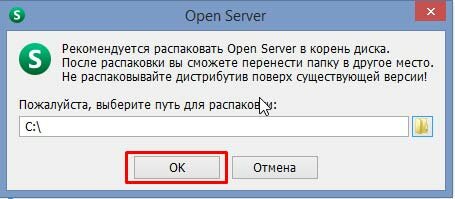
Installing Open Server on disk
Go to downloads and double click click on our downloaded file. Next, you will be asked to select the path where the local server will be installed. I will leave it unchanged, because I only have one disk - the disk C:\
Unpacking will follow. We go to our directory where we installed Open Server and click on the corresponding icon (I use a 64-bit OS). We choose “great and mighty” as the language.

Next, a dialog box will appear telling us that this is the first time we are running on the computer, which will prompt us to install Microsoft Visual C++ Runtime& Patches. We agree and continue working. This process may take some time.

After installing the local Open Server, you will see a red flag in the system tray.

Click right click mouse and select “Run”

After starting, you may receive an error that the port the server is accessing (80 and 443) is already occupied by another program, in most cases this is Skype. The solution is the following. Go to skype – Tools – Settings.

In the “Settings” section, you will need to go to the “Connection” sub-item and uncheck the “For additional incoming connections, use ports 80 and 443” checkbox. Save your changes.

After these manipulations, let's try again to open and launch the Open Server window. And Voila! Everything is working.

Creating a new site on a local Open Server
Great, the program has been launched, now we need to create a new website and see how it works on ours local hosting. To do this, go to the Open Server itself and its domains folder (domains or folders of our future sites).

Go inside and just click “Create” new folder».

There is already a site in the Domains directory called localhost. You can go to your browser and type this name into the address bar.
We will see a welcome message telling us that the server is running.

Now let's create our own folder with the new site and call it test.loc. LOC will indicate to us that the site is on a local machine.

Inside it, using any text editor, we will create a simple php file – index.php

We can create the index.php file itself using a text editor or also called a code editor – Sublime Text.

Now we go down to the very bottom of the window to the system tray area (where the Windows clock is located) and start our server.

After a successful launch, we go back to Open Server to the my sites tab and select our local one - test.loc

Now let's go to the browser and see the result php output code on the page.

Important! There is one very important nuance: the icon that everything is working may light up, and the message shown in the screenshot above may appear. Therein lies the mistake. If your site has PHP or scripts, then they WILL NOT work! This is because many antiviruses, such as Kaspersky and others, regard the launch of Open Server as a virus and block the operation of all scripts. Before your work session, simply disable your antivirus and then everything will work fine for you. This is just for information.
That's all for me, dear friends! I think you will be able to set up your local Open Server and test your future sites without any problems. Thank you for your attention, see you again.
Greetings to all readers of the blog site. This article will focus on the local Open Server.
What is a local server and what is it for? Local server is special program, which gives us the opportunity to work on our Internet project directly on our home computer.
Test your site, try out different features on it, polish it, while being able to observe how the project will look in browsers after publication on the Internet. And only after we bring our brainchild to fruition, do we let it float freely.
A local server is one of the tools that should always be at hand, even after everything on the site we created has been checked, working, and published.
Improvement appearance developing a website and its functionality is a fascinating and lengthy process, and for many, eternal. And performing any experiments in this direction directly on the working site is not good.
This means that the process of any innovations must be tested and tested on a local server. And after that, we upload the changed files to our working website via an FTP client.
The most popular local server among WEB developers is Denver. I work with him, my beloved, all the time. There are other local servers besides Denver, but I'm not familiar with them yet.
Why am I writing specifically about portable server system Open Server, not about Denver. Yes, because lately Open Server has become increasingly popular. More and more often they come across positive reviews, and comments about how convenient and cool it is. And I can't get past this. So today I install the software Open environment Server to your computer, in parallel, telling you step by step how to do this in this article.
Open Server which version should I choose?
All versions of the local server are portable and do not require installation. This means that Open Server can be downloaded to a flash drive or portable hard drive and used anywhere, on any computer.
Three distributions of the program are offered for download.
The "maximum" edition is full version Open Server. In addition to the local server, it includes a decent set of portable software for webmasters.

“Extended” edition is a version of the program without additional software. Recommended for those who do not intend to use additional software offered in the “Maximum” version in their work and want to save disk space.
The “basic” edition is the smallest version of the local server. In addition to the lack of software presented in the “maximum” version, the ImageMagick, PhpPgAdmin, PostgreSQL, Rockmongo, MongoDB and Git modules available in the “advanced” edition are also missing.
This version is recommended for users with slow Internet and those who want to save disk space as much as possible.
Which version should I download? If you are asking this question, then download “Basic”. Other versions are intended for advanced web developers.
Installing Open Server - "basic" edition.
If the situation is correct, on the page that opens we see the following:

Configuring local server settings, installing WordPress
Let's go through the settings. Open the menu, go to the “Settings” item, select the “Basic” tab:

In addition to the items marked by default, I noted two more. Running alongside Windows so as not to create extra shortcut on the desktop.
And the requirement to run the program with administrator rights. Recommendation directly from the developer of the portable local server.
In the “Menu” tab I did the following:

I checked the “Show sites in the main menu” checkbox so that the domains I added would be displayed in the Open Server menu.
And I chose a browser, specifying the path to the executable file to open web pages.
I left the rest of the local server settings at default.
Let's start installing WordPress on a local server.
Go to the Open Server settings, select the “Domains” tab, enter the name of your domain (I registered the site for myself), click on the ellipsis:

In the new window that opens, create a folder of the same name for the domain:

Click OK, save, and restart the server. If everything is done correctly, our folder will appear in the Open Server menu:

The folder has been created, all that remains is to drop the unpacked WordPress distribution files into it (download the latest WordPress distribution from here).
We do this by simply copying files and directories from folder to folder, or with using Total Commander.
From the unpacked archive we copy only what is inside the wordpress folder into the folder we created.
Our folder is located in the domains directory:
Almost everything is ready, but in order for everything to work, all that remains is to create a database for WordPress.
In the Open Server menu, on the “Advanced” tab, click on “PhpMyAdmin”.
In the window that opens, select the Russian language.
We enter the user - mysql.
Enter the password - mysql.

In the next window that opens, select the “Users” tab and click on the “Add user” link:

Select the host - localhost.
Coming up with a password
(We save the username and password in a secluded place, they will be useful to us later.)
Check the checkbox as shown in the picture.
Click OK in the lower right corner of the open window.
Close PhpMyAdmin - the database has been created.

All that remains is to rename the wp-config-sample.php file and make some changes to it.
We find this file in the following path: openserver/domains/your folder (in my case, the site)
Rename the file wp-config-sample.php to wp-config.php Open the file for editing (with Notepad++ editor), and enter the name of the database we created, username and password in the fields indicated in the screenshot:

Save the changes and close the edited file. We go to the Open Server menu, find our folder, click on it, and see the following:

Why won't Open Server start?
One of the reasons that the local Open Server server does not start may be running program Skype.
In order for the local server to work, exit Skype and launch Open Server, and after that Skype.
Problems with the local server may be due to the antivirus installed on the computer. If the server starts when the antivirus is disabled, then you need to deal with your antivirus program. Add Open Server files to the exceptions of the antivirus installed on your computer, and everything will work.
My AVG and COMODO firewall on the Open Server did not swear by default.
In contact with
How to create a local server on a computer? This question primarily concerns those who decided to create their own website and decided to install a local server in order to test it. But what is still needed for installation and why is it needed in general?
A local server is a program that allows you to develop a website directly on your computer. It differs from hosting in that a site on a local server is accessible only where it is directly installed.
This work is carried out with the aim of checking the functionality of the future site, so that in the future there will be no unexpected problems with the hosting.
There are several programs that allow you to install a local server. However, for the most part, the installation process is the same for everyone. Therefore, as an example, let’s consider “Denver” - a local server that is very popular in Russia, due to the fact that its creator is Russian and because it is very easy to use.
Such servers contain all the necessary files for work - Apache, PHP, MySQL, Perl, etc.., which means you only need to download the package itself.
Then proceed with the installation, after which everything should work correctly, which, for example, cannot be said about servers on the network where something is constantly not working. Therefore, this is, of course, the main convenience of a local server.
How to create a local server on a computer in Denwer
In order to create a local server, first of all, you need to download a set of necessary files. To do this, you need to go to the Denver website (//www.denwer.ru/). It looks like this:
Then click on the “DOWNLOAD” button. We will be asked to choose one of two versions of PHP, choose the newest one. Then, a new window will open where you will need to provide your contact information - first name, last name and email. Next, you will receive a link to download Denver by email.
We wait a few minutes and download the program files to your computer using the link you received at the previously specified email address.
Step 2. How to install a local server
After the download is complete, run the installer. Click yes and the unpacking will begin. Then we just follow the instructions.
However, you may or may not encounter an "Access Denied" error when you press the Enter key. But, despite this, we still press Enter and continue the installation.
You can use the non-system drive C as the installation location, so that when possible installation other versions of the operating system, all data was preserved.
During the installation process, the installer will ask you to select the letter Z as the installation location. If it is not busy, then you can select it; otherwise, select another letter, for example, D. Next, three shortcuts are created on the desktop.
The browser in a new window writes that “Denver” is installed, and also provides a list of possible errors that may occur when starting and working with the local server.
For example, this is blocked by the NOD32 virus in Windows XP. Another problem is the most common and is associated with a conflict in Skype. By default, both programs use port 80, so if the program does not work, you need to disable the use of the port in Skype. To do this, go to tools > connection problems > uncheck the box for using port 80 and 443 > then save and the problem should be solved.
In order to make sure that everything works, you need to enter the localhost address bar. But some browsers use this line like search. Therefore, for the first time it is better to enter the full address - //localhost. If everything worked, you should see a page like this:
At this point, the installation of the local server is complete, all that remains is to create a website on it and bring it to perfection, and then transfer it to hosting.
Having learned how to create a local network server, a completely logical question may arise: “What next?” To answer this you need to understand why, in general, a person needs a local server. If he just wants to practice creating websites and improve his skill level, then he should start studying hypertext markup languages and style sheets.
If he needed to create a local server in order to test the existing site before directly uploading it to the network, then he should first install it on the local server. Ask: “How to do this?” More on this below.
Uploading a site to a local server
A local server on your computer performs the same functions as a website on the network. The only difference between them is availability. After all, a local server installed on your computer will be accessible only to you, while the hosting site will be visible to everyone. Therefore, in order to avoid negative criticism from evil site users, all errors should be eliminated locally.
A website is a collection of web pages that are written in HTML, CSS and Javascript. These development tools can be used without the help of a local server and therefore site development begins with them. PHP, in turn, can be used on a server (any server); it is necessary for the site to be dynamic.
That is, if it were necessary to change information on all pages of the site, then there would be no need to go into each file and change something.
It would be enough to do it in one. However, at the beginning of development, the site is static, but this does not matter, because there you need to create only those pages that will differ from each other. Usually this is the main page, subsection and article page. You can add a form later feedback, registration page and forum.
However, it will be much more convenient to create a website directly on a local server in order to use all functions to the maximum from the very beginning. To do this, go to My Computer and see the disk that “Denver” created.
We go into the disk, go to the home folder and create a new folder and write the site address as the name. Next, you need to create a www folder inside. And directly in it we create a text file with the html extension (for example, index.html). To check whether it is displayed correctly, right-click on it and select open using notepad (or any other editor - Sublime text, Notepad, etc.). Inside the file we will write standard program"Hello world!" It looks like this:
Then we save and restart Denver by clicking on the Restart Denwer shortcut so that all the changes made take effect. However, if we now try to go to our website, which has the same name as the folder created in the Denver drive, we will not see anything. Because the local server conflicts with the hosts file. It is located here C:\WINDOWS\system32\drivers\etc\hosts.
The hosts file allows you to identify specific addresses sites with a specific IP address. For example, our local machine – 127.0.0.1 www.localhost. When we type any site in the browser line, the first thing we do is check this site and go to the address on the left. If the transition to our local site does not work, this means that its address is not registered in the hosts file. This is often caused by an antivirus that blocks access.
To solve this problem, you need to go to the antivirus and select the settings section. There you need to find the “threats and exceptions” category > click the “setup” button and select our folder that we created in “Denver”. Next, save all the changes made and click ok.
Of course, this problem may not arise for everyone. Usually it occurs due to the characteristics of a particular antivirus. Now, after switching to the local site, the following message should appear on the screen: “Hello world!”
If we want our site to work at localhost, then we just need to go to the localhost folder on Denver, go to www and also create html file.
Denver users often have problems sending emails. The fact is that Denver doesn’t actually send letters, it only generates them and stores them in the folder:
tmp > !sendmail. In that folder there will be letters in the form of regular text files. So, if they are sent on a local server, then there will be no problems on the real one.
Thus, we can say that a local server is an excellent platform for website development, which is suitable for both beginners and professionals. Because installation does not require any special knowledge and skills, it is enough just to be familiar with the computer and be able to use application programs.
Plus, it should be noted that the local server cannot be seen from the Internet. The only thing you can do is open access to your home network, provided that all computers are in your home and use a common network connection. But, usually such questions do not concern ordinary users.
Much more important points for them are directly related to the possible costs of maintaining the site. For example, payment for hosting and domain. However, there is clearly no need to worry about this, because purchasing a domain costs about a thousand a year, and you can find hosting for the same amount. Is this really such a big expense that you can’t go to make the site accessible to the masses and everyone can see what has been created for more than one month, or even a year?
If such arguments still do not convince a person, then at first you can use demon paid hosting, but it limits the user's actions. For example, you cannot sell advertising from the site in any form, but as you know, this is the main source of income for a web resource. So, when the site administrator sees that the visitors are still there, demanding bread and circuses, and he receives absolutely nothing for his work, then the transition to paid hosting will happen at once.
Perhaps, after reading this article, every user has learned something new for himself, and now if he is asked: “How to create a local server?”, he will confidently tell everything that he found out here. So as not to miss my next one, no less interesting article, highly recommend subscribe to rss feed my blog.
Well, how do you like the article? Did you like it? Maybe you want to add to it or ask me to write something worthwhile next time? Feel free to write about it in your comments.
On this note, I conclude this article, and I would like to take this opportunity to congratulate everyone on the upcoming New Year 2017! May the coming year be better than the last! Health and good luck!


