What programs for formatting a hard drive. Distinctive features of the program. Formatting SSD drives
Greetings to all readers of my blog, Denis Trishkin here.
Using a computer for a long time, sooner or later the need arises Windows reinstallation. This can be done in several ways. The correct one is the one before which you need to do formatting hard drive. In this article I will tell you exactly how this happens, and also introduce you to the main concepts.
So what is formatting? Even at school, this process was presented as a division into sectors and tracks, with the loss of all information previously recorded on the storage medium. In the realities of today's technological world, formatting is the process of marking an electronic storage medium, regardless of its shape and structure, be it optical or HDD, memory card, flash drive.
To put it simply, the process is the erasure of all existing files in the specified area. Moreover, when new ones appear, they are already placed on top in a seamless manner. Because of this, access to them will be easier in the future, and, consequently, the speed of processing requests will decrease. OS and individual programs will work faster.
File system types( ^)
Before moving directly to familiarization with the process itself, it is important to introduce you to such a concept as file system and its types. So, it is a table that indicates the order of storing, recording and naming information on media. In other words, it is responsible for all processes related to transferring and reading data.
There are several most famous and used types:

Formatting process( ^)
We immediately need to clarify that we are talking about formatting before installing Windows. Therefore, we will talk about working with hard drives, and not with other data custodians.
Formatting methods before installing a new system( ^)
There are only a few ways to format before installing a new Windows:
using built-in capabilities;
command line (use the same tool);
programs third party developer(most often this is Acronis Disk Director );
use another computer.
Step-by-step instructions for formatting with built-in capabilities( ^)
It should be noted right away that I will talk about Windows 7, 8, 10, because previous versions Microsoft has stopped supporting it. So, when, during the installation of a new operating system, you reach the disk selection point, you need to:

The built-in tool allows you to format the disk only in a quick way.
However, it does not provide additional functions. That is why many specialists use special formatting programs that work even without an installed operating system. The above is considered the most convenient Acronis Disk Director. This application is paid, although there is the possibility of temporary use.
Formatting using Acronis Disk Director( ^)
To use the application you need:
1 Download the program image file using a torrent tracker.

increase
2 Write the downloaded image to a USB flash drive

increase
3 Using the BIOS, check that the system boots first from the flash drive, press the F10 button and agree.

increase

increase
4 After rebooting, confirm working from the flash drive.
5 A black screen appears where you need to select full version Acronis Disk Director.
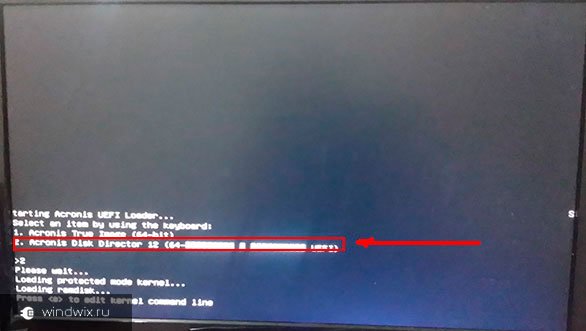
increase
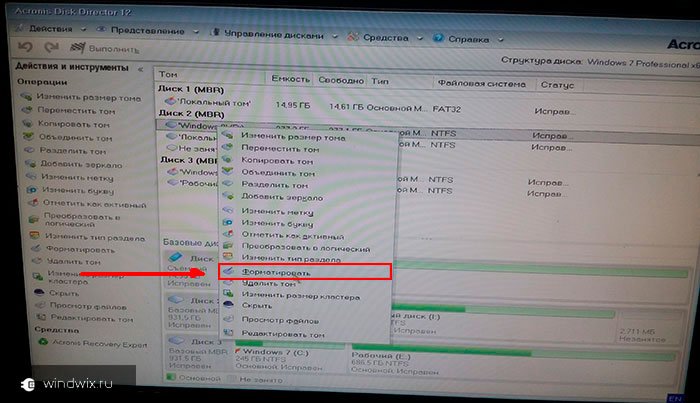
6 On the pop-up window, mark “manual” mode.
7 After this, select the section and click on the item in the left menu.
increase

increase
9 After this, the program sends us to the initial partition selection window. This is necessary to enter additional changes. But since we are only formatting the disk on which Windows will later be installed, we click on the checkbox.

increase

increase
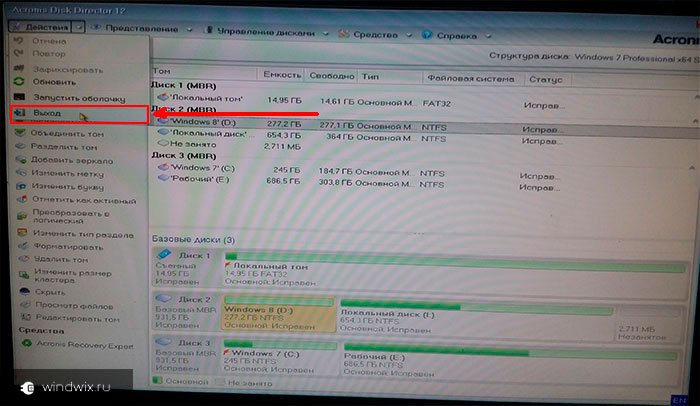
10 We are waiting for the process to complete. After this, you can exit the program and continue installing the OS. In this case, there is no longer any need to format the disk with the built-in program.
increase
Formatting via the command line( ^)
Almost no one uses this method, since the methods described above are sufficient for most. But sometimes there are still situations when he remains the only one.
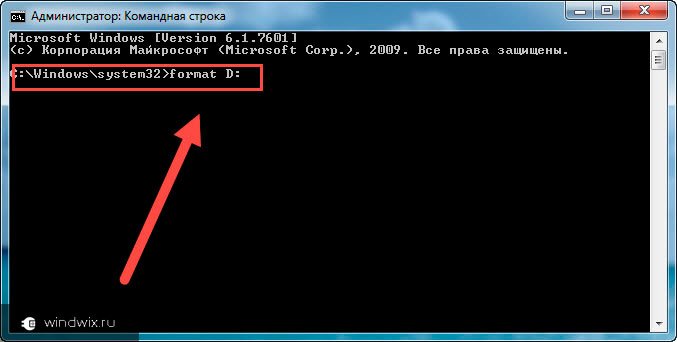
To call the command line, before copying a new one Windows versions to your computer, when the first installation window appears, press the key combination “ Shift+F10" After this, a black window will appear. It contains the command “ format" along with the letter of the partition that needs to be formatted (this could be C, D, E and others). After this you need to confirm the action: “ Yes" Or write " No» if you made a mistake with the letter of the section or simply changed your mind.
The situation can be resolved using third party computer. The infected hard drive is connected to it and cleaned in a standard system. To do this, after booting the system in the section " My computer“You need to select the damaged partition, right-click on it, and then select the appropriate menu. Specify the file system, cluster size, and volume label.
increase
After hard formatting The disk is installed on the original computer and Windows is installed. Sometimes during this, the system requires you to re-divide the partition into sectors and tracks. Don't worry - this is normal.
Formatting the hard drive before installing Windows - important step. If you don't do it, a new version will work with errors and most likely not for long.
I hope this article will clarify for you the main issues that are associated with the formatting procedure. Subscribe, recommend me to your friends and along with you become computer literate.
In this article you will learn what formatting is, learn how to properly format a hard drive, learn about various types HDD formatting– including low-level. We will also select good program to partition the hard drive.
What is formatting?
Disk formatting– this is the procedure for applying labels to a data storage device - a hard drive (HDD), memory card, CD/DVD or other storage medium. The formatting operation is equally useful for new and “worn” HDDs that have served their life.
A disk that has no partitions is absolutely useless. In addition to the fact that you apply markup to the disk, formatting deletes all data almost irrevocably (although there is). Therefore, you need to be careful and prepare in advance to format your hard drive.
Over the years of operating the operating system (Windows, Mac OS, Linux), the hard drive turns into a “garbage dump”, since many programs leave their files on the disk, and after uninstallation, their “roots” still remain on the HDD. As a result, the system is slow and unstable. There are various freezes, slowdowns, noise - it behaves inappropriately. After reformatting, the hard drive is optimized and begins to work better. Many devices last a long time without this procedure. I advise you to insure yourself and format your hard drive at least once a year.
Sooner or later, formatting the disk is inevitable. However, before doing this, it is very important to update or reinstall the operating system on your computer. Along with deletion unnecessary files you get a completely clean environment without defects, harmful viruses, unused programs, data that leads to conflicts. Thus, before reformatting the hard drive, we reinstall the OS.
Before formatting, do backup copy all important data on another drive. As already mentioned, during this procedure, various service information and marks are written to the disk, which allow information to be written to the HDD in the future without hindrance.
Steps to format a hard drive
- Low level– at this stage, basic markings are applied to the disk at a low level. As a rule, this is done by the hardware developer. In this case, special tracks and service data are written to the disk. This information remains on the hard drive almost forever - it can only be overwritten using proprietary utilities. These programs can only replace service data. By the way, if you make low level formatting hard drive, then you will no longer be able to recover data later, unfortunately or fortunately. Therefore, if your goal is to destroy information, then you can use this format.
- Section breakdown. It is clear that storing data on a disk without partitions is quite inconvenient. For some logical organization, the HDD is divided into special zones, drives – drive C:, drive D: and so on. For these purposes, both utility utilities built into the OS and external programs For hard formatting discs, which I have already written about more than once.
- High level. This type of reformatting process creates boot sectors, file tables. We will talk about all this below.
Types of disk formatting
You may know that standard system tools provide 2 methods by which you can format a hard drive - external or internal:
- quick formatting : takes less time, allows you to carry out the procedure as is. The point is that with this type of computer formatting, the files in the file table are overwritten with zeros, while the data is stored as if nothing had happened, and you can later restore it. Also when this method you're not optimizing file structure, and if there were defects on the hard drive, you will not fix them when quick method
- normal formatting : Longer and deeper formatting of the hard drive. Data on internal or external drive are completely destroyed, the file system is checked for possible mistakes, damage. bad sectors, bad blocks. Thus, when the usual way reformatting, you kill two birds with one stone, although you lose a little more time.
Several ways to format a disk - from simple to complex
Formatting - simple operation, accessible to non-advanced users. Next, I will tell you how to format a computer yourself - from simple to complex, depending on your skills and level of computer proficiency.
Using standard Windows tools when formatting
The Windows XP-10 operating system has built-in tools to perform this operation. Formatting a hard drive is done like this:
- Open “Explorer” (or another file manager),
- Go to the “My Computer” section
- Click on to the desired disk
- Select “Format”
- Next, click on the “Start” button
This is the easiest way to format your computer without additional tools. Despite its simplicity, however, all stages must be performed consciously, clearly understanding why you are doing it. Before giving your consent to formatting, carefully check whether the drive you have selected is correct.
Perhaps the video instructions show more clearly how to format a disk.
An alternative formatting method in Windows 7/8/10
Go to the “Disk Management” console on your computer. In Windows OS it is available at “Control Panel – Administrative Tools – Manage... – Disk Management”.
Go to the "Disk Management" section from the Panel Windows management 10
You need to select from the list the disk (volume) that you want to format, following the same steps as described above.
Administration section "Computer Management"
Formatting a hard drive via the Windows command line
To start formatting, open on your computer command line(console). To do this we use the combination WIN keys+ R , in the “Run” window that appears, enter CMD command, press ENTER.
Note. To format a disk via the command line, you will need administrator rights. Start - CMD - open context menu by clicking on the "Command Prompt" application icon - Run as administrator. If you try to format the disk without administrator rights, you will not succeed: access will be denied. Anyway, watch the video where I show you how to format as an administrator.
In front of us is the console. To format we use the following commands:
format drive letter: – format drive letter
Press Enter. We carefully read what is written in the console, further actions With hard drive We perform according to the situation.
Full hard drive formatting via HDD Low Level Format Tool
Low-level formatting will optimize the HDD structure. This is useful when preparing to reinstall the operating system. At the same time, you can solve problems with faulty sectors of hard disk.
In addition to basic functions, HDD Low Level Format Tool can be used to read SMART indicators. You can check the number of read errors, disk uptime, etc.
How fully format the hard drive:
- After installation we launch HDD program Low Level Format
- In the Drive search window, select the hard drive (if several are installed). The easiest way to distinguish one hard drive from another is by capacity. Click Continue
- Go to the LOW-LEVEL Format tab
- To quickly format (delete partitions and MBR records), select the Perform quick wipe option.
- To completely format the hard drive, the above option should be ignored
- Before you completely format your hard drive, check that the drive you have selected is correct. Only then click the Format this device button.
How to format a tablet
In essence, there are no differences here with the methods described above. All you need is to remove the memory card from the tablet (usually an SD card) and use a card reader to connect it to your computer on which the formatting program is installed (see download link above). note that we're talking about about formatting the memory card, not internal memory tablet.
In some cases, when other measures do not help, formatting helps. For example, if the hard drive starts to work slowly, copying data from the disk to another medium is slow, etc. Formatting also helps to completely get rid of viruses, because... is happening complete removal all data available on the disk. Besides, correct reinstallation The operating system cannot do without this procedure.
How to format a hard drive? To perform this action, there are many programs that also allow you to perform other operations on the disk, for example, defragmentation, etc. But in most cases, the standard tool provided by the Windows system itself is sufficient.
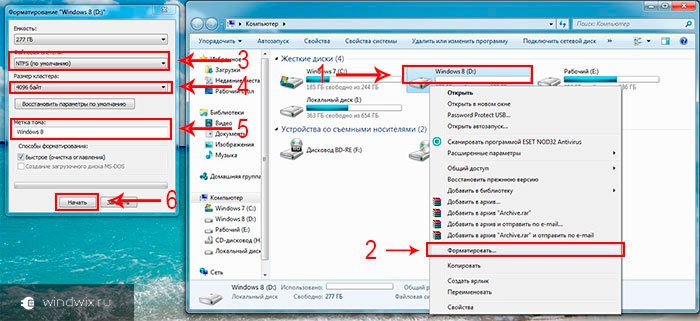
To format the desired hard section disk, open "My Computer", select the local disk, right-click and select "Format" from the list. But first, save all important data from this section, because... they will be deleted with virtually no possibility of recovery! A window with formatting options will open. Consider these options.
Capacity. Shows the total capacity of the selected partition. IN in this case the parameter cannot be changed.
File system. A method for organizing and indexing data. In a nutshell, the file system affects the size of the file name and maximum size the file itself. Usually, the default for hard drives is NTFS, and for other memory cards, FAT32, etc.
Cluster size. This parameter indicates the minimum volume disk space, used to store the file. In other words, if you plan to store small files on the media, then the cluster size should be small, but if the files take up a lot of space, the cluster size should be increased. In addition, the cluster size affects the speed of the device, but with this increase, resource consumption also increases.
Volume label. By default, this field is empty. If you want the section to be called something other than " Local disk(D:)", and for example, "Cinema (D:)", enter the word "Cinema" in this line.
Quick formatting (cleaning table of contents). If you uncheck the box, the disk will be completely formatted with search bad sectors(if any), and not just clearing the table of contents (in this case, new files will be written directly on top of the old ones). Of course, complete formatting takes much longer.
Once you have selected the required options, click the "Start" button and confirm the formatting.
There are several basic methods for working with hard disks. In the event that you need to change the capacity of the hard drive, it is recommended to use special utilities.
You will need
- - Partition Manager.
Instructions
If you need to increase the capacity of your hard drive, use the included utility standard programs Windows operating systems. Open the My Computer menu. Right click on hard drive, whose size you want to increase, and go to its properties.
Select the General tab. At the bottom of the window, find the option “Shrink this drive to save space”, check the box next to it and click the “Apply” button. The time it takes to complete the compression process depends on the size of the drive, the number of files on it, and the speed of your computer.
If you need to reduce the size of a disk or its partition, then use Partition program Manager. Download the version of this program that is suitable for your operating system and install it. Restart your computer.
Enable Partition Manager. Select advanced user mode. This allows you to produce larger set transactions with disks. Open the “Wizards” tab located on the main toolbar.
Select "Create Partition". In the window that appears, activate the “Mode for experienced users" and click the "Next" button. Select the hard drive whose size you want to reduce. Click "Next".
Set the size of the future local disk. It is by this value that the size of the volume being modified will be reduced. Click "Next".
Select file system for a future section. Specify the volume label, if required. Click "Next". In the new window, click the “Done” button.
To start the process of reducing the size of your hard drive and creating a new partition, click the “Apply intended changes” button. It is located under the main toolbar of the program. If you reduce hard size disk on which the operating system is installed, the computer will continue to perform the operation in MS-DOS mode.
Video on the topic
Most typing jobs require a computer literacy. Specialists should know all the capabilities of the Word editor, in particular, what is needed and how the document is formatted.

Why is it important to know how to format text correctly?
A document typed only using a keyboard looks like a collection of sentences in which it is difficult to grasp the main idea of the author, as well as to trace the logic of his reasoning. To make reading and memorization easier Word editor and others to him similar programs provide for text formatting, including breaking into paragraphs, highlighting a red line, the presence of indents and protrusions, columns, tables, lists and some other points.Particular nuances of document formatting
The main way to divide a document into several logically complete parts is to place paragraph marks, which is done by pressing the Enter button. To make it easier to read, each paragraph should begin with a red line - an indentation, which can be done in two ways. Its optimal size is 1.25 cm, and this is exactly how much you should move the upper hourglass marker located on the horizontal ruler with the mouse cursor. Another method is through the menu located at the top of the window: the “Format” button – the “Paragraph” line – the “Indents and Spacing” tab – the “Indents” column. You need to enter the required value in the “first row” cell, then click “OK”.To move all the text, not just the red line, move the bottom of the hourglass by the desired amount. This is how the “To and from whom” column is formatted in letters. The same action can be performed by following the path described above and entering numbers in the “Indent” column in the “left” or “right” cells.
To ensure that the text fills the entire document evenly and does not shift to its left margin, you can distribute it across the width of the page. To do this, select the required paragraphs and click on the “Fit to Width” button on the formatting panel. It looks like a square of horizontal stripes. There you can center the text for the title or move it to the right in the form of an epigraph.
The list function is convenient when you need to enumerate large quantity items, as well as adding new ones to the middle of the list after its creation: the numbering will change automatically. Numbered or bulleted list can be set using the corresponding buttons on the formatting panel or through the “List” command in the “Format” menu.
In addition to the listed functions in text editor you can change the size and type of font, bringing it closer to a business one or, conversely, to a congratulatory one, highlight part of the document with underlining, italics, bold or colored font, summarize the data in a table, and also perform other specialized actions (inserting an image, diagram).
Tip 4: How to recover files after formatting your hard drive
Don't be upset if for some reason you deleted important files from your hard drive. Most information can be recovered if you follow the correct algorithm actions.

You will need
- Easy Recovery.
Instructions
Use Easy Recovery to search and restore important files, deleted from the hard drive or external drives. Before installing the application, make sure that the selected version is suitable for the operating system you are using. Complete the installation Easy programs Recovery and restart your computer.
It is important to take into account the fact that the application should be installed on an unformatted hard drive partition. This approach will prevent overwriting deleted information. Launch Easy Recovery by clicking on the shortcut on your desktop.
Select the “Data Recovery” operating mode. If you have completely erased a certain partition of your hard drive, go to the “Recovery after formatting” sub-item. Check the box next to " Deep Scan" Left-click on the local disk that will be analyzed by the program. Click "Next".
Specify local disk settings. Please note that in this column you need to select the characteristics that the volume had before formatting. If you changed the file system, indicate this fact. Click the "Scan" button.
The process of analyzing deleted information can take from 20 to 50 minutes. Much depends on the size of the local disk being scanned. Wait for the list of found files to be provided. Select those that should be kept in their original state with a check mark.
Apply the "File Reconstruction" function if a certain part of the information was damaged during the recovery process. The main purpose specified function– restoration of documents and archives various types.
Sources:
- recovering files after formatting a disk
Tip 5: How to recover data from a formatted hard drive
Most personal computer users believe that formatting a hard drive permanently erases its contents. Formatting just creates new address tables. By installing a special program, you can return lost information without much difficulty. The most popular and easiest to use program is Data recovery wizard. It allows you to recover almost all files and directories from a formatted hard drive, even from sectors.

You will need
- - Data program recovery wizard.
Instructions
Download the Data recovery wizard program from the Internet. Install it on your Personal Computer. Launch the program. In its main window, select the Format recovery option. After this command, the program will independently display a list of all partitions that it finds on all logical drives your system. If the disk you need was not found as a result of the search, use the function Advanced recovery, designed to restore areas with severe damage. Next, select the section you need from the list and click the Next button. the program will scan and analyze the file system. You will have to wait for some time while the program scans. The duration of this operation directly depends on the size of your hard drive.
Browse the directory tree that will be displayed at the end of the scan of your hard drive. To restore files, select the checkbox next to them, as well as all directories and folders that also require recovery. Click Next. Remember that when restoring data from a formatted disk, you must correctly specify the directory for the new save. Never save recovered files and folders in the same location where they were before formatting. This action can lead to overwriting of recovered files and their permanent destruction.
Prepare enough free space on your hard drive. To restore formatted data you will also have to wait. Correctly specify the path to save the data and click Next. If the list of restored files is large enough, the operation will be lengthy, but definitely with a positive outcome. All formatted files will be restored and ready for use.
Today external hard disks can be programmed with several file system options. In order for the device to work on your PC, you need to run it correct formatting.

You will need
- Computer, external hard disk.
Instructions
Today there are several varieties external hard disks. Some of them are implemented with pre-installed formatting for a specific file system, while some devices are universal; they are formatted for the desired file system during installation. Let's consider two options for formatting external .
Formatting a disk with a pre-installed file system. After you connect the device, it will appear in the “My” section, however, writing files to it may not be possible due to the file system of your and hard system disk may not match. In order for the device to become accessible to, it must be formatted to the parameters you need. Right-click on the device shortcut and select “Format”. In the window that opens, set the “Format” option and click on the “Start” button. After the operation is completed, the device will become available for writing and reading files.
Formatting a universal disk. In this case, when connecting the device to the computer, you need the drivers on the PC that you will find included with the hard drive. The installation wizard will automatically detect your computer's file system and format the device with the appropriate settings.
Formatting, in the usual sense, is the process of recording certain information responsible for proper storage files, and also, in some cases, system boot files to the begining disk. Formatting is performed to delete data or to restore work hard disk. Formatting does not physically delete data, so even after complete formatting, information from the disk can be recovered.

You will need
- - a program for working with computer hard drive partitions.
Instructions
Formatting can be done both using operating system tools and using special programs. In some cases, formatting is only possible using special applications, for example, the system disk in the operating room Windows system. Based on this, before formatting it is necessary to determine which partition of the hard drive the operation will be performed on.
If only one hard drive is displayed in “My”, it is the system drive by default. In this case, you can format it only using a special program. If you see multiple hard drives in the My Computer folder, you need to determine which one is the system drive and which one needs to be formatted. The system drive usually has the letter “C” and is called “Local Disk C”. When entering system disk, you will find folders with the names: “ Program Files" and "Windows". IN this section your operating system is located and it will not be able to format itself.
If you need to format a non-system hard drive partition. In the “My Computer” window, right-click on the desired section, in the pop-up menu at the bottom, select “Format...”. In the window that appears, you can select the type of formatting: quick or full. Full formatting takes much longer, but when you select this item, the system will automatically check the hard drive partition for integrity and try to restore damaged clusters. When you select “quick format,” only the sector in which information about files and folders is stored will be deleted on the disk. In addition to the formatting type, you can select the cluster size. The efficiency of disk space use depends on this parameter. Very small size cluster increases the efficiency of using free space, but slightly slows down the speed of accessing files and makes it impossible to defragment the disk using the built-in Windows defragmenter. Too much big size cluster will slightly increase the speed of accessing files, but will not allow maximum use of free space. Optimal size cluster - 4Kb or 16Kb. You can also change the drive letter here. After selection required parameters, click “Start”. Once the process is complete, a window will appear informing you that formatting is complete.
If you need to format the system disk. It is also necessary to install a program for working with hard drives on your computer, for example, Acronis Disk Director Home. In the program window that opens, you will see a list of all your hard drives and partitions. At the top they are displayed in the form of a list, where the following are indicated: type, capacity, activity and file system. And from below - in graphical form, with a visual display of occupied and free space. Click on the required section once with the left mouse button. A menu of operations available for this volume. Among them, select "Format". In the window that appears, as described in previous step, select the cluster size and volume letter. In addition, you need to select a file system. "NTFS" is recommended. After selecting the required parameters, click “Ok”. Next, you need to apply the operations performed. In the left top corner in the main window, click “Apply scheduled operations.” In the window that opens, click continue. After the program has been running for some time, a window will appear notifying you that all operations have been completed. Click "Ok". By using this method You can format any partition of your computer's hard drive.
Video on the topic
05.01.2016
In this article we will look at several programs for formatting flash drives. USB flash media is a device that allows you to store and exchange information. If, for example, the device is infected with viruses or if you want to change the file system format to NTFS, FAT 32, exFAT, you can format it.
To format a flash drive you will need to use one of following programs or utility:
HP USB Disk Storage Format Tool
The utility was developed by Hewlett-Packard and is intended for formatting flash drives and memory cards in NTFS, FAT, FAT32. Works via USB 2.0 port. The utility allows you to create boot DOS– devices, this is useful if you need to install Windows, for example. The program interface is easy and intuitive. Formatting your device can be done in just a couple of steps. The utility is also completely free.
HDD Low Level Format Tool
 HDD Low Level Format Tool
 The program can return the state of USB flash drives and hard drives to the initial state(factory), filling the device with zero bytes. This operation will completely remove all existing information on the media, including viruses. The program interface is quite simple. Here you can view all information about the storage medium: file system, volume, serial number, buffer size and of course format it.
SDFormatter
Formatting an SD card SDFormatterThe program is designed for formatting SD cards that are used in phones, cameras, players. By using special formatting methods that include the appropriate SD card specifications, the utility can help in situations where others software just useless. The program interface is extremely simple, and to format the card you only need to complete a few steps.
Format a flash drive using the Windows system utility
Also, do not forget that full formatting can be done using standard means Windows. To do this, simply insert the media into USB port and in the “My Computer” window, right-click on it and select the “Format” line. Next, select the required file system format and format the flash drive. To format a flash drive using this method, you do not need to download anything.
 We format the flash drive using standard Windows tools
Convert.exe utility, which can be used via the command line
To change the file system it is not necessary to erase all data from the flash drive. To format a flash drive without losing data, you can use the Convert.exe utility and the command line. To format a flash drive you do not need to download any programs.
To do this, open the command line and enter the following command:
convert<буква_флешки>: /fs:ntfs /nosecurity /x
in my case it will be: convert F: /fs:ntfs /nosecurity /x
 Format a flash drive without deleting data
  Formatting a hard drive is the process of creating a file system on its partition, accompanied by deleting data and creating a new file system structure. Functionality for formatting hard drives and solid-state drives is contained in almost all modern operating systems, but the standard mechanism is not always optimal and applicable. This material will tell you in more detail how to format a hard drive in several ways.
Format HDD regular means very simple. To do this, you need to select the desired partition in Explorer, right-click and select “Format” from the pop-up menu.
 In the menu that opens, select formatting options. It is recommended to use NTFS as the file system, and leave the cluster size as standard. Checking the box next to “Quick formatting” significantly speeds up the process, but only the FS table is created anew. The data itself physically remains on the disk, although it becomes inaccessible. If you do not check the box, all data will be physically erased (filling each memory cell with zeros), but the process will take a long time. A hard drive with a capacity of several terabytes will take hours to format. But such formatting allows you to permanently destroy data, for example, when transferring the drive to a new owner.

Alternative way format the HDD using standard means - through the “Control Panel”. To do this, you need to find the “Administration” menu, select “Computer Management” in it and in the left column find “Disk Management.” The menu that opens will display all drives in a structure. The advantage of this method is that this way you can format disks that do not have a partition and therefore are not displayed in Explorer.

How to format a hard drive via the command line
To format a disk via the command line, there is a utility format command. To use it, you need to run the command line as an administrator and enter the format command. It should look like this:
format [drive letter]:- formatting will happen without any questions, into the same FS that is on the disk, in a slow way(with complete erasure).

format [drive letter]: /q — the “/q” flag triggers a quick format, without physically clearing the contents of its memory. The flag can be placed in combination with any other keys.
format [drive letter]: fs:[file system]— formatting the selected partition into one of the supported file systems: NTFS, FAT, FAT32.
format [drive letter]: fs:[file system] /q- the same thing, but with quick formatting.
How to format your hard drive before installing Windows
To format your hard drive before installing Windows, you must select full installation, wait until the menu for selecting a partition to install appears, click on the desired drive and press the “Format” button at the bottom. The system will independently determine optimal method formatting, file system type and cluster size. The whole process takes less than a minute.
Before you format your hard drive - windows installation You may need to create additional system partitions to boot the OS. The screenshot below shows that such a partition takes up 100 MB. It stores part of the system bootloader.

The disadvantage of formatting this way is that you can't manually manipulate the parameters. Ordinary users do not need this, but sometimes it is necessary that instead of the standard NTFS systems there was the same FAT32. For example, such a need arises on tablets with Intel processors and two installed OS (Windows + Android), like the ten-inch Chuwi Hi10. In order for the Windows partition to be visible from Android, it must be formatted in a compatible file system. Work with NTFS without special plugins and third party programs The “green robot” can’t.
The correct answer to this question is “not at all.” Computer bios It is intended for slightly different purposes and does not have functionality for working with HDD. Usually popularly “formatting from under Bios” refers to formatting via the command line in a text operating system(for example, MS-DOS). The advantage of this solution is that you can even work with system partition, which is not used.
For hard format drive through boot disk with DOS you need to create an image of such an OS, write it to a flash drive and copy the formatting utility there. Instead of DOS you can also use special program for working with HDD, for example, GParted. This option is preferable as it is more functional.
To format a HDD from BIOS using a bootable USB flash drive, you need to download. This is an automatic installer that will download and write the latest version of Gparted to a flash drive.

After creating the flash drive, you need to restart the PC, go into Bios (usually by pressing DEl or F2) and find Boot menu. In it you should select the item containing the words “ Boot device priority" or similar in meaning. Among them, you should put your flash drive first. Then you need to press F10, agree to save the settings and wait for loading from the flash drive.

In the loaded menu of the GParted program, you need to select the language, select the disk and find the item responsible for formatting. You can select the file system, cluster size, format type, and other options.


