How to recover files erased from a hard drive. How to recover files from your hard drive. Recovering files using special programs
The loss of information stored on a hard drive (HDD) is a sad event, but most often not fatal. Accidentally deleted documents, folders and even entire partitions can be restored if nothing happened that could prevent this.
How to recover files from hard drive, in what cases you can do this yourself and when it is better not to take risks, but to turn to specialists, we will tell you further.
When can missing files be recovered?
The main condition for successful information recovery is physical serviceability of hard disk.
Most likely, you will be able to return data that:
- were deleted without going to the Recycle Bin;
- destroyed by a virus;
- disappeared due to a file system failure (with such problems, entire directories and partitions are usually lost);
- were in a partition that was formatted (formatting erases some of the information about the location of the files on the hard drive, but they themselves remain in place).
But in what cases it will not be possible to restore information:
- if the area of the hard drive where the data was stored was overwritten (for example, when reinstalling operating system with volume formatting, all objects of the old OS are destroyed irrevocably);
- if objects were deleted using a shredder program (shredders also overwrite the storage areas of deleted objects, many times);
- if the magnetic surface of the hard drive “pancakes” is damaged.
When you shouldn’t do recovery yourself

If you are not confident in the serviceability of the drive, but the information is very valuable, it is better to refrain from experiments and contact for restoration specialized service. The service is not cheap, and the specialists working there are not omnipotent, so the less you torment the “sick” disk, the lower the price will be and the higher the chances of success.
The following symptoms indicate a malfunction of the hard drive::
- Unnatural noise during operation (clanging, clicking, clanging, whistling, etc.).
- The HDD from time to time ceases to be detected by the computer - it either disappears or appears.
- The operating system is very slow, the hard drive is always loaded at 100% without high load to RAM.
- Various errors occur when writing and reading files.
- The operating system or programs that monitor the status of the HDD in real time (if installed) inform about a drive malfunction.
- The computer stops booting from the hard drive (provided that it boots normally from other media).
- Often there are " blue screens death" indicating errors typical of disk problems (INACCESSIBLE_BOOT_DEVICE, NTFS_FILE_SYSTEM, KERNEL_MODE_EXCEPTION_NOT_HANDLED).
Four most important rules for data recovery

How and with what help do you recover data from hard drives, I’ll tell you a little later, but now a few words about what needs to be done before this and how to correctly carry out the recovery procedure.
- The recovered data can be reset to another partition of the same hard drive or to another physical media, but not to the same place from where they were read. Therefore, if your HDD is not partitioned, prepare a flash drive or another hard drive of suitable capacity.
- As soon as you notice the loss of important data, stop all operations with the HDD and immediately begin recovery. This will prevent accidental overwriting.
- Try to restore everything you need in one session without stopping the program. Moreover, without restarting the computer.
- If one program does not help, use others until all the information is recreated.
Three popular HDD data recovery programs
R-Studio
R-studio from the Canadian company R-Tools Technology - the most powerful software package recovering information from storage media different types. It is aimed at professional service engineers, but can also be used by non-specialists, as it is easy to operate and intuitive. Translated into many languages of the world, including Russian.

Main features of R-studio
- Supports all major file systems: FAT12-FAT32, NTFS, exFAT, ReFS, NTFS5 (encrypted), HFS, HFS+, Ext2-Ext4, UFS1 and UFS.
- Able to determine object types based on file signatures. This helps to extract information from damaged drives where the file system is defined as RAW (unknown).
- Supports RAID arrays and dynamic disks. Has RAID reconstruction function.
- Can create images physical drives, their sections and individual directories, from which it then reads data. After creating such an image, the media from which recovery is being carried out can be disconnected.
- Allows you to view the contents of read objects, even if there is no program associated with them on your computer.
- Recreates service MBR records, GPT and BCD.
- Contains hex editor to manually fix damaged files.
- Displays S.M.A.R.T parameters. – results of self-test of the current HDD status, as well as SSD ( solid state drives), diagnoses the condition of the read heads, corrects surface defects.
How to use
- Launch R-studio with administrator rights.
- Select the drive from which you want to read information.

- Specify scanning options. In particular, note the types of files that are recoverable.

- After finishing reading, select the “Recover all files” option in the “Disk” menu.

- Specify the saving parameters - location, structure, attributes, etc.

- Wait until the operation is completed.
Ontrack EasyRecovery
Ontrack EasyRecovery from the Polish developer Kroll Ontrack - another recovery software package lost files, which can be used by both professionals and beginners. Available in several versions with different sets of functions, translated into Russian.

EasyRecovery features
- Recognizes more than 250 file types.
- Works with different types of media, including damaged ones.
- Creates drive images.
- Equipped with tools for analyzing the current state of the HDD.
- It has a built-in hex editor, as well as a shredder for permanent destruction of file system objects.
- Allows you to create emergency bootable media with EasyRecovery in case the operating system stops booting.
- Can connect to other computers over the network.
- Capable of reading information from virtual environments VMware.
How to use
- Run the program as administrator. Click the Continue button.

- Select the media type on which you lost data and click Continue again. This button must be pressed after each step, so I will not repeat myself.

- Specify the section you want to scan.

- Select a recovery scenario (we are particularly interested in deleted or formatted data).

- Wait for the reading process to complete.

- The found documents will be displayed in the EasyRecovery window. You can view them as a list or thumbnails.

- To save the file, click on it right click. Select “Save As” or, as elsewhere, press Ctrl+S.

Recuva
Recuva, a product of the British developer Piriform Limited, is one of the most popular free data recovery tools. The utility is very easy to use and very effective. Is different high speed scanning.

Recuva features
- Can work without installation (has an official portable version).
- Supports FAT16-FAT32, NTFS and ExFAT file systems.
- Works with damaged media.
- Has a file shredder.
- Capable of restoring directory structures, mail messages, documentation Microsoft Word, texts, music, images, saved web pages, video files and system objects, including hidden and zero-sized ones.
Compared to the two previously reviewed programs Recuva features much more modest. This applies to both restorative functions and additional tools. Thus, Recuva is best at restoring recently deleted objects, and although it detects old ones, it often cannot read them, despite the fact that they were definitely not overwritten. And yet, let’s not find fault with her too much, because “don’t look a gift (free) horse in the mouth.”
By the way, in addition to the free version of the utility, there is a paid version - Recuva Pro (costs $24.95). Its differences are advanced recovery functions, automatic installation updates, virtual media support and the ability to contact Support.
How to use
- Launch the utility. If it opened in the English version, go to the “Options” menu and select the Russian language on the “General” tab.

- From the drop-down list on the left side of the window, select the scan area.

- After the scan is completed, the utility window will display a list of found objects, some of which are marked with green circles, some with red and some with yellow. A green mark indicates a good chance of restoring the object, a yellow mark indicates a weak one, and a red mark indicates a complete absence any chance.
- To restore something found, mark it in the list and click the button of the same name at the bottom right of the window.

Each of the three applications reviewed is good in its own way. Recuva is convenient to keep on hand for everyday use– despite the limited functionality, it solves its problems well, but most importantly, quickly. And if we can’t cope with something, we use EasyRecovery and R-Studio - “heavy weapons” for the most intractable situations. For 90% of users, this set is enough for almost all occasions.
Are you looking for how to recover files deleted from your hard drive or flash drive? Deleted an important MS Office document, DVD video, mp3 file or photo? Don't know how to recover files deleted after hard formatting, external drive, flash drive or logical NTFS partitions, FAT? Do you want to recover files deleted from the Recycle Bin or using the "Shift" + "Del" keys?
Recovering erased files
program:
Starus File Recovery
Recovering deleted files is a process accessible to everyone! And your personal assistant in this important matter will be the Starus File Recovery application. Possessing efficient algorithm disk analysis, Starus File Recovery is the most quick tool for data recovery throughout the market.
The process of scanning the disk and building a list of deleted files and folders will take seconds. After this, you will immediately see your files. User-friendly interface and rich product functionality meet the needs of data recovery professionals various companies. Starus File Recovery - recovery of deleted data available to everyone!

Program installation
The program uses a convenient wizard that will help you quickly and easily install the product on your computer. When installing the program, consider which disk you are going to restore files from - you cannot install the program on a disk or partition that contained the information to be recovered.
Recovering files with preview
After installation, in the main program window, select the drive from which you want to recover files. Starus File Recovery will begin to analyze the selected disk and display its contents. After analysis, on the left side the program will display a list of folders located on the selected disk. Having highlighted required folder on the left, you can view its contents in the main part of the program. You can use the Search option to find the required file.
For convenience, use the “Filter” option (“View” – “Filter”) to see only deleted files and hide existing ones. Use the main panel to view, highlight and restore necessary files and folders. If the option " Preview", then by selecting the file, you can immediately view its contents in the upper right part of the program. In the central part, select the files and folders that you want to restore, and click the “Recover” button in the panel. The Save Files Wizard will open.
File recovery in step-by-step mode
Convenient step by step wizard Recovery for analyzing, searching and saving deleted files can be used from the very beginning of work. To launch the wizard, select the “Wizard” option from the “File” menu. In the window that opens, you just need to follow detailed instructions masters Next, the wizard will offer you a list of disks located on your computer and devices connected to it.
Having selected a disk or device, the wizard will prompt you to select the required type of analysis (“Normal scanning” or “Deep analysis”). A normal scan will allow you to find deleted files based on the available information in the file system. Using this option you can recover all information about your files (file name, date, attributes...). Using deep analysis, the program will search for deleted files by signatures (search by file contents). In this case, you will not be able to recover information about files (file name, date, attributes...)
Next, you will be asked to indicate the types of files needed for recovery. Additional options will allow you to choose necessary criteria to search for files. You can search for all or only deleted files, and you can include or exclude hidden and system files from the search. You can also search for files of a specific date or size. During the deep analysis process, found files will be automatically added to the list of files. You can change the display type and file sorting method. You also have the option to view or change file properties.
After completing the analysis, select the files needed for recovery and click “Next” to save them.
How to save files
Carefully follow the wizard's instructions to successfully save the recovered files. You can select the desired method for saving files and other necessary options (saving to hard disk, burning to CD/DVD, creating a virtual ISO image, saving online via FTP server).

Saving to hard drive
The program allows you to save recovered files to your hard drive, USB drive or any other physical or removable drive. It is strictly recommended not to save files on the same disk from which the recovery takes place! Select a folder to save the recovered files.
To recover only deleted files and skip existing ones, select the “Recover only deleted files” option. (This option is only available if you are saving files directly from the program and not from the recovery wizard.)
If you want to restore the directory structure in which deleted files are located, select the “Restore folder structure” option. If the option is selected, all subdirectories will be restored and all files will be saved in the same folders they were in before deletion. Otherwise, all files will be saved to one selected folder. (This option is only available if you are saving files directly from the program and not from the recovery wizard.)
Along with the main file data, you can restore alternative data streams (only supported in file NTFS systems). To do this, select the “Recover alternative data streams” option.
When restoring some files, the first letter of their names is lost and replaced with a “?” There are files in which other parts of the name are lost. In order to automatically replace all unknown characters when saving files, select the “Replace all unknown characters with” option; if this option is disabled, then you will be prompted to replace characters during the recovery process.
Burn to CD/DVD
The program allows you to save recovered files to CD or DVD media. You can also clean up the rewritable disc here. First, you need to select the recording media from the list of CD/DVD drives installed on your computer and optionally empty the rewritable disc.
The next window allows you to select the necessary options for writing files to disk: specify the name of the disk, select the disk writing speed and file system. To create or continue a multisession, select the “Multi-session disc” option. If a multi-session disc is inserted into the drive, you will be prompted to start a new session or select a track to continue an existing one.
In the next window, select the files needed for recovery and click “Burn” to start burning them to disk.
Creating an ISO image
By selecting the option Create a virtual ISO image, you can save all the recovered files into one ISO file – virtual image CD data or DVD disc. Here you can specify the disk name and file system. In the next window, select the files required for recovery and click “Create” to begin creating the virtual image.
Saving to a remote server
An integrated FTP client will allow you to upload recovered files to the server. Specify the required options for saving files. In the next window, select the files needed for recovery and click “Next” to continue. Specify your FTP server settings. You can enter the path to the required remote directory on the server so that when you connect, the program will automatically open this directory.
Losing data from a hard drive is, unfortunately, a common occurrence. If this happened due to its malfunction, then to restore data you need to contact service centers that are engaged in retrieving data from damaged storage media.
However, if the hard drive is working properly, then in most cases you can recover deleted data yourself using a specialized software, which will be discussed below.
Reasons for lost files
The reasons for losing data from a hard drive can be different. They are divided into two categories: mechanical and software.
Mechanical reasons include:
- blows;
- shaking;
- overheat;
- failure of the hard drive controller.
Photo: data recovery from hard drives
The second reason includes software glitches and user errors:
- computer viruses;
- sudden power outage;
- errors;
- formatting;
- accidental deletion.
Deleted files disappear completely
If data was lost due to errors, formatting or accidental deletion, it can be completely restored. For example, when formatting, the data itself is not deleted; only the header is erased, which contains information about its location on the hard drive.

The same applies to accidental deletion. The operating system marks the sectors that store data as write-ready and displays them as free space. At the same time, the files themselves remain on the HDD up to their sectors with new information.
In some cases, even with mechanical damage, for example, if there is an impact, you can recover data from the hard drive, but only service centers do this.
Video: Data Recovery
What to do if important information is deleted
The most important thing is not to panic. The likelihood of recovering a newly deleted file is very high. In this case, users have a completely reasonable question: how to restore data? Special programs will come to the rescue that will scan specified areas of the hard drive and help perform recovery even after full formatting.
To reduce the risk of complete loss of information, you should adhere to the following tips:

Overview and operating principles of utilities
Recovery utilities provide the user with various tools that, when used in a timely manner, give almost 100% results.
At work they use following methods recovery:
- reconstruction of the file system (FS) structure. Used in case quick formatting or deleting a logical volume. In this case, the directory structure is not disrupted, which makes it possible to restore entire directories and subdirectories while preserving the paths.
- file recovery. This method involves reading FS service records from which the software determines the location and attributes. This method works if there has been no data replacement.
- ability to restore information using signatures. Performed by sector-by-sector scanning for the presence of known signatures. In this case, their paths and names are not saved, and the result is sorted by their type. The method is used if the FS is damaged and its reconstruction is impossible.
Modern programs use all three methods. This approach ensures maximum and effective result operation of the necessary software. The article presents the most popular and powerful programs. Many of them are free, but there are also paid versions.
PC Inspector File Recovery
A simple but powerful application that allows you to recover not only data, but also deleted sections. Detects HDD even if there is no boot sector. Supports work with network media and FAT file system. PC Inspector File Recovery can be installed both in Windows OS and created boot diskette, which allows you to run it even in the absence of the OS or in case of damage to the FS.

PC Inspector File Recovery is free and supports the Russian language, but the quality does not always correspond to what is stated. In this case, the developers suggest using paid services. Overall, the app is great for most users due to its ease of use.
Working with the program
The interface is convenient and most importantly simple. Work is performed in step by step mode.
When starting, you will be asked to choose one of three operating options:
- search for deleted files. Used for accidentally deleted information;
- search for lost data. The option will help restore data in the event of a system failure or quick formatting;
- search lost volume. If the drive is inaccessible or has a missing drive letter, this option will fix the problem.

After selecting the mode, PC Inspector File Recovery will start scanning and display information about available volumes.
Then the desired section opens, where the user selects the search area, noting the start and end sectors of the scan. The application will find all the lost data in the specified range and display it in a window from where you can save it.

Similar actions are performed for the other two modes. Despite its simplicity, the utility effectively searches and saves deleted data.
Recovering data from a hard drive using the R-Studio utility
R-Studio is considered one of best programs among analogues. If the loss is not related to physical damage to the media, then in most cases R-Studio is highly likely to save the deleted data.
Initially it was intended for restoration specialists, but over time its capabilities expanded and R-Studio became available to ordinary users.

Photo: R-Studio program Data Recovery
TO key features programs include:
- Supports all major file systems on Windows, Linux and Macintosh;
- extraction from damaged, formatted and reformatted media;
- the ability to view content of any type and assess the chances of successfully returning it;
- treatment bad sectors;
- presence of a hexadecimal editor;
- A professional RAID reconstruction module that is comparable to specialized software packages.
R-Studio can be used on almost all operating systems Windows family, Linux and Macintosh. It is also possible to create bootable media.
The application has intuitive interface. When launched, it displays available media (including removable media).

To start scanning, you need to select the volume from which you want to recover data and click the “Scan” button. After this, the search process will begin.
Easily able to recover lost data, even in the most difficult cases.
Recovers data that was lost as a result of:
- virus attacks;
- system failure;
- improper shutdown of the computer;
- FS damage;
- formatting (including full);
- errors when creating volumes.
There are cases when the operating system does not start due to loss system files, in this case, you can create a boot floppy disk and save them.

Thanks to a powerful algorithm, Ontrack Easy Recovery is able to restore damaged ZIP archives, and text documents created in the MS Office software package. The unique Ontrack Data Advisor module can diagnose the general condition of disks and identify bad sectors.
Ontrack Easy Recovery interface
Great for anyone from home user and ending with specialists in service centers. A discreet but simple interface allows you to quickly understand the controls and get to work immediately.
In the main program window, you only need to select the media type and click the “Continue” button, then a window will appear with a list of partitions, in which the user selects the drive with which to work.
After this, access to the tools opens:
- view logical volume;
- return after formatting the partition and deleting it;
- drive diagnostics;
- disk tools.

The last point includes following operations with section:
- creating an image;
- deploying a volume from an image;
- copying;
- viewing;
- update.
Depending on how the files were deleted, the appropriate tool is selected and the scan of the marked area begins. Compared to other software packages, this process is quite fast. Upon completion, the viewing window will display the information found, which can be saved.

The program supports the Russian language, but is paid.
Boot floppy with Windows Easy Recovery
Windows Easy Recovery will help save data in case of damage to the FS or inability to start the operating system. It saves all data to a working HDD, partition or removable media. The application is loaded into RAM and runs from it. This is convenient if the media has a damaged file system.

Its interface is no different from any other software running in Windows environment. Unless all names will be shortened to 8 characters. To create a floppy disk, you need to download a special installer and go to the “Make Emergency Boot Diskette” item.
Windows Easy Recovery is free, but unpopular, even though good quality work.
Power Quest Lost & Found
An effective utility for recovering deleted data. Works only from bootable media. Characterized by the need to carry additional storage for saving (flash drive or second hard disk), since Power Quest Lost & Found does not save to the restored partition to avoid overwriting them.
The program installer serves only to create a boot floppy disk with the operating system. DOS system and the necessary tools for work. After this, the computer boots from the floppy disk, and Power Quest Lost & Found is ready to use. Its recovery reliability is very high. The application itself runs from random access memory computer.
Recovery process
Power Quest Lost & Found works in a step-by-step mode; after launch, it immediately begins scanning the surface of the media for the presence of bad sectors, which you will be asked to skip. Upon completion of the scan, the user can select the partition to be restored and the media on which the data will be saved.
After the scan is completed, the utility will display a tree structure of all directories, and also indicate the likelihood of their recovery:
- green and yellow – high;
- red – low;
- gray – impossible.
To save, you need to select the necessary files, then click “Start Recovery”. Depending on their size and number, the process can take up to several hours.
Note: Since control is only carried out using the keyboard, you will need to become familiar with the required key combinations. To do this, call up the help menu using the F1 key.
Restorer 2000
Another interesting application, which can be called an analogue of R-Studio, but with poorer functionality. Despite this, Restorer 2000 performs its assigned tasks efficiently. Works with FAT and NTFS file systems, and also supports the creation of backup images.
The interface is similar to the R-Studio shell. To start scanning, you need to select an object and press the scan button. The detected data will appear in the right window, where you can view its contents.
In general, Restorer 2000 fully copes with its tasks, but purchasing paid version not advisable, since there are analogues with big amount functions and tools.
GetDataBack
A powerful tool for recovering lost information. Distributed separately for NTFS and FAT file systems. The latter is suitable for removable media(memory cards, flash drives). Regardless of the type of deletion, GetDataBack will most likely return them completely intact, but only if no write operations were performed on the drive.
Its distinctive feature is the ability to recover both after full formatting and from media with physical damage, however, here the developers do not give a 100% guarantee, but the opportunity itself is a huge advantage.

In addition, GetDataBack includes the following features:
- search for lost items based on service records;
- the ability to restore files using signatures;
- reconstruction of the FS;
- work via the network;
- flexibility of settings.
These features allow the program to occupy a leading position among both professionals and ordinary users.
Stages of work
Initially software package It is supplied in German, but you can download the localization language separately. The interface is the same as its counterparts - step-by-step. The first step is to select a work scenario that will configure it for the appropriate mode.

There are several modes:
- I don't know and will use the software settings (default settings);
- quick scan (used when a volume is lost or accidentally deleted);
- loss of FS, for example, after formatting or markup;
- significant losses of FS, for example, after installing a new operating system;
- recovering deleted files.
After selecting the script, GetDataBack will open a window where you need to mark the disk or partition to be restored. After this, the application will start scanning and open a tree structure of files and directories in a new window. Viewing and saving are also performed there.

Overall, GetDataBack is very good and does the job well in most cases.
Acronis Recovery Expert - recovering data from a hard drive
Last on the list, but a well-known program that differs flexible functionality And high quality searching for lost information. However, Acronis Recovery Expert's specialty is the reconstruction of partitions that were lost for one reason or another. If your computer is missing by chance remote volumes, the program cannot be checked.

The main features of the program include:
- the ability to recover disappeared partitions with any file system and any size;
- opportunity to work with boot disk or floppy disks;
- support from almost everyone types of hard disks with IDE interfaces and SCSI.
Principle of operation
Unlike other programs, Acronis Recovery Expert tries to recover the entire partition with all data, reading information about it from the MBR and MFT. However, despite the popularity of the program and the manufacturer, it has its pitfalls.

Efficient Acronis work Recovery Expert is provided if the disk space is partially full. If most of the space was occupied, then there is a high probability that the utility will not only not recover, but will also corrupt the data, since it writes information to the same section, thereby increasing the risk of overwriting information.
Interface
A feature of all Acronis products is a clear and intuitive interface. The work can be done automatically or manually. The first one is suitable for beginners. Manual mode provides the user with information about the structure of volumes, as well as the ability to select a search location. After this, the process will begin, which may take several hours.
Recuva includes the following features:
- search for data deleted from the recycle bin, player or flash drive;
- support for all file types;
- support for almost all types of removable media;
- multilingual interface.
For “everyday” data recovery from a hard drive, recuva is ideal.

A loss important files the phenomenon is not new, so it is always recommended to do them backups, and also keep on hand one, or better yet, several utilities that will help you recover data even if the operating system crashes. It is important to remember that after losing files, you cannot write any information to the disk. The ideal option would be to launch using bootable media.
Here are some tips to help minimize the risk of data loss due to a software glitch:
- Always keep the disc clean. Don't clutter it with useless data;
- Clean up temporary files regularly;
- Defragment and check for errors regularly;
- There should always be at least 10-15% free space on the media.
Important! After the file is deleted, defragmentation and error checking are strictly prohibited! This may result in complete data loss and impossibility of recovery.
The loss of information stored on a hard drive (HDD) is a sad event, but most often not fatal. Accidentally deleted documents, folders, and even entire sections can be restored if nothing happened that could prevent this.
I’ll tell you further how to recover data from a hard drive, in which cases you can do it yourself, and when it’s better not to take risks and turn to specialists.
How to recover data from a hard drive
When can missing files be recovered?
The main condition for successful data recovery is the physical health of the hard drive.
Most likely, you will be able to return data that:
- were deleted without going to the Recycle Bin;
- destroyed by a virus;
- disappeared due to a file system failure (with such problems, entire directories and partitions are usually lost);
- were in a partition that was formatted (formatting erases some of the information about the location of the files on the hard drive, but they themselves remain in place).
But in what cases it will not be possible to restore information:
- if the area of the hard drive where the data was stored was overwritten (for example, when reinstalling the operating system and formatting the volume, all objects of the old OS are destroyed forever);
- if objects were deleted using a shredder program (shredders also overwrite the storage areas of deleted objects, many times);
- if the magnetic surface of the hard drive “pancakes” is damaged.
When you shouldn’t do recovery yourself

If you are not confident in the serviceability of the drive, but the information is very valuable, it is better to refrain from experiments and contact a specialized service for restoration. The service is not cheap, and the specialists working there are not omnipotent, so the less you torment the “sick” disk, the lower the price will be and the higher the chances of success.
The following signs indicate a hard drive malfunction:
- Unnatural noise during operation (clanging, clicking, clanging, whistling, etc.).
- The HDD from time to time ceases to be detected by the computer - it either disappears or appears.
- The operating system runs very slowly, the hard drive is loaded at 100% all the time without a high load on the RAM.
- Various errors occur when writing and reading files.
- The operating system or programs that monitor the status of the HDD in real time (if installed) inform about a drive malfunction.
- The computer stops booting from the hard drive (provided that it boots normally from other media).
- Blue screens of death often occur indicating errors typical of disk problems (INACCESSIBLE_BOOT_DEVICE, NTFS_FILE_SYSTEM, KERNEL_MODE_EXCEPTION_NOT_HANDLED).
Four most important rules for data recovery

I will tell you a little later how and with what help data is recovered on hard drives, but now a few words about what needs to be done before this and how to correctly perform the recovery procedure.
- The recovered data can be reset to another partition of the same hard drive or to another physical medium, but not to the same place from where it was read. Therefore, if your HDD is not partitioned, prepare a flash drive or another hard drive of suitable capacity.
- As soon as you notice the loss of important data, stop all operations with the HDD and immediately begin recovery. This will prevent accidental overwriting.
- Try to restore everything you need in one session without stopping the program. Moreover, without restarting the computer.
- If one program does not help, use others until all the information is recreated.
Three popular HDD data recovery programs
R-Studio
R-studio from the Canadian company R-Tools Technology is the most powerful software package for recovering information from various types of media. It is aimed at professional service engineers, but can also be used by non-specialists, as it is easy to operate and intuitive. Translated into many languages of the world, including Russian.

Main features of R-studio
- Supports all major file systems: FAT12-FAT32, NTFS, exFAT, ReFS, NTFS5 (encrypted), HFS, HFS+, Ext2-Ext4, UFS1 and UFS.
- Able to determine object types based on file signatures. This helps to extract information from damaged drives where the file system is defined as RAW (unknown).
- Supports RAID arrays and dynamic disks. Has RAID reconstruction function.
- It can create images of physical drives, their partitions and individual directories, from which it then reads data. After creating such an image, the media from which recovery is being carried out can be disconnected.
- Allows you to view the contents of read objects, even if there is no program associated with them on your computer.
- Recreates MBR, GPT and BCD service records.
- Contains a hex editor for manually fixing damaged files.
- Displays S.M.A.R.T parameters. – results of self-test of the current state of the HDD, as well as SSDs (solid-state drives), diagnoses the condition of the read heads, corrects surface defects.
How to use
- Launch R-studio with administrator rights.
- Select the drive from which you want to read information.

- Specify scanning options. In particular, note the types of files that are recoverable.

- After finishing reading, select the “Recover all files” option in the “Disk” menu.

- Specify the saving parameters - location, structure, attributes, etc.

- Wait until the operation is completed.
R-studio, as a rule, manages to restore what other programs cannot handle. This complex is good in everything except the price: the cost of a license starts at $79.99. Available in versions for Windows, OS X and Linux.
Ontrack EasyRecovery
From Polish developer Kroll Ontrack is another lost file recovery software package that can be used by both professionals and beginners. Available in several versions with different sets of functions, translated into Russian.

EasyRecovery features
- Recognizes more than 250 file types.
- Works with different types of media, including damaged ones.
- Creates drive images.
- Equipped with tools for analyzing the current state of the HDD.
- It has a built-in hex editor, as well as a shredder for permanent destruction of file system objects.
- Allows you to create emergency bootable media with EasyRecovery in case the operating system stops booting.
- Can connect to other computers over the network.
- Capable of reading information from VMware virtual environments.
How to use
- Run the program as administrator. Click the Continue button.

- Select the media type on which you lost data and click Continue again. This button must be pressed after each step, so I will not repeat myself.

- Specify the section you want to scan.

- Select a recovery scenario (we are particularly interested in deleted or formatted data).

- Wait for the reading process to complete.

- The found documents will be displayed in the EasyRecovery window. You can view them as a list or thumbnails.

- To save the file, right-click on it. Select “Save As” or, as elsewhere, press Ctrl+S.

In order to become a legal user of Ontrack EasyRecovery, you will also have to fork out some money. The license price starts from 89 EUR. Versions available for Windows and OS X.
Recuva
– a product of the British developer Piriform Limited – one of the most popular free data recovery tools. The utility is very easy to use and very effective. Features high scanning speed.

Recuva features
- Can work without installation (has an official portable version).
- Supports FAT16-FAT32, NTFS and ExFAT file systems.
- Works with damaged media.
- Has a file shredder.
- Capable of restoring directory structures, email messages, Microsoft documents Word, texts, music, images, saved web pages, video files and system objects, including hidden and zero-sized ones.
Compared to the two previously reviewed programs, Recuva's capabilities are much more modest. This applies to both restorative functions and additional tools. Thus, Recuva is best at restoring recently deleted objects, and although it detects old ones, it often cannot read them, despite the fact that they were definitely not overwritten. And yet, let’s not find fault with her too much, because “don’t look a gift (free) horse in the mouth.”
By the way, in addition to the free version of the utility, there is a paid version - Recuva Pro (costs $24.95). Its differences include advanced recovery functions, automatic installation of updates, support for virtual media, and the ability to contact Support.
How to use
- Launch the utility. If it opened in the English version, go to the “Options” menu and select the Russian language on the “General” tab.

- From the drop-down list on the left side of the window, select the scan area.

- After the scan is completed, the utility window will display a list of found objects, some of which are marked with green circles, some with red and some with yellow. A green mark indicates a good chance of restoring the object, a yellow mark indicates a weak one, and a red mark indicates the complete absence of any chance.
- To restore something found, mark it in the list and click the button of the same name at the bottom right of the window.

Each of the three applications reviewed is good in its own way. Recuva is convenient to keep on hand for everyday use - despite its limited functionality, it solves its problems well, but most importantly - quickly. And if we can’t cope with something, we use EasyRecovery and R-Studio - “heavy weapons” for the most intractable situations. For 90% of users, this set is enough for almost all occasions.
Hello friends! Today we had a small incident, because of which I urgently had to use free program to recover deleted files called R.saver, naturally I’m telling you all the details, so the information may be useful to some of the readers.
I decided a long time ago to do a review on our site. all free programs for recovering deleted files I was planning such an article, but here came the perfect opportunity to test another one similar program R.saver in combat conditions.
The R.saver program is based on professional versions very serious products for data recovery UFS Explorer, website http://www.sysdevlabs.com/. The program can reconstruct damaged file systems and restore deleted files even after full formatting. Searching and recovering deleted files can be done even if the desired partition of the hard drive is completely deleted and consists of unallocated space.
Free program to recover deleted files
An acquaintance of mine collected for several years a “personal archive” consisting of his favorite films, photographs, music and e-books. All these files were located on his additional partition (F:) of the laptop; photographs of friends, an archive of the operating system, work documents, and so on were also located on this partition.My friend knew that it was unreliable to store what he had collected over the years only on a laptop and specially bought a portable hard drive for his collection. USB disk Having connected it to the laptop, he was about to copy the entire collection onto a portable screw, went to the disk (F:), selected with the mouse all the folders needed for copying and accidentally clicked “Cut” instead of “Copy”!

My friend didn’t know what to do next, since he had never used this “Cut” function in his life, he called me and in a panic, said that all his files, collected through long and back-breaking labor, had become translucent. I answered - you need to log in to the portable HDD USB, click on empty space right mouse and select the "Paste" function from the menu. My friend couldn’t remember exactly what happened next, except for the fact that during the process of transferring files, for some reason he turned off the computer and decided to wait for me.
Arriving at his place in the evening, I turned on my laptop. Even if you turn off the computer during such a transfer, some of the cut files should remain where they were, and the other part should be transferred to another specified location, but the result was completely different.
The laptop was missing almost all the files my friend needed, which is about 100 GB! Most importantly, the folder called "Personal Archive" with all the archived files disappeared, only the folder " Home video"I was able to find only 5 GB of video files on a portable USB hard drive.

So, let’s get to work and save the collection with the free program for recovering deleted files R.saver. Let's go to official website of the R.saver program and download it.

Note: Friends, if you want to temporarily retrain as a data recovery specialist with various media, then you must follow safety rules. What are the rules?
The first rule is not to restore deleted files to the same hard drive where they were located. In our case, you can connect a portable USB hard drive to your laptop and restore files there. Or you can connect a simple hard drive to your laptop using . Or, if the case is very serious, you can remove the laptop hard drive and connect it to to a simple computer and restore deleted files with a special program, but this method, of course, is primarily for repair specialists. Let's launch our program R.saver.

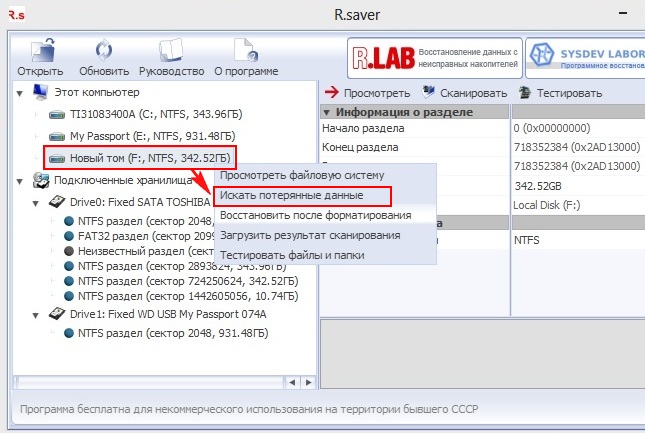
The program is simple and we will figure it out as we work. In the main window you need to select from the list of partitions the one on which the files were deleted. You may ask the question: - And if suddenly hard disk partitions are completely deleted, what should you choose then and how to restore deleted information. We will also discuss this case at the end of the article. I will delete all existing partitions from the hard drive and try to recover deleted files located on them.
But first of all, we will select for recovery the partition (F:) of the laptop from which my friend’s files disappeared. “Disk management of our laptop”, here is our section (F:),

On which there is only one folder "Home Video" remaining from the entire collection.
In the main window of the R.saver program, right-click on the F: drive and select “Search for lost data.” Attentive users may notice that there is also the “Recover after formatting” option, later (in the appropriate situation) we will use it.
We answer “Yes”, the way we want to do it full scan partition (F:) for the presence of deleted files.

Performed file system reconstruction based on signatures using the IntelliRAW algorithm.


We wait for a little over an hour and see that the program did not recover all the files, but oh well, more than half necessary files restored, most importantly, the much-needed “Personal Archive” folder was restored. I didn’t understand one thing in the program, why the size of all files is 0 KB.
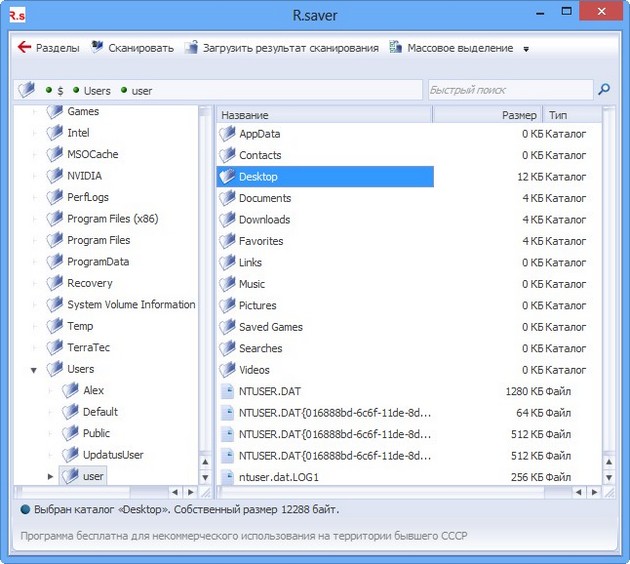
So, we restore the found folders with files. I wonder whether the files will be readable; it happens that the information recovery program will restore the files, but they will not work.
We right-click on the folder we need to restore and select (you can click “View” before restoring and see all the files located in the folder to be restored). Select "Copy to..."

Explorer opens, select the folder into which we want to copy the files applying for recovery, then click “Select”

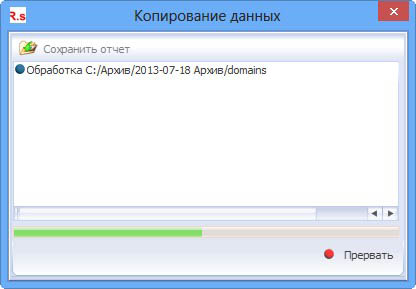
The file recovery process begins.


In the main window, right-click on the formatted partition and select "Recover after formatting"

The file system is reconstructed for an hour, then a search (lasting 20 minutes) for file systems on a formatted partition (volume 50 GB) occurs.

In the window that appears with a list of found file systems, we need to select the file system of the type we need with the minimum positive offset, in our case it means the first one.

This hard drive belongs to another friend of mine who accidentally formatted his hard drive. So, the R.saver program found a bunch of hundred-year-old files on it and only two necessary folders.

Restoration occurs in exactly the same way as in the previous case, select “Copy to...”, Explorer opens, select the folder into which we want to copy the files applying for recovery and click “Select”, the file recovery process begins.
Recovering files from a hard drive on which all partitions have been completely deleted
Now, friends, let’s completely delete all partitions from the Samsung 120 GB hard drive (which we have already mocked in our articles) and see if we can recover deleted files in this case. We delete all partitions from our hard drive and run the R.saver program.

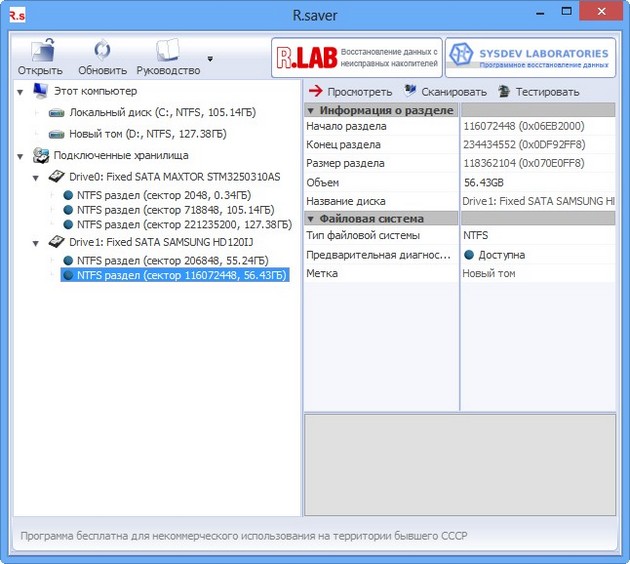
In the main window of the program you can see that all our hard Samsung drive 120 GB is the "Unknown Partition". Right-click on it and select “Find lost partition”

Click on the "Find Now" button

The program scanned our 120 GB hard drive for 40 minutes. Save your search results just in case. Among the partitions found, there are two partitions that match the size of those that previously existed on this hard drive, this is the drive (C:) with a capacity of 55, 24 GB and the drive (G:) with a capacity of 56, 43 GB; we mark them with checkboxes and click on the “Use selected” button.

The main program window opens,

We right-click on the found first partition 55, 24GB and select “Browse file system” (if you select “Search for lost data”, the search will be repeated, but personally this did not give me anything and there were no more found files).

In the window that appears, we see all the files located in the root of the disk (C:), let's try to go to the desktop C:\Users\users\Desktop and restore the files located there.


Please, all deleted files on your desktop are available for recovery. Click on the desired folder right mouse and select "Copy to...,

In the explorer that appears, select a location on your hard drive and click “Select”

Files are being restored.
With the disk (G:), things didn’t work out so smoothly; the program couldn’t find the deleted files I needed.

But as I already said, in general for free program she worked well.
Friends, while working with the R.saver program I might have missed something, I will be grateful for any help in the comments.


