How to properly connect the hdd to the motherboard. How to properly connect a second hard drive to a computer. Connecting a hard drive via the IDE interface
Computer technology It has long ceased to be a curiosity; almost everyone has it in stock. The only difference is the nature of use: some users actively use the equipment, downloading movies, games and music onto it, while others use an electronic computer when they want to watch last news in world wide web or do some homework.
IN certain time it is necessary to replace outdated components
In this regard, the load level of the hard drive also differs. If there is very little free space left, then you should not expect normal performance from your PC at all. Given these circumstances, many owners decide to purchase a second “screw”, thereby increasing disk space. However, it is very important to first find out how to connect the hard drive to the computer.
Finding information on the Internet on how to connect a hard drive to a computer is not difficult. It is only important to carefully read all the recommendations, and then no problems will arise if the user independently installs an additional hard drive, while leaving the old one in the same place.
An old hard drive must be removed only if it has become completely unusable and cannot be restored. By installing a second hard drive along with the old one, the user receives expanded space, thanks to which all actions will be performed faster.
Installation in a PC case
Connecting a hard drive to a computer begins with the step where the user must initially place it in the case and securely fasten it.
To ensure correct insertion of the “screw”, you should first remove the cover from the housing system unit. In the front part you can easily find special compartments designed for drives and hard drives. The drives are located at the top, and the second hard drive should be located at the bottom of such bays.

The hard drive is inserted into any free compartment, but preferably on a short distance from what is already available. This is very important, since during operation they both heat up, which will adversely affect the performance of the PC.

Then the second hard drive is inserted strictly along the guides so that the connectors are directed towards the inside of the system unit to ensure its comfortable connection in the future. When the new hard drive has taken its correct position, it should be securely fastened by tightening the screws on both sides, ensuring a tight connection with the compartment.

After fastening, you should check the strength by trying to loosen it. If the hard drive does not wobble, it means that all actions were performed correctly.
Connection using cables
Once you have successfully connected the second hard drive to your computer, you can move on to the second part of these important steps. At this stage, you should connect the second hard drive directly to motherboard, as well as provide power supply to it.
To do this, you will need to purchase additional cables. By the way, it is advisable to note that the connectors through which the hard drive is directly connected may differ, depending on the year of manufacture of the PC.

The old computer is equipped with IDE connectors, while the new one already has SATA connectors, which are characterized by amazing performance. Previously, users were instructed when making a purchase to pay attention to the connectors and purchase only a hard drive with the right kind. Currently, finding a hard drive with an IDE connector on sale is problematic, but this does not mean that there is no hope of installing a second drive. Just in in this case The user is required to additionally purchase special adapters.

Connecting the second hard drive using SATA connectors and adapters, the owner of a smart machine not only ensures the speed of the system, but also facilitates the installation process.
Installed a few years ago old hard drive with an IDE connector, it was necessary to manually configure the operating mode of the “screws”, which involved installing jumpers in certain positions.

Connecting using SATA connectors is much easier. All connectors on the new equipment are equipped with special partitions, so it is a priori impossible to connect the second hard drive incorrectly.

USB connection
There is another one alternative way, providing absolutely easy connection of new disk space, while completely eliminating the need to disassemble the system unit case.
In this regard, many people want to know how to connect an additional hard drive to a computer without experiencing any additional difficulties. The answer is obvious, the second hard “screw” can be connected to an electronic computer using a USB device.

Such hard drives receive power via the USB connector to which it is directly connected. However, this is typical only for disks measuring 1.8 or 2.5 inches. More powerful ones, for example, starting from 3.5 inches, already need additional source power supply
External devices are very easy to connect, so they are preferred big amount users.
Detecting devices in BIOS
Having provided correct connection hard drive, you should make sure that it is displayed correctly in the BIOS, otherwise you can’t dream of quality work it would just be stupid.
To make the correct settings in the BIOS, you should also understand how to connect the old hard drive to the computer, how to connect the new hard drive, how to ensure correct operation these two disks.
The user understands that operating system installed on one of the disk spaces; in most cases, the old hard drive is the place where the operating system was once loaded.
In this regard, in BIOS settings The user must set boot priority from the old hard drive. Setting the priority incorrectly will prevent the system from booting. In the BIOS, determining priority is absolutely simple, since SATA with an assigned number will be written next to the existing hard drives. It is the number that indicates priority. The hard drive with the operating system must be set to SATA 1.

If any hard drive does not appear in the BIOS, you should double-check that it is connected correctly, otherwise you will not be able to use the installed disk space.
So, installing an additional hard drive is a predictable act, accompanied by actions that can easily be performed by any user if he makes an effort and shows increased attention.
You bought a new one HDD for a computer and don’t know how to connect it?! In this article I will try to talk about this in detail and in an accessible way.
First, it should be noted that the hard drive is connected to motherboard either via the IDE interface or via the SATA interface. IDE interface on this moment is considered obsolete, since it was popular back in the 90s of the last century, and new hard drives are no longer equipped with it. The SATA interface is found in all computers that have been produced since approximately 2009. We will consider connecting hard drive with both interfaces.
Connecting a hard drive via SATA interface
Disconnect the system unit from the network and remove sidebar. At the front of the system unit there are compartments for devices. The upper compartments are usually installed optical drives CD/DVD, Blu-Ray, and the bottom ones are intended for installation hard drives. If your system unit does not have the compartments shown in the figure, you can install the hard drive in the upper compartment.
We install the hard drive in a free cell so that the connectors face inside the system unit, and fasten it to the case with screws: two screws on one side and two on the other.

On this installing hard disk is completed, check that it is not loose in the cell.
Now you can connect the hard drive to the motherboard.
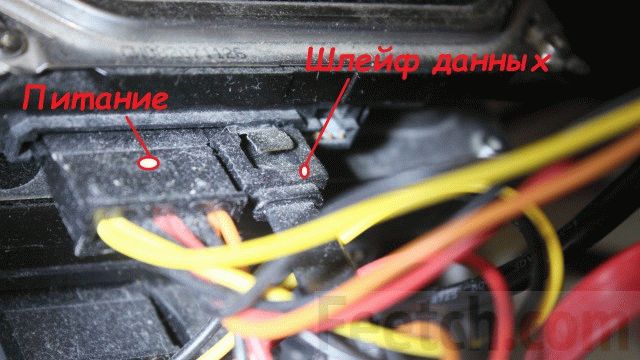
If you purchased a hard drive with a SATA interface, then the drive itself has two connectors: the shorter one is responsible for transferring data from the motherboard, the longer one is for power. Additionally, the hard drive may have another connector; it is useful for supplying power via the IDE interface.

The data cable has identical plugs at both ends.

We connect one end of the cable to the SATA data connector on the hard drive.

The data cable plug can be either straight or L-shaped. You don’t have to worry about the correct connection; you simply won’t be able to plug the cable into the wrong connector or the wrong side.

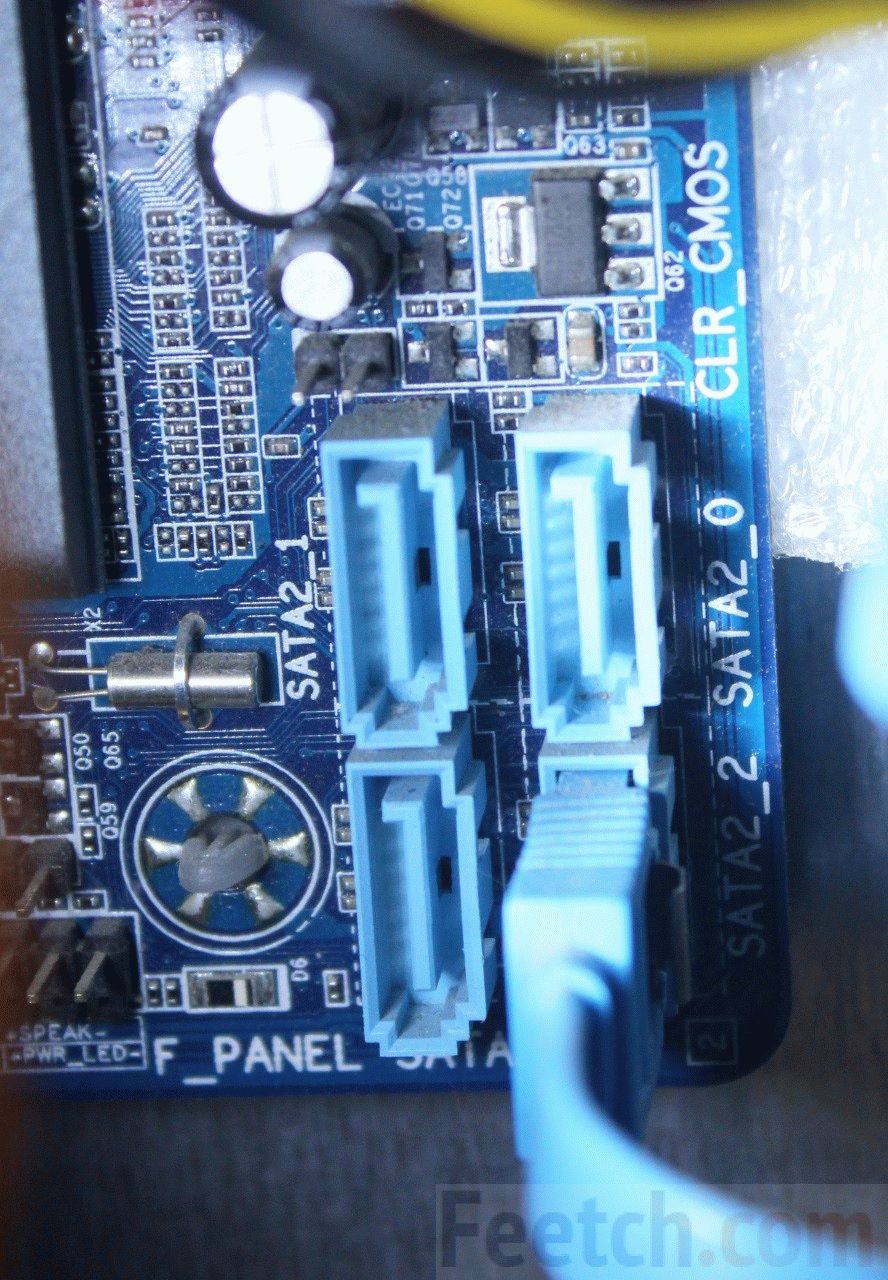
We connect the other end of the cable to the connector on the motherboard, usually they are bright in color.

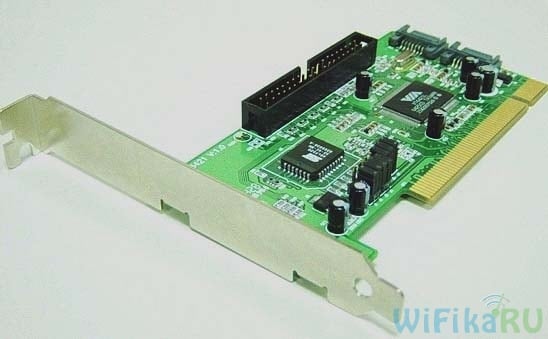
If the motherboard does not have a SATA connector, you need to buy a SATA controller. It has the form of a board and is installed in the system unit in PCI slot.
We are done connecting the data cable. Now we connect the power cable to the corresponding connector of the hard drive.

If your power supply does not have connectors for SATA devices, and the hard drive does not have an additional power connector for the IDE interface, use an IDE/SATA power adapter. Connect the IDE plug to the power supply, the SATA plug to the hard drive.

That's all, we connected a hard drive with a SATA interface.
Connecting a hard drive via the IDE interface
We install the hard drive into the system unit in the same way as described in the paragraph above.
Now you need to set the mode work hard disk: Master or Slave. If you are installing one hard drive, select Master mode. To do this, you need to place the jumper in the desired position.

The IDE connectors on the motherboard look like this. Next to each of them there is a designation: either IDE 0 – primary, or IDE 1 – secondary. Since we are connecting one hard drive, we will use the primary connector.

That's all, the hard drive is now connected.
I think now, using the information from this article, you can P connect the hard drive to the computer.
We also watch the video
Modern "hard drives" are presented in a wide range of models and technological versions. There are those that connect to the PC through motherboard slots. Can also be used external hard a disk connected to a computer via a USB port. There are even more exotic media formats - wireless, working via Wi-Fi. But today we will talk about modifications of hard drives that are more or less familiar to Russian users. Let's figure out how to connect the hard drive of the internal or external type and get it to work correctly. In the first case, we will “climb” into the PC system unit (or by opening the laptop case). In the second, we will use a USB connection.
PC hard drive: main interfaces
It will be useful to take a short theoretical excursion into “disk” technologies. How do they differ from each other? IDE interfaces and SATA, which we just talked about?
The IDE standard appeared quite a long time ago - in 1986. But it remains relevant to this day. Its main advantages: versatility, as well as a data transfer speed that is fast enough even for most modern user tasks. SATA - much more new format. It appeared on the market in the late 90s. There are, of course, other standards for connecting a hard drive to a PC - such as, for example, SCSI, which, like IDE, appeared in the mid-80s.
The most widespread today (if we talk about the desktop segment) is SATA. But on those computers that were introduced to the market in the mid-2000s (many of them are still used by their owners) IDE interfaces are installed and fully functional. The SCSI standard, due to its relative high cost, is used mainly in servers.
One of the main reasons for SATA's leadership is its high (for home-level PC) data transfer speed. As a rule, it reaches values of several hundred megabits/sec. Of course, the same SCSI interface works much faster - the typical value for it is 600 Mbit/sec or more.

There is also a separate class of hard drives connected via a USB connector. From a technological point of view, they are practically in no way inferior to the “classics” in form of hard drives with IDE and SATA interfaces, and at the same time connecting them is much easier. You just need to find a free USB connector on your PC.
Inside the system unit
If we're talking about about desktop PC, then how to connect new hard disk for it? Unlike, for example, a laptop (not to mention a tablet or PDA), “desktops” make it possible to connect not one, but several internal “hard drives” at once - the dimensions of the case allow it. And user tasks, one might say, also require it. In practice, the need to connect a new hard drive may arise if the current one is full (nowadays this is not uncommon, even if you have a 1 TB hard drive - modern games and HD movies consume a lot of space) or for some reason its functionality does not suit the PC owner. The steps for connecting the media are as follows.

First of all, you need to determine what data connection the new hard drive uses (and make sure that the motherboard is capable of working through this connection standard). Most modern hard drives operate via SATA technology. Legacy models may work through the IDE channel. They differ not only technologically, but also in appearance. The SATA standard implies the use of a cable with a small amount lived IDE, in turn, is a multi-core tape. By the way, if the motherboard is, as they say, too modern and does not have a slot for outdated IDE drives, you can always buy an inexpensive adapter between the two standards.
IDE
As for IDE slots, as a rule, there are two of them on the motherboard - primary and secondary. However, you can connect two to each hard drives(or another type of device compatible with the IDE standard, such as a DVD drive). In turn, there is also a subordination between them: there will definitely be a “main” (in English master) device and a “slave” device. Thus, there are four options for connecting a hard drive to a PC: as a master (or slave) primary (or secondary). There are no problems with how to connect second hard disk.
The width of an IDE connector is approximately twice that of a SATA connector. However, it is completely impossible to mistakenly connect to the other instead of one. What is important is the color of the IDE cable with which the motherboard and hard drive are connected. IT specialists call the cable less productive gray. In turn, the more advanced ones are yellow. It will be great if you can buy a second one if it is not available by default. The fact is that gray cables have only 40 cores, and yellow cables have as many as 80. Of course, the difference in speed will not be twofold, but an order of magnitude.
An IDE cable usually has three slots - at one end, at the other, and also in the middle. Thus, the first one connects to the controller located on the motherboard. You can connect hard drives to the second and third.
It is advisable that when connecting an IDE cable to the primary slot, the connector to be connected is marked with a small triangle. This will ensure the greatest stability of the installed hard drives. Another rule is that when connecting an IDE cable to a hard drive, you should connect the primary slot of the cable to a similar connector on the hard drive. As we said above, they are designated in English - primary.
After connecting the power cable and the IDE connector, you must also remember to connect the wire leading to the indicator lamp (which is usually located on the front panel of the system unit. It is designed to signal to the user that the hard drive is working (it is being accessed). Of course, You don't have to connect it - that's optional.
Jumpers
How to connect extra hard disk in the most correct way from the point of view of its interaction with the old hard drive and the hardware structure of the PC as a whole? Much depends on correct location so-called "jumpers". They regulate the mode in which the hard drive operates - “primary” or “slave”. Also, the position of the jumpers is determined by the number of hard drives connected to the PC. Exactly how they should be fixed depends on specific model Winchester. Usually upon purchase new hard The disc comes with a user manual. What should you pay attention to when reading it?
First of all, on terms such as “Drive Select” and “Slave Present”. The first one is responsible for the correct position of the jumpers relative to setting the disk to master or slave status. Usually, if the jumper is in place, the first mode is activated, if not, the second mode is activated. If we use only one hard drive, then the corresponding part must be removed from it. The "Slave Present" type switch should be installed on the disk that is supposed to be used as the main one (but provided that an additional hard drive is connected to the same controller).
SATA
If we have a modern PC at our disposal, then with a high probability our new hard drive will work in the SATA standard. Installing a new hard drive, as many IT specialists believe, working within this interface is extremely simple. All we do is find the corresponding wire on the motherboard and connect the hard drive to it (after placing and securely fixing the device in the socket provided for it using fasteners or bolts - see the figure).

The next step is to connect the wire responsible for power supply, having also first found it on the motherboard (as a rule, there are plenty of them there). It is very important to secure the hard drive - you cannot let it, say, hang on a SATA cable.
BIOS setup and additional software
Installing a hard drive, as a rule, does not end with working only with the hardware. Despite the fact that the PC is almost guaranteed to recognize the hard drive as a new device and will be able to establish communication with it at the hardware level, most likely we will need to configure some software options.
It is worth noting that, as a rule, no drivers for the hard drive are required to be installed. The basic system for working with hardware, pre-installed in a PC, almost always guarantees correct work with hard drives (provided, of course, that they are connected correctly). However, sometimes additional software still needs to be used. We are not talking about drivers - there may be a need for application applications.
The most common scenario in which there is a need for additional software settings- disk boot sequence failure. The fact is that when a hard drive is installed in addition to the current one, the basic computer management system - BIOS, may mistakenly calculate (figuratively speaking) that Windows boot(or the OS that is installed) must come from the new hard drive. Since the hard drive that we connected most likely does not have any operating system, the computer will not be able to boot in this case. But this can be easily fixed by setting BIOS required sequence of disk accesses during boot.
You should go into this system (DEL key at the very beginning of the computer boot), and then find the Boot Sequence option. It is important that the first place in it is to boot from the main hard drive (HDD1). If the BIOS already has HDD1 (and the OS still doesn’t load), then, on the contrary, you need to install HDD2 in the first position. Or, as an option, get inside the system unit again and change the SATA connectors between the two hard drives in some places - but it's quite difficult option, despite the fact that you can get by with a simple change of settings in the BIOS. Everything should work. As a rule, no additional program for the hard drive is required.
In some cases, it becomes necessary, in addition to setting the order in which disks are loaded, to carry out more fine tuning Winchester. For example, set parameters such as the number of heads and tracks (and in some cases, sectors) used as resources for storing data. However, this type of configuration should be left to experienced IT specialists.

Sometimes you need to format a new hard drive. What type of hard drive program is optimal for solving this problem? You can almost always get by standard means Windows. You can start the process of formatting the hard drive by right-clicking on it in the “My Computer” window and selecting the appropriate option. Usually this program asks you to select file system- NTFS or FAT32. In the majority modern computers The first one is used and we select it. It is recommended to perform a full format.
Inside the laptop
Laptops are an equally common type of personal computer technology, when compared with the popularity of desktop PCs. Therefore, it will be useful for us to know how to connect a hard drive to a computer of this type. In this case we are talking about the internal hard drive (about the external one - a little later).
As a rule, the internal space of a laptop case allows only one hard drive to be connected to the device; a second one simply will not fit. Therefore, in this case we are not dealing with adding a hard drive, but with replacing the old one with a new one. But how to connect two hard drives to a laptop at the same time? Only in one case - if at least one of them is external. Theoretically, you can connect two hard drives if you use a SATA cable with two connectors. But this will reduce the mobility of the laptop - the second hard drive will have to be located outside the case. It is unaesthetic and inconvenient.

In space laptop hard The disk is usually located closer to the bottom of the case (and not to the keyboard). As a rule, the hard drive is open to view immediately after unscrewing the cover. But sometimes it is hidden behind protective panels that functionally complement the walls of the case. To remove them, you usually need to unscrew just a couple of screws.
Let us note right away: if the hard drive is installed in the laptop much deeper than in the case of protective panels (that is, it is necessary, as an option, to remove the keyboard to gain access to the desired area inside the case), then it is better to entrust the replacement of the hard drive to IT professionals. Otherwise, there is a risk of incorrectly assembling the computer, after which it will not work.
Removing the old hard drive is usually very simple. The new one also connects quite easily. In many cases, the connection to the motherboard laptop is coming without cables (directly into the connector - and almost always the same SATA). Therefore, it is difficult to “miss” the required slot when connecting a new hard drive. There are also almost never any problems with how to connect the old hard drive back.
OS in reserve
Since the standard hard drive will most likely be connected to the laptop only in a single copy, you need to take care in advance about where the operating system will be loaded from (we remove the old hard drive with the pre-installed OS). The main difficulty here is that you need to install it in advance on hard drive Windows or another OS using another laptop with a guarantee that it will work on a new computer is impossible. The selection of hardware components may be too different. There is a possibility that the operating system will not boot. Therefore, it is recommended that when planning to install a new hard drive, you obtain bootable media from which you can reinstall the OS. Or, as an option, temporarily use some portable operating system - from the Linux series, for example, which does not require installation.
Disk outside the computer
Having studied how to connect a hard drive to a computer or laptop through installation as a hardware component, consider the option of connecting external hard drive. There are two main technological implementations possible here.
There is an option with connecting a hard drive, the standard purpose of which is to connect to the motherboard, externally. To do this, you need to use a special adapter that converts SATA signals into those transmitted via USB technology. In this way, you can connect almost any hard drive to a laptop (as well as to another computer equipped with USB ports). This scheme, however, has one drawback - the relative high cost of the adapters in question. In some cases, it can be comparable to the price of a good, large hard drive that does not require additional accessories for connecting via USB.

This device reflects the second technological implementation of connecting a drive to a computer. This is a “classic” external hard drive, which is sold under this name in most stores digital technology. It can be connected to any free USB slot on a PC or laptop - much like a flash drive.
One thing to note the most important nuance, concerning the first technology. If we decide to connect a hard drive via USB (we are talking about IDE and SATA devices), then it is very undesirable to disconnect the device from the port while it is active. It is necessary to enable "safe removal" in Windows in advance. Otherwise, the hard drive, whose speed is “spinned up,” may not withstand a sudden stop and fail. In turn, a “classic” external hard drive (we know how to connect it - via USB without adapters) works on slightly different principles, and is quite designed to be disconnected from the PC, even if you do not use “safe removal” in time. Although, as IT specialists note, this, if possible, should not be done. This kind of experiments may reduce the life of the hard drive.
Precautions when working with a hard drive
Before connecting the hard drive to the computer, you should make sure that there are no sources of static electricity nearby (which could be, for example, a woolen sweater). IT specialists do not even recommend removing the hard drive from the packaging (it performs antistatic functions) until its direct installation into the system unit. When installing a hard drive, you must not touch the parts of the microcircuits that are brought out. The most important thing is that before connecting the hard drive to the computer, it is important to turn off the power to the system unit (and ideally, all devices connected to it - monitor, printer, etc.).
A hard drive is a solid-state drive, which is called as opposed to a floppy - floppy disk, which has not been used by users for a long time. The operation of connecting a hard drive is not so complicated and in many cases the user can do everything independently, without contacting computer specialists.
In what cases do you have to connect hard drives?
- When upgrading, you replace the old drive with a more powerful and larger one.
- For expansion disk memory. For example, to place computer games and some applications on a separate hard drive.
- During repair - replacing a failed drive with a functional one.
- To read large amounts of previously recorded information.
Basic provisions
If a system unit with an IDE interface has more than one hard drive, then one of them on the bus is designated as the main one, and the second as the auxiliary one. The first one is called Master, and the other one is called Slave. Such a division is required so that when loading the operating system after turning on, the computer knows exactly which disk is the boot one.
In all cases, you can set the boot sequence from drives using the BIOS settings. And in IDE this is done by installing jumpers on the disk enclosures according to the diagram shown on the enclosure.
By type of interface, hard drives differ between IDE – the old model and SATA – in all new computers. If you have old model system unit, and you are going to connect a new hard drive with SATA interface, you will need to purchase a special adapter.
Junk
It happens that you pick up this old thing and can’t figure out what to connect and where. Old interface IDE (1986) is attached to a parallel cable. Usually there are either 2 or 4 connectors on the motherboard. Always an even number, because the Master/Slave rule works. Settings can be specified using jumpers (example):
- Master – the presence of a jumper between the leftmost contacts (7 and 8) of the control connector.
- Slave – absence of any jumpers.
The specified configuration may vary depending on the manufacturer, as well as the set of permissible functions specified by the connector. The IDE interface made it possible to conveniently connect a hard drive and a CD drive to the computer at the same time. This was enough for most users. The disadvantage of the parallel interface was the low transfer speed. IDE is otherwise referred to among professionals as parallel ATA or ATA-1. The transfer speed of such devices does not exceed 133 Mbit/s (for ATA-7). With the introduction of the serial SATA interface in 2003, the aging information transfer protocol began to be called parallel PATA.
The name ATA-1 was assigned to the IDE interface in 1994 when it was recognized by the ANSI organization. Formally, it was an extension of the 16-bit ISA bus (predecessor of PCI). It is curious that in the modern world there is a tendency to use video card interfaces to create ports for connecting hard drives. This was followed by accelerated ATA-2 and packet ATAPI. The IDE interface has not been officially supported since December 2013. Connecting such a hard drive to a new motherboard is only possible with an expansion card.

Using such devices, you can perform the exact opposite function: install previous generation hard drives on new motherboards. So, for example, on the old A7N8X-X there are only two IDE port, but there are 5 PCI 2.2 slots for expansion cards. The universal adapter is just right for this case. And you can install a modern hard drive up to SATA3, but its operating speed will, of course, be several times lower than the maximum.

Hard drives for standard IDE interfaces are probably already mostly out of order. And there are not so many of them left in the world. It remains to add to this that the configuration of ATA devices can be changed using jumpers, and the explanatory drawing is located directly on the device body. Unscrupulous suppliers sometimes keep jumpers for themselves, and not every configuration in this case can be carried out by the user. There are usually not enough jumpers.
Today there is a new trend: for some time replaced by cards PCI Express Traditional PCI is making a comeback on motherboards. This means that “old stuff” can now be connected to a modern system unit using an adapter.

SATA drives
Specialists in general case There are three generations of SATA. The gradation is based on the speed of information transmission:
- SATA – 1.5 Gbit/s.
- SATA2 – 3 Gbit/s.
- SATA3 – 6 Gbit/s.
A standard SATA drive has two connectors, one of which is used for power supply, and the second serves as a data transfer cable. It is not recommended to swap hard drives by connecting them to different SATA ports. The plugs have keys that prevent the connector from being connected incorrectly.
Sometimes the hard drive can contain useful information that any advanced user can understand. But sometimes the designation tends to be so ornate that only a true professional can comprehend it. As, for example, in this case.

There is information about the brand, serial number, technical data and even measures of disk capacity. But its interface remains unknown. This is important when choosing hardware for a computer with limited capabilities. If the disk had a SATA3 interface, then it is useless to install one in an old system unit. There are many other similar examples. Let's say in advance that this drive has a SATA 2.6 interface. Consequently, its information exchange rate limit is 3 Mbit/s.
If information about the HDD interface type is available
How to tell the difference? First, you can look at the body. Here is an image of an old disk that supports two speeds, therefore, it is a SATA2 device.

When removed from the system unit, it was equipped with a jumper that reduced the speed.
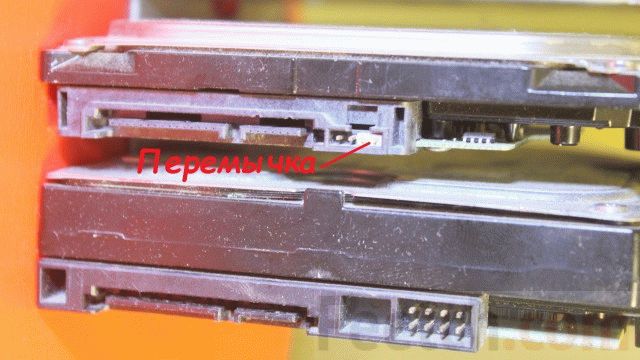
The jumper was immediately removed, therefore, the device will now function twice as fast. On the SATA 2.0 bus of the GA-H61M-D2-B3 motherboard.
This once again suggests that it is not enough to buy a system unit; you also need to study its entire device in general and hard drives in particular. The drives inside were paired using a special hanging frame.

This achieves better maintainability of the structure. Both hard drives were quickly removed from the case. As an alternative, a bay installation option is used, where the housing is secured with screws on both sides, and two side covers must be removed for dismantling. Which is not very convenient, considering that each of them usually jams. It is rare to find system unit cases where the sidewalls are removed using simple methods.
If HDD interface data is missing
Sometimes the hard drive may not have data transfer speed information. In this case, you can, of course, stock up on AIDA, but it’s even easier to look up the information on the Internet. By price or appearance The brand of the drive is determined by the case.
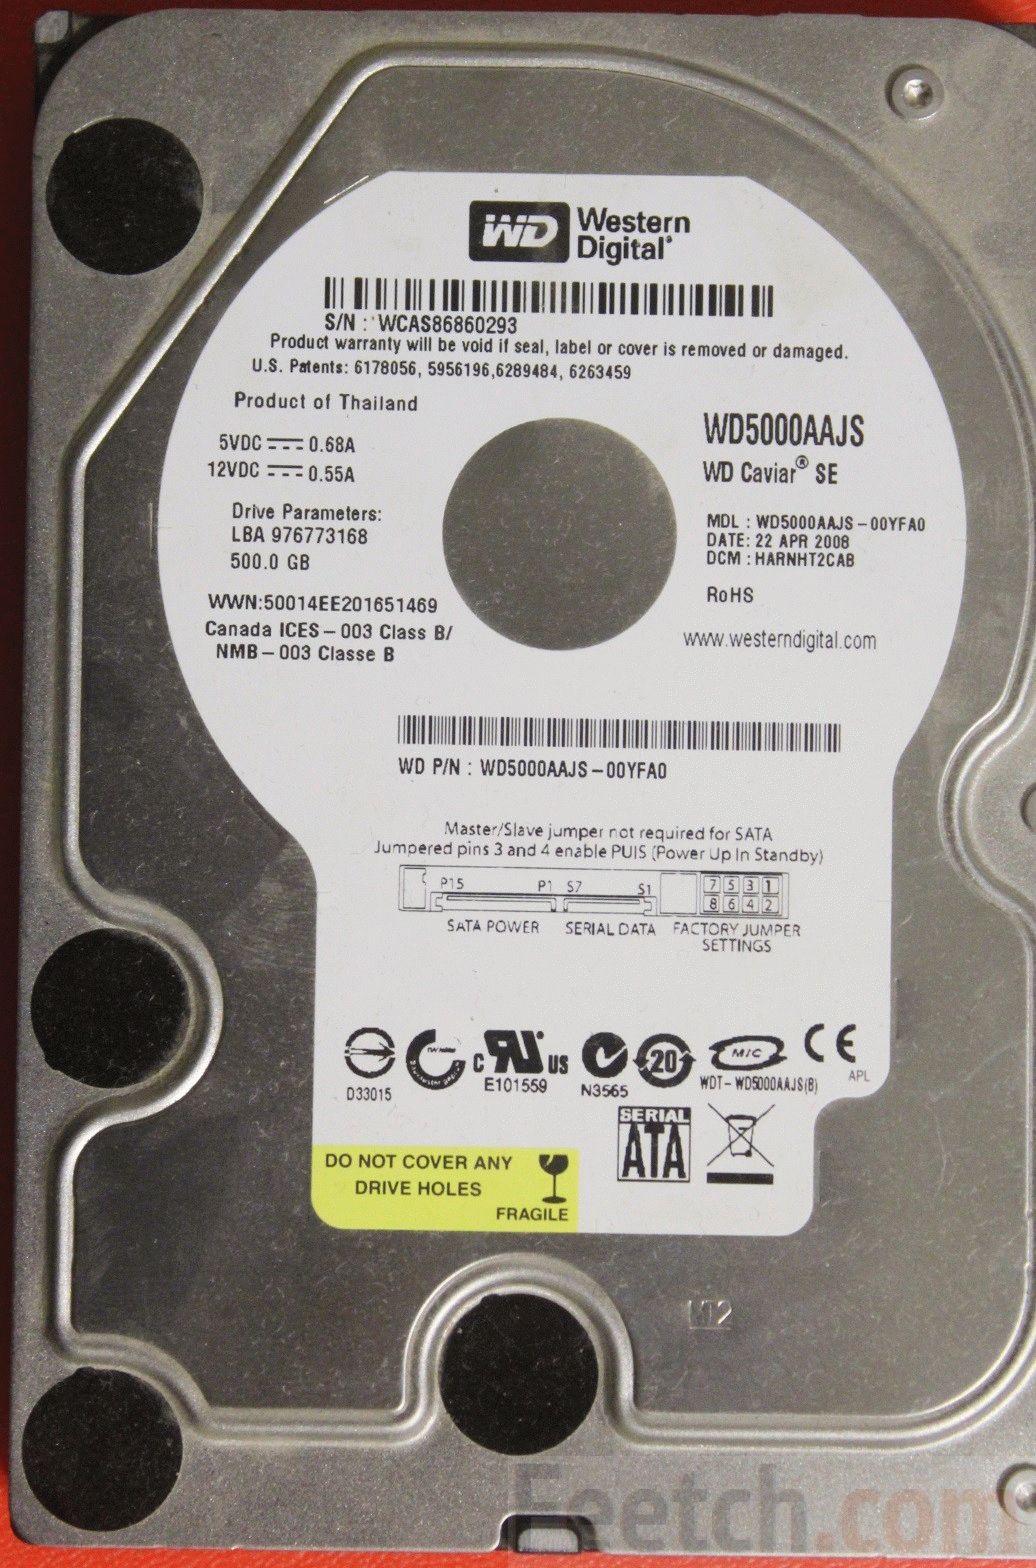
Let's say we have WD5000AAJS in our hands. Only one thing is known - at lunchtime he will be a hundred years old. Therefore, you need to familiarize yourself with historical information in the Internet. Since models are constantly updated, you need to enter the code followed by a dash - 00YFA0. The search engine quickly gave the answer, and now there is every reason to say that throughput channel is 3 Gbit/s (SATA 2.5 generation).

We have already discussed above how to connect such equipment to an outdated motherboard that does not have a SATA interface. So let's move on to new products.
Connecting SATA to exSATA bus
When engineers approached the problem of increasing SATA speeds to 12 Gbit/s and higher, it turned out that this was not economically viable. Energy efficiency drops sharply while prices rise. Someone noticed that the graphics bus PCI cards Express works without problems at high speeds, and then it was decided to make some kind of hybrid between it and the now obsolete SATA. To do this, the connector was divided into two parts:
- Specific. Small port on the side.
- Standard. Two ports for SATA0 connection.

The figure shows a dual exSATA port. This can include 4 hard drives with a SATA interface, or 2 exSATA, or 1 exSATA and 2 SATA. Below is an example of including two SATA drives to one exSATA port.

Due to its large size, covering three exSATA slots at once, the plug is called a hub among professionals. You need to start with BIOS checks. It turned out that some motherboards can turn off SATA support, completely switching to Express, which supports speeds of up to 16 Gbps.

You can watch at the same time BIOS capabilities regarding RAID arrays. Let us remember that in the latter case, several hard drives can duplicate their information for reliability, or turn on alternately, which significantly increases the speed of operation. The size of the article does not allow us to speak in more detail on this topic.
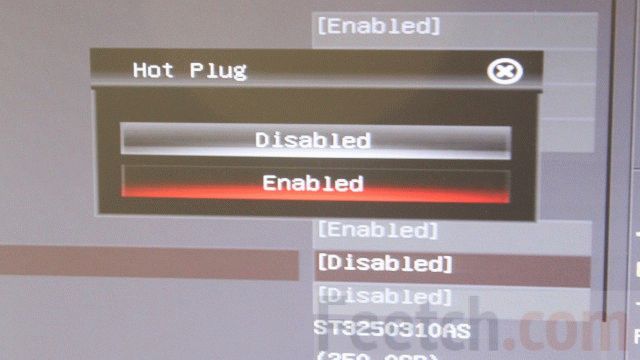
The selected AHCI mode is the default mode for most systems. It provides maximum compatibility with old equipment it is completely transparent to the user. To safely hot-plug drives, it is recommended to set the appropriate option in the BIOS settings.
When installing a new operating system, the sequence for connecting bootable media is specified. The hard drive is not put in first place. Instead, leadership is given to a flash drive or DVD drive.
Before connecting

How to connect an IDE hard drive
On the motherboard, the IDE connector is visible from afar. You can recognize it by its characteristic slot with many contacts and a key located approximately in the center of the block.

A splitter cable is usually hung on each port, so that a master and a servant are on the channel at the same time.
Before connecting a drive, you need to correctly configure the jumpers on its case - Slave or Master. There will definitely be a diagram on the case on how to do this.

For discs from different manufacturers the order in which the jumpers are inserted will be unique (they seem to be competing in this). The disk must be a bus master, otherwise the operating system cannot be started from it (No IDE Master detected). Therefore, it is necessary to set the slave jumper on the CD drive.

After setting the jumpers, insert the hard drive into a suitable cage and secure it with four screws on both sides. Connect the single data cable connector to the corresponding header on the motherboard. Connect the power cables. The order doesn't matter here.
Now you can close the system unit covers and connect the computer. The system itself should detect new connections and configure everything. The user will only have to confirm operations in the Add New Equipment Wizard.
If the system is confused about where the Master is and where the Slave is, then it is necessary to make assignments in the BIOS. Immediately after turning on the power, press the F2 or Del key repeatedly to open BIOS installation. Find the order description interface boot devices, set the parameters. The first is the CD drive from which the system is installed. Save the settings using the F10 key. After this, the operating system will begin loading.
How to connect a SATA hard drive to an old motherboard
To connect a SATA hard drive, use an adapter for PCI buses. It may have one or another number of ports; accordingly, several hard drives are installed.
Insert the card into the slot, connect the hard drive, place it in the bay and secure it with screws on both sides - two or four screws in total. It is advisable to choose the location of the modules inside the system unit in such a way that, if possible, there is enough free space between them to ensure ventilation. Otherwise, if the computer overheats, it will automatically turn off.
Now connect the power cable to hard drive. If the power supply is an old model for IDE, you will need an adapter to connect SATA. Now you can connect the data cable to the hard drive. After the system boots, you should install the driver from the included DVD, and the new drive will become visible through Explorer.
Sometimes there is no other drive other than SATA. And then you need to install Windows again via a PCI adapter. The bootloader will not see the drive, but will give you the opportunity to find it manually. This is where you will need to find it on DVD required driver for the current operating system. The installer will then notice the disk and you can create partitions for the new operating system. This is absolutely accurate, because the authors installed the “seven” in this way on an old system unit.
Co desktop computer the situation is much easier than with a laptop, so let's start with it. So, you already know what characteristics to rely on when purchasing, so we’ll leave this topic outside the scope of today’s article.
- First of all, even before purchasing, you should have figured out what free connectors for connecting drives are available on your motherboard - the old IDE or one of the varieties of SATA (I, II or III).
- And secondly, what free power connectors are available on the .
Modern hard drives, motherboards and power supplies work with connectors SATA type. However, if they are all already occupied on the power supply, then also take care of purchasing a Molex-SATA adapter to connect your second drive to Molex-type power.
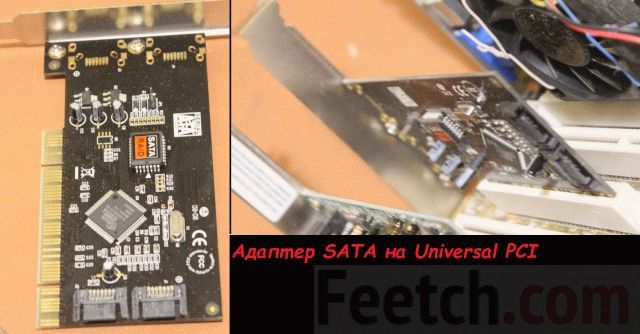
If you want to use a second old hard drive with a connection to an “IDE” type motherboard, and your latter is new and no longer has such an input, then we buy an adapter from IDE to SATA.
Another option to connect a hard drive to a computer that does not have a corresponding connector for it is to use a special IDE-SATA PCI controller. The advantage of it is that with it you can connect the old IDE disk To new board, and new SATA drive to the old motherboard. It looks like an expansion card that is inserted into a PCI slot on the motherboard and adds support for working with IDE devices. Let me remind you that you can connect two disks or drives to a standard cable at once.
Let's say you have already figured out all your nuances, purchased a second hard drive and, if necessary, adapters, and now you need to install it in the case and connect it to the motherboard and power supply. First we fix the hard drive in special basket in the case, or we insert it along the guides and secure it with special fasteners or ordinary screws - depending on.

After that, connect the “small” SATA to the corresponding connectors on the back of the drive and on the motherboard, and into the SATA socket bigger size(for power supply) we insert either an adapter connected to the cable from the power supply, or directly the power supply cable with a SATA plug. We do this carefully so as not to break the socket on the hard drive, since there is no limiter at the bottom and you can easily break off a piece of the board with the contacts of this connector.
In the screenshot below, green arrows indicate wide SATA arrows that connect the second hard drive to the power supply, and red arrows indicate narrow ones that go to the motherboard.

Yes, do not forget that all connections must be made with the power supply disconnected from the outlet, or with the power switch turned off, if there is one on it. As you can see, there is nothing complicated.
How to install a second hard drive in a laptop?
Is this really possible? Yes, today you can also increase the amount of space not only on a desktop PC, but also on a laptop. And for this it is not at all necessary to replace the standard hard drive that is already in the laptop, and therefore you will not have to face all the associated problems, such as transferring files and reinstalling Windows and all programs on the new hard drive.
The second hard drive in the laptop (remember, 2.5 inches in size) is connected using a special adapter, which is installed instead of the laptop one DVD drive And - you must admit, now almost no one uses this device. And if you need to view discs, you can always use an external one connected via USB.
This is what this adapter, invented (or copied?) by the Chinese, looks like:

In online stores it can be found under the name “2nd SSD HDD HD Hard Disk Driver Caddy SATA for 12.7mm CD / DVD-ROM Optical Bay". Inside and outside this adapter there is a connector for connecting a disk and for connecting the adapter itself to the laptop board.
So, we insert the hard drive into the adapter. You may also have to screw the mount yourself to the back of the adapter, through which it will be screwed to the laptop body.


And in its place we insert the adapter and secure it with the same screw. After this, a new hard drive will appear in the “Computer” menu, which after formatting can be fully used.
How to install a small hard drive in a computer?
Speaking about connecting a hard drive, one cannot help but touch upon the problem that users sometimes encounter when there is a need to install a hard drive or 2.5″ SSD into a computer whose case only has fasteners for standard wheels 3.5″ in size. For this case, there are also special adapters in which such a hard drive can be secured and inserted into a regular place under disks of larger diameter.

BIOS does not recognize the second hard drive
Another common problem that you may encounter when you have 2 hard drives installed is that the computer simply does not see one of them. First of all, if you are using an adapter, then this may be the problem. Use known-good adapters.
If you haven’t used it or your adapter is working, then the whole point is in the BIOS settings, namely, the operating mode of the hard drive controller is incorrectly set.
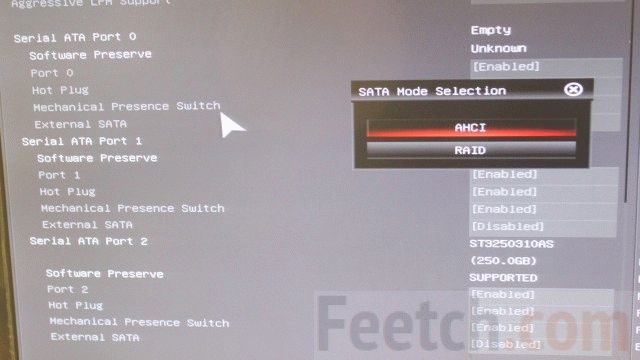
We reboot the computer, go into the BIOS and look for the “SATA Controller” item (or SATA ATA/IDE/Raid Config, Mass Storage Controll or something like that to set the mode HDD operation). If you connected a drive to the motherboard via a SATA cable and a modern operating system is installed on the computer (Windows Vista, 7, 8 and higher), then the AHCI, IDE, Native or Enchansed position can be activated in this item. Wherein
only in AHCI mode will be achieved maximum speed transferring data from disk.
If more old Windows, or if the hard drive was connected, then only IDE, Native or Enchansed.
The disk controllers themselves must also be enabled. Here are a couple of screenshots from different BIOSes with these settings:

If your computer has 2 hard drives (or a disk + DVD drive) and both of them are connected via IDE cables, then the problem may be that they are not configured correctly with each other. If you have just such a connection and in the BIOS you see the following picture:

then this is your case. In this configuration (when both are connected via IDE), one disk should be Master, that is, the main one, the one on which Windows is located, and the other Slave, that is, secondary.
This priority is configured using a special jumper installed on the contacts on the back of the case.

All possible positions of this jumper and their modes are usually described on a sticker on the disk body. They may differ from one manufacturer to another.

From our table we see that if Windows is installed on the disk and it will be our main one (Master), or if it is used alone, then we put a jumper on the first 2 vertical contact. If it is secondary (Slave), then remove the jumper altogether.
We do this with our hard drives and go into the BIOS again. Now they will be automatically detected by the motherboard and the following picture should be drawn:


