How to change the resolution from 1024x600 to 1024x768. How to set your monitor resolution higher than the maximum
Good day!
I will describe a fairly common situation about which I often receive questions. So …
On an ordinary “average” laptop by modern standards, with an IntelHD video card (possibly plus some other discrete Nvidia), Windows 7 is installed. After the system is installed and the desktop appears for the first time, the user notices that the screen has become somewhat then small compared to what it was (note: i.e. the screen has become low resolution). In the screen properties, the resolution is set to 800×600 (as a rule) and cannot be set differently. And what to do in this case?
In this article I will give a solution similar problem(so that there is nothing tricky here :)).
SOLUTION
This problem most often occurs with Windows 7 (or XP). The fact is that their kit does not (or rather, there are much fewer) built-in universal video drivers(which, by the way, is present in Windows 8, 10 - that is why, when installing these OSs, there are significantly fewer problems with video drivers). Moreover, this applies to drivers for other components, not just video cards.
To see which drivers there are problems with, I recommend opening device Manager. The easiest way to do this is to use Windows control panel(just in case - screenshot below of how to open it in Windows 7).

In the control panel, open the address: Control Panel\System and Security\System . On the left in the menu there is a link to the device manager - open it (screen below)!

How to open Device Manager - Windows 7
Next, pay attention to the “Video adapters” tab: if “” is present in it, this confirms that you do not have drivers in the system (because of this, the resolution is low and nothing fits on the screen :)).

Important! Please note that the icon shows that there is no driver for the device at all - and it does not work! For example, the screenshot above shows that, for example, there is no driver even for the Ethernet controller (i.e. for the network card). This means that the driver for the video card will not be downloaded, because... there is no network driver, but network driver you can't download it, because... no network... In general, it’s still a node!
By the way, the screenshot below shows what the “Video adapters” tab looks like if the driver is installed (the name of the video card will be visible - Intel HD Graphics Family).

The easiest way to solve this problem - this is to get the driver disk that came with your PC (however, such disks are not provided for laptops :)). And with its help, everything can be quickly restored. Below I will consider the option of what can be done and how to restore everything even in cases where it doesn’t work for you LAN card and there is no Internet to even download the network driver.
1) How to restore the network.
It will be impossible to do without the help of a friend (neighbor). As a last resort, you can use regular phone(if you have internet on it).

The essence of the solution in what is special program 3DP Net(the size of which is about 30 MB), which contains universal drivers for almost all types network adapters. Those. Roughly speaking, download this program, install it, it will select the driver and your network card will work. You can download everything else from your PC.
How to share the Internet from your phone:
2) Auto-installation of drivers - useful/harmful?
If you have Internet access on your PC, then good decision may become auto-installation of drivers. In my practice, of course, I have encountered both the correct operation of such utilities and the fact that sometimes they updated drivers in such a way that it would be better not to do anything at all...
But in the vast majority of cases, the driver update proceeds correctly and everything works. And there are a number of advantages from using them:
- save a lot of time identifying and searching for drivers for specific equipment;
- can automatically find and update drivers to the latest version;
- when failed update- such a utility can roll back the system to the old driver.
In general, for those who want to save time, I recommend the following:
- Create a restore point in manual mode- how this is done, see this article:
- Install one of the driver managers, I recommend these: .
- Using one of the programs above, search for and update “firewood” on your PC!
- In case of force majeure, simply roll back the system using a restore point (see point 1 just above).

Driver Booster is one of the programs for updating drivers. Everything is done with one click of the mouse! The program is provided at the link above.
3) Decide on the video card model.
If you decide to act manually, then before downloading and installing video drivers, you need to decide what model of video card you have installed in your PC (laptop). The easiest way to do this is to use special utilities. One of the best, in my humble opinion (and also free) is (screenshot below).

Determining the video card model - HWinfo

By the way, if you have a laptop - then video drivers for it can be found on the laptop manufacturer’s website. To do this you need to know exact model devices. You can find out about this in the article about determining the laptop model:
3) Official sites
There seems to be nothing to comment on here. Knowing your OS (for example, Windows 7, 8, 10), video card model or laptop model - all you need to do is go to the manufacturer’s website and download the required video driver (by the way, not always the most new driver- the best. Sometimes it is better to install an older one - because... it is more stable. But it’s quite difficult to guess here; just in case, I recommend that you download a couple of driver versions and try it experimentally...) .
Websites of video card manufacturers:
Websites of laptop manufacturers:
4) Installing the driver and setting the “native” screen resolution
Instructions
First, let's look at the easiest way to increase resolution screen on . Right-click on any empty area of the desktop. If the mouse is not connected, click on the button that performs similar function. You will see a window appear on the screen in which you need to select the “Properties” section. After this section will be , you will see a menu that will display five different tabs. You need to switch to “Options” by clicking on this tab. A new window will open in the same form. Here you can determine what is best for you permission by moving the corresponding knob. Once you've made some changes, save your settings and close the menu.
You can also increase the permissions screen on laptop using the interface. To do this, the necessary ones must be installed (you can find them included with). Install the required one from the appropriate disk, and then run the system. If the computer is not restarted, the drivers simply will not work. Once the system is booted, you can move on to setting the resolution.
Pay attention to the taskbar, namely the system tray. A video card icon will appear here, on which you need to right-click. A context menu will appear with options possible settings video cards. Select the option to change permission screen, and go to it. In the window that appears, you can select required parameters. After you increase permission, save the changes you made and close the video cards.
To make it more comfortable for you to work at your computer, you can adjust the sounds, color scheme, permission screen- edit any little detail according to your taste.
Instructions
To understand simple settings computer, you won't need much time.
Don't be afraid to experiment a little. The main thing is to remember which menu you went to and what exactly you changed, then it will just be the original settings.
You can also ask someone who is computer savvy to spend some time with you.
Resolution in . It depends on the monitor and its parameters. Resolution is responsible for the clarity of images of objects. The higher permission– the clearer the objects. Low permission m is considered 640 by 480 - if you are going to play games made for DOS, you may need to set it to low permission. High permission- 1600 to 1200. If you don’t like your current permission, try setting 1024 by 768 or 1280 by 1064. Select permission, at which you will be most comfortable working.
To change permission screen, right-click on the desktop on empty space. In the small menu that opens, select the “Properties” line. In the new menu that appears, click on “Options”. Select the one you need on the scale permission screen and click the "Apply" button. Then click "OK". Ready!
In the same window, you can change the wallpaper on your desktop (“Desktop”), set it (“Screensaver”) or change the color scheme of the menu windows and desktop. After each option you like, click “apply” and then “OK”.
Video on the topic
Permission screen is the number of pixels used for padding screen. Laptop monitors have their own specific... It directly depends on overall dimensions screen– height and width. You can optimize image quality by setting the correct monitor resolution in your laptop operating system.

You will need
- A little attention
Instructions
First you need to collapse everything open windows so that only the desktop is open to the user. Then you need to call up the menu by right-clicking on an area of the desktop free of icons.
IN context menu that appears after this, select “ Permission screen", next to which there is a small icon in the form of a monitor.
After the control panel window opens called “Settings” screen", the display selection will become available (in in this case"Mobile PC display" must be selected, and you will also be able to change the resolution of the selected screen and the orientation of the image that is displayed on the screen.
Next you need to choose a resolution screen, which is required by the user in the drop-down list called " Permission" To do this, use the mouse pointer to move the slider up or down. The higher the user moves the slider, the higher the resolution will become screen. If you move the slider lower, the resolution screen will decrease.
Now it is important not to forget to click on the “Apply” button in order to confirm the changes in Windows 7 or Windows Vista. By confirming the changes, the user saves the actions he has taken so far. If the user forgets to click the “Apply” button, the changes will not be saved and will have to start from the very beginning.
note
This article describes how to change the screen resolution of a laptop on which the operating system is installed. Windows system 7 or Windows Vista. The method for changing screen resolution in Windows XP is different from the specified method.
Sources:
- how to change screen resolution in windows
Quantity random access memory used in a netbook affects overall performance devices. To improve performance, you can install additional memory modules in your laptop. They will be able to increase the speed and stability of the system.

Checking slot availability
The standard configuration of modern netbooks rarely includes more than 2 GB of RAM. This means that to increase the speed of the device you need to install additional bar, which can increase this indicator several times.
Not all laptops support memory expansion, and therefore you must first make sure that the operation is possible. Take a screwdriver and unscrew the plastic flap for the RAM strips. The cover covers part of the device's hardware and is designed to replace memory without having to disassemble the entire case.
Check for an additional memory slot. If you see another free slot, then installing additional RAM is possible. If both slots are occupied, the only option to increase performance is to buy a new memory stick with a larger capacity.
Buying a new plank
Buy new sticks of RAM. For example, it would be advisable to purchase one or more 1 GB sticks for a device equipped with 1 GB of RAM. Or if you have only one slot available in your device, purchase a 2 GB board instead of a 1 GB stick.
When choosing a suitable RAM, pay attention to the strips, clock frequency which is approximately equal to that of the module pre-installed in the netbook.
You should not buy memory that is many times larger than the preinstalled one. A large amount of RAM affects the battery life without charging due to increased power consumption. Also too a large number of memory may simply not be detected by the computer due to excess permissible restrictions on the amount of RAM.
Before purchasing, it is advisable to take the module old memory take it with you so that salespeople at the component store can pick up suitable type RAM for the connector used in the netbook.
Installation
The RAM installation process may vary depending on the device type and netbook model. Bend back the clips that secure the memory into the slot, and then install the strip so that it easily fits into the desired slot. Once the strip is installed, the clamps should automatically lock into place.
Increasing the amount of RAM will have a positive effect on the performance of the netbook in games and resource-intensive applications.
Secure the previously removed netbook cover and tighten it with the bolts. Start your computer and check its functionality. Installation of the strip is complete.
Video on the topic
When purchasing a computer or laptop, after Windows installations, permission screen may not be set to the maximum possible level if drivers for the video card are not installed or if graphics drivers were installed later. Increase permission screen can be done as follows.

Instructions
Go to the control panel. It is located in the system “My” - under address bar“Open Control Panel or you can launch it from the Start menu.” With Control Panel open, select the View: Small Icons view mode. The display mode changes to the right top corner control panels. A variety of icons will appear on the display to control a particular PC device. Find the “Screen” icon and left-click on it once.
You will see the “Screen” control panel element, which is responsible for transmitting the image to the display. Set readability here with screen– “Fine – 100% (default)” if the “Medium 125%” mode is set and click the “Apply” button. If the readability level is already one hundred percent, in the left column in special menu find the link “Settings screen» and click on it.
You will be taken to the settings section screen and image position. Select the drop-down menu next to “Resolution” and drag the slider as high as possible. After the operation has been completed, click “Apply” and look at the result. If you are satisfied with it, click “Save changes” in the prompt window. If the icons turn out to be too small, difficult to read, or blurry, change the position of the slider one step down and click the “Apply” button until you are completely satisfied with the result.
Video on the topic
note
If it is impossible to change the screen resolution, or there are only 2 steps in the resolution settings, you need to set latest version drivers for your video card.
Sources:
- you can enlarge the screen
The question of changing the resolution in Windows 7 or 8, although classified as “for beginners,” is asked quite often. Setting up your monitor or screen settings on your laptop is very easy.

Types of monitors
The resolution of your monitor or laptop screen determines the clarity of text or images shown on the display. With a high resolution, for example, 1900x1200 pixels, all objects will look sharper. Also, objects become smaller, and accordingly more of them will fit on the screen. And at a low resolution, for example, 1024x768 pixels, the size of images and text increases, only their clarity becomes worse.
The available resolution to use depends on the monitor itself. Thus, older CRT monitors usually have a diagonal of 17 inches and only support a resolution of 800x600 or 1024x768 pixels.
LCD monitors or laptop screens have a diagonal of 17 and above, and also support more high resolutions. And the larger the monitor itself, the higher the resolution it can support. The ability to increase screen resolution depends on the diagonal of the monitor, as well as on the video adapter used.
How to change screen resolution
To change the screen resolution, you need to go to the “Screen Resolution” section. To do this, click the “Start” button, then select “Control Panel”, go to the “Appearance and Personalization” section and select the “Adjust screen resolution” command. There is another way: you need to call up the menu on the desktop with the right mouse button and select “Screen Resolution”.
In a new window you need to select the required resolution (the system will show the recommended resolution for of this screen). To apply the new resolution, you need to click the “Apply” button. The screen resolution will immediately change and the user will have 15 seconds to think - save this permission or return to the previous one.
LCD monitors, like laptop screens, work best at their native resolution. This does not mean that you need to set this exact screen resolution, but for maximum clarity of images and text, it is recommended to use your own resolution.
If the user does not know the resolution of his monitor, it can always be found from reference guide or on the official website of the manufacturer. You can also determine the screen resolution by the monitor diagonal. For example, 19-inch screens support a resolution of 1280x1024 pixels, 20-inch screens support 1600x1200 pixels, 22-inch screens support 1680x1050 pixels, and 24-inch screens support 1900x1200 pixels.
What to do if you bought new monitor, and the optimal resolution, which is determined by the screen matrix, is not in the list offered by Windows?
A photographer I know needed to buy a new decent monitor for photo processing. His choice fell on the huge 27-inch DELL UltraSharp U2715H. This monitor was successfully purchased and the process of connecting it to the laptop began. The laptop was quite old - Lenovo G580 with installed processor Intel Core i5-3210M, integrated Intel HD Graphics 4000 and discrete video cards Ouch NVIDIA GeForce 610M. operating system Windows 7 64bit – installed from the factory and never reinstalled.
The monitor was connected via hdmi cable. A new monitor was selected as the main display. Standard Definition monitor DELL U2715H specified by the factory – 2560x1440px. But when selecting from the list available permissions this did not happen. The most high resolution was 2048x1152 pixels.
Installing drivers on the monitor itself did nothing. Video card drivers were updated with an error. It was decided to reinstall the entire system, from scratch, a clean, non-factory one.
After installation clean Windows 7 64-bit, the most fresh drivers on all laptop devices, except integrated and discrete video cards. The driver for the new monitor was also installed. Installation of the same latest drivers from Intel and NVidia ended with the error that no devices were found in the system. But Center Windows Updates offered the necessary drivers as updates.
Drivers have been installed Intel video cards HD Graphics 4000, version 10.18.10.4276
And NVIDIA video cards GeForce 610M, version 384.94
After that, new options appeared in the video card settings. Namely, when you right-clicked on the desktop, the item appeared in the submenu Graphics options for Intel video card. The item was selected Graphics options → User Permissions
Launch has begun Control panels HD Intel graphics
A warning appeared indicating that further actions may lead to hardware problems.
Despite the fact that “Yes” was selected, I want to warn you that this can really be dangerous for your computer. Incorrect installation screen refresh rate too high resolution monitor can bring to physical breakdown video card or other computer hardware. We understood the risk and, moreover, were mentally prepared to replace the laptop with a more powerful one.
After the Intel HD Graphics Control Panel has been launched, on the left side we select the monitor we need - in this case, the DELL U2715H. Then we indicate the resolution we need, refresh rate and screen color depth.
Save the specified parameters
With the initially specified ideal options for this monitor being 2560x1440px, 32bit and a frequency of 60Hz, we ended up with a completely blank screen. After a few seconds, the video card’s operating mode automatically returned to its original state.
The frequency was reduced to 30Hz - and oh, miracle! Our monitor began to work in the specified mode. Gradually raising the frequency, we obtained a maximum operating value of 49 Hz.
Now we need to make sure that this mode is maintained after a reboot. On the desktop in the submenu select Screen resolution. In the window that opens, click on the link Extra options
On the tab Adapter click on the button List of all modes
and we see at the very bottom everything we have created custom permissions. We point to the maximum working value - in our case it is 2560x1440px, 32-bit, 49 Hz.
Click OK
After this we can increase maximum resolution screen, which is now marked as recommended
That's it, now we have a working monitor at its optimal settings.
The monitor works great for the second month, the colors are excellent, the laptop copes perfectly with Photoshop CC 2017 64-bit, Adobe Photoshop Lightroom CC. According to the photographer, there are no freezes.
How to run Windows 8 MUI applications on a netbook.
Not all Windows 8 apps use new interface Modern UI, but standard set Windows 8 apps, which included best apps, will require his support.
Question: I recently installed Windows 8 on my netbook. When I launch the MUI application, I get the following message: “The program cannot be opened. The screen resolution is too low to launch it. Change resolution? How to solve this problem?
Answer: For correct Windows operation 8 requires a resolution of 1024x768, this applies to MUI applications (heirs of the previously famous Metro apps), and most netbooks have a lower resolution of 1024x600, typical for small widescreen screens.
There are several ways to run MUI applications on a netbook, although none of them are completely satisfactory.
The first way is to connect external monitor supporting resolutions of 1024x768 and higher. MUI applications will not have problems running if the resolution is increased.
If you want to run these applications directly on the built-in screen, then most netbooks support the ability to scale the display to a resolution of 1024x768. This will allow programs to run, but will reduce graphics performance and lead to a slight loss in display quality, although the text will remain quite readable. In any case, this permission can be set only while using MUI applications, and returned the rest of the time native resolution gadget 1024x600.
Another way is to make minor changes to Windows registry. This will make it possible to run a netbook with a resolution greater than 1024x768. However, this may require you to log in as account Administrator.
The sequence of actions is as follows:
1. Click the Start button and type “regedit” in the search bar. Double-click on the regedit icon that should appear in the search results.
2. From the Registry Editor menu, select Edit, then Find. In the search field, type "Display1_DownScalingSupported". Click the "Find Next" button.
3. Change the value of the found key from 0 to 1 by double-clicking on it and typing “1”. Confirm the change by clicking the "Ok" button.
4. Repeat the search by pressing the F3 key and correcting all values of this parameter (there may be several of them).
5. Reboot your netbook, then check the availability of additional resolutions, which include 1024x768.
6. Select this option to be able to launch MUI applications.
This method is also suitable for Windows 7. It is useful in cases where some applications create dialog boxes, which do not fit on the screen. In addition, it can be used in combination with programs remote access, similar to LogMeIn.
Good day! Many users understand permission as anything, so before starting to talk about it, I want to write a few words of introduction...
Screen resolution- roughly speaking, this is the number of image pixels per certain area. How more points- the clearer and better image quality. So, each monitor has its own optimal resolution, in most cases, which needs to be set for high-quality picture on the screen.
In this article I will consider the issue of changing the resolution, and typical problems and their decision in this action. So …
What resolution should I set?
Perhaps this is one of the most popular questions, when changing the resolution. I’ll give you one piece of advice: when setting this parameter, I primarily focus on ease of use.
As a rule, this convenience is achieved by setting optimal resolution For specific monitor(everyone has their own). Usually, the optimal resolution is indicated in the documentation for the monitor (I won’t dwell on this :)).
How to find out the optimal resolution?
2. Next, right-click anywhere on the desktop and select screen settings (screen resolution) in the context menu. Actually, in the screen settings, you will see the option to select a resolution, one of which will be marked as recommended (screenshot below).

You can also use various instructions for selecting the optimal resolution (and tables from them). Here, for example, is a clipping from one such instruction:
- - for 15-inch: 1024x768;
- - for 17-inch: 1280×768;
- - for 21-inch: 1600x1200;
- - for 24-inch: 1920x1200;
- 15.6-inch laptops: 1366x768.
Important! By the way, for old CRT monitors, it is important to choose not only correct resolution, but also sweep frequency(roughly speaking, how many times the monitor blinks per second). This parameter is measured in Hz; most often monitors support modes of: 60, 75, 85, 100 Hz. To prevent your eyes from getting tired, set it to at least 85 Hz!
Changing the resolution
1) In video drivers (for example Nvidia, Ati Radeon, IntelHD)
One of the most simple ways To change the screen resolution (and in general, adjust the brightness, contrast, picture quality and other parameters) is to use the video driver settings. In principle, they are all configured in the same way (I will show a few examples below).
Intel HD
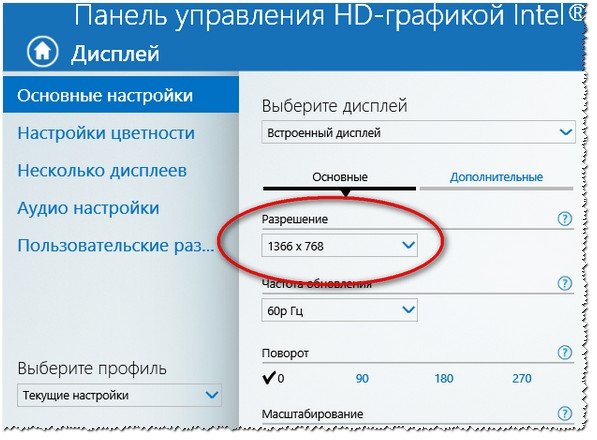
Extremely popular video cards, especially in Lately. In almost half of budget laptops you can find a similar card.
After installing the drivers for it, simply click on the tray icon (next to the clock) to open the IntelHD settings (see screenshot below).

Actually, in this section you can set the required resolution (see screenshot below).
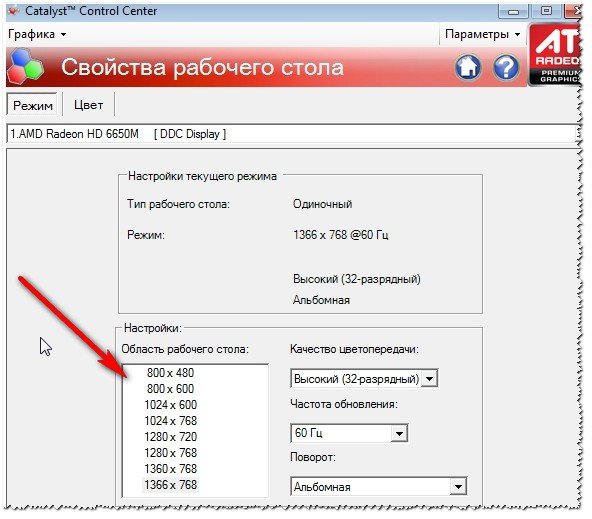
AMD ( Ati Radeon)
You can also use the tray icon (but not every driver version has it), or simply right-click anywhere on the desktop. Next, in the pop-up context menu, open the line “Catalyst Control Center » (note: see photo below. By the way, the name of the setup center may vary slightly, depending on the software version).

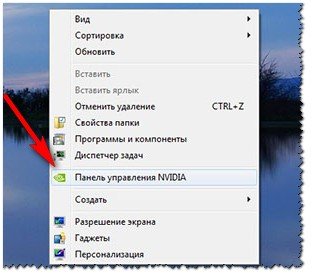
Nvidia
1. First, right-click anywhere on the desktop.
2. In the pop-up context menu, select “ Panel Nvidia control "(screenshot below).

2) On Windows 8, 10
It happens that there is no video driver icon. This can happen for several reasons:
- reinstalled Windows, and you got it installed universal driver(which comes with the OS). Those. there is no driver from the manufacturer...;
- There are some versions of video drivers that do not automatically put the icon in the tray. In this case, you can find a link to the driver settings in the Windows Control Panel.
Well, to change the resolution, you can also use control panel. IN search bar Type “Screen” (without quotes) and select the coveted link (screen below).


3) On Windows 7
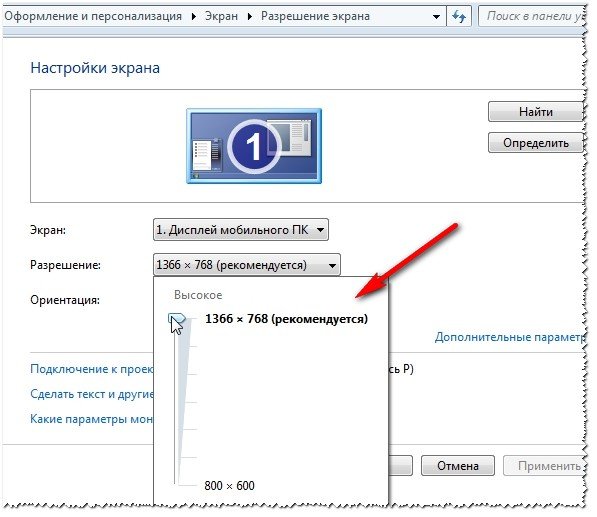
Right-click on the desktop and select " Screen resolution"(this item can also be found in the control panel).

Next you will see a menu that will display all possible modes available for your monitor. By the way, the native resolution will be marked as recommended (as I already wrote, in most cases it provides the best picture).
For example, for a 19-inch screen the native resolution is 1280 x 1024 pixels, for a 20-inch: 1600 x 1200 pixels, for a 22-inch: 1680 x 1050 pixels.
Older CRT-based monitors allow you to set the resolution much higher than recommended for them. True, they contain a very important quantity - frequency, measured in hertz. If it is below 85 Hz, your eyes begin to ripple, especially in light colors.
After changing the resolution, click "OK". You are given 10-15 seconds. time to confirm settings changes. If you do not confirm within this time, it will be restored to its previous value. This is done so that if your picture becomes distorted so that you cannot recognize anything, the computer will return to its working configuration.
4) On Windows XP
Almost no different from the settings in Windows 7. Right-click anywhere on the desktop and select “properties”.


Here you can select the screen resolution and color quality (16/32 bits).
By the way, the quality of color reproduction is typical for old CRT-based monitors. In modern ones the default is 16 bits. In general, this parameter is responsible for the number of colors displayed on the monitor screen. Only a person is practically unable to distinguish the difference between 32-bit color and 16-bit (perhaps experienced editors or gamers who work a lot and often with graphics). Whether it’s the butterfly’s business...
PS
For additions on the topic of the article, thank you in advance. That’s all I have for this, the topic is fully covered (I think :)). Good luck!


