How to set up a new monitor on your computer. Manually adjusting screen resolution. Setting the correct resolution
Often, after printing digital photos on a color printer, users are faced with the problem of incorrect colors being displayed.
Those. The photo looks completely different when printed than when viewed on the screen.
To fix this problem, calibrate the laptop screen.
Monitor calibration is a procedure for adjusting its color gamut in order to bring the colors displayed on the device screen as close as possible to the real colors that the user will receive after printing.
After performing the calibration procedure, the image will be almost the same on different computers with different displays.
Display calibration is mainly dealt with by people whose field of activity is related to video and photo editing (both professionals and amateurs), artists and designers, as well as web designers.
The disadvantages of uncalibrated displays include:
- inaccurate representation of colors and shades,
- loss of detail in light and dark areas,
- incorrect brightness and gamma values,
- incorrect display of web page design,
- eye fatigue after working with a computer.
It should be noted that displays on an IPS matrix, although to a lesser extent, also need calibration.
As a rule, special software is supplied with the monitor to perform calibration.
Maybe these articles will also be of interest to you:
- Why might the monitor not turn on? - Common causes
- Top Tips: How to Change Monitor Screen Resolution
Screen calibration methods
There are two approaches to display calibration - hardware and software. The most accessible method for the average user is the software calibration method.
Software calibration, as a rule, does not allow one to reach the level of hardware calibration, but this method should not be neglected.
The hardware method is more expensive both in terms of money and the qualifications of the person performing the calibration. The hardware approach can be divided into 3 key stages:
The monitor settings (color, brightness, contrast) are performed in such a way that, in the adjusted position, they meet the requirements of the equipment (spectrophotometer and calibration software).
Configuring the video card for linear operation mode.
Testing the system and saving the changed settings to the monitor color profile.
Advice! For simplified hardware calibration, you can print the image on a color printer, and then change the display parameters to achieve maximum similarity between the digital and printed image.
Preparing to calibrate the screen
The first thing you should start with is resetting the video card settings; all settings should be brought to the standard form.
Before performing calibration, a very important indicator is the temperature of the matrix.
To achieve a uniform temperature, it is necessary to select a video sequence with a total duration of about 4–5 hours, with a dynamic picture, having first expanded the viewing window to full screen.
These manipulations will allow uniform heating of all areas of the display matrix.
The next stage is choosing the right level of lighting. Initially, we recommend working on lighting stability.
This can be achieved by performing calibration on a sunny, fine day in the afternoon.
At this stage, our task is to obtain the most calm, stable and soft light. It should also be taken into account that LCD displays tend to distort colors depending on the viewing angle.
- Instructions: Connect your phone to the TV - favorite photos on the TV screen
We calibrate the screen using programs
Screen calibration using Windows is quite trivial and is more suitable for desktop computers than laptops.
To configure, you need to go to Start, write “calibration” in the search bar, and then go to the corresponding menu.
To begin calibration, you must click the “Next” button, after which the setup will be performed using the Calibration Wizard, each step of which is provided with detailed explanations in Russian.
There are quite a large number of programs for performing screen calibration.
In this article we will look at just one of them - Atrise Lutcurve.
The program is paid, but has a 30-day trial version, a Russified user interface, as well as clear instructions for working with each mode of the program.
The installation of the program is unremarkable, so we will not focus on it, but will move directly to calibration.
Important! To improve the quality of calibration, before performing it, follow the recommendations described in the previous paragraph. When making adjustments, you need to fix your gaze and try not to change it until they are completed.
We launch the program, go to the first tab “Black Point” and make the settings.
The essence of the setting is to change the parameters “Black” and “R” “G” “B” until the squares “2,2,2” and “3,3,3” are visible, and the background should remain as black as possible, and the square “1,1,1” should be on the verge of being distinguishable.
When setting up, you should first use the ability to adjust the brightness in hardware (in laptops this is a combination of the Fn key and function keys from F1 to F12) and only then, after exhausting the hardware capabilities, should you configure it in the program.

Go to the “White Point” tab and adjust the contrast so that you see the squares “252,252,252” - “254, 254, 254”.
When adjusting, you want to get as neutral a white as possible, with no tints.

We adjust the gamma in the corresponding tab. In this setting, we should get the color of the vertical columns to differ as little as possible from the background.
Ideally, everything should be gray, although easily distinguishable color is acceptable.
It is acceptable to leave the top and bottom of the columns colored, but the middle part should be completely gray.

If your monitor supports sharpness adjustment, you can adjust it in the Gamma and Sharpness menu.
The essence of the adjustment is to make the squares less visible both among themselves and against the background.
The clarity of the monitor is not adjusted correctly if the stripes of squares differ sharply from each other in brightness.

In the next tab “Color Balance” you can fine-tune the color temperature of the image.
To do this, you need to make the light, dark and mid-tones of gray as desaturated as possible.
After this, you need to return to the previous settings, seeking a compromise on all parameters.

The main advantages of Windows 7 include the ability to simply customize the monitor screen to suit the user's requirements. Of course, it won’t be possible to significantly modify it, but it’s possible for everyone to customize it to their own taste.
The bulk of all the necessary tools for adjusting the screen and font size are located in the “Control Panel” - “Design and Personalization”. It’s even easier to configure by right-clicking on the screen, a menu will appear where you need to click on “Personalization”.
Customizing the Windows 7 screen includes different options: color of the desktop and windows, cursor size, type of sound notifications, etc. It is possible to manually configure each interface parameter. However, it is easier to perform simultaneous customization by using the standard themes provided in Windows 7.
Themes
There are the following 3 types of topics:

Standard ones do not have decorative elements of the operating system (soft lines, transparency, shadows) and create a businesslike appearance.
The advantage is that it reduces the load on computer hardware. This allows older Windows 7 PCs to be used.
Aero has different background images for the screen, which change periodically automatically, as well as individual window colors.
High contrast – designed for visually impaired users.
If desired, it is possible to download more themes from the official Microsoft website. To do this, click on “More Internet Topics”. There are an abundance of topics available to the user here.
But sometimes you only need to change the desktop image or just the window color, etc., without changing the design as a whole. All the required functions for this are located at the bottom of the “Personalization” menu. 
Screen background
To change the desktop picture, you need to click on “Desktop Background”. In the window that appears, select the picture you like or a number of them.
 It is possible to select from a standard set of pictures in Windows, but by pressing the “Browse” key you can select an image from the “My Photos” or “My Pictures” folders.
Below the picture selection menu there are keys for placing them on the monitor, as well as a slide show function.
Windows background
You need to click on “Window Color” in “Personalization”. There is the possibility of correction - changing the color and tone of all windows in Windows, and it is also possible to adjust transparency, color shades and brightness.
 If the user does not have enough of these settings, he should enter “Advanced design options”.
Sounds
In order to configure sounds for events in Windows, you need to click on the “Sounds” button in the “Personalization” menu. You need to decide on the choice of a standard scheme, or manually select the sounds that accompany operating system events.
 Perhaps you can simply turn off the sounds by activating the "Mute" function.
Screensaver
To configure the monitor screensaver, you need to click on the “Screenaver” button in the “Personalization” menu.
By default, Windows 7 has 6 screensavers, but if necessary, there are a large number of screensavers on the global network.
 To save energy, it is recommended to simply turn off the screen saver.
In the “Personalization” window, commands are available for adjusting icons on the monitor screen, adjusting the cursor and changing the image of the account icon.
How to change font sizes and screen resolution?
To ensure the convenience of working on a PC, you need to adjust the size of icons, fonts, and the clarity of display of inscriptions and images.
These parameters significantly depend on the screen resolution - this is the main parameter of the monitor, determining the number of pixels that fit on the screen.
To adjust the resolution, you need to right-click on the desktop and click “Screen Resolution”. It should show "recommended" in the resolution bar.
Even the outstanding technical characteristics of a monitor do not guarantee that the image on the screen will be perfect. The quality of the picture depends on the display settings no less than on its electronic “stuffing”.
Factory settings in most cases do not allow the monitor to reach its full potential. There are three reasons for this.
1. Saving. The cheaper the display, the less attention the manufacturer pays to setting it up. And even quite expensive models (10–15 thousand rubles) are often far from ideally configured.
2. Individual differences between displays of the same model. At the design stage, the monitor components - matrix, backlight, control electronics - are adjusted to each other: backlight lamps are selected according to the emission spectrum and transmittance of the matrix subpixels, the control electronics sets the shape of the gamma curves, etc. However, the parameters of the components of a single monitor are always slightly different from the nameplate ones, and as a result, the image characteristics also “float”.
3.
Background lighting. Factory settings are designed to operate the display under a certain color and brightness of background lighting. However, users have to work at the computer either during the day, when sunlight makes it difficult to see anything on the screen, or in the late evening, straining from the excessive brightness of the image. And the color of external lighting can change from bluish for fluorescent lamps to red for the “Ilyich bulb”. As a result, the shades on the screen will also be perceived differently (the explanation for this is
see below for this phenomenon).
Incorrect settings lead to “crooked” color rendering. Most users don't notice how unrealistic the colors are on the screens they use every day. The human sensory system adapts to color distortions, and over time he ceases to see them. But if you put a “lying” monitor next to another, high-quality and correctly configured one, the difference in the image will be shocking: you may unexpectedly see that the faces in the photographs have an unhealthy blue tint, the grass is acid green, etc. In addition, when processing photographs on a monitor with incorrect color reproduction, the following unpleasant effect may occur: the user adjusts the colors in the photo, unknowingly compensating for the display's deficiencies, and as a result, the image is reproduced correctly only on this device. For example, if the monitor displays a picture with a blue tint, the user will turn down the brightness of this color in Photoshop and the photo will appear yellowish on other displays.
The second blow is taken by the perceived contrast: adjusting the electronics with incorrectly specified gamma curves makes the image faded and faded, or, conversely, too dark.
Fortunately, these shortcomings can be corrected. Most monitors allow you to customize image parameters within a wide range, and even with cheap models, color reproduction and contrast can be significantly improved. As for expensive displays, they can be adjusted with pinpoint precision, which allows them to be used even for professional color work.
At the same time, a well-tuned monitor is important not only for design, digital graphics and printing specialists. The pleasure of playing games or watching movies, as well as comfort when working with text and even the health of the user, depend on the correct settings. We owe chronic eye fatigue not only to constant sitting in front of a monitor, but also to poor image quality.
Preparatory actions
Before you begin setting up your monitor, you need to let it run for about 15–20 minutes. During this time, it will have time to warm up, and the backlight lamps will return to normal operation. In addition, you should clean the screen from dust and traces of touch. For this, use special wet wipes soaked in an alcohol-based composition. They do not leave streaks and not only remove dirt well, but also provide antistatic protection for some time, protecting the screen from dust. It is helpful to read the manual that came with your monitor to understand the controls and available adjustments. Pay attention to the ability to move the menu from the center of the screen to its peripheral part - this may be necessary during setup.
IN Display options Windows needs to set the basic picture settings to the correct values. In Vista, to access these options, right-click on Desktop, select “Personalization” from the drop-down list and in the window that opens, click on the “Display Settings” link. In Windows XP, just select “Properties” in the same context menu.
1. Move the slider in the “Resolution” section, setting the value corresponding to the “native” resolution of the display (in most cases, this is the maximum). Otherwise the image will be very blurry.
2. In the “Color Quality” menu, set the value to “Highest (32 bits)”.
3. Click on the “Advanced” button and in the window that opens, go to the “Monitor” tab. Select the maximum value from the drop-down list.
4. Close all windows opened in the previous steps by clicking on the “Ok” button.
Setting up your monitor using the OSD menu
The easiest way to set up a monitor is to tinker with its on-screen menu. Unlike “ancient” cathode ray tube displays, the best models of which have a “spread out” range of options, modern LCD monitors have an order of magnitude fewer adjustments available to the user (first of all, image geometry settings have disappeared). Three of them are found in the menu of the vast majority of models and allow you to adjust the picture by eye, without using auxiliary “software” or additional hardware devices, although it is impossible to achieve a significant improvement in image quality in such a simple way.
1. Brightness . This parameter sets the overall backlight intensity of the image.
and equally affects both its darkest elements, up to black, and light ones, including pure white. Insufficient brightness makes the picture too dark, the difference between shades of similar intensity in the shadows becomes almost imperceptible (“shadows” and “highlights” are terms from professional photography denoting dark and light areas of the image), they merge with black. And too much brightness on displays with low contrast emphasizes “unreliable” black color. By increasing the brightness using the menu, it is necessary to achieve optimal reproduction of black on the screen, in which it remains quite dense, but shades close to it will be clearly visible. A photograph with a night scene taken with flash is perfect for this purpose.
2. Contrast. This setting should not be confused with contrast as a display characteristic.
Editing the corresponding OSD option will not deepen the blacks on the screen, but will only change the shape of the gamma curves. If the contrast is too high, the picture looks too bright and “hits the eyes,” which is especially noticeable when working with standard text (absolutely black letters on a bright white background). Because of this, the user quickly gets tired, general fatigue increases, and irreversible consequences for vision are possible in the future. Therefore, for everyday work not related to computer graphics, it is recommended to lower the contrast slightly. The picture will not be as rich as with the maximum value, but the strain on vision will be reduced. To view photographs and videos, amateur work with graphics programs and computer games, the contrast should be increased to the required level, focusing on high-quality reproduction of the lightest areas of the picture: if you “overdo it,” then the details in the highlights will disappear.
In addition, the contrast can be adjusted to the external lighting conditions, increasing during the day, especially in bright sun, and decreasing in the evening.
3. Colorful temperature. This term, familiar to amateur photographers, will also be found in the monitor settings menu.
In this case, this parameter sets the ratio of brightness of red, green and blue colors in the image on the monitor. It is measured in degrees Kelvin and is called temperature because it corresponds to the radiation spectrum of a completely black body heated to the appropriate temperature. The higher the color temperature, the cooler (paradox of perception) the hue of the image.
To a person, the colors of objects look the same regardless of the lighting, although in fact they change noticeably - this is clearly visible in photographs. When the lighting changes, the brain finds familiar objects in the environment and sets “white balance” based on them. At the same time, the colors of objects in which he is less “confident” (including on the monitor screen) are adjusted accordingly. This phenomenon is easy to check at home: paper sheets look white in the light of an incandescent lamp, but the document field in Microsoft Word has a bluish tint (unless, of course, the color rendering is shifted towards warm tones; in addition, the strength of this effect depends on the size screen - the brain “trusts” the color of a large object more strongly and begins to take it into account when setting its “white balance”).
By adjusting the color temperature of the display, the user can adjust the hue of the picture to the spectrum of background lighting - then the difference in perception will disappear. LCD monitor menus usually offer several fixed color temperatures to choose from. Lower numbers give the image a warm pink tint, while higher numbers make the gamma cooler, bluish. Standard color temperature values correspond to several types of lighting: 2000K – household incandescent lamp, 3000K – fluorescent lamp with a “warm” phosphor, 4000K – fluorescent lamp with a “cool” phosphor, 5500K – bright daylight, 6500K – medium-brightness daylight ( aka D65, is the standard value for most displays), from 7500K to 8100K – cloudy “weather” and 9300K – shadow. When changing the nature of the backlight, you need to select the appropriate option on the display, but not all monitors have such a wide range of color temperature settings. In this regard, outdated CRT displays are more convenient: good models allow you to set any custom parameter value. On LCD monitors, for this you have to “conjure” with separate sliders for red, green and blue colors.
Using them, only a color correction specialist can set the correct color temperature.
Monitor software setup
The on-screen menu allows only rough adjustments of the display (although even such “processing with a file” in some cases will significantly increase the quality of the picture). You can more carefully adjust image parameters using specialized programs. The principle of their operation is simple: specially selected images are displayed on the screen, and the user changes the parameters of the picture until it takes the form specified by the program instructions. The accuracy of display calibration using such applications directly depends on the visual acuity and meticulousness of the user.
In simple calibrator programs, settings are made using the monitor's on-screen menu. As a result, quickly changing settings is only possible if the monitor allows you to save user profiles. In addition, when you change the color intensity using the OSD menu, the brightness of the color will decrease proportionally in both light and dark areas. Moreover, if the corresponding gamma curve of the display has dips or “humps,” simple linear color compensation can only smooth them out, but not completely eliminate them.
More complex utilities require “feedback” from the user in the form of selecting certain items in test tasks, and “at the output” they record the so-called ICC profile of the monitor, which contains compensating gamma curves that, when superimposed on the display curves, give uniform color rendition throughout brightness range (of course, with strong errors, but this option is still better than simple linear compensation).
Most utilities for subjective monitor calibration are universal and allow you to adjust all image parameters in one pass. However, we recommend using two different programs to adjust the display: one is more suitable for adjusting brightness and contrast, the other is better at color correction.
Adjusting Brightness and Contrast Using EIZO MonitorTestTo adjust the brightness and contrast of the image, you can use the free EIZO MonitorTest utility. The purpose of using this and similar programs is to set the brightness and contrast values so that in dark areas of lighting the brightness transitions are clearly distinguished, but the black color remains sufficiently deep. After downloading the archive with the utility to your hard drive, follow these steps.
1. Unpack the archive and run the .exe file in the program's welcome window
Click the forward button to move to the test pictures.2. An information banner of the program is displayed at the bottom of the screen indicating the serial number and purpose of the open test image.Of all the tests contained in the program, we need option number 14/24.
Press the forward button until you reach it. Did you miss it? No problem – go back by pressing the “back” button.
3. Call up the monitor's OSD menu and, if possible, move it to the side so that it does not cover the scale located in the center of the test picture,
which contains a “palette” of eight dark shades on a black background and eight light shades on a white background.4. Set the contrast control in the monitor OSD to maximum and the brightness control to minimum.
5. Increase the brightness until the background and all the dark rectangles at the top of the scale are visible. Now gradually reduce the brightness until only rectangles numbered 6 to 24 remain distinct, and the leftmost one, corresponding to a hue with an intensity of 1.2%, merges with the black background.
Remember that if you set the brightness in the menu too high, the monitor will not be able to display blacks correctly, and if the brightness is too low, it will cause loss of shades in dark parts of the image.
6. After adjusting the brightness, select the appropriate contrast for the ambient lighting conditions. As you decrease it, stop at the value at which large rectangles around the central scale will remain clear and will differ sharply from each other in intensity. You can control how the monitor displays the lightest shades close to white using the lower half of the central scale. It’s not scary if the rightmost rectangles with numbers 252 and 249 merge with the white background - this is how it should be if the contrast of the picture is normal.
7. To exit the program, double-click the “turn off” icon on the test screen and in the splash window.
You won't have to change the brightness settings later as you work, since your monitor is already adjusted to display dark shades correctly. You will have to use the contrast regulator to achieve comfortable viewing of the image in accordance with the external lighting.
Color settings
You can improve the color fidelity of your monitor's images by using a small free program called Monitor Calibration Wizard. The utility supports gamma curve compensation and will allow you to save the ICC profile of the monitor after passing all tests. To get a profile, follow these steps:
1. Run the program installer. If your computer is running Windows Vista, you will need administrator rights to install the program. Right-click on the file name, select “Run as administrator” from the menu that opens and confirm the Windows security prompt.
2. After the installation window appears, click on the “Next” button four times, wait until the file copying process is completed and close the installation window by successively clicking on the “Finish” and “Ok” buttons.
3. Monitor Calibration Wizard will launch automatically. Click the “Run Wizard” button in the program window, then click “Start” to start setting up.
4. Before calibration, the utility will ask you to adjust the contrast and brightness of the monitor. She suggests doing this using white and black rectangles in the window.
which is not very clear and convenient. If you have already adjusted the brightness and contrast using EIZO MonitorTest, click "Continue".5. Now you have to work with red, green and blue colors in turn. The red adjustment window will appear first. The first thing you need to do is move the slider from left to right and ensure that the top square is barely noticeably divided into bright and slightly darkened halves.
Achieve a similar result with the bottom square: moving the slider under it from right to left, divide it into a black half and a dark red half that is barely noticeably different from it. Using these manipulations, the maximum and minimum levels of red color intensity are set.
6. By alternately moving the sliders under the remaining seven targets left or right, try to achieve as close a match as possible between the reference (the outer part of the square, made up of alternating colored and black pixels) and the adjustable brightness of the central part of the square. To make this easier, we recommend looking at the custom target using your peripheral vision - focusing on the text above the target block or on the button below it.
7. Having dealt with all the target squares in this window, evaluate the results and, if necessary, try to make more precise settings (the program, alas, does not allow you to go back). Click on the "Continue" button. You will be taken to a similar window for adjusting green and then blue. Repeat the procedures described in steps 5 and 6. When you have finished adjusting the blue, click “Continue” again.
8. Charts in the next window show compensating gamma curves before and after calibration. Assess the differences. To test the new settings in action, click on the “15 Second Test” button and then “Ok”. Over the next 15 seconds, the picture on the monitor will be displayed using the created profile (we recommend checking the effect on some color photo by first opening it in the viewer).
9 The program also recommends checking how picture brightness correction in combination with the ICC profile affects the image: move the Brightness slider and click on the “15 Second Test” and “Ok” buttons.
10 If you are satisfied with the calibration results, click on the “Apply” button.
The created color profile will be used in the system. Otherwise, you can click “Cancel” to continue without installing a profile.
11 The program returns us to the original window. For what? First, you should save the current (just created and activated) profile to a file - to do this, you need to type its name in the “Profile Name” field and click on the “Save” button. In addition, using the “Load Profile” section, you can load another profile and test it by clicking the “Test” button (selecting the default option allows you to return to the original system settings).
By checking the “Load at Windows Startup” checkbox, you will tell the Monitor Calibration Wizard utility to load the profile every time Windows starts. The checkbox in the “Persistent profile, don’t let the current profile change” checkbox ensures that the utility is loaded into the system tray and restores the effect of the color profile after some other program tries to cancel it (this is what games often do). The “Apply fix to override driver level color correction” option helps to cope with situations where color management for one reason or another is carried out not at the Windows profile level, but in the graphics card driver. However, you can check this box only if it is really necessary, since enabling this mode will increase the load on the computer processor
Calibration is the process of adjusting the color rendition, brightness and contrast of the image of a monitor or other visualization device (for example, a projector or TV) in order to achieve the most complete match of tone, colors and shades on the screen and when printing. In everyday life, calibration has the goal of simply making the image natural and pleasing to the eye.
Almost everyone has encountered the need to calibrate a monitor - when they brought it home from the store and turned it on for the first time. For those who do not work in graphic editors and are not involved in photography, it is enough to do this “by eye”, using the adjustment buttons on the monitor itself or Windows tools. Great accuracy is not important here - the main thing is that the image is without obvious color distortions, moderately bright and moderately contrasting.
Artists, designers and photographers need deeper - professional calibration, which is done either using programs or special devices - calibrators.
The first option is available to everyone - the majority of such applications are free and not too difficult to use. However, to achieve a good result you also need a diamond eye. The second option provides maximum accuracy, but few people use it. The reason is the high cost of calibrators. Even a budget device costs as much as a good smartphone, but some artists and photographers rent them or use the services of calibration specialists, fortunately this is not required to be done often.
Since we don’t have a calibrator, let’s talk about ways to configure the monitor using programs.
Easy monitor calibration using Windows
The tool we are interested in is called “Color Calibration”. In Windows 10, it is called through the “Settings” application - section “System” - “Display” - “Advanced display settings”.

In Windows 7 and 8.1 - through the Control Panel and the “Display” section. Or through “Display Settings” in the desktop context menu.

After launching the utility, follow the suggested operations step by step. But before doing this, be sure to expand the window to full screen and sit directly in front of it, otherwise the result may not be accurate. The distance from your eyes to the screen should be the same as during normal work.
The first step is to set the basic color parameters
Open your monitor's menu by clicking the button on its panel and set the default color settings. If you have a laptop, continue to the next step.
Second step - adjusting the gamma
Here is an image of a square with dark spots inside and a settings slider. There is a dot in the center of each spot. Your task is to make the dots invisible (merge in brightness with the background).

Third step - adjust brightness
Open the monitor menu again or the “Power Options” section in the Windows Control Panel - now we will need the brightness adjustment slider. Instead, you can use the “Brightness-” and “Brightness+” buttons on the monitor panel or laptop keyboard.
Move the slider to adjust the brightness so that the suit details and shirt of the person in the picture are moderately visible, and the X on the wall behind him does not blend into the background, but is barely noticeable.

Fourth step - adjusting contrast
By controlling the contrast adjustment slider, make sure that all the folds and buttons on the white shirt are clearly visible, and the shirt does not blend into the wall.

Fifth step - color balance
Move the sliders of the three colors - red green and blue - until the stripes in the center of the screen are neutral gray.

Sixth step - saving calibration
Compare the current (new) calibration with the previous one. If you are satisfied with it, click "Done". If you next want to proceed to setting up text display, first check the “Launch ClearType tool...” checkbox.

Setting the display of text
Here you should select an example where the pangram (text that includes all the letters of the alphabet) is read best and apply the setting.

The Windows Calibrator is sufficient to properly set up your monitor for work other than graphics editing and fine art printing.
To check the quality of calibration, you can use specially created wallpaper from the website RealColor.ru. Select a set of wallpapers according to your screen resolution so that the picture does not change in size.

Monitor calibration for photo printing and graphics work
How to get the best results
To get a really good image, where black is black (not dark gray), white is white, and color does not depend on the angle of rotation of the screen, you need a professional monitor. Photographers and graphic artists prefer screens with an IPS matrix (the best option is S-IPS).
On budget monitors with TN-type matrices, it is, alas, impossible to achieve high accuracy of shades and colors. And the point is not that the programs do not allow this, but in the qualities of the screen itself. But we will work with what we have.
So, let's start with preparing the workplace:
- The monitor should be placed where you usually use it.
- The room must be sufficiently lit. It is better to carry out calibration in the lighting in which you are working. If you work in both natural and artificial light, it is optimal to create two color profiles. Directional light sources should be removed from the screen during calibration.
- Before calibration begins, the monitor must be operated for some time. CRT monitor - at least an hour, for others 30 minutes is enough.
- The background image should be set to neutral, preferably gray tones.
Adobe Gamma
Using Adobe Gamma, monitors are calibrated for working in Photoshop. Since the applications were created by a single developer, they are optimal for sharing - profiles created in Gamma are displayed in the Photoshop menu, and the user can quickly switch between them.
The utility is included with Photoshop, but if desired, it can be downloaded separately, although not from the official website (it is not there), but from third-party resources. It does not require installation, you just need to run it.
If you are calibrating for the first time, select the Step by Step version.

Next, we’ll create a description of the new profile (in Latin letters).

Next we move on to the calibration process. Using the monitor settings menu, we will adjust the brightness and contrast so that the gray square in the center of the window almost merges with the black one, but is distinguishable against its background. The frame should remain white.

The next step is to determine the type of glow (color of the phosphor). The required value can be taken from the monitor’s factory profile (it will be set by default if you have not previously changed anything in the settings). If you are at a loss, leave “Native” or “HDTV (CCIR 709)”.

Now let's set up the gamma for correct color rendering (the ratio of red, green and blue channels). Using the slider, we will align the brightness of the gray square against the background of black and white stripes, or set one of the default values. For an LCD monitor it is better to choose 1.8, for a CRT - 2.2.
If you uncheck "Consider one gamut", instead of a gray square there will be three - red, green and blue, with separate adjustment tools. With their help, you can remove the color tint of the screen, if any. If not, it’s better not to touch them.

After adjusting the gamma, we will determine the color temperature of the monitor’s white point. This setting depends on the ambient lighting. To work in daylight, it is optimal to set 6500° K, for artificial heat (incandescent lamps) - 5000° K, for artificial white heat (fluorescent lamps) - 9300° K.
To determine the color temperature visually, click the “Change” button.

Three light squares will be displayed against a dark background. Your task is to choose the most neutral gray.

At the final stage, set the white point display as a hardware value and save the profile.

To quickly edit existing profiles, it is more convenient to open the program as a control panel. Here all the settings are in one window.

Assessing calibration quality using web services
Online monitor testing services are convenient to use as an addition to calibration programs. With their help, you can evaluate and adjust not only brightness, contrast and color, but also sharpness, geometry, the presence of dead pixels, flicker level, etc. This is important if you use the monitor for photo editing or professional graphics work.
There are no settings elements in the services, so if you need to fix something, you will have to use third-party tools - monitor buttons and menus, Windows tools or programs.
Monteon.ru
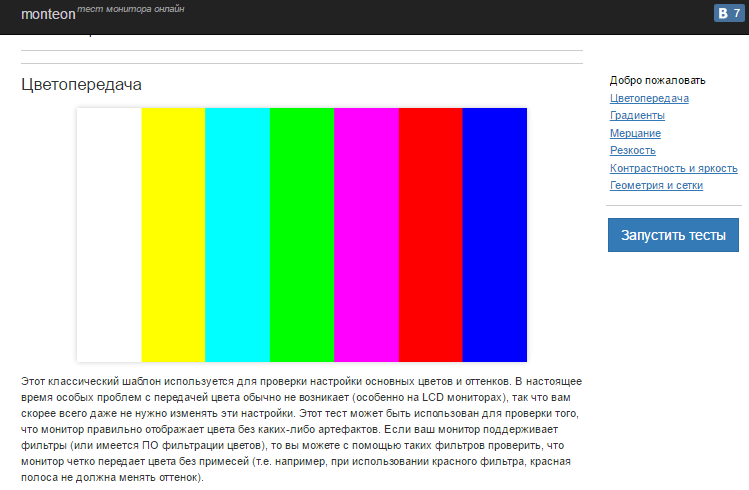
The Monteon.ru service allows you to evaluate the following:
- Color accuracy.
- Presence of dead pixels.
- Smooth gradient transitions.
- Flicker (phase synchronization on VGA monitors) and moire (stains in the form of a wave-like pattern, which should not normally exist).
- Sharpness of boundaries.
- Brightness and contrast.
- Zonal brightness (the difference in brightness in the center and on the periphery of the screen).
- Geometry and grids (clipping of image edges, peripheral distortion on a widescreen screen with an aspect ratio of 16:9).
Online Monitor Test

Online Monitor Test is an English-language service. There are 4 testing options to choose from:
- Simplified - for Smart TV, tablets and smartphones.
- In a browser window format (it is recommended to run in full screen mode).
- In windowed format with a resolution of 1920X1080 (resolution can be reduced).
- In the form of an application that runs outside the browser. Works without installation.
Online and offline versions of the program (except for the simplified version) contain the same set of tests.
Those who use two monitors can also check for image output delay on one of them (Input lag).
Using the Online Monitor Test you can evaluate:
- Displays similar shades of gray.
- Accuracy of seven primary colors and smooth color gradient.
- Matrix response time (6 different tests).
- Uniform lighting and color fill (5 colors).
- Presence of dead pixels.
- Flicker and moire.
- Readability of text written in several small fonts. The color of the text and background can be changed using sliders.
Each test is accompanied by a hint in English, but it’s not difficult to figure out what’s what without it.
This is how quickly and easily every user can calibrate their monitor at home. To maintain image quality, monitor manufacturers recommend repeating calibration every 3-4 months.
Each monitor has its own differences and conveys different image quality. But for many it is very important to have an idea of how to set up your monitor screen so that the transmitted colors are as realistic as possible and match the printed photos and images.
Almost all monitors offered on the domestic market intended for home use do not have the most advanced matrix. This is what explains the relatively low cost compared to professional monitors. Not everyone can afford to purchase professional equipment, especially since it is impractical, but for some it is very important to obtain clear image quality with natural color reproduction. First of all, this is necessary for amateur photographers, for whom it will be much easier to work if the color rendition of the monitor is identical to the printed image. That is why it is very important to have an idea of how to adjust the monitor screen so that the color rendition is as close to real as possible.
Setting the screen means not only setting color parameters, but also many other factors that can affect the display. Let's look at the most important of them.
Even nowadays, the connection is made using a VGA interface. However, at the moment, other types of connections (DVI, HDMI, USB, DP) are very often used. More modern interfaces meet higher standards, because less interference occurs during signal transmission. And even if your video card and monitor, among others, have a VGA input, don’t skimp and purchase a cable of a newer standard with modern interface plugs.
Installing drivers
Modern operating systems, when reinstalled, have standard drivers for the video adapter, with which you can work for a long time without any hassle. However, they do not meet modern requirements. In order for color rendering and the capabilities of the video card and monitor to be fully utilized, they must be installed separately. To do this, you can use the installation disk that always comes with the video card or download the necessary drivers for a specific model from the manufacturer’s official website. Downloading the latest version of drivers is considered the best way, because the disk may already have an outdated version, which does not always have a positive effect on image quality.
Screen resolution
For each video card and monitor there is a specific list of screen resolutions. It can vary significantly for each monitor and video card. As a rule, it contains one item on which it is written that this resolution will be optimal for your equipment. But if you have already taken up the issue of setting up the screen, try different resolution options and choose the one that suits you best. This can be done by going to the following path: " Control Panel» — « Screen» — « Options", or right-click on the desktop and select " Screen resolution».
Screen frequency
In modern LCD monitors, it is recommended to use the maximum frequency that is possible. This will avoid possible flicker, which negatively affects human vision. Moreover, when choosing components, try to take into account the fact that the maximum frequency in the video card was the same as in the monitor.
Depending on the purpose for which you are purchasing a computer, you should also take into account the frequency of the monitor. For example, if games will be more prevalent, choose a frequency of 85 MHz; for office work, 60 MHz will be enough.
To change the frequency parameter, follow the following path: " Control Panel» — « Screen» — « Options» — « Additionally» — « Monitor" and set the value of this parameter. If the sharpness of the image disappears at the highest frequency, select a lower value until the sharpness is completely equalized. On monitors, in the settings menu, you can also change the frequency value.
Monitor contrast, brightness and color temperature
Contrast and brightness should be adjusted at the right angle of view. A white background is best suited for this, for example, when opening a text document in MS Word, because you can compare it with a sheet of blank paper. Change the contrast, brightness and color until the gamma of the white sheet on the screen matches (at least approximately) the real one. Also, using color temperature you can


