Find out and change the monitor screen resolution. How to change monitor screen resolution? Selecting the optimal resolution
Good day! Many users understand permission as anything, so before starting to talk about it, I want to write a few words of introduction...
Screen resolution- roughly speaking, this is the number of image pixels per certain area. The more dots, the clearer and better quality the image. So, each monitor has its own optimal resolution, in most cases, which needs to be set for a high-quality picture on the screen.
In this article I will consider the issue of changing resolution, and typical problems and their solutions to this action. So …
What resolution should I set?
This is perhaps one of the most popular questions when changing resolution. I’ll give you one piece of advice: when setting this parameter, I primarily focus on ease of use.
As a rule, this convenience is achieved by setting the optimal resolution for a specific monitor (each has its own). Usually, the optimal resolution is indicated in the documentation for the monitor (I won’t dwell on this :)).
How to find out the optimal resolution?
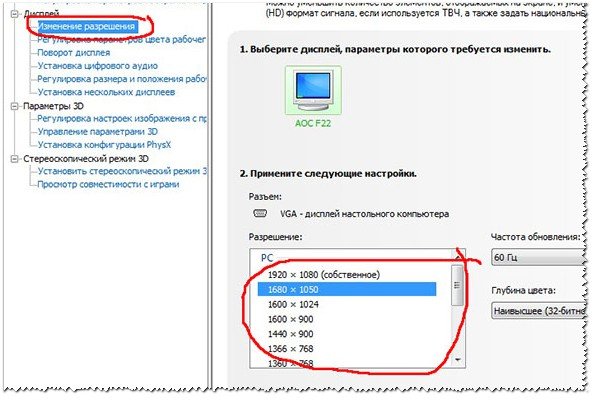
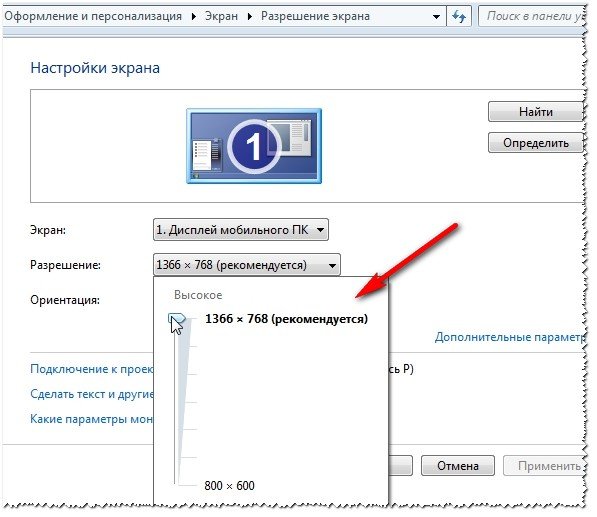
2. Next, right-click anywhere on the desktop and select screen settings (screen resolution) in the context menu. Actually, in the screen settings, you will see the option to select a resolution, one of which will be marked as recommended (screenshot below).

You can also use various instructions for selecting the optimal resolution (and tables from them). Here, for example, is a clipping from one such instruction:
- - for 15-inch: 1024x768;
- - for 17-inch: 1280×768;
- - for 21-inch: 1600x1200;
- - for 24-inch: 1920x1200;
- 15.6-inch laptops: 1366x768.
Important! By the way, for older CRT monitors, it is important to choose not only the correct resolution, but also sweep frequency(roughly speaking, how many times the monitor blinks per second). This parameter is measured in Hz; most often monitors support modes of: 60, 75, 85, 100 Hz. To prevent your eyes from getting tired, set it to at least 85 Hz!
Changing the resolution
1) In video drivers (for example Nvidia, Ati Radeon, IntelHD)
One of the easiest ways to change the screen resolution (and in general, adjust brightness, contrast, picture quality and other parameters) is to use the video driver settings. In principle, they are all configured in the same way (I will show a few examples below).
IntelHD
Extremely popular video cards, especially recently. In almost half of budget laptops you can find a similar card.
After installing the drivers for it, simply click on the tray icon (next to the clock) to open the IntelHD settings (see screenshot below).
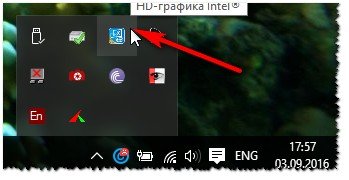
Actually, in this section you can set the required resolution (see screenshot below).

AMD (Ati Radeon)
You can also use the tray icon (but not every driver version has it), or simply right-click anywhere on the desktop. Next, in the pop-up context menu, open the line “Catalyst Control Center" (note: see photo below. By the way, the name of the setup center may vary slightly, depending on the software version).


Nvidia
1. First, right-click anywhere on the desktop.
2. In the pop-up context menu, select “ Nvidia Control Panel"(screenshot below).

2) On Windows 8, 10
It happens that there is no video driver icon. This can happen for several reasons:
- reinstalled Windows, and you have a universal driver installed (which comes with the OS). Those. there is no driver from the manufacturer...;
- There are some versions of video drivers that do not automatically put the icon in the tray. In this case, you can find a link to the driver settings in the Windows Control Panel.
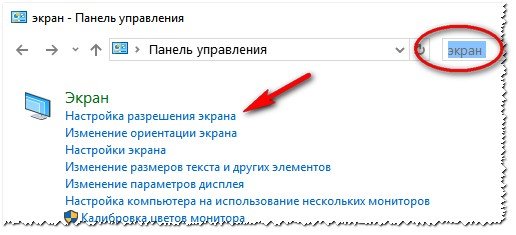
Well, to change the resolution, you can also use control panel. In the search bar, type “Screen" (without quotes) and select the coveted link (screen below).

3) On Windows 7
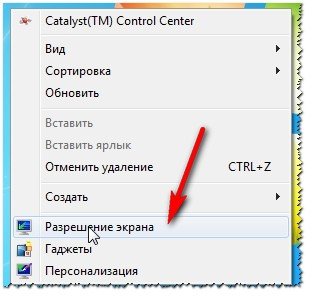
Right-click on the desktop and select " Screen resolution"(this item can also be found in the control panel).
Next you will see a menu that will display all the possible modes available for your monitor. By the way, the native resolution will be marked as recommended (as I already wrote, in most cases it provides the best picture).
For example, for a 19-inch screen the native resolution is 1280 x 1024 pixels, for a 20-inch: 1600 x 1200 pixels, for a 22-inch: 1680 x 1050 pixels.
Older CRT-based monitors allow you to set the resolution much higher than recommended for them. True, a very important quantity in them is frequency, measured in hertz. If it is below 85 Hz, your eyes begin to ripple, especially in light colors.
After changing the resolution, click "OK". You are given 10-15 seconds. time to confirm settings changes. If you do not confirm within this time, it will be restored to its previous value. This is done so that if your picture becomes distorted so that you cannot recognize anything, the computer will return to its working configuration.
4) On Windows XP
Almost no different from the settings in Windows 7. Right-click anywhere on the desktop and select “properties”.

Here you can select the screen resolution and color quality (16/32 bits).
By the way, the quality of color reproduction is typical for old CRT-based monitors. In modern ones the default is 16 bits. In general, this parameter is responsible for the number of colors displayed on the monitor screen. Only a person is practically unable to distinguish the difference between 32-bit color and 16-bit (perhaps experienced editors or gamers who work a lot and often with graphics). Whether it’s the butterfly’s business...
PS
Thank you in advance for any additions to the topic of the article. I have everything for this, the topic is fully covered (I think :)). Good luck!
For a novice user, the Photoshop program will seem like a magical tool that, with mysterious ease, can change any photo beyond recognition. But how!? Tell! How he does it? What mechanism works? What happens inside the photograph that it changes in any way, as if it were a chameleon? Nothing complicated, you just need to know what digital photography consists of and what rules apply to it, then everything will fall into place.
Namely, this is the type of graphics that Photoshop works with; it consists of tiny elements - pixels, like any object made of the smallest particles - atoms.
Pixels- these are tiny square-shaped elements that contain information about color, brightness and transparency. The term comes from crossing two English words - picture (image) And element.
A digital image file consists of vertical and horizontal rows of pixels that fill its height and width, respectively. The more pixels an image contains, the more detail it can display. They are elusive to the human eye because they are negligible. You'll have to zoom in a lot to see them:
Pay attention to . The visible part of the image is marked with a red frame. I zoomed in to 1200% on the area where the panda's nose and mouth are. As you can see, the image consists of a set of colored squares. When enlarged, it looks like a patchwork quilt of square pieces.
By looking closely, you can understand the basic principles of image construction:
1. Pixels are square in shape and arranged in a grid in the image (think of a checkered notebook sheet).
2. Squares are always strictly one specific color; they cannot even be a gradient. Even if it seems to you that some square is shimmering in color, then this is nothing more than an optical illusion. Enlarge this area even more and you will see this.
3. A smooth transition between colors occurs due to gradually changing tones of adjacent pixels. Even the line of contact of contrasting colors can contain more than a dozen tones.
Image Resolution
The concept of image resolution is inextricably linked with pixels.
The resolution of a digital photograph is written as follows: 1920×1280. This notation means that the image is 1920 pixels wide and 1280 pixels high, that is, these numbers are nothing more than the number of those very small squares in one row and column.
By the way, if you multiply these two numbers - 1920x1280 (in my example it turns out 2,457,600 pixels), then we get the total number "shreds", of which a specific image is composed. This number can be reduced and written as 2.5 megapixels (MP). You came across such abbreviations when you got acquainted with the characteristics of a digital camera or, for example, the camera in a smartphone. Equipment manufacturers indicate the maximum value that their product is capable of. This means that the higher the MP number, the higher the resolution of future images can be.
So, the higher the resolution, the smaller the pixels, which means the quality and detail of the image increases. But a photograph with a higher resolution will also weigh more - such is the price of quality. Since each pixel stores certain information, as their number increases, more computer memory is required, which means their weight increases. For example, the photo with bears at the top of the article with a resolution of 655x510 weighs 58 KB, and a photo with a resolution of 5184x3456 will take up 6 MB.
Pixel sizes and printing
It is important to differentiate situations when we talk about pixel sizes and their impact on the quality of the photo.
Looking at images on a monitor screen, we see that the pixel sizes are always the same. The computer resolution size is considered 72 dpi.
Note
Please note that when you create a new document in Photoshop, the program offers you exactly this value by default:

When viewing large photographs on a computer, for example, 5184 × 3456, you can feel how detailed it is, there is no grain and no defects, it is bright and clear. But believe me, such a photo is again 72 dots per inch. Just for fun, let’s open the image properties:

A large photo will look great on a computer due to its scale. What is your screen resolution? Obviously not 5184x3456, but smaller. This means that the computer must reduce such a photograph so that it fits entirely on the computer screen. The pixels are compressed and their sizes are reduced, which means great image quality. If you were to view such a photo at its original size, you could easily see blur and fade in the image, as well as hard edges of contrasting details.
Pixel sizes are something that people mostly think about when it comes to printing a photo. Here 72 points may not be enough.
For example, I created a document measuring 655x400 pixels with a resolution of 72 pixels. Look at the column print size:

Photoshop has calculated that an image of 655x400 with a resolution of 72 pixels can be printed on paper measuring 9.097x5.556 inches (in centimeters this is 23.11x14.11)
655 pixels wide divided by 72 pixels per inch = 9.097 inches wide
400 pixels divided by 72 pixels per inch = 5.556 inches in height
It would seem, “Wow! What a big sheet of paper you can print on!” But in fact the photo will look something like this:

Blurred photo, no sharpness or clarity.
Printers are considered high-resolution devices, so in order for photos to print beautifully, you either need to print photos initially at a large size, like mine 5184x3456, or change the number of dots per inch in the range of 200 to 300.
I’ll take the same 655x400 image again, but change the number of pixels to 200, this is what Photoshop writes:

The print size has decreased by almost three times. Our image now prints 200 pixels onto 1 inch of paper.
What happens is that the image will be small, hardly fit into a standard 10 by 15 photograph, but it will be of high quality, clear and detailed.

It turns out that there is a certain minimum resolution for printing photographs. If the picture is initially small in size, as mine was, then there’s nothing to even think about good print quality.
What size should an image be in order to print it beautifully?
Let's say you came back from a vacation from Crimea, or took 100,500 photographs of a child and, of course, want to print something in a photo album (example 1), and make one of the most remarkable ones in the form of a painting on the wall (example 2). Let's figure out what size such photographs should be and whether modern cameras can achieve this.
Example 1
So, as a rule, a photo album contains photos of the size 10×15 cm(in inches this is 3.937×5.906). Now we’ll find out what the minimum photo size should be for everything to print beautifully. For calculations we take a resolution of 200 dpi.
200 pixels per inch x 3.937 inches wide = 787 pixels;
200 pixels per inch x 5.906 inches high = 1181 pixels.
That is, a photograph 10×15 cm = 787×1181 pixels, minimum (!)
And having learned the total number of pixels in this resolution (787 × 1181 = 929447 pixels), rounded to the nearest million, we get 1MP (megapixel). I have already written that the number of megapixels is the most important characteristic of modern cameras. The average number of MP in cameras and smartphones reaches approximately 8 MP.
This means that current technology will easily make it possible to take photographs that are immediately suitable for printing images in 10×15 cm.
Example 2
Now let’s look at the case when you have chosen a photograph and want to hang it on the wall in a frame measuring, say, 30x40 cm (I took the frame size from the IKEA store catalog), I’ll immediately convert it to inches: 11.811x15.748. For this size of photo, I would take the maximum resolution size: 300 dpi, this is already considered professional and the highest quality print (just what you need for a large framed picture). And now the calculations:
300 pixels per inch x 11.811 inches wide = 3543 pixels;
300 pixels per inch x 15.748 inches high = 4724 pixels.
Therefore, your photo must be at least 3543x4724 pixels. We multiply the values and get 16,737,132 pixels or 17 MP!
Thus, to print a photo into a frame, you will need a powerful camera. In this range are already being considered. And this is an expensive and serious type of technology.
In general, you should now be able to understand at least a little how the Photoshop program works and how all these photo editing shenanigans are achieved. Having learned about pixels, their properties and capabilities, this process should no longer seem like magic.
If you notice an error in the text, select it and press Ctrl + Enter. Thank you!
Monitor resolution is the size of the resulting image in pixels. The higher the resolution, the more detailed the image you can get and the higher the cost of the monitor (all other things being equal).

Typical resolutions of modern monitors are given below:

Separately, it is worth mentioning Full HD and 4K resolutions.
Built-in speaker system
If you do not have serious demands on the sound quality of your audio system, you should consider purchasing a monitor with built-in speakers. If you connect such a monitor using an HDMI or DisplayPort connector, you will not need a separate cable for audio transmission, which is very convenient.

Headphone output
If you use headphones frequently (for example, listening to music at night or in the office), then a monitor equipped with a headphone audio output would be a smart purchase. This will make them more convenient to use.
3D image support (3D-Ready)
The 3D format is gradually gaining popularity. First it conquered cinema screens, and now it is penetrating the household appliances market. Some monitor models already support 3D content. Such monitors have a high screen refresh rate (144 Hz and higher) and can alternately display images for the left and right eyes. To ensure that each eye sees its own picture, the kit includes special glasses with “shutter” technology.

To summarize, we can conditionally divide monitors into several price categories:
monitors costing from 5,000 to 10,000 rubles. Inexpensive monitors for office or home use. They have a diagonal size from 17 to 21 inches. As a rule, they are equipped with TN-type matrices, or an inexpensive variety of VA or IPS matrices. Maximum resolution is FullHD or less. Equipped with VGA or DVI connectors. Additional adjustments to the screen position are rare.
monitors costing from 10,000 to 20,000 rubles.
Monitors for everyday home use fall into this category. They have a diagonal size from 22 to 27 inches, equipped with good TN, VA or IPS matrices with FullHD resolutions. Equipped with HDMI or DisplayPort connectors. May have USB hubs, built-in speakers and screen position adjustments.
monitors costing over 20,000 rubles.
More advanced monitors with diagonals from 24 to 35 inches and higher, with matrices with resolutions from FullHD to 5K with good response speed and color reproduction. In this category there are models with a curved screen or 3D image support. They also have on board a wide range of different connectors for connecting system units and other devices, USB hubs, and audio outputs.
I hope this small guide will help you choose the right monitor for your computer. It is important that your monitor's screen resolution and refresh rate are set correctly. At the same time, on modern LCD - TFT monitors the resolution should be the one recommended for this monitor, otherwise the image quality will be poor. Well, for old CRT monitors such a parameter is important as
Screen refresh rate.
If you have a CRT monitor and want to preserve your vision, you must constantly monitor this parameter (because sometimes the settings spontaneously get lost).
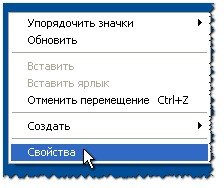
Right-click on an empty area of the monitor screen (i.e., not on an open window of some program or on an icon). The context menu opens:

In this menu select: Properties
The Properties window opens: Display
Select the Settings tab.
In the Display field you will see the name of your monitor and video card model. And below is the Screen Resolution, which you can change if you wish. The usual, standard resolution is presented in the table:
But for LCD monitors you need to set only the native resolution, no more, no less. Otherwise, the image looks blurry, color reproduction is distorted, and working on such a monitor does not bring any pleasure.
We click it and a window with the properties of the monitor and video card opens in front of us. These windows may differ depending on the video card. 
What to look for on the General tab. The default scale here is 96 dpi. This is the normal size. Let it be so.
But below, please note that the switchable button (the so-called radio button) should be in the following position:
After changing the display settings:
Apply new display settings
Otherwise, if you change the screen resolution or color quality (and sometimes you will have to do this), then the computer. Do you need it?
Go to the Monitor tab 
This tab contains the most important monitor parameter – the screen refresh rate. I have 60Hz, which is the norm for an LCD monitor. But, if you have a CRT monitor and the frequency is the same, then this is terrible! Your vision is in danger!
Actually, such a frequency can be detected without looking at the display parameters. To do this, turn sideways to the monitor and look at the screen with your peripheral vision. If you see the screen flickering, it means it’s time to scrap the monitor (its frequency is 60-70 Hz).
Although, first open and look at the Monitor tab. Perhaps no one has set the correct screen refresh rate.
First of all, check the box “ Hide modes that the monitor cannot use" And from the remaining numbers, choose the maximum value. For LCD I chose the recommended 60 Hz. And for a CRT monitor it must be at least 85 Hz.
If in the “Hide modes that the monitor cannot use” position, the maximum value is 85 Hz or more, then you set this value and can still work with such a monitor. If the maximum frequency that the monitor can use is less than 85 Hz, then it’s really time for such a monitor to be scrapped, because vision is given to a person only once and you don’t want to be excruciatingly painful later for aimlessly lost vision (I paraphrased Ostrovsky) .
Personally, I immediately felt with my own eyes when the frequency was off for some reason. Then I opened this tab, set the frequency to 90 Hz (for my monitor it was the maximum) and my eyes immediately became comfortable.
So, you press the button and select the desired frequency from the list, which in most cases is in the range of 85-100 Hz.
Now click the Apply button and then OK.
Before you click OK, I want to say that the remaining tabs are not as important as the ones discussed. You can look at them, but you don't need to change anything about them.
Screen refresh rate is not that important if you have an LCD monitor. If you have an outdated CRT monitor, then the screen refresh rate must be checked. To do this, click the link Extra options. Fig.7
Fig.7
Have you ever found yourself in the following situation? The boss or customer wants to know what size your design will be when printed, but the monitor doesn't show the actual size. All you have to do is adjust the layout using a ruler using a magnifying glass, and apply the leaves to the screen. After this article this will end!
For a beginning designer, this is unique material that I collected bit by bit. To tell the truth, I was only able to really understand it in practice. On the site I already wrote about pre-printing. In this article, I will talk about how to measure the resolution of your monitor in real physical measurement. You will also learn what the treasured numbers 72dpi and 96dpi mean, which can be found when creating a new workspace in Photoshop and not only in it.
Monitor resolution is measured in pixels
When talking about permission, terrible confusion constantly occurs. Resolution in Photoshop refers to the number of pixels per square inch; monitor resolution refers to the number of pixels across the width and height of the screen. What about camera resolution or camera resolution?
The reason for the confusion is mistranslated English terms. People mix up words all the time resolution And dimension . You shouldn’t blame them for this; the meaning is really very similar.
But now we are talking about monitor resolution. The resolution of your monitor refers to its width and height in pixels. And no more.
When I was in school, computer monitors had a resolution of no more than 800 by 600 pixels. And this was considered quite good. Some lucky people had 1024 by 768 pixel monitors. These, of course, were considered the coolest in the entire school.
Time has passed, today my parents have an average monitor with a resolution of 1920 by 1080 pixels. What does this mean in simple terms? This means that in 10 years our monitors have received an additional 1000 pixels in height and width. But their physical size remained approximately the same. The monitors haven't doubled in size. Perhaps they diverged a little in width. Widescreen, you know. But the resolution also changed the proportions.
So how many pixels are there in one inch of your monitor?
How to calculate the actual size on the screen?
Photoshop and sleight of hand will help answer the above question. Have you ever encountered a scrupulous customer who wanted to understand how much space your sticker, flyer, cover or postcard will actually take up? However, the product did not go to print, does it exist only in the monitor?
In this situation, you are trying to explain that the sizes do not match, but approximately... and begin to guess the size with a magnifying glass tool, checking it with a ruler placed on the screen. Okay, I admit, I did this when I first started working.
The Magnifier tool will help you calculate the actual size. Zoom Tool. Select the magnifying glass in Photoshop and in the settings panel, click the button Print Size. This button shows the actual print size of your graphic.


And if everything is correct, you will get a complete mismatch with the actual printed size. That is, yes, the button will do something, increase or decrease the graphics. Unfortunately, not in printed size, but in some kind of fictitious size. Looks like it's not working? Or not?
Mysterious 72 and 96 dpi
You've probably come across these two meanings. 72dpi, or more precisely 72 ppi (pixtels per inch). Theoretically, this means that your monitor has 72 pixels per inch. In practice, this would be true if it were 1985. A little later, monitors improved their pixel performance. The screens were able to fit as many as 96 pixels per inch. This is so small that looking at the monitor you can still distinguish the pixels.
Today, monitors have vastly different resolutions and ability to fit pixels per inch. This number varies from 90 to 120 pixels per inch.
When we create a new area in Photoshop, the program prompts us to set the resolution of the work area. The default value is 72. However, if you select a preset layout for web graphics, the value will change to 96. Both values mean absolutely nothing. This will not affect the workspace in any way. The monitor displays as many pixels as the pixels installed in its operating system in width and height.
If you made a website 1280 pixels wide, be prepared for the fact that it will not be able to display correctly on monitors with a resolution of 800 pixels in width, although such monitors are no longer available.

The question is, if permission does not affect anything, why is it needed at all? It is needed primarily for printing and preparation for printing. There, the number of pixels per inch is extremely important, as it determines the quality of the image on paper.
In web design, resolution also affects the ratio of some physical parameters. Roughly speaking, on the line View > Ruler in one inch you will have 96 pixels instead of 72. The size ratio will also change. Time New Roman 12p at 72 pixels and Time New Roman 12pt at 96 pixels are fonts of different sizes. Because Pt is a point physical size, and is based on physical quantities, and the visual size of a physical quantity depends on the associated resolution size. In our case it is different. That is, 12p letters at 96 pixels of resolution are greater than at 72x.
Otherwise, set it to at least 1ppi, as long as you prepare the layout for the screen, it doesn’t matter at all, considering that the ratio of resolution to the size of the work area can be calculated in a matter of seconds.
How to measure a flyer on a monitor?
So how to measure the real resolution of a monitor, and why the button Print Size does not work? Don't worry, everything is under control. The button does not work due to incorrect resolution settings. Artifacts of the past 72 or 96ppi have crept into the resolution settings. You need to set the real resolution of your monitor and then everything will be as it should.
It is important to understand that the monitor supports several resolutions at once. For example, the one I'm working on now supports sizes from 800 by 600 to 1920 by 1080 pixels. The latter is of course set by default.
It is important to understand that with a size of 800 by 600 pixels there will be one number of pixels per inch, and with a resolution of 1920 by 1080, it will be completely different. Much bigger. We are of course interested in the best resolution your monitor can support, not the worst. We will build on it.
How to find out the resolution of your monitor
The resolution of your monitor should be written in the technical data sheet of the monitor. Most often it is impossible to find it. The actual resolution is also not always written in the technical specifications. Moreover, even the width and height dimensions are not always written. For my old Samsung, I found the dimensions taking into account the plastic edging, but this is not at all what I need. You want pure screen size and nothing more.

If you couldn’t find the dimensions or resolution, go to the plan B, stick and rope. Take a ruler and measure the monitor's width and height. I measured the LG monitor on which I am writing this article, it turned out to be 48 by 27 cm.
1 inch = 2.54 cm That is, my monitor is approximately 19 by 10.5 inches. I round because special precision is not needed here. And what kind of accuracy can we talk about when measuring a monitor with a ruler?
The resolution on the monitor is set to 1920 by 1080 pixels. Divide the width of 1920 by 19. Rounded, we get 100. Dividing 1080 by 10.5 gives the same amount. That's all, the real monitor resolution is 100ppi.
That is, on 1 inch of a monitor, with a resolution of 1920 by 1080, about 100 pixels fit.
Adjusting resolution in Photoshop
Finally, how to customize the Print Size button in Photoshop? Let's go to settings Edit > Preference. Open the Units & Rulers tab. In the dialog box, in the settings Screen Resolution We change the fictitious resolution to the correct one. In my case, 100. That's it.

Now try creating an A4 sheet with a resolution of 300dpi. Let's say we are preparing a leaflet for printing. Find a real A4 piece of paper on your desktop. In Photoshop, click the button Print Size. Place the piece of paper on the screen. It is done.
Now, to the customer’s question, “what size will it be in real life?” you don’t have to draw in the air with your hands, you don’t have to adjust the screen according to the ruler, you don’t have to touch it to a piece of paper and speak, but this. Just click on Print Size. Photoshop will show everything itself.
I hope this article was useful to you and successful experiments in printing!


