Create a disk image from ultraiso files. How to create an iso disk image file using paid and free programs. Using Ashampoo Burning Studio Free
Image disk iso(image) is special file, which contains a copy of the user-specified data from the media. It can be stored on the PC hard drive. In other words, this folder is, in essence, a DVD disc, but which does not have a material shell. A duplicate is usually created for Reserve copy so that if necessary it can be reproduced in initial form, if the original is missing. Many users are often interested in the question of how to create an iso image of Windows 7? It's simple: there are special programs for reading and writing data.
What is ISO
For PC users, ISO folders in the system can become real lifesavers if viruses suddenly attack the computer. No one wants to lose their personal data without further recovery. It is important to make backup copies, that is, to form image systems. ISO is digital copy optical drive. When loading a special ISO programs will contain folders in the same form as if the disk was inserted into the PC. Learn how to make an iso - how to create the disk image you need for work and play.
Programs for creating a disk image
ISO format helps to read and copy from media various information: content, directory structure, system information, boot information. Thanks to this ISO format allows you to create a copy boot system. To create a backup copy, there is a special program for iso images, and more than one. There are several such programs - both free and paid. The most convenient and at the same time popular are Nero, Ultraiso, Alcohol 120%, Daemon Tools.
Ultraiso
The UltraISO program is used to record a variety of media. The main function of UltraISO is to create a byte-by-byte copy of data. Create ultraiso image possible from a natural compact drive, where the main source is an existing real disk, which must be inserted into the drive. To do this you need:
- information carrier put it in the drive and run UltraISO;
- then open “Tools” in the menu;
- find the item “Create CD image” (you can just press F8);
- A window for creating an archive should open in front of you;
- then in the window, select the drive where the drive is installed;
- indicate the location where the ISO file is saved and its name;
- select required format, V in this case ISO;
- click on the “Make” button;
- Next will be the process of creating an ISO file;
- upon completion of the process, the duplicate will be located in the folder that you chose.

Daemon tools
the main task Daemon tools is about creating a backup and opening it in different formats. This program considered simple and easy to use. If you don't have it installed, you should just download it for free. After Damon Tools is ready for use, we proceed to creating a complete copy of the data. So, let's look at how to create an iso image for Windows 7 Daemon program Tools. To do this you need:
- Insert the storage medium into the drive that needs to be imaged;
- click on the Damon Tools program;
- in the list that appears, find “Create image”;
- select the drive whose data you will copy further (as a rule, this is the very first one in the list);
- then find the “Output image file”, that is, indicate where the finished archive with data will be stored;
- select the format (press the key with three dots);
- find a place to store the file and determine the format (iso);
- write a name for the future archive;
- click “Save”;
- After all the settings, click on the “Start” button;
- copy creation will begin;
- Upon completion of the creation process, click “Close” and go to where the duplicate is stored.
How to burn an image
The original for the ISO image can be a flash drive, an optical real disk, a partition or a set of files located on a hard PC. Each of these options for creating a copy of information has its own characteristics. But first of all, before choosing what exactly the duplicate will be saved to, you should prepare the image itself with the help of the programs described above necessary information.

To a flash drive
To record a copy Windows data download a free portable one to a flash drive unetbootin program, which does not require installation. Your actions:
- Launch the software, in the pop-up window select the disk image item - the desired flash drive.
- You indicate that this is a flash drive, not a hard drive, and which one specifically.
- Click on OK, and after a few minutes the recording will be completed successfully.
- Once completed, it is not necessary to restart your computer.
- Click “Exit”.
- During the recording process, the program sometimes offers to overwrite the file.
- Click "Yes".

To disk
Create boot disk with a copy you can use reliable program Nero:
- If you don't have the program on your PC, download it for free from the Nero website.
- Launch the program after installation.
- A “burn ISO image to disk” window will pop up on the screen.
- Choose DVD or CD.
- Click “File – Open”
- Select the desired file.
- Click on “Open”.
- Insert into the drive blank disk.
- Click “Burn” and record a complete copy of the data.
- After the process is complete, the drive should come out of the drive.
- You can check that all files are read at once. Launch the media.
Video on how to create an iso file
U Windows users there is often a need to preserve important information– for example, you need to work with the image. The entire process of creation and further recording will not cause any difficulties for professionals; the procedure is completed in a few clicks. For beginners, there is a special video that will help you understand what an ISO is and how to create an ISO image for Windows 7.
How to create an installation flash drive
It is convenient to store a copy with the operating system on disks, but during operation these optical storage media are scratched, cracked, and sometimes lost. Given these circumstances, it is more convenient to use a flash drive to create a duplicate. Creation bootable flash drive occurs using the UltraISO program. Details on how to copy setup files on a flash drive, described in the video. After watching you can easily record necessary information from WINDOWS 7 OS to a flash drive for further installation of the OS on the computer.
Burn ISO to DVD
The image file is used to create a copy of the DVD. If you simply transfer all the information from a DVD to a hard drive, then information about tracks, boot and other data will be lost. Possessing backup copy, later you can easily restore original version copied media. How to correctly burn an ISO archive to DVD is described in detail in the video.
You may need to create an ISO image when you need to burn a bootable disk or flash drive, for example with Windows, or copy a disk, for example with a game. In order to make an image the desired disk, a special program is required.
There are several popular programs for burning ISO image files, both paid and free. One of the most popular paid programs is Alcohol 120%, which allows you to create ISO file s and images, and emulate virtual disk(drive).
Watch the video: how to create a disk image on a flash drive.
And probably the most popular free program for burning images is CDBurner (Office website: http://cdburnerxp.se). This program has more than sufficient functionality and allows you to perform most common operations with disks and flash drives, from creating images and copying disks, to recording audio and video. Also in CDBurner you can make an ISO image from any folders or files; to do this, you need to select them and move them to the project window.
The interface of the CDBurner program is intuitive, and understanding it will not be difficult. If you have any questions, you can ask them in the comments to this article.
Another shareware and quite popular program for creating ISO images disks - UltraISO (http://www.ezbsystems.com/ultraiso/index.html). The UltraISO program has trial period during which you can try out the functionality, after which you will be offered to purchase paid version. Maximum size created image V free version UltraISO - 300 MB (This is clearly not enough to burn a boot disk with Windows, but it is quite enough for the test).
How to burn an ISO disk image to a USB flash drive (flash drive).
Sometimes, for example, if your laptop or netbook does not have a disk drive, you need to burn a disk image (usually a boot disk with Windows OS) onto a flash drive. Using flash drives is much more convenient and convenient than slightly outdated CD and DVD drives. And the UltraISO program will help us with this again.
Before you burn an ISO disk image file to a flash drive, you need to format it. To do this, go to “Start” - “Computer” click right click on the icon with your flash drive and select the appropriate menu item.
After the flash drive is formatted, run UltraISO program and in the upper left corner click “File” - “Open” and select the required (pre-created or downloaded) ISO image. After that, go to the item "Boot" - "Burn image hard drive" and select our flash drive, then click "Record". Done!
Advantage Windows installations from an ISO image recorded on a flash drive is that it is much faster and the likelihood of errors and installation interruptions is minimal, unlike installation from a CD or DVD.
Rate the article!Greetings to everyone who visited my blog page to read another useful article. I decided to devote it to how to create an iso disk image file. Let's talk about user needs such as creating an image from a source or files on a PC, mounting it on virtual media or recording it to a disc. In my deep conviction, the easiest way to solve these problems is through the appropriate software - UltraISO, Daemon Tools, Nero Burning Rom and Alcohol 120 (that's not all possible options, but I am often asked about these programs).
Definition
For those who do not fully understand what a disk image is, I will try to explain it clearly. For example, you borrowed a game from a friend that runs only from the disk and simply does not work without it in the drive. You liked the game. There was a desire to keep it for myself, but the installer needs to be returned. Simply copying files from a disc to a PC will do absolutely nothing. Every time you start the game through game.exe, it will swear and require you to insert a disc into the drive. In this case, you just need to make an .iso file. That is, create a disk clone on your computer with all its contents, settings and autorun. In order for the system to accept the created image as a real game disk, it must be mounted on virtual drive. That is, next to your existing drive, displayed in the “My Computer” (“Computer” or “This Computer”) folder, another virtual one will appear, onto which all the information from the game installer will be transferred. The same iso file can be used or a flash drive.
It happens that the PC has installation files for a program or a video project (for example, a wedding filming, in which individual videos are collected into a single film with menus, animations, and so on), which need to be burned onto media to create an installer or DVD -disc with the film. In these cases, you should do the same steps, but with copying source files not from a blank, but from the “insides” of the PC. All of the above just seems complicated. In reality, this is easy, literally in a few clicks, done using special programs.
I seem to have explained it, so you can move on to how to create an iso disk image file step by step for each utility I indicated above.
Ultra ISO

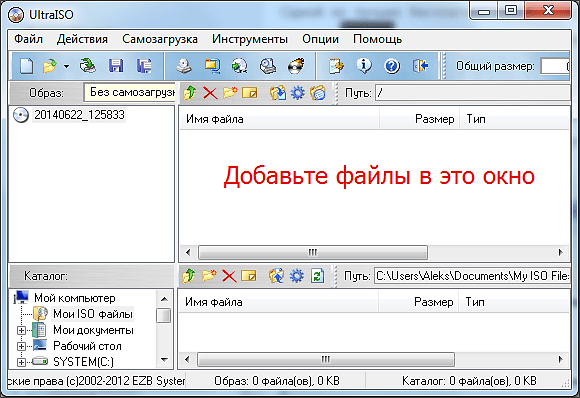
Before you create an iso file using any program, you need to download and install it, but keep in mind that ultraiso is a paid service. Although if you this utility required for one-time use and small amount files (up to 300 MB), then you can get by with a trial period. Let's say this is about us. So, downloaded, installed, launched, chose a trial period. Let's now try to create an image from the files available on the computer. For this:
- Using the bottom of the window, find it on your PC and add it to top margin all required documents (by simple drag and drop).
- Then, using the “File” section of the main menu and the “Save As...” command, we create an .iso file, not forgetting to give it a name.

- We wait for the process to finish and get the desired image.
To create an image with optical media we do the following:
- We insert it into the drive.
- Among the menu sections we find “Tools” and select the “Create CD image” command or click the corresponding button on the toolbar.

- We start the process by clicking the “Create” button and wait for it to complete.
We write the created project.iso to a disc:
- We insert the blank into the drive.
- In the program, through the “Open” command in “File”, find the previously created image and double-click on it (or click “Tools”, select “Burn ...” or the corresponding button on the taskbar).

- We configure the recording options (select the drive and method), start the process and wait a bit.

Disk media is not so popular these days. Most users prefer to deal with flash cards. Therefore, I’ll briefly tell you how to create a disk image and burn it to a flash drive using the same UltraISO program:
- Insert the flash drive into the connector and launch the utility.
- In the “Boot” menu section, select the “Burn hard disk image” command.
- We show the way.
- Format the flash card (optional, but recommended).
- Let's start the process.

Daemon Tools

A disk image is created in approximately the same way in all programs, so further I will describe the process in less detail - now briefly about how to create an iso file in Daemon Tools:
- We insert the source media into the drive and access the utility.
- We command it “Create image...” through the “Tools” menu.
- We set the format, speed, name and other parameters.
- Click the “Next” button to go to advanced settings, and then “Start”.

Advanced Daemon Tools settings allow you to protect the resulting project with a password or block its data, divide it into volumes or compress it, ignore damage, and much more.

Nero

Several years ago, to work with disk media many preferred Nero program, using which you can also create an iso disk image file, and I’ll tell you how now. The process of creating a disk image is carried out in Nero Express, and burning it to media is done through Nero Burning Rom:
- Paste the source and open Nero.
- Use the left arrow to open the list box available applications and go to Nero Express.
- In the left half of the window that appears, you need to select the “Image, project...” option, and in the right half - desired action(copy of CD/DVD).
- We specify the directory to save the image and start the process by clicking on the “Copy” button.

To burn the created project to a blank, you will need to go to the Nero Burning Rom application and use its functionality.

There is another way:
- We turn to Nero Express.
- In the left window, click on the “Data” section, in the right window, indicate the required disk type.

- Add documents stored on the PC and go to “Next”.
- Through the arrow on the left we get to the advanced burning settings.
- We set the name, and install Image Recorder as the drive (required!).

- Click on “Record”, indicate the save directory and wait for the end of the task.
Alcohol 120

The last one on my list is the Alcohol 120 utility, so here’s how to create an iso disk image file in it:
- We insert the source into the drive and open Alcohol 120.
- Among the list of “Basic operations” we find the task “Image creation”.

- In the wizard window, set the parameters - drive, save location and format, project name, and so on.
- We command “Start” with the corresponding button.

To conclude the story, I would like to separately note that you can open iso files to view content created by you or someone else using the same programs and regular archivers. Bye everyone.
If the computer is under Windows control 7, then to create a system image it is not necessary to install additional programs. You can use the “Data Archiving and Restoration” service.To do this, you need to connect an external drive or flash drive formatted in NTFS to your computer, and then go to the “Control Panel” and select the “Backup and Restore” section. A dialog box will open, on the left side of which you need to select the “Create a system image” item.
Now you have to answer the system’s question “Where should the archive be saved?” Use local hard Not recommended. In the event of a virus attack or illiterate user actions, it is often impossible to restore the system from it. It is better to choose one that is pre-connected to the computer external storage. Can also be used DVDs, but this is less convenient.
Under no circumstances may you edit the received archival copy. Any change to the received data will make it impossible to restore the system from this archive file.
Now you need to select the disks that will be archived. If on external drive there is enough space, and you have a lot of free time, it is better to tick everything local disks. Then you can be sure that all your data will be recovered. Otherwise, choose to archive system disk C.
In the next dialog box, to confirm the selected parameters, click on the “Archive” button. This will start the system archiving process and in the dialog box you will see the green “Archive saving in progress” indicator moving. It shows what stage the process is at.
When the creation of the system image is completed, another program window will appear asking you to create a “System Repair Disk”. If you have not done so before, you must agree and click the “Yes” button. After all, if the operating system does not boot, then without this disk it will be impossible to restore the created image.
When archiving is complete, a notification “Backup completed successfully” will appear in the “Create a system image” window. Click the "Close" button to exit the program.
How to create an operating system image using Acronis True Image
Compared to a standard archiver, the application has advanced capabilities. Launch the program and in the main window click on the “Create archive” item. Now you need to choose which disk partition will be saved. To create copy of Windows, you need to click on the “My Computer” menu item and select HDD, on which the operating system was installed. Typically this drive is the C drive.To archives with the latest state operating system were always at hand, it is recommended to set an automatic backup schedule in the program settings.
The next dialog box will describe the various archives that can be created when Acronis help. Simply review the program's offerings and click Next. Now you need to specify the location where the future archive will be saved. Take care to create a folder for archive files better in advance. As in previous method, optimal solution The archive will be recorded on external media.
Next, you need to select one of the archiving types, described in the previous window. The best option is “Creating a full archive” because it is completely autonomous and does not depend on other copies. In the Backup Options dialog box, check the first option, “Use default settings,” and click Next.
Over time, you may accumulate different images Windows. For example, you can create an archive of an operating system with or without drivers, a “clean” image or with already installed necessary programs. Therefore, in next step write a description of the archive so as not to confuse it with others. Click “Next” and Acronis will begin the task.
ISO image is a file with ISO extension which contains files and folders. Typically, an ISO file is created during the copying process optical disk using special programs. But, an ISO file can be created without an optical disc. In this article you will learn how to make an ISO image from a real optical disc, as well as without it.
To make an ISO image from real disk we need a computer with a floppy drive, an optical disc, and an imaging program. There are many various programs to create images. Most Popular paid programs of this kind are UltraISO, Alcohol 120%, Ashampoo Burning Studio and DAEMON Tools Pro. Among free programs the most popular are Ashampoo Burning Studio FREE, CDBurnerXP and ImgBurn.
In this article we will talk about how to make an ISO image using the example of a free program. This program has a minimum of functions and a very simple interface, which means that even a novice user can use it.
Insert the optical disc into the drive and run ImgBurn. In the window that opens, click on the “Create image file from disk” button.
After this, a window will appear in front of you to create an ISO image from an optical disc. Here you need to select the drive that will be used to create discs.

And also specify the folder in which the ISO image will be saved.

After selecting the drive and folder to save, you can start the process of copying the disc to an ISO image. To do this, click on the button at the bottom of the window.
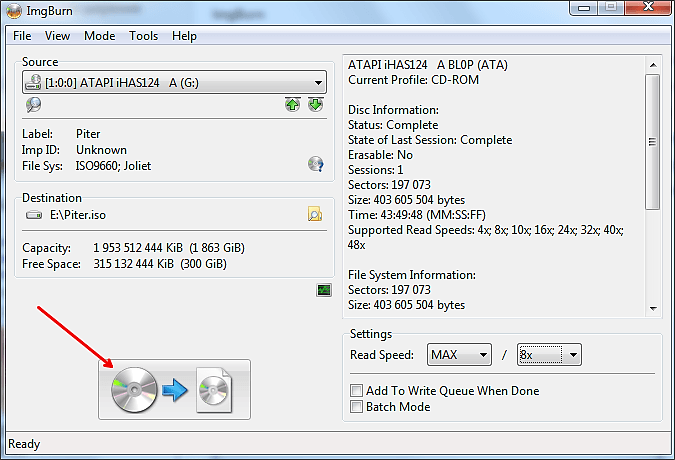

After this process is completed, the ISO disk image will be located in the folder you specified.
How to make an ISO image from files
In order to make an ISO image simply from files without using a real CD, you will need. This program is paid and costs about $30. Before purchasing, you can check out the trial version.
To make an ISO image from files, run the UltraISO program and add necessary files to the main program window.