Boot disk with a system image. How to create a boot disk using the DOS method? Creating Auto-Boot Discs
How to create a boot disk for Windows 7 - 10, XP? Where to get a disk image, how to burn it. These simple questions always arise for novice Windows installers.
Of course, you can buy a ready-made licensed disc. But you can buy licensed disks only for those versions of Windows that are currently supported from official dealers or sales representatives. But only those that are sold by the manufacturer and are provided with improvements and corrections, that is, updates. It will, of course, be expensive and only what is currently on sale. What if you need an earlier version, one that is no longer officially sold? You can buy such installation disks in completely different stores for many times cheaper, or even create them yourself.
A little about installation disks.

Boot disks for Windows 7 - 10, XP are always different types of assemblies, i.e. software packages from Microsoft or other than them. Non-standard assemblies are carried out by different craftsmen and not always out of idle curiosity or noble motives. Trojans are often inserted into assemblies. Personally, I came across a few on cheap, unlicensed discs purchased at the store. After installing the OS from such a disk, the computer may become infected and perform functions unknown to us. You may use such discs at your own risk. If you use an infected disk not only for yourself, other people may also suffer. This is quite possible.
To avoid such troubles, I suggest you create a boot disk for Windows 7 - 10, XP yourself. Believe me, it is not at all difficult and much cheaper than buying a ready-made disk, it is absolutely safe, and most importantly, you will make yourself boot disks of exactly the versions of Windows that you need. You probably already know exactly what you will install. 
I suggest starting this issue by creating a bootable Windows XP disk. Perhaps you will say: “Why do I need it, I have the newest, coolest computer.” But take your time.
Firstly The process of creating a boot disk does not depend in any way on the version of Windows and is performed absolutely the same. This means it doesn’t matter which version of Windows you use. The main thing is to understand the principle.
Secondly, there is no guarantee that tomorrow you personally or someone you know will not need this same Windows XP, which still works reliably on millions of old computers or weak laptops, and works great on all new ones. By the way, many beeches don’t have anything else because of their configuration, often you can’t install anything else.
ZverDVD boot disk image Windows XP

Thirdly, I offer you such a proven build of Windows XP that, once you try it, you yourself will fall in love with it. It's called "ZverDVD". In my opinion this is the best build. Some might want to argue that there are others. Yes, there are other good builds. But I liked this one more than others. And now I will briefly tell you why.
Most assemblies suffer from useless volumes. That is, the creators believe that the larger the volume, the better, and it doesn’t matter what they shove in there. These costs arise due to the desire to make more profit from scratch, since assemblies are posted on torrents and often on file sharing sites, and there they pay money for large volumes and the number of downloads. Personally, I don’t like it when the installation disk contains an incredible amount of unnecessary programs and, in addition, repetitive ones in theme. 
So the guys who created the "ZverDVD" package approached this matter like the greatest masters. It feels like they did it for themselves, and not for show. Their main principle was “Do no harm.” Drivers for the most common devices were added to the Windows XP installation package shown in the figure, which made it possible to activate during installation almost any computer released at the time the assembly was released. Added useful and important default settings. Unnecessary and unnecessary functions are disabled.
All errors in the preset settings were corrected with lightning speed. All updates were included in the package as quickly as possible. Officially announced releases of builds occurred at most only once every three months. But if necessary, there were also intermediate ones. That is, the guys worked as if in official production with plans and deadlines. The latest build of XP includes all the latest updates and is polished like a diamond. It has everything you need and nothing unnecessary.
But that's not all. The ZverDVD group has released a collection of the best and most necessary programs for any user. It's called "WPI". This is a package of pre-installed programs. Moreover, the programs are prepared in such a way that they are installed absolutely correctly on both XP and 7, and therefore will work on 8/8.1/10. Each assembly release is accompanied by updates to the versions of programs included in WPI. This pack alone is worth having in your collection.
And that is not all . The so-called "Alkid SE" package is installed on the "ZverDVD" disc. This is a somewhat stripped down, lightweight, pre-installed and fully functional Windows XP that can be booted straight from the DVD and runs absolutely on any computer. You need it when you have an emergency. The computer cannot boot from the hard drive and there is a huge threat of data loss. By activating your computer from such a disk, you can save (save) all your data and then safely reinstall Windows.
If you are interested in any details about this assembly or addresses of torrents from which you can download the assembly, then you should register on the "ZverDVD" forum. There are answers to all possible questions, and for one thing, links to torrent trackers for downloading the assembly.
The government, appeasing business, began to prohibit the operation of torrents, blocking them by domain name. Therefore, these links do not work directly, but as always, there are options to bypass such blocking. In Yandex or Opera browsers, enable VPN mode all the time and then download images as usual.
Boot image disk Zver 2018.4 Windows 8.1 Pro x64

For those who are categorically against Windows XP, I want to share some good news: “ZverDVD” has finally released a new build, the very current “Zver 2018.4 Windows 8.1 Pro x64”. It turned out to be very large, more than 7.74 GB. So it won’t be possible to write it in full onto a regular disk. You will have to tear off the WPI block. The full volume of this assembly can only be written to a 9 GB disc or one with a capacity of 8 GB or more. The capabilities of this assembly are the same as the previous one, only all programs have been updated and instead of Windows XP, the Windows 8.1 PRO x64 installation package with updates up to and including April 2018 has been installed. All settings are left as in the original.
Zver boot disk image 2018.5 Windows 10 Enterprise x64

For lovers of everything new, even more good news. Zver has released a build for Windows 10 Enterprise x64. Its name is Zver_Windows_10_enterprise_LTSB_v2018.5_x64. The build image file size is 6.39 GB. It's 8 GB. This build updates all programs in the WPI package and adds all Windows 10 updates released before May 2018. You can download it at this address. All settings are left as they are in the original version of Windows.
And so, I hope that you have already downloaded the disk image you need. If not yet, then you can do this right now using any of the links provided in the previous paragraphs. You may need to register for torrents, but I think this is not a problem for you. After downloading, you will have a huge file on your computer called ZverDVD_2014.5.ISO or Zver_2018.4_Windows_8.1_Pro_x64.iso or Zver_Windows_10_enterprise_LTSB_v2018.5_x64.iso.
What is a disk image file?
The file name extension "ISO" just means that this is a disk image file. A disk image file is an archive file (maybe without compression, which is most often the case) in which all files are saved in the sequence needed to load the operating system. Here, perhaps, for a better understanding, you need to explain a little how files are written to a CD/DVD disc?
Here's the thing. Disc burning programs write information as you see it on the screen, and not as needed to load the operating system. That is, ordered alphabetically or something else (for example, by date and time of file creation or by size). And if we copy all the information from the boot disk to the hard drive, and then write it to a CD/DVD in the usual way, then we won’t have a boot disk. That's the problem.
And when we create an image file from a ready-made boot disk, then the entire structure of the disk is completely preserved. There is a boot area with the system bootloader, and a system area with system files located exactly in the order in which the system bootloader wants to see them, and then all the files. That is, the image file is an exact copy of the boot disk. And if we use a special program to write this image file onto a CD/DVD disk, then we will get an absolutely exact copy of the disk from which the image file was taken. This is extremely important for creating a bootable disk.
Programs for recording images
Nero Burning ROM
You probably already noticed from the text that you need a special program to record an image file. Windows itself can only write the image as a file, but cannot unpack it and write everything as it should. Special programs solve this problem perfectly. One of these specialized programs is "Nero Burning ROM". The entire package "Nero Burning ROM" is quite huge and multifunctional. It contains a cover editor for discs, and an audio file editor, and a video file editor, and audio/video players, and and and... a lot of things, but now we only need the disc burning itself, directly "Nero Burning ROM" .
Where can I get it? And it is available in the WPI package, inside any ZverDVD image file. This is one of those necessary and good programs that you will need sooner or later. How to get it from there? As I already told you, the image file is an archive, so it can be easily opened by any archiver. So if you have a WinRAR or WinZip or 7Zip archiver, then you can easily unpack this archive into a separate folder. Next, open it and look for the WPI folder. Open it and run the only file in this folder called WPI.EXE. Once it is fully operational, you will see something like this window. 
In the lower left corner, I circled a red rectangle, there is a timer showing how many minutes the installation process will begin. To stop it, you need to click the mouse in any free space and the timer will disappear. See screenshot below. 
As you can see, the timer has disappeared and you can now safely see which programs are marked. The default selection is currently made. By the way, look carefully at how well the most important programs are selected. This alone speaks of the high qualifications of the people who created this package. If you don’t need these programs, then click the deselect button (circled in red) and all the checkmarks will disappear. Look further.

You see all the checkboxes are unchecked. Now you can safely point the arrow at each program and read a little about what it is needed for. Check the programs you need. If you are currently running Windows vista/7/8/8.1/10, then do not select the item .netFramework 1-4.0 (crossed out in yellow). This software package was created specifically for Windows XP. .netFramework 4.5 has been developed for Windows vista/7/8/8.1/10 and it is downloaded by the system as an update package automatically. 
And so at the moment we are only interested in one program, Nero Micro. Here we mark it and click the “start installation” button. The program is small. So you won't have to wait long at all. After installation, an icon of a blazing coliseum will appear on the screen. Let's launch the program.
How to create a boot disk for Windows 7 - 10, XP using Nero?
When you start the program, the screen looks like the figure below:  How to create a bootable Windows 10 - 7 XP 5 Windows disk in Nero
As you can see, a window popped up in the middle of the screen prompting you to create a “New Project”. But we don't need this. We click the red cross in the upper right corner and close this window.  How to create a boot disk for Windows 10 - 7 XP 6 Windows in Nero
Next, open the DVD drive and insert a pre-purchased blank disc for recording. Fortunately, its price is low, 11-17 rubles per piece, if you take it without boxes. (A plastic box costs another 20 rubles.) And so we insert the disc with the colored side up. And close the drive. Click the "Open" icon - it's a yellow folder with a green arrow. Or open the "File" menu and select the second line "Open" from the drop-down menu. A list of files/disks appears. We look for the folder where we put our image file “ZverDVD_2014.5.ISO”, select this file and press “OK” or just the “Enter” button on the keyboard. The program immediately recognizes this file as a ready-made disk image and offers to burn it to DVD. See the picture below.  How to create a bootable Windows 10 - 7 XP 7 Windows disk in Nero
Here, in principle, everything is already configured correctly, but still I will say a few words for clarification. When recording system boot disks, it is very important that they are readable on all drives.
Therefore, there is no need to check the “Determine maximum speed” checkbox.
The imitation item will not allow you to record. There is no need to mark it either.
“Recording” should naturally and understandably be included.
"Finalize disk" this means closing it after recording. No further recording will be possible. This is a very important point. If you do not finalize it when recording a full disc, then it may not be readable at all on all drives. So we definitely tick this box.
The recording speed is also a very important point. If you write at maximum or simply high speed, then the disc may then be read uncertainly or even poorly on some drives. If you specify a speed of 1x, the recording will take a little longer, but will be of better quality and the disc will be readable on almost all drives. (Joke: at speed 1, write even on plywood, it will still be readable). So I recommend that when recording boot disks, write them at the first speed, if the disk allows it, or, as a last resort, at the lowest speed indicated on the disk and auto speed detection should be disabled as mentioned above.
Before pressing the “Burn” button, here are a few more very important recommendations:
1. Disable all running programs, leave only "NERO".
2. Be sure to disable all downloads from the Internet.
3. Disable hard drive maintenance.
4. If you have the screen saver turned on (this is the mode when the screen goes blank or any screen saver turns on, especially active, moving or rotating) DISABLE!!! for the duration of recording.
5. In short, you need to disable everything that works with disks.
After pressing the "Burn" button, disc recording will begin. If the disc is disposable, it will be impossible to erase and rewrite it. Therefore, any distraction of the computer from the recording process or pushing the drive or the entire computer can lead to the disc being damaged.
This means that you need to behave like this:
Disable all unnecessary programs, especially those that may be using the hard drive.
Prevent the inclusion of such programs in automatic mode, i.e. disable autostarts of any programs, scheduled tasks, screen savers and screensavers.
Press the "Burn" button and carefully move away from the table without pushing the computer. I think you won’t be interested in sitting near the computer for a long time and doing nothing. The only thing you can do is check the "check the disk after burning" checkbox. This means that after recording is completed, the disc will be checked for recording quality, but this does not need to be done. At the end of recording, the drive will open to cool the disc. This means the recording is complete. The inscription on the screen “Recording completed successfully” will also notify you of this and the recording time will be indicated (for example, 5 minutes 45 seconds).
That's it now. You yourself created a boot disk for Windows XP, Windows 8.1 or Windows 10, which you can use to install, reinstall Windows, as well as the most necessary programs for each user. In addition to this, you now have an important tool that will allow you to activate absolutely any computer if it refuses to boot on its own and perform manipulations such as testing with an antivirus program, saving information to any medium, accessing the Internet to update software, etc.
After all of the above, it’s not hard to guess that in order to create a Windows 7 boot disk, you need to do everything the same, you just need to download the Windows 7 image file from the Internet. For Windows 10, if you are doing not an update, but a clean installation, everything is the same, only the image dozens. The only difference may be that it is better to download all versions of Windows starting from 7 from the Microsoft website or from trusted sources. That is, if it is an assembly, it must be of high quality, not broken, and comply with your license. We will look at how to test the assembly in another article.
Let's summarize. Today you:
1. Learned how to create a boot disk for Windows 7 - 10, XP;
2. We found out where you can download images of boot disks for windows 7 - 10, XP;
3. Learned to use the "Nero" program in terms of recording ready-made images;
4. We got acquainted with the images of the "ZverDVD" discs;
5. Created your first boot disk;
6. We received a collection of very necessary and important programs (WPI), provided in the “ZverDVD” disk image package;
7. We have at our disposal a very important tool “Alkid SE”, which will allow you to activate any computer if Windows refused to work on it at the most inopportune moment and save information on it if necessary.
Good luck with creating installation disks and installing Windows 7 - 10/XP.
Its main purpose is to install or reinstall the Windows 7 operating system (OS). It can also help to reset a forgotten or lost administrator password. This media can also be used to enter the OS preinstallation environment (Windows PE), which is a minimum set of operating system functions used to prepare the computer for OS installation, launch its installation, and roll back to a previously created restore point.
The first and most important condition is the presence of a so-called Windows 7 installation image file. This is a file containing all the necessary data for installing the OS. It has a file name extension of .iso and is about 4 GB in size. It can be downloaded from various Internet sources, for example, torrent trackers. Typically, such sources provide so-called hashes (checksums) of the image, which after downloading must be checked to ensure the authenticity of the image and the absence of errors during downloading.
We will need a DVD blank (namely a DVD, not a CD, which is explained by the size of the file - the system image), and one of the programs for transferring (not copying - a bootloader is also written to the DVD) of this image to the DVD. This disc can be either one-time recording (DVD-R) or rewritable (DVD-RW), and its recording speed does not matter much, since it is produced at the lowest speeds. The rest of the article discusses several different ways to accomplish the required task.
Ways to create a boot disk
Now let's move on directly to describing methods for creating an installation disk using third-party utilities such as:
- Ultra ISO
- CDBurnerXP
- ImgBurn
- Windows 7 USB/DVD Download Tool
All of them can be easily downloaded from the Internet and have a simple and intuitive interface that does not require any complex actions from the user. In addition, the installation disk can be made using the tools built into the seven.
Burn a bootable disc using UltraISO
After launching this program, its main menu is displayed, in which you need to select the “File” element, and in the submenu that opens, select “Open”.
A window opens to select a boot image of the seven, in which you need to point to the required iso file and click the “Open” button. Then this window closes and you return to the main menu of the utility. After that, click on the “Tools” item in the main menu and in the drop-down list click “Burn CD image...”. 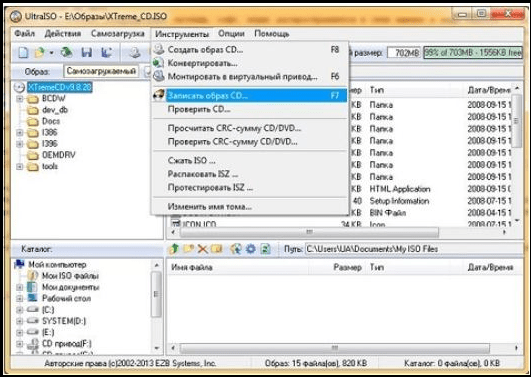
In response to this, a window with recording parameters appears: 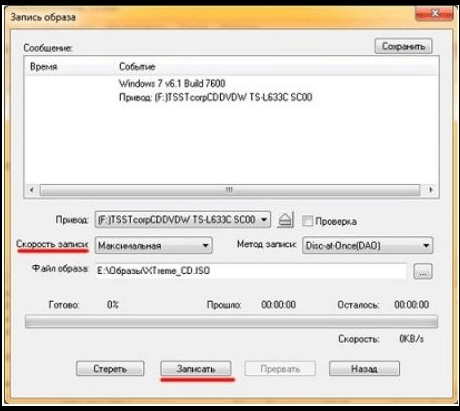
It needs to be set:
- The “Drive” parameter is a DVD device with the future boot disk installed.
- Recording speed is “Minimum”.
- Disc-at-Once recording method.
After this, you need to click the “Record” button. The burning process starts, usually taking several minutes. At the end of the process, the DVD device tray opens, which signals the completion of the process.
Creating a boot disk with ImgBurn
Before you run this utility, you need to install a DVD blank into the DVD device. In the Russified version of the program, its main window looks like this:  In this window, you need to click on the “Burn image to disk” picture, after which a window appears to set the parameters for the image burning process:
Here you need to set the following parameters:
- In the “Source” parameter, select (yellow button) the required image file.
- In the “Destination” parameter, set the DVD device.
- We check the “Check” checkbox so that upon completion of the recording process, the recorded image is compared with its original file.
- In the “Recording speed” parameter, set the lowest speed.
- Click on the picture with the arrow in the lower left part of the window to start the recording process.
The process of burning the image begins, which also takes several minutes. Having finished recording, the program pulls out the DVD device tray, then pushes it back in and begins the process of checking the recorded image. If the check is successfully completed, the utility plays a melody as a signal that the recording process has completed.
How to burn an installation disc using the CDBurnerXP utility
Despite the presence of “XP” in the name, starting with XP, this utility is functional in all versions of the OS. As for its interface, it is not much different from the ImgBurn interface. This is what the main CDBurnerXP window looks like: 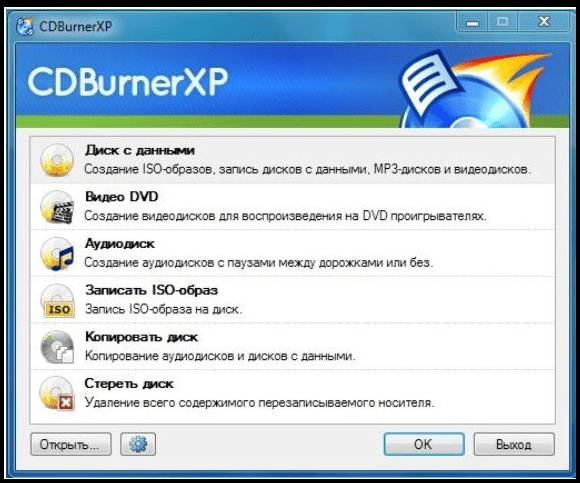
Of course, to make installation media, you should click “Burn ISO image” in this window, and then click the “OK” button. In response to this, a window appears for setting recording parameters: 
What to do now:
- Using the Browse button, specify a file with an iso image of the seven.
- In the “Recording device” parameter, specify the DVD drive, and to the right of it – the minimum speed.
- In the “Recording method” parameter, set Disc at Once.
- Check the “Check data after recording” box.
Other parameters are set by the user at his discretion. The image burning process begins by clicking the “Burn disc” button. Upon completion, a check is performed - comparing the recorded image with its source in the file.
USB/DVD Download Tool
This utility was developed by Microsoft. It can be downloaded from the Internet and installed. The recording process in this utility is divided into several steps, each of which has its own window.
Step 1 of 4. In this window you need to specify the file with the iso image. To do this, click the Browse button, select the required file and click “Next”. In some cases, the program does not like the specified files, about which the user receives a message. If he is sure that the image file was downloaded correctly and is not corrupted, then the only thing that can be done is to use another utility;
Step 2 of 4: This step selects the type of media that will be used as boot media. It can be a USB drive (for example, a flash drive) or a CD. To create an installation DVD, press the DVD button;
Step 3 of 4. At this step, the utility asks you to install a blank DVD disc. You should not try to install a DWD-RW disc that has already been burned - it must be erased in advance. Insert a blank DVD-R or DVD-RW disc and press the “Try again” button. The utility will make sure that the disk is clean and display the “Begin burning” button. We press it, the next step begins;
Step 4 of 4. This is the process of burning the image itself. We are waiting for the message “Bootable DVD created successfully” to appear, indicating the completion of the process of creating the installation disk of the seven.
Recording an image using built-in OS tools
It should be noted right away that this method, although it does not require the installation of third-party programs, is not reliable and sometimes requires repeated repetition due to errors that arise.
To make the installation disk built into the OS, you must complete the following steps:
- Insert a DVD-R disc (or DVD-RW - whichever is better) into the drive.
- When using a DVD-RW, erase all data recorded on it. To do this, in the “Computer” window, right-click on the DVD drive and select “Erase this disk” from the list that appears. A message will appear indicating that all information on the disk will be deleted. Click “Next” and wait for a window to appear indicating that the erasure was completed successfully, then click “Finish.”
- Double-click on the iso image with the left button. If no program is associated with this file, a window opens to select the program to record. In it, select “Windows Disc Image Burner” and click “OK”.
- The Disc Image Burner window appears. In it you need to set the “Disc recording device” parameter, check the “Check the disk after burning” checkbox and click the “Burn” button. The disc burning process will begin.
Sometimes all of the above steps have to be repeated due to errors that occur.
- The need to set a minimum write speed is explained by the fact that DVD discs do not always support the write speed declared by the manufacturer. It follows from this that errors may occur during recording, which can only be detected after the recording is completed - at the verification stage. If using a DVD-R, this will result in the CD having to be thrown away.
- The recording process must not be interrupted under any circumstances - this usually leads to the same thing as described in paragraph 1.
In contact with
In order to install Windows OS on a personal computer, you must have an installation disk or . Creating a DVD is much easier and faster, and it costs significantly less than USB drives. This article will detail how to ISO to bootable Windows 7 DVD. You will use programs such as UltraIso and ImgBurn to do this.
What it is
When a user purchases a licensed version of Windows in a box, he receives a boot disk and an activation key. Using the DVD, the operating system itself is installed, and then it is activated by entering the key.
Those users who purchase the digital version only have an activation key at their disposal. They can download from the official website or from torrent trackers. But to use it, you need to know how to burn an ISO file to external media. Special programs are used for this. Some of them, for example, UltraIso, are paid, others are freely distributed.
UltraIso program
The most commonly used program for working with images is the UltraIso utility. It allows you to work with ISO files directly, editing their contents without first unzipping. Users can open any image in this program and work with it as with a regular folder in Windows Explorer.
To download the UltraIso utility, you will need to go to the fan site http://ultraiso-club.ru/. Next, you need to click on the “Download UltraIso” button in the center of the screen. Enter the captcha and the download process will begin. 
Installing and activating the UltraIso application
Before burning the image, users need to install the program on their personal computer. The process is standard, just follow the Windows Installer instructions:

Create a boot disk
The DVD burning process itself is very simple. Click on the button with the image of a burning disk on the program toolbar. In the window that opens, you need to select the drive, specify the path to the prepared image and click “ Burn" or " Burn".
It is recommended not to select the highest recording speed. The slower the process, the better the bootable media will be.

ImgBurn program
An excellent alternative to the paid UltraIso is a simpler free utility -. Its functions are quite enough to create a high-quality bootable DVD. To download ImgBurn, go to the official website of the developer -
There is no need to say what the UltraISO program is, every user is very familiar with this software. She gained such popularity for a reason. This program contains a bunch of tools for working with removable media, virtual drives and image files. However, its interface is not very clear for a beginner and it is quite difficult to understand all the abundance of possibilities. Unfortunately, it won’t be possible to talk about everything at once in one article, since there is a lot of information, but this article will tell you how to burn an image to a disk using UltraISO.
Burning an image to CD/DVD media
So, first, let's figure out how to burn an image to disk using UltraISO. To do this, you will need:
Insert the disc into the computer's drive and open the program.
Add an image. To do this, click "File" and select "Open" from the menu. In the explorer that appears, navigate to the image.
Click the "Tools" button located above the toolbar.
In the menu, click on "Burn CD image".
Set recording options. Specify the drive where the disc is inserted. If you only have one, then this step does not need to be completed. Set the recording speed. It is recommended to choose the maximum one to speed up the recording process. Do not change the recording method. In the line "File image" the path to the previously selected file should be laid out; if it does not match, then change it.
If the disk is RW, that is, rewritable, then click the “Erase” button.
Click the "Record" button.

After all the steps, recording will start, you can tell by the sound of the drive. So you have learned how to burn an image to disk using UltraISO. However, as mentioned above, this program has many functions, and the one presented above is just one of them. Next, we will tell you how to burn an image to a flash drive and how to create a bootable flash drive or disk, so we advise you to read to the end of the article to learn as many functions of the program as possible.
Recording to Flash Drive
Now let's figure out how to burn an image to a disk via UltraISO on a flash drive. This is done as follows:
Open the program with administrator rights.
Click the "File" button and select "Open".
In the Explorer window, navigate to the image file and click “Open”.
Now, above the toolbar, click “Boot” and from the menu select “Burn Hard Disk Image”.
In the window that appears, you need to make settings in accordance with the image that will be attached below this list.

Then the recording will start. The process may take a while, but during this time you can use the rest of the system components. As a result of the recording, the system will produce a characteristic sound.
Creating a bootable USB flash drive
The methods described above were how to burn an image to a disk using UltraISO and an image to a flash drive, but most often the program is used to record a boot image of operating systems. The program copes with this very well. Now we will analyze in detail the instructions on how to burn a Windows 7 image to disk via UltraISO. By the way, the instructions will be general for other versions of Windows, and not just for the seventh.
So, before you burn the image to disk via UltraISO with autorun, you need to:
Launch the program by first inserting a flash drive or disk into the computer.
Click the "File" button and select "Open" from the menu.
In the Explorer window that appears, you need to open the folder in which the OS image you prepared is located, select it and click “Open”.
Above the toolbar, click the "Boot" button.
In the menu, click on the line “Burn hard disk image”.
Now format the flash drive or erase the disk and click on the “Burn” button, which is located next to “Format”.

As a result, you need to wait for the recording to finish. This will be indicated by the line in the process log “Recording completed”. After this, you can take the drive out of your computer and use it for your own purposes.
Conclusion
As you can see, you don’t need much experience to burn an image to a disk or flash drive using UltraISO. By following the instructions included above, this process can be completed in just a few minutes. It is significant that for each method the instructions are almost identical, so the likelihood of confusion is reduced to a minimum.
How to create a Windows 8 boot disk is a fairly relevant topic today. The fact is that modern technologies are steadily developing, becoming deeper and deeper into people's lives. Thanks to this, people become more familiar with computers and operating systems. One of the latest operating systems is Windows 8. It is relatively new and many have not yet gotten used to the new features.
In addition, the services provided by Microsoft are also changing. Now the Remote Help Center provides new capabilities and has made it even easier to purchase and create bootable Windows 8 discs. So, let's get to the point.
Preparing to create a bootable CD/DVD
First of all, we will need to buy an operating system. You can do this on the official Microsoft website. After this, you can create a bootable Windows 8 disk in two ways:
- Using a utility from Microsoft.
- Using a program from a third-party developer, for example, UltraISO.
In the second case, we first need . This can also be done on the official website after paying for the license. An email will be sent to your email address with a link and activation key. By following the link, you will be taken to an online service where the image will begin downloading. Further actions depend on which option you choose. Let's look at both points in more detail.
Creating a Bootable DVD Using a Microsoft Utility
So, this method is suitable for those who have just paid for the license, but have not yet had time to download the operating system image. In this case, you should receive an email with an activation key and a download link. Follow this link. The update assistant should start, with the help of which the image will be burned to CD/DVD.
Creating a bootable DVD using Microsoft utility: Video
All you have to do is choose one of the options offered:
- Install now.
- Create installation media.
- Install from your computer later.
Since we want to create a bootable DVD, we select the second item. Of course, a blank drive should already be in the drive. That's all. The system will automatically download the image and create a bootable CD. You only need to wait for the job to complete. This will take quite a lot of time. It depends on the speed of your Internet connection. As you can see, creating a bootable Windows 8 disk is a fairly simple procedure. But what to do if you already have an image that needs to be recorded. In this case, the Microsoft Update Assistant will not be able to help. Therefore, we move on to the second option.
Creating a bootable DVD in UltraISO
This method is suitable for those who already have an operating system image. The UltraISO program itself unpacks it and writes it to a CD, turning it into a bootable one. So what does it take? In addition to the system image, we will need a blank DVD and a drive that will actually burn it. It is worth noting that, unlike the first method, this program allows you to create bootable disks not only with operating systems, but also with games and various utilities for checking the system and much more. In addition, you can use pirated images. However, it is worth warning that they have some limitations in functionality, and sometimes can cause irreparable harm to your computer.
Creating a bootable DVD in UltraISO on Windows 8: Video
Insert a blank DVD into the drive. Launch the UltraISO program. The program menu is divided into four windows. In the lower left window called “Directory” we need to select the folder in which the image we need is located. After this, the entire contents of this folder will appear in the lower right window. Select the required file. Open it by double-clicking with the left mouse button. Now the unpacked image, with all the boot files, is displayed in the upper right window.
Now let's go to the toolbar. This is the top row and has various tabs. We are interested in the “Tools” tab. Click on it. In the menu that appears, select “Burn CD image”. The same service can be opened by simply pressing the F7 key.

There is no need to configure anything here. At the very bottom there is a “Record” button. Click on it. All. After that, all you have to do is wait until the recording is complete, after which you will have a bootable CD/DVD.

Now you know how to make a bootable Windows 8 disk using UltraISO. In fact, this is not the only program. There are a lot of them, but this application is easy to use and multifunctional. With its help you can. In addition, it performs the functions of a virtual drive. As you can see, everything is extremely simple. It is also worth noting that you can write additional programs to the disk image if there is free space on it. For example, you can add drivers for your system to the image. Thanks to this, you can install Windows and drivers from one drive.
How to create a bootable Windows 8 disk: Video


