Virtual disk emulation program DAEMON Tools Lite. Daemon Tools Pro - features of using the program
— Using Daemon Tools Lite to create virtual CD/DVD drives
The Daemon Tools program is rightfully considered one of the best tools for creating virtual drives that will bypass a variety of copy protection systems, such as SecuROM, SafeDisc, StarForce, Protect CD and many others.
There are four versions of this software in total, and only one of them is free. The rest can be used without payment only for a 20-day trial period. They differ in the number of virtual drives that can be created and some other features. However, all versions, without exception, support formats such as ccd, ape/cue, bin/cue, iso, isz, mdx, cdi, mds, nrg.
This is what the Daemon Tools Lite program menu looks like. It may not seem very informative, but it is quite enough for productive work with this software.

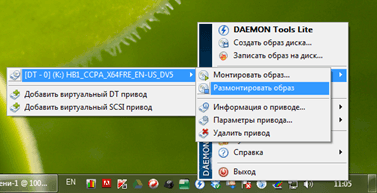
In principle, to work with the program it is not at all necessary to run it in this form. After all, the installed Daemon Tolls is usually displayed in the lower right corner of your desktop.
![]()
In this case, it will be enough to right-click on this icon to access the main functions of the program. But for greater clarity, it is worth considering this software in the mode that is presented in the first image.

The first two buttons on this panel allow you to add images to the catalog. Images can be created by both this and other special programs, and their extensions were indicated above. Once you add an image to this directory, you can always quickly access it later, unless its location on the computer changes. The second button removes the image from the catalog. You will need to do this if you want to delete the image file.

The next three buttons are needed in order to place images directly on the virtual drive. The first of them allows you to mount the image. If you already have added images in your catalog, then by selecting one of them and clicking on the “Mount” button, you will quickly download this image. If there are no images in the catalog, the user will be offered the opportunity to search for them using Explorer. In order to remove the image from the virtual drive, just click on the “Unmount” button, which comes next. The next, third button allows you to unmount all virtual drives at once. Even in the free version there can be as many as 4 of them, while in the advanced professional version the number of drives is 32.

The next three buttons are responsible for adding and removing new virtual drives. You can add a DT or SCSI drive. There is not much difference between them, and it all depends on how copy protection reacts to the presence of one of these types of virtual drives. In any case, you can easily add as many of them as the program's capabilities allow. The third button removes the drives, which only takes a couple of seconds.
The two buttons next to each other relate to functions such as creating a disk image and writing an image to disk. If you click on the first of them, then this image creation window will appear in front of you.

Here you can select the drive that contains the disk whose image you want to create. Then select the reading speed and indicate the location where the image file will be saved. Its data can be compressed to save space.
But to burn the image to disk, you will need to install the special program Astroburn Lite. After installing it, it will be enough to simply select one of the images that are in your directory and click on the “Burn image” button.
So, the last ones are the settings and help buttons. In the settings, you select the language, file associations and some other features that can make using the program more comfortable. The help field traditionally takes the user to the developer's website, support service, and allows you to check for updates.
Using this program is very simple, and a small number of buttons on the panel allows you to quickly understand all its functions. That is why at present even
Today, such storage media as CDs and DVDs have gradually lost some of their popularity to methods of electronic data transmission. Many users download movies, books and music on the Internet and watch it all on their computer without any problems. However, things are somewhat different with computer games: since their developers receive their profit from the sale of discs, they try to protect their product from distribution as much as possible. Safedisc and Securom protection systems have appeared, known to every avid gamer, which require the presence of the original CD in the drive. It is precisely in order to deceive the security system that special emulator programs were invented. They are able to read disk image files (in which games are usually distributed on the Internet) and place them in a so-called virtual drive, which allows you to bypass the security system and enjoy the game without the original CD.
Daemon Tools is one of the most common such programs. The reason for the high popularity of this application is that it is free and easy to use. However, many users who have not previously encountered emulators often find some aspects and functions of Daemon Tools unclear. We will tell you how to learn how to fully work with this emulator in this article.


(namely the Lite version) is available absolutely free from the website of its developers. The Pro version is paid, but we will not consider it, since in the vast majority of cases the capabilities of the free version are sufficient. The installation of the program is completely standard, after which the Daemon icon will appear in the lower right corner of the display on the taskbar.
The application is ready to use. The first step is to create a virtual drive, to do this you need to right-click on the icon and select “Virtual Drives” and then “Add”. The free version allows you to create up to four virtual drives, each of which can contain an image. To begin with, one will be enough for us. After creating a virtual drive, the system will think that a real drive is connected to it and will assign a free letter to it. You can check this by going to “My Computer”: You will see there the virtual element created a moment ago, along with the real drive and hard drive.


Next, we need to insert the virtual disk image into the virtual drive. To do this, click on the program icon in the lower right corner again and select “Virtual drives” again. Now we see that the drive we created has appeared there, next to which it says “No data”. We move the cursor over it and select the “Mount image” item. In the window that appears, the program prompts us to choose which file to mount. You must select a pre-downloaded image file (for example, .iso, .mds, .nrg). Having found the desired image, click on the “Open” button. Mounting the image usually occurs within 5-10 seconds, after which the computer will begin to believe that there is a real disk in the drive. Now you can completely safely install and run the downloaded game or program, as if you were installing it from a regular disk.


Thus, working with Daemon Tools is very easy and pleasant and not at all difficult. This program is installed on almost all home computers, since its convenience and functionality are necessary for every modern user.
Instructions for those who do not know how to use Daemon Tools. The program is multifunctional, but easy to use.
Daemon Tools– applications for emulating a disk image. In other words, using this tool you can create a virtual drive for reading virtual disks. You can create an exact copy of any disc (well, almost any), which is especially useful if you need to always have a DVD disc in your computer drive.
1. How to open a disk image using Daemon Tools
Find the disk image on your computer that you want to open. Right-click on it and go to the “ To open with» — « Daemon Tools».

There may be a situation where this method of opening a disk image file will generate an error. In this case, you must first open the Daemon Tools application (right-click on the icon in the lower right corner of the screen), then go to the “Virtual Drives” section and click on a free virtual drive.

After that, click on “ Mount image» and find the required disk image on your computer.
2. How to create a disk image in Daemon Tools
The process of creating a disk image is also quite simple. Right-click on the program icon and go to the “ Create an image..." A special window will open with several parameters.

Drive unit: the name of the drive where the CD or DVD disc is inserted.
Reading speed: This is the speed at which the disk image will be written.
Output image file: the location on the disk where the image will be saved.
Compress image data: do not do this as there may be errors in the image.
Delete image on error: if the file is damaged during creation, it will be deleted (check the box).
Add to image catalog: at your choice.
Protect the image with a password: To access the image you will need to enter a password.
After setting all the necessary parameters, click the " Start" and wait until the disk image is created. As a result, you should see this picture:

The format of the created image will be mdx is a new extension from Daemon Tools for saving the entire image.
Now you know how to use Daemon Tools. Remember that similar actions can be done in programs such as Ultra-ISO, Nero and the popular Alcohol 120.
Gradually, DVD and CD media are becoming a thing of the past, leaving their place to memory cards and USB devices. However, there are still many programs and games that require a disc for installation. What should users who do not have an optical drive in their laptop or computer do? Programs for working with disk images will come to your aid, for example, one of the most popular is called Daemon Tools. In it you can trick the system and create a virtual drive, burn bootable CDs and USBs, create images yourself, mount them to view the contents. This program has many versions, most of them are distributed free of charge. Learn to use Daemon Tools and choose your version of the program using this article.
Which version of Daemon Tools to choose and how to install it
At the very bottom you will see a small list of products under the word “Products”. The main ones can be identified:
- Lite version - intended for all computer users whose needs do not go beyond those listed above. This version of Daemon Tools is simple but has many features, it is recommended for installation and will be discussed in this article.
- Pro is a professional program that is unlikely to be understandable to an inexperienced PC user.
- Ultra – the capabilities and complexity of this version are between Lite and Pro, but you won’t need its features if you don’t work with disks all the time.
- The Mac version is designed for Apple computers.
Click on Daemon Tools Lite and click “Download” to download the free version.


- Installing the software is quite simple and will not raise any questions for you.
- After installation, Daemon Tools will appear on your desktop and in the Start panel. Log in to the program.


- Now you are ready to work with images and disks, as well as some other program features.


How to mount an image in Daemon Tools and view its contents
Often you could come across files with an ISO extension that did not want to open and required the installation of Daemon Tools. This file is an image of a real physical disk on which any data is recorded: games or programs. This is where you can mount it and see what's recorded on it.
- Launch Daemon Tools.
- Open the folder where the image is located.
- Double click on it.

- Now look at the program again - the image will already be mounted from below.
- You can mount several images at the same time and they will all be displayed below as blue icons.
- Double click on this icon.

- The image will launch and the installation of the program will begin. Now you know what you need to do with ISO files to run them.


How to create a new image in Daemon Tools
In the “New Image” tab, you have access to all the functions for creating your own ISO file.
- “Create an image from a disk” is a function that helps you create an image of an existing physical disk. You will just need to insert the disk into the computer, the program will read it itself.
- “Audio CD” – creating music discs for listening on players, such as car audio, DVD players.
- “Create an image with data” means creating an image file from ordinary folders and files on your computer.
- “Convert image” – Daemon Tools converter between ISO, MDX, MDS formats.

- Using the “Create image with data” tab as an example, you can see how easily the program works.
- In the very bottom line, select the format, preferably ISO. In the “Save As” field, specify the directory to save the image.


- Find the plus sign at the top of the window and add the files you want to put in the image.

How to burn an image to disk in Daemon Tools
- This procedure is often needed when you need to install software from a disk. Prepare your ISO file and go to the “Disc Burning” tab.


- Here you can record not only images, but also regular files, using the built-in tools of the system.
- The window is no different from what you saw above. You also need to add files using the plus sign and insert the disk into the computer.


Working with USB in Daemon Tools
You have two functions:
- Creating a bootable USB.
- Setting a password for a flash drive.
The first one is often needed when you are reinstalling the system and there is no disk at hand. The second method will protect your device from prying eyes. Both procedures are quite simple and do not take much time.


Setting up Daemon Tools
- To set some parameters for the program, click on the gear in the lower left corner.


- All tabs contain important parameters that are best configured to suit your needs. These include the Daemon Tools language, loading the program with the system, port.
- Now you can easily create and mount images.

Daemon Tools Lite is one of the most popular optical disc emulation programs. In this article we will talk about how to use Daemon Tools Lite.
The interface of Daemon Tools Lite is very simple. All actions are performed from one menu, which can be called up using the icon in the notification area (on the panel next to the clock).

The first menu item is DAEMON Tools Lite. This menu item opens the main program window. Here the user can view a list of disk images that he has mounted recently. Also, using this window you can perform all the functions of the main program menu.

At the top of this window there is “Image Catalog” and “Latest Images”. With their help, you can mount disks with a regular double click.
Mounted drives are displayed at the bottom of the screen. They can be controlled using the context menu.
All actions that can be performed using the DAEMON Tools Lite window are also duplicated in the program menu.
Let's consider in order all the other elements of the main menu of the DAEMON Tools Lite program
The second item on the menu is "Create a disk image". When you select this menu item, the utility for creating disk images is launched.

Here the user is prompted to select the drive in which the disk is installed and indicate the location where the created disk image will be saved.
The main menu item is "Virtual Drives". With it you can add or remove drives and .

In order to mount a disk image using the Daemon Tools Lite program, you need to call the Virtual drives menu - select one of the installed drives - select Mount drive. After this, a window will open in which you need to select a disk image file on your hard drive.
After the image is selected, the disk will be mounted and appear in the system. After which you can work with it as with a regular disk installed in an optical drive.
Once the disk is mounted, it can be unmounted using the same menu.
The “Settings” menu item launches a window with program settings.

Here you can configure hotkeys and other features for integration with the system.
The following menu items are “Image Catalog” and “Latest Images” with their help, you can mount disk images that have been used recently in one click.
The last menu items are: "Buy Online", "Help" and "Exit". Their purpose is clear from their name and does not need explanation.


