How to partition local disks. How to partition a hard drive - detailed instructions
In fact, dividing the hard drive of Windows 7 and Windows 10 into several partitions is no different. Initially, a computer or laptop has only one partition on which the operating system is installed. Divided for convenience. For example, one will only have Windows, while the other will have music, videos, important documents, photographs, etc. And now, if the OS, which malfunctioned on “Disk C”, has become infected with viruses, then you can safely reinstall it without fear for your files, because they are located on another “Disk D”. And this is just one of the reasons why it is better to “split” the HDD into several parts.
How to partition a Windows 7 hard drive
(This procedure is also suitable for Windows 8/8.1)
This can be done using the OS itself or using specialized software: EASEUS Partition Manager, Acronis Disk Director, MiniTool Partition Wizard and others.
In the first case, go to disk management. Login must be done only as an administrator. Start menu -> Computer -> Management.


The new HDD partition will be formatted.

Click “Finish”
As shown in the screenshot below, we end up with the following - “New Volume (D:)” with the NTFS file system.

And if we now go to “Computer” or “Explorer”, we will be able to observe our “creation”. Which, as we see, is almost empty, unlike “Local C”.

And in conclusion, I would like to talk again about the advantages.
Firstly, this is the safety of personal data, which will be on the second, third, etc. Railways created by you. There should be nothing on the main “Local C” except the operating system and some installation programs. We store all personal folders and files separately. We can say that this is a certain essence that the user resorts to when he wants to share a hard drive in Windows 7.
Secondly, due to such “discharge”, the operating system will work much faster, since it will be less loaded.
Thirdly, in my opinion it’s just convenient.
Leave your comment
In this article we will look at how to divide a Windows 7 hard drive into partitions using the capabilities included in the Windows 7 operating system. It will not be a secret to anyone that for this you can use programs that are usually paid, and this is a disadvantage for many users will probably be the most basic.
By the way, so you understand for the future, we will not use axes or other sharp objects to divide the hard drive into partitions. Partition means when you have one physical disk, for example, drive C:/, and in order to create another partition, for example, drive D:/, you need to split it/split it, or, more precisely, pinch it off. That is, when partitioning a disk, we will pinch off a part from it and make another partition of the hard disk from it. Thus, from one physical disk (which can be touched), we will create logical disks (virtual), but in fact, as you understand, this is one hard disk.
So, we're done with the theory, now we can start practicing.
First, open the “Computer Management” window by clicking “Start” - right-click on “Computer” - select “Management”.

Now select “Disk Management”.

This window provides all the information about the hard drives existing in the computer, what logical drives they are divided into and what their capacity is.
In general, this program presents a huge range of possibilities for managing disks; they can be compressed, deleted, formatted and changed drive letters. The only thing I would like to mention is that many of the features will require at least some technical knowledge about the peculiarities of the computer as a whole, so it is recommended that the average user use them as carefully as possible. So that you remember how to partition a disk in Windows 7, you need to perform this procedure a couple of times. This way you will absorb all the information.
On the monitor screen we will see that the program provided us with information about two hard drives (in my case) that are located inside the computer.

Disk 0 - 931.51 GB and Disk 1 - 465.76 GB. From a school computer science course, many probably remember that in computers the countdown starts not from “1”, but from “0”, which is why the first disk for us is represented as “0”.
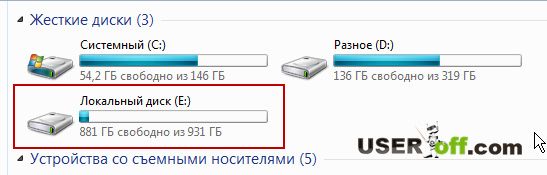
Today’s entire article will concern only Disk 0 (the system denotes it with the Latin letter “E”). I would like to note that this disk currently contains data, I will not copy or transfer it anywhere, I will leave everything on this disk, but I will also carry out the necessary operations with it. Let's see what happens with this data.
In order to divide our disk into two logical ones in Windows 7, right-click on it and select “Shrink Volume...” from the drop-down list.

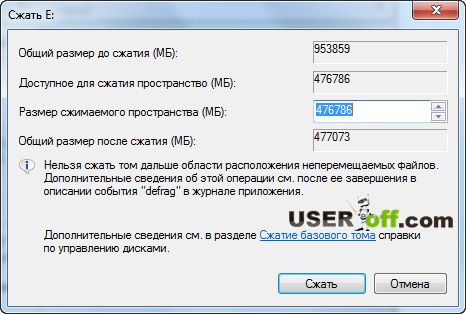
After a few seconds, the system will collect data (“poll” the disk) and present the information to the user.

In my case, “Space available for compression” is 476786 MB, that’s 465.6 GB.
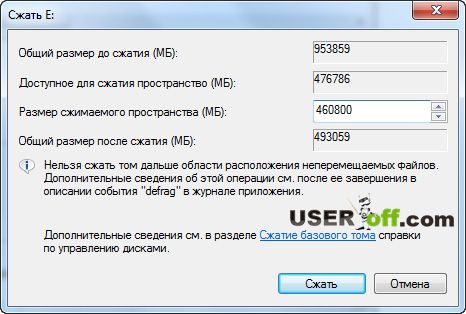
Manually change the “Compressible Space Size” to a value of 460,800 MB (450 GB). Since I want to split the hard drive into two equal sizes, so I specified 460800 MB (450 GB). Now we have indicated how much space we want to pinch off from the “Total Compression Size” (953859 MB).
If you have a 250 GB hard drive, then you must specify a different size accordingly. For example, make one disk 100 GB, and the other 150 GB.
The system will automatically calculate the “Total size after compression” (what remains of the disk) and display it in the corresponding field. In my case, it will be 493,059 MB (481.5 GB).
After such calculations and calculations, you can safely click on the “Compress” button. The process will not last long, but it will be clear, and as many of the readers will notice, this procedure is quite simple.
After some time, another disk will appear, and now one physical disk consists of two logical ones. Look at the screenshot below:
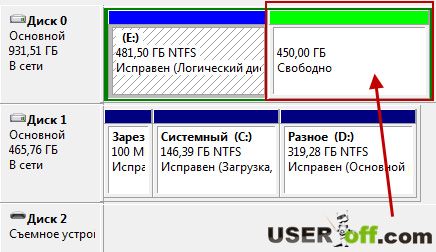
As you can see, the first drive with the letter (E:) remained in our computer, but another one appeared next to it. Now we need to make it visible to us in the “Computer”, and also assign a letter. By the way, go to “Computer” and make sure that this disk is not there. That's how it should be ;).
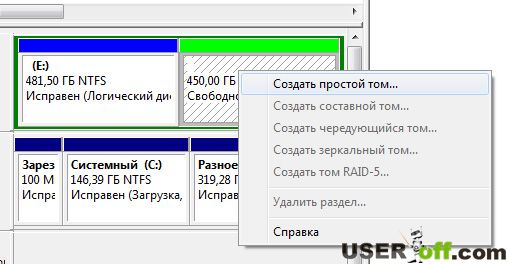
In order to turn this unallocated partition into a full-fledged logical disk, right-click on it and select “Create a simple volume...” from the menu that opens.
As a result, the “Simple Volume Creation Wizard” window will appear, in which we click the “Next” button.

In the next window, do not change anything in the “Simple Volume Size”, click “Next”.

The third dialog will ask you to specify the drive letter. After this, click “Next”.

You can assign a label to the disk, the same one that will then be displayed in Explorer. We also make sure to select the NTFS file system, check the “Quick Format” box and click “Next”.

In the last window, the system will provide the selected parameters and general information on the new logical drive. Once you have read it, you can click “Done”.

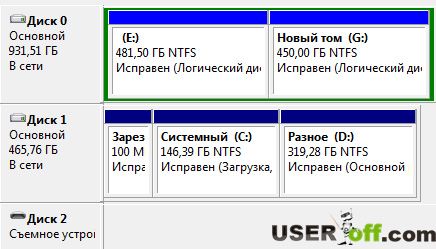
The window will present a new logical drive "G" next to logical drive "E" belonging to the hard drive "Disk 0".
What happened to the data that was on this computer? Everything is fine with them, let's go to the “Computer” and make sure of this.

All! As you understand, partitioning a disk in Windows 7 is not difficult and, at the same time, leaving all the data on this disk safe and sound. I hope that with the help of this article, you have understood how to partition a Windows 7 hard drive.
Dividing the hard drive into partitions in all Windows systems above Vista follows the same principle. Only the login procedure differs, but we will use the universal method.
Command line for partitioning disks
For our purpose, you can also use the console, for those who are used to working with the command line.

Disk partitioning during installation
Another convenient way is to create volumes during system installation.

We use third-party software
You can also use specialized utilities to create partitions. They differ from standard Windows tools in their expanded functionality and more stable operation. Also, such software is capable of splitting partitions without deleting data from them.
The first application that I would like to mention is Minitool Partition Wizard Free. As the name suggests, the application is completely free, but boasts quite powerful functionality.
All actions are intuitive. When the application loads, right-click on the section and select the required action. For example, to partition a disk, you need to select Split.
Then, by moving the slider or entering values manually, indicate the required size and we confirm changes. When the process is complete, the disk can be used. 
Another powerful free application is AOEMIPartitionAssistant. The interface and functionality are very similar to the above-mentioned application.
Launch the program and select the desired drive. Right-click on it and get the available actions.
We are interested in the point - Splitting a section.
Further everything is similar to the previous program. Set the size and confirm the changes. After that, in the main window, click the button Apply and the volume partitioning process will start. 
If you've never divided a hard disk into parts, then you're probably wondering why this is done at all. In fact, there are quite a few reasons - from banal convenience to safety. Why divide (partition) a hard drive? Once upon a time, hard drives were small in size - 20-40 GB. Although even then many began to split them into 2 parts: the operating system and user files. Today, in the “terabyte” era, this is especially relevant. High-quality videos and music can take up hundreds of gigabytes - why not have their own section? Work files and studies are much more important and therefore also a separate storage area. Also, several people can use the computer - each with their own space. Or an example of parental control: limiting access to discs with games and films is just for study. Convenient! In addition, there are users (I am one of them) who have several operating systems on their computer, such as Windows and Linux. And here, dividing the hard drive into a certain number of partitions is a natural necessity. A little theory
. What are the sections? It is advisable to know this information so as not to get confused. Firstly, a partition can be unallocated: this is when you seem to have allocated space for a new partition (“bite off” a piece from the “C” drive, for example), but the system does not see it. Don't be alarmed - your hard drive has not become smaller and you have not done anything irreversible. Most likely, this section is simply not marked yet. So, what are the sections? · "Primary", "Primary", "Primary partition"- something like this. If you have only one partition and the operating system is installed on it, then it is the primary one. It must have a file system (NTFS, FAT). There can be up to 4 such partitions on a hard drive. It happens that you bought a laptop, but you can’t add a new partition. There may already be 4 of them, and some of them are hidden (Recovery – hidden partition with a backup copyWindows recovery tool). · "Additional", "Advanced", "Extended partition". The extended partition itself has neither a letter label nor a file system. If you seem to have created a partition, but it is NOT displayed in the system, then most likely it is extended. The extended section can only be in a single copy. It is included in the number of main sections - that is, if you have an extended one, then in addition to it you can have 3 more main sections. So why is it needed then? - you ask. I answer. That’s why the extended partition was invented – so that you could bypass the 4 partition limit. It is “inside” the extended section that you can create as many logical drives. But in the system you will only see these disks along with the main partitions - they will all have their own letter designation and file system. The extended partition will exist hidden. This can be confusing because different programs may use different names. Or, for example, “forget” about them altogether - which is the sin of the system utility in Windows 7. But now, I hope, you understand this structure at least in general terms. I'll try to depict it clearly: - Main section “C:” (Logical 1 NTFS or FAT) - Main section “D:” (Logical 2 NTFS or FAT) - Main section “Advanced”(No letter and no file system) - Logical 4 “F:"(NTFS or FAT) - Logical 5 “G:"(NTFS or FAT) - Logic 6"H:"(NTFS or FAT) - Main section “E:” (Logic 3: NTFS or FAT) The letter designations for partitions can be any - not necessarily alphabetical. File systems too. FAT and NTFS are simply commonly used on Windows. If you have less than 4 sections, then let them all be basic - there is no point in making an extended one. Methods for partitioning a disk There are as many ways as there are programs. It should be noted that there are a lot of funds, most of them are paid programs. But in general, methods for partitioning a disk can be divided into 3 main areas. Method No. 1. System The system utility is quite simple and not very functional. You will be able to perform some operations with the main partitions, such as: resizing, creating a partition. The easiest way to do this is this way: the “Computer” icon on the desktop (it’s also in “Start”) - right-click. Then select “Manage” (you must have administrator rights). In the window that opens, in the left column, select the “disk management” utility. We wait a few seconds.  And here are our disks. Disk 0– and there is our hard drive with its partitions. What is in the CD-rom does not bother us, but only puts us in the right mood. As you can see, the system utility is all 6
considers hard disk partitions to be simple and basic. Although in reality this is not the case. The program does not see that the last 3 partitions have other file systems (not FAT or NTFS) and that these are logical partitions inside an extended partition. This is a big minus. The program still can’t do a lot of things, but it can quickly and easily perform basic operations on partitions. For example, we can very simply create a new primary partition by “pinching off” a piece from drive “D” or “C”.
And here are our disks. Disk 0– and there is our hard drive with its partitions. What is in the CD-rom does not bother us, but only puts us in the right mood. As you can see, the system utility is all 6
considers hard disk partitions to be simple and basic. Although in reality this is not the case. The program does not see that the last 3 partitions have other file systems (not FAT or NTFS) and that these are logical partitions inside an extended partition. This is a big minus. The program still can’t do a lot of things, but it can quickly and easily perform basic operations on partitions. For example, we can very simply create a new primary partition by “pinching off” a piece from drive “D” or “C”.  I forgot to say that the very first partition is, as a rule, on Windows 7, the so-called. “
Recovery”, which I mentioned at the very beginning. You shouldn't touch him. This is generally a hidden section. It will help you return your laptop or computer to its factory state by wiping the entire hard drive and returning Windows 7 to its original settings and software package.
I forgot to say that the very first partition is, as a rule, on Windows 7, the so-called. “
Recovery”, which I mentioned at the very beginning. You shouldn't touch him. This is generally a hidden section. It will help you return your laptop or computer to its factory state by wiping the entire hard drive and returning Windows 7 to its original settings and software package.  To separate a part from an existing volume, right-click on it and select “Shrink Volume...”. A window like this appears where you just need to select the required size for the new partition. I chose 1000 MB - I’ll delete it later anyway. You must choose the size yourself.
  After this, we had an unallocated area of 1000 MB in size. Right-click on it and select “Create simple volume”.
  What are you waiting for? Click “Next”! Since we need the entire section, we leave the maximum size.
  Next, assign a letter (any one from the list) and go “Next”.
  We choose a file system - we can’t do without it. We have selected what we need – NTFS, so we finish with the “Next” button.
  We receive a table with a preliminary summary and click “Finish” to complete the procedure.
  All. A new volume has been created. Congratulations! And now I, as the owner of a well-functioning system, have a reasonable question: “Why did I do this???” That's right - to show you. But now this new 1 GB volume is like a fifth wheel to me. Therefore, we will immediately analyze the procedure for returning the “bitten off” disk space to its place. Maybe it will come in handy for you too. First, let’s delete the volume we just created (right button, “Delete Volume”). Now instead of a volume there is an unallocated area. Let's move on. So, right-click on the disk from which we “stole” some space. And select “Extend volume”.
  By clicking “Next” we see a completely new window.
  We do not touch the size settings. Actually, we don’t touch anything, but move on - after all, our unallocated area called “Disk 0” has already been added to the “Selected” column. We again receive a preliminary summary and complete the process with the “Finish” button.
  That's all. Everything is back to its previous state! Method number 2. When installingWindows 7 Unfortunately, I can’t provide screenshots of this method, but everything is quite simple there, in Russian. I'll give you just a few tips. And remember that during installation you will not be able to read the instructions if you do not have another device with the Internet at hand. So it's better to print or write down all the steps. I will describe the sequence of actions. After you start installing Windows 7 and go through the language selection window, accept the license terms and select “Full installation”, a window will open asking you to select a partition for installing Windows. In this window you will see if you have any unoccupied space. There will also be a “Disk Settings” button, click it and tools for working with disk space will appear. Here you can format the disk or disks, as well as create new ones by clicking on the button of the same name, and set the desired disk size. All changes will take effect after clicking the “Apply” button. That's really all you need. If you did something wrong, calmly delete the partitions and create them again. Provided, of course, that there is no data there, otherwise formatting or deleting the partition will kill it. Method number 3. Specialized programs To talk about all the programs that help you break up a website, an entire website is not enough. I’ll just list which programs are the most popular today. Their functionality, as a rule, allows a lot. But we are only interested in disk partitioning, so if the program is in Russian, you can easily figure out how to create the partition structure you need if you read the article carefully. So, programs for working with disk space: · Acronis Disc Direktor; · Paragon Partition Manager; · Partition Magic; · Ranish etc. I hope you manage to distribute disk space conveniently and correctly. Good luck!
Physical storage is displayed in the system as virtual volumes, also called local disks or partitions.
The drive can be represented by only one volume, which holds all the disk space and stores all your files. Or it can be divided into several volumes, between which all available space and files are distributed.
The first option is very common, but not the most practical. Keeping OS components in the same place as movies, games and other entertainment content is not a good idea. You or other computer users may accidentally touch important files. And if the system fails and it is needed, then the rest of the volume’s contents will be deleted along with the old OS.
Fortunately, you can always split your drive into two or more partitions. In general terms, the procedure goes like this: you take away some space from an existing volume and use this space to create a new one.
For example, you can leave about 40–50 GB for the one with the installed OS, and allocate the rest of the space for a new section reserved for programs and entertainment content. In this case, system and personal files will be stored separately. And if you have to reinstall the system, your content will remain on the computer.
Before partitioning the disk, be sure to copy important files to other media. Your personal data shouldn't be harmed, but it's better to be safe.
The listed separation methods are suitable for both types of drives: traditional (HDD) and solid-state (SSD).
1. How to partition a disk in Windows
By regular means
For partitioning and other operations with drives in Windows, the standard Disk Management utility is used. To open it, right-click on the “This PC” shortcut and select “Manage” → “Disk Management”. You can launch the utility even faster using a special command: press the Windows keys + R, paste into the field diskmgmt.msc and click OK.
In the Disk Management window, you will see a list of local volumes (partitions) into which your drive is already divided. Among them there may be hidden system partitions that are not displayed in Explorer. This is normal, don't pay attention to them.
In the lower half of the window, right-click on the volume you want to split and select the “Shrink Volume” option.

Then specify the amount of data you want to allocate to the new volume and confirm compression.

As a result, the screen next to the selected volume will display the specified amount of free space available for the new partition. Right-click on this area and select “Create Simple Volume”.

If you have Windows XP, the compression option will most likely not be available. Then just right-click on the one you want to split and select “New Partition”. Further steps will be approximately the same for all OS versions.
When the New Volume Wizard appears on the screen, follow its prompts.

In the process, you will need to select the letter and label (name) of the section. When the wizard prompts you for a disk, select the NTFS system and confirm your choice. After formatting, the created volume will appear in Explorer. If this does not happen, restart your computer.
In exactly the same way, you can partition the disk in the future, adding new volumes.
In a third party program
If for some reason you are unable to partition a disk using standard Windows tools, try doing it in one of the third-party programs. For example, in the utility. It's free, compatible with all versions of Windows from XP to 10, and quite simple.
To partition a disk in MiniTool Partition Wizard, select the appropriate volume in the program and click Move/Resize Partition in the left panel. In the window that appears, in the Unallocated Space After field, specify the amount of free space that will be taken from the current volume in favor of the new one. Click OK.

A new nameless section marked Unallocated will appear in the main program menu. Right-click on it and select the Create command. In the next window, fill in the Drive Letter and Partition Label fields, select NTFS as the file system and click OK.

Returning to the MiniTool Partition Wizard main menu, click Apply on the top panel to apply the changes. The computer will restart and white text will appear on the black screen. Wait and do not turn off the device. When Windows boots, the created volume will appear in Explorer.
2. How to partition a disk on macOS
If you have a Mac, you'll need the pre-installed Disk Utility program to partition your drive. It can be found in the Finder menu → Programs → Utilities.
After launching Disk Utility, in the left pane, select the disk you want to partition and click on the “Partition” button.

A window with further instructions will appear on the screen, in which you can select the number, size and other parameters of the new partitions.

When you have made all the necessary settings, click “Apply” and wait for the changes to take effect.


