Sorting by color in google sheets. How to delete contacts on Android. SA Contacts Lite
Hello, friends! Most often Google Sheets are filled with big amount data and, as a result, find required lines or columns, for example, with similar values, is very difficult. But the developers foresaw this and, just like in Excel, added everything necessary functions that will help solve this problem.
In this article we will look at this. Let's figure out how to sort rows in ascending or descending order, and if you need to leave only certain data visible, then it is better to use a filter. We will also talk about it and tell you how a regular filter differs from the filtering mode in Google Sheets.
How is sorting done?
Sorting should be used when you need to organize data in a table. For example, arrange numbers from highest to lowest value, or, depending on the first letter, place words in cells alphabetically.
Select the desired range, open the “Data” tab and select “Sort Range”.
If you have selected data from the table along with the header, then check the “Data with header line” checkbox. Next, select which column you want to sort by. For example, I’ll sort the table by Cost - this is column B, which means I select it. Then mark with a marker how everything needs to be done in ascending or descending order.
There is an option here to “Add another column”. This is necessary if you want to sort first by price, and then, for example, by availability in stock. Click on the “Add...” button, but select sorting by column C.
When you're done, click "Sort."
After this you will get the desired result. In the example, I sorted the vegetables by price.
To return everything to the way it was, click the “Undo Actions” arrow at the top or the “Ctrl+Z” key combination.
In order for the table to change correctly, I need to select all columns, and, for example, not only B, if I want to sort by Cost. Because if you select only B, then after sorting the data in columns A and C will not correspond to it, since the numbers will appear in ascending order, and the data in cells A and C will remain in place.
How to make a filter
Data filtering can be used when there is a lot of data entered, but leave it at this moment you only need certain ones. For example, to display those products whose cost does not exceed 130.
Select the blocks in the desired column along with the table header, open the “Data” tab and click “Create filter”.
A button with stripes will appear in the header cell - it is needed to configure the filter. Click on it to open a window for setting parameters. Let’s first look at the “Filter by condition” option.
If you have created big table and it would be more convenient for her hat to always remain in sight, you can.
In the first field, select the appropriate condition: display only empty cells whose text begins or ends with..., a number less than or equal to the specified one, etc.
In the second field you need to enter data for the selected condition. For example, let’s see how many vegetables we have whose price is greater than or equal to 150. Then click “OK” and see the result.
You can also sort the rows left after applying the filter. In the window for setting filter parameters at the top there are two necessary items.
If you select the “Filter by value” option, then uncheck the boxes next to the items that you want to hide and click “OK”.
The “Select All” button will allow you to check off everything, and the “Clear” button, on the contrary, will remove the checkmarks in front of all items.
Filter by color
If your table has cells with data shaded in specific color, and you are interested in how to make a filter by color in Google Sheets, then you first need to determine its code for each color, and you can already apply a filter to it.
There is no built-in formula that would suit us, so we need to add custom function. Open the “Tools” tab and select “Script Editor” from the list.
The following window will open in a new browser tab to create a new project. Delete all written code - select it and press “Delete”.
Come up with a name for the project and click “OK”. After this, you can close the tab.
It is most convenient to display the color code in the column next to the shaded cells. Therefore, we place the cursor in D2 and write the following formula:
GetCellBackgroundCode(CELL(“address”,C2),$E$1)
Here C2 is the address of the cell filled with color, and E1 is needed to update the data (you can specify any other address, but do not remove the dollar sign), write any numbers.
Select D2 and drag the formula down by pulling the bottom right corner. “Loading” means that the calculation is in progress.
When the counting is finished, the cells will display a color code that matches the background in the adjacent block.
Now you can apply a filter to them. Select the entire range.
Open the Data tab. If you already have a filter in the table, then you need to disable it so that the “Create...” button appears, which we need.
In order to remove the filter in Google Sheets, you need to click the “Disable...” button on the mentioned tab.
When a button appears in the header, click on it. In the parameters window, select “By value” and leave checkboxes only opposite those codes that correspond to the desired colors. To apply, click “OK”.
Now we have only those rows left in the table whose cells are filled with green.
To keep the code column out of the way, you can group it. And when you need it, you just need to expand it by clicking on the “+” sign.
Now I’ll tell you why cell E1 is needed. It will be needed for recounting. For example, you have filled in the colors, you have written the formula and determined the codes. If you need to replace some colors, the code will not be calculated automatically. To do this, delete the number from E1 and press “Enter”. Now the formula will be recalculated. When you change the fill color again, write something in E1, for example. 123, and the codes will change again. And you need to do this constantly, just as you change the background of the blocks.
Creating a filter mode
We looked at how to create a filter, but this may not be suitable for everyone. The filter is good to use if you need:
- So that the data remains filtered.
- Other users who have access to the table also saw the filtering result.
If you just need to use it for work and after you finish everything needs to be turned off, then it is better to use the filtering mode. Advantages over regular filter he has the following:
- You can create several modes.
- Give each of them a name.
- Opportunity different users view the table in different modes.
- You can create a link to a filtered table and send it to one user, and then select a different filtering mode and send the link to another person.
- Ability to create duplicate modes and slightly change parameters in them.
- If you do not have rights to edit the table, but need to filter the data, a temporary mode will be created.
So, filter the data in the table as needed and open “Data” – “Filters” – “Save as...”.
The margins at the left and top will become gray– this means we are in filtering mode. Let's give the table in this form a specific “Name”. The “Range” to which the filter is applied will also be indicated.
On the right there is a gear-shaped button - this is “Options”. “Create a copy” – duplication of the mode. It will be useful if you want to slightly change the current filter, but you also need to leave the old one. “Delete” – deleting the mode. To exit from this mode and return to normal table, just click on the cross on the right.
This way you can create as many filtering modes as you need, applying the filter to specific table data. To view any of the filtered values, open the “Data” tab and select the desired name from the saved list.
Sorting data in a table is not difficult. The filter will take some figuring out, especially if you need to filter by cell color or create several filtering modes. But spend 20 minutes on this and working with Google Sheet will become much more convenient if only the necessary values remain in it.
Sorting and filtering data are useful and frequently used operations when working with any spreadsheet editor.
Sorting allows you to organize the chaos of data and identify patterns. By using filtering You can select only the information that interests you at the moment.
Sorting data in a table
In Google Sheets, sorting can be done by all data in the sheet, or only by the values of a designated range.
"Global" sorting only makes sense if there is no text information, (for example, column headers), charts and other objects. Otherwise, you will get a mess in which it will be difficult to figure it out. But if you still need this feature, use the “Sort sheet by column...” commands from the “Data” menu.
Let's take a closer look at range sorting.
Let's say we have a table of sales by month, and we want to sort the data for January in ascending order.
- Select all cells with sales information, including product names and data from other periods. If you select only the cells in the January column, the changes will affect only that column. Which loses all meaning, since we will not be able to associate the quantity sold with the product itself.
- Next, go to the “Data” menu and turn to the “Sorting range...” item.
- A settings window will open, where we indicate the column by which to sort and its direction (ascending or descending).
You can add other columns as needed. Then processing will be carried out sequentially. First on the first column, then on the second, etc.
Click the “Sort” button.

The result is a table ordered by the selected column. In the picture above, this is column "B". And we have a clear picture of the sales of goods in January.
Data filtering
Filters allow you to hide unnecessary data and thereby make it easier to navigate the table. You indicate what information you want to see and the system removes all unnecessary things. Let's look at working with filters using an example.
Let's use the same table about sales by month, as well as its diagram.

We will leave only information on vacuum cleaners and irons. For this:
- We go to the column for which we want to select data.
- In the “Data” menu, select the “Filter” command and a small arrow appears in the current cell, indicating the availability of filtering.

- Click this arrow and set up the selection: leave a checkmark next to the values that you want to leave, indicate the desired sorting option.

- Set up a filter for other table fields. In this case, the filters will overlap each other.
The result will be the display of information that satisfies the condition. Fields for which the filter is enabled will be marked with a funnel icon.

Please note that the system has automatically rebuilt the chart according to the data in the table. This is very useful when a diagram presents a large amount of information.
To disable the filter, use the Disable Filter command in the Data menu.
Saving filters
If you use certain filters often, you can save them and recall them at the right time. For this:
- Set up data selection.
- Go to the menu “Data” - “Filter” - “Save as filter...”.
- The row and column headings will change to dark gray, and filter tools will appear at the top of the table. With their help, you can specify a clear name for the filter, change the data range, and also delete a previously saved filter.
- After all the settings, click the cross on the right in the filter editing panel.

Now, to access the saved filter, click on its name in the “Data” menu. Come back to as before You can use the “Original” command in the same menu in the “Filters...” section.
In general, working with contacts on Android is both easy and difficult at the same time. The thing is that most people use applications installed by the manufacturer, and these can be either standard ones from the Android package or programs included in branded shells. So, first, let's look at the general situation using one example.
Android contacts are in application of the same name. As a rule, developers of shells for Google OS bring it to the first home screen, so finding it is not difficult.
The interface of the Contacts application is simple and clear. At the top there is a menu of Phone Book sources, icons for searching and creating a new contact, as well as a menu for the application itself.

By swiping left and right you can quickly go to contact groups, screen speed dial and even the call log.

The phone book sources menu allows you to select contacts from which to show in the application. There are options: SIM, Skype and other instant messengers, account Google posts and the phone book of the device itself. The user can check or uncheck the boxes next to each source. Helpful advice: if you're annoyed that Android is pulling up email addresses, nicknames from Skype and turns phone book into a mess, then just turn off the relevant sources.
The contact search in the application has automatic selection. To find the right person, it is not necessary to type his full name. It is enough to indicate the first letters and the application will select all matches.


When creating a contact, the user selects its location, then indicates a number (you can choose from 6 options) and email. You can add a contact to a group. In addition, for each contact you can specify additional fields: from birthday or other significant events to a custom note.


The application menu includes eight items. We will dwell on some of them later. The settings mainly concern the way contacts are displayed in the application. You can also set up synchronization with accounts, view the capacity of the SIM card, and select the tabs that will be shown when swiping left and right.
How to Transfer Contacts from Android to Android
Unlike iOS, Android offers big choice native options for transferring contacts from one device to another.


Every Android smartphone is linked to account Google. To transfer contacts from using Google, just make sure that synchronization of contacts with your old smartphone is enabled Google profile and Gmail. To do this, go to Settings - Account and Sync - Google - Gmail. Next, click on the account name and select Contacts. Depending on the settings made earlier, they will sync automatically or when clicked. Then on the new device it is enough to do the same thing so that the contacts appear on it. It is important that gadgets are connected to the Internet.

You can also transfer contacts from Android to Android using SIM card or VCard file. To do this, in the Contacts application, go to Menu – Contact Management – Import/Export Contacts. Here you can export contacts to a SIM card, memory card or phone memory.
The SIM is then inserted into new phone, you can also move the memory card there. On the new device, the same actions are performed, only instead of Export you need to select Import from the appropriate location.
If the user has exported contacts to the phone's memory, then he will then need to transfer the VCard file from there. This can be done by connecting phones to a computer - most Android phones are defined as removable disks, either sent by e-mail to yourself (but here it is more logical to use synchronization via Gmail, described above), or transmitted via Bluetooth. Then on the new phone you need to repeat the steps already described for importing contacts.

You can transfer contacts from phone to phone using using Bluetooth. True, this method is only suitable for small quantity records - and once you can send no more than 10 pieces. To do this, go to the Contacts application menu and select the Send contacts option. Then check the box necessary records and then select the sending method – Bluetooth. You must first establish a Bluetooth connection between the phones.
Also, the Send contacts item allows you to send them by e-mail, With via SMS or MMS, but these methods are not relevant when transferring contacts from phone to phone.
How to Transfer Contacts from iPhone to Android
There are two ways to transfer contacts from iPhone to Android, synchronizing with Gmail and using a VCard file. Both will require some effort.

Default to iPhone contacts synced with iCloud. You need to switch synchronization to Gmail without losing your phone book. To do this, go to Settings on your iPhone - Mail, addresses, calendars - Accounts/iCloud and turn off Contacts synchronization. A pop-up window will appear. In it you need to select the “Keep on phone” option. This is how we will save contacts on iPhone. If you choose another option, your contacts will be deleted from your iPhone.

Now you need to set Gmail as the default account for Contacts on your iPhone. The setting is done in the Settings section - Mail, addresses, calendars. In the Contacts sub-item, one of the last will be the Default Account. You need to select an item and check Gmail. After some time, your contacts will be synced with Gmail. If it already has contacts, they can be duplicated.

Next, you need to activate your Gmail account on Android. After some time, the contacts will appear on the phone. If this does not happen, then you need to look in the sources menu in the Contacts application to see which sources are activated. Possibly with an account Gmail entries the checkbox is unchecked. You may also need to force synchronization. This is done in Settings - Account and Sync - Google - Gmail.
To transfer contacts from iPhone to Android, you can use a VCard file. You can only create a file in iCloud. Therefore, first of all, you need to make sure that your contacts are synchronized with the cloud.

To do vCard file, you need to select all contacts using ctrl-AWindows or Command-A on Mac, in the settings menu of the iCLoud web application there is an Export vCard option. Save the file to your hard drive or flash drive. Any in a convenient way write it to the memory of your Android device.
We have already described further actions. In the Contacts application, you need to go to Menu - Contact Management - Import and Export Contacts, select Import Contacts, and then the location of the VCard file - in the phone memory or on the SD card. The Contacts application will copy all data from the file into the device memory.
Instead of recording the VCard file on your Android phone, you can import contacts from it into Gmail and then synchronize it with the gadget. To do this, in Gmail you need to select Contacts, and then select Import. In the pop-up window, select the last item. All that remains is to synchronize the device with Gmail.
How to Transfer Contacts from Windows Phone to Android
There are several ways to transfer contacts from Windows Phone on Android. You can use applications that allow you to make a VCard file. Since contacts Windows users Phone is synchronized with the account Microsoft entry, then they will be located in Outoook.com by default, you can add an account Outlook entry in Android. Finally, you can transfer contacts from Outlook using a csv file.

To transfer contacts from Windows Phone to Android via Outlook.com sync, you need to add an account to your phone. To do this, go to Settings – Accounts and synchronization and press +. From the proposed selection, click on Outlook, then enter your account information and select contact synchronization. U this method there are some disadvantages. In some cases, Outlook prevents you from editing contacts on third party devices, so it’s better to make contacts “native” to Android by transferring them through a file
On Outlook.com, you need to select People from the menu. Then click on the Manage button, and in the new menu - Export for Outlook.com and other services. The contacts will be saved to a CSV file. It needs to be saved to your computer.

Next, in Gmail, as already described above, you need to select Contacts. There is an Import item in the menu. If you click it, a pop-up menu will appear in which you need to select import from CSV file or VCard. All you have to do is select a file on your hard drive, the contacts will be uploaded to Gmail and then synchronized with Android.
How to transfer contacts from Android to computer
Transferring contacts from Android to computer is very easy. It is enough to create a VCard file. They can work with him Microsoft programs Outlook or Windows Contacts, as well as other applications.

To export contacts to a VCard file on your phone, you need to go to the Contacts application: Menu - Manage contacts - Import and Export contacts and select the option: Export to SD card or Export to phone memory.
All contacts will be saved to a VCard file. Then you can save it to the computer’s memory and open it in the appropriate program for working with contacts. The file can be stored as backup copy on the computer. However, it will not sync with Android. Therefore, it is advisable to synchronize Android contacts with Gmail.

By the way, you can also export contacts from Gmail. To do this, select the export contacts item in the menu. They can also be saved in a VCard file.
When opening a VCard in Windows programs There may be problems with displaying the Cyrillic alphabet. VCard is saved with UTF-8 encoding by default, and in Windows Windows-1251 is used, however, in latest versions Microsoft OS has expanded support for Unicode. However, if there is still a problem, then you need to open the file in any text editor, for example, Notepad 2, which supports changing the encoding. Change it and save. In fact, a VCard is a regular text file.
Sync Android contacts with Google
Android contacts sync with Gmail and Google by default if you have an account added to your phone. And without an account it is impossible to fully use Android.

To add an account, you need to go to Settings - Accounts and Synchronization. Here, click on Plus and select from the Google list. Next, enter your account information or create one.

Now in the list of added accounts will appear Google item. If you go into it, the name will be there mailbox"[email protected]". By selecting an account, you can manually start synchronizing various data and Google services. Contacts are at the very bottom of the list.
In the menu item Settings - Accounts and Synchronization at the very top there is an Auto-sync switch. If you activate it, all accounts will be synchronized automatically. If it is turned off, then synchronization must be started manually, as described in the paragraph above.
Importing contacts to Android
Importing contacts to Android is quite simple.
In the Contacts application, you need to go to Menu - Contact Management - Import and Export Contacts.

A menu will open with three options for importing contacts. Import from SIM. You need to select it to copy contacts from the SIM card to the phone memory. Import sSD-fold and Import from phone memory must be selected to overwrite contacts from contact files, for example, VCard. Android does not need to specify the location of the contacts file. The system itself will find all supported files and offer to select the one from which data will be imported.
If it is not physically possible to connect your phone to a computer in order to write a VCard file to your phone, you can send it by mail, via Bluetooth, upload it to the cloud and then download it to your device.
You can also import contacts to Android through the application Google Contacts. You can access it from Gmail. In the Advanced menu item, select Import contacts. Next, to transfer contacts to Android, you just need to synchronize your contacts with Gmail.

In the new Gmail versions The Import item is in the More section, not the Advanced section. It also supports importing contacts from Yahoo mail, Outlook, AOL and others. Therefore, if your contacts are synced with other email services, you can retrieve them from there directly. It is enough to enter your mail access data. However, Google warns that for a number of services, the contact import function is implemented by third-party developers, so everyone must decide for themselves whether to trust their credentials to third-party service providers.
Where are contacts stored in Android?
Contacts in Android are stored in the file contacts.db or contacts2.db. It represents the base SQLite data. It is easy to find software on the Internet that can be used to read such files. However, the files themselves are not so easy to find.
To access them, you must have root rights. If they are not there, the user simply will not see this file, he will not see the folder in which the database is located. Only if you have root rights can you go to Android/data/data/com.android.providers.contacts/databases/, where the contact files are located.
Export contacts from Android
You can export contacts from Android using the built-in functionality of the Contacts application.
In the application menu, select Manage contacts and then Import and export contacts. There are three options for export: save contacts to SIM, save to memory card or phone memory. When saved to a memory card or phone memory, contacts will be exported to a VCard file, which can then be used to import contacts on both Android and iOS. postal services, cloud, desktop applications.
How to Recover Android Contacts
The solution to this problem depends on whether contacts have been synchronized with Gmail and whether a VCard backup has been made.
If your contacts were synced with Gmail, then simply synchronizing them with your phone is enough. However, it may happen that contacts were accidentally deleted from your Android smartphone. It synced with Gmail and the contacts there also disappeared. It's no problem.
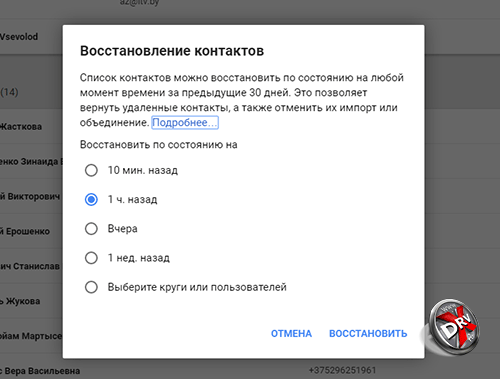
Google stores contacts for up to 30 days. In Gmail, in the Advanced/More section, select Recover Contacts. A menu will appear in which you select the date for restoring contacts. Once they are restored to Gmail, they can be synced with your phone.
If a backup was made to a VCard, then to restore it, simply load the file into the device memory or onto a memory card and import contacts from it, as described in the previous sections.
How to delete contacts on Android
There are several ways to delete contacts on Android, depending on how many contacts you need to delete and how securely you want to delete them.

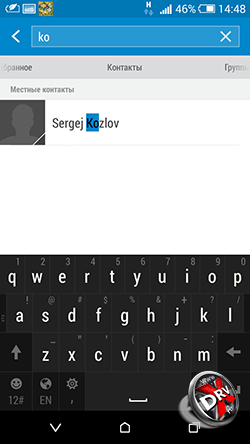
To delete one contact, you can open the Contacts application, select required Contact and press it while holding your finger at one point. will appear context menu in which there is a Delete item.

You can also go into contact and click on the three dots on the right top corner. This is the contact menu. There is also a delete option here.

The Delete contacts option is also available in the menu of the Contacts application itself. When you click on Delete contacts, the user will be presented with a list of contacts in which they can mark contacts for deletion or select all. Next, click on the Delete button.
You can simply reset all phone data. This is done in Settings – Backup and reset.
Backup Contacts on Android
Android offers several ways to backup contacts
The first method is simple and reliable, but keeping your contact backup up to date will be difficult. It's about about exporting contacts to a VCard file. How to do this, see above in the section Exporting Android contacts.
The second method is to synchronize contacts with Gmail. It is often enabled by default. How to manage synchronization is described above.


Selecting an account for Android backup
The third way is to enable backup for the entire phone on Google servers. This is done by Settings – Backup and reset. When activating the backup copy Android will make a copy of the phone on Google servers, not only contacts will be stored there, but also all personal data, application data, etc.
Contacts apps on Android
The Contacts application for Android has good functionality and is quite convenient, so there is not much point in third-party solutions, but we will still look at some applications
VCF Contacts
- Developer: AndloRD.
- Grade: 4,1.
- Number of installations: 1 million.
This application is an alternative for standard Contacts from Android. It is not distinguished by advanced functionality, but is rather interesting because of its different approach to storing the phone book. If Google Contacts stores all information in a database, then VCF Contacts stores all information in a vCard (vcf) file. This is the file that can be obtained as a result of export.


When installing the application, it takes an existing vCard file as a basis or creates one based on the phone number books android. As a result, the user always has an up-to-date vCard file on his phone. This can literally save you in the event of a sudden system failure.
Contacts can be sorted, sent by mail, via instant messengers. Unfortunately, the functions to add to Android and to another vCard file are only available in paid version.
Contacts+
- Developer: Contacts Plus team
- Grade: 4,1.
- Number of installations: 50 million.
Makes contacts more fun. All contacts are presented with avatars. This view makes it easier to call the right person - selecting by person faster. There are advanced search functions: you can search not only by name or phone number, but also by mail, SMS, etc.


Themes and various options phone book design. Contacts+ also has call and SMS log.
Contacts are stored in encrypted form.
The application has a separate backup function. True, in free version You can only save up to 2000 contacts, calls or SMS. Copying is configured separately for each category of information.
Save contacts to TXT
- Developer: Viked.
- Grade: 4,3.
- Number of installations: 15 thousand.
IN Android contacts can be exported to vCard format. This application allows you to save them in txt.You can save them in text file all contacts, individual entries or several.


You can also configure which fields will be saved in the file.
The file can be used in the future at the user's discretion. You can also send it by email.
Simpler Contacts Dialing
- Developer: SimplerApps
- Grade: 4,3.
- Number of installations: 5 million.
First of all, it is an alternative to the standard Android phone implementation. Not only the phone book is supported, but also a dialer, Caller ID, and work with SMS. However, the application has several interesting features for working with contacts. The most important thing is backup. You can do it like local copy contacts and save it in the application cloud. You can set up automatic backup generation. The application constantly searches for duplicates in contacts automatically.


Another one interesting opportunity- search for photos on Facebook. The application prompts the user to compare his friends in social network with a list of contacts and, if there are matches, use Facebook profile photos for Caller ID.
Also can be used for application interface various topics.
SA Contacts Lite
- Developer: samapp.
- Grade: 4,0.
- Number of installations: 1 million.
Applications for exporting and importing contacts to Excel files. Excel is best source to import into Outlook.
The application allows you to customize which fields will be exported to Excel. You can transfer all contact fields, including the photo. The only exception is personal melody assigned to the contact.


The application also automatically converts encodings according to Windows requirements And Microsoft applications so that names in contacts are displayed correctly.
The exported file can be stored on a memory card, sent by mail, or uploaded to cloud services.
The limitation of the free version is that you can only export the first 300 contacts. You will have to pay for a larger phone book.
Conclusion
Working with contacts in Android is well organized. There is practically no need to contact third party applications if you read our guide. Using Android you can do everything possible actions with contacts.
However, if you want to decorate and diversify your dialer or phone book, then Play Market enough applications. True, you need to be careful when choosing them. We are still talking about personal data.
Sorting data is a useful and quite commonly used operation. After all, when you work with large amounts of information in a table, organizing the data in it becomes a very important task. Sorting data in a Google Sheet helps to bring order to the data and identify patterns in it. There are different techniques for sorting in a Google Sheet or Selection Range.
We will look at how table sorting differs from range sorting, how to correctly describe sorting criteria, and how you can sort by several columns of a Google spreadsheet at once. We will also focus on ways automatic sorting data if they change.
In this article, you'll learn how to sort data to make your table contents easier to view and organize.
- how data is sorted in Google Sheets
- sort the entire sheet
- sorting a single range
- sort by multiple columns at once
- automatic sorting
How to sort data in Google Sheets
Google Sheets uses two types of sorting:
- Sorting by columns
- Range sorting.
Now we will talk about each of them in more detail.
So let's sort our table by column.
Sorting a sheet
With this sorting method, all the data on the sheet will be ordered. Be careful if you have multiple tables on your worksheet!
Attention! Before sorting the entire table by column, be sure to freeze the column headings - otherwise they will also be sorted and end up in the middle of your data!
So, in order to make it convenient for us to view the sorted data, let's first fix the column headers so that they are always visible and not hidden when looking down the table.
To do this, place the cursor on any table header cell and select View - Freeze from the menu and then specify required amount lines.
Then choose which column we will sort our table by.

By clicking the triangle next to the letter of the column, you can choose 2 sorting options - ascending or descending. This will sort the entire table.
Or you can select from the Data menu - Sort sheet by column... and then the required sorting option.

It is important to note here that if you have selected the entire column, then you will have the option to sort the data range (which we will talk about below).
But if you select "Sort range by column...", then only the selected column will be sorted and the rest of the data will remain unchanged. This will break the structure of your data, and there is no point in sorting it this way. Therefore, be careful!
Range sort
Let's look at the second method - range sorting.
This will be useful if you have several small tables of data in your Google Sheets, but you only need to sort one of them.
Sorting a range will not affect the data of other tables located on the worksheet.
Use your mouse to select the range of cells you want to rearrange.
Then you have 2 options:
- Right-click and select “Range sorting” from the menu that appears.
- In the menu, select Data - Range Sort.

Will open additional window with sorting settings.
Here you can specify that the data range you selected contains column headers. In our example, we did not select the column headers, so we left the checkbox empty. That is, we will sort the entire selected range. If you check this box, the first row of the selected range will not be sorted.
You can also select which column to sort by by clicking on the drop-down icon. We chose column B.
Here, by default, the sorting order is “ascending” from A to Z. If necessary, you can change it to the opposite - from Z to A.
Sort data in a Google Sheet by multiple columns
If you need to sort by several parameters, then in the sorting settings you can add one more or even several columns.

To do this, use the “Add another column for sorting” item in the sorting settings. Then select the desired column from the drop-down list.
For each column, you can select the sort order - ascending or descending.
As a result, the sorting will be performed sequentially - first by the first column, then by the second, and so on (in our case, first by B, then by D).

Here in our example, we sorted the orders first by customer and then by product. As a result, we see each customer's orders organized by product.
Automatic sorting of Google Sheets
Let's say we have a table with sorted and ordered information. But what if new data is added to the table? After all, they will no longer be sorted, and we will have to repeat the sorting again?
- Using the SORT function.
- Using a PivotTable.
- Using Google Scripts (we will not consider it here, since it is available only to developers).
For those who do not have programming skills, using the SORT function will be the easiest solution.
To do this, we will create another sheet, which we can call “Sorting”. We will place our sorted data on this sheet.
Our data will be located on the “Data” sheet.

Copy the column headings from the “Data” sheet into row A of the “Sorting” sheet.
In cell A2 of the “Sorting” sheet, write the function formula:
SORT ("Data"!A2:G , 2 , 2 )
Here "Data"!A2:G are the coordinates of the range from which the data for sorting will be taken.
Please note that we are only specifying the top left cell and the rightmost column. This gives us the ability to add new data to our original table without changing the sort formula.
2 is the ordinal number of the column in the specified range by which we will sort. In our case, we will sort sales by customer name.
2 - sort order. 2 means sort in ascending order, from smallest to largest. 1 means sort in descending order, from largest to smallest.

As a result, on the “Sorting” sheet we received sales data sorted by customers.
To test the capabilities of automatic sorting in Google Sheets, add another row with sales data to the original table on the “Data” sheet.

This entry will immediately automatically appear in the table on the “Sorting” sheet.

You can also use a pivot table for sorting. It also does not affect existing data and is placed on a separate sheet.
Use your mouse to highlight the table columns that you want to include in the PivotTable, and then click Data - PivotTable from the menu. Details about working with pivot tables and their capabilities you can read in our material.


