Test the hard drive for errors. Why do errors occur on the hard drive? Run Chkdsk using the command line
This article describes causes and solutions to the error “Windows has detected hard drive problems disk". If you see this warning, it means it's in progress. hard drive problems appeared. The system may be corrupted or may not boot the next time you start it. As a result, there is a possibility of losing your data, such as photos, videos, music, important documents and more.

This is due to the fact that problems or other serious errors may occur during the operation of the disk, damaging the operating system, slowing down or even stopping its operation. It is very annoying because it can appear every 5-10 minutes. In most cases, such a message is a sign hard drive malfunction disk, system failure, loss of a system file, etc. It is not recommended to ignore it, and the best solution would be to find out the reason for its occurrence.
Possible causes of the error
There are many reasons for this error to occur.
It usually occurs when a hard drive fails, but can also be caused by a registry error, low RAM, over-running or over-installing programs, a virus, malware, and many other reasons. You can solve it by trying to restore the system, delete unnecessary files system, or update it.
Possible causes of hard drive failure:
Mechanical or logical error. It is very likely that it is caused by file system corruption, bad sectors, or mechanical problem. The hard drive is responsible for storing data, and its failure will lead to data loss.
Virus. When a computer gets infected with a virus, it will no longer function as before, even if the antivirus software removed it. The antivirus does not repair the damage caused by the virus, but only removes it. In such cases, the message is due to data corruption by a virus.
Damage system files . Their damage can be caused by incomplete uninstallation of the program, deletion of important system information, improper shutdown of the computer, etc. A damaged file, in turn, will result in the absence of data required by the system for proper operation.
Human factor . Many users, trying to improve PC performance, may cause a system problem. For example, changing settings system registry, or the location and properties of system files. Because they are not good at system components, then follow incorrect instructions or perform incorrect operations. Some of them may damage your system or hardware.
How to fix the error
It is difficult to determine the cause from the error message. This doesn't mean that damaged hard disk, or a problem with the system. Listed below are a few solutions that may help in fixing it.
Solution 1: sfc /scannow command
Use standard tools to fix errors that are built into the OS. These tools can help fix many serious problems. Standard utility "System File Checker" will check and eliminate the error in their integrity. To launch it, open the menu "Start" and enter cmd in the search field. Then clicking right click mouse select "Run as administrator".

For more information on how to launch the command line, watch the video
At the command prompt, enter sfc / scannow and press the key Enter.

The process will quickly show the result. This command checks system files and replaces damaged ones with a backup copy. Do not close the window until the scan is completed.
Solution 2: chkdsk command
If the first method does not work, you can check with the command chkdsk. On the command line we write it with the drive letter that needs to be checked. If you want to test the default section, you don't need to write anything else.
Enter "chkdsk" and press "Enter".

If you need to make a complete scanning hard disk with automatic correction of system file errors and bad sectors, must be added to the command chkdsk parameter /F.
Difficulties may arise with checking the disk on which the OS is installed; the system will prompt you to check it the next time you reboot, for which you need to enter confirmation "Y".
After checking, the problem should disappear. Before attempting this command, it is recommended that you do backup data. Since correcting errors may overwrite some data.
Solution 3: Find bad sectors
Check bad sectors. They will help with this Victoria programs or HDD Regenerator. The latter even has a function physical recovery damaged sectors. This is achieved through “magnetization” faulty areas. For more information about how these programs work, see our channel:
If the drive has a large capacity, the scanning process may take some time. After its completion, a report on bad sectors will be displayed.
During the repair process, data stored on damaged sectors may be erased, so it is recommended to make a backup copy before starting it.
Solution 4: Service Center
Contact service center for disk repair. Repairs require special equipment and spare parts, which we do not have. ordinary users. Some disks may still not be recoverable.
How to turn off error messages
The error appears when the system believes that the disk is damaged and reminds you to back up your data. But there are times when everything is fine with it, but the OS throws an error. Which is very annoying when working on a computer, but it is possible to disable them.
To do this, press the key combination Win+R and in the window "Run" write a command gpedit.msc(not available in Windows Home version).

In the window that opens, look for the folder "Disk diagnostics" / "Diagnosis of the disk. Tune custom text alerts"


This will turn off notifications, but will not fix the disk problem. So before you do this, make sure that the HDD is not causing the problem.
Backup in case of error
As already mentioned, disk problems can cause the loss of important data. Therefore it is recommended to do backup copy, if such an error occurs. By copying it to another disk or media.
This can be done using standard Windows tools, more details in the video clips:
The cloning speed mainly depends on the disk speed, the selected mode and the amount of data.
How to recover files from "broken" disk can be found in the video of our channel
People keep more information on their own hard drives than ever before. It's natural: consumers demand more space, and hard drive companies are responding to their demands by producing massive 500GB drives that are also quite fast, spinning at 10,000 RPM. However, large, high-performance hard drives require more maintenance than small ones.
Let's take a look at the structure of your hard drive. Hard disks consist of a series of circular tracks called disks. Each disk sector is divided into small pieces called sectors. These sectors store data magnetically. You may have seen error messages that indicate there is an error in sector X or Y. This occurs when the electric motor drives the center spindle to a sector of the disk that cannot be read. In this case you can eliminate hard mistakes disk and allow the partition to be read. This article will help you when you need an easy way to fix problems with hard drive.
Project No. 1 - Check the condition of your hard drives
An easy way to learn how to restore hard crash disk is to run CHKDSK, a disk checking utility. This standard application Windows that allows you to scan HDD to detect errors. Frequent use This utility alone will allow you to eliminate all errors present on the hard drive and restore the hard drive to its level best performance. The utility works by marking error zones and asking the computer what to do with the error: skip it or fix it.
Here's how to do it:
1. Open the "Computer" folder.
2. Select the hard drive, click on hard icon disk by right-clicking the mouse.
3. Go to "Properties".
4. Go to the "Service" tab.
5. Click the "Run check" button.
6. For more full recovery check the "Automatically fix" checkboxes system errors" and "Check and repair bad sectors."
7. If a new dialog box appears, click “Schedule disk scan” to begin the process.
You should run this utility every 3 months to resolve hard drive errors in time and avoid slowing down your hard drive.
Project #2 - Organize fragmented data
The next way is to restore hard structure disk, tidying up the data contained on your hard drive. You load tons of data onto your hard drive every time you use your Windows. Your operating system is running great job, organizing this data. However, there is no perfect system. As a result, the data you add is often placed in unproductive areas of the disk. This is known as fragmentation. At this point, you need to take steps to defragment your data to fix your hard drive's poor performance issues. If there are problems in the registry, then you will probably have to “clean” it in order to effectively restore order to your hard drive. The defragmentation process can cluster bad registry data with healthy registry data, which can cause your hard drive to become sluggish.
How to defragment:
1. Open the Start menu.
2. Click on “Computer”.
3. Right-click on the image of hard drive C.
4. Go to the "Properties" section.
5. In the properties menu, open the "Tools" menu.
6. Select the "Defragmentation" command.
7. In the defragmentation menu, click the "Defragment" button
Project #3 - Throw away all the trash
Now that your files are in order and you've cleared up any hard drive errors, it's time to clean up your recently defragmented data. All files are saved in one or more places on your hard drive. Old versions of this data are often compressed by the system and put aside in the “far corner”. However, when your computer or registry needs specific file, the location of all versions of this file is determined. This slows down and complicates the process of eliminating slow hard performance disk. But Microsoft developed great tool, which allows users to remove unnecessary compressed and temporary data. In turn, this allows you to troubleshoot and fix slow hard drive performance caused by the presence of unnecessary data.
Here are the necessary instructions:
1. Go to "Start".
2. Select the "Programs" section.
3. Open "Standards".
4. Select "Service".
5. Click on the “Disk Cleanup” line.
Ultimately, these few steps should help you fix your hard drive problems and slow work Windows. When it comes to hard drives, the saying "bigger is better" can be a saying. But we should not forget that “the greater the power, the greater the responsibility.”
CHKDSK is a standard application for hard checks disk for errors, detecting bad sectors on the hard disk, correcting file system errors. The CHKDSK application (short for Check Disk) is built into the operating system Windows system.
The Chkdsk.exe program finds file system errors, bad sectors on the hard drive, and eliminates detected problems. If checking the disk for file system errors reveals problems, the CHKDSK check runs when the computer is turned on.
When using Chkdsk.exe in different Windows versions, there are some differences:
- On Windows XP operating system utility program chkdsk finds file system errors and repairs bad sectors on the disk.
- In Windows 10,Windows1,Windows 8,Windows 7, Windows Vista With default settings, CHKDSK finds file system errors but does not fix them. To correct file system errors and check disk sectors, you must manually set certain parameters.
Problems with the Windows operating system affect its performance. File system errors occur in the following situations:
- Due to a power outage - if the computer suddenly turns off, an unexpected system failure may occur (to prevent such situations, use a UPS - uninterruptible power supply).
- If the system is infected with malware.
- Due to a computer hardware malfunction.
Bad sectors may appear on the surface of the hard drive. When checking a disk with using chkdsk, bad bad sectors of the hard disk are marked as damaged, the system no longer reads or writes information from bad sectors of the disk. The system will try to recover data from damaged sectors (clusters, directories), if possible.
The chkdsk disk scan runs in two modes:
- V graphical interface means of the system;
- with help command line.
If your computer does not boot due to a problem, you can check your hard drive using installation DVD with Windows operating system. After booting from removable media, in the system recovery options, select the command line to run a disk error check.
In this tutorial I will show you how to use the CHKDSK application using an example. operating system Windows 10
CHKDSK check for file system troubleshooting in GUI
The easiest option to check the file system for errors: run CHKDSK program in a graphical interface using system tools.
Follow these steps:
- Launch Explorer.
- Right-click on the local disk on which you want to scan.
- In the “Properties: Local disk (X:)” window, go to the “Tools” tab.
- In the “Check for errors” section, click on the “Check” button.
- In the “Checking errors (Local disk (X:))” window that opens, select “Check disk”, despite the fact that the operating system writes that no errors were found when checking the disk.

Available in Windows 7 additional options checks, to run them you need to check the boxes next to the following items:
- Automatically fix system errors.
- Check and repair bad sectors.
- The scanning process begins and will take some time. Checking time depends on size local disk and the amount of data on the disk.

When checking file system errors, the status is scanned:
- Checked basic structure file system.
- File name connections are checked.
- Security descriptors are checked.
- The USN log is checked.
- After completing the verification process, information about its result will open. IN in this case, the disk was successfully checked, no errors were found. If errors are found, you will be asked to fix them.
For getting detailed information, click on the “Show details” link.

In the Event Viewer window, click Details.

In the “Event Properties” window, in the “General” and “Details” tabs, it is available detailed information about the result of the disk check.

The information obtained about checking the disk for file system errors can be copied to Notepad or another text editor for further study.
How to run CHKDSK (check disk) on the command line
chkdsk command to check the hard drive with given parameters executed from the command line:
- Run Command Prompt as Administrator. Read How to Find the Command Prompt in Windows
- For check system partition(system drive) in the command line interpreter window, enter the command:
- Press the "Enter" key.
- A message appears in the Command Prompt window stating that the CHKDSK command cannot be run because the specified volume is in use system process. To start checking the system disk after rebooting the system, press the “Y” key and then press the “Enter” key.
- During system reboot will be tested and restoring the system disk.

A sample command template looks like this: ["chkdsk" (application name)], space, [drive letter of the drive being checked followed by a colon ("c:", "d:", "f:", etc.), path, or filename], space, [command options].
Command parameters have the following meanings:
- /F - file system check and automatic correction errors found.
- /R - search for bad sectors on the disk, restore the contents (the command requires the /F key, example: “chkdsk C: /F /R”).
- /V - displays full file paths, displays file names on the disk, in the NTFS file system - displays cleaning messages.
- /X - disconnect the disk before checking, descriptors of this disk will not be checked (the mandatory /F key must be set, example command: “chkdsk C: /F /X”).
- /I - Performs a less stringent check of index items; CHKDSK performs a faster but less thorough check.
- /C - skips checking cycles within the folder structure.
- /L: size - Changes the log size to a value specified in kilobytes.
- /B - reset the scan results, re-check previously found damaged ones sectors of hard disk (the /R key is required, example command: “chkdsk C: /F /R /B”).
In most cases, to check the file system and eliminate bad sectors on the hard drive, it is enough to use the “F” and “R” flags.
How to disable disk check in CHKDSK when Windows boots
In some cases, disk check runs when you turn on the computer, before loading the Windows operating system. In most cases, you need to wait until the check is completed; a restart will not follow.
Constantly checking the disk every time the system starts, indicates the presence of problems and the need to eliminate them. You may need to consider replacing your hard drive. There are programs, for example, that constantly monitor the status of computer disks.
To disable Chkdsk from running when booting Windows you can use 2 methods: changing values in the operating system registry, or using the command line.
Disabling disk check on the command line:
- Run Command Prompt as Administrator.
- In the command line interpreter window, enter the command (“C:” is the name of the drive on which you want to disable the startup of Check Disk when the system boots), and then press the “Enter” key:
- If you need to disable scanning on several drives, add the corresponding drive letters to the command separated by spaces, for example, “chkntfs /x c: d:”.
- Using the command “chkntfs /d” you can return the original settings.
Switch off automatic check disk when loading the operating system in the following way:
- Launch Registry Editor (type “regedit” in the search field, run the command).
- Follow the path:
- Click on the “Session Manager” option.
- Find the “BootExecute” parameter, left-click on it.
- The Edit Multiline window displays the default value.

- To disable disk check during Windows startup, before the asterisk add the parameter:
- To disable scanning on multiple partitions, add drive letters separated by a space. Example for drives “C:” and “D:”:
Conclusions of the article
The CHKDSK system application, built into the Windows operating system, is used to check the file system for errors and to detect bad sectors on the computer's hard drive. Using the utility, you can fix system errors and eliminate negative impact(disable writing and reading) on the system due to the presence of bad sectors of the hard drive.
Hard disk (HDD) is the most important element of a computer on which all the necessary information, programs and user files are stored. Like any other component, over time the hard drive wears out and its normal operation, failures begin to occur. Along with physical wear and tear, which leads to the appearance of so-called bad sectors (bad blocks), logical errors associated with the file system, indexes and the main file table often arise.
For the time being, you may not observe problems in work hard disk, but this does not guarantee that one fine day the hard drive will not die for long. Therefore, it is important to periodically (once or twice a year) check your hard drive for errors and bad sectors that require repair. Regular monitoring will allow you to track the condition of the media and respond in a timely manner to changes in its condition. Of course, you should not neglect such a proven method of protecting information as backup. The most valuable data must be duplicated on a backup storage device.
Symptoms of a failing hard drive
In most cases, HDDs operate uninterruptedly for several years without requiring any special attention. However, in case of improper use ( physical impact, lack of proper cooling) the resource of the storage medium is significantly reduced. In rare situations, there may be a manufacturing defect or sudden failure.
Failures in the hard drive may be indicated by loading the operating system for too long, the unreasonable disappearance of files and folders, and slow startup of applications. Obvious symptoms of a hard drive losing performance are slowdown of programs and long copying files. If the computer constantly hangs, and nothing but restarting helps, then in the process of identifying the causes, checking the hard drive should be the first point.
Using standard Windows 7/10 tools
You can test the media standard means Windows. The easiest way is to select in Explorer needed hard disk, click on it right key mouse and go to the “Service” tab.
Next, click the “Run scan” button and set the scan parameters in the window that opens. If both checkboxes are checked, Windows will automatically correct all system errors and restore damaged sectors during diagnostics.

The results of the audit can be found in the report.

Command line
You can also audit your hard drive using the utility chkdsk called from the command line. In fact, such a check will not differ much from the above option.
So, launch the command line by selecting the required Start menu item. Then enter the command in the window: chkdsk G: /f /r
- G – name of the hard drive being tested (select the drive you will check);
- f – error checking and correction;
- r – detection and recovery of bad sectors.

All information about found errors and bad sectors will be displayed as the diagnostics are carried out.

Third-party programs for checking your hard drive
There are many programs and utilities for finding bad sectors and fixing them. HDD errors. We will list only the most famous ones.
Victoria
Perhaps the most popular hard drive checking tool. The program can be launched as in Windows environment, and in DOS mode from a bootable flash drive.
The interface provides five tabs: Standard, SMART, Tests, Advanced and Setup. First of all, go to the section Standard, where in the list of devices we select the hard drive we are interested in. IN Drive areas passport will display basic information about the HDD.
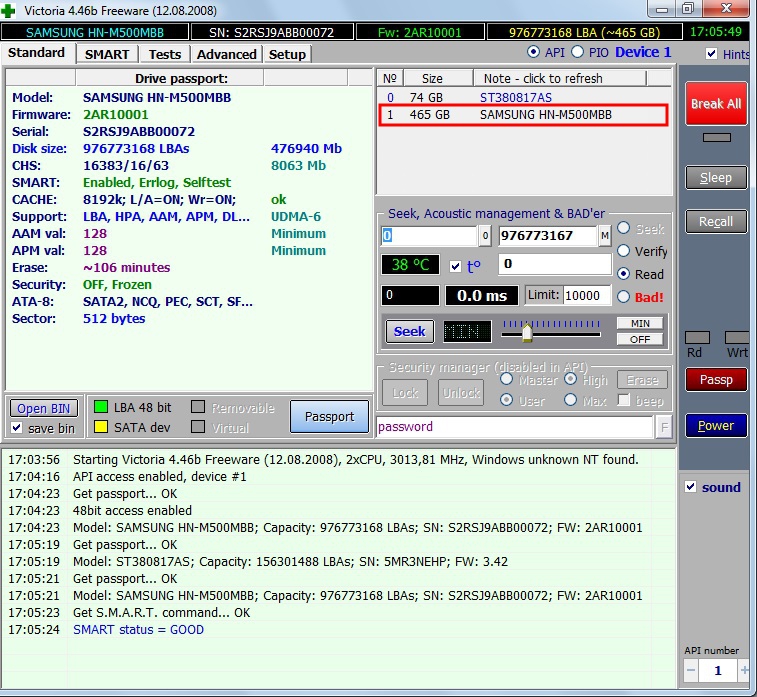
Next, select the tab SMART and press the “Get SMART” button. SMART (Self-Monitoring, Analisys and Reporting Technology) is a hard drive self-monitoring technology. Those. The hard drive monitors its operation during operation, recording information on a set of parameters that allows one to assess the condition of the media. It is this service information that we are trying to obtain.
After clicking “Get SMART”, either the inscription GOOD on a green background or the inscription BAD! will appear to the right of the button. on red. The second option will indicate that the media is in unsatisfactory condition and will most likely have to be replaced. For more detailed study SMART statistics, pay attention to the list of parameters on the left. Here we are primarily interested in the attribute 5 Reallocated sector count, indicating the number of sectors remapped. If there are too many of them, then the disk has begun to “crumble,” that is, its surface is quickly degrading and it is urgent to make a copy of all data. In this case, there is no point in restoring the hard drive.

Chapter Tests makes it possible to check the hard drive for bad sectors, as well as try to “cure” or reassign unreadable blocks. For simple testing of the hard drive, set the switch to Ignore and start the test with the Start button. Sector health is assessed by measuring response time. The smaller it is, the better. Each response time range has its own color designation. The slowest blocks are marked in green, orange and red. Sectors that could not be read at all are marked in blue. If there are a large number of “slow” and unreadable blocks, the hard drive should be replaced.

The Victoria program allows you to restore bad sectors, but we will not consider all the nuances of the procedure. Moreover, “treatment” often contributes only to a slight extension of the service life of the storage medium. To reassign bad blocks, perform a check with the mode enabled Remap. If the restoration was successful, do not rush to rejoice. Re-diagnostics the disk after certain period operation. The appearance of new bad blocks will indicate that the degradation of the hard drive is irreversible, and it’s time to find a replacement.
HDDScan
This is another one convenient program to identify problems with hard drives. After launching the application, select Select list Drive drive that needs checking.
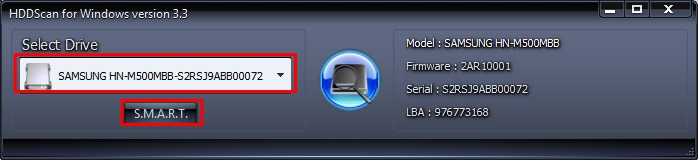
Below we click on the “S.M.A.R.T.” button and get acquainted with the provided report.

Now let's diagnose the disk surface. Click on the round button to the right of the drop-down list of media and select Surface Tests in the menu that opens.

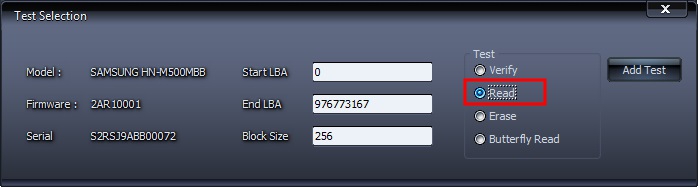
Click on the Add Test button, thereby adding a test to the list and starting its execution.

You can receive information about the progress of testing in Graph, Map, and Report modes. All blocks are also distributed into groups with corresponding color markings depending on access time.


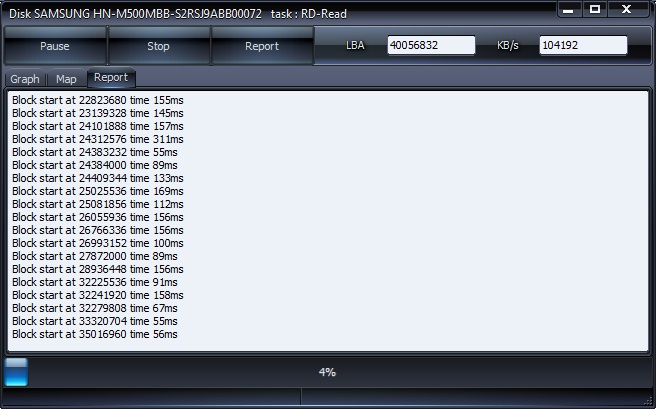
At the end, a final report is generated.

Perhaps this is all we wanted to tell you about the methods of checking a computer’s hard drive for functionality. We hope the information provided will be useful to you and help you save important data.
Computer using standard program“check disk (chkdsk)”, included in operating systems from Microsoft.
I don’t know how it is at work or at home, but for our IT department, work increases immediately after sudden shutdown light on one of the floors of our organization. I remember one time an electrician was changing the socket and, without being at all embarrassed, turned off all the automation on the staircase, and that was about fifty computers in one wing of the floor, two 50-port switches and wireless wifi access point in wiring closet:)
And as winter approaches, such things, alas, happen more and more often (people begin to abuse heaters of all kinds and power). Operating systems really do not like such manipulations with energy supply, and not all user computers are equipped.
What usually happens is the following. After another similar mass blackout, there are always one or two computers on which, after the power supply is restored, . At an arbitrary stage of loading, the operating system goes into a cyclic “reboot” (reboots) and here our intervention is urgently required :)
In such cases, as a rule, you need to scan your computer's hard drive with a check disk program, which checks the integrity of the OS file system and tries to eliminate any errors and inconsistencies found.
Let's first see how you can check your hard drive using a graphical Windows interface?
To do this, right-click on the icon the desired disk and select “properties” from the menu that opens. In the window that appears, go to the “Service” tab.
And there we click the “Run check” button.

Under the "Check Disk Options" we have two checkboxes:
- automatically fix system errors
- check and repair bad sectors
We can select any of them (or both) and click the “Launch” button.
This graphical interface launches standard utility"check disk", to check the hard disk using the "chkdsk" command. Moreover, if only the first checkbox is checked, the program checks the hard drive in three stages, and if there is a second one, it adds two more levels of checking to these.
After completing all (three or five) stages of the scan, the program will notify us that the procedure has been successfully completed and (for Windows 7) offer to review its results. By clicking the arrow next to “Show details”, we can see a list of all the checks that the utility has done.

Graphics, windows, buttons... all this is great, but let's dive a little deeper with you and see how you can check your hard drive using the command line " cmd»?
Note: we discussed working with the cmd command interpreter in one of the .
There is a task - to check the hard drive of a computer that has stopped booting (usually after a sudden power outage) and restore the operating system to functionality.
What do I do in such cases? I remove the drive from the “victim” and connect it as an additional one to my computer. I click the "Start" button (for Windows XP - run) and in the field that appears I enter cmd.
Note: a similar procedure can be carried out on the same (damaged) computer, booting from some kind of recovery disk like a “Live CD”, but for me personally, it’s more convenient. I, to the fullest, carry out general preventive maintenance for the “patient” and test the drive for the presence of . They also like to appear after such “surprises”.
I offer now in line command interpreter type the following: chkdsk /?
Design " /? " will allow us to view all the available arguments (keys) that we can apply along with core team chkdsk.

As you can see, the explanation for each “key” is given in Russian, so it won’t be too difficult to figure it out. Additional arguments are introduced through the sign “ / "(right slash). Now let's try to check the hard drive with the chkdsk command.
Take a close look at the screenshot below:

Circled in red at the top is the structure “ chkdsk d: /f/r"What does it mean? Check (chkdsk) drive d (d:) by applying the keys " f" And " r"(what they do can be found in the previous screenshot). Just below you can see the completed stages of this check and the number of remaining ones (stage 1 of 5, stage 2 of 5, etc.), as well as the percentage of completion of the current one.
What's interesting is that running the chkdsk command with the attribute /f starts a check in three stages, completely similar to what happens after selecting the first checkbox in the graphical interface:

Adding a "key" /r identical to checking the second box in the screenshot above (check and repair damaged sectors). In fact, to check the hard drive, the same utility is launched. It’s just that some people find it more convenient to use graphic windows and a mouse, while others make do with the command line.
The check window at boot and before the operating system starts is slightly different, but the essence remains the same:

At the top it is indicated which logical drive Now it is checking what type of file system it contains and below are the verification steps that are already familiar to us. For Windows 7, similar information is presented on a black background.
So, let's go back to our console. A complete program report might look like this:

The item marked in red is of paramount importance to us here: the number of kilobytes in bad sectors. If there is “0” here, then everything is fine :)
Let's take a quick look at what exactly each of the hard drive verification steps does?
The first pass checks the files. During this phase, CHKDSK checks the entry information for each file in the main table MFT.
Note: MFT - Master File Table (master file table), which contains information about all files and their attributes located on the volume with the file NTFS system. Approximately 12% of disk space is reserved for it.
The first stage is checking each file for internal consistency (ex: the same data sector is marked as belonging simultaneously to two different files)
During the second stage, the indexes are checked. What it is? These are the directories of the file system, it is checked whether the record segment for each directory and file is contained in the main file table, as well as the date of the modification time of the files and their size. The CHKDSK command checks to see if any files are orphaned (empty) or have an incorrect MFT location record.
Further (at the third stage) of checking the hard drive, security descriptors are analyzed. They contain information about the owner of files (directories) and access rights to them at the file system level. Verifies audit information for user data sets.
If the fourth stage of checking the hard drive is used, it includes a search for bad sectors (bad blocks). If one is detected, the program automatically adds information about it to the MFT table and more entry no processing is performed on it and the sector is excluded from the file table.
The fifth stage is to check free space on disk. There is nothing special to comment here :)
This way we can check our hard drive for the correctness of all the metadata it contains.
The term "metadata" in this case means "information about data." Metadata ensures the integrity of the file system and also contains information about all its files and directories. It contains information about the clusters that make up each file, which clusters are free and which are busy, contain bad sectors, etc.
And now - harsh reality! :) Unfortunately, it happens that the metadata structure is so corrupted that using the command chkdsk not only does it not help, but it can further complicate the situation in restoring the operating system.
On the other hand, there were times when my inner instinct told me to check the hard drive using this tool and I got the result I needed. So try it and decide for yourself whether to use this recovery tool or not?
The screenshot below is a photograph of one of the longest verification cycles in my practice. The utility worked for more than two hours, while the following picture was constantly displayed on the monitor:

But from the blinking LED indicator of the hard drive on the front part, it was clear that there was an active exchange of data with the drive, so I waited stubbornly and finally waited complete completion this process. After reboot Windows work has been restored!
The CHKDSK command actually does a lot of checking and can fix a wide variety of errors found in the file system and in separate files. For example, you may see these “scary” messages while scanning a disk:

The second is another example from practice:

And now the team is making corrections to the file itself hard system disk.

In all cases, the final scan result is positive. Do not neglect this “repair” opportunity provided by the developer himself! Sometimes disks with a damaged file system (when you can’t even enter the disk and in its properties file system displayed as RAW) "miraculously" come back to life only after using this command.


