Check for hard drive failure. Checking and fixing disk errors using the Windows Chkdsk utility
As you know, all computer data is stored on a small, but often very capacious storage device - a hard drive, or hard drive, HDD (Hard Disk Drive). So, like any device, the hard drive gradually wears out, which affects its performance and performance. You can notice this: if your PC (laptop, netbook) is a “seasoned” friend who has been working for several years, it may begin to freeze, “think” for a long time when accessing certain folders, etc. These are sure signs of the appearance of “bad” sectors on the hard drive. In this case, he simply needs your help in the form of checking and, if possible, correcting errors in his work. This can be done in several ways, I’ll tell you about everything in order. If you decide to figure out how to check your hard drive for errors, then my recommendation is to read this article to the end, and only then start following the steps described in this article.
In order to properly maintain your hard drive and extend its life for many years, you need to understand some basics of how the drive works. Therefore, first I will try to tell you in as simple a language as possible what is happening inside the hard drive, and because of what it loses its “former grip” over time, and after that I will mention what programs will help you in maintaining and fixing your hard drive. If you do not have the desire to delve into the problem literally from the inside, but plan to simply go through instructions like “click here - click here” - move to the second part of the article with a description of methods and programs for checking the hard drive. The first section of the material will be devoted to theory, and I will try to make it as interesting and understandable as possible. Go!
How the hard drive works and formatting
A hard drive is a device consisting of several glass/aluminum plates coated with a ferromagnetic material. Above the surface of each platter (disk), at a distance of about ten nm, there are magnetic heads that read and write information to the disk.
During the production of hard drives, the final stage involves applying tracks, sectors and marks to the magnetic surface of the disk. This process is called low-level formatting. Thus, service information is written to the disk. In simple terms, the “magnetization” of service information is higher than that with which we will subsequently fill the disk. That is why user data and files can be written and erased many times, but service information cannot.
IMPORTANT: if you read/heard somewhere that low-level formatting will help fix hard drive errors, and this can be done using any program, remember: this operation is performed once and only at the factory using expensive equipment. It is impossible to perform low-level formatting using software at home! Of course, you can format it, but it won’t be the formatting we would like.
Sometimes I resort to such formatting (there are special utilities), but I do this procedure to format the disk when other programs refuse to do this. Ask why this happens? Because some programs, if they cannot format the disk, write a message, for example, “Format the hard disk could not be completed,” and if you use special programs that format several times in the same area, then sometimes this option works - when the disk cannot be easily formatted.
The hard drive is equipped with some semblance of an operating system (not Windows, which we all know about and use). With the help of marks and OS commands applied to the disk, the drive “understands” exactly where the magnetic head needs to be delivered at the current moment in time for reading/writing. The table of tracks, sectors and labels, as well as the disk OS - Firmware, firmware - is stored in a special section, closed from the BIOS and the operating systems we are familiar with, in a zone. Therefore, if you suddenly wonder whether you need to update the firmware of your hard drive, know: you don’t need to do this. After all, a hard drive is not an IPhone, and it doesn’t need updates for a modern hard drive to function properly.
Bad HDD sectors – physical, logical, software
We are getting closer to the problem - the hard drive is losing its functionality.
So, the disks are marked into tracks and the tracks are divided into sectors. By the way, the minimum hard disk sector size available to the user is 512 bytes. What happens if a sector suddenly becomes unreadable? The hard drive controller gives the command to make a few more reading attempts (at this moment we, on the other side of the monitor, can notice how the PC is slightly “stupid”), and if the operation is unsuccessful, the system marks the sector as faulty (failed, bad block ), and the information that should have been written to this sector is written to another working sector in the reserve section. At the same time, information is entered into the labels table that this sector is now considered non-working. The process of redirecting from bad sectors to spare ones is called “remapping”, or in slang “remap”.
Note: imagine: the magnetic head cannot always continuously move along the tracks sector by sector - due to bad sectors, it has to jump to the backup track and back every now and then. For this reason, by the way, you can hear extraneous sounds and crackling sounds from the HDD. Naturally, the more bad sectors there are on the disk, the slower the hard drive works.
There are several types of bad sectors:
- Physical bad block. Such sectors arise as a result of physical, mechanical damage to the hard drive - shedding of a ferromagnetic material, cracks, chips. It is logical to assume that their occurrence is due to physical impact - vibration, impact or high temperature (overheating), dust penetrating inside the disk. A physical bad sector cannot be corrected by any software; the only solution is to enter it into the defect table and assign it a “deputy” on the backup track. Therefore, do not knock on your laptop and also be attentive to the computer system unit, which is usually placed under the table.
- Logical bad block. They are a consequence of a violation of the logic of the hard drive and are divided into two categories: correctable and irreparable.
- Uncorrectable logical bad block. In this case, service information is violated - sector label, address, etc., which is sometimes possible to correct, but is only accessible to specialized specialists with expensive equipment.
- Correctable logical bad block. Along with the information, an additional parameter is written to the sector - a checksum, or Error Correction Code (ECC), which allows you to restore information even in the event of a failure. It happens that you turn off the computer (for example, from the outlet while the system was still running), information was written to the hard drive, but the checksum was not entered into the table. This is where HDD recovery programs come to the rescue, which, “without asking” the sectors, forcibly write zeros into them, and, accordingly, new checksums. After this, the sector returns to work, and the disk is formatted without problems using standard Windows tools. If formatting is not done, the hard drive will access the disk multiple times and your computer or laptop will freeze due to an incorrect checksum.
- Software bad block. The name itself tells us that such blocks arise during the operation of the program, which means that such problems can be corrected with the help of any program. This includes incorrectly marked sectors and other “small things” that can be corrected by regular formatting.
IMPORTANT: I'm sure you all know this very well, but just in case I'll say it: formatting will destroy all your data on the disk.
Therefore, before formatting a disk, make sure that all the necessary information from it is copied to another medium. Otherwise, you will simply lose it.
Standard Windows utilities for checking hard drives
We've sorted out the theory, let's move on to practice. There are several applications for working with “problem” hard drives that have proven themselves to be a powerful and reliable tool. First things first.
In the window that opens, go to the “Service” tab and see that we have few options - you can check for file system errors or run defragmentation. We won’t stop at checking (press the button and check), but I’ll say a few words about defragmentation. As the name implies, this process is the reverse of the process of disk fragmentation as a result of a remap (this was discussed in the theoretical part of the article above). Simply put, defragmentation is the organization of the disk table and spare sectors for faster access to the latter and speed up the response of the hard drive as a whole. It is recommended to run disk defragmenter occasionally. However, remember: any operation to check or repair a hard drive is a lengthy process, so you need to allow yourself some time.
Conclusion: you need to check the disk for errors in the file system and you can also defragment the disk.
Another way to check the disk using standard means is through the command line. We launch it - press “Win” + “R” on the keyboard, then enter “cmd” and click “OK”. Next, write the command “chkdsk C: /f /r”, where “C:” is the letter of the drive being checked, “/F” and “/R” are parameters indicating that it is necessary to automatically correct errors, as well as check for bad sectors and try recover information.
Attention! If you are unable to use this command, namely, you do not have enough privileges to use this command, then below I will tell you what to do in this situation.
Note: the method that I described above rarely helps, so I highly recommend the chkdsk utility, which saved me more than once.

You should also take into account that if your physical disk is divided into logical drives, for example, C, D, etc., then you need to check all your logical drives.
If the disk you are checking is currently in use, the system will prompt you to schedule a disk check the next time you restart the PC, you need to press the Y key: “Y” - “Yes”, and “N” - “No” ). After which you must reboot your device.
If the disk is free, a check will be carried out, the results of which will be displayed on the screen. The program may ask you to disconnect the volume (local disk), in which case you also press the “Y” key on the keyboard. Below I have shown an example of this message:

If you run the command “chkdsk /?”, the program will display a complete list of parameters that can be used with this utility, however, in most cases, the method described above is sufficient for diagnostics.
If the utility writes that you do not have privileges to execute the command, then you need to run it as an administrator. It's easy to do. For users who have Windows 8 or 10 installed, press the “Win” + “X” keys, a menu will open where you need to select “Command Prompt (Administrator)”. After this, you can safely enter the command you need. If Windows 7 or XP is installed on your computer, then you need to search for “cmd” or “command line”, right-click on it and select run as administrator.

By the way, you can return to the results of the disk scan later, even after closing the command line and restarting the PC. For this:
- Press “Win” + “R”, write “eventvwr.msc” in the line, click “OK”.
- In the “Event Viewer” window, open “Windows Logs”, right-click on “Application” and select “Find...” from the menu that appears.
- Enter “chkdsk” into the search bar and find the corresponding log entry.

Well, we’ve sorted out the standard checking tools, now let’s look at software from third-party manufacturers.
If Windows does not boot for you, then connect the hard drive you are testing to another computer. This way, you will boot from another hard drive, and check your own (which may have errors).
Checking the drive using Seagate SeaTools
This program, as the name suggests, was released by the manufacturer of the HDDs of the same name - Seagate, but this does not prevent it from being “omnivorous” and working with any disks. You can download it from the official website, the software is free: . At the time of writing, you need to click on the link “SeaTools Diagnostic Software for Windows OS”, which is located on the left. After downloading and installing the program, you need to run it.
Next, select the disk that you are trying to restore to normal operation (by checking the box on the left) and click “Basic tests”. Here you can select options for working with your hard drive. In the picture below I showed what checking capabilities this utility has. You can use all the options this program offers. You can click on the picture below to see the program interface:
Like any self-respecting utility, there is a boot disk image (Seagate for DOS), launching from which will allow you to use the scanning functions before loading the OS. For example, when the system does not boot. It is advisable to check the hard drive in this mode. Because this way you will not have problems during verification.
In addition, the program has a “Help” section, which is entirely in Russian.
Checking Western Digital drives
The next utility is more narrowly focused and is designed to work exclusively with Western Digital HDDs. Its name is Western Digital Data Lifeguard Diagnostic. To download the program, go to the manufacturer’s website http://support.wdc.com/downloads.aspx?lang=ru, find the program in the list and download it. Next, run the program, right-click on the desired drive and select “Run Diagnostics”.
Traditionally, there is a version of a bootable iso image and the capabilities are similar to previous software, the interface is elementary.
Disk analysis with HDDScan
I’ll mention another worthy representative of the “army” of fighters against hard drive errors. Particularly noteworthy here is the testing function in linear recording mode - “Test” - “Erase”. When launched, the program forcibly writes data sector by sector, thereby returning most of the bad sectors to work (this was also mentioned above). By the way, if it is possible to disconnect the hard drive from your PC and connect it to another with HDDScan installed on board, then use this verification option. This way you will achieve maximum scanning efficiency. You can download the program on the website. After downloading, you need to unpack the archive, go to the unpacked folder and run the “HDDScan.exe” file.
To run the test, select your hard drive on the left, then click on the picture with the hard drive and select “Surface Tests”.
In the window that opens, leave everything as default – “Read” and click “Add Test”. So, we have started the scan, now we can double-click on the “RD-Read” entry with the left mouse to open a window where there will be detailed information about working with the hard drive.
If you have a lot of delays - from 20ms and above, then this means that your disk is already very bad and you need to think about where to copy all the important data that is on hire. In the future, you need to replace the bad hard drive with a new one. It is advisable to use the program on another computer so that no processes interfere with checking your disk.
Recovering a hard drive in Victoria
So we get to, perhaps, the most popular tool for “revitalizing” magnetic data storage devices. This program is sometimes very problematic to download from the official website and therefore I will give you a link to another site where you can download this program http://www.softportal.com/software-3824-victoria.html. I always try to provide links only to official sites, but sometimes developer sites do not open for some reason and therefore I had to provide a link to a third-party resource. This site is popular and therefore you don’t have to worry about viruses.
After downloading the archive, unpack it and run the program as administrator. Be sure to take this step!

At the beginning of work, select the “Standard” tab, and in the window on the right, select the desired disk, and then click on the “Passport” button. In the log window below you will see how your HDD was identified. If an entry appears in the log, it means that the program was able to read information from this hard drive.
If this does not happen and you see “Get S.M.A.R.T. command... Error reading S.M.A.R.T!” — probably the HDD controller is not working in the mode we need. To change it, you will have to go to the BIOS and go through the following path: “Config” - “Serial ATA (SATA)” - “SATA Controller Mode Option” - change from “AHCI” to “Compatibility” (IDE). Save the changes in the BIOS and continue working with the program.
Note: do not forget to return everything to its place after finishing working with Victoria.
So we got to the disk test: go to the “Test” tab, click “Start”.
As the check progresses, the cells in the left window will be filled with multi-colored rectangles. It is in our interests that they are all gray - this is the color of the working sector. But the blue and red ones are an indication of the bad sectors of the disk. If after checking there are especially many blue cells, then you need to run the check again, first turning on the “Remap” option (located at the bottom right). As a result of such a check, the program will try to isolate broken blocks (I also talked about this in theory), hiding them. It is also worth noting that orange and green rectangles mean that there are sectors on your disk where there are very high delays. If they are present, then this is also very bad.
IMPORTANT: if the results of the disk check are disappointing, I recommend copying the information to a backup disk, or being prepared to replace it. Once the disk begins to “lose” sectors, then most likely this process will continue. It is impossible to predict how long the disk will serve you. If this hard drive does not have the necessary files, and you only use it for browsing the Internet, then of course you don’t have to buy a new storage medium. The next time you have problems with this hard drive, it means that it is already unstable and you will need to buy a hard drive.
I tried to describe theory and practice as simply as possible. Of course, it will be difficult for the average user to study the material in 5 minutes, and therefore give your disk enough time to resolve the issue of its unstable operation.
In this article, I gave examples of utilities that computer technicians use, and if you use other programs, then there is nothing wrong with that. After all, the most important thing in your case is the result. Namely, to understand what to do with your media – restore it or it’s time to buy a new hard drive.
I hope I and this article were useful to you. Good luck with your testing and only high-quality hard drives!
Video that will help you work with Victoria:
Hard disk (HDD) is the most important element of a computer on which all the necessary information, programs and user files are stored. Like any other component, over time the hard drive wears out, its normal operation is disrupted, and failures begin to occur. Along with physical wear and tear, which leads to the appearance of so-called bad sectors (bad blocks), logical errors associated with the file system, indexes and the main file table often arise.
For the time being, you may not observe any problems with your hard drive, but this does not guarantee that one day the hard drive will not die. Therefore, it is important to periodically (once or twice a year) check your hard drive for errors and bad sectors that require repair. Regular monitoring will allow you to track the condition of the media and respond in a timely manner to changes in its condition. Of course, you should not neglect such a proven method of protecting information as backup. The most valuable data must be duplicated on a backup storage device.
Symptoms of a failing hard drive
In most cases, HDDs operate smoothly for several years without requiring special attention. However, in case of improper operation (physical impact, lack of proper cooling), the resource of the storage medium is significantly reduced. In rare situations, there may be a manufacturing defect or sudden failure.
Failures in the hard drive may be indicated by loading the operating system for too long, the unreasonable disappearance of files and folders, and slow startup of applications. Obvious symptoms of a hard drive losing its functionality are slowdowns in programs and long periods of copying files. If the computer constantly hangs, and nothing but restarting helps, then in the process of identifying the causes, checking the hard drive should be the first point.
Using standard Windows 7/10 tools
You can test the media using standard Windows tools. The easiest way is to select the desired hard drive in Explorer, right-click on it and go to the “Service” tab.
Next, click the “Run scan” button and set the scan parameters in the window that opens. If both checkboxes are checked, Windows will automatically correct all system errors and restore damaged sectors during diagnostics.
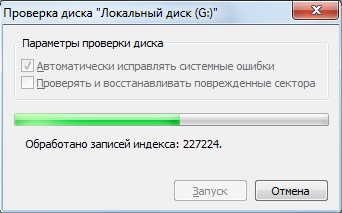
The results of the audit can be found in the report.

Command line
You can also audit your hard drive using the utility chkdsk called from the command line. In fact, such a check will not differ much from the above option.
So, launch the command line by selecting the required Start menu item. Then enter the command in the window: chkdsk G: /f /r
- G – name of the hard drive being tested (select the drive you will check);
- f – error checking and correction;
- r – detection and recovery of bad sectors.

All information about errors and bad sectors found will be displayed as the diagnostics are carried out.

Third-party programs for checking your hard drive
There are many programs and utilities for finding bad sectors and fixing HDD errors. We will list only the most famous ones.
Victoria
Perhaps the most popular hard drive checking tool. The program can be launched both in Windows and in DOS mode from a bootable USB flash drive.
The interface provides five tabs: Standard, SMART, Tests, Advanced and Setup. First of all, go to the section Standard, where in the list of devices we select the hard drive we are interested in. The Drive passport area will display basic information about the HDD.

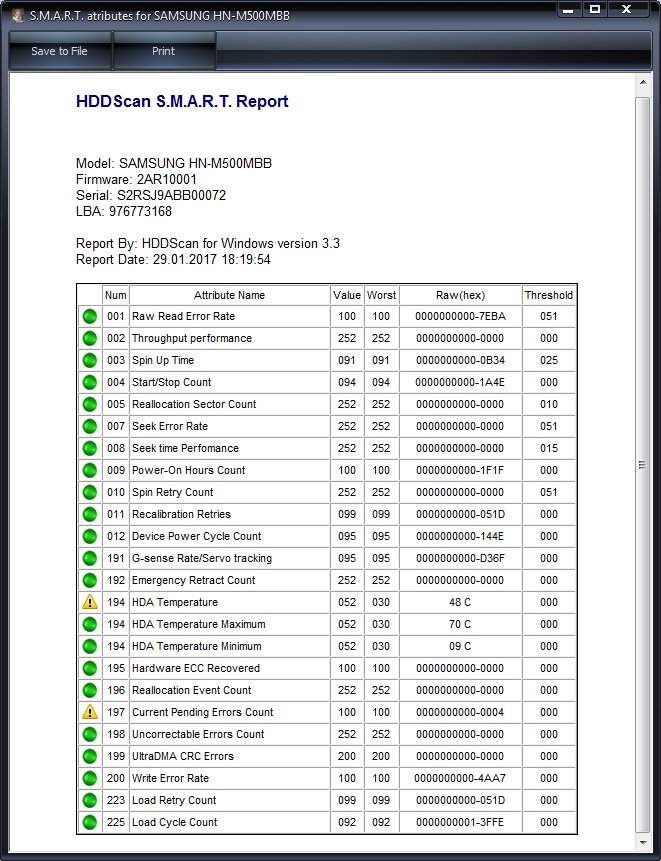
Next, select the tab SMART and press the “Get SMART” button. SMART (Self-Monitoring, Analisys and Reporting Technology) is a hard drive self-monitoring technology. Those. The hard drive monitors its operation during operation, recording information on a set of parameters that allows one to assess the condition of the media. It is this service information that we are trying to obtain.
After clicking “Get SMART”, either the inscription GOOD on a green background or the inscription BAD! will appear to the right of the button. on red. The second option will indicate that the media is in unsatisfactory condition and will most likely have to be replaced. For a more detailed study of SMART statistics, let's pay attention to the list of parameters on the left. Here we are primarily interested in the attribute 5 Reallocated sector count, indicating the number of sectors remapped. If there are too many of them, then the disk has begun to “crumble,” that is, its surface is rapidly degrading and it is urgent to make a copy of all data. In this case, there is no point in restoring the hard drive.

Chapter Tests makes it possible to check the hard drive for bad sectors, as well as try to “cure” or reassign unreadable blocks. For simple testing of the hard drive, set the switch to Ignore and start the test with the Start button. Sector health is assessed by measuring response time. The smaller it is, the better. Each response time range has its own color code. The slowest blocks are marked in green, orange and red. Sectors that could not be read at all are marked in blue. If there are a large number of “slow” and unreadable blocks, the hard drive should be replaced.

The Victoria program allows you to restore bad sectors, but we will not consider all the nuances of the procedure. Moreover, “treatment” often contributes only to a slight extension of the service life of the storage medium. To reassign bad blocks, perform a check with the mode enabled Remap. If the restoration was successful, do not rush to rejoice. Re-diagnostics of the disk after a certain period of operation. The appearance of new bad blocks will indicate that the degradation of the hard drive is irreversible, and it’s time to find a replacement.
HDDScan
This is another handy program for identifying hard drive problems. After launching the application, select the drive that needs to be checked in the Select Drive list.
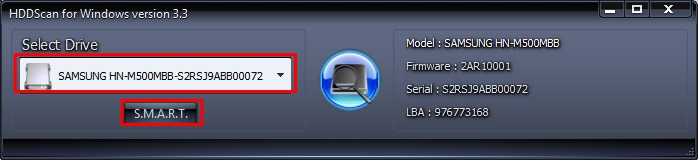
Below we click on the “S.M.A.R.T.” button and get acquainted with the provided report.
Now let's diagnose the disk surface. Click on the round button to the right of the drop-down list of media and select Surface Tests in the menu that opens.


Click on the Add Test button, thereby adding a test to the list and starting its execution.

You can receive information about the testing progress in Graph, Map, and Report modes. All blocks are also distributed into groups with appropriate color marking depending on access time.


At the end, a final report is generated.

Perhaps this is all we wanted to tell you about the methods of checking a computer’s hard drive for functionality. We hope the information provided will be useful to you and help you save important data.
Hello dear blog readers. - hard drive recovery, this is the topic of our article today. The last issue was dedicated.
To treat your Windows computer and hard drive partitions, there is a special program called CHKDSK, which anyone can use.
You will learn how to enter it and what steps you need to take to restore Windows and partitions on your hard drive in this article.
Recovering the disk
Your computer has stopped functioning normally, Windows boots every once in a while or doesn’t boot at all, you hear strange, repeating sounds and noises from the system unit. What could be the matter, you ask me?
Most likely, one of the fans located inside the system unit is noisy. It is also possible that the hard drive is making such noise - it does not have enough power, it has errors or it will soon fail, this happens. You need to think about buying a new one and saving the information on the old hard drive as long as possible.
As I said above, the Windows operating system has a built-in chkdsk utility, with which you can check your hard drive for errors and restore the operating system if it does not boot.
This method does not always work, but in most cases in my practice, using the chkdsk program, it was possible to restore the previous functionality of the Windows operating system. They can also help you.
There are three ways to run chkdsk on your computer:
- Running chkdsk from Windows
Running chkdsk on Windows
This method can be used if your Windows system is running normally and you want to check your hard drive for errors.
Go to My Computer.

Right-click on the desired logical drive (C, D, E, etc.).
In the pop-up menu, go to the very bottom and select “Properties”.

In the window that appears between the top tabs “General” and “Equipment” - go to “Service”.

Select “Check disk for errors” and go to “Run check”.

Disk scan options - check the two proposed options: “Automatically correct system errors” and “Scan and repair bad sectors”, click the Start button.

If the disk is currently in use, you will be prompted to disconnect this volume.

After you disconnect this volume, a disk scan will begin, which may take some time and will depend on the amount of information on this logical disk.

If this is a system drive on which the operating system is installed, then you will be prompted to run this scan after restarting the computer. You need to click Schedule scan and restart your computer.

After restarting the computer, when using Windows Vista and Windows 7, a black window with white letters will appear.

If you are using Windows XP, the window will be blue. We don’t press anything and wait 10 seconds, after which 3 to 5 tests will run, on average it takes from half an hour to several hours.

At the end of the check, the computer will reboot itself and will operate in normal mode.
It is important to know! If you do not wait for this check to complete, restart your computer yourself. The next time you turn it on, you will receive a message about the disk check until you complete it.
Running the chkdsk utility from the command line
If you are a Dos and command line lover, or just want to see how the chkdsk utility works on the command line, you can use this method.
First of all, you need to press the key combination Win + R (English) K (Russian) on your keyboard, thereby getting us to Run the program or Run. Here's a screenshot for clarity, if you don't understand what we're talking about:

A small Run window appears, where you need to type the command, write the desired [volume:] (logical hard drive), for example, and specify the command for further operations or. Here's an example.
A little more detail:
- - team name.
- [Volume:] is a logical hard drive.
- — is set to correct errors on a logical disk.
- — is set to detect bad (damaged) sectors and restore the part that can be read.

You need to wait a little and the chkdsk program running in DOS will appear in front of you. The volume you selected must pass five tests. This procedure can take a long time, especially the last fifth test.

After all the checks, the next time you restart the computer, a window with a check disk may appear, which were described in the last paragraphs of the first method of launching the shkdsk program. So be prepared for this.
Running chkdsk using the Windows boot disk
Let's say that when you boot your computer, Windows constantly reboots at the initial boot stage or a black screen just appears. There is a second way to use or how to run CHKDSK, but for this you must have a Windows boot disk handy.
Thank you for reading me on
Regardless of your operating system (Windows XP, Windows 7, Windows 8), go to Computer (My Computer, This Computer), right-click on the drive you want to check, select " Properties".
In the properties window, go to the " tab Service" and click the " button Run check".

Check both boxes
Automatically fix system errors.
Scan and repair system sectors.
and press " Launch".

If you check the system volume (the disk on which the operating system is installed, usually drive C), you will see the message " Windows cannot verify the hard drive that is currently in use", click " Disk check schedule".

Then restart your computer/laptop; during boot, the process of checking and correcting errors on the disk will begin. It will last from several minutes to an hour (depending on the size of the partition and the physical characteristics of the hard drive). When finished, the operating system will boot.

Checking the hard drive using the chkdsk utility.
CHKDSK (short for check disk) is a standard application in the DOS and Microsoft Windows operating systems that checks a hard drive or floppy disk for file system errors (for example, the same sector is marked as belonging to two different files). CHKDSK can also fix file system errors it finds. (from Wikipedia)
In order to run the chkdsk utility, you need to run a command prompt with administrator rights, to do this:
IN Windows XP click - "Command line"
IN Windows 7 click "Start" - "All Programs" - "Accessories" "Command line" and select "Run as administrator".
IN Windows 8.1 right click on "Start" - "Command Prompt (Administrator)".
As a result, a command line console will open.
First of all, let's find out the syntax of the chkdsk utility:
CHKDSK [volume[[path]filename]] ]
Volume Specifies the mount point, volume name, or drive letter of the drive being checked, followed by a colon.
file name Files checked for fragmentation (FAT/FAT32 only).
/F Correcting disk errors.
/V For FAT/FAT32: output the full path and name of each file on the disk. For NTFS: display cleanup messages (if any).
/R Search for bad sectors and restore surviving contents (requires /F).
/L:size For NTFS only: Set the log file size (in KB). If a size is not specified, the current size value is displayed.
/X Pre-dismount the volume (if necessary). All open handles to this volume will be invalidated (requires /F).
/I NTFS only: Less strict checking of index entries.
/C NTFS only: skip checking for loops within folder structures.
/B NTFS only: Re-evaluate bad clusters on disk (requires /R)
The /I or /C options reduce Chkdsk execution time by skipping some volume checks.
Of all the command attributes, the two most often used to check a disk for errors are /f and /r. The final command looks like this:
chkdsk C:/F/R
With this command we will check partition C, correct errors on the disk and restore information from damaged sectors (if any).
After entering this command, you will be prompted to check the volume the next time the system reboots, click Y and a key Enter.

Now you need to reboot the system, when loading you will see a window prompting a check, do not click anything, just wait 10 seconds.

Checking for hard drive errors using Victoria.
The Victoria program is designed to check for errors on hard drives with IDE and Serial ATA interfaces. The program is a completely ready-made solution for a comprehensive, in-depth, and at the same time, the fastest possible assessment of the real technical condition of the HDD.
First of all, download the ISO image of the program from official website . Unzip the downloaded archive and burn it to a CD/DVD, as described in the article How to burn to CD/DVD . After this, boot from the burned disk, how to do this is described step by step in the article How to boot from a CD/DVD disk or USB flash drive .
After booting from the disk within 10 seconds, select the program for your device (Victoria for the computer will load by default).

The program interface will launch. Press the F2 key so that the program itself finds the disk; if this does not happen, you must do it manually. To do this, press the "P" key. The same will have to be done if the system has several hard drives and you need to select one of them. If you have hard drives with a SATA interface, then in the Select HDD port menu that appears, select - " Ext. PCI ATA/SATA". Move using the cursor keys "up", "down", and select using the "Enter" key.


Next, to check the disk surface, press the F4 key. In the HDD scan menu window: select the necessary scan parameters. By default, it is proposed to scan the entire disk from the beginning of "Start LBA: 0" to the end of "End LBA: 20971520". I recommend leaving these default values. The next menu item – I recommend leaving “Linear reading”, since it is intended for the fastest and most accurate diagnosis of the surface condition. In the fourth point, I recommend choosing the mode BB = Advanced REMAP since this mode checks the disk most efficiently and corrects errors on it without deleting information.

After this, a check for hard disk errors will start and bad areas will be corrected. This procedure can take from several tens of minutes to several hours. Depends on the volume and spindle speed.

When finished, remove the disc from the drive and restart the computer.
Video of checking a hard drive using the Victoria utility. Error elimination - DRSC+DRDY is missing or the screw does not remove BUSY
Thank you very much for your answer, for your response!
I wait until the end of the check (checks drive C, where Windows is), by the way, the check goes quite quickly, no more than 3-5 minutes, and after that the computer reboots and turns on normally.
“Of course it would be nice to format your entire hard drive,” do you mean the entire disk, even those partitions where Windows is not installed?
In general, here’s another problem. The computer turns on, but does not boot, and freezes on the motherboard splash screen. In this case, it can hang on the motherboard screensaver for half an hour (and then nothing happens, I turn off the computer with the button), or maybe 5-10 minutes, and after that it displays Disk boot failure, insert system disk and press enter. I went into the BIOS more than once when this started to appear, and I discovered that the BIOS sometimes doesn’t see my hard drive. Or the situation is this: the computer still boots, Windows boots, but after loading, after a short time of 10-20 minutes, a blue screen appears, errors 0x0000007A, 0x00000077.
I noticed that this all started after I installed a new video card (1 month ago). Of course, before there were also blue screens, somehow there was also a disk check at boot, but this was very rare, isolated cases so to speak, but here it has been going on for a whole month. At the same time, there is no certainty, it would be okay to do one thing, otherwise it’s different every time - all the situations described above alternate, now one thing, then another. I assumed that this was due to the new video card, because I read that there is a hardware conflict, incompatibility, they also write that after installing the video card you need to reinstall Windows (especially if you change the manufacturer, and I did, it was Nvidia, now Radeon), but I did not reinstall Windows.
(text continued)
Computer information:
Processor QuadCore Intel Core 2 Quad Q6600, 2400 MHz (9 x 267)
Gigabyte GA-EP43-DS3 motherboard (4 PCI, 1 PCI-E x1, 2 PCI-E x16, 4 DDR2 DIMM, Audio, Gigabit LAN, IEEE-1394)
Memory module DDR2 4096 Mb Corsair 2*2 GB
Gigabyte AMD Radeon HD 7700 Series video card (1024 MB). There was a GeForce 8800 GTS video card.
Disk drive WDC WD6400AAKS-00A7B0 (640 GB, 7200 RPM, SATA-II)
PSU 550W
Operating system Microsoft Windows XP Professional SP3 (32-bit) (installed about 1.5 years ago)
The entire computer, that is, all the insides of the computer, is about 5.5 years old, except for the new video card.
(text continued)
The disk has already been checked by the Victoria program. As a result, it produced 14 bad sectors (blue squares with an “x”), 1 orange and 94 green, the rest are gray. I didn’t take any action in relation to the bad sectors, I just tested the hard drive. SMART hard drive in HDDScan: all indicators are marked in green, and only 197 Current Pending Errors Count is marked in yellow with an exclamation mark.
I forgot to write that against the backdrop of all the situations described above that have been happening to the computer over the past month, it may one day turn on, boot completely normally and work normally all day,
This can happen even over the course of several days,


