Why is there a gray screen on the monitor? Secrets of triple pressing the Home key: black and white screen and minimum brightness
Good afternoon, dear blog readers! Remember the good old days when the cathode ray tube TV screen suddenly changed color? The hand itself reached for the slipper, just like when hunting a cockroach. But even a modern monitor can suffer the same fate. I was once asked to figure out why the computer screen turned green. A very simple and quick diagnosis followed.
For quick diagnostics I needed:
- extra VGA wire
- laptop
First it was necessary to disassemble existing scheme- monitor + VGA cable + old desktop computer. Upon disassembly, it was discovered that the VGA cable was not a simple one, bought for three pennies in the transition, but with gold-plated contacts! Then the laptop was connected to the monitor, first through a VGA cable with gold-plated contacts, then through the cable that I brought. Which was without frills. The result was not long in coming, but... first things first. What kind potential causes Could there be an unexpected change in the color of the monitor screen? Why is the screen color now green?
- problem with the computer's video card
- problem with the monitor
- there is a problem with the cable, for example, there is a break or rupture in its wires
- Problem in software settings colors
Let us briefly examine these hypotheses in order.
Video card problem
Fault in graphics chip, for example, its partial dump is the main reason that the video card at the output “colors” the monitor screen specific color. Blade GPU we can cure it at home by warming it up with a special hairdryer. But, to be honest, I haven’t practiced this yet.
If you have on your computer discrete video card, then it must be inspected for swollen capacitors or other burnt parts. Swollen condensers can be replaced yourself if desired.
Overheating of the video card can lead to the described result. First, you should check the temperature of the video card famous program GPU-Z, so as not to wastefully gut something that is securely fastened with tape and works that way. We should not see numbers greater than 90 degrees in the GPU Temperature field. Once I saw the processor temperature about 100 degrees, and it continued to rise rapidly. I had to severely disconnect the computer from the network, otherwise it was in danger of self-digestion.

If it turns out that the temperature of the video card is really going through the roof, then it’s time to clean the inside of the computer using a vacuum cleaner or compressor, then, if necessary, check the functionality of the cooler on the video card and replace the thermal paste underneath it.
You can also damage the connector on the video card, especially if you pull the cable too hard. This can be checked by slightly shaking the connector itself. If it does not stay in place like a glove, then this may well be the reason for the monitor screen to turn a certain color.
The video card connector on the motherboard could become unsoldered during its life. If, when the video card is slightly shaken in the motherboard connector, something happens on the monitor - the screen tint changes, artifacts appear or disappear - then all this clearly indicates a problem with the connector on the motherboard. It is treated by re-soldering it. Or sending the motherboard to a service center.
Finally, the video card drivers could fail. This should be checked last if we suspect a hardware problem, but we must keep this option in mind. Download from the video card manufacturer's website fresh drivers and install them. I hope it doesn't fall out for you!
Problems with the monitor itself
The screen color may have turned green or some other color due to a malfunction of the monitor itself. If the LCD monitor screen is painted in warm colors, then most likely the backlights are low. The only solution is to replace the burnt out lamp with a new one.
But still, the matrix, and not the backlight, is responsible for the color, so its malfunction leads to incorrect color rendition of the monitor. In particular, the screen may turn a certain color. Only replacing it will help.
Among the relatively light options is damage to the matrix cable. It is quite possible to replace it with another one. It’s easy to find out what gives the screen a reddish tint—the cable or the backlight—just remove the cable going to it from the matrix and turn on the monitor. If the backlight is to blame, then the backlit screen will remain reddish.
The control board may also be faulty. Just as in the case of a video card, a processor failure may occur on the monitor’s control board. In principle, this is also a curable disease with the same heating.
Cable problem
If successive changes of VGA cables had not led to a noticeable improvement in image quality, then it would not have been possible to identify the culprit so quickly. The problem was that there was not enough space on the table for the monitor, so they did this with the cable:

The rich inner world of the cable could not stand it and burst.
There is one adequate solution here - replacing the cable, and don’t do that again!
Problem with software color settings
If there is no reason to suspect the video card or anything else of a hardware malfunction, then it makes sense to reset the monitor’s color settings to default. Someone’s playful hands could well have rummaged through the screen settings. Of course, everything will be different on your monitor, but I will show you the very idea of how you can distort all the colors on the screen. Here is a slightly “collective farm” image:

It is clear that here you can creatively approach the issue of monitor color rendering. Choosing the wrong one color scheme, you can then try for a long time to look for swollen capacitors on the video camera.
Or, for example, calibrate colors using the Windows Control Panel. You can ruin everything there too! To verify this, you can go to Control Panel -> Hardware and Sound -> Display, then click on the “Color Calibration” link.
 The following calibration wizard window will appear:

If you compare the last two screenshots, the difference is visible to the naked eye, at least in the white areas of the window.
Also, do not forget that video card manufacturers supply their drivers with various control panels for them, for example, “Control Panel HD Intel graphics" Various profiles can be used here as color scheme settings. The profile can be configured in the “Display” section of this program.

So many enticing sliders!

Conclusion
This option diagnostics using an additional replacement cable and a laptop allows you to very quickly discard unnecessary hypotheses.
First, we replace everything - both the cable and the computer with a laptop. If the monitor now displays normally, then everything is fine with it. Now we connect the laptop to the monitor using the old cable. If everything is fine now, then the problem was with the computer’s video card or driver settings. If the image again has the wrong colors, the problem is in the cable. However, if no replacements help, you should pay attention to the monitor itself, its color settings and its video connector.
Of course, after the initial sorting of the causes, a more in-depth diagnosis should follow, identifying real problems and a description of their solutions. Those. not “something with the monitor”, but for example, the wrong color scheme was selected in the monitor settings, which was replaced with a more suitable one.
Subscribe to blog updates!
Thank you You have successfully subscribed to new blog content!
If your screen suddenly turns black and white in Windows 10, there are not many reasons for this error, it is mainly related to work special features systems, namely with a Color filter. This article will describe the fastest and convenient options fix this error.
Black and white screen Windows 10
The main reasons for the black and white screen in Windows 10:
- Color filter
- Video card driver settings
- Third party software
- Monitor Screen Settings
Most common cause The errors are in the Accessibility settings – Color filter. To turn it off, go to Settings – Accessibility – Color and high contrast and disable the item Apply color filter.

In more recent insider builds (for example, 17083), the accessibility menu has changed and this item has moved to a separate Color filters tab with function settings.

Combination Windows keys+CTRL + C also allows you to enable/disable this function, but in latest builds you can control the launch of the Color Filter using a keyboard shortcut; how to do this using the Registry Editor will be described below.
How to turn off the black and white screen in Windows 10 through the registry
Open the registry editor (Win+R - regedit) and go to the branch - HKEY_CURRENT_USER\Software\Microsoft\ColorFiltering

The following values will determine the functionality of the color filter:
- Active – determines whether the filter is enabled or disabled
1 = Enabled
0 = Off - FilterType – defines the filter type
0 = Grayscale
1 = Inverted colors
2 = Inverted grayscale
3 = Red-green (impaired perception of green, Deuteranopia)
4 = Red-green (impaired red perception, Protanopia)
5 = Blue-yellow (Tritanopia) - HotkeyEnabled – allow the use of the keyboard shortcut +CTRL + C to enable or disable the filter
1 = Allowed
0 = Disabled
Video card settings
If, after completing the steps in Windows 10, the screen for some reason remains black and white, then the reason may be the settings of your video card.
For Nvidia devices: go to the desktop, right-click on the free space and select Nvidia Control Panel.
In the Display tab, open Adjust desktop color settings. We will need the Digital Intensity extension, in the case of black and white it can be set to 0%.

For AMD\ATI Radeon devices Several programs have been created to control video card parameters.
For “old” devices – Catalyst Control Center. Reset color parameters performed by the Defaults button in the Display Color tab.

For “new” devices – AMD Radeon Settings. Open Display settings and perform a Reset.

As a last resort, you can update the video adapter driver. Open Device Manager - Video adapters, then right-click on your video card and select Update driver.

In the first case, try Automatic search updates. If updated driver will be found and installed, perhaps the cause will be solved.
Secondly, try selecting earlier installed driver. Select Search this computer for drivers - Driver from the list of available drivers on this PC and install the previously installed driver.

How Alternative option, you can remove the device with driver programs and reinstall them after restarting the computer. You can also use the video card driver installer and run Clean installation, in this case both the driver and software the video card will be reinstalled.

Impact of third party software
If suddenly the computer screen turns black and white in Windows 10 after installing or updating any applications and programs, then there is a high probability that they are the ones affecting the operation of the system in such an unpleasant way.
To determine the cause we will use " clean boot»:

- Open the Task Manager window (Ctrl+Shift+Esc) and open the Startup tab
- Disable All Entries - this will prevent applications from automatically loading when the system is turned on.
- Then open the System Configuration window (Win+R - msconfig)
- Click the Services tab, check Hide all Microsoft services and select Disable all

Antivirus services will not be disabled, as they are protected by the self-defense module.
If the problem does not appear after a reboot, you can figure out what application caused the error using a brute force method - gradually turning on applications and services until the erroneous one is identified.
Monitor Screen Settings
The last option to resolve the issue when the screen becomes black and white in Windows 10 is to reset the screen or monitor settings. This option is not suitable for laptops and monoblocks, because the monitor settings are responsible for the screen settings.
If you are using a monitor, try resetting the settings to factory settings.

Additionally
If the suggested options do not help, try the following actions:
- If the error is software in nature, run or run reinstalling Windows 10
- If the error is hardware, to determine the faulty device, check the error when connecting to another PC connector or to another display.
Have a great day!
Here are the TOP 10 most common malfunctions of LCD monitors that I have personally experienced. The rating of malfunctions is compiled according to the personal opinion of the author, based on experience in service center. You can take this as universal guide for repair of almost any LCD monitor from Samsung, LG, BENQ, HP, Acer and others. Here we go.
I divided the malfunctions of LCD monitors into 10 points, but this does not mean that there are only 10 of them - there are many more of them, including combined and floating ones. Many of the breakdowns of LCD monitors can be repaired with your own hands and at home.
at all, although the power light may blink. In this case, the monitor lights up for a second and goes out, turns on and turns off immediately. In this case, tugging at the cable, dancing with a tambourine and other pranks do not help. The method of tapping the monitor with a nervous hand usually doesn’t help either, so don’t even try. The reason for this malfunction of LCD monitors is most often the failure of the power supply board, if it is built into the monitor.
Recently, monitors with an external power supply have become fashionable. This is good because the user can simply change the power source in case of breakdown. If external source If there is no power, you will have to disassemble the monitor and look for a fault on the board. in most cases it is not difficult, but you need to remember about safety precautions.
Before fixing the poor guy, let him stand for 10 minutes, unplugged. During this time, the high-voltage capacitor will have time to discharge. ATTENTION! DANGEROUS TO LIFE if the diode bridge and PWM transistor burn out! In this case, the high-voltage capacitor will not discharge in an acceptable time.
Therefore, EVERYONE check the voltage on it before repairing! If dangerous voltage remains, then you need to discharge the capacitor manually through an insulated resistor of about 10 kOhm for 10 seconds. If you suddenly decide to short-circuit the terminals with a screwdriver, then protect your eyes from sparks!

Next, we proceed to inspect the monitor’s power supply board and replace all burnt parts - these are usually swollen capacitors, blown fuses, transistors and other elements. It is also MANDATORY to solder the board or at least inspect the soldering under a microscope for microcracks.
From my own experience I will say that if the monitor is more than 2 years old, then 90% there will be microcracks in the soldering, especially for LG, BenQ, Acer and Samsung monitors. The cheaper the monitor, the worse it is made at the factory. To the extent that the active flux is not washed away - which leads to failure of the monitor after a year or two. Yes, yes, just when the warranty ends.
2nd place - the image blinks or goes out
when you turn on the monitor. This miracle directly indicates to us that the power supply is faulty.
Of course, the first thing you need to do is check the power and signal cables - they must be securely fastened in the connectors. A flickering image on the monitor tells us that the monitor's backlight voltage source is constantly jumping out of operating mode.
With this malfunction, a high-frequency squeak from the backlight transformer can also be heard. It typically operates at frequencies between 30 and 150 kHz. If its operating mode is disrupted, vibrations can occur in the audible frequency range.

4th place - no backlight,
but the image is viewed under bright light. This immediately tells us that LCD monitors are faulty in terms of backlighting. In terms of frequency of occurrence, it could be placed in third place, but it is already taken.
There are two options - either the power supply and inverter board burned out, or the backlight lamps are faulty. The last reason V modern monitors with LED backlighting LED is not common. If the LEDs in the backlight fail, then only in groups.
In this case, the image may darken in places at the edges of the monitor. It is better to start repairs by diagnosing the power supply and inverter. The inverter is that part of the board that is responsible for generating a high-voltage voltage of about 1000 Volts to power the lamps, so under no circumstances should you try to repair the monitor under voltage. You can read about it on my blog.
Most monitors are similar in design, so there shouldn't be any problems. At one time, monitors simply fell off due to poor contact near the tip of the backlight. This can be cured by carefully disassembling the matrix in order to get to the end of the lamp and solder the high-voltage wiring.
A simpler way out of this unpleasant situation can be found if your friend-brother-matchmaker has the same monitor lying around, but with faulty electronics. It won’t be difficult to make two monitors of similar series and the same diagonal.
Sometimes even the power supply from a monitor with a larger diagonal can be adapted for a monitor with a smaller diagonal, but such experiments are risky and I do not recommend starting a fire at home. But in someone else’s villa, that’s a different matter...

6th place - spots or horizontal stripes
Their presence means that the day before you or your relatives had a fight with the monitor over something outrageous.
Unfortunately, household LCD monitors are not equipped with shockproof coatings and anyone can offend the weak. Yes, any decent poke with a sharp or blunt object will make you regret it.
Even if there is a small trace or even one broken pixel left, the stain will still begin to grow over time under the influence of temperature and voltage applied to the liquid crystals. Restore defective pixels Unfortunately, a monitor won't work.

7th place - no image, but backlight is present
That is, a white or gray screen appears on your face. First, you should check the cables and try connecting the monitor to another video source. Also check whether the monitor menu is displayed on the screen.
If everything remains the same, look carefully at the power supply board. The power supply of an LCD monitor usually generates voltages of 24, 12, 5, 3.3 and 2.5 Volts. You need to use a voltmeter to check if everything is okay with them.
If everything is in order, then carefully look at the video signal processing board - it is usually smaller than the power supply board. It contains a microcontroller and auxiliary elements. You need to check if they are getting food. With one probe, touch the contact of the common wire (usually along the outline of the board), and with the other, walk along the pins of the microcircuits. Usually the food is somewhere in the corner.
If everything is in order regarding the power supply, but there is no oscilloscope, then we check all the monitor cables. On their contacts. If you find something, clean it up isopropyl alcohol. In extreme cases, you can clean it with a needle or scalpel. Also check the cable and the board with the monitor control buttons.
If all else fails, then perhaps you are faced with a case of broken firmware or microcontroller failure. This usually happens from surges in the 220 V network or simply from aging of the elements. Usually in such cases you have to study special forums, but it’s easier to use spare parts, especially if you know a familiar karateka who fights against unwanted LCD monitors.

8th place – does not respond to control buttons
This case can be easily treated - you need to remove the frame or back cover monitor and pull out the board with the buttons. Most often there you will see a crack in the board or in the solder.
Sometimes there are faulty buttons or cables. A crack in the board violates the integrity of the conductors, so they need to be cleaned and soldered, and the board must be glued to strengthen the structure.

9th place - reduced monitor brightness
This occurs due to aging of the backlight bulbs. LED lights According to my data, it does not suffer from this. It is also possible that the parameters of the inverter may deteriorate, again due to the aging of the components.

10th place - noise, moire and image jitter
This often happens due to bad VGA cable without an electromagnetic interference suppressor - a ferrite ring. If replacing the cable does not help, then it is possible that power interference has penetrated into the imaging circuits.
Usually they are eliminated from the circuit design by using filter capacitors for power supply on the signal board. Try replacing them and write to me about the result.

This concludes my wonderful rating of the TOP 10 most common malfunctions of LCD monitors. The bulk of data on breakdowns was collected based on repairs of such popular monitors as Samsung, LG, BENQ, Acer, ViewSonic and Hewlett-Packard.
P.P.S.: Power supplies and frequent malfunctions of LCD monitors
IN Lately Monitor manufacturers are increasingly equipping new monitors with external power supplies in plastic case . I must say that this makes it easier to troubleshoot LCD monitors by replacing the power supply. But the operating mode and repair of the power supply itself complicates the operation - they often overheat.
I showed how to disassemble such a case in the video below. The method is not the best, but it is fast and can be done with improvised means.
DIY LCD monitor repair
A common malfunction is when the LCD monitor lights up for a second and goes out. What to do in this case and how to use this TOP of faults.
It's simple. To repair your LCD monitor, follow these steps:
- Step 1. Disconnect the monitor from the 220 V network and from the computer and decide whether you will repair it yourself or take it to a service center for diagnostics at an inexpensive price.
- Step 2. If you decide to figure it out yourself, then take the tools: screwdrivers, a knife or scalpel and a soft base to lay the monitor down with the matrix.
- Step 3. Disassemble the LCD display, observing safety precautions and remembering the latches. How they open is shown in the animation above.
- Step 4. Discharge the high voltage capacitor. It is necessary! Especially if you want to get to the next step.
- Step 5. Inspect the board for swollen capacitors, burnt transistors and microcracks.
- Step 6. If any findings are found in Step 5, replace the burnt ones and solder the cracked ones.
- Step 7. Check the functionality of the monitor, observing safety precautions. If everything is ok, then go to Step 10.
- Step 8. Take a multimeter and test the fuses, diode bridge, transformers and transistors. Replace burnt radio elements.
- Step 9. Check the operation of the LCD monitor. If the monitor continues to blink, then you need to check the voltage in control points on the board. This requires knowledge of circuit design, as well as a service manual with an ideal circuit. Further actions difficult to describe in general terms. This is where it starts creative process Repair experts. To discuss, write in the comments or contact.
- Step 10: If you successfully repair the flickering LCD monitor yourself, do a test run for 2-3 hours in a disassembled state. After this, the monitor can be assembled and used.
Everyone knows that spending a long time at the computer is bad for your health. This especially affects human vision. The fact is that a person is not able to see the frequency, but the eye picks up this frequency, and over time, weakening of vision may occur. Using the computer, your eyes gradually get tired and stop focusing clearly on the image. But for many people, the computer is work, which means that this harm cannot be avoided. In order to reduce it as much as possible, it is necessary competent setup monitor colors and resolution.
Configuration using AdobeGamma program
For optimal color display, adjustments must be made using special program, which is called AdobeGamma. The first step is to install it on your computer. After installing the program, you should set the screensaver on your desktop in a solid gray color. Setting monitor colors in Windows 7 for the desktop is in the “Personalization” section, which appears in a pop-up window when you right-click on its splash screen (background). There you need to select the “Desktop Background” item and in it the “Image Location” drop-down menu, in which there is a “Solid Colors” menu item. Grey colour can be seen immediately.
Now it's time to proceed directly to the procedure itself. After launching the AdobeGamma application, setup is carried out using the setup wizard (you need to select this option) - a special program that allows you to go through the entire process step by step. The next step is to select “ color profile" It is generally recommended to leave the default profile (for inexperienced users). Now you need to click on the “Next” button to continue and set the contrast to the maximum value. The brightness should be adjusted so that the square, which is located inside another square, is as close to black as possible, but still stands out a little from its background. You can simply skip the next step.
Next you need to configure gamma correction using the bottom tab common window settings. If the program for adjusting monitor colors is not localized, it will be called WindowsDefault. To the right of it there is a small field where you are prompted to enter the value of the Gamma parameter. The most commonly used is 2.2. In the same window, you need to uncheck the ViewSingleGammaOnly parameter to display gamma values by color. Now, using the mouse, you need to bring the result to such a state that all three squares become absolutely indistinguishable from their background. At the next stage the value is set color temperature, which should be equal to 6500K. The setup is now complete. After completion, it is possible to compare the result with original value. To do this, use the Before and After buttons. Customizing colors Windows monitor 10 is carried out in a similar way with the only difference being that the versions of the AdobeGamma program may differ.
Adjusting the Image Using Monitor Functions
Almost all monitors have special functionality (menu) with which you can quickly make color adjustments. The interface of such a menu is as clear as possible and is translated into Russian for most devices, so to change the contrast, color or brightness of the screen, you just need to select the appropriate item using the buttons located below. For more detailed information You can refer to the instructions from the manufacturer, which usually comes with the device. For example, color adjustment Samsung monitor occurs with the help of a special Menu buttons located under the screen, when clicked, the monitor menu drops down. It has two main sections responsible for color rendering - Picture and Color, which will help produce everything necessary settings. U different manufacturers And different models These sections may be called differently, but ultimately the meaning is still the same.

Image adjustment via the system
Windows itself also provides functions that allow you to adjust the color of your monitor. There is a program for this called “Calibration”, which can be found by searching in the “Start” menu. The application itself will tell you what to do next after launching it. An important parameter is the correctly selected screen resolution, which is optimal for the monitor being customized. Usually in a dropdown menu with an enumeration acceptable values screen resolution it is marked as “Recommended”. This is the one you should choose. This parameter is located in the video card settings. To get there, you need to click on the desktop right click mouse and select the appropriate item in the menu that appears. Different video card manufacturers call it differently, for example, for NVIDIA you need to look for a line called “Panel NVIDIA management”, and for Radeon - “ Graphic characteristics Radeon.” All other color settings are also located there. To achieve best result, in addition to the correctly selected screen resolution, you must select highest value 32-bit color depth. As a rule, this setting is always located in the same place as the screen resolution setting, so it won’t be difficult to find it.

Adjusting screen brightness
Surely many have noticed that the monitors standing on the stand in the store have visually different images. On one it is dimmer, and on the other, on the contrary, it is too bright. This is due to different settings colors for everyone separate device. If the buyer is not satisfied with the default color settings of the monitor, he can change them. To do this, you need to click the button called Menu and in the panel that appears, select the Picture value, where the brightness and contrast settings are located with the adjustment sliders located to the right of them. It is worth noting that for different models and manufacturers the names of these parameters may vary or even be marked with schematic figures, but general meaning For end user always clear.
After finding the desired settings, you need to take a clean White list paper, put it in front of the monitor, create a regular one using the Notepad program blank document and compare the color of a sheet of paper with the white background of the document in the program. This procedure is carried out to evaluate and subsequently adjust the white color of the monitor. Next, for the slider responsible for the brightness of the picture, you need to find a position so that White color on the monitor matched the white color of the sheet of paper on the table.
Adjusting the screen contrast
To adjust the contrast, 2 images of identical shirts of different colors can help: one shirt is black and the other is white. The main thing is that the colors are monochromatic. Both images need to be opened and placed next to each other. Now you should move the contrast slider until the folds on both shirts become clearly visible. Once you achieve this effect, you can adjust the brightness a little more. At this point, the process of completing the brightness and contrast adjustments can be considered complete. The white color obtained as a result of these manipulations may differ from the monitor settings that were set by default at the time of purchase. However, experts say that this is just an optical illusion caused by the eye getting used to the original values.

Setting the color of a laptop using Windows
Laptops have long become an integral part of our lives. It is enough to configure the laptop correctly once so that later problems do not arise. unnecessary problems and didn't have to spend Extra time. Setting the colors of a laptop monitor is not much different from the settings regular monitor. They are located in the “Color Management” section in the Control Panel Windows systems. Having entered the section, you need to select the “Details” tab and then click on the “Calibrate screen” button. Then simply follow the instructions provided by the setup wizard.
Customize Laptop Color Using the intelHDgraphics App
But this is not the only method applicable to solve this problem. For example, there is software that solves this problem better. If the laptop is running on Intel processor, then you should adjust the color through the “Graphic characteristics” section. You can get there using the same pop-up menu, called by right-clicking the mouse. When you open a section, a window will appear with several categories responsible for the video card parameters. To adjust the color, select the “Display” category. There, in the “Color” tab, you can find the “Advanced” tab, in which the necessary color adjustment controls are located. The only parameters are hue and saturation, with which the adjustment is made. The level of increase or decrease in values is determined by the user himself based on his needs.

Features of adjusting brightness on a laptop
It is known that if you need to quickly adjust the monitor screen, you can use the interface of the buttons located on its body. But on a laptop, things are a little different, and to be honest, this becomes a real problem for many uninformed users. The fact is that there are simply no such buttons on the laptop body. This is not due to the lack of space for this functionality, but to the fact that the optimal image is selected by the equipment developer.
But sometimes the need for quick color adjustments arises. To solve this problem, the laptop has special key Fn, responsible for additional functionality. Holding this key will activate additional functions keys that have icons in a different color. To adjust the brightness of the monitor, you need to use the keys with the image of the sun ( standard icon brightness).

Testing Color Rendering Using Real Color
There is another remedy that is considered a reference in certain circles. This is a special Real Color wallpaper that bears some resemblance to the tuning grid once used in televisions. When using this method, special wallpapers with the optimal resolution for a computer or laptop are installed on the desktop. By looking at the screen from a normal distance, you can determine whether the color rendition is calibrated correctly. At correct setting A smooth gray gradient should be visible, and if stripes appear and shades mix, it means the color is set incorrectly.

To summarize, we can say that adjusting the color of the monitor is a rather painstaking task and depends on many factors. Therefore, for each individual case, its own parameters must be applied to meet specific needs. But in order not to be scattered among the multitude various methods, you need to do this: for quick setup use the built-in system parameters, and for more complex tasks you can resort to third-party applications.
In order to write detailed instructions on using all the possibilities of mobile operating system iOS would require publishing a thick, multi-page book. In a miniature box even impressive in size iPhone 6 Plus There is clearly no space provided for such a brochure. However, who reads official instructions in 2015? This is why you periodically discover functions that were so close, but even after several years of using Apple smartphones you hear about them for the first time. Let's talk about Universal access and opportunities pressing the Home key three times.
So let's go to Settings - General - Accessibility. A whole treasure trove of different things awaits us here. additional settings, but we are interested in the ability of the smartphone to respond to a triple press of the Home key.
In black and white
A smartphone was announced just over a month ago. A special feature of the device is the presence of two screens: traditional and E Ink based on electronic ink. In addition to the fact that the E Ink screen is very economical in battery consumption, it looks stylish. You can achieve the same black and white effect on an iPhone (we are not talking about electronic ink, alas).

On the menu Universal access scroll to the bottom and open the item Keyboard shortcuts. We have several points:

Put a tick against Shades of Gray and we can safely return to the iPhone Dock. Now three times in a row press the key Home.

Voila, and iPhone screen turned gray. Triple-clicking again will return the color scheme to normal.
Quick change of brightness to minimum
Many of us like to check our email, browse our favorite website, or read right before bed. The bright light emitted by a smartphone in complete darkness has a negative effect on our eyes. Look at bright screen It even hurts, so swiping from bottom to top and moving the brightness slider to minimum is a familiar operation that has to be performed every night. Thanks to Universal Access there are more quick way minimum brightness settings.
We follow the already familiar route: Settings – General – Accessibility – Keyboard shortcuts. There is nothing that can in any way be related to the screen brightness settings. But whoever seeks finds:
- 1. Place a checkmark next to the item Increase.
2. Three times press the key Home.
3. Using three fingers, tap the screen three times(not on the Home key and precisely three fingers).
Menu opens Magnification settings– this is exactly what we need.
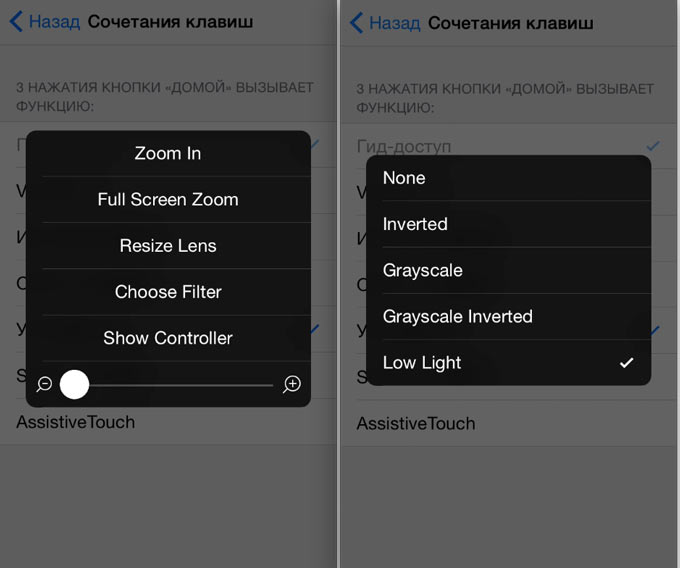
Select an item Choose Filter (Select filter). Choose from the options offered Low Light (Low brightness). Return to the Dock and press the Home key three times. The brightness suddenly drops to its minimum value.
Using reduced brightness not only allows you to quickly change settings, but also reduce energy consumption iPhone battery . The fact is that using brightness reduction through Universal Access Together with the standard brightness settings from the control center (swipe from bottom to top), you can achieve the minimum acceptable level of screen backlight. At standard settings The minimum brightness level will be significantly higher. Less screen brightness means less battery consumption. This minimum level can only be used at night. On a clear day it will be impossible to see anything on the screen.
Important! If, when applying a filter, part of the screen (usually top part) remains light, follow these steps:
- 1. Go back to settings Keyboard shortcuts.
2. Turn on Increase triple pressing the Home key.
3. Using three fingers, triple-tap the screen.
4. Select an item Resize Lens.
5. Stretch filter boundaries in full screen.
Two in one
It is possible to simultaneously use a black and white filter and minimum level brightness Having completed the settings listed in the second paragraph ( Magnification – Low Light), on the menu Accessibility - Keyboard shortcut check the box next to it Shades of Gray. Pressing the Home key three times will bring up the following menu:

Now you have the opportunity to choose which filter you want to keep (both are possible), and which one is not needed now.
There are a ton of other settings in the Accessibility menu that let you adjust the level of screen magnification, color inversion, and VoiceOver features, but that's a completely different story.
![]()


