Replace white with transparent online. Replace a white or plain background with a transparent one online
Want to do
the background Are the pictures transparent?
A simple one will help you multifunctional editor photo!
- Add
snapshot - Replace
background - Save
result
Just download:
HOW TO MAKE THE BACKGROUND OF A PICTURE TRANSPARENT? WITH A HOME PHOTOGRAPHY STUDIO YOU WILL REMOVE YOUR BACKGROUND QUICKLY AND EFFORTLESSLY!
If you think that only a Photoshop wizard can completely remove the background from an image, this article will convince you otherwise. Find out how to do transparent background from the picture, without having professional skills in photo editing. All you need is a convenient graphics editor "Home Photo Studio". The software will allow you to replace the background of any image with a transparent one in just a few steps.
Step 1. Working with the original
In the start window, click "Open image", in the file tree find the desired folder and upload a picture to work with.
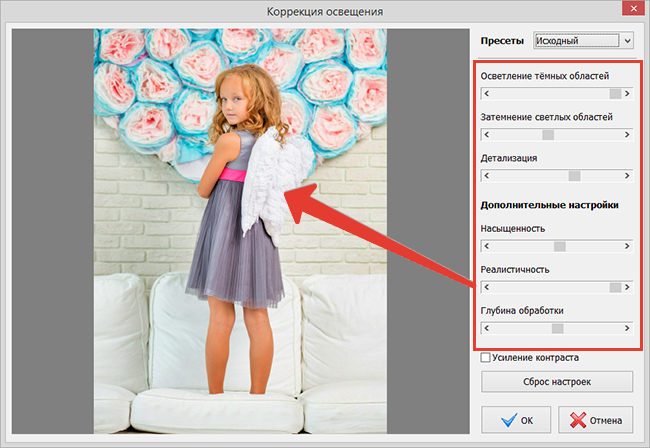
Before replacing the background, make sure that you are happy with everything in the photo. On the menu "Image" you will find many convenient tools to improve the photo. Correct imperfections by selecting the tab "Elimination of defects". You can easily remove common imperfections from photos such as noise, red-eye, or color imbalance. Use "Lighting correction" to adjust exposure and detail manually.
Are you satisfied with the result? Great, now you have to...
Step 2. Make the background transparent
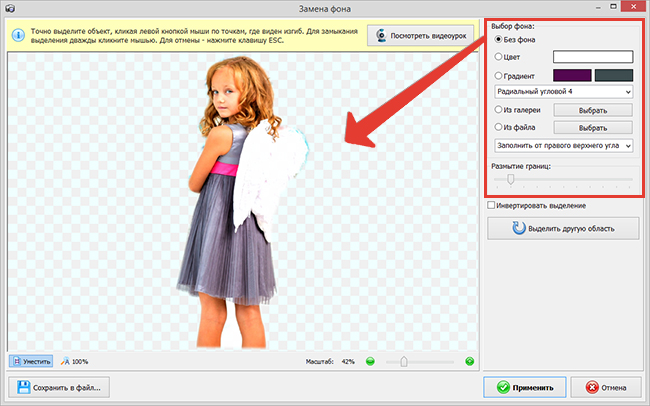
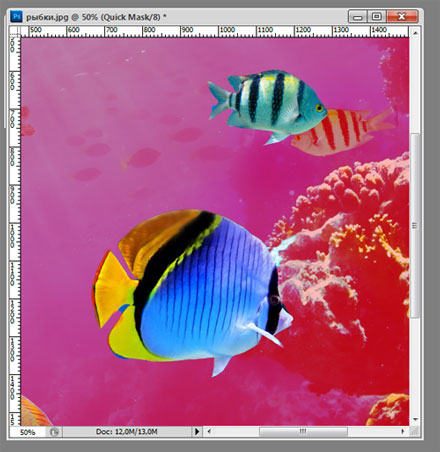
On the menu "Effects" click on the tab "Background Replacement". The first thing you need to do is separate the subject from the background. To do this, carefully trace the shape around the edge using the cursor. Made a mistake? Not scary! Just use the function "Select another area" and start working again. For convenience, you can enlarge the image by clicking the button "100%". Close the start and end of the selection double click mice. Was it uneven? Hide sloppy edges by increasing the amount of edge blur.

Great! Now in the list of design options, mark the very first item - "Without background". One click and everything outside the selection border is deleted. This will be indicated by a checkerboard pattern in the image. The example is a photo with a colored background, but you can also do White background pictures are transparent. The algorithm of actions will not change.
Pay attention to the options available "Background Replacement". In the future, you will be able to design the background of your photographs in a single color or gradient fill, as well as using textures and background images. The program's collection options didn't work? Upload the file from your computer. Everything is very simple!
Step 3. Save the result
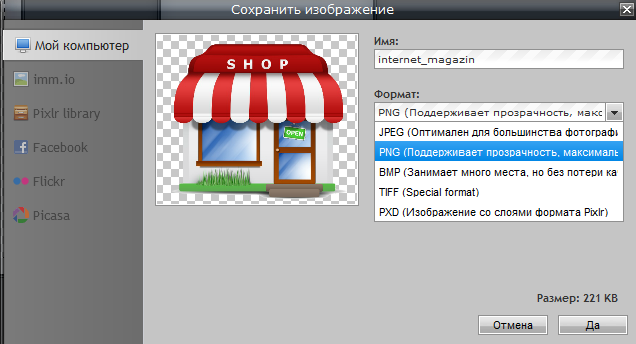
Do not rush to close the background replacement window, first save the result. Click the button "Save to file". In the window that appears, enter the name of the image and in the line "File type" set as format PNG or GIF. This is important because only these formats support the display of transparent areas. If you miss this nuance, the program will automatically save the image with a white background. Check your settings and click again"Save"
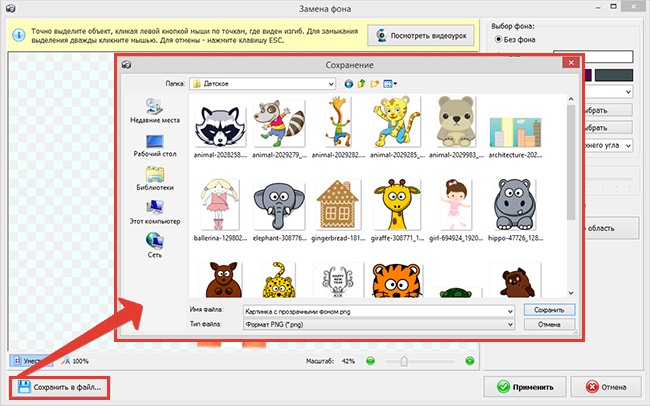
. Ready!
Quick and easy, isn't it? Just three steps and you have a photo with a transparent background! If you wish, you can further process the image after replacing the background. Pay attention to the toolbar. With the help of dodge, burn, blur, and sharpen brushes, you can edit separate areas picture. Tool"Stamp" useful for retouching. Just hold down the button ALT
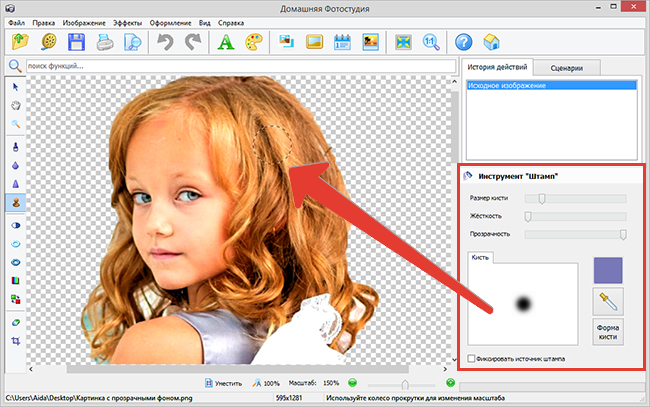
, select an area in the photo that will be the source of the stamp, and paint over the unwanted object. In the future, you can overlay a picture with a transparent background on another photo, use it as clipart, or create an original collage. All this is possible with a convenient option"Photomontage" , you will find it in the menu.
"Decor" Overlay a layer with a png or gif image on another image. Change the size and position of the object. Adjust the blending mode and transparency, and use a mask if desired. Detailed instructions on how to perform photomontage in"Home Photo Studio"
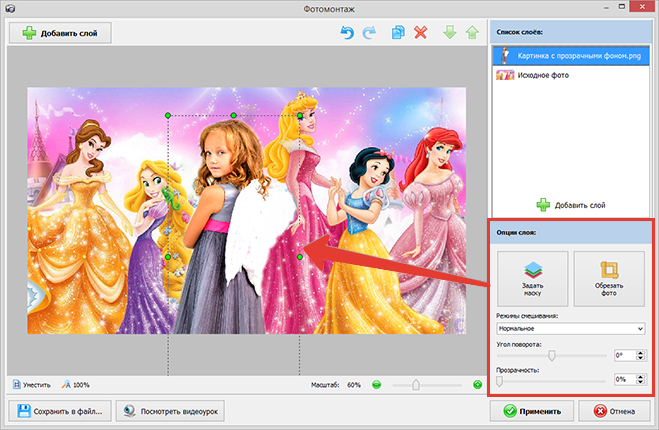
, you will find in other articles of the online textbook.
Now you know how to make the background of a picture transparent and how you can apply this useful skill. If you decide, you will not need to master complex graphic editors. High-quality retouching, quick elimination of defects, photo editing accessible to beginners - the program has everything you need to work with photographs. Transform absolutely any image quickly, easily and with pleasure!
Date of publication: 03/10/2013
Some people draw pictures on their own. For example, I have a good friend who creates all the images for his website in 3ds Max. But most webmasters take images from the Internet, and very often they come across excellent images with an inappropriate background for the background of the blog. But this problem can most often be solved; you just need to make the background of the picture transparent. About, how to make the background of a picture transparent, I will tell you in this article.
The most common way to make the background of a picture transparent is to use the graphics editor Photoshop. But not many of us have it installed on our computer. this program. Personally, I don’t have Photoshop on my computer.
How to make a transparent background for a picture.
For example, I have a picture that I really liked, but the main background of this picture is white, and the background of my site is a completely different color (for example, blue).
 My task is to make the background of the picture absolutely transparent and place this picture on a site with a different background. In order to make the background transparent, I will use the online image service Pixlr.com. Pixlr.com is a kind of Photoshop. Edit any image using of this service You can do it online without installing any programs on your computer.
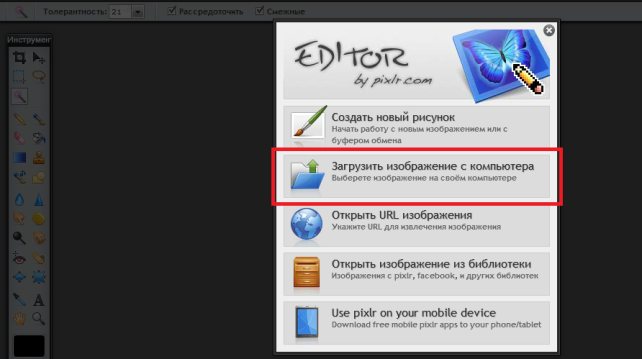
1) Go to the Pixlr website and upload the image:
2) C right side in the “Layers” window, double-click on the “lock” image, which prevents us from deleting back layer on the picture.
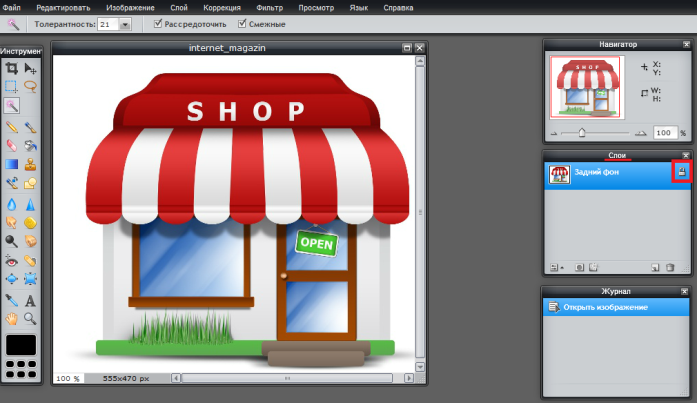
After two clicks of the mouse, the “lock” will turn into a “tick”, which allows us to remove the background from the image.

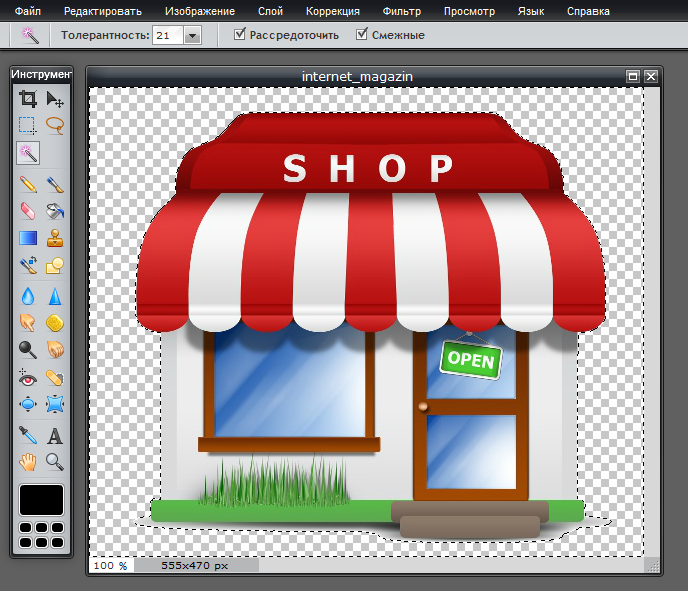
3) In the “Tools” panel, select “Magic Wand” and click on the background that we want to get rid of. In my case, I'm clicking on the white background that I need to remove. After clicking on the background, the background that will be deleted will be highlighted with a dotted line.

4) After the background is selected, press the button Delete, and the background will be removed:
5) Save the picture with a transparent background to your computer. Must be saved in PNG format. Otherwise, the transparent background will be lost.
As a result, in just a minute I made a picture with a transparent background and now I can place it on the site, for example, with a blue background.

I would like to note that this method will not always be able to remove any main background of the picture and make it transparent, but for most cases this option fits.
If anything is unclear from the article, I advise you to watch my online lesson: “How to make the background of a picture transparent”:
Quite often you can find a suitable image on the Internet, for example, to insert it into a website. Or perhaps you are making a collage, and you need to add others to one drawing. But the images you need usually have some kind of background.
Let's figure out how we can make a transparent background for a picture using the editorAdobePhotoshop. I have English installed Adobe version Photoshop CS5, so I will show it on it. I'll try to give various combinations hot keys.
If you don’t have Photoshop installed yet, you very rarely use it, or it’s in English, you can. This is a simple Russian-language image editor that will not take up much space on your hard drive. By clicking on the link, you can read the detailed article. possible from our website.
First, let's look at a simple example. Let's say you have an image on a plain background, it could be a logo or the name of something. Let's make this logo or inscription on a transparent background in Photoshop.
Opening desired image in the editor. Now let's make a transparent background for the layer. In the “Layers” window, double-click on the added layer – there will be a padlock opposite it. The window “ New Layer", click "OK" in it. After this, the lock will disappear.
Choosing a tool "Magic wand". In the properties bar, specify the sensitivity level, set different meanings to understand how it works, for example 20 and 100. To deselect the picture, press “Ctrl+D”.
Set the sensitivity and press with a magic wand to the background area. To add to the selected background those parts that are not selected, hold down “Shift” and continue selecting. To delete selected areas, click “Delete”.
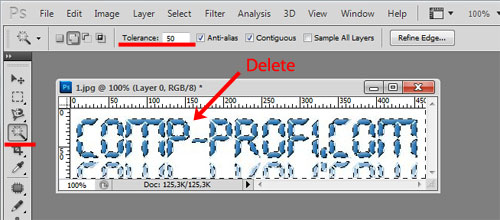
Now instead of a background there is a chessboard - this means that we managed to make the white background transparent. Remove selection – “Ctrl+D”.

If you have an image or photograph that has a lot of various colors and objects, let's consider how make a transparent background for an image in Photoshop.
In this case, we will use the tool "Quick Selection". Click on the magic wand with the left mouse button with a slight delay and select the desired tool from the menu.

Now we need to select the object that we want to leave on a transparent background. In the property line set various sizes and click on the object, adding areas to it. If highlighted by mistake unnecessary background, press "Alt" and remove it.
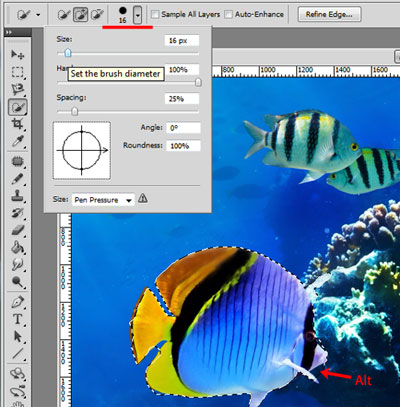
To view the result, press "Q". Those parts of the image that will become transparent will be highlighted in pink.
Copy the selected areas by pressing “Ctrl+C”. Next we create new file, “Ctrl+N”, with a transparent background.

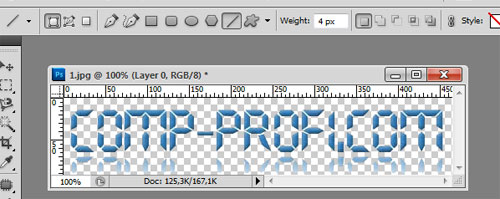
Paste the copied fragments into it, “Ctrl + V”. If there are unnecessary parts of the background left on them, remove them using the Eraser tool. We save images taken on a transparent background in PNG or GIF format.

Make the white background of the picture transparent, or make a transparent background for individual fragments of a color image or photograph in Photoshop. After that, you can use them where necessary: insert them into a website, add them to another drawing, or make interesting collages.
The main thing is to specify the picture on your computer or phone, and then click OK at the bottom of this page. By default, the plain background of the picture is replaced with a transparent one. The background color of the original image is determined automatically; you just need to specify in the settings what color to replace it with. The main parameter influencing the quality of the replacement is the “Replacement Intensity” and it can be different for each picture.
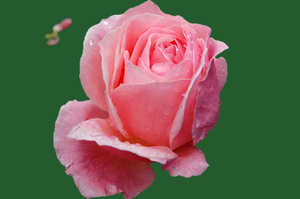
An example of a photograph of a pink rose without changes and after replacing the plain background with transparent, white and green:

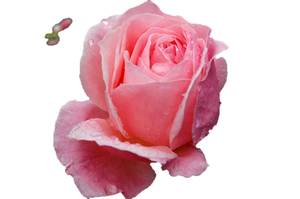
First example with a rose flower on a transparent background made with the following settings:
1) Replacement intensity - 38;
2) Smoothing along the edges - 5;
3) Replace the plain background with a transparent one;
4) Trimming (<0) или Добавление (>0) at the edges - "-70";
5) Invert - disabled (not checked).
For creating second example, with a white background, the same settings were used as in the first example, except for the parameter: “Replace plain background with” - white. IN third example, With green background, the settings are also used as in the first example, except for the parameter: “color in hex format” - #245a2d.
The original image is not changed in any way. You will be provided with another processed image with a transparent or specified background.
Dear friends, Olga Abramova is in touch with you and today’s post will be about how to make the background of a picture transparent and, if necessary, replace it with any other one.
The background(background) is often ugly or simply out of place. For example, a photo requires a plain background, instead of, for example, a home environment or human surroundings.
Let's look at three options as an example - two using online services, the third in Photoshop. By making the background transparent, we can easily replace it with the one we need.
1. The first service that I use very actively is Clippingmagic. A very simple device and very effective in operation. The only thing I don't like is that you can't upload a picture via URL, only from your computer.
The site is in English, but does not cause any difficulties in working. Once you upload a picture, it will appear on the left side. All you have to do is click on the green brush circle with the + sign and drag it over the image you want to leave. And with a brush from a red circle with a sign - draw or simply put dots over the background to be deleted. You can choose the size Brush brushes Size from 5 to 40px for more ideal removal of excess.
When everything is ready, click the floppy disk icon to save and click the Download button. The picture will be saved on your computer in .png format.

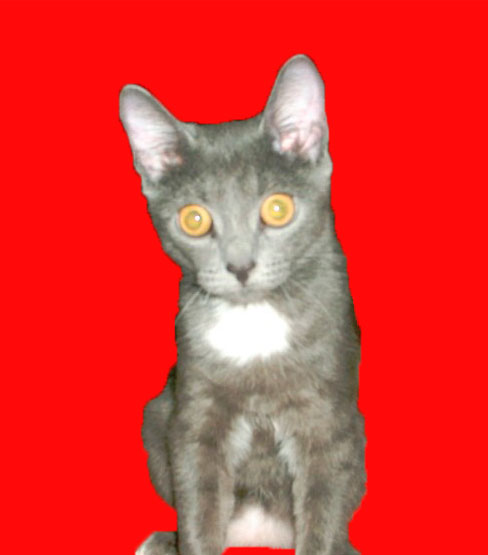
This is what happens when you process a photo with this service. I specifically added a red background to make the result easier to see:

Quite a worthy result :)
2. The next service is called Pixlr. It is also easy to use, but depending on the quality of the photo, the result will be appropriate. In some cases, you will have to “finish” the picture to achieve the desired effect :)
Video about using the Pixlr service:
Here's what happens when you use it:

I didn’t even bother adding a background, and it’s clear that it’s not very good. Despite the fact that it took a long time to wave the magic wand. Now, if the background is plain and the picture high resolution, then the result will be good with minimal effort.
3. Now consider working in Photoshop. To get started, watch the video.
The lesson is very detailed. But if you limit yourself only to removing the background without applying additional functions by smoothing the contours, this is what happens:
Therefore, Photoshop, although time-consuming, is most suitable for photo processing, in which you can immediately perform all the actions: remove one background, add another, smooth out all the irregularities.
So, the conclusion:
For those who are friends with Photoshop or at least understand it a little, this is the most The best way processing the image to obtain a transparent background.
Among online services, I preferred Clippingmagic. Well, Pixlr will do, depending on the image quality.
Online services are good because they save a lot of time and good replacement Photoshop.
I guess that there are more than two services for such operations on the Internet, so I’m very interested in who else uses which ones. Please share and add to my collection of photo editors :)
Beautiful pictures everyone!


