How to disable all energy-saving features of a laptop. Activating energy saving in Windows. Disabling hibernation - the control panel can help you
Power saving modes (and the ability to configure them) first appeared in Windows 98 and are currently present in every operating system.
Their use is associated with possible necessity saving battery power (as, for example, in laptops), it can be used as one of the options for shutting down work (the next time you turn it on it will take less time), as well as to save electricity consumption (imagine how much a company’s bill can decrease if there are several hundreds of PCs).
In this article we will look at how to install, how to choose one of existing options and also how to remove energy saving mode on your computer.
Basically, greatest number Energy in a running computer is spent to support the operation of the monitor and hard drive.
Monitor states
At regular work of the monitor, both of its blocks are active - horizontal and vertical scan. This mode is called normal (Normal) and consumption is up to one hundred watts.
Almost instantly, the display will return to operation from the Stand-by state, in which horizontal scanning is turned off and consumption is reduced to ninety percent of normal.
When switching to Suspend mode, only vertical scanning will be disabled, the consumption will drop to ten to fifteen percent, but the monitor will also take a little longer to come out of it.
Using the Power-off mode entails turning off both scanners, while power consumption is reduced to a minimum of five percent. But also a return to normal operation will take the same amount of time as turning it on from a “cold” state.
Metamorphoses of the hard drive
The computer switches to Stand-by mode after saving the intermediate results of the work open applications in RAM. At the same time, an appeal to hard drive stops.
The Hibernate state differs from the previous one in that the entire state of the OS at a certain moment will be captured on the expanses of the hard drive (and not in the RAM), to which it will return the next time it is turned on.
New Hybrid Sleep mode for the first time Windows Vista combines the features and consequences of both previous ones - both storing open application files in RAM and the system state in the “hiberfil.sys” file on the hard drive.
Activating Power Saving in Windows
On Windows 7, three power modes have been present in the consumption settings since Vista. Up to Windows 10, the energy saving mode is represented (in Russian transcription) by three options: “Sleep”, “Hibernation” and “Hybrid Sleep”.
They correspond to the Stand-by, Hibernate and Hybrid Sleep states discussed above.
However, please note that not all motherboards and video cards have energy saving support.
Also, this feature may be disabled in the BIOS or in the system settings.
As for other operating systems, on Mac you can enable the required mode by using the “Energy Saving” tab in “ System settings" In Linux, the appropriate commands (setterm, xset...) are entered through the console.
Selecting a mode in Windows 10
To put your PC into one of the gentle modes on Windows, you need to use the following algorithm actions:
After activating the Start button menu, place the cursor on the “Shutdown” line (it may have the name “Shutdown”). In this case, there will be an appearance additional menu, in which the cursor will need to be positioned on the “Sleep” key:

Similar actions will lead us to the “Hibernation” mode. Just press another key:

The hybrid sleep state is more complicated. IN laptop computers by default it will be disabled.
To activate it, you first need to go to the tray icon with the image of the battery (since on laptops using OS Windows settings energy consumption are displayed in the System tray):

By right-clicking we will open from the “Power Options” menu that appears:

The following control dialog will open in front of us:

The checkbox in it will correspond to the currently used parameters.
Having moved to “Settings”, you need to turn on the plus sign opposite “Sleep” and enable the option “ Hybrid sleep"to set the value to "on." corresponded to the picture:

After such activation, the “Sleep Mode” button in the “Start” menu will no longer put your computer into simple “Sleep”, but into “Hybrid”.
Wake-up of the PC from any state associated with reducing power consumption is done by pressing the power button (although to bring it out of normal “Sleep”, just move the mouse or press any of the keyboard buttons).
Setting up an energy saving plan
In addition to the standard ones, on any computer it is possible to fine-tune acceptable power consumption modes. This is typical mainly for computers powered by batteries (since stationary ones always work connected to the network at maximum).
The transition to the parameters is carried out by the already mentioned method of calling “Power Options” from the tray.
The parameters available for adjustment are opened by clicking on the section shown in the following figure:

Here we get to the list of all possible schemes:

Separately, it should be said that in addition to operating system schemes, those that correspond to installed applications from your laptop manufacturer (in in this case"Power4Gear").
The enabled checkbox corresponds to the one used in this moment scheme.
If your laptop runs alternately on battery power and mains power, then it is logical to create your own power supply to avoid alternating between switching on balanced and maximum.
To do this, in the “Power Supplies” window, place the cursor on “Creating a circuit...”:

We connect the checkbox opposite any of the existing ones (no matter which one) (1), enter a name for the new scheme to be created (2), activate the “Next” button (3):

We will have direct access to the three main settings and to changing the list of additional ones:

Availability for their adjustment is enabled, as shown in the picture:

Each section opens by clicking on “+”. Also, for each, a value is set for operation from the mains and from the battery. For example, for a hard disk partition.
In general, you need to carefully go through all sections additional settings, analyze the expected events and place all the checkboxes in accordance with the need and with your own vision of your work or habits. Don't forget that for more simple solution To learn how to exit Power Saving Mode, you will need to carefully review the Power Buttons and Cover section.
Disabling Energy Saving
Before you disable the power-saving mode on your computer, you need to turn to “Power Options” again. Either through the tray or through the “Control Panel”.
The “Plan Settings Changes” tab allows you to set the computer sleep function to “never”.
If you want to disable this feature, then after setting these values you need to click “OK” and “Apply”.
Now you know about the power saving options and controls on your computer. Read our new articles, ask us new questions.
“Before you have time to charge your tablet, it’s already dead!” you can often hear from happy owners of gadgets.
There may be two reasons affecting Android energy saving:
1) inability to properly use the battery and
2) manufacturing defect.
We will consider the first reason in this article.
Mobile laptops have faded into the background with the advent of portable gadgets: tablets and smartphones. The latest miracle of technology is much more pleasant to use and costs less. If you don’t need anything else besides surfing the Internet, music and games, then a tablet is what you need! Almost everyone is satisfied with such a convenient purchase, and they are happy to use it to the fullest.
However, very soon the joy gives way to surprised disappointment from the question that arises: “Why does the battery discharge so quickly?” Yes, the battery really rarely pleases anyone with its performance, or maybe consumers’ expectations are simply a little too high. Be that as it may, there are several secrets for saving energy.
1. Brightness
The lion's share of the charge goes to the screen backlight, so it is worth setting the minimum brightness at which the convenience of operation is maintained. You can even conduct a small test and find out how many minutes it will take to get 1% charge at maximum brightness and at minimum brightness. The test results are impressive.
2. Auto rotate
Disable auto-rotate screen, like any other sensors. This will also reduce power consumption.
3. Wallpapers and widgets
Avoid live wallpapers and running widgets; they also consume battery power on your tablet (or smartphone).
4. Wireless connections
Turn off unnecessary wireless connections. Working wireless connections mercilessly eat up battery power. This means it is extremely important to turn off Wi-Fi, GPS, and Bluetooth when not needed.
It is also worth turning the “My location” section slider to off.
By the way, in order to inactivate all wireless connections in one fell swoop, which waste battery power, you can use Airplane Mode.
5. Synchronization
This is a necessary thing, often replacing information media, as well as other methods of data transmission. However, her constant work in background extremely undesirable. Synchronization settings and disabling synchronization can be found in account management.
6. Work in the background
Factory Android firmware burdened with many applications that are most often unnecessary. However, in order to somehow change or completely stop their work, some experience will be required.
You need to stop running applications carefully, after first understanding what the application does and what it serves. Otherwise, the performance of the tablet (gadget) may worsen, or even as a result of such ill-considered activity, a reboot may be required. In general, you should only stop background applications if you are sufficiently prepared to do so.
What should I do to stop background applications? For this purpose, you can use the “Application Manager”, which is in standard menu“Settings” (Fig. 1).

Rice. 1. Launch Application Manager
By selecting the “Running” tab (1 in Fig. 2), you can see which of these applications are constantly “spinning” in the device’s memory and “consuming” its resources, including battery life.

Rice. 2. Application Manager. The “Running” tab is open
By clicking on any of the running applications, for example, on the Settings application (3 in Fig. 2), we find ourselves in the “Application Information” window, which contains the “Stop” button that interests us (Fig. 3).

Rice. 3. “Stop” button in the Active application window
On the “Running” tab you can see “cached processes” (2 in Fig. 2), which can also be stopped in the same way using the “Stop” button (Fig. 4).

Rice. 4. Stop button in the window Active application cached process
As a rule, the operating system provides minimal information about each application and each cached process. This information may include, for example, messages:
- "When the service is stopped, the application may crash,"
- “Normally this process does not need to be stopped” or
- “When stopping the application, some data may be lost,” etc.
These messages must be treated carefully, these recommendations must be followed, because it is not for nothing that they are written to us, users of tablets (gadgets).
To be honest, I don't touch it myself background applications and processes, I try not to stop them unnecessarily. Perhaps this leads to faster battery drain, but I feel safer than waiting for some “adventures” due to erroneously or incorrectly disabled applications and processes. Let them work, since the operating system needs it.
7. Bluetooth keyboard
It consumes relatively little energy. However, if you often deal with documents that require a lot of printing, then it is best to purchase a USB keyboard. A Bluetooth keyboard may be more convenient, but it is not beneficial in terms of energy consumption.
8. Extreme Energy Saving Android
It is impossible not to mention the standard Android option “Extreme Energy Saving”. You can use it to save battery power. True, they mainly use it if there is no way to charge a fairly discharged battery of a tablet or gadget.
“Extreme Energy Saving” is enabled in “Settings”. The option of interest is called: “Extreme energy saving” (Fig. 5).

Rice. 5. Turn on extreme energy saving Android
When this option is enabled, the use of applications is limited; they are loaded only from the list of main applications, which you need to select yourself. The transmission of mobile data is also disabled, if the tablet or smartphone “can” do this, WiFi and Bluetooth are disabled. However, we must remember that after disabling the extreme power saving mode on the screen of your device, the location of application icons may change, the picture will become unusual, although this will not make anything worse.
9. Battery
Finally, we can’t help but say about monitoring the use of battery resources and optimizing the use of battery resources that the Android operating system provides. To do this, there is a “Battery” option in the “Settings” menu. It allows:

Rice. 7. Optimizing applications to save battery life
So, if you click on the Facebook application, which consumes most of the electricity of our gadget (Fig. 8),

Rice. 8. Application optimization options using the example of Facebook
...then in particular, it is clear that when set for Facebook apps optimization option " Automatic optimization(Optimization of applications not used for 3 days)" optimizing power consumption is not enough (Fig. 8). You should select the “Always optimize” option.
But the “Disable” option for energy saving on Android disables optimization, and the application consumes the largest amount of electricity for its operation.
So
These 9 tips will help extend the life of your battery.
But it is worth remembering that its capacity decreases over time, even with proper use of the gadget, simply because the battery is periodically charged and discharged. And its resource is precisely calculated by the number of possible charge-discharge cycles.
The more cycles, the more wear accumulator battery our tablet (gadget), and nothing can be done about it. Everything is not forever...
Receive current articles by computer literacy straight to yours Mailbox
.
Already more 3,000 subscribers
Starting from the seventh version, operating Windows systems have acquired extensive user settings to control energy consumption and save battery power. Thanks to this, the battery life Windows operation 10 on a laptop or tablet can be significantly extended.
The function operates on the same principle as the energy saving mode on mobile devices. After its activation, the system changes the parameters so as to maximize the battery life of the computer (or tablet), namely:
1. reduces display brightness;
2. disables applications running in hidden (background) mode;
3. cancels the issuance of push notifications.
By default, the function turns on automatically when the charge percentage drops to 20%. If the device is reconnected to the network, then the mode Windows Energy Saver turns off and the device starts operating as usual.
How to turn it on?
Saving Windows charge not only turns on automatically. It can be activated at any time. So, if you turn it on immediately after disconnecting the power supply (without waiting for the charge level to drop), you can significantly extend autonomous operation devices.
For this:
1. In the system notification area, find the small battery icon; 
2. and then simply activate “battery saver”.
For quick access to the main power supply configurations, open the center Windows notifications 10 (which is on the right side of the screen by default) and select required block. To disable the energy saving mode, perform all the described steps in reverse.
Settings
To change basic energy saving settings:
1. Open “Start” and go to “Settings” - “System”;
2. here find the “battery saving” block. 

A dialog box will open where you can:
1. disable the energy saving mode (its automatic activation);
2. change the minimum battery charge threshold when it turns on (for example, not 20%, but 50% or even 90%). To do this, simply move the slider to the desired location; 
3. disable automatic reduction screen brightness. This is not recommended, since it is the backlighting that consumes the most system resources;
4. allow the system to send push notifications to the user.
To allow (or vice versa deny) programs background work After activating energy saving, you must:
1. check the box next to “always allow”;
2. After that, click on the “add application” button and select those that will work despite the savings.

Perhaps the most consumed resource of all is screen brightness. Therefore, if you want to reduce energy consumption as much as possible, then change this option Not recommended.

Battery usage
After going to the “battery usage” block, you can find all the information about where the charge is spent and which applications consume most of it. 
Here you can also find percentage battery consumption main components:
1. wireless connection Wi-Fi;
2. display;
3. system.
This information can greatly help in developing energy saving policies. Because with its help you can determine which programs consume the most and which ones are best disabled. Also, if you plan to extend your battery life, turn off Wi-Fi if possible.

Here you can also find other data regarding the operation of applications. For example, energy consumption in normal mode and in the hidden (background).
Nutrition and hibernation
To change other, more familiar power saving settings, return to the system menu and go to the “power and sleep” tab.
Here, as in others Windows versions you can specify the time after which:
1. the screen will go dark or the brightness will decrease;
2. The power will be turned off.
In this case, you need to specify two parameters: when the computer is powered from battery and from the network. 
If the window interface seems unusual to you, then to configure the same parameters in a more familiar form, click “additional network settings” in the “related parameters” block.
In the same menu, you can build an entire policy for power control. By default, the user has two main modes available: “standard” and “balanced”. Thus, by changing additional battery monitoring parameters, you can save all custom settings. 
You can also change other options here. For example, adjust the power supply to the processor and other parts of the computer. However, changing them is highly not recommended. Since the basic options will be quite enough.
As you can see, enabling or disabling power saving mode on a computer with Windows 10 installed on it is not as difficult as it might first seem. All basic parameters (brightness settings, hibernation time, etc.) remained without significant changes. Except that others became available to the user, additional functions for monitoring battery charge. 
If you think that these instructions are not enough or you still have any doubts about changing certain configurations, then we suggest you familiarize yourself with detailed instructions on working with the "ten". Including change basic settings screen brightness, sleep transition, and so on.
Virtually every operating system includes power management tools. Energy saving mode- a useful function, but it will be out of place when the computer performs main tasks.
You will need
- A computer with a pre-installed Windows operating system.
Instructions
1. To disable this option on Windows 98/Millenium/2000 operating systems, click the “Start” button and open the “Control Panel” applet. In the window that opens, double-click on the “Power Management” shortcut. Here you need to choose a power management scheme with settings that will be optimal for your computer. Go to the line "Disable monitor" and select "Never". To save the settings, click the “Apply” and “OK” buttons.
2. In Windows XP, you should also launch the Control Panel, the shortcut for which is located in the Start menu. Select either Power Options or Productivity and Maintenance, and then Power Options. In the window that opens, go to the “Power Management Schemes” tab and select the desired one mode .
3. For desktop computer it is recommended to prefer “Home/Desktop”, and for portable devices"Portable." On the contrary, the options “Disconnect Disks” and “Display Disconnect” should be preferred to “Never”. To save the changes, click the “Apply” and “OK” buttons.
4. For operating rooms Windows systems Vista/Seven in the “Control Panel” you need to open “System and Maintenance” and select the “Power Options” item. In the window that opens, select a power plan and click on the “Change plan settings” link.
5. Go to the Advanced Options applet and click the Edit button. Here you need to reveal the elements “Sleep later...” and “Sleeping mode» select the “Never” option.
6. A similar action must be performed with the drop-down parameters “Hibernate later...” and “Turn off the screen later...” (Tab “Screen”) - prefer the value “Never”.
7. In order to close the current window and save the metamorphoses, step by step click the “OK” and “Save” buttons.
Disabling your monitor's power management option will prevent it from going into sleep mode after a certain period of inactivity. Sleep mode is a feature aimed at reducing energy consumption. But it happens that the computer turns on sleep mode when it is in the middle of solving tasks such as backup copying hard disk, checking the system for viruses or reforming huge multimedia files to a different format. Absolutely, in this case this function should be disabled.

Instructions
1. Windows XP Click the "Start" button located in the lower left corner of the screen. Select the “Control Panel” link. Control panel applied to metamorphosis different settings Windows XP. IN classic menu“Start” double click on the “Power Options” button. If you have a Start menu by category, select Productivity and Maintenance, Power Options. On the Properties: Power tabs, you can manage your screen's power settings and hard drives, as well as configure the Source Uninterruptible Power, if you have one. Select the “Home/Desktop” section in the “Power Plans” tab. Select "Never" for "turn off display" and "turn off drives". Click the “Apply” button, and then the “OK” button.
2. Windows 98/ME/2000 Windows 98/ME/2000 Click the Start button, select Control Panel and locate the Power Management or Power Options icon in Control Panel Settings. Select the Power Options tab if it is not yet selected. From the drop-down menu labeled “Turn off the monitor,” select “Never.” Click "Apply" and "OK".
All modern OS include a power management subsystem. The core function of this subsystem is to implement energy saving by shutting down or entering a low power state peripheral devices or even each computer during a long period of inactivity by the user. This function extremely suitable. However, if you need to ensure a continuous likelihood of a rapid response from the computer to user actions, you should disable mode energy saving .

You will need
- – administrative rights on Windows.
Instructions
1. Open the Control Panel window. To do this, click on the “Start” button (located on the taskbar). In the menu that appears, select “Settings”. In the child menu that appears, click on “Control Panel”.
2. Open the dialog for setting the operating parameters of the power management subsystem. In the list of shortcuts in the Control Panel window, find the item “Power Options”. Select it. Right-click on the element. In the appeared context menu select “Open”. You can also double-click on a shortcut. The “Properties: Power Options” dialog will open.
3. Make a new power management plan. In the “Properties: Power Options” dialog, switch to the “Power Management Schemes” tab. Click the “Save As” button. In the “Save Scheme” dialog, enter a new unique name for the scheme. Let's say, “Without energy saving“. Click the “OK” button.
4. Edit the schema you just added. In the list located in the “Power management schemes” group, select the element corresponding to the diagram you made. In the lists “Display off”, “Disk disconnection”, “Pending mode via", "Sleeping mode through”, located in the “Scheme settings...” group, select the elements with the text “never”.
5. Disable mode energy saving. In the “Properties: Power Options” dialog, click the “Apply” button. The settings of the selected scheme will be saved. Also, the current circuit will be selected as used to control the computer's power. In accordance with the selected settings, the computer's display and hard drives will not turn off for any period of inactivity by the user. Also, the computer will never be put into standby or sleep mode. mode. After completing all the described actions, click the “OK” button. Close the control panel.
Helpful advice
Turning off the monitor during periods of long absence can significantly extend its life.
From settings monitor The ease of working on a computer depends on it. If the wrong settings are selected, this can result not only in an unbreakable feeling of irritation and nervousness, but also in headaches, decreased visual acuity, and nausea. In order to change options monitor, take advantage of the probabilities of the system or your video card.

Instructions
1. To change the size of windows, fonts, icons, and window appearance, open Control Panel through the Start menu. Under Appearance and Themes, select the Display icon. Or, right-click in any place on the desktop that is free from files and folders, and in the drop-down menu, left-click on “Properties”. The Display Properties dialog box opens.
2. The overall design of the desktop, the appearance of folders and the Start menu is configured on the Themes tab. At the bottom of the window you will see visual display selected topic. Using the drop-down list, select the topic that you like. To install custom theme, select “Browse” and specify the path to the desired topic. Click the "Apply" button.
3. Adjust the image size on the monitor on the “Options” tab. In the “Screen Resolution” section, use the “sliders” to select a resolution that is comfortable for your eyes. Click the "Apply" button and confirm your selection. For tube monitors, set the screen refresh rate (screen flicker). To do this, on the current tab, click the “Advanced” button. In the window that opens, go to the “Monitor” tab. Check the “Hide modes that the monitor cannot use” box. Using the drop-down list, set the desired frequency. Click OK and Apply.
4. Customize additional folder design, font size and smoothing on the “Design” tab using the “Advanced” button. On the Desktop tab, set background picture, preferring it from the drop-down list, or click the "Browse" button and specify the path to the custom image. Custom icons for standard folders install by clicking the "Customize Desktop" and "Change Icon" button.
5. Open your video card settings control panel. Adjust the color, brightness and contrast of the image on the corresponding tab. You can also adjust the contrast using the system options. Through the start menu, call up the “Control Panel”, click on the “Special Probabilities” icon, in the window that opens, go to the “Screen” tab. With support for Customize button and drop-down list, set a combination of colors and fonts that is easy on the eyes. Confirm your selection and close the window.
Video on the topic
Studio monitors are one of the most important elements in sound recording and mixing. They provide an opportunity to evaluate the sound of a particular composition and eliminate frequency gaps.

Instructions
1. Search the Internet for all possible options to choose studio monitors. Essentially, these are the same computer speakers, only with the widest possible range of sound. Their main difference from traditional household acoustics is the virtual absence of gaps in the frequency interval, i.e. if on yours computer speakers the frequency range from 20 Hz to 44 kHz is indicated, this does not mean that they cover it completely, unlike professional studio monitors.
2. Read on recording forums. There is probably a corresponding discussion thread where knowledgeable users We were considering one or another option for studio monitors. Read the presentation of several systems, then try to find out how much they cost.
3. Go to a music equipment store to get your bearings and pick up studio monitors. The sales assistant will be able to advise you on a multifunctional option in terms of price-quality ratio. Please note that such equipment needs to be purchased a little “for growth”. If you now buy relatively inexpensive studio monitors, then in a few years they may no longer be enough for you, because your sound engineering skills and sound requirements will certainly increase.
4. Also consider the option of studio monitors and headphones. They look no different from ordinary bulky headphones, but their sound will probably pleasantly surprise you. Cool studio headphones are slightly cheaper than cool studio monitors, but they have one significant advantage: their sound is not affected by room acoustics. Even if the room has poor sound insulation or is completely absent, the headphones will sound wonderful, unlike studio monitors, the clear sound of which may be (albeit slightly) added to room noise and echo.
Video on the topic
You should only open the monitor case in special cases and if you have the appropriate skills to work with equipment. If certain malfunctions occur, it is best to immediately take it to the service center and do not do repairs at home.

You will need
- - crosshead screwdriver;
- – flat screwdriver;
- – a plastic card or a mild knife.
Instructions
1. Discover your model's statement monitor on the Internet or check yourself to see if glue was used to hold the walls together frame A. Prepare your work surface, taking into account the fact that you will have to place the matrix on it during disassembly.
2. Disconnect the monitor from the computer, power source, remove all connected wires from its connectors and inspect it frame, check for the presence of fastening elements (in some models they may be hidden with special plugs); they are usually located on the back wall of the device.
3. Unscrew the mounting bolts and remove the monitor from the stand. If you have certain problems with the latter, read on the first pages of the user's manual how to correctly remove the monitor from the stand in your case (usually special latches are used that you need to press and pull the stand).
4. Pry up frame monitor using a flat-head screwdriver or a non-sharp table knife. If it is made of very thick plastic, do not use them, first try removing the cover frame but with your hands.
5. If in your model monitor glue was used to hold the parts together frame a, use a wide flat-head screwdriver. Install it at the junction of the sides frame and by installing it in vertical arrangement. Lightly hit the screwdriver handle from above until you hear the classic cracking sound. It would be better for everyone not to make major efforts here in order to open monitor, because it can lead to breakdown frame and damage to internal components.
6. Next pry frame monitor around the perimeter using plastic card and open back cover. For subsequent disassembly monitor, if necessary, download a special service instructions to your model and without it, do not proceed with independent repairs.
Helpful advice
Do not open the monitor case until the warranty period has expired.
Modern lamps that save energy, after burning out, become a type of household waste with a higher hazard class. This is why they need to be properly disposed of. For recycling, special collection points for burnt-out waste are provided in all cities and other residential areas of the country. energy saving lamps.

Instructions
1. The lamps contain internal structure up to 5 mg of mercury vapor. If a lamp accidentally breaks in an apartment, in a trash can or in a public trash bin, it will have a toxic effect on the inhabitants of the house and on the state of wildlife. It was therefore initially recommended that when similar lamps were produced, they should be handed over to points for subsequent industrial recycling after completion.
2. In order to properly dispose of an energy-saving lamp, pack it after it burns out in its own packaging or other cardboard packaging, where it will not break. You can wrap several burnt-out lamps in paper and place them in one box. Now you need to find collection points for such lamps in your city.
3. Not all points accept used lamps from individuals. Some exist intentionally to accept large quantities of non-functioning lamps from huge businesses.
4. Reception in all cities fluorescent lamps carried out in regional DEZs and REUs. For them, special containers with a signature are installed on the territory of such enterprises. If you do not find a container, ask the administration of the enterprise how you can dispose of the lamp. The city's environmental cleaning services are also required to accept for recycling not only mercury lamps, but also used mercury thermometers and disposable batteries.
5. The problem with the delivery and acceptance of energy-saving lamps and other devices containing mercury has become so serious that in some Russian cities, city district prosecutor's offices have turned to the courts with a request to organize collection points for such raw materials through HOAs. In turn, the courts ordered the HOA to install containers and collection points for waste lamps. Therefore, you can ask a reasonable question in your HOA where you can return used lamps.
To connect the monitor to a computer, one of the currently existing interfaces (DVI, D-SUB (VGS), HDMI, DisplayPort) can be used, depending on which one is available on the monitor. You can figure out which one is better to use only by understanding how they differ.

VGA input (D-SUB 15)
One of the first interfaces for connecting a computer and a monitor, the one that transmits analog signal V color scheme RGB together with horizontal and vertical frequency scan signals. This interface developed for use in monitors with cathode ray tubes. Connector preferred of blue color has 15 contacts arranged in three rows. The entire row is shifted relative to its neighbors so that the contacts are arranged in a checkerboard pattern. The connector body is trapezoidal in shape so as not to confuse the orientation of the mating connector when connecting. The connector is called D-SUB, while VGA defines the signal format. IN LCD monitors allowed to meet this exit, however, in terms of performance it is inferior to digital ones. DVI input
Digital monitor input, the one that was developed for flat monitors with matrices in which each pixel is represented as a separate fixed element. The connector has a rectangular shape with beveled corners on one side and two separate groups of contacts. The main group is 24 contacts located on 3 rows, the smaller group is 4 contacts located to the side and divided by a slot, which is also a lock. DVI input is rated for purchase digital signal from the video card. Meet CRT monitor With DVI input Not sure it's going to happen. The interface was originally developed specifically for use in LCD monitors, plasmas and other similar devices, where it is possible to transmit the signal from the video card to the matrix without additional reforms. In order not to confuse or insert the connector of the connecting wire on the wrong side, there are bevels on one side of the connector and an additional slot on the side of the core group of contacts. The DVI connector can also transmit an analog signal (DVI-A, DVI-I). There are separate wires and adapters for all valid connections. It is important not to confuse them when connecting.
HDMI input
A connector that appeared during the subsequent formation digital interfaces for monitors and other multimedia equipment. Main specifics given input is the probability of transmitting not only a digital video signal, but also sound. The connector itself is flat, rectangular in shape, inside of which there is a tongue with contact pads on both sides. To orient the mating connector to connecting cable There are characteristic bevels on one side of the connector. The bevels are not straight, but slightly rounded, concave into the connector. With help HDMI interface You can connect several monitors at once or combine a monitor and, say, a home theater.
DisplayPort input
The connector was designed for a format that is actually similar to HDMI; the information transfer speeds and the shape of the connector are slightly different. Its shape is rectangular and flat. The lock is the beveled corners on one of the short sides. Externally, the connectors of the last two types are identical in size, however, the presence of completely different locks will not allow you to confuse them and insert a connecting wire of the wrong format.
Video on the topic
Hello, today I will describe to you what energy-saving PC modes are and why they are needed. Many PC users have questions about how to save battery power and power consumption of their personal computer while they are away. And rightly so, why should a PC just work like that, wasting battery power for no reason.
Next, I will describe point by point about energy saving modes and how to set them up on Windows 7,8,10
To prevent your computer from wasting extra energy and draining the battery, you can switch it to one of the energy-saving modes while you are away. And thus save your battery charge. You can put the PC into an energy-saving mode in which it will completely turn off, but the current information will be completely saved, the operation of the personal computer can be quickly restored and continued to work. You can also switch to power saving mode without turning off the PC, s the ability to immediately continue working.
Setting up energy saving mode on Windows 7
For Windows 7, there are 3 types of energy-saving modes: sleep or sleep mode, hibernation and hybrid sleep mode.
Sleep mode This is a mode in which the PC is not completely turned off and all current work is stored in RAM. To switch to sleep mode, just press start, power off and select sleep mode. This mode is most often used, especially among laptop owners, since energy consumption is almost zero, and current work can be started in a few seconds; after exiting sleep mode, all programs will be in the same state as before entering sleep mode. Also, the advantages of sleep mode include the fact that it is harmful for the PC to turn it off and on frequently, since this creates so-called transient processes that increase the load on the PC and, as a result, increased wear and tear on the equipment.
Hibernation Mode differs from sleep mode in that when switching to energy-saving mode, all data is saved in a specially created file on the hard drive PC disk, and myself Personal Computer turns off completely. This method guarantees the safety of data since it is stored on the hard drive and not in RAM.
Hybrid sleeper The mode is designed specifically for desktop personal computers, it is something between sleep mode and hibernation mode. In this mode, all current data is saved in RAM, and on your hard drive.
In order to change energy saving modes, you need to open Start - Control Panel

In the window that opens, switch to the Energy Saving item. This is a standard power plan that is configured by specialists. If you not advanced user It’s better not to mess with the power plan settings. If you want to experiment, then click on the item Setting up power plan. In fact, there is nothing complicated there.

In the window that opens, select Change advanced power settings. In the window that appears, you need to configure necessary wai options.

Energy saving modes Windows 8, 10
The energy saving modes of Windows 8 and Windows 10 are similar Windows modes 7, which were indicated above.
In Windows 8, you can access energy-saving modes as follows. On Windows icon In the lower left corner, right-click and select Control Panel.
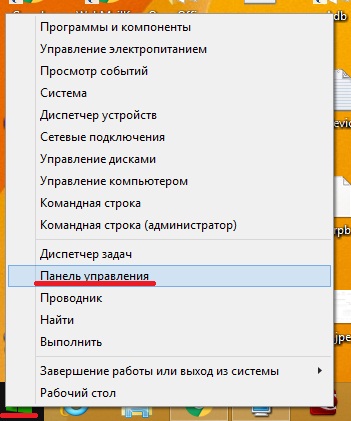
In the Control Panel, switch the view to Small Icons and open the Power Options item. Further actions similar to the example described above.

In order to configure the settings for energy-saving modes in Windows 10, you need to go to Start and select Settings.
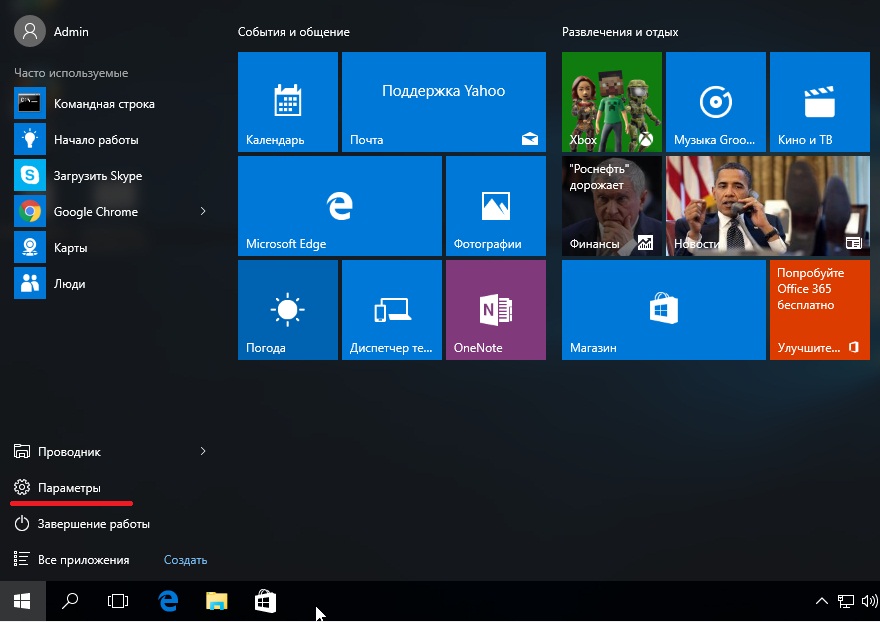

Here, in the left column, select Power and sleep mode and in the menu that appears on the right, click on Additional power settings


Each energy-saving mode has its own advantages and disadvantages, for example, sleep mode is good because it can
quickly return to work, but if the PC is de-energized, all unsaved data will be lost. The good thing about hibernation mode is that when you turn off the PC, the data will not be lost since it is stored on the hard drive, but it will take a few minutes to return to the robot. I hope you will find everything you need in this article.


