Wireless Dual Band Gigabit Router TP-LINK Archer C9
Before we start setting up the router, let's check the connection settings using local network. For this:
Windows 7
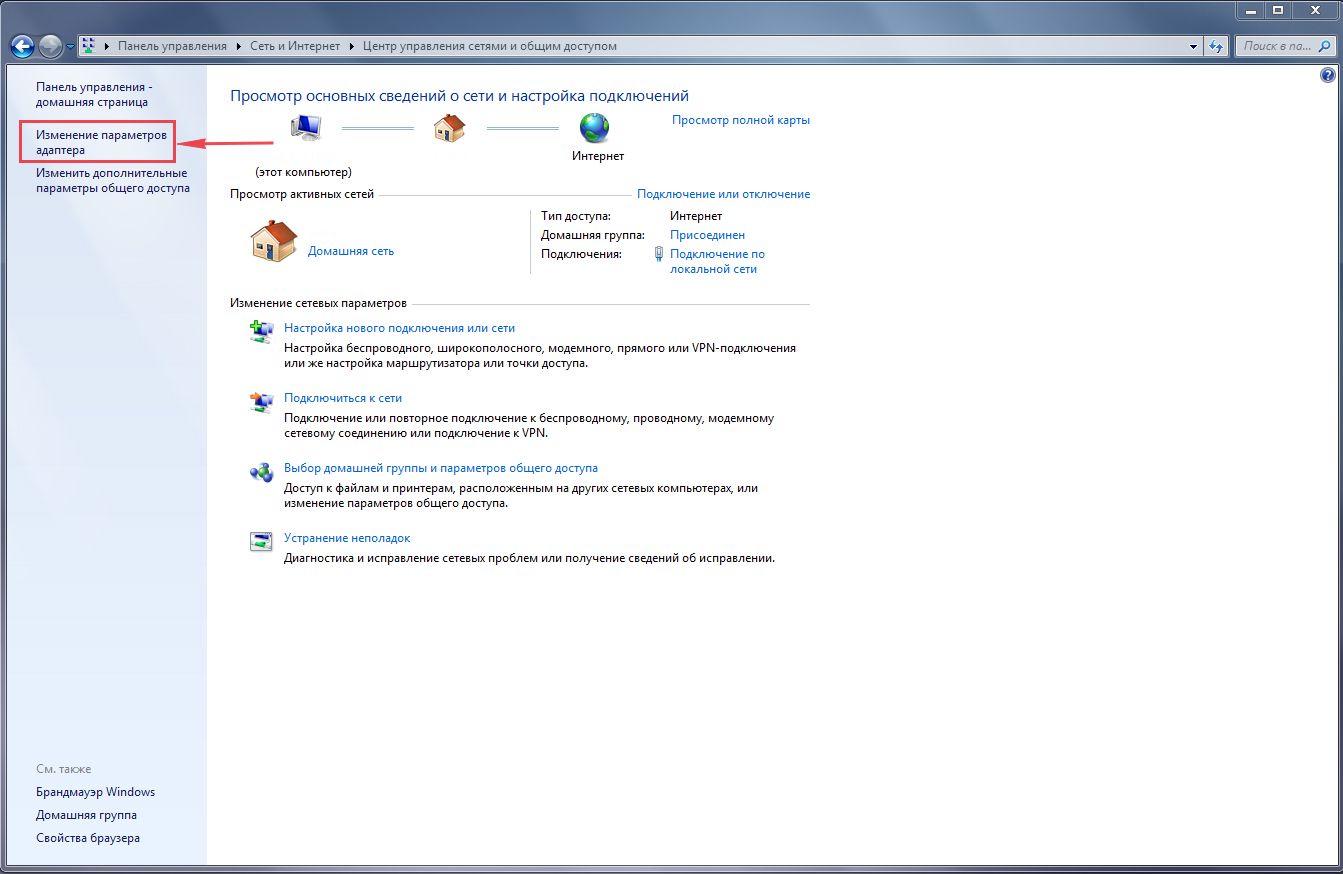
1. Click on " Start", "Control Panel".
2. Click on " View network status and tasks".

3. Click on " Change adapter settings".
4. LAN connectionProperty".

5. From the list select " Internet Protocol Version 4 (TCP/IPv4)" and press " Property".

6. " and "", then press the " button Ok".

Windows 10
1. Click on " Start", "Options".

2. Click on " Network and Internet".

3. Select " Ethernet" and click on " Configuring adapter settings".

4. In the window that opens we see " Ethernet". Click on it right click mouse, select " Property".

5. From the list select " IP version 4 (TCP/IPv4)" and press " Property".

6. In the window that opens, you need to check the box " Obtain an IP address automatically" And " Obtain DNS server address automatically", then press the button " Ok".

Connecting the TP-Link Archer C2 AC750 router to a computer
The next step is to connect the router TP-Link Archer C2 AC750 to your laptop or Personal computer(PC). To do this, you need to connect the cable that your provider provided to you to the blue port of the router (that is, this is the cable that goes to your apartment, house, office, etc. from outside), and the cable that came with router, one end into one of the four ports that are marked yellow on the router, and connect the other end to your laptop or PC. And yes, don't forget to connect the power cable.

Authorization of the TP-Link Archer C2 AC750 router
So, we connected the router, now you need to use any browser (be it Google Chrome, Mozilla Firefox, Internet Explorer, etc.) get into its web interface. To do this, open the browser and enter the router address in the address bar: 192.168.0.1 and press the button " Enter" on your keyboard.
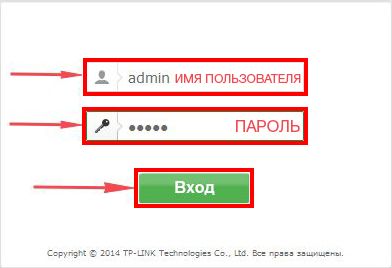
- Username - admin
- Password - admin
So, enter the data and press " Login"

Setting up the Tp-Link Archer C2 AC750 router
And finally we got to the router’s Web interface and now you need to configure the equipment. First of all, let's secure the wireless network by setting a password for wi-fi. Then you will need to find out what type of connection is used to access the Internet, is it PPTP, L2TP or PPPOE. You can find out by calling your provider (this is the organization with which you entered into an agreement to provide Internet services). So, let's start setting up the router.
Setting a password for wi-fi
The Tp-Link Archer C2 AC750 router is dual-band, which means that the router supports 2 operating frequencies for wireless connections, 2.4 GHz and 5 GHz. 5 GHz allows you to achieve higher bandwidth, but has a shorter range than 2.4 GHz, 2.4 GHz is more susceptible to interference. 5 GHz is not supported by all devices. Therefore, which frequency to choose is up to you. You can select both, and depending on the circumstances, change the wireless connection on your devices. In our example, we will consider exactly this option, when 2 frequencies are operating.
1.
On the Web interface, go to the menu in the "tab" Selecting operating frequency" and put a checkmark next to the frequency that is more suitable for your devices; in our case, select both and press the button " Save".

2.
Go to the "tab" Wireless mode - 2.4 GHz"and we get into" basic settings".
3.
In the column " Name demon wired network
"come up with and specify a name for your wireless network, given name In the future it will light up when you connect to the network. I advise you to indicate the frequency used in the name of the network, for example: “imya seti 2.4”.
4.
Let's select " Region" - Russia and press the button " Save".

5.
Wireless Security"and select the encryption type" WPA/WPA2-Personal".
6.
Below we put " Authentication Type:" on " WPA2-PSK" And " Encryption:" on " AES
7.
In field " Wireless password:Save".

8.
Go to the "tab" Wireless mode - 5 GHz"and we get into" basic settings".
9.
In the column " Wireless network name“come up with and indicate the name of your wireless network; this name will be displayed in the future when you connect to the network. I advise you to indicate the frequency used in the name of the network, for example: “imya seti 5”.
10.
Let's select " Region" - Russia and press the button " Save".

11.
Now you need to set a password for the wireless network. To do this, go to the tab " Wireless Security"and select the encryption type" WPA/WPA2-Personal".
12.
Below we put " Authentication Type:" on " WPA2-PSK" And " Encryption:" on " AES". These settings are recommended.
13.
In field " Wireless password:"we come up with and enter a password. Then click " Save".

14. After we pressed " Save"A message will appear above this button indicating that the settings have been saved and now we need to reboot the router. This is what we do by clicking on the button" click here"by sending the router to reboot. After the reboot, the name of your wireless network will appear in the network settings of your computer.
Setting up PPTP
PPTP on the router Tp-Link Archer C2 AC750
Let's also write and illustrate PPTP on the router Tp-Link Archer C2 AC750.
1.
Net", then " WAN".
2.
IN " WAN connection type:"choose" PPTP/PPTP Russia".
3.
Username:"), password (in line " Password:IP Address/Server Name:").
4.
Connect automatically NOT Connect on demand
5.
Save".

Setting up PPTP with a static IP address
Let's look at the connection setup PPTP with static IP address on the router Tp-Link Archer C2 AC750.
1.
Go to the menu in the tab " Net", then " WAN".
2.
IN " WAN connection type:"choose" PPTP/PPTP Russia".
3.
Below you will be asked to indicate your username (in the line " Username:"), password (in line " Password:").
4.
Static IP address".
5.
IP Address/Server Name:"), IP address (in the line " IP address:"), subnet mask (in line " Subnet mask:"), default gateway (in line " Main gate:") and DNS (in the line " DNS:").
All of the above data is provided to you by the provider (the organization that provided you with the Internet).
All this data is usually specified in the contract with the provider. If for some reason you could not find them, you need to call hotline Your provider and find out how you can get them.
6.
After you have entered all the necessary data, check the box next to " Connect automatically" (This setting will keep your Internet connection constantly, so if you NOT unlimited tariff I recommend checking the box next to " Connect on demand", that is, the Internet is connected only when you start using it).
7.
After all manipulations with the settings, press the button " Save".

L2TP setup
Let's look at the connection setup L2TP on the router Tp-Link Archer C2 AC750.
1.
Go to the menu in the tab " Net", then " WAN".
2.
IN " WAN connection type:"choose" L2T/L2T Russia".
3.
Below you will be asked to indicate your username (in the line " Username:"), password (in line " Password:"). You will also need to specify the server IP address (in the line " IP Address/Server Name:").
All of the above data is provided to you by the provider (the organization that provided you with the Internet).
All this data is usually specified in the contract with the provider. If for some reason you could not find them, you need to call your provider's hotline and find out how you can get them.
4.
After you have entered all the necessary data, check the box next to " Connect automatically" (This setting will keep your Internet connection permanently, so if you have NOT For an unlimited tariff, I recommend checking the box next to " Connect on demand", that is, the Internet is connected only when you start using it).
5.
After all manipulations with the settings, press the button " Save".

Setting up L2TP with a static IP address
Let's look at the connection setup L2TP with static IP address on the router Tp-Link Archer C2 AC750.
Typically a static IP address is provided legal entities, or how additional service to the basic tariff for individuals.
1.
Go to the menu in the tab " Net", then " WAN".
2.
IN " WAN connection type:"choose" L2TP/L2TP Russia".
3.
Below you will be asked to indicate your username (in the line " Username:"), password (in line " Password:").
4.
Since the connection uses static ip address, You check the box next to " Static IP address".
5.
Specify the server IP address (in the line " IP Address/Server Name:"), IP address (in the line " IP address:"), subnet mask (in line " Subnet mask:"), default gateway (in line " Main gate:") and DNS (in the line " DNS:").
All of the above data is provided to you by the provider (the organization that provided you with the Internet).
All this data is usually specified in the contract with the provider. If for some reason you could not find them, you need to call your provider's hotline and find out how you can get them.
6.
After you have entered all the necessary data, check the box next to " Connect automatically" (This setting will keep your Internet connection permanently, so if you have NOT For an unlimited tariff, I recommend checking the box next to " Connect on demand", that is, the Internet is connected only when you start using it).
7.
After all manipulations with the settings, press the button " Save".

Setting up PPPOE
I bring to your attention Video instructions for setting up the connection type PPPOE on the router Tp-Link Archer C2 AC750 using the Tp-Link TL-WR1043ND router as an example.
PPPOE on the router Tp-Link Archer C2 AC750.
1.
Go to the menu in the tab " Net", then " WAN".
2.
IN " WAN connection type:"choose" PPPOE/PPPOE Russia".
3.
Below you will be asked to indicate your username (in the line " Username:"), password (in line " Password:Confirm the password:").
All of the above data is provided to you by the provider (the organization that provided you with the Internet).
All this data is usually specified in the contract with the provider. If for some reason you could not find them, you need to call your provider's hotline and find out how you can get them.
4.
After you have entered all the necessary data, check the box next to " Dynamic IP address
" And " Connect automatically" (This setting will keep your Internet connection permanently, so if you have NOT For an unlimited tariff, I recommend checking the box next to " Connect on demandConnect according to schedule
5.
After all manipulations with the settings, press the button " Save".

Setting up PPPOE with a static IP address
Let's look at the connection setup PPPOE with static IP address on the router Tp-Link Archer C2 AC750.
Typically, a static IP address is provided to legal entities, or as an additional service to the basic tariff to individuals.
1.
Go to the menu in the tab " Net", then " WAN".
2.
IN " WAN connection type:"choose" PPPOE/PPPOE Russia"
3.
Below you will be asked to indicate your username (in the line " Username:"), password (in line " Password:") and password confirmation (in the line " Confirm the password:").
4.
Since the connection uses a static IP address, you check the box next to " Static IP address".
5.
Specify the IP address (in the line " IP address:"), subnet mask (in line " Subnet mask:").
All of the above data is provided to you by the provider (the organization that provided you with the Internet).
All this data is usually specified in the contract with the provider. If for some reason you could not find them, you need to call your provider's hotline and find out how you can get them.
6.
After you have entered all the necessary data, check the box next to " Connect automatically" (This setting will keep your Internet connection permanently, so if you have NOT For an unlimited tariff, I recommend checking the box next to " Connect on demand", that is, the Internet is connected only when you start using it, or " Connect according to schedule", that is, the Internet works at a certain time specified by you).
7.
After all manipulations with the settings, press the button " Save".

Changing the web interface password
I bring to your attention Video instructions for changing the password on the router web interface Tp-Link Archer C2 AC750 using the Tp-Link TL-WR1043ND router as an example.
Resetting the web interface password
If you set a password for the web interface of the router and forgot it, I suggest you watch the Video instructions for resetting the web interface password on the router Tp-Link Archer C2 AC750 using the Tp-Link TL-WR1043ND router as an example.
Firmware update
I bring to your attention Video instructions for updating the firmware on the router Tp-Link Archer C2 AC750 using the Tp-Link TL-WR1043ND router as an example.
Setting up an FTP server on the Tp-Link Archer C2 AC750 router
I bring to your attention Video instructions for setting up an FTP server on a router Tp-Link Archer C2 AC750 using the Tp-Link TL-WR1043ND router as an example.
Setting up a media server on the Tp-Link Archer C2 AC750 router
I bring to your attention Video instructions for setting up a media server on a router Tp-Link Archer C2 AC750 using the Tp-Link TL-WR1043ND router as an example.
Setting up a print server on the Tp-Link Archer C2 AC750 router
I bring to your attention Video instructions for setting up a print server on a router Tp-Link Archer C2 AC750 using the Tp-Link TL-WR1043ND router as an example.
Connecting a computer to wi-fi
After connecting and setting up the router, you need to connect the computer to a wireless network (wi-fi), consider connecting to wi-fi in two operating systems ah, these are Windows 7 and Windows 10:
Windows 7
Video instruction
1.

2. Sultan

3.
Connect automatically" and press
"Connection".

4. Specify " Security keyOK".

5.

Windows 10
Video instruction
1. In the lower right corner of the desktop, find the wireless network (wi-fi) icon and click on it with the left mouse button.

2. A window pops up with a list of available wireless networks. Select a wireless network, in my case it is the network " Sultanova"(You select the network whose name was given at ).

3. After selecting the network, check the box next to " Connect automatically" and press " Connect".

4. Specify " Security key"This is the wireless network password that you specified when . After you have specified the key, click " Further".

5. We wait perhaps a couple of seconds and you are connected to your wireless network.

Before we start setting up the router, let's check the local network connection settings. For this:
Windows 7
1. Click on " Start", "Control Panel".
2. Click on " View network status and tasks".

3. Click on " Change adapter settings".
4. LAN connectionProperty".
5. From the list select " Internet Protocol Version 4 (TCP/IPv4)" and press " Property".

6. " and "", then press the " button Ok".

Windows 10
1. Click on " Start", "Options".
2. Click on " Network and Internet".

3. Select " Ethernet" and click on " Configuring adapter settings".

4. In the window that opens we see " Ethernet". Right-click on it and select " Property".

5. From the list select " IP version 4 (TCP/IPv4)" and press " Property".

6. In the window that opens, you need to check the box " Obtain an IP address automatically" And " Obtain DNS server address automatically", then press the button " Ok".
Connecting the TP-Link Archer C20 AC750 router to a computer
The next step is to connect the router TP-Link Archer C20 AC750 to your Laptop or Personal Computer (PC). To do this, you need to connect the cable that your provider provided to you to the blue port of the router (that is, this is the cable that goes to your apartment, house, office, etc. from outside), and the cable that came with router, one end into one of the four ports, which are marked in yellow on the router, and connect the other end to your laptop or PC. And yes, don't forget to connect the power cable.

Authorization of the TP-Link Archer C20 AC750 router
So, we have connected the router, now you need to access its web interface through any browser (be it Google Chrome, Mozilla Firefox, Internet Explorer, etc.). To do this, open the browser and enter the router address in the address bar: 192.168.0.1 and press the button " Enter" on your keyboard.
- Username - admin
- Password - admin
So, enter the data and press " Login"


Setting up the Tp-Link Archer C20 AC750 router
And finally we got to the router’s Web interface and now you need to configure the equipment. First of all, let's secure the wireless network by setting a password for wi-fi. Then you will need to find out what type of connection is used to access the Internet, is it PPTP, L2TP or PPPOE. You can find out by calling your provider (this is the organization with which you entered into an agreement to provide Internet services). So, let's start setting up the router.
Setting a password for wi-fi
The Tp-Link Archer C20 AC750 router is dual-band, which means that the router supports 2 operating frequencies for wireless connections, 2.4 GHz and 5 GHz. 5 GHz allows for higher throughput, but has a shorter range than 2.4 GHz; 2.4 GHz is more susceptible to interference. 5 GHz is not supported by all devices. Therefore, which frequency to choose is up to you. You can select both, and depending on the circumstances, change the wireless connection on your devices. In our example, we will consider exactly this option, when 2 frequencies are operating.
1.
On the Web interface, go to the menu in the "tab" Selecting operating frequency" and put a checkmark next to the frequency that is more suitable for your devices; in our case, select both and press the button " Save".

2.
Go to the "tab" Wireless mode - 2.4 GHz"and we get into" basic settings".
3.
In the column " Wireless network name“come up with and indicate the name of your wireless network; this name will be displayed in the future when you connect to the network. I advise you to indicate the frequency used in the name of the network, for example: “imya seti 2.4”.
4.
Let's select " Region" - Russia and press the button " Save".

5.
Wireless Security"and select the encryption type" WPA/WPA2-Personal".
6.
Below we put " Authentication Type:" on " WPA2-PSK" And " Encryption:" on " AES
7.
In field " Wireless password:Save".

8.
Go to the "tab" Wireless mode - 5 GHz"and we get into" basic settings".
9.
In the column " Wireless network name“come up with and indicate the name of your wireless network; this name will be displayed in the future when you connect to the network. I advise you to indicate the frequency used in the name of the network, for example: “imya seti 5”.
10.
Let's select " Region" - Russia and press the button " Save".

11.
Now you need to set a password for the wireless network. To do this, go to the tab " Wireless Security"and select the encryption type" WPA/WPA2-Personal".
12.
Below we put " Authentication Type:" on " WPA2-PSK" And " Encryption:" on " AES". These settings are recommended.
13.
In field " Wireless password:"we come up with and enter a password. Then click " Save".

14. After we pressed " Save"A message will appear above this button indicating that the settings have been saved and now we need to reboot the router. This is what we do by clicking on the button" click here"by sending the router to reboot. After the reboot, the name of your wireless network will appear in the network settings of your computer.
Setting up PPTP
PPTP on the router Tp-Link Archer C20 AC750
Let's also write and illustrate PPTP on the router Tp-Link Archer C20 AC750.
1.
Net", then " WAN".
2.
IN " WAN connection type:"choose" PPTP/PPTP Russia".
3.
Username:"), password (in line " Password:IP Address/Server Name:").
4.
Connect automatically NOT Connect on demand
5.
Save".

Setting up PPTP with a static IP address
Let's look at the connection setup PPTP with static IP address on the router Tp-Link Archer C20 AC750.
1.
Go to the menu in the tab " Net", then " WAN".
2.
IN " WAN connection type:"choose" PPTP/PPTP Russia".
3.
Below you will be asked to indicate your username (in the line " Username:"), password (in line " Password:").
4.
Static IP address"
5.
IP Address/Server Name:"), IP address (in the line " IP address:"), subnet mask (in line " Subnet mask:"), default gateway (in line " Main gate:") and DNS (in the line " DNS:").
All of the above data is provided to you by the provider (the organization that provided you with the Internet).
All this data is usually specified in the contract with the provider. If for some reason you could not find them, you need to call your provider's hotline and find out how you can get them.
6.
After you have entered all the necessary data, check the box next to " Connect automatically" (This setting will keep your Internet connection permanently, so if you have NOT For an unlimited tariff, I recommend checking the box next to " Connect on demand", that is, the Internet is connected only when you start using it).
7.
After all manipulations with the settings, press the button " Save".

L2TP setup
Let's look at the connection setup L2TP on the router Tp-Link Archer C20 AC750.
1.
Go to the menu in the tab " Net", then " WAN".
2.
IN " WAN connection type:"choose" L2T/L2T Russia".
3.
Below you will be asked to indicate your username (in the line " Username:"), password (in line " Password:"). You will also need to specify the server IP address (in the line " IP Address/Server Name:
All this data is usually specified in the contract with the provider. If for some reason you could not find them, you need to call your provider's hotline and find out how you can get them.
4.
After you have entered all the necessary data, check the box next to " Connect automatically" (This setting will keep your Internet connection permanently, so if you have NOT For an unlimited tariff, I recommend checking the box next to " Connect on demand", that is, the Internet is connected only when you start using it).
5.
After all manipulations with the settings, press the button " Save".

Setting up L2TP with a static IP address
Let's look at the connection setup L2TP with static IP address on the router Tp-Link Archer C20 AC750.
Typically, a static IP address is provided to legal entities, or as an additional service to the basic tariff to individuals.
1.
Go to the menu in the tab " Net", then " WAN".
2.
IN " WAN connection type:"choose" L2TP/L2TP Russia".
3.
Below you will be asked to indicate your username (in the line " Username:"), password (in line " Password:").
4.
Since the connection uses a static IP address, you check the box next to " Static IP address".
5.
Specify the server IP address (in the line " IP Address/Server Name:"), IP address (in the line " IP address:"), subnet mask (in line " Subnet mask:"), default gateway (in line " Main gate:") and DNS (in the line " DNS:"). All of the above data is provided to you by the provider (the organization that provided you with the Internet).
All this data is usually specified in the contract with the provider. If for some reason you could not find them, you need to call your provider's hotline and find out how you can get them.
6.
After you have entered all the necessary data, check the box next to " Connect automatically" (This setting will keep your Internet connection permanently, so if you have NOT For an unlimited tariff, I recommend checking the box next to " Connect on demand", that is, the Internet is connected only when you start using it).
7.
After all manipulations with the settings, press the button " Save".

Setting up PPPOE
I bring to your attention Video instructions for setting up the connection type PPPOE on the router Tp-Link Archer C20 AC750 using the Tp-Link TL-WR1043ND router as an example.
PPPOE on the router Tp-Link Archer C20 AC750.
1.
Go to the menu in the tab " Net", then " WAN".
2.
IN " WAN connection type:"choose" PPPOE/PPPOE Russia".
3.
Below you will be asked to indicate your username (in the line " Username:"), password (in line " Password:Confirm the password:").
All of the above data is provided to you by the provider (the organization that provided you with the Internet).
All this data is usually specified in the contract with the provider. If for some reason you could not find them, you need to call your provider's hotline and find out how you can get them.
4.
After you have entered all the necessary data, check the box next to " Dynamic IP address" And " Connect automatically" (This setting will keep your Internet connection permanently, so if you have NOT For an unlimited tariff, I recommend checking the box next to " Connect on demandConnect according to schedule
5.
After all manipulations with the settings, press the button " Save".

Setting up PPPOE with a static IP address
Let's look at the connection setup PPPOE with static IP address on the router Tp-Link Archer C20 AC750.
Typically, a static IP address is provided to legal entities, or as an additional service to the basic tariff to individuals.
1.
Go to the menu in the tab " Net", then " WAN".
2.
IN " WAN connection type:"choose" PPPOE/PPPOE Russia".
3.
Below you will be asked to indicate your username (in the line " Username:"), password (in line " Password:") and password confirmation (in the line " Confirm the password:").
4.
Since the connection uses a static IP address, you check the box next to " Static IP address".
5.
Specify the IP address (in the line " IP address:"), subnet mask (in line " Subnet mask:").
All of the above data is provided to you by the provider (the organization that provided you with the Internet).
All this data is usually specified in the contract with the provider. If for some reason you could not find them, you need to call your provider's hotline and find out how you can get them.
6.
After you have entered all the necessary data, check the box next to " Connect automatically" (This setting will keep your Internet connection permanently, so if you have NOT For an unlimited tariff, I recommend checking the box next to " Connect on demand", that is, the Internet is connected only when you start using it, or " Connect according to schedule", that is, the Internet works at a certain time specified by you).
7.
After all manipulations with the settings, press the button " Save".

Changing the web interface password
I bring to your attention Video instructions for changing the password on the router web interface Tp-Link Archer C20 AC750 using the Tp-Link TL-WR1043ND router as an example.
Resetting the web interface password
If you set a password for the web interface of the router and forgot it, I suggest you watch the Video instructions for resetting the web interface password on the router Tp-Link Archer C20 AC750 using the Tp-Link TL-WR1043ND router as an example.
Firmware update
I bring to your attention Video instructions for updating the firmware on the router Tp-Link Archer C20 AC750 using the Tp-Link TL-WR1043ND router as an example.
Setting up an FTP server on the Tp-Link Archer C20 AC750 router
I bring to your attention Video instructions for setting up an FTP server on a router Tp-Link Archer C20 AC750 using the Tp-Link TL-WR1043ND router as an example.
Setting up a media server on the Tp-Link Archer C20 AC750 router
I bring to your attention Video instructions for setting up a media server on a router Tp-Link Archer C20 AC750 using the Tp-Link TL-WR1043ND router as an example.
Setting up a print server on the Tp-Link Archer C20 AC750 router
I bring to your attention Video instructions for setting up a print server on a router Tp-Link Archer C20 AC750 using the Tp-Link TL-WR1043ND router as an example.
Connecting a computer to wi-fi
After connecting and setting up the router, you need to connect the computer to a wireless network (wi-fi), let's consider connecting to wi-fi in two operating systems, these are Windows 7 and Windows 10:
Windows 7
Video instruction
1.
2. Sultan

3.
Check the box next to " Connect automatically" and press
"Connection".
4. Specify " Security keyOK".

5.

Windows 10
Video instruction
1. In the lower right corner of the desktop, find the wireless network (wi-fi) icon and click on it with the left mouse button.

2. A window pops up with a list of available wireless networks. Select a wireless network, in my case it is the network " Sultanova"(You select the network whose name was given at ).

3.
Check the box next to " Connect automatically" and press
"Connect".

4. Specify " Security key"This is the wireless network password that you specified when . After you have specified the key, click " Further".
5. We wait perhaps a couple of seconds and you are connected to your wireless network.

We have a tri-band MU-MIMO gigabit router at our disposal TP-LINK Archer C4000. One of the features was the HomeCare system, which protects the network and offers improved capabilities parental controls. Supports TP-link Tether application, technologies Reserve copy And cloud update firmware. The stated speed is up to 4,000 Mbit/s (1,625 Mbit/s at 5 GHz + 750 Mbit/s at 2.4 GHz).
TP-LINK Archer C4000 review
Equipment
Supplied in a massive box with a picture of the router and detailed data on its operating features and technical specifications. The kit includes a power adapter, patch cord and useful documentation. This model comes with a three-year warranty.
Appearance
TP-LINK Archer C4000 looks futuristic. Massive body with polygonal lines. Visually, it is more reminiscent of a spaceship, rather than the usual format of routers.
The main material is plastic with a matte finish. The main area of the lid is a ventilation grille with triangular holes.

You can install it either on a flat surface or fix it on the wall. On inside Ears are provided for self-tapping screws. Four compact rubber feet are designed to ensure a stable position.

There is also a sticker here containing technical information by router, production and network data. Just like the lid, the entire area is ventilation grille, effectively removing warm air from the radiator.

On the front panel there is a row of LED indicators, displaying the operating status, activity of wireless networks, local connection, network access, WPS and USB connectors.

There are three buttons responsible for turning off the wireless connection, activating the WPS connection and turning off the indicator backlight.

The TP-LINK Archer C4000 design uses six antennas, which when assembled do not protrude beyond the plane of the cover.

On the back there are five gigabit RJ-45, USB 2.0, USB 3.0, a hidden reset button, a power port and a mechanical switch.

Filling
It uses a 64-bit quad-core Broadcom BCM4908 processor operating at a frequency of 1.8 GHz, plus 3 coprocessors. 512 MB available random access memory. MU-MIMO, Beamforming, Airtime Fairness, RangeBoost, NitroQAM technologies are supported.
Claimed speeds of up to 4000 Mbps are a combined 750 Mbps on 2.4 GHz and dual 1625 Mbps on 5 GHz. There are two separate channels for 5 GHz, allowing you to share devices on the network that require high data transfer speeds, for example, gaming PCs, SONY and XBOX consoles, smart set-top boxes, and 4K resolution TVs. MU-MIMO technology will allow all these devices to work simultaneously.

HomeCare
We, the editors, first became acquainted with HomeCare technology in the TP-LINK Archer C4000 router. It consists of having a built-in antivirus. The user gets a tool to manage bandwidth, prioritizing between home devices, consoles, smartphones, tablets and TVs. Traffic is filtered with protection against malicious activity, and unauthorized intrusion is prevented. An advanced parental control tool is available to restrict access to inappropriate content.Control Panel
Initially, the user is greeted by an assistant who offers to set up the network in a few steps and connect to the provider. The interface is in Russian, so even an untrained user can figure it out.
The control panel is available in two filling options: basic and extended. The main window displays statistics on the use of network resources, data on all bands, wired connections, USB devices, wired and wireless clients.


In the “Network” section, you can configure the wired network settings. The options list contains the full range of options, including IPTV and DDNS.


It is possible to change the operating mode by choosing between a router and an access point.

IN " Wireless mode» set the network name, password, operating mode. The network can be turned off according to a schedule.


To protect personal data and limit speed for TP-LINK Archer C4000 guests. This way it will be possible to separate users within the same network and block access to local resources.

Two USB connectors can be used to organize network access to the connected hard drive.


You can also connect a printer and organize a backup.

In the “Parental Control” section, time restrictions and filtering levels are set.


The user will be able to change the priority of using the Internet provider resource in one click by selecting the content type.


Separate tab with detailed settings built-in antivirus options.


There is NAT forwarding.

IPv6 supported. Here you can also clone the MAC address.

Tab with VPN access settings.

In conclusion, let's note the system tools.

TP-Link Terher

You can control the TP-LINK Archer C4000 from the screen of a smartphone or tablet running operating systems Android systems and iOS. The main window displays a list of available devices on the network. From here you can add the device manually.

When you go to the management window, data on status, connection speed, active clients and wireless network data is displayed.

In the “Clients” tab, you can set the priority for connected clients. View and visually distribute devices across different frequency ranges. Unwanted devices are blocked.

Attention is paid to safety. HomeCare technology is placed in a separate tab with options for setting up parental controls, antivirus and QoS.

As mentioned above, from the “Tools” tab you can fine tuning router operation. It is quite possible to do without a web panel during operation and startup.
Tests
During lengthy tests, the router demonstrated stable work under continuous load. The average data exchange speed, according to measurements, was:- 2.4 GHz – 116 Mbit/s,
- 5 GHz – 349 Mbit/s.
Results for TP-LINK Archer C4000
 TP-LINK Archer C4000 will become excellent choice for those who do not accept compromises and prioritize the stability and security of the local network. We have before us a high-quality, top-level router with support for current technologies, two channels in the 5 GHz range, an application for a smartphone, two USB, excellent quality coverage, traffic prioritization, built-in antivirus and a high-performance platform. It can be recommended for use both at home and in the office.
 receives the well-deserved award "Gold...
At the time of testing, TP-Link Archer C3150 is one of the most powerful routers in the router market. Modern element base, Availability required interfaces and support for MU-MIMO technology make this router a real network combine, on the basis of which you can configure a print, media and NAS server. Moreover, the latter will be accessible from anywhere globe via FTP access. The speed capabilities of the router are also amazing, considering the fact that this is a gigabit router.
TP-Link Archer C3150: equipment and capabilities
 We don't see much point in describing the contents of the box. All you need to know is that all the necessary wires to connect the device are there, so you don’t have to buy anything extra. All that remains is to install and configure the router, and then make the most of its capabilities.
Let's start with the fact that we have before us a representative of the top category of ac standard routers, which will be of interest primarily to those users who have a gigabit network and ac-compatible devices. There is no particular point in purchasing it for a 100-megabit home network, because a good half of the speed potential will remain unrealized.
 In order not to be unfounded, we immediately note that, according to the manufacturer, it is capable of providing a total speed of up to 1,000 Mbit/s at a frequency of 2.4 GHz and 2,167 Mbit/s on a channel with a frequency of 5 GHz.
The SmartConnect technology used here allows you to automatically select the appropriate band for each device on the network, providing the most optimal speed data exchange. They are responsible for processing large data streams and stable network operation on each of the two channels. dual core processor Broadcom, running at 1400 MHz, and two coprocessors.
 On board there are 4 gigabit LAN ports, a gigabit WAN connector and two USB interfaces (versions 2.0 and 3.0). Using the latter, you can connect a printer or external drives, turning the router into a NAS. If the Internet goes off in your office or home, you can insert a 4G modem into the USB port to organize a backup network connection.
And to ensure that the router does not overheat due to the tasks assigned to it, the lower and part of the upper surface are perforated. There is also a gap between the top cover and the body with holes for air circulation. We did not disassemble it, but we are sure that the dimensions of the radiator, which is responsible for passive cooling of the router components, are impressive, judging by the dimensions of the device.
TP-Link Archer C3150: features
 Thanks to Multi-User Multistreaming (or MU-MIMO) technology, the router can communicate with multiple devices in your home or office network simultaneously. This is fundamentally different from other MIMO routers, which operate in single-user mode and are forced to switch between clients connected to them, processing their requests in turn.
Our test MU-MIMO router does not need to do this: although it also works with devices in multi-threaded mode, it is able to manage several clients simultaneously without switching between them, making other devices wait.
 Another one interesting opportunity The device is based on Beamforming technology. It is implemented on the basis of four dual-band antennas with a high signal gain, which allows you to create a directional Wi-Fi signal towards specific device or a section of the house (for example, if the router is installed in a country house and you need to provide good speed connections on the veranda).
What if, in addition to “ac” devices in the house, there are also “n” clients? Airtime Fairness technology allows the channel to be evenly divided between modern devices and older generation devices, preventing the latter from reducing the overall network speed.
TP-Link Archer C3150: watch 4K video and play online games over the air
 Thanks to four dual-band antennas, it will provide maximum coverage throughout the entire apartment, country house or small office. And the possibility of directed data transfer to devices, which we wrote about just above, opens up the possibility for users to watch UHD video via wireless connection without any jerks or delays. The same goes for network games. In addition, it allows you to organize four stable wired connections, which will allow you to achieve maximum data transfer rates.
TP-Link Archer C3150: management and settings
A top-end router is not synonymous with the phrase “difficult to manage.” Setting up this unit is as simple as possible, and if this is not your first time dealing with routers, then just rejoice at the intuitive interface. For configuration, you can use the standard web interface or mobile Tether app(for smartphones based on Android and iOS OS).
 Standard setup will take no more than 30 seconds. You just need to follow all the steps that the “master” offers you initial setup" In the router web panel, users have three interface options: quick setup, basic functions and for advanced users.
In case of basic option Most of the settings for will be set automatically. When switching to the advanced version, the user receives full control above the router. But in mobile application interface corresponds only basic settings, allowing access only to the basic parameters of the device.
TP-Link Archer C3150: characteristics
| WLAN standard | ac |
| Maximum theoretical speed of WLAN-ac | 2167 Mbit/s |
| Maximum theoretical speed of WLAN-n | 1000 Mbit/s |
| Gigabit LAN | 4 ports |
| 100 Mbps LAN | — |
| USB 3.0 connector | 1 port |
| USB 2.0 connector | 1 port |
| DSL modem | — |
| Print server | Yes |
| FTP server | Yes |
| DynDNS support | Yes |
| Telephony: analog | — |
| Telephony: ISDN | — |
| DECT | — |
| Telephony: VoIP | — |
| Additional Applications | TP-LINK Tether |
| Transmitter power | < 20 дБм или < 100 мВт |
| Sensitivity (reception) | 5 GHz: 11a 6 Mbps: -91 dBm 11a 54 Mbps: -72 dBm 11n HT20: -70 dBm 11n HT40: -69 dBm 11ac HT20: -60 dBm 11ac HT40: -61 dBm 11ac HT80: -56 dBm 2.4 GHz: 11g 54 Mbps: -73 dBm 11n HT20: -72 dBm 11n HT40: -69 dBm |
| Control | Access control Local control Remote control |
Although network hardware differs significantly from the same video cards, processors or monitors, the specifics of the markets in all cases remain the same, regardless of the type of components. First, top-end devices hit store shelves, and then, when the hype subsides a little, more affordable solutions appear.
Exactly the same situation was observed after the announcement of the standard wireless communication IEEE 802.11ac. The first routers of this class impressed not only with their performance and capabilities, but also with their price tag. When new mode gained some popularity and all restrictions on the use of the IEEE 802.11ac standard were resolved, stores computer equipment literally flooded with inexpensive solutions.
One of them is , which nominally belongs to the AC750 class. By the way, this is not the cheapest router in the TP-LINK Archer network equipment line. For those who do not need gigabit ports, the manufacturer offers a “light” version of this device- TP-LINK Archer C20i. It uses a simplified hardware platform and maximum speed transmissions via the LAN interface are limited to 100 Mbit/s. Let's hope that this model will soon come to us for testing, but now on our agenda TP-LINK router Archer C2.
Specification:
|
Wireless router |
||
|
Supported network standards |
IEEE 802.11a/b/g/n/ac, IPv4/IPv6 |
|
|
Frequency range for wireless communication |
||
|
Data transfer rate |
For 2.4 GHz frequency |
Up to 300 Mbit/s |
|
For 5 GHz frequency |
Up to 433 Mbps |
|
|
For both ranges (total) |
Up to 750 Mbit/s |
|
|
Quantity (type) |
2 (external, removable, RP-SMA connector) |
|
|
2.4 GHz Configuration |
||
|
5 GHz Configuration |
||
|
Interfaces |
1 x RJ45 (WAN) 10/100/1000 Mbit/s 4 x RJ45 (LAN) 10/100/1000 Mbit/s |
|
|
WAN connection type |
Dynamic IP, Static IP, PPPoE, PPTP (Dual Access), L2TP (Dual Access), BigPond |
|
|
Encryption modes |
64/128-bit WEP, WPA, WPA2, WPA-PSK, WPA2-PSK |
|
|
Network Security |
Protection against DoS attacks, firewall SPI, filtering by IP/MAC address, domain name, binding by IP/MAC address, parental control |
|
|
Data prioritization (QoS) |
WMM, Bandwidth Monitoring |
|
|
Guest networks |
1 x for 2.4Hz frequency 1 x for 5Hz frequency |
|
|
Additional services and features |
Virtual server, Port Triggering, UPnP, DDNS, VPN (PPTP, L2TP, IPSec) |
|
|
additional services |
Data storage (Samba / FTP), media server, print server, 3G/4G modem connection |
|
|
230 x 144 x 35 mm |
||
|
External power supply (DC: 12 V / 1.5 A) |
||
|
Products webpage |
||
|
Product page |
||
Packaging and delivery

The TP-LINK Archer C2 router comes in a small cardboard box which abounds different tables and diagrams describing the main capabilities of this model. In addition, there is an image of the device itself and a comparison with other solutions from TP-LINK series Archer. In a word, the information content of the packaging is at the highest level.

Inside the box, in addition to the router itself, we found an external power supply, two removable antennas, a LAN cable, a disk with software and a user manual - a complete “gentleman's” set of any modern wireless router.
Appearance

The TP-LINK Archer C2 model has a quite presentable appearance. Especially stands out top panel, made of glossy plastic. The presence of the original texture further enhances the mirror effect. Yes, even in a modern office or apartment this router it will look quite organic. In our opinion, TP-LINK did not make a mistake with the design - compared to its competitors, TP-LINK Archer C2 looks very attractive.

If you look at the body of the device under test from the point of view of functionality, then there is nothing to complain about here either. It is smaller than its classmates (230 x 144 x 35 mm), but is equipped with all the necessary connectors and controls with convenient access. The only, but not so significant, drawback is the inability to place the router on the wall.

But the absence of special fastenings made it possible to increase the area occupied ventilation holes. They cover the entire back panel and the ends of the case. To prevent the router from slipping and damaging the surface on which it will be installed, the manufacturer has provided four rubberized feet.

A strip of indicators reporting the current device status and status network connections, traditionally placed on the case cover.

Available interfaces and controls also take their usual place on rear end router. For wire connections There are four RJ45 (LAN) connectors and one RJ45 (WAN) port. All of them comply with the 10/100/1000 Mbit/s standard. Wireless broadcasting is carried out using two external removable antennas. There is also a USB connector, which expands the functionality of the TP-LINK Archer C2 model. Depending on the connected devices, it allows you to turn it into a file storage (with access via an FTP or Samba client), a media server, a print server or a router with Internet access via a 3G/4G modem.
The controls are represented by three buttons. The first, larger one (“Power On/Off”) allows you to turn the device on/off. The other two (“Wireless On/Off” and “WPS/Reset”) are intended for manual blocking wireless interface communications and automatic connection to existing Wi-Fi networks. Long-pressing the “WPS/Reset” button (more than 5 s) will reboot the router and then reset all settings.
Hardware platform

The TP-LINK Archer C2 model operates under the control of a combination of MediaTek MT7620A and MediaTek MT7610EN chipsets. The first is responsible for supporting the IEEE 802.11n standard in a MIMO 2x2:2 configuration and provides a maximum data transfer rate of up to 300 Mbps at a frequency of 2.4 GHz. The second allows you to organize broadcasting in the 5-GHz range using the IEEE 802.11ac standard in operating mode MIMO antennas 1x1:1. In this case, the speed limit is 433 Mbit/s. So the manufacturer cheated a little by indicating the router class as AC750. It would be more correct to say AC733. True, this does not change the essence, since we're talking about about theoretical throughput. IN real conditions It is the AC750 class devices that will act as direct competitors to the TP-LINK Archer C2.

But let’s return to the hero of the review, or rather, to his hardware platform. The MediaTek MT7620A chip mentioned above also includes a MIPS processor operating at 580 MHz, hardware NAT service, USB 2.0 port controller and a number of other interfaces that remain unused in this router. Responsible for the correct functioning of gigabit ports Network Controller Realtek RTL8367RB.
The RAM subsystem is represented by a DDR2 ESMT M14D5121632A chip with a capacity of 512 Mbit. Router settings and executable instructions are stored in 8 MB flash memory.
Setting up the router
The TP-LINK Archer C2 model is configured via a WEB interface. Traditionally, it consists of a set of tabs on which the relevant settings are grouped. I liked that each option is equipped detailed description, which is displayed on the right side of the window. True, the entire text is currently presented on English language, which can be considered a defect on the part of the manufacturer. After all, the lack of Russian or Ukrainian localization can scare away novice users, and most useful functions will remain inaccessible to them. We have no doubt that it will be available soon new firmware with Russian localization of the WEB interface.


The TP-LINK Archer C2 model has standard (for this class) functionality, and available settings quite enough to organize a local network at home or in a small office. The new product supports direct connection to the Internet, as well as through the PPPoE, L2TP and PPTP protocols. Port forwarding and forwarding services, DMZ and UPnP are available; It is possible to protect against DoS attacks by activating the built-in firewall. For control network traffic an extensive system of rules is provided, which includes filtering by domain names, ports, IP and MAC addresses. Using parental control options for connected clients, you can set up an Internet access schedule and also prohibit visiting unwanted resources.


For each of the two frequency ranges Wi-Fi has its own separate tab, where you can select the type and width of the channel, the encryption method, and also propose to set white and black lists of client MAC addresses. The number of guest networks is limited to two (one for a 2.4 GHz connection and one for a 5 GHz connection). Moreover, in addition to the standard rules for access to network resources, you can allow or deny access to drives connected to the router via the USB port.
And, of course, the TP-LINK Archer C2 model offers basic functions such as viewing status network connections, changing the administrator password, updating the router firmware, displaying logs and statistics, and many others. The full list of options can traditionally be found in our gallery of screenshots.
Testing
The main problem network technologies, and especially wireless lines, can be called signal transmission interference. They are the ones who force you to spend money on decoding and additional check everyone transmitted packet limited computing resources of the Wi-Fi client. Create radio interference for wireless channel very simple - almost any electrical appliance or digital device. The most common Appliances: microwave oven, refrigerator motor or even a lamp daylight when it is turned on, etc. Another important, and often the main source of interference can be the high density of Wi-Fi networks surrounding the place of use wireless solution. Taking into account all these factors, we cannot talk about complete repeatability of test results for the wireless segment of the network.
Therefore testing everyone network solutions, which came into our laboratory, occurs under “ideal” operating conditions: in one room with direct visibility and at a distance of no more than two meters between points. To conduct the experiments, we used the following additional network equipment: ASUS RT-N66U, ASUS EA-N66 and Gigabit Ethernet Intel 82566MC.
Comparative performance testing in 802.11n mode at 2.4 GHz using WPA2 encryption

Comparative performance testing in 802.11n mode at 5 GHz using WPA2 encryption

Data flow in both directions


Comparative performance testing in 802.11ac mode at 5 GHz using WPA2 encryption

Data flow in both directions

Data flow from client to router

Data flow from router to client
Under real operating conditions average speed data transmission in both directions via wireless connection using the IEEE 802.11n communication standard at 2.4 GHz was about 138 Mbps, which is very good result. But the transition to the 5 GHz frequency had a negative impact on speed indicators: from 138 Mbit/s they dropped to 97 Mbit/s.
Therefore, in the 5 GHz band, we recommend using IEEE 802.11ac mode whenever possible. After its activation, the average data transfer speed increased to 202 Mbit/s. At the same time, a significant increase in performance was observed on separate areas connections: “client - router” and “router - client” (maximum 267 Mbit/s in each case). Yes, this is lower than that of AC1200 and AC1750 class routers, but let’s not forget that TP-LINK Archer C2 costs less than them.
Comparative testing of packet transmission speed through the LAN interface for another LAN client

Data flow in both directions
The performance of the node responsible for exchanging data via LAN interfaces is comparatively low. high level: the maximum speed was 800 Mbit/s, and the average almost reached 700 Mbit/s. True, such figures cannot be called record-breaking. Some competitive cross-data solutions demonstrate performance levels of 800 - 900 Mbit/s.
Comparative testing of the speed of packets passing through the router's NAT service

But there are no longer any questions about the operation of the NAT service, which has a hardware implementation here. During the experiment, the average switching speed was 935 Mbit/s, which is several times higher than that of lower-quality gigabit solutions where the NAT service operates at the software level.
Comparative testing of the speed of reading and writing files using a SAMBA client on an external SSD drive connected via a USB 2.0 connector

Reading from a connected SSD drive

Recording to a connected SSD
The speed of reading files through the SAMBA client from an SSD drive connected to the router via a USB 2.0 connector was about 10.6 MB/s, and the writing speed was 9.1 MB/s. These indicators correspond to the results of competitive solutions for USB interface 2.0. Of course, for implementation file storages, especially in small offices, it is better to use the option with a USB 3.0 port. Although this in no way cancels the fact that based on TP-LINK Archer C2 you can organize a home file server. It will simply have lower performance and in some situations may limit the functionality of other devices.
conclusions

Model TP- LINKArcherC2 is one of those routers that allows you to experience the benefits of the IEEE 802.11ac wireless standard without spending a lot of money. It provides good performance on both Wi-Fi channels(about 140 Mbit/s at a frequency of 2.4 GHz and 200 Mbit/s at a frequency of 5 GHz), as well as an acceptable switching speed in the wired network segment (approximately 700 Mbit/s in both directions). I would also like to note the excellent implementation of the hardware NAT service.
The advantages of this model also include expanded functionality, which is achieved through the use of a USB port. Thanks to it, the router can also play the role of network storage files, print server, media server or device for accessing the Internet via a 3G/4G modem. True, not all of the above services showed high performance. On the other hand, TP-LINK Archer C2 does not claim to be a “networked office processor”. A more significant drawback, in our opinion, is the lack of Russian localization of the WEB interface at the time of testing, which can complicate setting up the router and administering network connections. This is especially true for beginners who are encountering a device of this level for the first time. Let's hope that in the next firmware the manufacturer will correct this defect and translate the names of the settings and their descriptions into other languages.
In general model TP-LINK Archer C2 left a pleasant impression, so it can be safely recommended for solving problems related to organizing a small network.
Advantages:
- IEEE 802.11ac standard support;
- support for simultaneous operation of two wireless Wi-Fi channels data transmission at frequencies of 5 GHz and 2.4 GHz;
- relatively high speed data exchange in real conditions: on average 140 Mbit/s and 200 Mbit/s in both directions using IEEE 802.11n and IEEE 802.11ac modes, respectively;
- availability of gigabit LAN and WAN ports;
- the presence of a USB 2.0 connector, which significantly expands the functionality of the router and provides the user with access to a number of services: print server, media server, FTP storage;
- the ability to connect 3G/4G modems to access the Internet;
- hardware implementation of NAT service;
- IPv6 protocol support;
- presence of a hardware button for the “WPS” mode;
- functional WEB interface;
- attractive design.
Peculiarities:
- there are no mounts for placing the router on the wall;
- The performance of the node responsible for the LAN interfaces is slightly lower than that of other gigabit solutions.
Flaws:
- lack of Russian or Ukrainian localization (in next versions firmware they will probably be added).

TP - LINK for the router provided for testing.
We express our gratitude to the Ukrainian representative office of the companyASUS for the provided auxiliary equipment.
Article read 17887 times
| Subscribe to our channels | |||||


