How to calibrate the keyboard on a laptop. Setting up the keyboard in Windows XP. How to set up a keyboard on a computer - basic option
How to connect a keyboard to a computer? How to do basic keyboard settings on PC? How to set up the language bar on your computer?
The keyboard is one of the most important information input devices into a computer. For example, you can work with a PC without a mouse, but without a keyboard you won’t be able to. The serial interface of the keyboard is usually connected to a special controller located on the system board.
It is very important to know how to set up the keyboard on a computer, since the ease of working with a PC depends, first of all, on the keyboard settings. The keyboard can connect to your computer in three different ways:
- Standard PS/2 connector. Never insert the device's plug into PS/2 while the computer's power is on. This may render the motherboard unusable.
- USB port. A keyboard connected to a USB port works in almost identical mode to a keyboard connected to a standard PS/2.
- Wireless keyboard connection. This connection method assumes it will work after Windows starts. After the operating system starts, the wireless driver is loaded and the keyboard is ready for use.
After connecting the keyboard, you should begin setting up.
How to set up a keyboard on a computer - basic option
To begin basic keyboard setup, you need to go to the Start menu/Control Panel. Then select the "Keyboard" tab. Next, the “Properties: Keyboard” window will open. In this window you can make some basic settings.
Adjusting the speed
The keyboard is designed in such a way that when you press a certain key for a long time, the symbol depicted on that key will be displayed several times until you release the key. This setting can be adjusted using the slider in the "Repeat input character" section. The “Delay before repeat start” section specifies the time after which the pressed character will be played again. The Keyboard Properties dialog box contains a text box in which you can try out the settings you entered.
Using the “Repeat Speed” slider, you set the delay time interval before the pressed symbol starts playing again. The Cursor Flicker Rate section determines the frequency at which the cursor symbol flickers on the screen. By moving the slider to the right/left, you set this parameter. After the changes have been made, click "OK".
How to configure language settings
To determine which language will be used by default on the system, you need to right-click on the language bar icon. Select: taskbar / “Options” / item “Default input language” - in this tab, select the required language that will go into the OS by default.
By clicking the “Keyboard Options” button, additional keyboard parameters are configured: which key will enable/disable Caps Lock, which key combination will switch between languages (usually Alt left + Shift is used).
To configure additional language support (right to left writing, hieroglyphs), you need to go to the “Start” / “Control Panel” / “Switch to Classic View” / “Language and Regional Options” menu, then click “Language” / “Languages and Services” text input"/"More details" and make the necessary settings.
Setting up the keyboard is not difficult, but it is still recommended. The comfort of communication with the computer will depend on the settings made, so pay due attention to this point.
As part of computer literacy, let's talk about special function keys on a laptop. With their help you can easily and quickly control your laptop.
Laptop function keys F1-F12
In Figure 1, the Fn key on a laptop is highlighted with a red rectangle (left), and the function keys on a laptop that work in conjunction with the Fn key are highlighted with green rectangles.
The inscriptions printed on the special function keys in question usually have their own color (more precisely, their own design) on the built-in keyboard, for example, red, blue, green (or they can simply be surrounded by a white frame). The same color (or design) is the “Fn” lettering on the “Fn” key on a laptop. This means that these special keys only work if they are pressed simultaneously with the “Fn” key.
For example, if the “F1” key has a red (blue, green) icon of a crossed out built-in mouse (which means “disabling the built-in mouse” of the Tach-Pad for a Sony laptop), then to disable the built-in mouse you need to press the “Fn” key on the laptop, and, while holding it down, simultaneously press the “F1” key. Reconnecting the built-in mouse is done in the same way: “Fn” - “F1”.
On different laptops, the “F1” – “F12” keys have different meanings. No standardization is used here.
- On one laptop, “F1” may mean disabling the built-in mouse, and on another, for example, turning off the PC to sleep mode (an icon with a twice or thrice repeated “Z” symbol, which, according to laptop manufacturers, means the sound “Z-z-z-z...”, in Russian it sounds “Z-z-z-z...” and resembles breathing during sleep).
- The key responsible for connecting and disconnecting Wi-Fi usually has an image of an antenna emitting a signal in all directions.
- The key to increase image brightness on the built-in display has a stylized image of the screen (frame), inside of which there is a large sun icon.
- And on the screen brightness reduction key, the image of the sun inside the stylized image of the screen is small.
Almost all images printed on the “F1” – “F12” keys are understandable without additional explanation. And if necessary, do not neglect the instructions included with all laptops without exception. These instructions exist both in printed form (it’s good if they are written in Russian, otherwise sometimes it’s anything but Russian), and in the form of .pdf files on the PC, located in a special folder on the C: drive (also Unfortunately, these descriptions are not always made in Russian).
This type of laptop control using function keys is very convenient. Without them, it would be necessary to call special programs for each connection or disconnection or for each adjustment. Moreover, not all of these programs can be found in the “Control Panel”.
Sometimes specific programs (for example, adjusting the backlight of the built-in keyboard or managing the battery charge to ensure longer battery life) are not located in the “Control Panel”. Then you need to find them among special laptop management programs. And you need to know them.
In addition, controlling the laptop using function keys (and using special laptop control programs) makes it possible to apply settings unique to this laptop.
These settings are for example:
- adjusting the keyboard backlight,
- battery life saving system management,
- special features for users with disabilities, etc.)
cannot be executed by standard programs from the Windows Control Panel.
What do you need for the function keys on a laptop to work?
It is important to understand that controlling a laptop using the “F1” – “F12” function keys is done using special programs that laptop manufacturers have installed into the laptop’s native operating system. Function keys simplify access to these programs and make these programs seemingly invisible to the laptop user.
However, by pressing the function keys on the laptop, the user receives the required response (in the form of connecting or disconnecting certain laptop devices, in the form of adjusting brightness and volume, etc.) by automatically launching these special programs.
This means that if these special programs are not in the laptop, then the function keys will not work. And no settings will be made! Another confirmation of the fact that the unity of working software (i.e. programs) and working hardware.
Why did the function keys on my laptop stop working?
- How can programs responsible for function keys disappear?
- In different ways. For example, you can reinstall the system in a laptop, but install not the “native” system, but another one. Let's assume that the laptop you purchased had Windows XP. And I wanted to install Windows 7. We install, we get Windows 7, which does not have special laptop management programs. And then the laptop's function keys will not work.
You can accidentally or purposefully remove special laptop management programs. Sometimes they seem to be loaded into the operating system, since they can be pre-launched when the PC boots. By optimizing PC loading, disabling “unnecessary” (from the point of view of the user optimizing the PC operation) programs at boot, you can accidentally disable “necessary” laptop management programs. This, by the way, is one of the reasons why I don’t like download optimization, often advertised by some advanced users.
Special programs may be destroyed by viruses. There are other ways to lose special laptop control programs.
How can I restore the function keys to work normally?
Reverse recovery is possible if there is a “native” system distribution package supplied with the laptop. Or by downloading “native” programs from the Internet, if they are available on the websites of laptop manufacturers. The latter is especially useful if the PC user changes the version of the operating system (as in the above example of replacing Windows XP with Windows 7), but does NOT use the “native” operating system that came with the laptop.
Special laptop management programs may require periodic updates. Updates to specific laptop software cannot be done in the standard way using the Windows update service. To update special laptop software, you also need to have a special program for checking and installing updates.
This program works by accessing updates via the Internet. You need to run it periodically (if it does not start automatically every time you boot Windows) and use it to check for updates and install them. If the program allows it, then it is useful to set the automatic mode of searching and installing updates for special software for managing a laptop.
Some users connect an external keyboard to their laptop. In this case, sometimes the function keys of the laptop do not work if they are pressed using an external keyboard connected to the laptop via . But they can work, depending on your luck. That is, there is no guarantee that the laptop's function keys will work on an external keyboard.
To summarize, we can say that controlling a laptop using function keys and special programs with which these function keys are “associated” is a very convenient service from laptop manufacturers. Thanks to them for this! And the safety of this service is the task and responsibility of the laptop user.
You need to make sure that the system on the laptop is “native” and that all special programs are present on the PC. And so that they load “correctly” when you turn on the PC. And also be sure to be updated “correctly” throughout the entire period of operation of the laptop.
And then working with a laptop will be pleasant and convenient, as intended by their manufacturers.
How to dial digital codes on a laptop
Digital codes are not directly related to the function keys of the laptop F1-F12, however, there is a problem with entering codes for the laptop, so let’s move on to its consideration and solution.
Reader question: When typing text, I use digital codes through Alt to type characters that are not on the keyboard: Alt+0151 is a dash (not a hyphen), Alt+0171 and Alt+0187 are corner typographic quotation marks, which is necessary when typing typographic text. How to dial these codes on a laptop?
There are full-size keyboards (Fig. 2) that have a small numeric keypad on the right (partially highlighted in red and blue). Anyone who works with numbers (accountants, bankers, marketers, users working with Excel spreadsheets, etc.) almost always only deals with a full-size keyboard.
Using the small numeric keypad, you can enter numeric codes that cannot be entered using regular numbers, learn more about numeric codes.

Rice. 2. Full-size keyboard (without FN key). Click on the figure. to increase it
There are, of course, laptops with a full-size keyboard (as in Fig. 2, click on the picture to enlarge). As a rule, they have a large screen, but at the same time, such a laptop has a substantial size and weighs a lot. Among ordinary users, such laptops are rare. Pay attention to fig. 2, that with a full-size keyboard, the laptop does not have an Fn key; it is absent as unnecessary.
But what about users of regular laptops whose keyboards do not have a small numeric keypad, but need the functions of a small numeric keypad, in particular, entering numeric codes? Laptop manufacturers have gotten away with it by adding additional capabilities to other laptop keys. To enable such features, the laptop has an auxiliary Fn key (highlighted in Fig. 1 and shown in Fig. 3).
As can be seen in Fig. 3 (click on the picture to enlarge it), each laptop keyboard has a number row of keys from 1 to 9. They are in the second row, and in the first row are the function keys F1-F12. We will be interested in other numbers that are available on laptops and are written smaller than regular numbers (highlighted in Fig. 3).

Rice. 3 (click on the picture to enlarge it). There are dedicated keys for the small numeric keypad NumLock and FN, as well as small numbers from 1 to 9 for entering digital codes
To dial a digital code on a laptop:
1) find the Fn and Num Lock keys (in Fig. 3 they are highlighted with a red frame, they are designed in the same style - blue and italic, but the style may be different on your laptop). Press the Fn and Num Lock keys at the same time.
In this case, a mini-light on the laptop may light up, if such an indication is provided in the laptop. This way you will turn on the small numeric keyboard that laptop manufacturers have “hardwired” into a regular keyboard.
2) Notice the numbers 0 to 9, which are the same color (same style) as the Fn key. Each laptop will have its own style of designing symbols from the small numeric keypad; there are no standards here.
In Fig. 3 (clickable) small numeric keypad is “hardwired” (located) on the following laptop keys:
- the small number 0 is located on the letter M,
- small number 1 - on the letter J,
- small number 2 - on the letter K,
- small number 3 - on the letter L,
- small number 4 - on the letter U,
- small number 5 - on the letter I,
- small number 6 - on the letter O,
- small number 7 - on the big number 7,
- small number 8 - on the big number 8,
- small number 9 - on the big number 9.
On your laptop, try entering numbers from 0 to 9 using the small numeric keypad in a text editor, such as .
3) So, the Fn and Num Lock keys are pressed - the small numeric keypad is turned on. The numbers from it can be used as digital codes. To enter, for example, the code Alt+0151,
- Press the Alt key and, without releasing it, enter the code 0151.
- That is, while holding down the ALT key, click on the numbers one by one: first on the number 0 (where the letter M is in Fig. 3). Then, without releasing ALT, click on 1 (where the letter J is), then on 5 (where the letter I is) and again on 1 (where the letter J is).
- Release all keys - a dash should appear.
- If it doesn't work the first time, try a few more times.
4) If you no longer need the small numeric keypad, press the Fn and Num Lock keys at the same time. This will disable additional functions on the keyboard (that is, the small numeric keypad will be disabled).
And you can use the keyboard as usual to enter letters.
What if Small numeric keypad does not work on laptop? I think this could happen if
- The Num Lock key is not turned on or something else is done incorrectly. This usually happens when you first try to learn how to use a small keyboard.
- On the laptop, the native operating system, hardwired by the manufacturer, was reinstalled onto a non-native one.
Reader Questions
Here a few questions from blog readers with my answers, which served as material for writing this article (by the way, ask questions in the comments, if you don’t find an answer to them, I will answer, and my answer will come to you by email, to your E-mail).
Question 1: While I’m working on the keyboard, if I don’t see it, the cursor arrow itself runs away somewhere. Are there any commands to prevent this from happening?
Answer: The cursor runs away on a laptop if you accidentally and unnoticed touch the touchpad - this is the laptop’s built-in mouse. I disable the touchpad for this reason and use a regular mouse. I have keys to disable the touchpad
Question 2: Laptop, Windows 7. Such a problem happened: in the lower right corner of the screen it used to be written caps lock off or caps lock on (duplicating the indicator), but now it doesn’t write, the indicator works, but it’s not very convenient to look at it (especially in good weather conditions). bright room) caps lock mode is on or off.
What could have gone wrong in the settings, and what can be done to return a text notification about the status of the caps lock mode? Thank you.
Answer: Most likely, these are specific settings of your laptop. I know, for example, laptops that have a backlit keyboard, and it (its brightness, duration of illumination, etc.) is adjusted by a separate special program included in the laptop software.
If, for example, you reinstall Windows and install a non-native system that came with the laptops, then such specific programs disappear completely, and along with them the usual conveniences disappear.
If you have not reinstalled the operating system, then look in the Control Panel or among the special programs for managing your laptop for a program that configures this service that has become familiar to you.
.Question 3: Please tell me: on my laptop the CAPS LOCK and NUM LOCK indicators do not light up when I press. What to do? How to fix the situation?
Already more 3,000 subscribers.
A standard keyboard usually doesn't need any special setup to work in Windows 7: to start using it, you just need to connect it to your PC. But, as with any device, problems sometimes occur with keyboards. Most often this is a complete or partial failure, as well as incorrect operation. In addition, some users find the default keyboard setting inconvenient and want to change it.
We have prepared a story on how to troubleshoot your keyboard yourself and how to configure it for more convenient use in Windows 7.
The most common types of keyboard problems and methods for resolving them
- The keyboard doesn't work at all.
- Windows 7 does not recognize the keyboard.
- The keyboard works, but the wrong characters are printed when typing.
- The keyboard does not respond to pressing individual keys.
- The system does not recognize keyboard shortcuts.
The keyboard does not work, is not recognized by the system, the indicator lights do not light up
This problem indicates that the device is not connected to power or is faulty. To exclude the first reason:
- connect the keyboard to a known working USB or PS/2 port of the computer without adapters and other “intermediate” devices (connection to PS/2 can only be made when the power to the system unit is turned off);
- make sure the connection is secure.
If the keyboard still does not show signs of “life,” it is likely that the keyboard itself is faulty or its cable is damaged.
This condition of the wireless keyboard may indicate a discharge or lack of batteries.
The keyboard does not work exclusively on Windows. It works before the system boots, as well as on other computers
The keyboard is working, but does not work due to a system failure. The reasons may be:
- driver problems;
- blocking the device with software;
- viral infection;
- changes in the registry and damage to system files.
If the problem did not occur immediately after installing Windows 7 (the keyboard worked fine on this computer before), try removing its driver:
- open Control Panel -> Device Manager;

- Find the keyboard in the list, expand its context menu and select “Delete”.

- restart your computer.
These steps will help Windows 7 re-recognize the connected device and reinstall it.
Other mentioned problems with Windows 7 and programs that caused the keyboard to fail can be fixed with a system restore. To do this, go to Start, expand All Programs ->> Accessories ->> System Tools and click “System Restore”.

Select an appropriate checkpoint that was created before the failure date.

Confirm your intention by clicking the “Done” button.
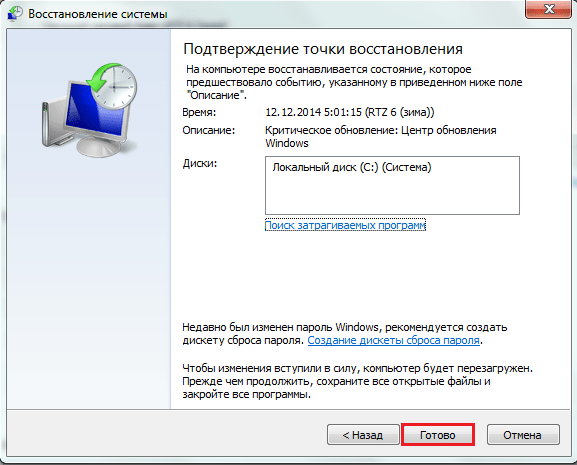
Wait for the recovery to complete. All changes, which include installing and configuring software, adjusting the registry, installing Windows 7 updates, etc., will be canceled, and what was blocking the keyboard will no longer work.
If the possible cause is a virus infection, scan the system.
Windows 7 does not “see” the keyboard. It is detected as an unknown device
This often happens with non-standard keyboards that use their own drivers. Installing the required driver from the disk that came with the keyboard upon purchase or from the manufacturer’s website will help solve the problem.
The standard Microsoft keyboard driver can be downloaded from here.
Keys cannot be pressed or different characters are printed
Most often this is the result of the keyboard getting dirty and liquids getting inside it. You can clean the device from crumbs and other debris that accumulates under the keys using a special vacuum cleaner or a can of compressed air.

If the keyboard does not work after liquid has entered it, it must be disassembled, washed and dried.
If a problem similar to this occurs when connecting any keyboard to the computer, the source of the problem may be the port (PS/2 or USB) or the motherboard.
The functionality of individual keys can be checked using test applications, for example MS Key, which is included in the Microsoft IntelliType software suite, or online services Key-test, Keyboard Tester and the like.
Some keyboard shortcuts don't work
The reason for this is often third-party software for controlling the keyboard. Moreover, the application does not necessarily work on your system; perhaps it was installed before and was removed incorrectly. Sometimes the problem is caused by incorrect configuration of such programs.
To check this version, start Windows 7 in safe mode (programs from the startup list will not start under it). If the keyboard works normally, the assumption is correct.
Configuring Keyboard Settings in Windows 7
Layout settings
In the notification area on the taskbar, click the input language button and select the layout you want.

Or press a specified key combination. If you don't know it, open the Windows 7 Control Panel ->> Regional and Language Options.

On the “Languages and keyboards” tab, the “Change keyboard” option is available. Click the button.

In the “Switching keyboard” section, the key combination that changes the layout settings is indicated.
Set the delay before entering characters, input speed, and cursor blink rate
Open the Keyboard app in Control Panel.

Character input options in Windows 7 are located on the “Speed” tab. Move the sliders to find the settings that work best for you. You can check how this works in a special input field in the same window.

Here, below, you can set the cursor blinking frequency when entering text. It can also be changed by moving the slider left and right.
The keyboard ranks first in the hierarchy of input devices. If you can still work with a computer without a mouse, although it is inconvenient, then without a keyboard it is impossible. In computers, the serial keyboard interface is connected to a special keyboard controller on the system board, and in the first seconds after starting the computer BIOS checks the hardware configuration of the system and, first of all, the processor and keyboard controller. Moreover, a special interrupt channel IRQ 1 is allocated for the keyboard, which is not available for other uses. The operation of the keyboard is supported by special programs “hardwired” into the BIOS, as well as a keyboard driver, which provides the ability to enter Russian letters, control the speed of the keyboard, etc.
The keyboard can be connected to the computer in three ways:
to PS/2 connector– standard connector;
ATTENTION! Under no circumstances should you remove or insert PS/2 devices while the computer is powered on. This disables the motherboard. You MUST only turn on (turn off) the PS/2 mouse and keyboard by turning off the computer from the network!!!
USB port;
The keyboard connected to the USB port works almost the same as when connected
connection to a traditional PS/2 port. The controller chips installed in the keyboard are used to receive and interpret data before it is transferred through the USB port to the system.
wireless connection method.
Wireless keyboards do not work until Windows starts. Windows starts, loads the driver, and then the keyboard becomes available. What if you want to change BIOS settings? Not very convenient.
It is acceptable to disconnect and connect the keyboard while the system is running.
Despite the fact that the keyboard occupies such an important place in the system, it does not have many settings. We are talking about a standard 104-key QWERTY keyboard (read “querty”, the name comes from the first six English letters in the top row). This keyboard has a pre-installed driver and, accordingly, configuration programs in the system.
It’s another matter if you have some kind of fancy keyboard that has many additional buttons or a different key layout. Such a keyboard requires its own drivers and configuration programs, which must be supplied by the manufacturer with the purchased device.
Setting the keyboard operating modes is carried out in two different dialog boxes.
- For basic settings, use the dialog box Properties: Keyboard .
- To change the keyboard language settings, use the dialog box Languages and keyboards.
Basic settings
To start setting up basic keyboard settings, open the menu Start — Control Panel — Large icons— Keyboard.
Or press the keyboard shortcut +R, in the window that opens Execute to line Open enter control keyboard and press OK
A window will open Properties: Keyboard, in which you can make some settings.
Speed tab
The keyboard is designed in such a way that if you press a key and do not release it, the character depicted on this key begins to be entered again, i.e. the keyboard begins to continuously send the code of the pressed key to the motherboard.
In chapter Repeat the entered character There are two sliders that allow you to adjust this keyboard setting.
Slider Delay before replay starts— sets the amount of time during which you must hold down a key for the keyboard to begin repeating a character.
Slider Repeat speed— determines the character repetition interval after the delay time has expired.
The dialog box also contains a text field in which you can review the changed settings before they are approved by the system. Click on the text field, then press and hold any key, after which characters will be entered according to the parameters defined above using the sliders.
In chapter Cursor blink rate, by moving the slider to the right to increase or to the left to decrease, you can change the frequency of the cursor blinking. The result will be shown immediately. If you move the slider all the way to the left, the cursor will stop flickering.
After making changes, click the button OK.
Hardware tab
This tab displays information about the status of the device and mouse driver. By pressing the button Properties, you can update, uninstall, or rollback the driver and view additional information about the mouse, as if you had opened the mouse properties in
Aviation language settings
Pressing a keyboard key only sends an electronic signal to the computer. The issue of its interpretation, for example, its conversion into a symbol appearing on the screen, is decided by the keyboard driver. A keyboard layout is a set of rules for interpreting signals coming from the keyboard. Typically, the keyboard layout corresponds to the alphabet of a language. Depending on the work being done, different keyboard layouts may be used.
The keyboard layouts installed on your computer are displayed in the list on the tab Keyboard languages located in the dialog box Regions and Languages.
In this article we will look at this tab.
If the language bar is enabled on your desktop, you can also right-click on it and select Options from the context menu.
If there is no language bar on the desktop, press the keyboard shortcut to quickly open this tab +R and enter the command control intl.cpl,2 a window will open Languages and keyboards, which has two sections:
- — allows you to change the keyboard or text input language. You can customize your keyboard for use with a specific language or format by changing the keyboard layout. The layout determines which characters appear on the screen when you press a particular key.
- Interface language— allows you to add or remove languages that can be used in the system. Windows 7 Enterprise (Corporate) and Ultimate (Maximum) allow you to download language packs and MUI for free through the Windows Update service. After installing them, libraries, programs and other components that require translation are localized exclusively using MUI files containing all the resources that Microsoft considered necessary to localize, i.e. translate into another language. They are part of LP (Language Packs). Therefore, in Windows 7, LP packages make up more than 95% of the user interface.
In younger versions of Windows 7 there is no such option; to translate the system into another language, they provide another way, but this is a topic for a separate article.
In this dialog box we are interested in the section Keyboards and other input languages, namely the button Change keyboard... Click it. In the Languages and text input services window that opens, you can further configure the keyboard.
General tab
In chapter Default input language indicates the keyboard layout that will be assigned by the system immediately after turning on the computer. If you have more than one layout in your system, then in the drop-down list you can select another layout and assign it as the default by clicking the button Apply(the settings window will remain open) or OK(the window will close).
In chapter Installed services currently available keyboard layouts are displayed. In Russia, as a rule, there are two Russian layouts - of course, English is needed for the Internet. But you have the opportunity to add any other layout, or as many as you like. To do this, click the button Add.
A window will open Adding an input language. Select the language that corresponds to the keyboard layout you are adding. The value in the Keyboard layout or input method drop-down list is usually selected by default, but it must be checked and, if necessary, changed.
For example, let's add the Ukrainian keyboard layout.
1. Press the button Add. A window will open Adding an input language. Scroll down the list and alternately press the plus signs on Ukrainian (Ukraine) and Keyboard. Check the box for the language you need.
2. Press the button Show…, to determine which keys the letters of the alphabet and other symbols will be located on.
3. press the button OK.
After these actions, the Ukrainian language will appear among the available input languages, as well as in the Default input language drop-down list.
To remove any input language, select it and press the button Delete.
Button Properties— serves to display a sample keyboard layout.
Up - Down buttons are for navigation.
Language panel tab.
The Language Bar is a toolbar that automatically appears on the desktop when you add text input services, such as input languages, keyboard layouts, handwriting recognition, speech recognition, or input method editors (IMEs). The Language Bar provides a quick way to change your input language or keyboard layout right from your desktop. The language bar can be moved anywhere on the screen, minimized to the taskbar, or hidden (Microsoft help).
Several settings are available for the language bar:
Located anywhere on the desktop— setting this option will allow you to position the Language bar anywhere on the desktop by simply dragging it. Move the mouse pointer to the left edge of the panel, a cross will appear, hold down the left mouse button and drag the panel to a location convenient for you.
Pinned to taskbar— the option is enabled by default. (If your previously installed language bar has disappeared from your desktop or taskbar, check this setting first.)
Hidden- the language bar will not be displayed either on the desktop or on the taskbar.
The language bar is transparent when not active— the parameter is clear, but for its execution the Windows Aero effect must be enabled.
Show additional language bar icons on the taskbar— if the checkbox is checked, the keyboard layout switch icons will be duplicated in the Taskbar. In order to remove the keyboard layout indicator from the Taskbar (it will only appear in the Notification Area), you need to clear this checkbox.
Show text labels in language bar— if the checkbox is checked, a graphical icon and a text designation of the active keyboard layout will be displayed in the Language panel; if the checkbox is cleared, you will see only the icon.
Keyboard switching tab
Disabling Caps Lock mode— you can configure additional keyboard parameters (which key to turn Caps Lock on and off.
The Caps Lock key (translated as “locking capital letters”) is located on the left of the keyboard. If you do not press Caps Lock (i.e. the light is not on) and go into a text editor (for example, Word or Notepad), then when entering text, all letters (both English and Russian) will be displayed in small letters.
If you press Caps Lock (the light, or rather, the indicator light is on), then when entering text, the letters will be displayed in capitals (capital). In this mode, when you press the Shift key, lowercase (small) letters will be displayed (the exact opposite action of what is done in normal mode, when the Caps Lock light is not lit).
Caps Lock mode (or capital letter mode) is convenient when entering text consisting of such letters. To enter one large letter, it is more convenient, of course, to press the Shift key and, without releasing it, press the key with the image of the corresponding letter.
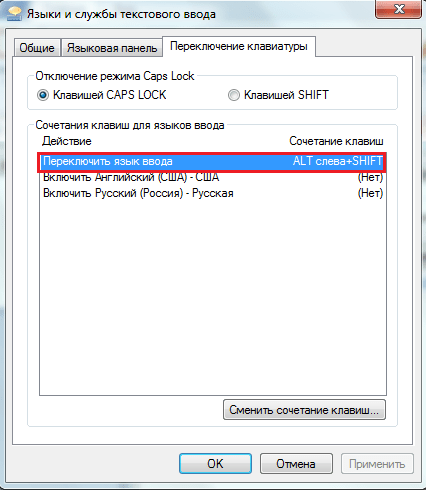
Keyboard shortcuts for input languages— keyboard shortcut for switching the default input language Shift + Left Alt. But you can put another keyboard shortcut, for example Ctrl + Shift or Yo or accent mark (‘), or you can turn it off completely.
To switch the assigned keyboard shortcut in the column Action highlight the line Switch input language and press the button Change keyboard shortcut. In the window that opens Changing keyboard shortcuts, on the left side, set the desired parameter.
In the same window you can make change keyboard layout, acting in a similar way. After making changes, click OK.
You can customize your keyboard for use with a specific language or format by changing the keyboard layout. The layout determines which characters appear on the screen when you press a particular key. Some input languages have multiple keyboard layouts, while others have only one. By using different keyboard layouts, you can type in different languages.
For example, to type in French you need to set characters with diacritics, and in German you need to set characters with umlauts. In addition, multiple layouts can be used for one language. For example, in different countries where residents speak French, different conventions have been adopted regarding the arrangement of the letters of the French alphabet on the keyboard. Therefore, Windows includes several different keyboard layouts for some languages.
If your documents use multiple languages, you can install all required
Change keyboard layouts as needed and switch between them using the key combination you assigned.
Selecting the lines one by one Enable English (US)-US And Enable Russian (Russia)-Russian. This is in my case, you may have other layouts installed, click the button Change keyboard shortcut.... A window will open Change the keyboard shortcut, in which by checking the box and selecting the desired value in the drop-down lists, you can assign a combination that will switch one or another keyboard layout. Click OK after the changes have been made.
Don’t forget to record all changes you make by pressing buttons Apply And OK.
The simplest solution to setting up a keyboard on a computer is to use WINDOWS.
There are three ways to connect a keyboard to a PC:
- You can use a standard PS/2 connector.
- Using a USB port. In this case, the operation of the device will correspond to the operation of the keyboard connected to the PS/2 port.
- Wireless method. It is only possible after the system has started. You will be able to use the keyboard after the special driver is loaded.
It is important to remember that before inserting the PS/2 keyboard plug into the computer, you must disconnect the power from the PC. Otherwise, you will render the motherboard unusable.
Now you can start setting up.
Basic settings in windows 7

It is important to remember that fast computer skills do not come on the first day. Only over time, gaining experience, the user acquires keyboard input speed. Therefore, setting it up will be much more difficult for beginners than for advanced users. First of all, you need to understand where the keyboard settings are on your computer.
Standard procedure:
1. First of all, for greater convenience of working with the keyboard, you should correctly make the following settings: delay before repetition and character repetition speed. To do this, go to the "Start" menu - "Keyboard". You will see a "Properties" window where you can make the necessary initial settings for the keyboard on your computer.
2. Setting the keyboard speed. One of the features of the keyboard design is that when you press any of the keys for a long time, the character depicted on it will be printed on the screen for as long as you keep this key pressed. This parameter is adjusted using the slider. Find "Speed" and set the replay speed settings as needed.
As a rule, for beginners it should be smaller, and for an advanced user, accordingly, larger. Thus, the delay should be longer, the less experience the computer owner has.
To do this, in the “Repeat signal” section, click “Delay before repeat”, where you determine the time after which the character you pressed will begin to be entered again. Next, in the “Flicker frequency” section, set the required frequency. To check the installed settings, a special device properties dialog box is provided. After making all the necessary changes, click "OK".
3. Language settings. You need to check which input language is installed on your PC. To do this, load the operating system and look at the language indicated on the layout sign (default). To do this, click on the language bar icon. After that, click "Options", then "Default input language" and "More details". Now select the desired language, which will become the default language and click "OK". If the language indicated there is English, change it to Russian.

In the "Options" section, make additional settings: the key with which Caps Lock will work; Simultaneously pressing which keys will switch languages. Typically these are the Alt and Shift keys. For additional language settings: hieroglyphs or writing options (from left to right), click: “Start” - “Control Panel” - “Switch to classic view” - “Standards”. Next - “Language” - “Text input services”, then “More details”, and then make the settings.
4. You also need to configure the mouse settings: click “Mouse”, then “Pointer Options” will appear, where you need to specify the desired cursor movement speed. If you have poor eyesight, you can connect a special option that allows you to display the trail of the pointer. If you have a laptop, you should perform touchpad settings. It is important to remember that they can only be seen in the "Mouse" section after installing certain drivers.
5. While working with a computer, connect “ClearType”: go to the “ClearType Settings” item, check the “Enable” checkbox, now you can launch the settings to select the desired method of displaying text. This option greatly improves the quality of text images.
Read this article on how to return your computer to factory settings. How to set up a tp link router - here.
Differences in setting up Windows XP

Setting up the Windows XP keyboard does not differ significantly, so we will only indicate the differences: The key combination used to switch the language is configured in Windows XP in the control panel as follows: “Start”, “Control Panel”, “Regional and Language Options”. A window will open, find “Languages” in it, then “More details”. Another window will pop up in which you need to disable CAPS LOCK and change the keyboard shortcut by clicking “Change shortcut”, then select the required keys and click “OK”.
If the keyboard refuses to work

How to set up a keyboard on a Windows 7 computer:
1. If the keyboard is not recognized by the operating system and the special indicators do not light up, this means one of two things: either the keyboard is disconnected from power, or it is simply faulty. To fix these problems, you should connect the device to PS/2 and USB (without adapters). If the keyboard still does not work, it means that it is truly faulty or its cable is damaged. This problem may be a consequence of discharge or lack of power supplies.
2. If the keyboard is faulty only in Windows 7, but before that it worked fine. It does not function due to system failures; the reasons may be: the keyboard is blocked by software, a virus, a driver malfunction, registry changes, or problems with system files.
If this started some time after installing the system, you need to remove its driver. To do this, click "Device Manager" in Control Panel. In the list that opens, click "Keyboard", open its menu, then select "Delete". Restart your computer. Setting up the keyboard in Windows 7.
Other Windows 7 problems can be fixed using system restore: click "Start", then open all programs ("Accessories", "System Tools", "System Restore"). Now select the required control point that was installed before the failure. Be sure to wait until the recovery is complete.
Thus, all changes: installation, registry and software settings, operating system updates will be canceled and everything that caused the keyboard lock will no longer work. If the problem is caused by a virus, an antivirus will help you.
3. The operating system does not see the keyboard and recognizes it as an unknown device. Usually, this happens with non-standard models that have their own driver. In this case, use the driver installation from the disk included with the keyboard or on the manufacturer’s website.
Read also: - Creating a gmail account means discovering the world of Google - A program for setting up sound on a computer - tips and tricks - How to set up a printer on a computer - How to set up Skype on a computer - Remote computer setup - what is included in the list of services? - How to adjust sound on a computer
←Return
domaster.su
Secrets of setting up the keyboard on your computer
 It is not enough to connect an input device; You also need to know how to set up the keyboard on your computer to make working with it as comfortable as possible. From our guide you will learn which hardware parameters are best to set and how this will affect the operation of the system.
Equipment setup
In a short instruction on how to connect a keyboard to a computer, we have already discussed some issues of setting up this input device, but adjusting the operating parameters was touched upon only briefly. Let's take a closer look at the hardware setup stage and see how you can slightly change the configuration of the connected keyboard.
Basic setup
Let's start with the basic settings that can be configured in the "Keyboard" section located in the "Control Panel".

Let's start with the first tab - here you can see several sliders that are responsible for the speed of entering a repeating character and the frequency of cursor flickering.
With the Delay Before Repeat Start and Repeat Speed options, you can specify how quickly the same characters will repeat when you press and hold a key.
You can check the configured parameters in a special line. The cursor blinking frequency is also shown here, which you can also set manually - from complete stillness to high-speed blinking. 
With the “Equipment” tab, everything is simpler: connected devices are displayed here, for which you can view or change the properties. 
In the keyboard properties you can:
- View the status of the device (working normally).
- View driver information, update it, or remove it.
- Assign some power settings - specify that the keyboard can be used to wake the computer from sleep mode.
The last feature is not available in all versions of Windows, but it is not of decisive importance, so there is no need to worry about it.
language and regional standards
Pressing a key only sends a certain signal to the computer. The keyboard driver interprets it. That’s why it’s so important to set up a layout, which is a set of rules for interpreting received signals.
Available layouts that correspond to the alphabet of a specific language are displayed in the notification panel. Sometimes users are faced with the fact that the layout is not visible; in this case, you need to restore the language bar on the taskbar.
Right-click on the language bar and select “Options” (or launch the “Run” menu through “Start” and enter the command “control intl.cpl,2”).
The Regional and Language Options window will appear on the screen under the Languages and Keyboards tab. What you are interested in here is the “Change” button - click on it to start setting up input device parameters. 
A new dialog box will open in which you will see three tabs. Let's look in detail at what settings are available in each of these sections.
Are common
The “Input language” line indicates the layout that is automatically installed when the computer starts. You can install any of the available languages by selecting it in the pop-up list and clicking the “Apply” button. 
On the same tab you can set an additional layout. Click the Add button and select a language. Expand it, specify the input method and click OK.
Using the “Show” button, you can open a virtual image of the keyboard with the new layout to see which button will be located where.
The system now has three layouts installed that you can switch between. To get rid of the excess, select it and click the “Delete” button. 
To save the changes, be sure to click the “Apply” button. Then you can move on to the next tab.
Language bar
Here you can configure the settings for the language bar, a small window that allows you to see what layout is installed and change it if necessary.  There are not many options for customizing the language bar. It can be hidden, pinned to the taskbar, or placed on the desktop where you can move it freely.
It is convenient when the language is displayed on the taskbar, so it is recommended to select this option.
The remaining parameters are responsible for some features of the display of the language bar. You can leave them unchecked by default or experiment a little - they do not carry any functional load.
Switching keyboard
On this tab, you can configure how to disable Caps Lock mode, in which all letters entered in the text are printed as capital letters.  The mode can only be activated by pressing the Caps Lock key, but you can disable it, for example, by pressing the Shift button.
If you don't feel comfortable switching languages, change the keyboard shortcut.
Click the "Change" button. 
Set a convenient combination and click “OK”.
Remember that language and layout are not always the same. There can be multiple languages on the same layout, so you need to assign functional keyboard shortcuts for both cases.
Keyboard problems
We have sorted out the setup, but there is one more important point left - correcting possible problems. Most often, users encounter the following problems:
- The system does not recognize the hardware or the input device simply does not work.
- When typing, the wrong characters are printed.
- Individual keys or their functional combinations do not work.
This is the most general description of the problems, but it covers the vast majority of special cases, so you can definitely find a solution for yourself here.
Hardware and system problems
The system does not respond to button presses, the indicator lights on the keyboard do not light up - these are signs that the device is not connected correctly.
- Make sure that the connection is made into a known working connector. Try installing another device into it.
- Make sure that the equipment plug is fully inserted into the socket. Also check the cable itself - it may be damaged.
Try connecting the keyboard to a TV or, for example, a tablet - if the device is detected and works normally, then the problem lies in the computer.
If the keyboard worked for a while, and then the system stopped detecting it, try simply restarting the computer. The next step is to reinstall the drivers.

The next time you start, the system should automatically detect the presence of a new connected device and install it. Don't forget to install the drivers if they are supplied on disk or distributed through the manufacturer's official website.
Sometimes the cause of incorrect operation of connected equipment is a virus infection of the computer. Scan the system for threats and neutralize them.
Problems with keys and their combinations
If, when typing, you see on the screen characters that are not the same as those you are typing, then most likely the keyboard is dirty or there is liquid inside its case. To clean the input device, you can use a special small vacuum cleaner or a can of compressed air.
An economical option is to turn the keyboard over with the buttons facing down and gently tap one corner on the table. If you have never done this before, you will be unpleasantly surprised by the amount of various garbage that ends up on the table.
The functionality of the keys can be checked using special online tests - for example, Key Test.
If the keyboard shortcuts that you have set in the keyboard settings do not work correctly, make sure that applications for controlling input devices are not installed or correctly uninstalled on your computer.
Often, users install such applications to assign convenient combinations, and then forget about them or simply uninstall them incorrectly, thus confusing the hardware configuration.
To make sure that it is a third-party application that is affecting the functionality of the shortcuts, boot your computer in safe mode and check the keys.
mysettings.ru
Setting up the keyboard on a laptop and computer
Vladislav Nikitin 2012-12-24 windows 7, Computer and userSetting up the keyboard on a laptop and a personal computer is basically no different and depends on the operating system: windows XP, windows Vista or windows 7, 8, 10. In fact, only the “PATH” differs, along which the keyboard properties are called up for further configuration.
The keyboard is configured in the Keyboard Properties dialog box. In windows 7: Start > Control Panel > Keyboard.
Keyboard properties - click to enlarge.
Keyboard properties in other Windows operating systems are opened either through the control panel or by selecting the Properties item in the context menu of the indicator on the Display Panel.
In Windows 7, the keyboard properties window has two tabs: Speed and Hardware. You don't have to configure anything on the Speed tab. Only for those who type a lot of text by occupation, it makes sense to set the minimum delay before repeating characters and the maximum speed for repeating them. Both of these settings affect how quickly characters are entered when a key is pressed and held down for an extended period of time.

Keyboard settings
On the Hardware tab, you can check the “status” of the keyboard.
In order to configure in Windows 7 - Language and its display in the tray, you need to go to: Start > Control Panel > Clock, language and region > Language and regional standards > in the window that appears, on the “Languages and keyboards” tab, click - Change keyboard.

Or simply right-click on the current language display and click - Options, the following menu appears:

Using the “Languages and text input services” tab, you can create different language layouts on your computer. Usually two are used: for Russian and English. Those who work a lot with other languages, such as German, can optionally install German language support. In this case, switching between languages will become more difficult - you will have to go through the layouts one by one.
The keyboard properties window before Windows 7 has two tabs: Speed and Language. You don't have to configure anything on the Speed tab. Only for those who type a lot of text by occupation, it makes sense to set the minimum delay before repeating characters and the maximum speed for repeating them. Both of these settings affect the speed at which characters are entered when a key is pressed and held down for a long time. Using the Language tab, you can create different language layouts on your computer.
To add support for an additional language, click Add and select the desired language from the drop-down list in the Add Language dialog box. Previously, this setup required the presence of a distribution CD with the operating system - at the end of the operation it had to be inserted into the drive, now everything is simple, add it, click apply and you're done.
One of the layouts must be designated as the default. Despite the fact that we type more text in Russian than in English, still make English the default language. This will not at all interfere with typing Russian-language texts, but it will protect against incorrect reproduction of characters in some programs made by domestic programmers (very rarely).
By the way, if you encounter such a defect, you will know how to quickly fix it.
Choose one of two possible ways to switch layouts: either by using the key combination ALT on the left + SHIFT, or CTRL + SHIFT, in the tab - switch keyboard.
Please note that both of these methods work reliably. Of course, there are special programs that allow you to switch layouts much more comfortably, but they need to be checked and tested. If your computer suddenly begins to behave strangely or stops working altogether, ask yourself: “Have I recently installed some great keyboard switch?”
The last thing to do is to check the box - Show language indicator on the taskbar, in windows 7 - Pinned to the taskbar.

With its help, you can switch layouts with the mouse (although it is more convenient to do this with a keyboard), but this is not the main thing. The main thing is that you will always see what condition the keyboard is in. When entering passwords that are not displayed when typing, keeping an eye on the layout indicator is very useful.
P.S. The two easiest ways to download music and movies in VKontakte.
abisab.com
How to configure keyboard settings in Windows 7
The mouse is the most convenient hand control device, but it is very inconvenient to use for data entry. The most convenient and effective manual data input device for most programs is the keyboard.
Before working with the keyboard, you should first set up the language selection tools. Many people have to deal with both domestic and foreign materials, which requires entering both Russian and foreign language characters. In particular, regardless of the fleet of programs used, Latin characters are required to work with the command line and to specify Internet addresses.
Keyboard layout
When you press a key, an electronic signal is sent to the computer. The issue of its interpretation, for example, conversion to a character code, is decided by the operating system according to a certain set of rules. This set is commonly called a keyboard layout. Logically, each keyboard layout is represented by a software service in the operating system. So, for example, installing a German language layout means: installing a software service that interprets the signals coming from the keys as characters of the German script.

It is clear that different languages correspond to different keyboard layouts, but even one language can correspond to several different layouts. If necessary, layouts can be quickly changed during work - for this, the operating system provides means for switching layouts.
Of course, a computer used in Russia requires a Russian keyboard layout. It is equally necessary to have an English (“American”) layout, without which there is nothing to do on the Internet. It is also important to be able to work with English-language programs, even if you do not usually use them.
To check which keyboard layouts are present (installed) on your computer, double-click on the "Region and Language Options" icon, which is located in the Control Panel window (Start Control Panel). Give a picture of the icon. Select the "Languages" tab and then click on the More button to open the Languages and Text Input Services dialog box with a single Options tab. If the required layout is not on your computer, you need to install it (add it).

Installing an additional keyboard layout
- Open the keyboard properties dialog box: Start - Control Panel - Keyboard.
- To add a new layout, click the Add button - the Add input language dialog box will open.
- In the Language drop-down list, select the language that corresponds to the keyboard layout you are adding.
- The specific layout is specified in the Keyboard layout or input method drop-down list. When choosing an English layout, you should specify the option: USA.
Many people are attracted to the US-international option, but it is better not to use it. This layout is intended for Western Europe. In it, some two-character combinations are automatically converted into letters with superscripts. Such a transformation is hardly necessary in our country, and it can lead to misunderstandings.
You often need to switch between keyboard layouts “on the go” while working with a program or document. This can be done using the keyboard or MOUSE, but the keyboard is more convenient. The key combination used to switch layouts must be previously specified (selected).
Language bar
The language bar allows you to switch the keyboard layout using the mouse. It is enabled by default and is located on the Taskbar next to the display panel (“collapsed”). The panel can also be placed in any place on the desktop (“expanded”). It contains an indicator showing the current keyboard layout.

The current language is indicated by a button with a two-letter designation. To select a different language, click on this symbol and select the desired language from the menu that opens.
Using the language bar, it is convenient to monitor the current layout, but it is not very convenient to switch it. It is still easier to change the layout using the keyboard.
To customize the language bar, right-click on it. Settings commands are available in the context menu, the content of which depends on whether the language bar is collapsed or expanded.
If the language bar becomes a nuisance, you can close it. To do this, click on the Language Bar button in the Languages and Text Input Services dialog box. Select the Turn off additional text services checkbox if it is cleared.

When actively working with multiple documents, it sometimes seems that the keyboard layout switches by itself. Actually this is not true. It’s just that the operating system very strictly monitors which layout is set in which window. The layout can change automatically when moving from one program to another, because the command to select a layout affects only the active program.

xn----ttbkadddjj.xn--p1ai
How to set up a keyboard on a computer?
The keyboard is one of the most important information input devices into a computer. For example, you can work with a PC without a mouse, but without a keyboard you won’t be able to. The serial interface of the keyboard is usually connected to a special controller located on the system board.
It is very important to know how to set up the keyboard on a computer, since the ease of working with a PC depends, first of all, on the keyboard settings. The keyboard can connect to your computer in three different ways:
- Standard PS/2 connector. Never insert the device's plug into PS/2 while the computer's power is on. This may render the motherboard unusable.
- USB port. A keyboard connected to a USB port works in almost identical mode to a keyboard connected to a standard PS/2.
- Wireless keyboard connection. This connection method assumes that it will work after Windows starts. After the operating system starts, the wireless driver is loaded and the keyboard is ready for use.
After connecting the keyboard, you should begin setting up.
How to set up a keyboard on a computer - basic option
To begin basic keyboard setup, you need to go to the Start menu/Control Panel. Then select the "Keyboard" tab. Next, the “Properties: Keyboard” window will open. In this window you can make some basic settings.
Adjusting the speed
The keyboard is designed in such a way that when you press a certain key for a long time, the symbol depicted on that key will be displayed several times until you release the key. This setting can be adjusted using the slider in the "Repeat input character" section. The “Delay before repeat start” section specifies the time after which the pressed character will be played again. The Keyboard Properties dialog box contains a text box in which you can try out the settings you entered.
Using the “Repeat Speed” slider, you set the delay time interval before the pressed symbol starts playing again. The Cursor Flicker Rate section determines the frequency at which the cursor symbol flickers on the screen. By moving the slider to the right/left, you set this parameter. After the changes have been made, click "OK".
How to configure language settings
To determine which language will be used by default on the system, you need to right-click on the language bar icon. Select: taskbar / “Options” / item “Default input language” - in this tab, select the required language that will go into the OS by default.
By clicking the “Keyboard Options” button, additional keyboard parameters are configured: which key will enable/disable Caps Lock, which key combination will switch between languages (usually Alt left + Shift is used).

How to set an alarm clock on a laptop in Windows 7


