Vmware OS installation. Common problems and their solutions. Basic virtual machine operations
When upgrading to the next version of the operating system Windows lines, some users are faced with the lack of support for their favorite applications in the new OS. Or it’s even more complicated - you have, for example, OS X, and you need applications that are compatible only with Windows.
On this moment There are a large number of “virtual machines” that can solve these inconveniences. For example, paid Parallel Desktop and VMWare Workstation, or free options- such as Microsoft VirtualPC or VirtualBox from Oracle.
We have already talked about VirtualBox in articles:
- Creating a virtual computer and installing Windows on it using VirtualBox;
Today I will talk about working with .
The process of installing a virtual machine is no different from the installation process regular programs, so you can skip it. After installation and reboot, the main program window will appear.
Everything in this emulator is easy to configure. On the left side are the virtual machines that you have installed. On the right is the “invitation” window of the program. With its help, you can create or open an existing virtual machine, connect to a remote server, and much more. At the top there are several panels containing controls.
Creating a virtual machine
In VMWare Workstation, you can choose several ways to create a virtual machine. To describe all possible functions, we will choose a selective method for creating a machine.

In the next window you must indicate compatibility with previous versions programs.

This is usually used for group work on various configurations. The left side of the window displays the products compatible with this machine, and the right side displays the restrictions that apply to this configuration. Now this is not important, so we leave everything as it is.
The next step is to install the system on a virtual machine.

In this case, you can specify as a real drive hard drives, so virtual image. Or you can select installation media later, right when the virtual machine starts.
Then you need to select the operating system that you are going to install.
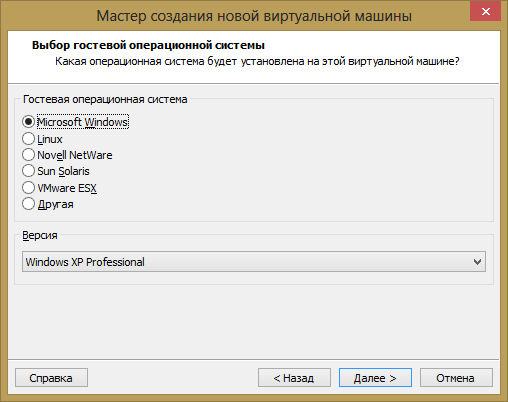
In accordance with your choice, the program will offer the optimal set of settings for a specific system. Next, you need to come up with a name for the virtual machine, as well as the folder in which it will be located.
On most modern computers The processor has more than one core. In the program you can also set the number of cores that you want to use in the guest system.
Note: Do not give too many physical resources to the virtual machine. The computer will run slower, and you will not get a big increase in the performance of the guest system.
At the next step, you need to specify the amount of RAM that will be allocated to the virtual operating system. The program will also warn you about the minimum amount of memory at which the system will function, and will also indicate a limit beyond which you should not go. IN in this case It is recommended to leave the value that the emulator program initially specified.
The next step is to specify the type of network you want to use.
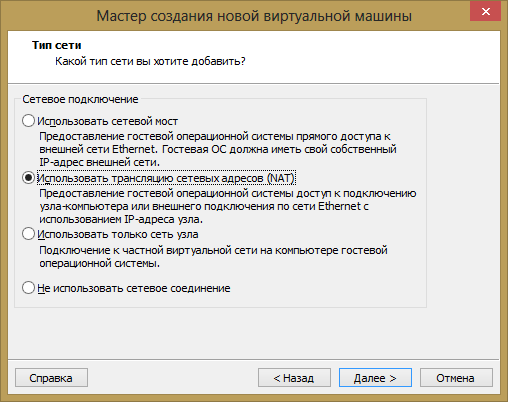
In this case, if you do not understand network technologies, nothing needs to be changed. After installation, the virtual machine will have a network and you will not have to configure it separately.
The next step asks you to select the disk on which the system will be stored.

You can create a new virtual disk or use an existing one. You can also take part physical disk for system operation. In the first two cases, a virtual HDD as specific file or groups of files. The configurator will then prompt you to select the virtual disk type. Since SCSI on older systems is either not supported or does not work well, it is advisable to choose the IDE interface.
Next, you need to specify the size of the future disk. In this case, we can specify a space slightly larger than what we need. In this case, you can select everything disk space immediately, or you can fill it gradually so that empty place the virtual disk did not take up real gigabytes. For convenience, the program will offer you to split the disk into several files, or save everything in one.

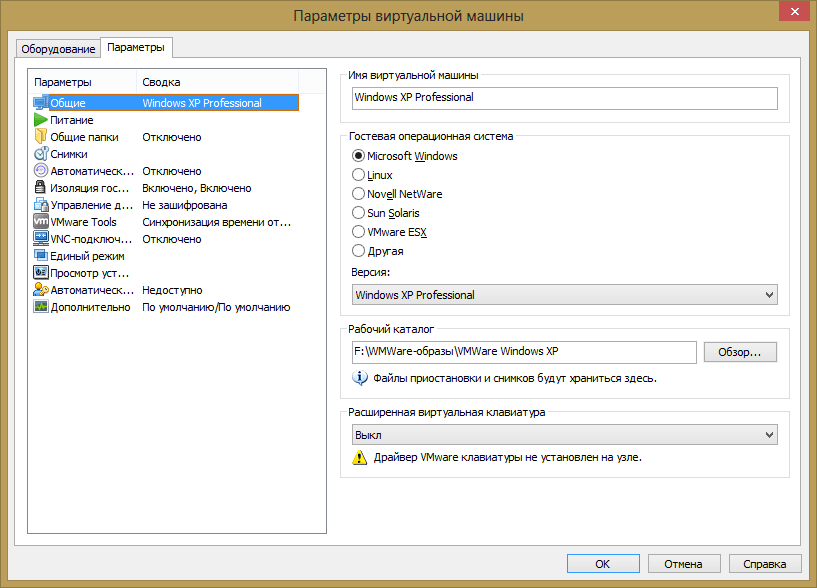
In conclusion, it is worth familiarizing yourself with the parameters of the created VMWare Workstation virtual machine. If everything is in order, then click the “Done” button, otherwise you can go back and change any parameter.
The right side of the program now displays a black screen indicating that the virtual machine is disabled, as well as information about the virtual machine's hardware. The process of installing the system on a virtual machine should be skipped since it is no different from installing a real operating system.
Procedure for starting a virtual machine, pausing and shutting down
So now everything is ready to launch. If you already have a system on a virtual machine (VM), then you can simply launch it. Or install the system on a newly created machine.

There are two options:
- If there is a VM, then in the window on the main tab you need to select “Open” and select the VM (file with resolution .vnw).
- After adding (or after creating a new one), you need to start the VM by clicking on the start button, which is located at the top of the window under the “Edit” menu, or by selecting the menu item Virtual Machine - Power -> Resume, or by pressing the key combination Ctrl + B.
It is worth noting that the virtual machine can be paused. In this case, its full state at the time of shutdown will be preserved and the virtualizer program can be closed. After resuming operation, all windows open source software and even processes in memory will remain in the same state in which you left them. This is the most convenient option using a virtual machine because you don't have to wait for it to load. There are three ways to pause a VM:
- Click the “Pause” button at the top of the window, under the “Edit” menu
- Select the menu item Virtual machine - Power - Suspend
- Press the keyboard shortcut Ctrl+Z
There are also less convenient way turning off the virtual machine and the virtualizer program - turning off the guest operating system as if you were turning it off on regular computer. Moreover, if you turn off the machine using VMWare capabilities, the system will automatically shut down, as if you had pressed Power button on the system unit.
You can shut down a virtual machine in the following ways:
- Click the “Stop Virtual Machine” button, which is located under the “Edit” menu
- Select the menu item Virtual Machine - Power - Power Off
- Press the key combination Ctrl+R
It is worth noting that sooner or later you will have to shutdown/reboot the VM because... “garbage” will accumulate in the guest operating system, which will disappear only after a reboot. It will gradually accumulate and eventually make the machine work slowly.
Everything is fine: guest system started and works, but it may not allow the mouse to leave its working window. In that case, if you go outside virtual system, you need to press the Ctrl+Alt key combination. However, there is a set of drivers that, by installing them, you do not have to do this. The system integrates into the host machine and you can switch between them without any problems.
You can do this as follows: go to the Virtual Machine menu - Install/reinstall the VMWare Tools package.

The VMWare Tools package installs drivers for sound cards, video adapters and other equipment.
An important fact is that VMWare Tools can work with several guest systems at the same time. In this case, each system will work independently of the others. Quantity at one time running systems limited only by the physical capabilities of your computer. And you, as a user, can switch between them using tabs.
There is a problem: let's say that the system has become unstable and you need to press the key combination Ctrl+Alt+Delete, but the task manager is called host system. You can send a similar combination to the guest system using the Virtual Machine menu - send the command Ctrl+Alt+Delete.
Everything is fine: the guest system is functioning and you are satisfied with almost everything, but there is one problem: the system screen is too small and this makes the work inconvenient. There are several ways to fix this problem:
1. If you have a large diagonal monitor, you can simply increase the screen resolution.
2. There is a more elegant approach: you can enable “single mode”. This is the mode for integrating the guest operating system into the main one. At the same time, you will be able to work in parallel with applications of both the host and guest systems. It is worth noting. That the entire screen will be used and the resolution of the guest system will be the same as that of the host. In order to switch to this mode, you need to click on the “Unified Mode” button, which is located in the menu under the “Tabs” menu, or go to the menu View - Unified Mode
3. It is possible to expand the operating system to full screen, completely covering the main working space. This can be done by clicking on the " Full screen mode", which is located between the Virtual Machine and Tabs menu, or go to the View - Full Screen menu. You can also use the keyboard shortcut Ctrl+Alt+Enter. In this case, the VMWare Tools panel will appear at the top of the system, which will automatically hide if you do not hover over it.
So now we have working system. It is necessary to add to it network folders– in this case we will give the system access to the physical hard drive. To do this, you need to shut down the virtual machine.
The system on the virtual machine is the same as on the real one. Accordingly, you need to turn it off like a regular system.
After turning off, you need to click the “Change settings” button and go to the “Options” tab.
In it you need to find the “Shared Folders” option, set the switch to the “Always On” position and select the necessary shared folders for your system. Can be specified as separate folder, and the whole section hard drive.
Apply the changes and boot the virtual machine. Externally the machine has a network, but internally a disk needs to be connected to the system. The easiest way to do this: open “My Computer” and select “Connect network drive" All! The virtual system has access to real data.
There is another, simpler way to transfer files and folders: to transfer data inside a virtual machine, you just need to drag a file from the real system into it with the mouse.
Connecting removable devices to a virtual machine
Sometimes the question arises: “What to do?” if you want to connect a flash card, printer and other devices directly to the machine. In this case, the developers have provided a number of operations that can connect external USB devices.
You can view the list of devices that are available to the machine in the Virtual Machine - Devices menu. There you can also see a list of currently connected equipment. By checking the box opposite required device, you connect it in the guest system; if you remove it, you disable it. It's simple!
For example, if you want to connect a drive to a virtual machine, you need to do the following:
- Connect the flash card to the computer and after a few moments it will appear in the “Devices” menu;
- Check the box next to the device and after some time you will see a system message stating that the device is connected.
Conclusion
Another important point: suppose that you reinstalled the operating system, but you still have the VMWare Workstation virtual machine. To run it, you need to open it in the program: Home - Open virtual machine. Then a window will appear upon startup.

In this case, you need to click the “I copied it” button. And the virtual machine will boot. Running virtual machine:

In conclusion, it is worth noting that a virtual system is a very useful and, at times, indispensable device. Undoubted advantages virtual machine features such as:
- If desired, you can virtualize any operating system and, accordingly, if the system is old, then old programs that are not able to run on it will work with it. modern equipment;
- Each system is independent, which allows you to conduct experiments without fear of “killing” the OS;
- You can create almost any hardware configuration and test the system's performance on it.
However, the medal also has downside– the VMWare Workstation program is paid and costs 8,300 rubles. Buy it or use analogues – it’s up to you.
New in version 15.0.3 / 14.1.6
Free update for all VMware Workstation Pro 15 / 14 users
- VMware Workstation Pro contains privilege escalation vulnerabilities:
- Workstation Player does not process paths correctly. This leads to the possibility of replacing the path to executable file VMX executable on host systems Windows user without administrator rights in order to increase privileges. In the CVE database (cve.mitre.org) the identifier is CVE-2019-5511 VMSA-2019-0002.
- COM classes are not processed correctly. This may lead to substitution of COM classes used by the VMX process in Windows host system in order to increase privileges. The CVE DB (cve.mitre.org) has assigned CVE-2019-5512 for this issue. More detailsVMSA-2019-0002.
- Updating the OpenSSL library to version 1.0.2q.
- Updating the libxml2 library to version 2.9.9.
New in version 15.0.0
This is one of the largest releases, including new features and numerous improvements for developers and system administrators.
*VMware Workstation 15 Pro requires a 64-bit processor and 64-bit host OS
*Intel Nehalem and earlier CPUs are not supported in this release.
Guest operating systems
More than 200 operating systems are supported, including the following.
- Windows 10
- Windows 8.X
- Windows 7
- Windows XP
- Ubuntu
- RedHat
- Oracle Linux
- Debian
- Fedora
- openSUSE
- CentOS
For a complete list of supported guest and host OSs, see the manual
VMware Workstation Pro allows you to run on Windows computer or Linux multiple operating systems in virtual machines (including Windows virtual machines).
VMware Workstation Pro turns your laptop into a data center
Run multiple operating systems on one computer
VMware Workstation Pro allows you to run multiple operating systems simultaneously on the same Windows or Linux computer. Create Linux and Windows virtual machines on other computers, servers or tablets with full network virtualization and simulation of specific parameters network connection. Use virtual machines for development, testing, designing solution architectures, demonstrating program capabilities, and other purposes.
Development and testing on any platform
Workstation Pro supports hundreds of operating systems and works with cloud and container technologies such as Docker.
Connecting to VMware vSphere
Securely connect to vSphere, ESXi, and other Workstation servers to run and manage both virtual and physical machines. The VMware hypervisor improves productivity and makes it easier to move virtual machines to another computer.
Secure and isolated environments
Launch additional system With certain parameters privacy, tools, network settings and use specialized tools to investigate OS vulnerabilities. Workstation provides one of the most secure hypervisors in the industry and provides powerful features for computer security experts.
VMware Workstation Pro Features
Connecting to vSphere
Use Workstation Pro to connect to vSphere, ESXi and other Workstation Pro servers. Remotely manage virtual Linux machines and Windows, use machine power management commands and migrate virtual machines to vSphere environments. The VMware hypervisor guarantees easy portability.
Pictures
Create restore points to quickly roll back changes when testing and creating demos. Snapshots make it easy to test different use cases without having to install multiple operating systems.
High-performance 3D graphics
VMware Workstation Pro supports DirectX 10 and OpenGL 3.3 standards for optimal performance when running 3D applications. You can run the most demanding 3D applications such as AutoCAD or SOLIDWORKS in virtual machines and get performance comparable to a physical machine.
High resolution screen support
Workstation Pro is optimized to support high-resolution 4K UHD displays (3840x2160), which are used in monitors for desktop computers and QHD+ (3200x1800) displays used in laptops and tablets. Workstation Pro also supports multiple monitors with different screen resolutions, such as a 4K UHD monitor and a regular HD monitor.
Cross Compatibility
Create Linux or Windows virtual machines that can run on any VMware product, or create limited virtual machines for use in Horizon FLEX. It even supports an open standard for creating and running virtual machines from other developers.
Cloning
Save time and effort by creating an exact duplicate of your virtual machine. Use the Linked Clones feature to quickly duplicate a virtual machine while saving physical disk space. Use the “Full Clones” option to create completely isolated duplicates with the ability to share and transfer.
Powerful virtual networks
Create complex IPv4 or IPv6 virtual networks for virtual machines or integrate with third-party software to develop data center topologies using software and real-time routing tools. The new version of Workstation introduces network emulation to introduce restrictions on losses, delays and bandwidth packages.
Powerful virtual machines
Create massive virtual machines with up to 16 processors, virtual disks up to 8 TB and up to 64 GB of memory to run the most demanding desktop and server applications in a virtualized environment. Give graphics-intensive applications an extra boost by allocating up to 2GB of available host system video memory.
Limited access to virtual machines
Protect your corporate content by restricting access to virtual machine settings such as drag-and-drop, copy-and-paste, and connecting to USB devices. Virtual machines can be encrypted and password protected to ensure access only to authorized users.
Sharing
Share and test applications in a virtualized environment. Run VMware Workstation Pro as a server for sharing preloaded virtual storages Linux machines and Windows with your colleagues, department or entire organization.
VMWare is software for virtualizing a computer and its components corporate level. With a virtual machine, you can install different operating systems and run them simultaneously. This can be very useful for testing various software, Linux distributions, improve security, or work with programs that are not supported by your operating system.
Before we do anything, we need to install the program itself. This is commercial software and is not distributed under open license. Moreover, there is a fee for companies to use VMware Pro. But for ordinary users there is a free version of VMWare Player with limited functionality.
With this edition of the program you can do everything you need ordinary users things like creating virtual machines, running them, setting up resources and a lot of other things. Restrictions are placed on features required by the developer, such as deploying machines on multiple computers or fine tuning network interfaces.
Due to the fact that the program does not have open source, you won't find it in the official repositories. Therefore, we will need to download the installer from the official website. Here you can find versions for Windows, Linux or MacOS.
Then you just need to run the installer and follow all the steps of the wizard. At one stage you will need to enter your Email address to register the program. We will not dwell further on the installation, since this is already described in the article.
2. Create a virtual machine
The first thing you will notice after launching the program is the interface. It is completely in English, but nothing can be done, there is no Russian language and there are no plans. To run your systems, you first need to create a virtual machine. To do this, select "Create a New Virtual Machine":

On the first screen of the wizard you need to select installation disk for a car. This could be an ISO image saved in file system, or a real optical drive.

One great feature here that VirtualBox doesn't have is that VMware is able to automatically detect a system it knows and perform some configuration steps without user intervention. This makes installation very easy. And many different Linux systems and distributions are supported here.

If supported for your operating system automatic setting, you will be prompted to enter the username and password for the new system:


Select maximum hard size disk, and whether it needs to be split into parts. Typically, if you don't plan to record it on small media, then there is no need to split:

Last screen, checking settings:

If you press the " "Customize Hardware", then you can configure various parameters hardware, but we will consider this point a little later:

Immediately after pressing the button "Finish" The new vmware virtual machine will start and the installation of the selected system will begin. You may not even have to configure anything during installation; VMWare will do everything itself.

3. Setting up a virtual machine
We are not always satisfied with the default settings. Sometimes you need to change the parameters of various equipment. Select the virtual machine from the menu and click "Virtual Machine Settings" or select the same item from the menu bar for the running machine.
In the window that opens, you can configure various parameters for it. The first tab indicates the size of available RAM.
On the tab "Processor" you can change the processor parameters, namely the number of cores and enable support for AMD-V or Intel-VT virtualization.
 On the tab "Disk" you can control virtual hard drive cars. You can view information about the used space, select a connection cable, and also mount the disk to real system to view or change files on it.
Tabs "CD/DVD", "Floppy" allow you to configure those connected to the virtual machine optical discs, images and floppy disks:
 On the tab "Network Adapter" you can customize the way you connect to the network. NAT, Bridged and Host-Only options are available. But in most cases NAT is great. Here, all requests from the virtual machine go to the Internet, but the Internet cannot contact it. But in local system between virtual machines and the host can establish a connection via IP and nothing additional needs to be configured here, unlike Virtualbox:

Tab "USB" allows you to configure the used USB version stack. Again, you don’t need to install anything additional:

On the tab "Display" You can customize the screen settings. You can select the number of monitors, enable 3D acceleration, screen expansion, and also set the amount of video memory. There is no limit on video memory at 128 Megabytes, which is very convenient.
Finally, in the section "Options" you can customize the machine name and Extra options switching on and operation:

3. Adding a device
Using the button "Add" in the settings window you can add a new device to the virtual machine, it can be a hard drive, network adapter or another type of storage device. New devices are added only like this:

For example, to add a hard drive, select in the next step of the wizard "Hard Drive". Disk type - SCSI:

You can create new disk, select an existing one or even add real disk. To create a new disk, the settings are similar to what we have already seen when creating a virtual machine:
 All that remains is to specify the name of the disk file and it will appear in the list:

What's interesting is that you can add disks and other components on the fly, right when the virtual VMware machine works. At times, using VMWare in this way can be very convenient.
4. Starting the machine
To start a switched off machine, click on it right click and select "Play Virtual Machine":

The download will then begin immediately. If during the WMVare splash screen you manage to click, grab input focus, despite the many interfering pop-up windows and click F2, then you will end up in BIOS menu, where you can configure the download priority:

Here everything looks the same as in the BIOS of any regular computer.
3. Working in a virtual machine
By default, input focus is not captured when you hover over a machine. To grab focus you need to click inside the window. You can also use the keyboard shortcut to grab input focus Ctrl+G. To turn off capture and return to the main system, click Ctrl+Alt.
Guest OS additions can be installed here, and if the system is supported, they will be installed automatically, but they are of little use here, because the shared clipboard for Player versions are not supported. But available a shared folder VMware.
To configure it, open the machine settings, go to the tab "Options", then "Shared Folders".
In field "Folder Sharing" select "Always Enabled":

Then click the button "Add" and select the desired folder:
 Next, the newly created folder will appear in your virtual system. And if it doesn’t appear, then you may need to restart the machine.
5. Cloning the machine
Unfortunately, the free version does not support snapshots of the virtual machine, but you can clone it for later use. There is no tool for this. Just copy the machine folder to another location, and then when the time comes, open the menu "Open Virtual Machine" and select the desired folder:

Now setting up vmware workstation will not cause you problems and you know what this virtual machine is capable of and what it is not capable of.
conclusions
In this article we looked at how to use VMware Player. It's a great virtual machine, but I still prefer VirtualBox. Despite all its features, like the BIOS, automatic installation And graphic settings For almost everything possible, there are no basic functions such as a shared clipboard or system snapshots. What do you think about this? What do you use? Write in the comments!
Today I will review the program Vmware Workstation 10, which will simulate another system on your PC or laptop. It doesn’t matter which one, from Windows series or Linux, or maybe even one or the other. It all depends on needs and desires. But first, a little introductory text so that the uninformed reader understands what we are actually talking about!
Well, let's get started. Starting from this article, I will post at least three links to download the programs I write about here. I know that very often many people have problems with this. And therefore it is worth considering this point.
You can download Vmware Workstation 10 here:
- nnm-club.me - torrent (requires registration on the torrent);
I installed the repack version for myself, and I will use it to conduct reviews. It all starts with downloading, then click on exe file and carry out standard procedure installations. I will do small retreat and tell you what requirements your system has this program, that is, what resources should be on the computer for normal use Vmware Workstation 10.
System requirements:
- 64-bit Intel processor Core™ Solo x86 or equivalent, dual core processor AMD Athlon™ 64 FX or equivalent
- Clock speed 1.3 GHz or more
- 2 GB RAM minimum/4 GB RAM recommended
You must also have at least 10 GB of free space on your computer. hard space disk, you will need to install another system that requires a certain amount of disk space.
Analysis of Workstation 10 menu controls
We see 5 main VM menu items, although the main ones are rather the two on the left, and the right three are sort of auxiliary. I will write a little about each of them. so that you understand why they are needed and how you can apply them for yourself.
Creating a new virtual machine- the most important thing for us, here we will create a new virtual machine, indicate to it system parameters and all sorts of little things.
Opening a virtual machine- this is one of the cool features of this program, you can export and then open your installed system. Actually, this is the window for opening it.
Connecting to a remote server— you can use a virtual machine not only on your computer but also on remote server. And this is the actual button for connecting to a remote machine.
Virtualization physical machine — This is a quick and comfortable transition of your PC to virtual environment. Although this is in the menu, it will not work for use with a 30-day trial or a broken repack. You need to register and obtain a license to download a special add-on that makes this transition.
Installing WIndows on a Workstation 10 Virtual Machine
We've sorted out the theoretical part and it's time to move on to the practice of installing the OS on a VM. Click on the icon for creating a new virtual machine. A window opens with the right to select the installation mode:
- Normal mode
- Selective
If you have no experience with running a VM before, then use normal mode, I'll take it as an example. After clicking next, we move on to the next window, where you must carefully indicate the location from which our new OS will be installed. I advise you to read my post in order to have an idea of how this is done. I will bet with ISO image on my computer, you indicate what is relevant to you. If you also install from an image, then you must also specify the path to the disk image on your computer. If the path you specified matches, then you will be given an entry similar to the one in the screenshot below.

Let's go further, and as usual you will be asked for a key, as well as a personalized name and, if desired, a password for your future account administrator. Enter the data and continue. Now be careful, the program asks you to indicate the location where your new virtual machine will be installed, in simple terms, you indicate the disk where it will be taken from free place for your virtual system. The default drive is “C”, you can specify another one.
Now we indicate maximum size for your VM, the default is 40 GB, and also check the box to split into several files or store data in one file. It also explains why this is needed. You decide and continue. You need to pay close attention to the following parameters already selected by default by the program.

512 MB of RAM is not enough for me and I want to add it, that’s what the button is for Equipment setup in which you specify the system parameters that will be available to your virtual machine. There you can edit the following parameters:
- Memory (RAM)
- Number of processors used
- CD/DVD ROM
- Network adapter
- USB controller
- Sound card
- Printer
- Display
Now that’s all, click ready and watch how your OS begins to install. I was also prompted to add to devices WEB camera, this can be done later if desired. Well, the installation of the System itself is no different from any installation on a real Physical system, if you have difficulties with this, I provided a link above to an article about installing the system. So I make my own coffee, and you do what you prefer, we will continue after installing our system.
My installation is complete and I want to show you the main aspects when using the guest OS. Since it’s difficult to describe in words, I’ll take a screenshot and post it in this article.
With this, I will say goodbye to you, I wish you good luck and more knowledge in mastering new technologies.
With all respect, Andrew.
It can be convenient and useful in many situations. If you need to test new version operating system; try some new settings or drivers without damaging your computer; work with another operating system and a lot of other cases when the use of virtualization will be very useful. Exist various programs for virtualization. One of the most popular among users is free utility VMware Player, designed for home use. In this article we will deal with installing and configuring a virtual machine with using VMware Player. Let's get started. Go!
VMware Player is a free but very useful utility
To install a virtual machine, the first step is to download and install the VMware Player utility. It's free, so you can download it directly from the official website. After launching the installer, a welcome window will open in front of you. Click the "Next" button. Next, you need to specify the drive and folder where you want to install the program. To change the default path, click on the “Change” button. Click “Next” again to continue. Uncheck the “Help improve VMware” option if you do not want the program to anonymously send information about the program’s operation to VMware, or leave it if you don’t mind. Then choose a location to create shortcuts. Check or uncheck the “Desktop” and “ Start Menu Programs folder". To begin the installation, click the "Continue" button. Wait a while for it to complete VMware installation Player to your computer. Once complete, you will see a window informing you that the installation was successful. Click on the “Finish” button to exit.
Now you can launch the utility. After the first launch, you will be taken to a window with a license agreement. Check the box “Yes, I accept the terms in the license agreement” and click “OK”. While in the main VMware Player window, click on the “Create a New Virtual Machine” item. A window will open in front of you in which you need to select installation from disk or image. In the first case, you need to specify the drive, and in the second, the path to the image. Click "Next" to continue.

Then you will be taken to a window where you enter the key licensed product, login/password and select the OS version you are installing. After filling out the required fields (only login is required), proceed to the next step.
Enter a name for the virtual machine, and specify the drive and folder where it will be stored. Next, set the disk size for the virtual machine (you can leave it at default). In this window, you can, in general, not change anything and immediately click “Next”.
In the next window, check all the parameters you have specified and, if everything is in order, click the “Finish” button. Ready. The virtual machine has been created. To change the settings after creating it, click “Edit” virtual machine settings", located in the main menu of the utility. There you can increase or decrease the amount of allocated RAM for the virtual machine, the number of processors used, make network settings, and so on. This is done in the “Hardware” section. When setting up a network, you need to pay attention to the types of “Network connection” connections. Mostly they use the “Host-only” type. Otherwise


