Installing a virtual machine vmware workstation 12. Virtual machine VMware Workstation Your ideal assistant!!! Installing a license key
We will consider the option of creating a virtual machine using a popular virtualization system VMware Workstation Pro 14, and also consider its parameters.
Before us is the main window of the program. (Fig.1)
Fig.1 - Main window of the program.
Click "File" -> "New virtual machine".(Fig.2)
 Fig.2 - "File" menu.
 Suitable in most cases "Ordinary" type, select it and click "Next >".
 Fig.3 - Selecting the configuration type.
 A virtual machine is like a physical computer for which you also need to install an OS. How should I install the OS?
And three options are offered: (Fig. 4)
- Install from disk using CD-ROM. (Naturally, we immediately reject the first option.. It’s 2018.. and the CD-ROM remained somewhere in 2005.)
- Select image file.
- Install the system later.
We will consider the option "Install the system later", because if you insert iso image immediately, then in the next step he will ask you to enter personalization (Account/Login/Password) for the future guest OS, but I want to enter it myself. (Personally, I like it this way.)
 Fig.4 - Selecting the guest OS installation method.
 Lists are very likely 99,9% that you will find the OS you need here.
We will show with an example - Linux Ubuntu Server 18.04 LTS 64-Bit therefore we choose:
- Operating system - Linux.
- Version - Ubuntu 64-bit.
 Fig.5 - Selecting the operating system.
 Next you need to specify "Virtual machine name."(Fig.6) - This name will be used for your convenience and displayed in the list of virtual machines. (K hostname has nothing to do with it.)
We will also indicate "Location:" virtual machine on your hard drive. Personally, I changed to a more convenient path for me.
 Fig.6 - Specifying the name of the virtual machine and its location.
 What size should I create the disk?- The virtual machine's hard disk is stored as one or more files on a physical disk. This file will be created small and will grow as applications, files, and data are added to the virtual machine.
We must indicate Maximum size virtual hard disk. I leave the recommended size for Ubuntu: 20GB.(Fig.7)
 Fig.7 - Specifying the maximum size of a virtual hard disk.
 Everything is ready to create a virtual machine.
We see a window with the parameters of the virtual machine being created. (Fig. 8) If you are satisfied with these parameters, then click "Ready". Personally, I’m a little unsatisfied, so I’ll click "Hardware setup"
 Fig.8 - Virtual machine parameters.
 Here we can highlight RAM capacity for our virtual machine.(Fig.9)
I'm leaving 1 GB.
 Fig.9 - Select the amount of RAM.
 You can set "Number of processors" And "Number of cores per processor". (Fig.10)
I'll leave one at a time. This is enough for Ubuntu Server.
 Fig. 10 - Processor configuration.
 Here we leave a checkmark "Connect at power on". And select the iso image of our Ubuntu Server. In order to install it.
 Fig. 11 - CD/DVD-ROMa parameters.
 Go to parameters "Network adapter".(Fig.12) Set by default "NAT" but since I want mine virtual machine had access to my test network and saw not only my physical machine, but also all other machines on the network. I'm in the section "Connect to the network" I choose "Bridge" and check the box "Replicating the state of a physical network connection".
We have considered all the main parameters. Click "Close".
 Fig. 12 - Network adapter parameters.
 But now all the parameters suit me, click "Ready".(Fig.13)
 Fig. 13 - Virtual machine parameters.
 Go to the main program window. (Fig. 14)
On the left there is a list of virtual machines. Our new VM Ubuntu added to it.
Click "Enable virtual machine".
 Fig. 14 - Launch our virtual machine.
 When switching to the next version of the Windows operating system, some users are faced with a lack of support for their favorite applications in the new OS. Or it’s even more complicated - you have, for example, OS X, and you need applications that are compatible only with Windows.
At the moment, there are a large number of “virtual machines” that can solve these inconveniences. For example, paid Parallel Desktop and VMWare Workstation, or free options such as Microsoft VirtualPC or VirtualBox from Oracle.
We have already talked about VirtualBox in articles:
- Creating a virtual computer and installing Windows on it using VirtualBox;
Today I will talk about working with .
The process of installing a virtual machine is no different from the process of installing regular programs, so you can skip it. After installation and reboot, the main program window will appear.
Everything in this emulator is easy to configure. On the left side are the virtual machines that you have installed. On the right is the “invitation” window of the program. With its help, you can create or open an existing virtual machine, connect to a remote server, and much more. At the top there are several panels containing controls.
Creating a virtual machine
In VMWare Workstation, you can choose several ways to create a virtual machine. To describe all possible functions, we will choose a selective method for creating a machine.

In the next window you must indicate compatibility with previous versions of the program.

This is usually used for collaborative work on different configurations. The left side of the window displays the products compatible with this machine, and the right side displays the restrictions that apply to this configuration. Now this is not important, so we leave everything as it is.
The next step is to install the system on a virtual machine.

In this case, you can specify both a real hard disk drive and a virtual image. Or you can select installation media later, right when the virtual machine starts.
Then you need to select the operating system you are going to install.
In accordance with your choice, the program will offer the optimal set of settings for a specific system. Next, you need to come up with a name for the virtual machine, as well as the folder in which it will be located.
Most modern computers have more than one processor core. In the program you can also set the number of cores that you want to use in the guest system.
Note: You should not give the virtual machine too many physical resources. The computer will run slower, and you will not get a big increase in the performance of the guest system.
At the next step, you need to specify the amount of RAM that will be allocated to the virtual operating system. The program will also warn you about the minimum amount of memory at which the system will function, and will also indicate a limit beyond which you should not go. In this case, it is recommended to leave the value that the emulator program initially specified.
The next step is to specify the type of network you want to use.

In this case, if you do not understand network technologies, you do not need to change anything. After installation, the virtual machine will have a network and you will not have to configure it separately.
The next step asks you to select the disk on which the system will be stored.

You can create a new virtual disk or use an existing one. You can also allocate part of the physical disk for system operation. In the first two cases, a virtual hard disk will be created in the form of a specific file or group of files. The configurator will then prompt you to select a virtual disk type. Since SCSI is either not supported on older systems or does not work well, it is advisable to choose the IDE interface.
Next, you need to specify the size of the future disk. In this case, we can specify a space slightly larger than what we need. In this case, you can allocate all the disk space at once, or you can fill it gradually so that the empty space on the virtual disk does not take up real gigabytes. For convenience, the program will offer you to split the disk into several files, or save everything in one.

In conclusion, it is worth familiarizing yourself with the parameters of the created VMWare Workstation virtual machine. If everything is in order, then click the “Done” button, otherwise you can go back and change any parameter.
The right side of the program now displays a black screen indicating that the virtual machine is disabled, as well as information about the virtual machine's hardware. The process of installing the system on a virtual machine should be skipped since it is no different from installing a real operating system.
Procedure for starting a virtual machine, pausing and shutting down
So now everything is ready to launch. If you already have a system on a virtual machine (VM), then you can simply launch it. Or install the system on a newly created machine.

There are two options:
- If there is a VM, then in the window on the main tab you need to select “Open” and select the VM (file with resolution .vnw).
- After adding (or after creating a new one), you need to start the VM by clicking on the start button, which is located at the top of the window under the “Edit” menu, or by selecting the menu item Virtual Machine - Power -> Resume, or by pressing the key combination Ctrl + B.
It is worth noting that the virtual machine can be paused. In this case, its full state at the time of shutdown will be preserved and the virtualizer program can be closed. After resuming work, all windows, open programs and even processes in memory will remain in the same state in which you left them. This is the most convenient option for using a virtual machine because... you don't have to wait for it to load. There are three ways to pause a VM:
- Click the “Pause” button at the top of the window, under the “Edit” menu
- Select the menu item Virtual Machine - Power - Suspend
- Press the keyboard shortcut Ctrl+Z
There is also a less convenient way to turn off a virtual machine and a virtualizer program - turn off the guest operating system as if you were turning it off on a regular computer. Moreover, if you turn off the machine using VMWare capabilities, the system will automatically shut down, as if you had pressed the Power button on the system unit.
You can shut down a virtual machine in the following ways:
- Click the “Stop Virtual Machine” button, which is located under the “Edit” menu
- Select the menu item Virtual Machine - Power - Power Off
- Press the key combination Ctrl+R
It is worth noting that sooner or later you will have to shutdown/reboot the VM because... “garbage” will accumulate in the guest operating system, which will disappear only after a reboot. It will gradually accumulate and eventually make the machine work slowly.
Everything is fine: the guest system is up and running, but it may not allow the mouse to leave its working window. In this case, if you want to leave the virtual system, you need to press the Ctrl+Alt key combination. However, there is a set of drivers that, by installing them, you do not have to do this. The system integrates into the host machine and you can switch between them without any problems.
You can do this as follows: go to the Virtual Machine menu - Install/reinstall the VMWare Tools package.
The VMWare Tools package installs drivers for sound cards, video adapters and other equipment.
It is important that VMWare Tools can work with several guest systems at the same time. In this case, each system will work independently of the others. The number of simultaneously running systems is limited only by the physical capabilities of your computer. And you, as a user, can switch between them using tabs.
There is a problem: let's say that the system has become unstable and you need to press the key combination Ctrl+Alt+Delete, but the task manager of the host system is called. You can send a similar combination to the guest system using the Virtual Machine menu - send the command Ctrl+Alt+Delete.
Everything is fine: the guest system is functioning and you are satisfied with almost everything, but there is one problem: the system screen is too small and this makes the work inconvenient. There are several ways to fix this problem:
1. If you have a large diagonal monitor, you can simply increase the screen resolution.
2. There is a more elegant approach: you can enable “single mode”. This is a mode for integrating the guest operating system into the main one. At the same time, you will be able to work in parallel with applications of both the host and guest systems. It is worth noting. That the entire screen will be used and the resolution of the guest system will be the same as that of the host. In order to switch to this mode, you need to click on the “Unified Mode” button, which is located in the menu under the “Tabs” menu, or go to the View - Unified Mode menu
3. It is possible to expand the operating system to full screen, completely covering the main workspace. You can do this by clicking on the “Full Screen Mode” button, which is located between the Virtual Machine and Tabs menu, or go to the View - Full Screen Mode menu. You can also use the keyboard shortcut Ctrl+Alt+Enter. In this case, the VMWare Tools panel will appear at the top of the system, which will automatically hide if you do not hover over it.
So now we have a working system. You need to add network folders to it - in this case, we will give the system access to the physical hard drive. To do this, you need to shut down the virtual machine.
The system on the virtual machine is the same as on the real one. Accordingly, you need to turn it off like a regular system.
After turning off, you need to click the “Change settings” button and go to the “Options” tab.

In it you need to find the “Shared Folders” option, set the switch to the “Always On” position and select the necessary shared folders for your system. You can specify either a separate folder or an entire hard drive partition.
Apply the changes and boot the virtual machine. Externally the machine has a network, but internally a disk needs to be connected to the system. The easiest way to do this is to open “My Computer” and select “Map network drive.” All! The virtual system has access to real data.
There is another, simpler way to transfer files and folders: to transfer data inside a virtual machine, you just need to drag a file from the real system into it with the mouse.
Connecting removable devices to a virtual machine
Sometimes the question arises: “What to do?” if you want to connect a flash card, printer and other devices directly to the machine. In this case, the developers have provided a number of operations that can connect external USB devices.
You can view the list of devices that are available to the machine in the Virtual Machine - Devices menu. There you can also see a list of currently connected equipment. By checking the box next to the required device, you connect it in the guest system; by unchecking it, you disconnect it. It's simple!
For example, if you want to connect a drive to a virtual machine, you need to do the following:
- Connect the flash card to the computer and after a few moments it will appear in the “Devices” menu;
- Check the box next to the device and after some time you will see a system message stating that the device is connected.
Conclusion
Another important point: suppose that you reinstalled the operating system, but you still have the VMWare Workstation virtual machine. To run it, you need to open it in the program: Home - Open virtual machine. Then a window will appear upon startup.

In this case, you need to click the “I copied it” button. And the virtual machine will boot. Running virtual machine:

In conclusion, it is worth noting that a virtual system is a very useful and, at times, indispensable device. The undoubted advantages of a virtual machine are such features as:
- If desired, you can virtualize any operating system and, accordingly, if the system is old, then old programs that cannot run on modern hardware will work with it;
- Each system is independent, which allows you to conduct experiments without fear of “killing” the OS;
- You can create almost any hardware configuration and test the system's performance on it.
However, there is a downside to the coin - the VMWare Workstation program is paid and costs 8,300 rubles. Buy it or use analogues - it's up to you.
Virtual machine- software that emulates computer hardware. Allows you to create and simultaneously run several operating systems directly independent of each other.
The original, main or real operating system is called the host, while the OS installed through the virtual machine is called the guest, secondary or virtual. In this case, the host and guest OS will operate as separately as possible. In the event of a virus attack or other malicious activity on a virtual machine, the data of the real OS (host) will not be affected.
One of the most popular programs for creating a virtual machine is VMware Workstation or its reduced functionality, freely distributed version VMware Player. With its help, you can install a minor OS X on the main Windows OS or vice versa, as well as a number of other operating systems, for example, the Linux family. There are ample opportunities for setting up and debugging the virtual OS.
Before you create a virtual machine, you need to install special software that allows you to do this. In our case, this is VMware Workstation. If for some reason this particular program is not suitable for you, you can install a guest OS on a virtual machine Virtualbox.
Installing the VMware Workstation distribution is similar to any other software:
- Run the program's executable file. Preparations for unpacking will begin.
- Next, a window will appear in which you can select a standard or custom installation. If you don’t know which components you need and are using a virtual machine for the first time, then choose the “standard” program package. If necessary, you can always expand the functionality and add them through the program menu.
- After clicking the Next button, you will be asked to select the directory in which the program will be installed.
- If necessary, you can mark the places where VMware Workstation shortcuts will be additionally placed for quick launch.
- At this point, the preparatory stage is considered complete, and after clicking the Install button, the distribution will begin the process of unpacking the main components.

Once the download is complete, a message will appear on the screen asking you to get started. This means that we have figured out how to install a virtual machine, and now we can start creating the virtual machine itself using VMware Workstation.
First start
The virtual machine and the guest operating system created in it will consume a certain amount of system resources. Therefore, before working with a virtual machine, it is recommended to close other resource-intensive programs, including those running in the background.
The next thing you need to understand is that the higher the production capacity of the computer, the more comfortable it will be to work with the virtual machine. It is not recommended to create, let alone run, more than one virtual OS on a device with weak hardware.
Immediately after launch, the main page of the program will open. In total, the user will have access to two main menus: the top and side menus located on the left, as well as the main screen or “Home”.
The top menu is similar in its capabilities to most programs of this level. Here you will find all the tools you need to configure: file, edit, view, virtual machine, tabs, help.
On the left side of the screen is the “Library”. This is where all virtual machines installed in the program will be displayed. Using the same menu, you can find out how to delete a virtual machine.
The “Home” or central screen contains the most frequently used functionality. Allows you to immediately start creating a new virtual machine or launch a previously created one, even on another device (you must first copy the data), as well as connect to a remote server or synchronize with VMware vCloud Air.
Since it is impossible to install Windows on a virtual machine without first creating it, we suggest you familiarize yourself with this process.
Making a machine
To create a virtual machine, you must perform the following steps:

- Installation using a bootable DVD through a physical, not virtual, drive of a laptop or PC.
- Boot using a virtual drive and a ready-made image file (ISO).
- Postpone loading the OS until later and create only the VM shell.

If you decide to install a secondary operating system immediately by selecting one of the first two options, a window will appear on the screen with all the information regarding the installation of the application. In our case it is Windows. Here you can immediately enter all the necessary data, key and password, or postpone it until later.

If the first or second boot method was selected, then after all the necessary settings have been made, the immediate installation of the selected OS will begin. Otherwise, it will begin after debugging the basic configurations of the virtual machine itself.
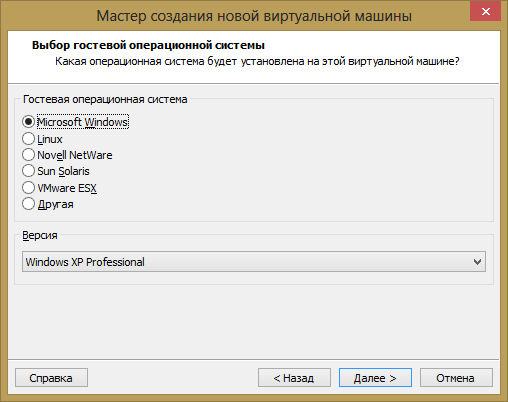
If you decide to install a guest OS later, using the third option, the program will prompt you to select the OS type from the list: Linux, Windows, Other, etc. After this, you must specify the version of the OS that will be installed. As in the previous menu, you can mark it as “Other”, but only if the required version is not in the list.

The program has a huge selection of pre-installed configurations for a wide variety of operating systems and their versions. Therefore, there should be no problems.
Setting up the application shell
The next thing you need to do is give a name for the VM, and also indicate the directory in which the main components of the program will be installed.

If the device has several drives, for example, system C and D, then it is recommended to change the location of the main folders and other system data of the VMware Workstation virtual machine to D. That is, to the drive that is not the system drive. This must be done so that in the event of a virus attack, unauthorized access, or an ordinary failure of the host (real OS), the VM files are not damaged.
Before you set up your virtual machine, make sure you know exactly what settings you need. Otherwise, leave the settings at default.
Thus, after reinstalling the main operating system on drive C, the data of the secondary one will not be affected.
You will only need to re-download the VMware Workstation program shell, and then turn on the existing virtual machine, pointing the program to the path to the files. But before you launch it, make sure that all the necessary tools are already installed.
Now you need to select the maximum amount of disk memory that the virtual machine you are creating will occupy. By default this is 60 GB. This is sufficient for most tasks, but you can change this setting to a higher or lower value if you wish.

Here you also need to take into account the fact that by saving, without splitting the disk space into several components, the guest OS you created in the virtual machine and the included host will work much faster.

At this point, the VM configuration is considered complete. And after clicking the Finish button, the process of loading the secondary, virtual, operating system will begin.
Virtual machine configuration
As a rule, there is no need for additional VM configuration. VMware Workstation automatically adapts to the system and offers the most optimal option. Moreover, if during the installation most of the parameters did not change and were selected by default.
If necessary, some configurations can be changed after downloading. Namely:
- open shared or remote access to some files and folders;
- change the characteristics of the VM hardware;
- add or change a previously selected drive for installing a secondary operating system;
- change settings for connecting external and USB devices.
To make some files and folders available for shared use by the guest OS and the host, you must:
- Go to the tab " Options" and in the drop-down list find the line " Shared folders", depending on the version which may have a different name.
- In the window that opens, check the box “ Connect as a network drive in Windows guests».
- After this, an additional Add button will appear, by activating which you can create and select a folder that you plan to make publicly available for the guest OS and the host.

To avoid problems with data loss and reinstallation of the main OS, it is recommended to select a directory that is not located on the disk with the real operating system installed on it.
After completing the steps described above, the folder will automatically become public. When you configure the default settings, you will be able to use the system's capabilities drag-and-drop, both from the secondary OS to the host, and vice versa. If any of the described functions are not necessary, then do not forget to uncheck the unnecessary option.
As you can see, setting up a virtual machine does not take much time and does not require additional knowledge to understand how it works.
Common problems and their solutions
Most of the problems, as a rule, arise due to the lack of components necessary for the correct operation of computer hardware (processor, video card, audio card, etc.). Do not forget that the secondary OS, like the main one, needs the most necessary programs to ensure stable operation of the video adapter, audio card, etc.
To avoid unnecessary problems with finding and installing them, immediately after loading the VMware OS onto the virtual machine, you will be prompted to install an additional component - VMware Tools, made to simplify work not only with the VM, but also with external devices, for example, printers, faxes, USB drives.

If for some reason this does not happen, then you can start loading the tool yourself. To do this, go to the menu item “ Virtual machine» and in the drop-down list find an offer to download this package. Upon completion, you will be prompted to reboot the guest OS. The installed tool will start working automatically, and no additional operations need to be performed to start it.
One of the most common problems is the appearance of an error like: The VMware Authorization Service is not running. To solve it, just go to the “Services” menu on the main OS, this can be done through the Control Panel - Administration. Then, in the list of services, find the one you need and start it. If necessary, enter the name manually. If it appears that the service is already running, turn it off and on again.
To avoid most problems, it is strongly recommended to install only official or verified builds of the program.
Video on the topic
By using VMware Workstation virtual machine you can install a virtual operating system on your computer.
The result is completely new computers, only virtual ones, and you can create an infinite number of them. This program will be needed if your computer is banned for hardware on any site. In our case, bookmakers ( I mean those who earn money from or are just going to join our ranks and become a financially independent person). When working with forks, there comes a time when any registered account is cut almost instantly, and some of the offices (not included in the list) basically prohibit the registration of several accounts from one computer and can even block it along with the money. And if you still want to work with such bookmakers, you definitely can’t do without VMware Workstation virtual machine.
vmware virtual machine You can download it for a fee on the official website vmware.com. But you can quite easily download its free version on the Internet. I can’t say that this is correct, since it violates the developer’s copyright, but this is a fact and since this is not an advertising article but a general educational one, I can’t help but highlight this aspect - to do this, just enter “vmware workstation torrent” into any search engine and voila, choose what you like... The only thing is, if you decide to go this route, be careful in choosing the source.
Virtual machine VMware Workstation 11 rus 64 bit
Installation for windows 7
Installing a virtual machine vmware should not cause difficulties even for the most inexperienced PC user. But just in case, I decided to post screenshots of most stages of installing the program. Moreover, without this, the article seemed incomplete to me, and I don’t like unfinished things... Vmware workstation 12 is installed in exactly the same way, and the earlier version (10) too.


Setting up VMware Workstation and installing windows 64bit on it
Here we will pause and look at everything in great detail, at least enough so that anyone could do it. The capabilities of the program are very wide and we will not consider them all, but will focus on those that we need in order to be stable. And so, without further ado, let’s get started...
Launch the installed VMware Workstation for example, I decided to take version 10, it is no different from 11 and 12 in terms of settings, I think the next versions will correspond since the publishers are distinguished by their stable conservatism in terms of design and functionality (and this is good!!!). In addition, I use this version myself, it is already installed and ready for demonstration.
1. VMware Workstation After the first launch, it immediately opens the main tab.
Find in the middle “create a new virtual machine” and click.

2. In the window that opens, leave normal mode create a virtual machine and click Further.

3. At this stage, you need to indicate from which media we will install windows. Either it will be installation disk as shown in the example, or ISO installation image file. The latter option is more convenient, since it is convenient to store the image on a computer or on a flash drive; it will not get worn out or scratched, plus the installation speed will be faster. But to do this, you first need to create it in a special program; I personally used UltraISO.

4. Here it is important for us to indicate the name of the computer, try not to repeat yourself, since the uniqueness of all the individual facts determines whether or not the Beech Sneakers and their bots will identify you.
There is no need to enter a product key or passwords; you can select the Windows version as desired. Click next.

5. You need to indicate the name of the virtual machine, this is not the name of the computer, but a name solely for your convenience, it will be displayed in the column on the left.
At the same stage, you can specify the location where the files of this virtual machine will be located on your computer.

6. Select the disk size. Windows will be installed on it and all programs can be divided, but I don’t recommend this, and neither do the developers. The default is 60 GB, you can leave this figure. But if you have enough memory installed on your computer, I advise you to increase it to 80 GB.

7. Click here - equipment setup.

8. In the window that opens, go to the memory section and by dragging the pointer or by pointing manually, select the size of the RAM of the future virtual computer. Please note that the RAM size depends on the configuration of your computer and the recommended sizes are indicated on the right. In any case, try to set a little less than the recommended size in order to avoid “brakes”.

9. In the same window, go to the section CPU and in the drop-down menu on the right, select the number of processors and cores inside them. There can never be too many of these 🙂 place as many as you can...

10. We remain in the same window and go to the tab network adapter, then press additionally and in the window that opens, generate a new MAC address (this must be done every time, since it is this that is used to track hardware on the Internet in the first place, at least that’s what many experts say, we won’t dispute it...)
Click OK and close the window equipment«.


11. Be sure to leave a checkmark and click Further.

12. At this point, the setup is complete, all you have to do is wait for Windows installation to complete and It is very IMPORTANT when the network location settings window appears, select HOME NETWORK.


When everything is installed and configured, I want to draw your attention to two useful functions:
- Expand to full screen ( blue marker, fig. below) - I think everything is clear here.
- Single mode ( red marker, fig. below) - This function allows you to display browsers and all open programs and folders on your main computer. It will feel as if the browser is running not on a virtual machine, but directly on your computer, and this without loss of confidentiality. If the power of your computer allows, you can simultaneously run several virtual machines and open all browsers from them in a single mode.

If you start the machine and these functions do not work, do not despair; this sometimes happens and is usually solved as follows:
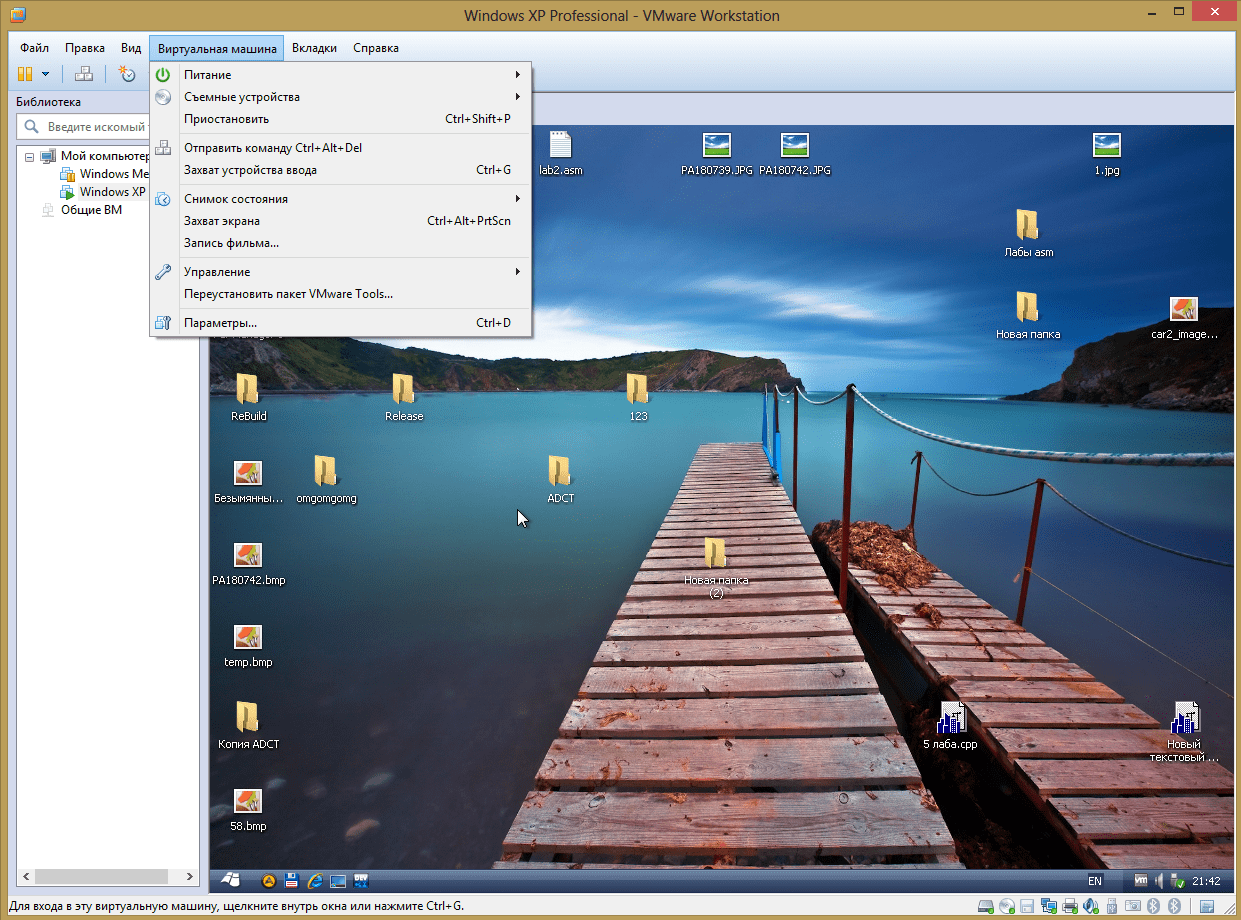
Open the “” tab in the top panel Virtual machine" and press install VMware tools...(picture below)

Now VMware Workstation virtual machine completely ready to work with, I remind you that the functionality of this program is much wider than described in this article, you can study them at your discretion. But since my site is aimed at teaching you, this information is quite enough!
P.S. Thank you for visiting my site. Enjoy your income!!!
Good afternoon!. Surely many of you, due to the power of modern computers, have on your personal computer various programs for virtualizing all kinds of systems. In the corporate segment, this is the hypervisor ESXI 5.5 and higher, and at home, this is Hyper-V on Windows 10 or Vmware Workstation 14. It is the latter that will be discussed; at the moment, the latest version is 14.1. Today I will tell you where to download and how it is done installing Vmware Workstation 14, step by step. So that you can create your own test site for testing or work.
What is Vmware Workstation 14
For people who are just getting acquainted with the Vmware Workstation product, I will tell you in a nutshell what kind of beast it is. Briefly and simply put, this is a program that is installed on operating systems of the Windows or Linux family so that separate, isolated OSes can be installed for further testing or work.
A simple example, I have Windows 8.1 installed locally, but this does not prevent me, using Vmware Workstation 14, from having Windows 10 installed, which I can break or study, without fear that I will break the main OS. Since essentially a virtual machine is just a file on a computer. I advise you to read more about virtual stands at this link.
Where to download Vmware Workstation 14
You can find the official website for downloading Vmware Workstation 14 at the link below:
https://www.vmware.com/ru/products/workstation-pro/workstation-pro-evaluation.html
As you can see there is a version for:
- Windows
- Linux

The Vmware Workstation 14 program itself is, of course, paid and at the link you will find a trial version, this is enough to install it and take a closer look.
What's new in Vmware Workstation 14
Let's quickly talk about the innovations in this version of the second class hypervisor. Support now available:
- Windows 10 1803
- Windows Server 1803
- ESXI 6.5
Of course, this version also improves system hardware support. Includes compatibility with the latest processors, including Intel Kabylake and AMD Ryzen. Implemented support for UEFI Secure Boot for virtual systems, which increases security. Additionally, a Virtual NVMe virtual controller is included for fast SSD access (with support for vSAN testing).
VMware Workstation 14 has improved network management. New network settings allow you to simulate certain situations that will be useful during testing. To the previously existing functions for adjusting delay and packet loss, adjustment of distance and network quality has been added. This is required to check the fault tolerance of the applications being tested. Other additional options have also been added there, for example, setting the names of virtual network adapters, etc.
Added the function of scanning virtual machines to update resources. Systems located on local disks and USB drives, as well as remote ones, are supported. Added support for power operations and simple system power on/off for vSphere ESXi hosts. Remote management supports operations such as shutdown, reboot, shutdown, directly from VMware Workstation.
And that is not all. Among other things, the new version includes many different improvements: minor conveniences have been added, automatic virtual system disk cleaning has been implemented, the interface based on GTK+ 3 for GNU/Linux has been updated, bugs have been fixed, etc.
How to install Vmware Workstation 14 on Windows
And so, for example, I will install on Windows 8.1, since I have it, but it is no different if you had Windows 7 or 10. After downloading the archive from Vmware Workstation 14, you will get this file structure. Run VMware-workstation-full-14.1.1-7528167.exe.

The installation wizard will start, which will begin to unpack the exe file

At the first step of the installation wizard, click Next.

We agree to the license agreement by checking the box "I accept the terms in the License Agreement"

You can install an additional driver for the keyboard by checking the box:
Enhanced Keyboard Driver (a reboot will be required to use this feature). This feature reguires 10MB on your host drive
The improved virtual keyboard feature provides better performance with international keyboards and keyboards with additional keys. This feature is only available for Windows host systems.

Uncheck both boxes:
- Check for product updates on startup - check for updates after installation
- Join the Vmware Customer Experience improvement Program - join the improvement program

In the next step, the installation wizard will prompt you to create shortcuts on the desktop and start menu.

The last step remains, to complete our installation procedure for Vmware Workstation 14 Pro, click the install button.

In a minute, the master will finish his work. Here you can exit it by clicking the Finish button, or install the Vmware Workstation 14 license key through the License button.

Installing a license key
If you have your own key, then copy it; if not, then generate it from a special file. Copy the key generated by the generator here.

If you skipped this step, don't worry, you'll have at least two more chances to do it. The first is when you launch the Vmware Workstation 14 hypervisor. The first window will require you to activate the product. As you can see, there is a trial, evaluation period for 30 days.


