How to password protect a flash drive without programs. Methods for setting a password on a flash drive. Setting a password for a separate folder
The question of protecting information on a flash drive mainly arises when it is necessary to store or transfer important information. Everyone chooses for themselves to protect separate file or the entire flash drive, but in this article we will look at how to put a password on a flash drive using the built-in utility in Windows and using several third party programs.
We will consider three various options setting a password on a flash drive using the built-in Windows utilities Bitlocker To Go, and with the help of programs ROHOS Mini drive And USB Flash Security.
How to put a password on a flash drive without programs?
Let's call this option setting a password on a flash drive without programs simply because the program being used is already available in Windows, and you won’t have to install anything additional. Utility Bitlocker To Go, which will be used to set a password on a flash drive, appeared starting with Windows 7 corporate version, but the Bitlocker technology itself appeared in Windows Vista SP1.
The password setting procedure begins with enable Bitlocker after connecting the flash drive to the computer. Right-click on the flash drive in Explorer and select from the menu "Enable Bitlocker...".

The next step is to set up a method for unlocking, and among the proposed options, select a password and enter it.

We will also be offered options for saving the key, with which you can recover the password to the flash drive. It is a perfectly acceptable option to save the key in a file.

And finally, the flash drive encryption procedure itself begins.


Now, when we connect our flash drive to the computer, Explorer will display a closed lock on it, and when you try to view the contents, you will be asked for a password. After entering the password, the closed lock changes to open.


This flash drive protection can be disabled only through the control panel. Need to go “Control Panel\\System and Security\\Encryption drive BitLocker» and for our flash drive select "Turn off BitLocker".

How to put a password on a flash drive using programs?
The first program that we will use to set a password on a flash drive is called ROHOS Mini drive. It can be used for free, but in free mode it can only protect up to 8 GB of information on a flash drive. You can download it from the website www.rohos.ru.
After installing and launching the program, a window appears where you will need to select a protection method. In our case we choose "Encrypt USB disk» . The next window specifies the parameters for the flash drive. If the flash drive is in automatic mode is selected incorrectly, specify another one, and if you are not satisfied with the parameters, go to the settings and specify your own. Having made the necessary adjustments, press "Create Disk".


With each activation, the program will create in the system new disk, with which we have to work, placing protected files on it.

After completing all operations with the disk, you must disconnect it by clicking on the tray icon and selecting the appropriate item.

By connecting such a flash drive to another computer, to access protected files you will need to launch the program located on the flash drive Rohos mini.exe. It will ask us for a password and how to connect the disk.

If the user does not have rights to install drivers and applications on the computer, you need to run the file from the flash drive Rohos Mini Drive (Portable).exe. This file will launch a small program Rohos Disk Browser, which will make it possible to work with the disk from the window of this application.

All files added to the disk will be automatically encrypted using AES algorithm whose key length is 256 bits. Once in possession of such a file, it is almost impossible to decrypt it.
The main advantage of this program is its size and the ability to use it on any computer, as well as the ability to use the unprotected part of a flash drive in normal mode. To remove a program from a flash drive, simply delete all application files and the encrypted data container itself.
The following program for setting a password on a flash drive is called USB Flash Security, and in free mode it can only work with flash drives up to 4 GB. You can download it from the website kashu-sd.co.jp.
After installing and launching the program, tabs corresponding to the detected flash drives will be displayed in its working window. Select the appropriate tab and press the button "Install". Save everything first important files, since they will all be deleted.


While setting up the flash drive, the program will display a window in which, on the tab "Password" You will need to enter a password and it is advisable to leave a hint. By default, data encryption is enabled on the flash drive, which can be at this stage disable on tab "Details".

Flash drive - convenient way information storage. Gigabytes of information are recorded on the flash drive: Personal Photos and video, data for work, useful utilities. But there is one drawback: a flash drive the size of a lighter is easy to lose. To prevent information from ending up in the wrong hands and being used by criminals, it is necessary to ensure the protection of personal data.

Setting access to information using a password
Reliable protection is installed on a USB flash drive in two ways. The first option is to use the built-in Bitlocker program. It is available to users of the Windows 7, 8 operating system. In the Bitlocker application, the developers used a simple interface. The program encrypts information on a logical drive or flash drive. WITH using Bitlocker can't set a password for separate folder.
Second method: use the program to protect personal files third party developers. There is a lot of such software. A set of program capabilities will help limit access to both the media and a separate folder on a USB flash drive or logical drive.
Protecting a flash drive in Windows
If on personal Windows computer 7 editions Ultimate, Enterprise or Windows 8 and higher, then the user has access to a built-in encryption application Bitlocker data. By following simple steps, we will get password-protected access to the data drive.
Step-by-step instructions for protecting information on a flash drive:
- We connect the flash drive to the computer.
- Open the “My Computer” folder and right-click on the flash drive icon.
- Select Bitlocker in context menu.
- In the new window, check the box “Use a password to unlock the flash drive.” We come up with strong password and enter it in the window provided. Click the “Next” button.
- On next step Bitlocker program suggests creating a special key. It will help restore access to information if the user suddenly forgets the password he created. This key is printed on a printer or saved on local disk. The decision is up to the user.
- We choose which part of the drive will be protected. If the data is very important, then it is better to choose the full encryption option.
- We wait for the end of encryption of information and click the “Close” button.
- Checking the security installation. We take out and reinsert the flash drive. In the “My Computer” folder, a “lock” icon should appear next to the flash drive icon. It means that protection is installed and access to data is only with a password.
 This is what a local disk protected by bitlocker looks like
 Free data protection programs
Available to users via the Internet software products. They will help protect personal data. Three popular programs, distributed free of charge, are described below.
TrueCrypt
The TrueCrypt program ranks first in popularity among users. She's reliable. Complex interface - main drawback programs. To understand the intricacies of TrueCrypt, you will have to spend time. The program can encrypt a separate folder on a flash drive or logical drive entirely.
Rohos Mini Drive
The developers of Rohos Mini Drive sought to create functional application small in size, and they succeeded. Free version The program does not require administrator rights, but is not capable of encrypting a flash drive with a capacity of more than 2 Gb. Rohos Mini Drive creates a secret sector up to 2 gigabytes in size (i.e., for example, a 16 GB flash drive is enough for you). To access the information posted there, a password is required. The program uses a robust algorithm AES encryption with a 256-bit key.
Advanced Encryption Standard(AES) – symmetric algorithm block encryption(block size 128 bits, key 128/192/256 bits). The United States government has adopted it as an encryption standard.
MyFolder
The MyFolder program helps you protect a folder on your local drive or USB drive with a clear menu. To open such a folder, you must enter a password. MyFolder encrypts on high speed, but uses the unstable Blowfish algorithm. Also, the program does not work under a 64-bit operating system.
Blowfish - cryptographic algorithm, which implements symmetric block encryption with a variable key length. Developed by Bruce Schneier in 1993.
Setting a password for a separate folder
In some cases, it becomes necessary to set a password for a folder with files on a flash drive. Easy and quick to protect personal information Special programs will help.
One of them is Anvide Lock Folder. The software has the following advantages:
After downloading, Anvide Lock Folder is ready to use. The interface is simple and clear. In the program window, specify a folder on a flash drive or personal computer and press the button with a closed lock icon. Enter the password, and the folder is password-protected. It can be accessed through the program. Anvide Lock Folder itself can be protected with an additional password.
Setting a password on a flash drive without a program
Manufacturers of Flash drives offer the use of hardware information protection. To use data encryption from the manufacturer, you must activate it the first time you use it. A password is set on the flash drive. It must contain letters, numbers and special characters.
 USB Flash drive in the form of a keychain from Toshiba in aluminum housing with password entry buttons
 A password longer than 8 characters is considered good. It should not be forgotten. Restore access or change Secret word impossible in 99% of cases. Without a secret word, it will not be possible to format a flash drive.
Ways to restore access to a flash drive
What if you forgot your password? There are hundreds of programs on the Internet that shout about their capabilities, but their effectiveness is questionable. The second option: look for a neighbor hacker who can remove or crack the password. Remember: use special software fraught with unpredictable consequences. On Personal Computer viruses can get in malware. So it's better to come up with good password that will not be forgotten, or never use a password.
Users often use a storage device in the form of a card MicroSD memory. They are used in mobile phones, tablets and cameras. MicroSD is often protected with a password. It is installed through the menu electronic gadget. When you reinsert the memory card into another phone or camera, you will need a password. If you forget it, then it is impossible to restore access to the flash drive without losing data on the MicroSD.
 The online store sells a device for resetting a password on a MicroSD memory card
 Nowadays, online stores sell devices called unlockers. They cost about $10–20. Using an unlocker, the protection is removed and the memory card is formatted. The data will be lost forever, but the MicroSD will remain at the owner's disposal. If you do not want to buy a device, then contact specialized service. Unlocking services are offered by repair companies Cell phones and computers.
Keep personal files locked. This also applies to data recorded on a USB flash drive. It is especially easy to lose a micro SD flash drive due to its small size.
Summarize. Choose security password. Remember the secret word. Having memory problems? Then better password don't put it. There will be considerable pain in restoring access; it is unlikely that you will be able to remove the password yourself without losing data, and the results of using cracking programs are not always positive.
Question from a user
Hello.
Tell me how to password protect the folder in which I have my documents. The folder is on a flash drive, and you have to carry it with you and connect it to different PCs and laptops. I wouldn’t want anyone to see them or copy them to themselves.
A small addition: the password must be placed on the folder, and not on the flash drive itself. Those. To see specific folder- enter a password, and everything else is free and open for viewing. Thank you in advance!
Good day!
The task is quite doable, below I will give several options for how to put a password on your files (and based on the pros/cons of each method, you can choose best option for myself).
One moment!
Some users (especially beginners) set passwords for everything: movies, music, games, etc. As a rule, all these media files that you simply downloaded from the Internet are of little interest to anyone (except you), and it hardly makes sense to protect them (unless you want someone to know that you are interested in them) .
At the same time, we have to observe how lazily they treat passwords, personal data, scans of passports, tax identification numbers, etc. First of all, it is these documents that need to be protected!
To a file (document, notepad)
The simplest, fastest and effective method putting a password on your folders and files means sending them to a password-protected (and encrypted) archive. When you need to gain access to files and folders inside the archive, you need to enter a password for access and use them safely.
On the plus side: you can protect any files in this way: Word/Excel documents, pictures, text files(notebooks), scans, etc. Also, archivers are available on any PC/laptop, which means you can open files on any computer!
There are, however, disadvantages: if you forget the password, it is very difficult to open such an archive (in some cases impossible); not convenient to work with large files(for example, with a video folder).
Below I will look at how to create such an encrypted archive in the popular archivers 7-Zip and WinRAR.
7-Zip
A very popular archiver that allows you to compress files stronger than its competitors: WinRAR, WinZIP, etc. The archiver is free, convenient and designed in a minimalist style (there is nothing superfluous). In general, it rightfully occupies a leading position...
After installing it, you will see a menu of the same name in Explorer: 7-Zip. Now, to create an archive, you just need to right-click on the required file or folder and select from the menu that appears "Add to archive..." (see screenshot below).

- (1) - must be specified name of your archive and the place where it will be stored. In general, the archive name can be anything, and it can later be renamed, just like a regular file;
- (2) - archive format. The best compression is provided by the 7-Zip format, which is what I recommend choosing;
- (3) - SFX archive - self-extracting archive. That is, if you check the box next to this item, an EXE file will be created (as regular program), by running it, you can extract files without using an archiver (a convenient thing for extracting files on any computer, even those without archivers at all);
- (4) entering a password - the password can be anything, here the archiver does not set any restrictions. However, remember that passwords like “12345”, “God”, “Love”, etc., associated with your name and date of birth, are very easy to hack! Install something more reliable (recommended 6-10 characters, with capitals and lowercase letters, numbers and specials. signs);
- (5) choosing an encryption method- I recommend leaving the default AES-256, and additionally checking the “Encrypt file names” checkbox. Thanks to this, your files in the archive not only cannot be opened, but you can’t even see what file names are hidden in the archive!
- (6) - start archiving.

Creating an archive // 7-Zip
After the archive is created, you can try to open it. For this action, any archiver (even not 7-Zip) will definitely ask you to enter a password for decryption. If you don’t know it or have forgotten it, then your files will remain inaccessible!

WinRAR
One of the most famous archivers, providing a good compression ratio. Allows you to open and extract files from all the most popular formats archives: ZIP, RAR, ACE, TAR, GZIP, etc.
To create an archive in WinRAR, just right-click on a file/folder and select "WinRAR/Add to Archive" (note: add to archive).
- (1) - set a name for the archive (Archive name), can be anything;
- (2) - select archive format (RAR recommended);
- (3) - select option "Set Password"(password setting) to encrypt the archive.

Then specify the password itself (line "Enter password", i.e. enter a password) and it is highly advisable to check the box "Encrypt file names"(i.e. encrypt file names).

After this you can start archiving. In general, the password-protected archive is ready - you can use it...
Password protection of Word/Excel documents, etc.
Documents created in Microsoft Office, can be encrypted regular means, without additional programs. It is very convenient when you often need to work with an encrypted document. By the way, you can also put pictures in such a document...
To set a password: open the menu FILE/INFORMATION . Then click on the function "Document Protection" and select what you want: encrypt using password (by the way, in addition to this, the document can, for example, be prohibited for editing, restrict access, etc.) .

Please note that the entered password (if you forget or lose it) is almost impossible to recover! By the way, the office itself is warned about this when it is assigned.

After the document is protected by entering the section "INTELLIGENCE", you will see a key and lock icon appear and a note that a password will be required to open the file. Actually, that’s it, the document is protected!

To folder/directory
It is not always convenient to set a password on specific file. For example, you have a catalog with pictures, personal photos, with which you often work (edit old ones, upload new ones, etc.), and which you would not want anyone to see without your permission. In this case, creating an archive every time is not convenient, and you have to resort to other tools. About them below...
♦
Protected Folder

Very convenient utility to protect and hide your files and folders from strangers. To protect a folder with a password, you just need to move it to a window (to the “safe”) - and everything in it will be reliably protected by your password.
Advantages:
- allows you to protect personal and important information from theft by programs;
- there are several levels of protection;
- very convenient to use: just drag and drop the folder - and it is protected!
- entirely in Russian;
- Compatible with Windows 7/8/8.1/10 (32/64 bits).
Very simple and at the same time reliable program to protect encryption and password protection of any folders: be they on a hard drive, flash drive or any other removable media. Each folder, by the way, can be protected by its own separate password. The program is fully translated into Russian and is supported by all popular versions Windows.
Advantages:
- there is no need to keep it running all the time;
- does not install any special drivers to the system;
- simple, clear interface- even a complete novice PC user can figure it out;
- there are hot keys;
- the program is compact and does not take up much disk space;
- free for home use.
I’ll show you with an example how you can easily encrypt and close your folder from prying eyes. Install and run the program. Then add a folder (you can use the Ins key).
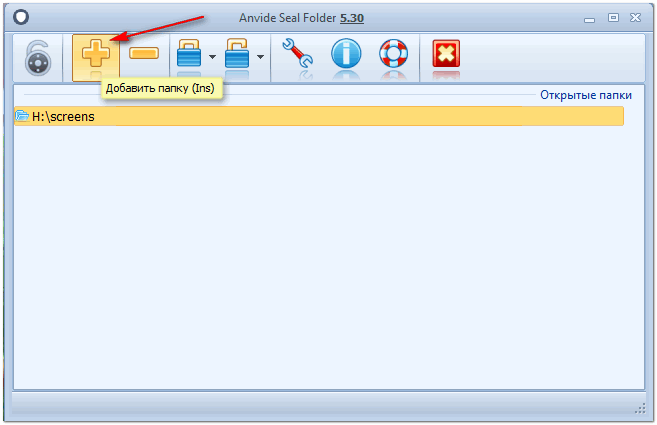

Now, even if you close or delete the program, your folder will remain inaccessible (an attempt to enter it (if you remember its name and address) will end in an error, as in the screenshot below).
By the way, the folder is not visible even if you boot into safe mode. In general, it is hidden reliably!

To decrypt a folder and the files in it, you need to run the utility again, click on the open padlock icon and enter the password.
To a flash drive
Method No. 1
The easiest way to put a password on an entire flash drive (or disk) is to use a feature that already exists in Windows - BitLocker. Allows you to reliably and quickly protect information on a flash drive
Note! BitLocker encryption Not available in all versions of Windows. If you have Windows 7 Ultimate or Enterprise, Windows 8/8.1/10 - most likely you should have it.
To protect a flash drive in this way, connect it to a USB port, open "My computer" (or “This PC”) and right-click on it, select from the menu that appears. Next, follow the wizard's instructions to set a password.

When the password is set, try removing the flash drive from the USB port and then plugging it in again - you will see that access to it is blocked (and its icon has become a closed padlock). Until you enter the unlock password, the information on the media is securely protected!

Unlocking a disk/flash drive
Method No. 2
A very simple and convenient utility for protecting flash drives (works in all versions of Windows). All you need to install protection on a flash drive is to download the utility and copy it to a USB drive (see screenshot below).

Action No. 1 - copied the program file to the USB flash drive
Then you can set a password.

Action No. 2 - launched the utility from the flash drive, formatted it and entered the password
ALL! Now when you connect a flash drive, it will appear empty (only the file will be visible in it USB programs Safeguard).
To see the files on it, you will need to run this file and enter the correct password. If you do this, a disk will appear Z, equal in volume to your flash drive - this is what you need to work with (and it is on this that all your files added for encryption will be located)...
In general, everything is simple, convenient and easy to use!
An analogue of a similar utility: Rohos Mini Drive.
ADDITION
You can also create a virtual encrypted disk (something like an image) to connect and view which you need to enter the correct password. Similar technology makes your files as secure as possible from outsiders. In addition, absolutely any type of file can be stored on such a disk.
Examples of programs: TrueCrypt, CyberSafe, Rohos Disk, etc.
PS: don't forget your passwords! Otherwise, make the files so secure that you won’t even be able to look at them yourself...
Many users want to put a password on a flash drive, but they can’t do it, or hide information on a flash drive. In this article I will try to show you interesting ways how to password protect a flash drive. Many people don’t even suspect that this can be done built-in without any problems. using Windows.
You can also find this function in early operating systems oh, even with Windows 7 Ultimate, the function of setting a password on a flash drive without the help of third-party programs was available to all users. I use Windows 10 Pro, and I will put a password on a 32GB flash drive.
First, let's open my computer, click on the flash drive right key mouse and in the context menu find the Enable function
By selecting this item, you will be taken to the BitLocker Drive Encryption (H:) window. In which Windows will prompt you to choose a method for unlocking the disk, I choose the usual method for everyone, unlocking the disk with a password, enter the password and click next.

After successfully choosing a password, you should archive your recovery key in case you forget the password, on Windows 10 I always use the first option Save to your account Microsoft, but as an example I’ll show you how you can save the recovery key to a file.

By selecting the Save to file option, we must specify the path where the file will be saved; according to the standard, these are my documents, so we leave it that way. 

IN latest update Windows 10 now has the ability to use new mode encryption, but since it is not compatible with older Windows versions, then I advise you to select compatibility mode.

On next Windows asks if we have changed our minds about encrypting the flash drive, if not, click start encryption .

This process can be lengthy depending on the number of files on the flash drive.

When the process is completed, Windows will warn us about this.

Now let’s check, to do this we need to remove the flash drive from the PC and insert it back, and when we try to log into the flash drive we will need to enter a password.

This method is universal and not complicated. To put a password on a flash drive, we didn’t have to use dubious programs. Now you know how to password protect a flash drive using built-in Windows tools.
How to protect a flash drive with a password using Rohos Mini Drive
Using the Rohos Mini Drive program, you can not only protect your flash drive with a password, but on your computer or even an application.
But we need to choose encrypt USB drive
.


In the last window, the program tells us that the partition has been successfully created. To open this partition on another computer, use the Rohos Mini.exe icon in the root folder of the USB drive.
The second method is universal and is suitable for all operating rooms. Windows systems. But not as convenient as the first one.
In this article, I showed you how to password protect a flash drive using Windows and using third party software, what is more convenient for you is up to you to choose. Write in the comments whether you liked the article and what method you chose.
USB flash drives are small, portable and universal devices storage Flash drives are very convenient for transferring data between computers. However, due to their portability and compact size, USB media can be easily lost. Therefore, you need to take care of reliable protection data on a flash drive.
Unfortunately, you can't simply set a password on the entire drive like you can with a smartphone or computer. For enhanced protection your files need to be encrypted. If you do not wish to purchase separately safe device flash memory with hardware encryption, you can use free programs to obtain a similar level of security.
In this article we have presented several simple ways to protect files and folders on a USB flash drive.

If you need to protect only individual important documents, and you do not need to encrypt entire folders, then you can simply limit yourself to installing password protection for individual files.
Many programs, including Word and Excel, allow you to save files with a password.
For example, when required document open at text editor Microsoft Word, you can go to the menu File > Details, select item Document protection and option Encrypt with password.
All that remains is to ask secure password and confirm its installation. Be sure to save the document and be sure to remember or write down the password.

Download portable version VeraCrypt and extract it to a USB drive. When you launch the application, a list of available drive letters will be displayed. Select a letter and press Create Volume
To create a virtual encrypted disk inside a file, select the option Create an encrypted file container and click "Next".
In the next step, you can select the volume type: regular or hidden. Usage hidden volume reduces the risk of someone forcing you to reveal your password. In our example, we will create a regular volume. Next, select the location of the encrypted volume – removable USB-disk.
Configure encryption and specify the volume size (must not exceed the size of a USB drive). Then select the encryption and hash algorithm, you can use the default settings. Then set your volume password. In the next step, your random mouse movements will determine the cryptographic strength of the encryption.
Once encryption is complete, each time you connect the USB drive to any computer, you can run the VeraCrypt hosted on it and mount the encrypted file container to gain access to the data.

VeraCrypt supports encryption of entire partitions and storage devices.
Download VeraCrypt and install the program on your PC. When you launch the application, a list of available drive letters will be displayed. Select a letter and press Create Volume. The VeraCrypt Volume Creation Wizard will launch.
To encrypt the entire USB drive, select the option Encrypt a non-system partition/drive and click "Next".
In the next step, you can select the volume type: regular or hidden. Using a hidden volume reduces the risk of someone forcing you to reveal your password.
On the next screen of the wizard you need to select the device, i.e. our removable USB drive, and then click “OK” and “Next”.

In our example, we will create a regular volume. On the next screen of the wizard you need to select the device, i.e. our removable USB drive, and then click “OK” and “Next”.
To encrypt the entire USB drive, select Encrypt the partition in place and click "Next". VeraCrypt will warn you that you must have backup copy data – if something goes wrong during encryption, you can restore access to your files. Then select the encryption and hash algorithm, you can use the default settings. Then set your volume password. In the next step, your random mouse movements will determine the cryptographic strength of the encryption.

Then select the cleaning mode. The more rewrite cycles, the more reliable the cleaning. In the final step, select Encryption to start the encryption process.
After encryption is complete, each time you connect the USB drive to your computer, you will need to mount it with using VeraCrypt to gain access to the data.

Many modern archivers, including the free 7-Zip, support AES-256 encryption and password protection of files.
Install 7-Zip, then right-click on the file or folder on your USB drive and select 7-Zip > Add to archive. In the "Add to Archive" window, select the archive format and set a password. Click "OK" to begin the archiving and encryption process.
Found a typo? Press Ctrl + Enter


