Connecting a second sata hard drive. How to connect a second hard drive to a computer? Motherboard support
The time has come when one hard drive in the computer is no longer enough. More and more users decide to connect second HDD to your PC, but not everyone knows how to do it correctly themselves in order to avoid mistakes. In fact, the procedure for adding a second disk is simple and does not require special skills. It is not even necessary to mount the hard drive - it can be connected as external device, if there is a free USB port.
Connection options second hard disk are as simple as possible:
- Connecting the HDD to the computer system unit.
Suitable for owners of regular desktop PCs who do not want to have external connected devices. - How to connect a hard drive external storage.
The easiest way HDD connections, and the only one possible for a laptop owner.
Option 1. Installation in the system unit
Definition HDD type
Before connecting, you need to determine the type of interface the hard drive works with - SATA or IDE. Almost all modern computers are equipped with a SATA interface, so it is best if HDD will be of the same type. The IDE bus is considered obsolete and may simply not be available on motherboard. Therefore, connecting such a drive may cause some difficulties.
The easiest way to recognize the standard is by contacts. This is what they look like on SATA drives:

And this is how the IDE does it:

Connecting a second SATA drive in the system unit
The process of connecting a disk is very easy and takes place in several stages:

Boot priority for SATA drives
The motherboard usually has 4 connectors for connecting SATA drives. They are designated as SATA0 - the first, SATA1 - the second, etc. The priority of the hard drive is directly related to the numbering of the connector. If you need to manually set the priority, you will need to go into the BIOS. Depending on the BIOS type, the interface and controls will be different.
In older versions, go to the section Advanced BIOS Features and work with the parameters First Boot Device And Second Boot Device. In new BIOS versions look for the section Boot or Boot Sequence and parameter 1st/2nd Boot Priority .
Connecting a second IDE drive
In rare cases, there is a need to install a disk with an outdated IDE interface. In this case, the connection process will be slightly different.

Connecting a second IDE drive to the first SATA drive
When you need to connect an IDE drive to an already working SATA HDD, use a special IDE-SATA adapter.

The connection diagram is as follows:
- The jumper on the adapter is set to Master mode.
- The IDE plug connects to the hard drive itself.
- The red SATA cable is connected on one side to the adapter, and the other to the motherboard.
- The power cable is connected on one side to the adapter, and on the other to the power supply.
You may need to purchase a 4-pin to SATA adapter.
Initializing the disk in the OS
In both cases, after connecting, the system may not see the connected disk. This does not mean that you did something wrong, on the contrary, it is normal when new HDD not visible in the system. The hard drive must be initialized before it can be used. Read about how this is done in our other article.
Option 2. Connecting an external hard drive
Often users choose to connect external HDD. This is much simpler and more convenient if some files stored on the disk are sometimes needed outside the home. And in the situation with laptops, this method will be especially relevant, since there is a separate slot for second HDD not provided there.
External hard The disk is connected via USB in exactly the same way as another device with the same interface (flash drive, mouse, keyboard).
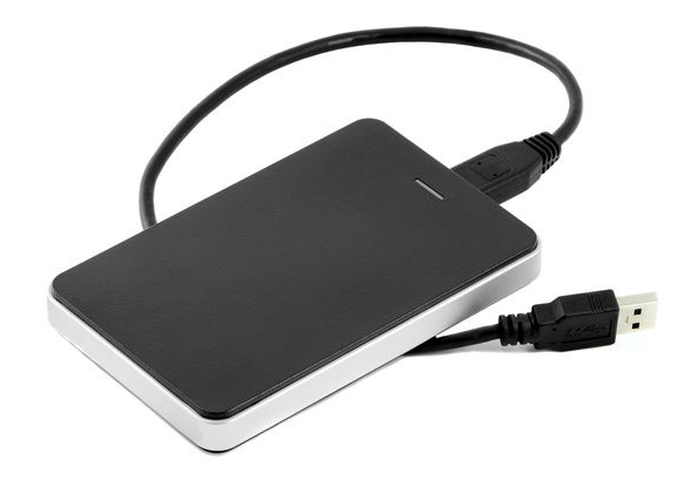
Hard drive designed to be installed in system unit, can also be connected via USB. To do this, you need to use either an adapter/adapter or a special external case for the hard drive. The essence of the operation of such devices is similar - the required voltage is supplied to the HDD through the adapter, and the connection to the PC is made via USB. Hard drives of different form factors have their own cables, so when purchasing you should always pay attention to the standard that sets dimensions your HDD.


If you decide to connect the drive using the second method, then literally follow 2 rules: do not neglect safe removal devices and do not disconnect the disk while working with the PC to avoid errors.
We talked about ways to connect a second hard drive to a computer or laptop. As you can see, there is nothing complicated in this procedure and it is absolutely not necessary to use the services of computer specialists.
Connecting second hard disk to computer.The time has come when one hard drive in a computer is no longer enough. More and more users decide to connect a second HDD to their PC, but not everyone knows how to do it correctly themselves to avoid mistakes. In fact, the procedure for adding a second disk is simple and does not require special skills. It is not even necessary to mount a hard drive - it can be connected as an external device if there is a free USB port.
Connecting a second HDD to a PC or laptop
Options for connecting a second hard drive are as simple as possible:
- Connecting the HDD to the computer system unit.
Suitable for owners of regular desktop PCs who do not want to have external connected devices.
- Connecting a hard drive as an external drive.
The easiest way to connect an HDD, and the only one possible for a laptop owner.
Option 1. Installation in the system unit
HDD type determination
Before connecting, you need to determine the type of interface the hard drive works with - SATA or IDE. Almost all modern computers are equipped with a SATA interface, so it is best if the hard drive is of the same type. The IDE bus is considered obsolete and may simply not be present on the motherboard. Therefore, connecting such a drive may cause some difficulties.
The easiest way to recognize the standard is by contacts. This is what they look like on SATA drives:
And this is how the IDE does it:
Connecting a second SATA drive in the system unit
The process of connecting a disk is very easy and takes place in several stages:
Boot priority for SATA drives
The motherboard usually has 4 connectors for connecting SATA drives. They are designated as SATA0 - the first, SATA1 - the second, etc. The priority of the hard drive is directly related to the numbering of the connector. If you need to manually set the priority, you will need to go into the BIOS. Depending on the BIOS type, the interface and controls will be different.
In older versions, go to the section Advanced BIOS Features and work with the parameters First Boot Device And Second Boot Device. In new BIOS versions, look for the section Boot or Boot Sequence and parameter 1st/2nd Boot Priority.
Connecting a second IDE drive
In rare cases, there is a need to install a disk with an outdated IDE interface. In this case, the connection process will be slightly different.
Connecting a second IDE drive to the first SATA drive
When you need to connect an IDE drive to an already working SATA HDD, use a special IDE-SATA adapter.
The connection diagram is as follows:
- The jumper on the adapter is set to Master mode.
- The IDE plug connects to the hard drive itself.
- The red SATA cable is connected on one side to the adapter, and the other to the motherboard.
- The power cable is connected on one side to the adapter, and on the other to the power supply.
You may need to purchase a 4-pin to SATA adapter.
Initializing the disk in the OS
In both cases, after connecting, the system may not see the connected disk. This does not mean that you did something wrong; on the contrary, it is normal when the new HDD is not visible in the system. The hard drive must be initialized before it can be used. Read about how this is done in our other article.
Option 2. Connecting an external hard drive
Often users choose to connect an external HDD. This is much simpler and more convenient if some files stored on the disk are sometimes needed outside the home. And in the situation with laptops, this method will be especially relevant, since there is no separate slot for a second HDD.
An external hard drive is connected via USB in exactly the same way as another device with the same interface (flash drive, mouse, keyboard).
A hard drive designed for installation in the system unit can also be connected via USB. To do this, you need to use either an adapter/adapter or a special external case for the hard drive. The essence of the operation of such devices is similar - the required voltage is supplied to the HDD through the adapter, and the connection to the PC is made via USB. Hard drives of different form factors have their own cables, so when purchasing you should always pay attention to the standard that specifies the overall dimensions of your HDD.
If you decide to connect the drive using the second method, then literally follow 2 rules: do not neglect to safely remove the device and do not disconnect the drive while working with the PC to avoid errors.
We talked about ways to connect a second hard drive to a computer or laptop. As you can see, there is nothing complicated in this procedure and it is absolutely not necessary to use the services of computer specialists.


Often unstable work computer is associated with a deficiency free space on your hard drive. To solve this problem, you can remove unnecessary files, but if there are none, you need to install it on your PC additional HDD. This article provides instructions for connecting a second drive and describes some underwater rocks, which the user might expect when performing this operation.
Motherboard support
So, how do you connect a second hard drive to your computer? "Are SATA or IDE ports soldered on the motherboard?" - the first question that should be answered before installing the HDD. You need to find out what model of motherboard is installed in the system unit. This can be done by installing the AIDA64 program on your computer. This utility shows full information about the computer. On the left side of the main application window, just click on the text “Motherboard” to find out the model. After this, you need to find the documentation for the motherboard and find out which connection ports for drives are installed on it: SATA or IDE.
If you cannot find the documentation, you will need to study the hardware of the computer yourself. To do this, you need to remove the left cover of the system unit, having first unscrewed the mounting bolts on its back side. Hard disks located in the front of the PC case in special pockets. Pay attention to the train that comes from motherboard to HDD. If it is wide, it means the drive connection interface is IDE; if it is narrow, it means SATA.
After visual inspection Still have doubts about what type of connection is used on the motherboard? In this case, disconnect the cables from the drive and pay attention to their cut. If there is a slot in the shape of the letter "G" in the connector. If the IDE connector will look like a rectangle with two rows of holes.
Pay attention to the motherboard area, where is he going cable from the drive. Are all ports busy? If there are no free ports, connecting a hard drive in the classic way will not work. Also take a look at the cable itself if the HDD connection interface is IDE. Usually it has two connectors for drives, and one of them may be free.

Before connecting a second hard drive to your computer, see if there are free pockets in the equipment case for installing drives. If they are not there, the hard drive can be placed on the bottom of the system unit, but this is unsafe for the equipment. When moving computer hard the disk will dangle, and there is a possibility that it will damage the PC components or fail itself.
Selecting a hard drive
Before you can connect a second hard drive to your computer, you must first purchase it. After determining the connection interface, you can begin selecting a drive. Remember that 3.5-inch hard drives are best for your computer. Smaller samples are designed for installation in laptops. Although, if there is a suitable one HDD parameters 2.5-inch form factor, you can install it in a special adapter case and use it in a desktop PC.
Also determine which one you will need. If only documents will be stored on it, it is enough to purchase HDD capacity 320 GB. If you plan to store films high definition And computer games, it is better to choose a hard drive with a capacity of at least 1 TB.

It makes sense to pay attention to the characteristics of the speed of reading and writing data. There is only one rule: more is better. Although, if the computer is used only for work in office applications, it makes no sense to overpay for this feature.
Correct jumper position
Users whose motherboard is only equipped with IDE ports, must configure the jumpers. How to connect a second hard drive to a computer, where to put the jumper? So, if only one HDD is connected to the cable, the jumper must be set to the Master position, and the drive itself must be connected to the outermost connector of the cable. If two drives are connected to one wire, then the jumper on the additional hard drive should be in the slave position, and it should be connected to the connector that is located at a distance from the edge of the cable. There is no need to install jumpers on a SATA drive, since a separate cable is used for each drive.

How to connect a second hard drive to a computer?
Order HDD installations for drives with any interface is the same. Regardless type hard disk to install it, follow the following actions:
- Disconnect power from the system unit.
- Unscrew the bolts holding the left housing cover and remove it. This usually involves pulling it back.
- Place the drive in the pocket of the system unit. At correct installation the slots for screws at the place where the hard drive is mounted and the holes on the HDD will coincide.
- Tighten the mounting screws.
- Before connecting the second hard drive to the computer, pay attention to connecting the cables to the first one. Connect to additional storage wires are the same as for the main one.
- Replace the case cover and turn on the computer.
BIOS setup
After a second hard drive is connected to the computer, several changes should be made to the BIOS, since sometimes the first boot device just appointed installed HDD. This results in the OS being unable to boot. To configure "BIOS":
- Turn on the computer by pressing the power button.
- As soon as the screen lights up, immediately start pressing the DEL or F8 key. Used on different motherboards different buttons to enter the BIOS setup utility. To figure out which key to press, watch the messages on the screen or read the instructions that came with your motherboard.
- After entering the BIOS, go to the Boot tab.
- Use the arrows to select and press "ENTER".
- In the menu that opens, move the cursor to the First Drive item, press ENTER and select the hard drive on which the system is installed. If you are not sure which HDD should be selected, set the switch to a random position.
- Return to the previous menu by pressing ESC.
- Here, move to the First Boot Device line and press "ENTER". Sometimes, to see it, you need to move to the Boot Devices Priority submenu.
- Select from the drop-down menu Hard Drive. Sometimes the full name of the hard drive will be displayed instead of this message.
- Press F10 to save your changes, then press ESC to exit the setup utility and restart your computer.
If after these manipulations the PC does not boot, return to step 5 and select another drive.
External hard drive
How can I connect a second hard drive to my computer if the SATA and IDE ports on the motherboard are busy? In this case the best option will use an external drive. Typically, such devices are connected to a USB port. Less often - to FireWire. In the first case, the drive can be installed on any PC, in the second - only on one equipped with a special port. The main advantage of an external HDD is portability. It can be easily connected and disconnected without turning off or disassembling the computer. However, such devices usually work slower than those installed in a PC case.
Operating system settings
What system settings should be made after the second hard drive is connected to the computer on WIndows 7? SATA or IDE - drives that are often not detected by the system in file manager after installation.

To display the new HDD in Explorer, follow these steps:
- In the Start menu search bar, type "Manage."
- Click on the item with the text “Computer Management”.
- On the left side of the snap-in window, select Disk Management.
- Click right click on the drive that is not displayed in Explorer. You can find out which HDD you should work with by comparing the indicated volume with the real one and examining the partition labels.
- In the expanded list of actions, click on “Create a simple volume”, then specify file system and cluster size, then click OK.
- After completing the operation, right-click on the HDD again, and select “Change drive letter” from the menu.
- In the window that opens, click on the “Add” button and specify the desired letter.
The time has come when one hard drive in a computer is no longer enough. More and more users decide to connect a second HDD to their PC, but not everyone knows how to do it correctly themselves to avoid mistakes. In fact, the procedure for adding a second disk is simple and does not require special skills. It is not even necessary to mount a hard drive - it can be connected as an external device if there is a free USB port.
Connecting a second HDD to a PC or laptop
Options for connecting a second hard drive are as simple as possible:
- Connecting the HDD to the computer system unit. Suitable for owners of regular desktop PCs who do not want to have external connected devices.
- Connecting a hard drive as an external drive. The easiest way to connect an HDD, and the only one possible for a laptop owner.
Option 1. Installation in the system unit
HDD type determination
Before connecting, you need to determine the type of interface the hard drive works with - SATA or IDE. Almost all modern computers are equipped with a SATA interface, so it is best if the hard drive is of the same type. The IDE bus is considered obsolete and may simply not be present on the motherboard. Therefore, connecting such a drive may cause some difficulties.
The easiest way to recognize the standard is by contacts. This is what they look like on SATA drives:

And this is how the IDE does it:

Connecting a second SATA drive in the system unit
The process of connecting a disk is very easy and takes place in several stages:

Boot priority for SATA drives
The motherboard usually has 4 connectors for connecting SATA drives. They are designated as SATA0 - the first, SATA1 - the second, etc. The priority of the hard drive is directly related to the numbering of the connector. If you need to manually set the priority, you will need to go into the BIOS. Depending on the BIOS type, the interface and controls will be different.
In older versions, go to Advanced section BIOS Features and work with the First Boot Device and Second Boot Device parameters. In new BIOS versions, look for the Boot or Boot Sequence section and the 1st/2nd Boot Priority parameter.
Connecting a second IDE drive
In rare cases, there is a need to install a disk with an outdated IDE interface. In this case, the connection process will be slightly different.

Connecting a second IDE drive to the first SATA drive
When you need to connect an IDE drive to an already working SATA HDD, use a special IDE-SATA adapter.

The connection diagram is as follows:
- The jumper on the adapter is set to Master mode.
- The IDE plug connects to the hard drive itself.
- The red SATA cable is connected with one side to the adapter, and the other to the motherboard.
- The power cable is connected on one side to the adapter, and the other to the power supply.
You may need to purchase a 4-pin to SATA adapter.
Initializing the disk in the OS
In both cases, after connecting, the system may not see the connected disk. This does not mean that you did something wrong; on the contrary, it is normal when the new HDD is not visible in the system. The hard drive must be initialized before it can be used. Read about how this is done in our other article.
Read more: Why the computer does not see the hard drive
Option 2. Connecting an external hard drive
Often users choose to connect an external HDD. This is much simpler and more convenient if some files stored on the disk are sometimes needed outside the home. And in the situation with laptops, this method will be especially relevant, since there is no separate slot for a second HDD.
An external hard drive is connected via USB in exactly the same way as another device with the same interface (flash drive, mouse, keyboard).

A hard drive designed for installation in the system unit can also be connected via USB. To do this, you need to use either an adapter/adapter or a special external case for the hard drive. The essence of the operation of such devices is similar - the required voltage is supplied to the HDD through the adapter, and the connection to the PC is made via USB. Hard drives of different form factors have their own cables, so when purchasing you should always pay attention to the standard that specifies the overall dimensions of your HDD.


If you decide to connect the drive using the second method, then literally follow 2 rules: do not neglect to safely remove the device and do not disconnect the drive while working with the PC to avoid errors.
We talked about ways to connect a second hard drive to a computer or laptop. As you can see, there is nothing complicated in this procedure and it is absolutely not necessary to use the services of computer specialists.
We are glad that we were able to help you solve the problem.
Poll: did this article help you?
Not reallylumpics.ru
How to connect a second hard drive
Even large disk space with long work on the computer may end. You can delete files and programs to free up some space, but this is a temporary solution. You can replace the hard drive, then you will have to reinstall the OS and configure the computer. It's easier to connect a second drive, which will significantly increase disk space for photos, games and movies.
Buy a hard drive of sufficient capacity and a SATA data cable to connect it from a computer hardware store. The disk capacity depends on the user's desire, but it is better not to save money and purchase a disk of at least a terabyte, so that you do not have to think about increasing the memory again soon. The hard drive of a modern computer is most often connected using a SATA interface. The IDE format was used on computers until 2000. To be sure that the drive and motherboard are compatible, consult your dealer or read the instructions for your computer.

Completely turn off the computer and everything additional devices from the power source. Place the system unit on its side and remove it sidebar. Consider the motherboard. On modern boards There may be several SATA controllers, up to 6 pieces. The IDE connector may be missing or used to connect a CD/DVD drive. In search the necessary controllers A computer board diagram will help you.

Install the new hard drive in special basket at a sufficient distance from the other so that they do not touch and do not overheat. If the case has three “slots” for the hard drive, then place them in 1 and 3, and 2 between them for ventilation. Secure the drive with four screws. Connect one end of the SATA cable (it doesn't matter which) to hard drive, and the second - to the found SATA controller on the motherboard. The second hard drive is connected.

If the power supply does not have a SATA connector, then you need to buy an IDE-SATA adapter. Connect new hard drive to the power supply: among several wires of the power supply, find the SATA wire. It is impossible to confuse it, since only it will fit the hard drive, or install an IDE-SATA adapter. Connect it to the connector of the new device. The second hard drive is now fully installed.

If the RAM bar prevents you from installing a second hard drive in a special basket and you removed it, then put it in place. Secure the side wall of the system unit with the mounting screws. Turn on the computer and that's it peripherals.

Wait full load operating system. It will automatically detect the new device external memory and will offer to format the disk in NTFS format. If this does not happen, open the “Computer” folder in Explorer, right-click on the new disk and select “Format” from the menu. If new local disk does not appear, then find it using the “Control Panel” section of the “Main Menu”, which opens with the “Start” button.

Elevated temperatures can cause rapid wear on the surface of the hard drive. If it is not possible to separate the hard drives with space, then there is one way out - install a second fan to cool the drives. If all SATA controllers on the board are busy, then buy PCI controller with SATA connectors for connecting a second drive.
SovetClub.ru
Connecting the main and additional hard drive
 Modern hard drives are distinguished by their capacity, sufficient to meet the needs of almost any user. However system requirements programs and games grow along with disk volumes, so sometimes there is a problem of lack of space. If you can't delete anything, you can connect a second hard drive.
Connecting equipment
First, let's figure out how to connect a hard drive to a computer.
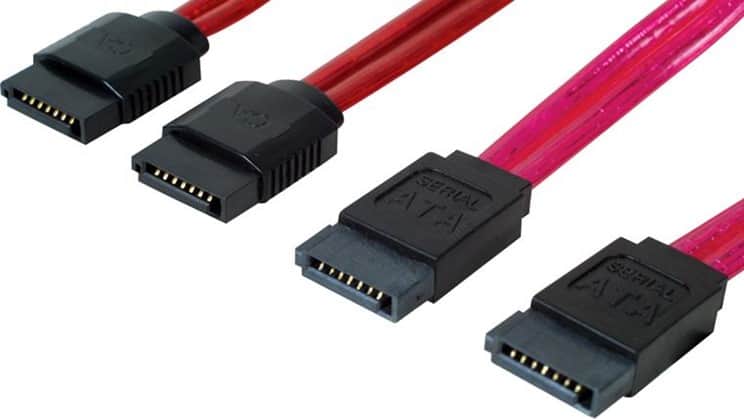
Modern hard drives for computers have a 3.5-inch format. They are connected using the SATA interface, which replaced the outdated IDE connector.
Look at your hard drive - it should have two connectors. One is short, designed to transfer data from the motherboard. The second one is long, it is needed to connect to the power supply and obtain energy for the hard drive to work.
SATA plugs can look different: straight, snap-on, L-shaped, etc. However, this does not matter - no matter how hard you try, you will not be able to connect the hard drive incorrectly.
Install one end of the SATA cable into the appropriate connector on the hard drive. Then connect the hard drive to the power supply. If the power supply is old, you may have to use a special Molex to SATA adapter to connect the devices, which can be purchased at any computer store.
The connected hard drive looks like this:
The second end of the SATA cable is installed into the corresponding port on the motherboard. These ports are usually painted blue or red, so you can easily spot them. Naturally, in this case, it is necessary to follow the main rule for connecting any equipment - “red to red, blue to blue, etc.”
If there are no SATA connectors or they are all occupied, you can purchase a special PCI controller. If you know how to connect network card, then you won’t have any problems installing this controller; the main thing is that there is a free slot on the motherboard.
Don't forget to secure the hard drive with screws!
After turning on the computer, the new disk should appear in the system. If this does not happen, perform the initialization procedure.
Right-click on “My Computer” and select “Manage.” 
Go to Disk Management.  The initialization wizard should appear on the screen. Click "OK" to launch it and complete the hard drive installation.
Second disc
Connecting a second hard drive is done in the same way. The main thing here is to maintain a distance between the hard drives so that they do not overheat.
Install the hard drive only in a special basket. Under no circumstances does it leave it hanging.
When you turn on the computer, a new disk is detected automatically. All you have to do is format it in NTFS system. If formatting does not start automatically:

After formatting is completed, you can work with the new hard drive.
Since you've decided to improve functionality your computer, try connecting USB, increasing the number of available ports. You can also connect a video card to your computer if your old one doesn't suit your visual needs.
Old hard drives
If you are the proud owner of two rare hard drives with IDE interface and want to install them on one computer, then you will have to do several additional actions so that the equipment works correctly.
- Connect the hard drive first hard drive to motherboard and power supply.
- Connect the second hard drive to the remaining connector on the cable.
Now you need to manually set the configuration of the hard drive operating modes. For this purpose, a special jumper is used.
- On the hard drive that will be the main one, it should be set to the “Master” position.
- The second hard drive is set to “Slave” mode.
The mode diagram should be indicated on the hard drive itself.
Finally, you need to check that Device BIOS were identified correctly. Go to basic system I/O and make sure that home page interface, the leading disk is marked in the “Primary IDE Master” column, and the slave disk is marked in the “Primary IDE Slave” column. Subsequent setup hard drives is done in the same way as when connecting hard drives via SATA interface.
mysettings.ru
How to properly connect a second hard drive to your computer
When you purchase a new HDD, the question arises of how to connect a second hard drive to your computer. This is not difficult to do, but before you get started, you need to make sure that your system unit is not under warranty. The fact is that in order to install a second hard drive, you need to remove the side cover of the computer. This will break the seal and therefore void the warranty. To avoid such a situation, you should contact a service center.

Connecting an additional hard drive
If the warranty has expired or is missing, feel free to remove the side wall. It is secured with two screws on the back of the PC. Be sure to turn off your computer and unplug it. An additional hard drive can only be installed when the system unit is turned off. This is not a flash drive, and the HDD may simply fail.
You need to inspect the motherboard and the place where the hard drive is already installed. Majority modern computers has SATA connections. Trace where the cable of the existing HDD is connected to the motherboard. There should be at least one more similar one next to this connector. This will depend on the type of motherboard you have. Large ones have up to 5-6 connectors, small ones can only have 2.
If you are the owner standard type motherboard, then you just need to select the socket to connect. If you have a combo (that is, a small one), then slight difficulties may arise. The fact is that the first hard drive and optical drive may already be connected to the slots. And it may turn out that there is no other place to connect extra hard There's simply no disk. These are budget motherboards, and sometimes they do not provide the ability to connect multiple hard drives. How to install two hard drives in this case? You'll just have to unplug the DVD-ROM to free up the port.
If you have an old computer with an IDE connection type and only one slot left, you have the opportunity to install two equipment on one cable. This can be either 2 HDDs or a hard drive with an optical drive. When connecting on one loop, it is advisable to follow the sequence in which the master will be connected to the connector. system disk, and for slave - additional. Master is the outermost connector on the cable, slave is in the middle. The instructions for the HDD should indicate in what position the jumpers should be set for a particular mode.
After we have figured out where to connect the second hard drive to the computer so that it recognizes it, we move on to the next point. This powers the device with electricity. Take a close look at the wires that come from the power supply. In older system units the connection type is IDE, in new ones it is SATA. Some PCs have both types at the same time. If the hard drive has a SATA port, and only IDE is left free in the power supply, do not worry. You need to purchase an adapter from one connection type to another.
We found out which connectors the second hard drive is connected to. Now it needs to be installed and secured. Find where the first hard drive is located. Depending on the size of your case, there may be one to three drive slots nearby. If there is a lot of space, it is advisable to connect two HDDs so that they are located further away from each other. Hard drives can get very hot during operation and require ventilation. The more free space around them, the better ventilation will occur.
IN small body installing a second hard drive will mean that both hard drives will get very hot. Especially in the hot season. Therefore, it is advisable to purchase a cooling system for them. When connecting a second drive, do not forget that it must be screwed to the case. Unlike solid state drives,HDDs have mechanical parts that can be easily damaged. During transportation, the hard drive may fall out of the slot, and this will damage not only it, but also, possibly, the motherboard.
Second hard drive on a laptop
Winchesters on laptop computers don't have the same large capacity, as on stationary ones. And sometimes users want to increase space, but the laptop does not have a slot for an additional hard drive. How to connect a second hard drive to a laptop in this case? This can be done by installing HDD instead optical drive.
There are special adapters for this. Without them, it will not be possible to connect another hard drive, since the connectors for DVD-ROM and HDDs are different. The first thing you need to do is figure out the thickness of your drive. On different laptops it may differ. The most common are 12.7 mm and 9.5 mm. You can find out this way:
Use a program to diagnose equipment like Everest or AIDA. View the optical drive model and find the specifications on the Internet. The exact dimensions must be indicated on the manufacturer's website. Unscrew the drive and take measurements manually.
After purchasing the adapter, you can begin installing the hard drive. Unplug your computer and turn it off. It can only be untwisted when not in use. Pull out the optical drive. In most cases, it is secured with 2-4 screws.
Take the adapter and remove the stop, which is located on the opposite edge from the connectors. Some people try to turn on the second drive by connecting it to the adapter at an acute angle. This can break the contacts. The support is removable and is needed to fix the hard drive. Then press the hard drive firmly against the contacts. Sometimes this requires effort.
After installation and fixation with the stop, tighten the bolts for more rigid connection adapter with disk. So as not to spoil appearance laptop, you need to remove the front panel from the optical drive and attach it to the hard drive adapter. Carefully insert the device into the laptop and put all the covers back. If everything was done correctly, the BIOS will display new hard disk.
Disk system settings
You learned how to install a second hard drive in a PC. But that's not enough for full-fledged work with him. Now you need to configure it so that the system recognizes it. After all, if the disk is new, it does not have marked areas and will not be displayed operating system. If you have Windows installed, this can be done by going to the "Disk Management" section. You can get to this menu by right-clicking on the “My Computer” icon and selecting “Manage”.
All connected drives and their capacity will be displayed in the lower central part. New disc will be labeled "Not distributed". You need to right-click on this area and click “Create simple volume”. The “Setup Wizard” will appear, following the instructions of which you will determine the space of the future disk, the file system and assign a letter to it. Remember that two partitions cannot be assigned the same letters. To avoid having to deal with OS freezes and process crashes, close all unnecessary programs. At the end of the procedure, the new hard drive will be displayed in the system.
We looked in detail at how to connect extra hard disk to computer. By watching the video below or above in the text, you will be able to understand and consider in more detail incomprehensible points.
Comments powered by HyperComments
HDDiq.ru
Connecting a second hard drive to a computer
Computer technology It has long ceased to be a curiosity; almost everyone has it in stock. The only difference is the nature of use: some users actively use the equipment, downloading movies, games and music onto it, while others use an electronic computer when they want to watch last news in world wide web or do part home work.

IN certain time it is necessary to replace outdated components
In this regard, the load level of the hard drive also differs. If there is very little free space left, then you should not expect normal performance from your PC at all. Given these circumstances, many owners decide to purchase a second “screw”, thereby increasing disk space. However, it is very important to first find out how to connect the hard drive to the computer.
PC connection
Finding information on the Internet on how to connect a hard drive to a computer is not difficult. It is only important to carefully read all the recommendations, and then no problems will arise if the user independently installs an additional hard drive, while leaving the old one in the same place.
An old hard drive must be removed only if it has become completely unusable and cannot be restored. By installing a second hard drive along with the old one, the user receives expanded space, thanks to which all actions will be performed faster.
Installation in a PC case
Connecting a hard drive to a computer begins with the step where the user must initially place it in the case and securely fasten it.
To ensure that the “screw” is inserted correctly, you should first remove the cover from the system unit case. In the front part you can easily find special compartments designed for drives and hard drives. The drives are located at the top, and the second hard drive should be located at the bottom of such bays.

The hard drive is inserted into any free compartment, but preferably on a short distance from what is already available. This is very important, since during operation they both heat up, which will adversely affect the performance of the PC.

Then the second hard drive is inserted strictly along the guides so that the connectors are directed towards the inside of the system unit to ensure its comfortable connection in the future. When the new hard drive took over correct position, it should be securely fastened by tightening the screws on both sides, ensuring a tight connection with the compartment.

After fastening, you should check the strength by trying to loosen it. If the hard drive does not wobble, it means that all actions were performed correctly.
Connection using cables
Once you have successfully connected the second hard drive to your computer, you can move on to the second part of these important steps. At this stage, you should connect the second hard drive directly to the motherboard, and also ensure that power is supplied to it.
To do this, you will need to purchase additional cables. By the way, it is advisable to note that the connectors through which the hard drive is directly connected may differ, depending on the year of manufacture of the PC.

Old computer equipped with IDE connectors, while the new one already has SATA connectors, which are characterized by amazing performance. Previously, users were instructed to pay attention to connectors when making a purchase and to purchase only a hard drive with the right kind. Currently, finding a hard drive with an IDE connector on sale is problematic, but this does not mean that there is no hope of installing a second drive. Just in in this case The user is required to additionally purchase special adapters.

Connecting the second hard drive using SATA connectors and adapters, the owner of a smart machine not only ensures the speed of the system, but also facilitates the installation process.
Installed a few years ago old hard drive with an IDE connector, it was necessary to manually configure the operating mode of the “screws”, which involved installing jumpers in certain positions.

Connecting using SATA connectors is much easier. All connectors on new technology are equipped with special partitions, so it is a priori impossible to connect the second hard drive incorrectly.

USB connection
There is another one alternative way, providing absolutely easy connection of new disk space, while completely eliminating the need to disassemble the system unit case.
In this regard, many people want to know how to connect an additional hard drive to a computer without experiencing any additional difficulties. The answer is obvious, the second hard “screw” can be connected to an electronic computer at USB help-devices.

Such hard drives receive power via the USB connector to which it is directly connected. However, this is typical only for disks measuring 1.8 or 2.5 inches. More powerful ones, for example, starting from 3.5 inches, already need additional source power supply
External devices are very easy to connect, so they are preferred big amount users.
Detecting devices in BIOS
Having provided correct connection hard drive, you should make sure that it is displayed correctly in the BIOS, otherwise you can’t dream of quality work it would just be stupid.
To produce correct settings in the BIOS, you should also understand how to connect the old hard drive to the computer, how to connect the new hard drive, how to ensure correct operation these two disks.
The user understands that the operating system is installed on one of the disk spaces; in most cases, the old hard drive is the place where the operating system was once loaded.
In this regard, in BIOS settings The user must set boot priority from the old hard drive. Setting the priority incorrectly will prevent the system from booting. In the BIOS, determining the priority is quite simple, since SATA with an assigned number will be written next to the existing hard drives. It is the number that indicates priority. The hard drive with the operating system must be set to SATA 1.

If any hard drive does not appear in the BIOS, you should double-check that it is connected correctly, otherwise use the installed one. disk space will be impossible.
So, installing an additional hard drive is a predictable act, accompanied by actions that can easily be performed by any user if he makes an effort and shows increased attention.
Sooner or later, any user is faced with the fact that his data no longer fits on his existing hard drive. A second hard drive can be a solution to this problem. In this article we will tell you how to install a second hard drive on your computer.
Step #1: Prepare your computer for installing a second hard drive.
First, you need to prepare your computer. First, you need to turn off the power and disconnect all cables from it. Simple shutdown Using the button on the power supply is not enough; the computer must be completely disconnected from the power supply.
Secondly, you need to open access to the internals of the system unit. To do this, you need to remove both side covers. Typically, the side covers are fixed to the back of the system unit with four screws. Remove these screws and carefully remove both side covers.
Step No. 2. Installing the second hard drive and securing it.
Once the computer is completely unplugged and the side covers are removed, you can begin installing the second hard drive. Hard drives are installed in a special compartment of the system unit. Identifying this compartment is quite simple. It's at the bottom right side system unit, and its width is exactly suitable for 3.5 inch hard drives.
In inexpensive computer cases, this compartment is usually turned with the hole towards the motherboard (as in the photo below). In more expensive models computer cases The hard drive bay faces the side cover.

During installing hard disk, it is better to keep the system unit in vertical position. Insert the hard drive into the hard drive bay (as shown in the photo below). In some cases, in order for the hard drive to fit into the bay without problems, you will need to remove the video card or RAM. You can read about how this is done in our articles: and. If your system unit has a lot of space for hard drives, then try to install the second hard drive away from the first. This way they will cool better.

Once the second hard drive is installed in the hard drive bay, it must be secured using four screws, two on each side of the hard drive (see photo below). You should not save screws and fix the hard drive with only two or three. In this case, it will vibrate and create a lot of noise.

Step No. 3. Connecting a second hard drive to the computer.
Once the second hard drive is installed in the computer and securely secured, you can begin to install it. Hard drives are connected using two cables: one cable goes to the motherboard (data is transferred through this cable), and the other to the power supply (it is used for power supply).
For connecting hard A cable is used to connect the drive to the motherboard (see photo below). This cable usually comes with the motherboard. If you do not have such a cable, you can purchase it separately.
To connect the hard drive to power, use a cable with a similar connector. (photo below).

If there are difficulties connecting the second hard drive to the computer, then look at how the first hard drive was connected and proceed in the same way.
Step No. 4. Assembling the system unit.
After the hard drive has been installed, securely fixed and connected, the system unit can be closed. Replace the side covers and secure them with screws. After installing the side covers, the computer can be connected to power and started. If everything was done correctly, then after the computer starts, a second hard drive will appear in the system.


