Connecting two hard drives. Connecting a hard drive via the IDE interface. Basic steps for installing a hard drive
Connecting second hard disk to computer.Connect the second hard drive to the computer.The time has come when one hard drive in a computer is no longer enough. More and more users decide to connect second HDD to your PC, but not everyone knows how to do it correctly themselves in order to avoid mistakes. In fact, the procedure for adding a second disk is simple and does not require special skills. It is not even necessary to mount the hard drive - it can be connected as external device, if there is a free USB port.
Connecting a second HDD to a PC or laptop
Connection options second hard disk are as simple as possible:
- Connecting the HDD to the computer system unit.
Suitable for owners of regular desktop PCs who do not want to have external connected devices.
- Connecting hard drive as an external drive.
The easiest way HDD connections, and the only one possible for a laptop owner.
Option 1. Installation in the system unit
HDD type determination
Before connecting, you need to determine the type of interface the hard drive works with - SATA or IDE. Almost everything modern computers are equipped with a SATA interface, respectively, it is best if HDD will be of the same type. The IDE bus is considered obsolete and may simply not be available on motherboard. Therefore, connecting such a drive may cause some difficulties.
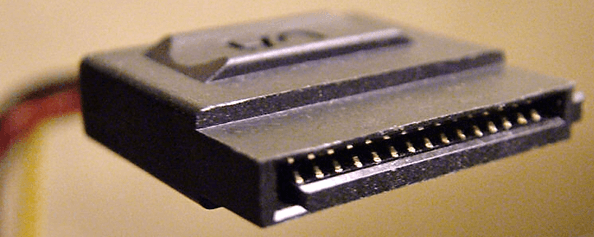
The easiest way to recognize the standard is by contacts. This is what they look like on SATA drives:
And this is how the IDE does it:
Connecting a second SATA drive in the system unit
The process of connecting a disk is very easy and takes place in several stages:
Boot priority for SATA drives
The motherboard usually has 4 connectors for connecting SATA drives. They are designated as SATA0 - the first, SATA1 - the second, etc. The priority of the hard drive is directly related to the numbering of the connector. If you need to manually set the priority, you will need to go into the BIOS. Depending on the BIOS type, the interface and controls will be different.
In older versions, go to the section Advanced BIOS Features and work with the parameters First Boot Device And Second Boot Device. In new BIOS versions look for the section Boot or Boot Sequence and parameter 1st/2nd Boot Priority.
Connecting a second IDE drive
In rare cases, there is a need to install a disk with an outdated IDE interface. In this case, the connection process will be slightly different.
Connecting a second IDE drive to the first SATA drive
When you need to connect an IDE drive to an already working SATA HDD, use a special IDE-SATA adapter.
The connection diagram is as follows:
- The jumper on the adapter is set to Master mode.
- The IDE plug connects to the hard drive itself.
- The red SATA cable is connected on one side to the adapter, and the other to the motherboard.
- The power cable is connected on one side to the adapter, and on the other to the power supply.
You may need to purchase a 4-pin to SATA adapter.
Initializing the disk in the OS
In both cases, after connecting, the system may not see the connected disk. This does not mean that you did something wrong, on the contrary, it is normal when new HDD not visible in the system. The hard drive must be initialized before it can be used. Read about how this is done in our other article.
Option 2. Connecting an external hard drive
Often users choose to connect external HDD. This is much simpler and more convenient if some files stored on the disk are sometimes needed outside the home. And in the situation with laptops, this method will be especially relevant, since there is a separate slot for second HDD not provided there.
An external hard drive is connected via USB in exactly the same way as another device with the same interface (flash drive, mouse, keyboard).
Hard drive designed to be installed in system unit, can also be connected via USB. To do this, you need to use either an adapter/adapter or a special external case for the hard drive. The essence of the operation of such devices is similar - the required voltage is supplied to the HDD through the adapter, and the connection to the PC is made via USB. Hard drives of different form factors have their own cables, so when purchasing you should always pay attention to the standard that sets dimensions your HDD.
If you decide to connect the drive using the second method, then literally follow 2 rules: do not neglect safe removal devices and do not disconnect the disk while working with the PC to avoid errors.
We talked about ways to connect a second hard drive to a computer or laptop. As you can see, there is nothing complicated in this procedure and it is absolutely not necessary to use the services of computer specialists.


The time has come when one hard drive in a computer is no longer enough. More and more users decide to connect a second HDD to their PC, but not everyone knows how to do it correctly themselves to avoid mistakes. In fact, the procedure for adding a second disk is simple and does not require special skills. It is not even necessary to mount a hard drive - it can be connected as an external device if there is a free USB port.
Connecting a second HDD to a PC or laptop
Options for connecting a second hard drive are as simple as possible:
- Connecting the HDD to the computer system unit.
Suitable for owners of regular desktop PCs who do not want to have external connected devices.
- Connecting a hard drive as an external drive.
The easiest way to connect a HDD, and the only one possible for a laptop owner.
Option 1. Installation in the system unit
HDD type determination
Before connecting, you need to determine the type of interface the hard drive works with - SATA or IDE. Almost all modern computers are equipped with a SATA interface, so it is best if the hard drive is of the same type. The IDE bus is considered obsolete and may simply not be on the motherboard. Therefore, connecting such a drive may cause some difficulties.
The easiest way to recognize the standard is by contacts. This is what they look like on SATA drives:
And this is how the IDE does it:
Connecting a second SATA drive in the system unit
The process of connecting a disk is very easy and takes place in several stages:
Boot priority for SATA drives
The motherboard usually has 4 connectors for connecting SATA drives. They are designated as SATA0 - the first, SATA1 - the second, etc. The priority of the hard drive is directly related to the numbering of the connector. If you need to manually set the priority, you will need to go into the BIOS. Depending on the BIOS type, the interface and controls will be different.
In older versions, go to the section Advanced BIOS Features and work with the parameters First Boot Device And Second Boot Device. In new BIOS versions, look for the section Boot or Boot Sequence and parameter 1st/2nd Boot Priority.
Connecting a second IDE drive
In rare cases, there is a need to install a disk with an outdated IDE interface. In this case, the connection process will be slightly different.
Connecting a second IDE drive to the first SATA drive
When you need to connect an IDE drive to an already working SATA HDD, use a special IDE-SATA adapter.
The connection diagram is as follows:
- The jumper on the adapter is set to Master mode.
- The IDE plug connects to the hard drive itself.
- The red SATA cable is connected on one side to the adapter, and the other to the motherboard.
- The power cable is connected on one side to the adapter, and on the other to the power supply.
You may need to purchase a 4-pin to SATA adapter.
Initializing the disk in the OS
In both cases, after connecting, the system may not see the connected disk. This does not mean that you did something wrong; on the contrary, it is normal when the new HDD is not visible in the system. The hard drive must be initialized before it can be used. Read about how this is done in our other article.
Option 2. Connecting an external hard drive
Often users choose to connect an external HDD. This is much simpler and more convenient if some files stored on the disk are sometimes needed outside the home. And in the situation with laptops, this method will be especially relevant, since there is no separate slot for a second HDD.
An external hard drive is connected via USB in exactly the same way as another device with the same interface (flash drive, mouse, keyboard).
A hard drive designed for installation in the system unit can also be connected via USB. To do this, you need to use either an adapter/adapter or a special external case for the hard drive. The essence of the operation of such devices is similar - the required voltage is supplied to the HDD through the adapter, and the connection to the PC is made via USB. Hard drives of different form factors have their own cables, so when purchasing you should always pay attention to the standard that specifies the overall dimensions of your HDD.
If you decide to connect the drive using the second method, then literally follow 2 rules: do not neglect to safely remove the device and do not disconnect the drive while working with the PC to avoid errors.
We talked about ways to connect a second hard drive to a computer or laptop. As you can see, there is nothing complicated in this procedure and it is absolutely not necessary to use the services of computer specialists.
Modern technologies are developing more and more every year. The time has long come when one hard drive in a computer is not enough. Great amount people connects the second HDD to personal computer. The connection procedure is nothing fancy and even a beginner can figure it out. Let's look at everything more carefully and in detail.
Connecting a second HDD to a laptop or Personal Computer
There are two options for adding an additional hard drive:
- To the PC system unit. This method Great for standard desktop computers;
- Addition, in the form external storage. This is very easy way, which is suitable for all devices.
Method 1: Adding to the system unit
The process of adding additional media to the system unit can be divided into several small stages. Let's look at each of them in more detail.
Type Definition
At the very first stage, you need to decide on the type of interface with which the hard drive interacts. It is worth noting that important fact that the predominant number of computers have SATA interface, therefore, it is advisable that the second hard drive is of a similar type. The motherboard may not have an IDE bus because it is considered very old, which may cause some problems when installing older hard drives.
The best way to determine the standard is to carefully consider the contacts.
Example of a SATA connector

Example of an IDE connector

Adding a second SATA drive to the system unit
Addition additional disk – simplest process which happens like this:

Boot priority for SATA drives
By default, there are four holes on the motherboard for adding SATA drives. It is worth understanding that their numbering starts from zero. Namely, the priority of the hard drive directly depends on the connector number. For independent task priority, you must use the BIOS. Each specific type of BIOS has its own special controls, as well as a special interface.
In the most early version you need to go to the “Advanced BIOS Features” menu and start working with items such as “First/Second Boot Device”. In modern versions, the path looks like this: “Boot/Boot Sequence – 1st/2nd Boot Priority”.
Adding an additional IDE drive
There are also cases when you need to connect old IDE disk. Step-by-step instruction The process looks like this:

Connecting the second IDE to the first SATA
If necessary this procedure, then you will need an appropriate IDE-SATA adapter. An example of an adapter can be seen below:

Step-by-step instruction:
- First you need to put the jumper in the Master position.
- The IDE plug is connected to the hard drive.
- Take a red SATA cable and connect one side to the motherboard and the other to the adapter.
- The power cable is connected to the power supply and adapter.
About possible display problems
Sometimes it happens that after additional hard drive was connected, the system cannot recognize it. Don't panic, because most likely you did everything right. Just for proper operation the second hard drive needs to be initialized.
Method 2: Connecting an external hard drive
Connecting an external HDD is convenient if the stored files are needed not only at home, but also outside of it. In addition, this method is the only correct one for laptop owners, since they simply do not have a special additional connector for a new hard drive.
In fact, everything is easy here, because the external hard drive is connected via USB, just like any other devices (mouse, keyboard, flash drive, webcam and much, much more).

Hard drives that are installed in the system unit can also be connected via a USB connector. Here you will need an external hard drive enclosure or a special adapter. The bottom line is this: the required voltage is supplied to the HDD through the adapter, and communication with the Personal Computer occurs via USB. Different hard drives have their own wires, so you should always check Special attention to the standard that specifies the dimensions.
If you learn to solve a simple problem, how to connect a hard drive to a computer, you will be able to repair the capricious device yourself or install an additional hard drive to increase internal memory. For installation work you will need a simple screwdriver and general knowledge about the simple design of the system unit.
Winchester, HDD, and hard drive – different names the same storage device. On this drive All information is stored permanently, it does not disappear after the power is turned off and can be deleted by the user. This is where you upload your music, TV series, photos and valuable documents. If you know how to connect a hard drive to a computer, then even if your PC is seriously damaged, you will be able to remove the HDD and transfer important data to other devices in just a few minutes.
How to connect a hard drive to a computer:
- Turn off the system side and disconnect all wires.
- Remove the side cover of the system unit.
- Having reached the inside of your PC, pay attention to the lower right zone, here are the compartments for mounting the HDD.
- We insert the hard drive into the free slot and screw it to the frame with screws on both sides.
- We make sure that the necessary connectors always face the inside of our block.
- The next stage of the task “How to connect a hard drive to a computer” is connecting the drive to the motherboard and power. For this purpose, there are cables in SATA or IDE format.
- The power and interface connectors on the hard drive are located next to each other, but they differ in size, and it is impossible to confuse them.
- It is advisable to connect the cables carefully until they stop; in case of an error, turn the connector over to the correct side.
- The connectors on the motherboard are located at the bottom and in most cases are marked.
- Connect the end of the power cable to the hard drive.
- Close the system unit with the lid and connect the peripheral cables.
- When you turn it on, sometimes the new HDD is not detected, then you need to find it in the “Disk Management” section, format it, and assign its name.
How to connect a second hard drive to a computer?
All blocks have several HDD slots located vertically one above the other. We mount the hard drive according to the same rules as in the previous instructions. IN standard version Several cables extend from the power supply, so the problem of how to connect two hard drives at the same time is easily solved. Otherwise, you will have to purchase an inexpensive splitter.

Computer disks measuring 3.5″ and 25 mm high will not fit inside a laptop; they are used for this purpose HDD size 2.5″ and 9.5mm high. To replace or install a new drive, you need to turn the laptop over, disconnect the battery and remove the cover, freeing access to the hard drive. Next, unscrew the mounting screws and can remove old disk or proceed directly to connecting a new drive.
How to connect extra hard disk to laptop:
- We place the chassis with the hard drive in the niche, connect it, pressing it all the way.
- We secure the hard drive to the bottom of the laptop with special screws.
- Install the battery.

How to connect a second hard drive to a laptop?
Many users have a desire to increase the memory of their device, but the size of a thin laptop does not allow this. in a convenient way, just like on a personal computer. There are several ways to implement this idea; you need to understand the components and choose correct option. Don’t be afraid to make a mistake about which SATA to connect the second hard drive to; in most versions, the devices are equipped with only one connector for the drive and a connector for the DVD drive.
Options for connecting a second hard drive to a laptop:
- In rare models there is a slot for a second hard drive.
- We use SATA-USB adapters, SATA-IDE, IDE-USB. We supply power to the device with an additional cord.
- The use of factory containers for HDDs, which allow connecting the drive via a USB port. When buying this adapter pocket, you need to know the size of your disk; there are versions for 2.5 inches and 3.5 inches.
- Purchasing a ready-made laptop computer.
- Remove the DVD drive and install a second hard drive in its place.
How to connect an external hard drive to a laptop?
This method of memory expansion has significant benefits, you do not need to disassemble the device and use special adapters, so even beginners can quickly solve the problem of how to connect a hard drive to a laptop. We buy external drive and let's get to work. Please note that some models are powered from the mains and require a separate power supply.
How to connect a hard drive to a mobile computer:
- Connect power to the external drive.
- Connect the USB cable to the hard drive.
- Second end USB cord connect to a free port.
- When the indicator lights up, the HDD is ready for operation.
- The disk is displayed on the laptop monitor.
The way devices interact changes over time, new formats are constantly emerging, which leads to problems of how to connect a new HDD to a personal computer or laptop. Port sizes and connecting cables from an old device often do not fit a new hard drive. There are three main types of interfaces that are actively used on mobile or desktop PCs, understand them to the modern user it won't be difficult.

IN SATA computers Reliable 7-pin connectors for the data bus and 15-pin connectors for power connections are used. They are reliable and are not afraid of multiple connections. The question is how much hard drives can be connected to a computer, it all depends on the number of ports on the motherboard. Interface cables to the disk and motherboard are connected in the same way. There are several SATA versions with different bandwidths:
- SATA I – 1.5 Gbit/s;
- SATA II – 3 Gbit/s;
- SATA III – 6 Gbit/s;

IDE interfaces have been in use since the 80s, throughput by today's standards, they are small - up to 133 MB/s. Now they have been replaced everywhere by new versions of high-speed SATA ports. IDE devices found mainly on budget motherboards and PCs in the low-cost segment. Due to the fact that users still have plenty of old-style drives, they have to solve the problem of their compatibility. The best option- produce IDE connection hard drive to a new generation cable without installation additional drivers– use a modern SATA-IDE adapter.

It is easiest to work with a special external USB disk, which does not require additional devices. If you connect a standard HDD from a PC or laptop, you need an adapter. It looks like a box made of metal or plastic case, when assembled, this device differs little from the standard one external hard drive. A 3.5-inch drive is often connected without a box, using a direct adapter cable. If one hard drive is not enough, then the problem of how to connect the HDD to the computer can be solved using a docking station for several disks.

They are the main store of information. In most cases, user data is stored there. And every day the volume of this data increases. Therefore, it is not surprising that sooner or later all users are faced with the fact that free place ends. There is only one way out of this situation; you need to buy and connect a second hard drive to the computer. In this article we will try to help solve this problem.
Step #1: Disconnect power from the computer.
Before doing anything to the computer, it must be completely de-energized. Disconnect all cables from the system unit. Easy shutdown The button on the power supply is not enough, all cables must be disconnected.
Step No. 2. Remove the side covers of the system unit.

One of the bays will already have one hard drive installed. This is your first hard drive, it contains your operating system and all data. The second one needs to be placed nearby. If the bay is designed for more than two drives, then it is advisable to place the second drive not adjacent to the first. This will significantly improve its cooling.

Carefully insert the hard drive into one of the installation locations. Please note that the drive should rest on small ledges and be secured with four screws. If there is not enough space inside the system unit, you may have to remove the video card or other components before installation. But, as a rule, this is not required.

After you have installed the hard drive in your computer, you need to secure it with four screws. Two screws are tightened on one side and two on the other. You should not skimp on screws, as this can cause unnecessary vibration and noise when the computer is operating.
Step #4: Connect the second drive to the motherboard and power supply.
Once the second drive is installed and securely fixed inside the computer, you can begin connecting it. Two cables are used, one goes to the motherboard, and the second to the power supply.
To connect to the motherboard, use this one (picture below). It is usually red in color, making it difficult to confuse. One cable connector needs to be plugged into the hard drive, and the other into the connector on the motherboard.

To connect to the power supply, a similar cable with a wider connector is used (picture below).
If your power supply is not equipped with a cable with such a connector, then you will need an adapter (picture below) from the old connector to the new one.

Step No. 5. Close the system unit.
After you have connected the second hard drive to the computer, you can close the system unit. Install the side covers and secure them with screws. Once the covers are installed, you can turn on the computer. If you did everything correctly, then after the computer boots, a new drive will appear in the system.


