When and why to replace an outdated HDD with a new SSD. Replacing the HDD in a laptop with an SSD - instructions. Comparison of HDD and SSD
Replacing a conventional hard drive with an SSD can significantly improve operating comfort and provide reliable data storage. This is why many users try to replace the HDD with a solid-state drive. However, after replacing the drive, you need to somehow transfer your operating system along with installed programs.
On the one hand, you can install everything again and then there will be no problems with moving to a new disk. But what to do if the old one has about a dozen programs, and the OS itself is already configured for comfortable work? It is this question that we will answer in our article.
So, you purchased a brand new SSD and now you need to somehow transfer the OS itself with all the settings and installed programs. Fortunately, we don't have to invent anything. Software developers (as well as the developers of the Windows operating system) have already taken care of everything.
Thus, we have two options: either use a third-party utility or standard Windows tools.
Before moving on to the instructions, we would like to draw your attention to the fact that the disk to which you will transfer your operating system must be no smaller than the one on which it is installed.
Method 1: Transfer OS to SSD using AOMEI Partition Assistant Standard Edition
First, let's take a closer look at the method of transferring an operating system using a third-party utility. Currently, there are many different utilities that allow you to easily transfer an OS. For example, we took the AOMEI Partition Assistant application. This tool is free and has a Russian interface.

- Among the large number of functions, the application contains a very convenient and simple wizard for transferring the operating system to another disk, which we will use in our example. The wizard we need is located on the left panel in the “ Masters", to call it, click on the command " Transfer OS SSD or HDD».
- A window with a small description appeared in front of us, after reading the information, click on the button “ Further" and move on to the next step.
- Here the wizard prompts you to select the disk where the OS will be transferred. Please note that the drive must not be partitioned, that is, it must not contain partitions or a file system, otherwise you will get an empty list at this step.
So, once you have selected the target disk, click the “ Further" and move on.
- The next step will be marking the drive to which the operating system is transferred. Here you can change the partition size if necessary, but do not forget that the partition must be no smaller than the one on which the OS is installed. Also, if necessary, you can specify a letter for the new partition.
Once all the parameters have been set, proceed to the next step by clicking the " Further».
- Here the wizard prompts us to complete the setup of the AOMEI Partition Assistant application to migrate the system to an SSD. But before that, you can read a small warning. It says that after a reboot, in some cases the OS may not boot. And if you encounter a similar problem, then you need to disconnect the old disk or connect a new one in place of the old one, and the old one in place of the new one. To confirm all actions, press the button “ End» and complete the wizard’s work.
- Next, in order for the migration process to begin, you must click the “ Apply».
- Party Assistant will display a window with a list of pending operations, where we just have to click the “ Go».
- This will be followed by another warning, where by clicking on the “ Yes", we confirm all our actions. After this, the computer will restart and the process of transferring the operating system to the solid-state drive will begin. The duration of this process will depend on a number of factors, including the amount of data being transferred, the speed of the HDD and the power of the computer.


After the migration, the computer will reboot again and now all that remains is to format the HDD to remove the OS and the old bootloader.
Method 2: Transfer OS to SSD using standard Windows tools
Another way to migrate to a new disk is to use standard operating system tools. However, you can use it if Windows 7 and higher are installed on your computer. Otherwise, you will have to use third-party utilities.
Let's take a closer look at this method using Windows 7 as an example.
In principle, the process of transferring an OS using standard means is not complicated and takes place in three stages:
- creating a system image;
- creating a boot drive;
- unpacking the image to a new disk.
- So let's get started. In order to create an OS image, you need to use the Windows tool " " To do this, go to the menu “ Start" and open the "Control Panel".
- Next, you need to click on the link “ Backing up computer data" and you can proceed to creating a Windows backup. In the window " Archiving or restoring files“There are two commands we need, now we will use the creation of a system image, for this we click on the corresponding link.
- Here we need to select the drive on which the OS image will be written. This can be either a disk partition or a DVD. However, it is worth remembering that Windows 7, even without installed programs, takes up quite a lot of space. Therefore, if you decide to burn a copy of the system to DVD, you may need more than one disc.
- Having selected the location where you want to save the image, click “ Further" and move on to the next step.
Now the wizard prompts us to select the sections that need to be included in the archiving. Since we are only transferring the OS, we don’t need to select anything; the system has already included all the necessary disks for us. Therefore, click " Further" and move on to the final step.
- Now you need to confirm the selected archiving options. To do this, click " Archive
- After a copy of the OS has been created, Windows will prompt you to create a bootable drive.
- You can also create a drive using the command “ Create a system repair disk" in the window " Archive or restore».
- At the first step, the bootable disk creation wizard will prompt you to select a drive in which a blank drive should already be installed for recording.
- If there is a data disk in the drive, the system will offer to clear it. If you use DVD-RW for recording, then you can clean it, otherwise you need to insert a clean one.
- To do this, go to “ My computer"and right-click on the drive. Now select the item “ Erase this disk».
- Now let’s return to creating a recovery drive, select the desired drive, click on the “ Create disk" and wait for the process to complete. Upon completion, we will see a window like this:
- Reboot the computer and go to the boot device selection menu.
- Next, the OS recovery environment will be loaded. At the first stage, for convenience, select the Russian language and press the button “ Next».
- Since we are restoring the OS from a pre-prepared image, we move the switch to the second position and click “ Further».
- At this stage, the system itself will offer us a suitable image for recovery, so, without changing anything, click “ Further».
- You can now set additional parameters if necessary. To go to the last action, press the button “ Further».
- At the last stage, we will be shown brief information about the image. Now you can proceed directly to unpacking to disk, to do this, press the button “ Further" and wait for the process to complete.


Attention! If your work machine does not have writeable drives, you will not be able to burn the optical recovery drive.


this indicates that the disk was successfully created.
So, let's summarize. At this point, we already have an image with the operating system and a bootable recovery drive, which means we can move on to the third and final stage.
This can usually be done by pressing the F11 key, but there may be other options. Typically, function keys are listed on the BIOS (or UEFI) start screen, which is displayed when you turn on the computer.


After this, a search for installed systems will be performed.


At the end of the process, the system will automatically reboot and at this point the process of transferring Windows to the SSD can be considered complete.
Today we looked at two ways to switch from HDD to SSD, each of which is good in its own way. Having familiarized yourself with both, you can now choose the one that is more suitable for you in order to quickly and without data loss transfer the OS to a new disk.
Unable to bear the constant lags of my laptop any longer, I finally decided to replace the hard drive in it with a brand new high-speed SSD. Hard drive “fatigue” is one of the main reasons for the decline in laptop performance, which I have already written about in more detail.
For 3,000 rubles, I bought the cheapest 60GB SSD available at Citylink (2,300 rubles) and an adapter for connecting a 2.5″ HDD instead of a DVD drive (700 rubles).
 Despite the cheapness, the manufacturer provides a 3-year warranty on the drive.
It's easy to get to the laptop's original hard drive. Typically, access to it and the RAM dies is closed with a separate, easily removable cover, so you don’t have to completely disassemble the laptop to replace it. In my case this was the case.
 Here it is, the original HDD, installed on a special slide. Let's get him.
 We unscrew the hard drive from the slide and screw the new SSD onto the slide.
 Installing an SSD in a laptop.
 Actually, that's all. The SSD is installed and ready to go.
Installing a native laptop HDD instead of a DVD drive
Installing an SSD is half the battle. You need to connect your own hard drive to use it as file storage, because 60GB of solid-state drive capacity is just enough to install the operating system, a basic set of software and have 10-20GB of free space for updates.
To install an HDD in a laptop, you need to remove the DVD drive and connect a hard drive in its place using a special adapter. Getting to the DVD drive is already much more difficult; manufacturers usually do not provide the possibility of quick replacement, and therefore you will have to open the laptop case.
But first we attach the disk to the adapter, and..
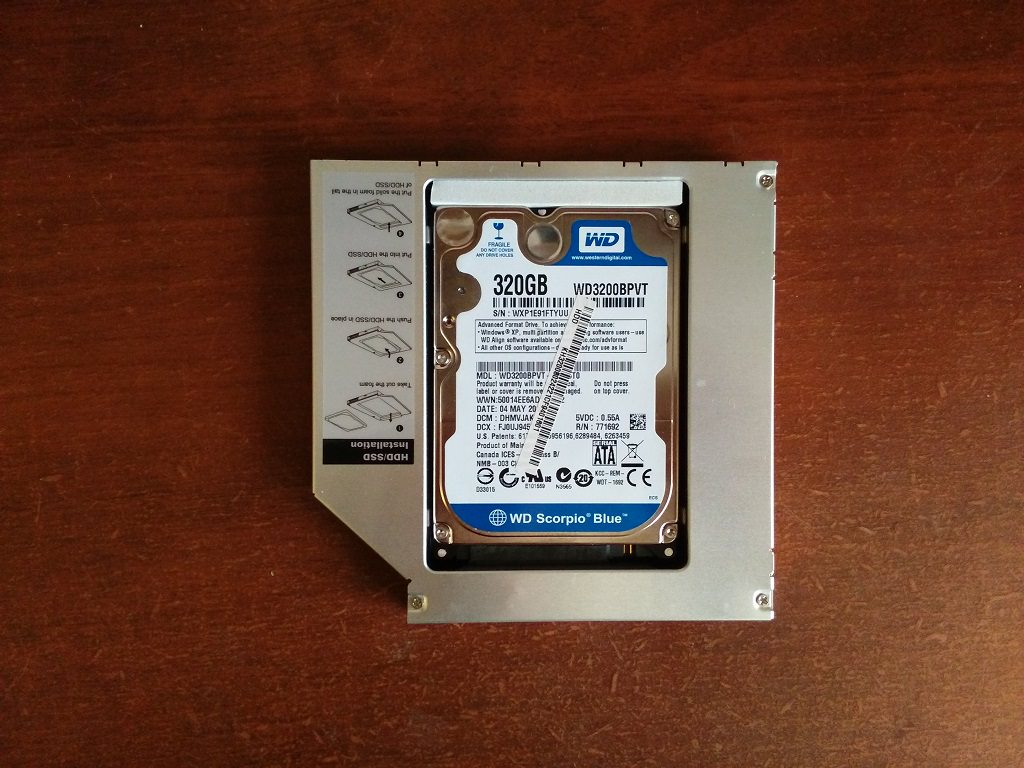 Bummer. It turned out that I bought an IDE-SATA adapter, and in my case I need a SATA-SATA adapter. Those. The hard drive is inserted into the adapter, but the adapter itself cannot be connected instead of a DVD drive, the connectors do not match. In the next few days I will try to return the unsuitable adapter back to Citylink and buy the correct one instead, after which I will write a continuation.
UPD: I submitted the adapter to Citylink, but decided to refrain from purchasing the correct one and installing the HDD for now. Perhaps in the future I will return to this idea.
conclusions
I installed pirated Windows 7 on a clean SSD and immediately. There are no lags in work. With familiar tasks that were previously always accompanied by annoying slowdowns (Firefox with 15 open tabs, an open Word or PDF file, a running book reader, a video player with a movie on pause), the system now flies. Which confirms my conclusion that the hard drive is the weakest point in the laptop. Therefore, if you want to give a new life to an old slow laptop, feel free to replace the hard drive with an SSD. It's inexpensive compared to the cost of a new laptop, but the result is obvious. Naturally, after that upgrade, the laptop will not run the latest games (if it didn’t run them before), but it will be quite suitable for home and office use and will last a long time.
October 23, 2012 at 07:50 pmReinstalling an SSD in a laptop
- DIY or Do It Yourself
The optical drive has a Slimline SATA connector. You could connect it with a “Slimline 13 Pin SATA Male to 22 Pin SATA Female Cable” cable, which you would have to wait for from the cunning Chinese, but we are not looking for easy ways.
For wealthy Pinocchios, there is an elegant solution: an adapter basket for HDD 2.5"" (Espada SS12, similar to DX). With the price of an SSD at 1.5 kilorubles, buying a basket for 1 kiloruble looks unjustified; it was decided to create a collective farm of our own.
I would like to make a reservation that it is not at all necessary to disassemble the laptop down to the screw to change the disk (as I had to do), and it is even advisable to install an SSD in place of the optical drive, since the cooling there is not so great, and the energy consumption of an SSD is an order of magnitude lower than it mechanical predecessor. The above is true provided that the revision of the sata drive is no less than the revision of the sata port of the purchased SSD, otherwise all the advantages of the SSD will be eaten up by the low-speed port of the laptop.
Tools and materials:
- DVD drive for a laptop (you can use the original one, but it’s better to get a dead one from a service station nearby);
- Interface cable "sata";
- Molex-SATA power adapter;
- Soldering iron, tin-lead solder, flux;
- Tester;
- Screwdrivers
- Knife/cutter
- Hot melt adhesive;
- Thermal tubes/adhesive tape/insulating tape;
- Replaceable HDD.
We definitely need solder, flux, a soldering iron, and a tester; if they are not available, then there is no point in fussing with anything; it will not work on twists. The tools are inexpensive and will come in handy in many other places. The flux must be acid-free passive for soldering radioelements (usually rosin). It is not recommended to use active ones. Everything is purchased at the hardware store.
It’s a pity to disassemble the original drive into parts, so we go to the nearest service center and beg for a dead one from the craftsmen. In St. Petersburg you can go to Juno and walk around the ruins; I got the drive for a symbolic 200 rubles. Of the entire unit, we only need the housing and the connector, with which we will use our collective farm adapter.

We need a sata cable to connect our implantable drive to the adapter:
we cut it to a convenient length, strip it, tin the wires and solder it to the DVD controller board, from which all the guts were previously pulled out. The wiring of the wires on the cable and on the connector is one to one.
for example, in the photo below from left to right: the 1st cable contact is connected to the 1st drive contact, the 2nd to the 2nd, and so on.

For convenience and to increase free space, I heartlessly broke off the controller board along with the mounting holes. Since then, it has been securely attached to a thick layer of hot-melt adhesive. When “processing” our board, we need to make sure that the edges of the torn tracks do not come into contact with each other or with surrounding objects. Another reason why I broke the board is the controller wiring, which interferes with the operation of our adapter. Therefore, we break it so that the power and signal lines are also broken and we are left with a board with a connector soldered on it. The broken board can be seen later.
In the photo below you can see a sata cable with the plastic insulation removed, underneath you can see two pairs of wires wrapped in copper foil. The foil needs to be unwound by 8-10 mm and cut, there are 2 wires under the foil, with a hot soldering iron tip we make a nick on the insulation 3-5 mm from the edge and quickly tear off the insulation, tin the bare ends and solder them to the connector itself. Whether to solder the screen is a purely personal matter; in my case, soldering was not required, it works the same way. Hot-melt adhesive is indispensable here: we use it to secure the sata cable and power wires after desoldering on our broken board. If we don’t secure it, everything will come off and we won’t have time to assemble it.

A molex-SATA adapter is needed, you understand, to power our drive.

It is precisely because the power connector for the optical drive is non-standard that we are working on this collective farm. For everything to work, you need to make connections according to the following scheme:

We cut Molex. If the standard conductors are long enough and soft, you can leave them, otherwise we cut them almost to the root and extend them.

We cut off the yellow one from the conductors, this is power +12, our disk will do without it. Also, if you are sure that the ground on the disk is common to everyone (and most likely this is the case), then one of the black wires can also be cut off.
We clean, tin, solder a suitable cable of the required length, and insulate it with thermal tubes. Red - +5V, black - ground.

We solder the other end to our connector in the drive, do not confuse the polarity. You can find the pads on the board and solder them there. A distinctive feature of “Earth” is its longer contacts.

We soldered it, fixed it with hot glue, and tried it on:

It would be a good idea to cover the inner surface with electrically insulating material (adhesive tape?), it will prevent a short circuit on the controller of the implanted disk, but will worsen the already unimportant heat transfer.
We tried it on, everything is fine, before final installation we check all the connections with a tester to check for the presence of contact where it should be, and the absence where it should not be. We finally fix the board (with hot glue). You can try on the disc. In order to be able to close the upper half of the case, you can trim the plastic compound of the connectors and bend/remove the slides on which the drive tray slides out.

We call everyone again. Close the upper half of the case and fix the drive. In my case, no additional fixation was needed - the disk was securely pressed. Carefully! If you press the cover of a working disk, you can jam the spindle with the cover and damage the HDD; restoring data will be problematic and expensive. Let’s not forget that we farm collectively to save money. When installing into a laptop, you can rearrange the mounting bracket, into which the fixing screw is screwed, from the original drive to the implanted one. Almost everything, all that remains is to insert the drive into the slot and secure it.

For aesthetics (so that no one will guess that we are collective farmers), the holes in the side of our laptop can be covered with a panel from the original DVD. The panel is removable, with latches. We attach it (no, not with hot glue) with double-sided tape!

Before booting, you should look into the BIOS and make sure that the device is detected. My disk was detected as ODD; to boot from the SSD, I had to put the optical drive last in the queue of boot devices.

In the operating system, as expected, everything is ok: SSD and HDD are defined as disk devices.
On budget computers, even with a good processor and other components, manufacturers sacrifice hard drive speed to save money, relying on capacity.
Replacing the HDD in a laptop with an SSD will speed up the computer and, if desired, you can get additional storage if you purchase a special adapter.
What you need to know
- Before making a replacement, you can worry about transferring the system. If you are planning to install a new OS, you can skip this point. Just transfer important files to a cloud service or flash drive.
- If you want to change the drive while preserving the system, then the new memory storage must be large enough to accommodate all the necessary information.
- If you have a new laptop with a valid warranty, then after opening the laptop yourself you will lose it.
How to save a copy of Windows
When replacing an old HDD with a new SSD in a laptop, many users think about how to transfer the system to a new drive. For this purpose, special programs have been developed from laptop manufacturers.
Some of them:
- Acer provides the “Acer eRecovery Management” utility;
- at Sony – “VAIO Recovery Center”;
- The Samsung company has “Samsung Recovery Solution 5”;
- Toshiba satellite – “Recovery Disc Creator”;
- HP Recovery Manager;
- Lenovo solution center;
- Asus has a "Backtracker" program;
- MSI Recovery Manager;
Over time, the list may grow. You can find and download new versions of programs from official websites.
You can also use universal ones: Macrium Reflect Free, Macrium Reflect. They are supported on all Windows operating systems.
For each program there are detailed instructions on the developers’ website, but basically all the functionality is the same: run the program, choose what and where to copy, wait until the process is completed. After replacing the disk, you will see the desktop as it was.
Let's start replacing the hard drive
Below we will look at an example of replacing a hard drive with an SSD in an Asus laptop. If your laptop is from another manufacturer, it’s okay; the principle is always the same for most models.
Before you begin disassembling your laptop, be sure to turn it off and remove the battery. And when working, try not to touch the components on the motherboard with a screwdriver or your hands; even the slightest scratch can damage it.
Let's start work:

If you decide to install a new system after replacement, then use Windows 7 and higher; Windows xp and Vista are not designed to work on an SSD drive and you may experience a drop in write speed. Also, versions 10 and 8 of the system are most optimized for running on a solid-state drive.
Otherwise, after you have installed the SSD, installing the OS will be no different from normal.
What to do with an old hard drive

1) The HDD drive can be installed as additional data storage instead of a DVD drive. They have long lost popularity and are practically not used.
To do this, you will need a special adapter that is inserted into the drive position. When choosing, pay attention to its height and width, since the dimensions of the disk drive depend on the thickness of the laptop itself. Also, the width of the adapter can also be different. The discrepancy between the dimensions will not interfere with the operation of the hard drive, but if you are a perfectionist, then this drawback will get on your nerves.
Connecting a hard drive instead of a drive is not difficult; usually the adapter comes with instructions and the necessary tools. This method of use will be optimal for replacing a hard drive without reinstalling the system.
2) Or, you can buy an external case with a USB adapter and use the hard drive as a portable drive.
Detailed video lesson
I'll show you how to change a HDD hard drive to a high-speed SSD drive. I bought a 250 GB Samsung 850 Evo SSD. and installed it on my laptop. Then I installed Windows and all programs on the new SSD drive.
I bought my SSD drive Samsung 850 SSD EVO 120 GB SATA III on AliExpress . At first I wanted to order this Samsung 750 SSD EVO 120 GB SATA III (it is 120 GB and cheaper), but in the end I ordered 250 GB, although I could have done with 120 GB. The Samsung 850 EVO SSD arrived after about 12 days (the fastest product that came from AliExpress).
The parcel is well packed and sealed with polystyrene foam. Inside the box is plastic, and in it is an SSD drive.

Here are the specifications of this SSD drive. My reading speed tests, notes at the bottom of the page.

1. Copy all the information you need from your disk
If you, like me, have only one hard drive space in your laptop, then first copy all the information from your hard drive to your external drive or to another computer. Or buy . So that you can then connect your removed HDD drive via USB and download everything you need from it to your new SSD drive.


Here is a visual video of this adapter.
2. Remove the hard drive and install the SSD
Turn off the laptop, unplug the laptop from all wires, turn it over and remove the laptop battery. Now on the back cover of the laptop, find the inscription HDD - this is the place where your hard drive is installed. On my Samsung NP-R560 laptop it is on the bottom left. The hard drive is closed with a cover with two screws.

We unscrew these two screws securing the laptop hard drive.

Remove the cover covering the hard drive. There should be arrows on it showing in which direction you need to pull to move the cover.

Here is the hard drive of my laptop. It has an aluminum lid to help dissipate heat and has a pull tab to make it easier to remove. Simply grab this tab and pull it to the left to disconnect the hard drive from the connector.

Done, the hard drive is disconnected from the laptop and connectors. We lift it and put it aside.

This is what a laptop looks like without a disk.

Now insert the SSD disk in place of the HDD disk.

Carefully insert it in place of the old HDD drive. I also installed an aluminum plate from the old HDD on the new SSD.

Close the hard drive cover.

Tighten the screws of the lid.

Ready. Now we turn the laptop over, insert all the wires into it, put the battery back and turn on the laptop.
3. Install Windows on the new SSD
There is nothing on the new SSD drive and there is no OS (Windows) either, so now you need to install Windows on it. You will receive this error when you try to boot from a new SSD drive that does not yet have a Windows operating system.
Partition table invalid or corrupted. Press any key to continue…

You need to insert your bootable USB flash drive and boot from it.

If you don’t have a bootable USB flash drive yet, it’s time to make one.
Here is a video on how to configure the BIOS to install Windows from a bootable USB flash drive.
Now that we have a bootable USB flash drive and boot from it, we install Windows on the new SSD. We select our SSD, it will be marked as “Unallocated space on disk 0” and click “Next” and install Windows.

The copying of Windows files will begin, then preparation for installation, installation of components, installation of updates, completion. The computer will restart several times. After the first reboot, you can remove the bootable USB flash drive.

If you have never installed Windows via BIOS, then you will find a video on this topic.
After installing Windows on a new SSD drive, change the boot priority in the BIOS so that the Windows bootloader is first searched on the SSD drive. Although if everything loads and works, then you don’t have to change anything. I'll go to BIOS, Boot - Boot Device priority.

And using the F5 or F6 key I will move the SSD disk to the very top, so that the boot sector on the SSD disk is first searched, and then on the other disks, if it is not found on the SSD.


4. Comparison of SSD speed with HDD and USB drives
Using the CrystalDiskMark 3 program, I measured the writing and reading speed of my HDD drive even before removing it and replacing it with an SSD. The reading speed from it was approximately 100 MB/sec. when reading and writing sequentially.


