How to build your own gaming computer from scratch. How to build an inexpensive but powerful computer. How to choose components
Hello, my dear readers!
During the rapid development of computer technology, it is very difficult to imagine your life without a PC. And if you don’t yet have a laptop, netbook, or personal computer, then you are definitely thinking about such a purchase.
What could be simpler: go and buy?! But purchasing a computer in parts and assembling it from components yourself is much cheaper, and you can choose the characteristics as you wish.
Before you build your computer from scratch with your own hands, find out how much it costs standard set details in the store. Actually I took advantage online service with checking the compatibility of elements of the future PC http://www.edelws.ru/constructor/. This is very convenient, since without special computer knowledge it is very difficult to select the hardware yourself. In addition, the components here are cheap.
Frame
There's no need to choose much here. This item has absolutely no effect on the operating process of the device. You should buy a case based on comfort. It is desirable that it be possible to install a USB port on the front side of the box, a disk drive and various panels on the rear wall (TV tuner, etc.).
The material doesn't matter either.
Dimensions may be an important aspect.
There are two main factors that play a role here: the number of slots for RAM sticks and cooling. If you just want to work on the computer and nothing else, then 2 slots for brackets are quite enough and cooling does not play a particularly important role.
But, if you are an avid gamer, then you should have the option of installing RAM from 8 GB or more, and for this you already need 4 slots. Naturally, for such power there must be a good and reliable cooler for cooling. So choosing motherboard, pay attention to the dimensions of the stock fan. It seems like a small thing, but it is important. 
power unit
The most popular option is a 500W power supply. Its power is quite enough to connect any peripheral device without autonomous power supply. In addition, such a unit is able to withstand voltage surges without harm to the computer.
The power supply must also fit the case you choose (for reliable fastening).
All memory modules are divided into 2 types: DDR2 (for desktop computers) and DDR3 (for laptops, netbooks and all-in-one PCs). The number of installed brackets directly depends on the motherboard you choose (discussed above). They are installed extremely simply, like a flash drive in a phone: press until it clicks.
When purchasing RAM, you should pay attention to the cut of the copper contacts of the strip, since they are all different in their design, that is, only a certain group of memory modules corresponds to each motherboard.
Choose this part very simple: the larger the volume, the better. 
This is a very important detail for any gamer. It is the graphics memory that can provide high-quality images. Among large quantity video cards are most often used by Nvidia G-Force, AMD ATI Radeon (for video games) and Intel ® Graphics HD (for work and office programs).
Intel ® Graphics HD is not a very powerful graphics card, but most stock laptops come with it. Naturally, a gaming computer also copes well with office work, but it costs more.
The type of connector for connecting a video adapter is different, so the graphics chipset must be selected according to the main circuit.
Nowadays the selection of such computer parts is simply incredible, so there will be no problems with the search. Cooling is also important for a video card. Regular office adapters do not have a cooler, only a large one aluminum radiator, which carries out cooling. More powerful cards equipped with one or even two fans for more reliable cooling.
There is no point in hiding the fact that the graphics chipset is the most expensive part in a computer, since most of the functions of a PC or laptop are available thanks to it. this adapter. Needless to say, most of even the oldest video games will not run on a stock graphics memory unit! If you need a budget work computer then discrete video card you should have enough. 
Processor (CPU)
Most motherboards already come with a processor installed. But, if you know how to install it yourself, then you can take an empty main board and select the CPU yourself.
Now the most popular central processors are i3, i5, i7 devices. The most expensive, the last respectively. There is absolutely no point in buying the first options, since they are already considered outdated.
 The above processors from Intel operate at maximum frequencies, which allows you to enjoy the work process of your computer or video game with great pleasure. But be aware: installing a CPU is not as simple a process as it might seem, so if you don't have even the most basic understanding of PC hardware, then buy the main board with the CPU already installed.
There is no need to select this part for a long time; all contacts are absolutely the same on any processor.
Hard disk (HDD, Hard drive or hard drive)
This computer part also has absolutely no significance in terms of device performance. The hard drive is only responsible for storing files, software and the computer's OS. All hard disks new generations have absolutely the same connection principle (SATA II), the only difference is in their purpose (PC or laptop).
If you want to store fairly large amounts of files, but don’t want to throw them away large amounts money, then 500 GB will be enough for you. All knowledgeable people choose Hard drives from Samsung, since these drives are highly reliable and have good throughput. 
Sound card
This small fee, which connects to the motherboard and is output to the back of the box. It contains headphone inputs, speaker system and microphone. Even age sound card doesn't matter: they are all structurally the same. Choose what is cheaper.
A couple more nuances
In principle, there is no need to install a floppy drive or optical drive, since they are already a thing of history. External hard drives and flash drives have completely displaced them from the world of computer technology. But, if you prefer to store information (photos, movies, music, etc.) on DVDs the old-fashioned way, then make sure you have a drive on your PC.
After reading the article, you learned how to assemble your own computer from components yourself. This way you can save up to 10%-15% of the cost of the long-awaited computer. If you want to understand hardware better and more deeply, I advise you to take a training course “ Computer genius”.
I wish you everything succeeds! Tell us in in social networks friends and acquaintances about your intentions by sharing a link to this article. Don't forget to subscribe to blog updates - this is an opportunity to get a lot useful information about your PC. See you!
Sincerely! Abdullin Ruslan
Assembling a new computer is quite a task, because everywhere you look, store shelves are simply bursting with all kinds of PC components. How to choose among this squeaking, buzzing, winking mass of light bulbs what is worthy of becoming the “internal organs” of your future “family member”? And so that these “organs” are compatible with each other?
Some people think that it is better to entrust the choice of filling for the “iron pet” to specialists or to purchase a system unit already assembled, but we are not looking for easy ways. Building a gaming computer is not like that difficult task when there is an assistant. Today we will learn how to use the free web service “Online PC Configurator” of one computer store and create 3 assemblies for games in 2017: up to 30,000 rubles, up to 50,000 rubles and up to 100,000 rubles. Believe me, even a second grader can do it!
How to Determine What Hardware You Need
The selection of components for a PC is usually followed by choosing the motherboard and other parts, taking into account compatibility. When assembling a gaming machine, I advise you to change this order a little, because...No, I don’t urge you to sweep the latest generation of powerful and expensive video cameras off the shelves. To buy exactly what will meet your needs and not spend too much, it’s better to do this:
- Make a list of toys that you are going to play on your new computer (after all, we are building a machine for games).
- Go through the official websites of the selected games and write down their system requirements. It is also advisable to look at resources where gamers communicate and take a closer look at their recommendations for choosing hardware. Sometimes these tips are more practical than those from the developers.
- Take the highest system requirements as the basis for the future build.
The key link when selecting components for a gaming PC is the combination of processor + video card (sometimes + monitor). We select the rest for them.
How to properly distribute your budget
The budget distribution survey is no less important than correct selection iron, because when putting together an assembly there is always a temptation to add something extra to it, and money tends to run out unexpectedly.The set of components for the system unit of a gaming computer includes 7-15 items. Our task is to divide them into 3 groups according to degree of importance:
- A key link in the future assembly – processor and video card. These are the most important and usually the most expensive devices.
- Equipment of the 2nd stage– what is necessary for the operation of a PC and what you cannot do without. This includes: a motherboard, a drive for installing the OS and programs (optimally an SSD), a processor cooler and a power supply. The power supply is one of the last to be included in the assembly, but we reserve funds for it in advance, since “”.
- Equipment of the 3rd stage. This group includes what you can do without if you don’t have enough money (in order to buy more later) and what you can save on: RAM (instead of 32 GB, 4-16 GB is enough for the first time), a second drive, an optical drive, a discrete sound card , peripherals, system unit case. As for cases: if the design with bells and whistles and the famous brand, which mainly determine their cost, are not particularly important to you, buy a regular inexpensive case that is suitable in size.
Devices of the first and second stages are 80-90% of your costs. Cutting the budget for them is extremely undesirable, because this is what will bear the main burden “on its shoulders” for the next 3-5 years. If the optimally fitting part seems too expensive to you, it is better to look for it in other stores.
When choosing equipment of the third stage, do not go for cheapness. Savings should in no case concern the quality side of devices! Only quantitative.
Economy gaming computer for 30,000 rubles (without peripherals)
Well, we've sorted out the theory, it's time to start practicing. The free one I mentioned above belongs to the computer store "DNS". This is not an advertisement, just this service seemed to me the best among analogues specifically for untrained users. It does a good job of checking device compatibility according to various parameters, there is an automatic calculation of the cost of goods and sometimes sensible tips pop up. In addition, it is very easy to use, and the finished assembly can be saved in your account on the store website. There is no need to buy anything after this.Before the build starts, the service page looks like this:

Let's start by including two key devices (how to do this, I think, is clear to everyone). The first is the processor. The main parameters for selecting a product (filters) are collected in the column on the left. Here are the criteria I set to select the models that suit me:
- Manufacturer: AMD. Since we are building a budget gaming computer, I give preference to this family.
- For a gaming computer.
- With a free multiplier and 8 cores.
- No cooling system included.
The configurator selected 5 processors for me at prices ranging from 6,900 rubles to 11,300 rubles. The cost of the first three is almost the same, the performance is the same, so I will choose the less hot and most energy efficient model AMD FX 8320E. To add it to the assembly, press the button " Included».

- For gaming PC.
- Manufacturer: AMD.
- Video memory capacity 2-4 GB.
An automatic filter is also included here " Compatible" It is present in every tab, but sometimes it is worth turning it off. I'll tell you why a little later.
The service selected 14 models. By brief description In the catalog it is difficult for me to understand how they differ. To see all the characteristics of the device I like, I will double-click on its name. This will open a product card with a detailed description and pictures.
To return to the configurator I will click " Back to catalog».
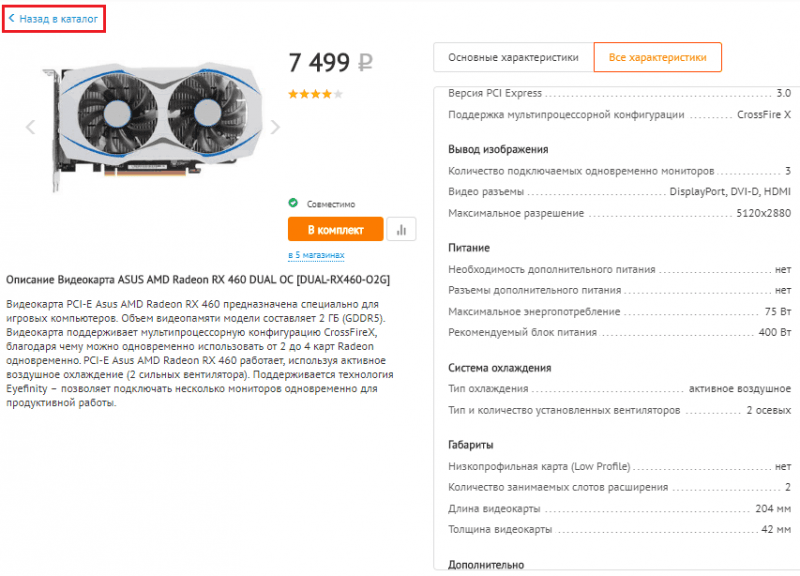
Having looked through all the models that suit me in terms of parameters and price, the kit is sent to a not too expensive one ASUS AMD Radeon RX 460 DUAL OC. By the way, it does not require additional power.

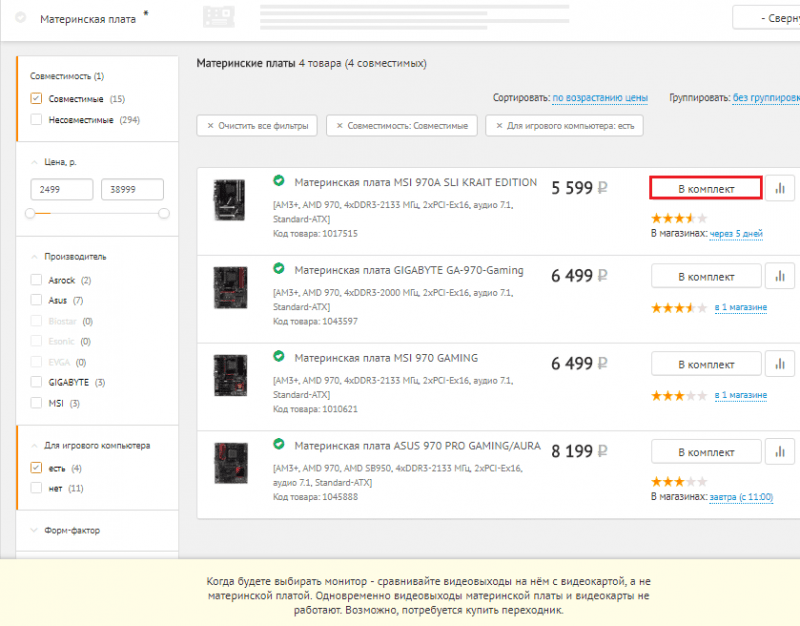
So, the key components have been selected, let's move on to the devices of the second group. Next up is the motherboard.
The configurator found 4 models for me that were compatible with the processor and belonged to the gaming class. After comparing their characteristics, reading reviews and reviews, I send them to the assembly MSI 970A SLI KRAIT EDITION, since, all other things being equal, it is slightly cheaper than the others.
It's time to choose a cooler. My criteria:
- Power dissipation – from 100 W (I focus on the TDP of the processor – 95 W).
- Base material – copper.
- Type - tower.
- Connector – 4 pin.
Socket AM3+ compatibility is automatically set. The choice fell on inexpensive DEEPCOOL GAMMAXX 200T.

I wonder if I'm on budget? At the top of the configurator the total cost of my potential purchases is displayed. There are about 9,000 rubles in stock, so so far everything is fine.

What is this red-green stripe next to the price and why does it say “Compatibility Issues” and “Non-Optimal Power Consumption”? It turns out that this is also normal, because I have not yet included the power supply and case in the assembly. If notifications of problems (red icons) remain after adding all parts of the system unit to the kit, then you have made a mistake somewhere.
- Capacity 120-128 GB.
- Interface SATA-3.
I'll look at other characteristics in the descriptions of the models.
I’ll take the fastest one available to me at a price - Sandisk SSD Plus. 120 GB is quite enough for the first time. Later I will buy an additional hard drive to store files.
By the way, if you did not add a PC case to the package, the configurator will consider the SATA interface incompatible with your devices. Why this was done, I don’t know. To avoid this distraction, simply uncheck the "Compatible" box.

The second group is almost finished. There is still a power supply left, but I will choose it a little later. First the RAM. I plan to equip my computer with 8-16 GB of memory, but since I no longer have the funds for this, I will buy 1 4 GB stick for now. Let it be a memory JRam– DDR3 with a frequency of 1600 MHz.

The total power consumption of my current build was 244 watts. The characteristics of the video card indicate the recommended power of the power supply - 400 W. You also need some reserve for possible upgrades and overclocking of the system. Accordingly, the power supply for the PC being assembled must be at least 450-500 W. And of course, it must be of high quality and reliable.
Following these wishes, I am sending a 500-watt Accord ACC-500W-80BR.
In addition to performance, I pay attention to the presence of all the required connectors (the main thing is 4+4 or 8 pin for powering the processor) and an 80+ Bronze energy efficiency certificate.

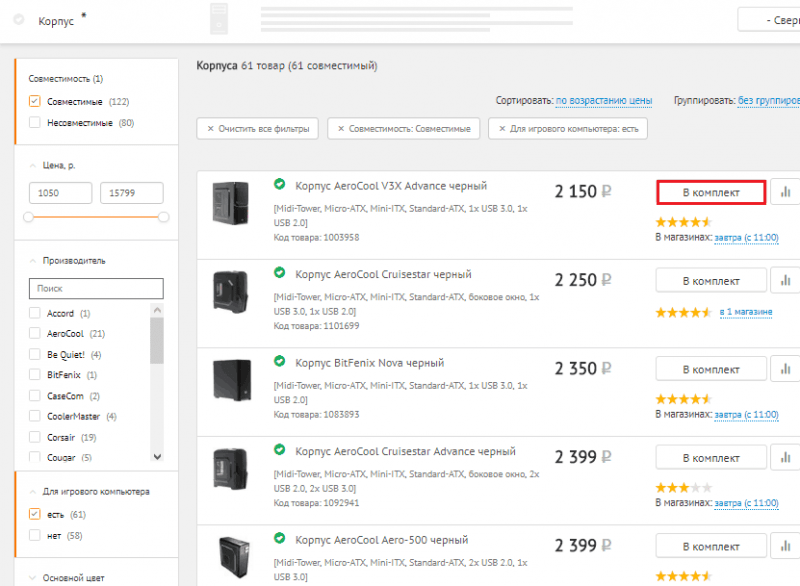
Well, all that remains is to find a cozy “house” for all this stuff. An expensive fancy “cottage”, alas, did not fit into my budget plans, so I’ll stick to a simple one steel case AeroCool V3X Advance. The main thing is that it suits me in size and the presence of the necessary parts: shelves for 2.5-inch drives, a cutout in the area of the CPU cooler, 2 built-in fans and a USB 3.0 connector on the front side.
The configurator shows that all selected devices are compatible, and their total cost was 31,843 rubles.

It turned out to be a slight overrun, but this is an approximate price, because it is not necessary to buy all the hardware in one store. It may be sold cheaper in other places.
Now I can save the configuration in my personal account (registration on the DNS website is required) in order to be able to return to it again (track price changes), edit and show it to other people (share a link).
Mid-budget gaming PC for just 50,000 rubles (without peripherals)
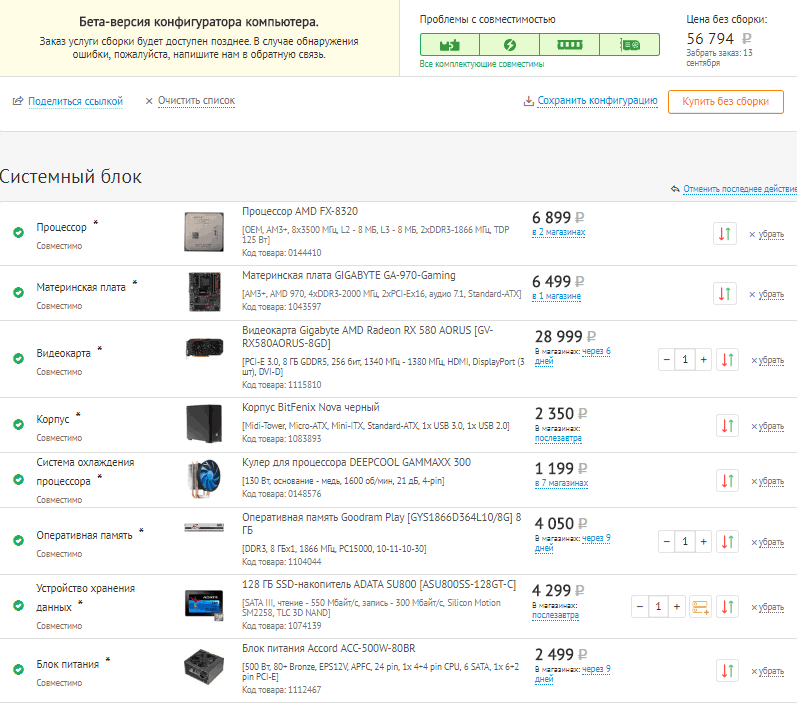
Let's consolidate the skills we've acquired and put together another gaming PC build worth about 50,000 rubles. This time without detailed explanations.Let's start with the processor + video card combination. Since you can’t get away with this amount either, let’s turn again to the AMD line and throw a CPU into the kit AMD FX-8320(compared to the FX-832E, it withstands high heat better and more stable). It will be paired with a video card Gigabyte AMD Radeon RX 580 AORUS – worthy game model with 8 GB of memory on board.

Next we select devices of the second stage. This is a gaming motherboard based on AMD 970 chipset GIGABYTE GA-970-Gaming, cooler DEEPCOOL GAMMAXX 300 at 130 W and SSD ADATA SU800 for 128 GB. Let's take the same power supply as in the previous assembly. Its power is just enough for all equipment, taking into account overclocking, plus the kit includes all the required connectors and a bronze certificate 80+.

The final chord is RAM and housing. I add 1 RAM module with the desired parameters to the set at the lowest price. This Goodram Play with a capacity of 8 GB and a frequency of 1866 MHz. In the future, the memory capacity can be increased to 32 GB. And all this will “live” in the “house” BitFenix Nova. This case is also not particularly fancy, but it has everything you need. Its main advantages are the lower placement of the power supply (important, since the processor and video card here are much hotter than in the previous assembly, and the power supply needs cold air) and the presence of a compartment for laying wires behind the rear wall (the fewer wires inside, the better the heat sink + it's comfortable).
As a result, goods amounted to 56,794 rubles. Also an overspend, but gaming video cards are expensive these days.
Let's go for a walk! Gaming system unit for 100,000 rubles
With a hundred thousand rubles at your disposal, you can afford not to save. We will collect for this amount full-fledged computer for the most resource-intensive toys and, perhaps, there will still be funds left for additional goodies.So, here's what I got:
- Processor + video card: Intel Core i5-6600K And MSI GeForce GTX 1070 AERO OC.
- Motherboard: MSI H270 GAMING PRO CARBON (Intel chipset H270).
- Cooler DEEPCOOL GAMMAXX 200T.
- SSD PlextorM8SeY With PCI-E interface and read/write speed of 2400/1000 MB/s.
- power unit Seasonic 550W(80+ Gold).
- Memory Goodram Play– DDR4, 2 modules of 8 GB, frequency 2133 MHz.
- HDD Toshiba P300– capacity 2 TB, speed 7200 rpm. It was not present in previous builds.
- Optical drive BD-RE LG BH16NS40 with the function of reading and writing 2-layer Blu-ray discs. It was not present in previous builds.
- Frame AeroCool Aero-500 with fan control unit and the ability to install liquid cooling.

The cost of the configuration was 100,343 rubles. Completely done! It wasn't enough just for discrete sound, but even without it it turned out very well.
I will not claim that the above assemblies are “ultimately true”, because they are compiled from the assortment of one store. Most likely, they can be supplemented and improved without going beyond the allotted budget, but to do this you need to browse online stores, read reviews, look at test results, compare and analyze the experiences of other users. However, this is what you need to do before purchasing; fortunately, the service allows you to save your assembly in your personal account, but, unfortunately, only one.If you have no experience self-selection computer components, do not rush to place your order immediately. First consult with knowledgeable people(not from among the store employees), and only when the assembly is approved by several experts, buy it.
Also on the site:
Do-it-yourself construction set for adults: how to assemble a gaming computer without being a specialist updated: September 5, 2017 by: Johnny Mnemonic
Do you want to build a computer for games or for Photoshop? Are you looking for instructions with photos on how to assemble a computer with your own hands? You've come to the right place.
The article continues the story about assembling a computer at home. Let us remind you that we are assembling a computer for a photographer, which easily turns into a powerful gaming computer by simple addition video cards. The selection of components for the photo and gaming computer being assembled, as well as methods for protecting electronic components from static electricity, was described.
Before you begin the computer assembly process, make sure you have a Phillips screwdriver - this is the only tool you will need. Make sure you have all the components needed to build your PC. Make sure you provide antistatic protection for sensitive electronic components. All this was described in detail in the previous article. If everything is in order, let's get started.
Computer assembly sequence. Step-by-step instruction
It is convenient to start assembling a computer by installing the processor (Core i5 6500) into the socket on the motherboard (H110M PRO-VD). To do this, remove the motherboard from the antistatic bag, holding it by the ends, and place it on a cotton fabric (calico, satin) folded in several layers. Several layers will gently hold the board, it will not slip and scratch the table. In addition, cotton does not accumulate static electricity. Raise the processor pressure plate lever (press down slightly and move it to the side), and fold back the processor pressure plate. There is a plastic plug on the pressure plate. We don’t touch her, she will go away on her own. Next, take the processor out of the box and remove it from the blister. We hold the processor exclusively by the ends, without touching the contact pads. We combine the triangular key on the processor and on the board. Also on the processor on the opposite side of the key there are 2 notches on the sides; they should also go around the corresponding protrusions on the board socket. Having aligned the key and the notches, we simply place the processor with the contacts down on the socket without any effort. If the key and the notches are aligned correctly, the processor will lie flat, without distortion. Next, simply lower the pressure plate onto the processor and secure it with a lever. At this moment, the plastic plug on the plate should bounce off on its own. We put it aside, it is no longer needed. The entire processor is installed on the motherboard.
 MSI h110m pro-vd processor installation
 The box with the processor also contains a fan, the so-called box cooler. Take it out of the box. Be careful not to lubricate the thermal paste that is applied to the heatsink where it touches the processor. The paste is needed to smooth out micro-irregularities, to ensure a tighter contact between the radiator and the processor body, so that heat is better dissipated. Every time you install or dismantle the cooler, you need to apply new paste. So if for any reason you want to remove an already installed cooler, do not forget to buy additional thermal paste in a tube. Installing a boxed cooler is generally simple: you need to rotate the fan around its axis so that the power connector reaches the mating part on the motherboard. Align the 4 holes on the board with the clips on the fan. Press down on the clips and they will snap into place. The clips must be fixed one at a time in the following sequence: first opposite along one diagonal, then along the other. Having snapped the clips, we connect the fan power connector with the mating part on the motherboard (marking on the cpufan board).
Next, install 2 RAM sticks on the motherboard (Kingston HyperX FURY Black Series 16 GB). The planks are very easy to install. You need to move the levers on the sides of the memory connectors on the motherboard to the sides. Install the strip into the connector, aligning the only notch on the strip with the protrusion in the connector, and gently press down. The bar will sink down, and the side arms will rise and snap into place.
 CPU cooler and memory sticks on the MSI h110m pro-vd board
 It's time to install our motherboard into the system case. We take our case (AEROCOOL MC3), remove the side covers, and put them aside. We put the body in horizontal position. You need to install the missing support bushings on the motherboard mounting panel. Four pieces, which are present on all board sizes, are already installed. We look at how many mounting holes there are on the board; under each hole you need to install a support sleeve. The support bushings are in a bag with screws that come with the body. The same bag contains a hex adapter for a Phillips screwdriver. The adapter is needed to tighten the threaded connection between the bushing and the panel. At first I didn’t notice this adapter and tightened the bushings with pliers, but you do everything as expected using the adapter.
When all the support bushings are installed, you can mount the motherboard connector socket on the rear wall of the system unit. The panel comes complete with motherboard. There are special recesses in the system unit case, so this socket seems to snap into place.
Now you can screw the motherboard itself onto the support bushings. For this we take the screws from the same package included with the case. When tightening the screws, the board must be pressed against the back panel, since it rests and springs with special tendrils.
 Mounting the MSI h110m pro-vd motherboard in the system case
 For those who want to build a powerful gaming computer and bought extra gaming video card type GeForce GTX 10 series, it's time to install it on the motherboard connector pci boards express and attach the socket to the rear wall of the system unit.
Turn the body over vertical position. Now we will install an optical DVD drive (DVD-RW LG GH24NSD0). In the following pictures, the devices are conventionally shown with connected wires. There is no need to do this yet. Installation of wires is a separate operation. On the front panel of the system unit case, you need to remove one of the three removable panels for external 5.25-inch devices. This will be the most top panel. To remove it, you need to bend one of the side clamps from the inside and press on the panel from the outside. The panel will fall inside, after which it can be removed. We insert our optical drive into the resulting hole in the case from the outside, aligning the drive with the front panel of the system unit. We fix the drive in the basket for external devices. On one side of the basket there are clips for quick fixation; there you just need to bend the lever. On the other hand, there are no such clamps, so we screw in 2 screws from the kit.
 Optical drive in the basket for external devices
 Now it's the turn of SSD (OCZ Trion 150 TRN150-25SAT3-240G) and HDD (1 TB WD Caviar Blue) drives. We put the solid-state drive in the basket for internal devices, 2.5 inch compartment. On one side, we insert the pins of the basket into the disk mounting holes, and on the other, we fix the disk with two screws from the kit to the system unit case. For hard drive On one side we screw in screws with a narrow pin head, they will slide along the guide. We insert the pin heads into the guides and insert the disk into the basket for internal devices, 3.5-inch compartment. On the opposite side, fix the disk with three screws from the system unit case kit.
 SSD and HDD drives in the basket for internal devices
 Now comes the power supply (Aerocool KCAS 600W). We take it out of the box and install it at the bottom of the case, with the fan down, towards the ventilation hole. The system unit has high legs, so there is room for air to enter. The power cord connector will face the outside and the wiring harness will face the inside of the chassis. We fasten the 4 screws from the kit on the rear wall.
 Power supply at the bottom of the system unit
 Now that all the components are in place, you need to connect them with electrical cables. All devices must be connected by interface cables to the motherboard. Plus, each device needs to be connected to a power cable from the power supply. In the pictures, all power cables have a black polymer braid. Almost all connectors are keyed, so it is impossible to mix them up unless you use excessive force. Plus, the board has signatures for each connector part. You should immediately try to lay the cables through channels and through technological holes in the system unit case, so that all that remains is to secure them later.
Let's connect the signal wires to the motherboard:
- 3 SATA3 cables from three devices: DVD drive, HDD drive, SSD drive. On one side of the cable the connector is connected to the device, on the other side of the cable the connector is connected to the motherboard. For the HDD drive, there is no need to connect the connector on the motherboard side yet. We will connect it after installing Windows on the SSD disk, this will be discussed later;
- Wires from the front panel of the system unit: blue USB3 connector, audio panel connector, USB2 connector. The buttons and lights on the front panel of the system unit come to the motherboard in the form of single contacts with markings. To install them, you need to check the diagram included with the motherboard. We also connect the front panel fan connector (marked on the sysfan board).
Let's connect the power wires to all devices. We take the wires from the power supply:
- CPU power connector;
- Motherboard power connector;
- Additional front panel fan power supply. Molex connector mounted in parallel signal wires, increasing the cross-section of the power wire;
- 3 SATA power connectors for each device: DVD drive, HDD drive, SSD drive.
- Those who installed a video card need to check whether it has an additional power connector (for powerful video cards). If so, then it needs to be connected.
The connection of connectors on the msi h110m pro-vd board is shown in the picture. In this and other pictures, the wires are conventionally shown held together with plastic clamps. There is no need to install clamps yet - this is done on last stage when everything is already working.
 MSI h110m pro-vd connector connection
 After connecting the wires inside the system unit, you can connect the power cord, plug it into a power outlet, connect the keyboard, mouse, monitor, and then . If you need to correct something during setup, do not forget to remove the plug from the outlet, including the one at the monitor.
After setting up the BIOS and installing the OS, if everything works, you need to use plastic clamps to secure the wires in the system unit case so that they do not dangle when moving the computer. If you are like in in this case If you use an integrated video card, you need to install a plug on the hole in the first PCI expansion slot (on the back wall, where the discrete video card panel usually comes out). The plug is included with the system unit case. You should end up with something like this:
 Fully assembled system unit. View from the motherboard
  Securing cables to the system board panel
 All that remains is to screw on the side covers of the system unit and you can use the computer.
In this configuration, everything came together and worked the first time for me. I solved my problem: developer camera raw Photoshop began to move and process the raw image from the photo matrix (RAW format).
Updated 06/02/2015. The article is relevant for the entire 2015.
How to choose a computer so as not to regret it. Choose a good and inexpensive computer!
If you have never been interested in the parameters of certain computer components, then choosing one will be quite difficult for you. But fortunately, you can read my article and your decision will be easy and correct. The most important thing to remember is that the most expensive is not always the best. And also do not trust consultants in stores, since their main task is to sell stale goods that no one buys. Therefore, they will try to convince you in every possible way, but you must insist on your own. To make sure your choice of computer is informed, read the article to the end!
So, the first thing we must do is decide what we need a computer for. There are three different options:
- office solutions;
- home options;
- and gaming systems.
Office computers These are not necessarily machines that are in offices, but simply a generalized name for budget solutions. They are only capable of working with documents and surfing the Internet. Even watching movies can be difficult due to the lack of a full-fledged video card, games will be terribly slow or will not start at all. After all, office solutions usually use weak components, for example, a built-in video card instead of a normal one.
Home computer This average level. Here you can already watch movies, even play some games, but not at maximum graphic settings. Such a computer is quite suitable for most users and will not eat up most of the family budget. It is advisable to assemble the configuration yourself, rather than take ready-made solutions, because usually their price includes assembly, various licensing software, which may well not be useful, and so on. It’s always better to collect everything yourself, especially since by 2015 home computer became a simple constructor, where it is simply impossible to assemble something incorrectly.
And finally, gaming computers. Again, this is a general name, it does not mean that the computer will be used only for games. It just tells us that the hardware of such a machine is very serious and powerful. Will allow us to process huge graphic images, for example, in PhotoShop or 3D Max. Cut and convert video at a decent speed, perform complex calculations. Such computers are assembled by the users themselves, often not immediately, since they are quite expensive.
For example, first you buy a good motherboard with a reserve for the future, and then an expensive video card, processor, and RAM are “hung” on it. First one video card, then a second one for SLI mode or CrossFire. First 8GB of RAM, then 8 more for working in Double-Channel or even Triple-channel mode, depending on the configuration.
So, if you need more than just a computer for checking email and typing, but you don't play the latest games in the gaming industry or process gigabytes of video, then home option computer will suit you.
Now we will go through all the components and talk a little about them. For each point, I will select examples of components that are successful, in my opinion, specifically for a home computer. As a result, at the end of the article, ideally, I will have a system unit that will delight its owner with its performance and potential.
Choosing a computer monitor
 We will start not with the system unit, but with the monitor, because this is actually the first thing the user sees, and if the image on it is bad and of poor quality, then what is the point of powerful hardware? If you agree with this, then continue, and if not, then go straight to the point about system units.
So, how to choose a monitor so that it pleases you with a rich and clear picture? It's easier than it seems. There are only a few monitors important characteristics. Well, I hope everyone has long understood that there are no CRT monitors out of the question. This is a relic of the past, I don’t know if they are even sold anywhere now or not, but, in any case, forget about them like a bad dream!
Naturally, this will be an LCD monitor, which should have an acceptable response time of 2-8 milliseconds, and it will most likely be widescreen, this is also almost a standard. The resolution is 1920x1080 for watching movies and games in Full HD format, you can, of course, take more, for example, 3840x2160.
Viewing angles are actually not as critical as many people write and talk about them. Angle 170 horizontally and 160 vertically – regular option, after all, you are not going to look at the monitor by placing it in front of you on the sofa or bed, right? Everyone sits and looks at the monitor at the right angle, and even with minor deviations the picture will not lose its brightness.
The matrix will most likely be either TFT PLS or TFT IPS. And this is no longer a toy for true aesthetes or photographers, as it was before; now these technologies are used in almost all modern models. It is used everywhere (to replace fluorescent), which consumes little electricity and improves color rendition. I also highly recommend purchasing monitors with a matte screen!
We will give examples in each section so that you roughly understand what we are talking about. The DELL U2414H and ASUS VX239H monitors may well serve as examples, each in their own field. They have different formats, different matrices, different time response, but at the same time each has its own strengths and weak sides. Read descriptions, reviews and understand.
That's all about monitors, now let's move on to the peripherals, without which normal work at the computer is not possible.
Peripherals (select mouse and keyboard)
As already mentioned, peripherals are a very important thing that you shouldn’t skimp on too much. Of course, I don’t encourage you to buy a wireless gyroscopic mouse for 10 thousand, but you shouldn’t buy a mouse for 100 rubles either. Either she scratches the table, then the cursor begins to twitch. And many cheap mice also have low dpi, which, in the presence of a large widescreen monitor will cause you a lot of inconvenience. 
General advice for both mouse and keyboard: do not buy cheap ones wireless devices. If there is no money for expensive models, then take it with a wire, otherwise later, in the vast majority of cases, problems with the signal will appear. These are not just my thoughts - this is really true. No money - we choose wires and no problems with the signal. If you have money and desire, we take quality products.
Let's start with mouse selection. It should be comfortable and fit the size of your palm well. Do not buy laptop mice for use on desktop computer, Truth. Your hands get tired quickly when working with such a mouse, as it is uncomfortable to hold. The palm should rest completely on the body of the mouse, and not lie on the table. I also don’t recommend chasing quantity. additional buttons on a mouse, most people don’t use them at all. But 2, maximum 4 additional keys on the side of the mouse can be allowed, the main thing is that they do not interfere with work. DPI is image resolution, and in relation to a mouse, in simple terms, this is the speed at which the cursor moves on the screen. More precisely, the ratio of the distance by which you physically moved the mouse to the distance on the screen by which the cursor moved.
The larger the monitor and its resolution, the higher the DPI for comfortable work you need. If you purchased a Full HD monitor with a resolution of 1920×1080 (I recommend choosing this), then you will need at least 800 dpi, and preferably 1200. Then you will not have to make unnecessary movements to move the cursor to the right place. An example of a good mouse is the A4Tech XL-750BK and in general the x7 series from A4tech is very successful.
Keyboard should be standard so that there are as few additional and, moreover, useless keys as possible, then it will last longer and typing on it will be more comfortable. Choose a device with short key travel, that is, small, thin keys. If you know how to touch-type, then getting used to such a keyboard will not be difficult for you; it will take a maximum of 1 - 2 days. It may also have outputs for headphones, microphone and USB. It all depends on your preferences; if necessary, choose a model with outputs. An example of a successful model that will fit into the budget of your home computer is Logitech K200.
We've sorted out the periphery. Now you have everything except the most important thing - the system unit! And we’ll start with the body for it, since very often people neglect the “box”, but in vain, and here’s why, read on.
How important is the system case?
The point here is this. Many people think that there is no point in buying good body. I screwed all the hardware and at least to cardboard box, the main thing is that it doesn’t fall off. But the point is that powerful iron, especially the video card and processor, get very hot. The temperature of a video card without a cooling system can soar over 150 degrees in a few seconds. Accordingly, when a cooling system is installed on it, it removes heat from the video card itself and releases it into the surrounding air layers. This is where you need a well-designed case so that air can flow in and out of the box freely, otherwise the cooling system will become ineffective. Then the computer will crash. 
If you don’t want to keep the case open all the time, then make sure that coolers (fans) are installed inside it for intake and exhaust. Again, a rather delicate point: if there is no balance between the amount of incoming and outgoing air, then dust will begin to accumulate inside the case and it will need to be constantly cleaned.
Sizes matter too. For example, most modern video cards have impressive volumes. CPU coolers can also be large. All this will lead to the fact that the components will simply interfere with each other and it will be impossible to install them. Make sure the case is spacious enough to accommodate all the parts you purchase. Example - Thermaltake Chaser A31 VP300A1W2N Black.
A few words about power supplies, an easy choice
Recently, power supplies have stopped being installed in cases, and they have to be purchased separately. In fact, this is correct, because the standard blocks that came with the case were almost always weak, and they still had to be replaced, but the cost of it was included in the price of the box. Accordingly, now we buy only the case, and select the power supply to suit our needs ourselves. It is worth noting that it does not grow in proportion to the increase in productivity. 
Yes, it is growing, but mainly due to video cards, since processors and hard drives somehow restrain their appetites in this regard. Reducing the CPU process technology often leads to reduced power consumption. U hard drives so-called “green” models are appearing, which also operate on lower energy consumption and emit less heat. But video cards constantly require more and more watts. Actually, because of this, we will need a power supply of 600-800 Watts. In this case, it is desirable that the wires can be disconnected from the unit itself. This will save a lot of space in the case, everything will be neat, beautiful and practical. Thus, you can focus on models such as Thermaltake TR2 RX 650W (detachable wires) and Thermaltake TR2 600W (not detachable).
Now, finally, let's move on to the components. This will be the most interesting part, especially for those who simply have not read the text until this point. The first thing we need is a motherboard, since it will determine which processor, video card, RAM and hard drive we install.
The motherboard is the basis of your computer
Now I will explain everything briefly so as not to bother you unnecessary information. Of all the parameters of the motherboard, we can highlight the most basic ones. For example, we will not consider the form factor, since for a home computer you will buy a motherboard of either standard ATX size (305x244 mm) or microATX (244x244 mm), which is more preferable, since this format not overloaded with extra slots. So let's look at the options that will really be useful to you when choosing:
- socket (the type of processor depends on it);
- RAM connectors (quantity, type);
- slots for video cards (number, type).
As for, for example, IDE or PCI connectors, forget about them, they are a relic of the past. You can also somehow justify the presence of PCI-E 1x, 2x, and so on, but they are also not a parameter that you should pay attention to when buying a motherboard. 
The socket can be either for Intel or AMD processors. Moreover, each of them can also be different. For example, on this moment LGA1150 is relevant for Intel. AMD has FM2+ and AM3+ sockets. But soon the situation will change again, I am sure of it. RAM must be DDR3, 2 or 4 slots. Of course, connectors for PCI-E video cards 16x two pieces, if you plan or you can limit yourself to one slot, support for PCI-E version 3.0 is required. An example is ASUS B85M-G, which has everything you need for a home system.
RAM, nothing complicated
Once we have chosen the motherboard, nothing can stop us - we have reached the finish line of assembling our system unit and the computer as a whole. There is nothing complicated in choosing RAM. It is only worth noting that it will be DDR3, the total volume is at least 8GB, the frequency is 1600 - 2800 MHz. 
This volume can be achieved in various ways. For example, buy one 8GB stick, but it would be better to install 2 4GB sticks. It will be much better both in price and performance. Here, as an example, let’s take a regular one, or better yet 2 pieces, in total we get 16 GB and excellent performance for a low price. Perhaps you have heard about RAM timings, but I do not advise you to change them (overclock the system) without knowledge in this area. The standard factory settings are quite sufficient.
Video card: one, two or zero?
Because we're talking about If you are talking about a budget home computer, and not about a powerful gaming solution, then there will be only one video card. But you can spend a little more money on it, instead of buying two cheap ones just for SLI or CrossFire. In the end, one good video card capable of meeting the requirements of even modern games at ultra settings.
The connector, naturally, will be PCI-E 16x, there can be no other option. About the choice specific model It’s worth turning to the same overclockers and their reviews. You should aim for 2 - 3 GB of memory, you don't need more. After all, we, I repeat, are assembling a budget home computer. So, after reading dozens of reviews, I settled on two models, you can buy the one that will be in your store. Also, personal preferences may come into play here, so choose for yourself: MSI GeForce GTX 970 and MSI Radeon R9 290. They both show good overclocking potential, if anyone is interested. But even on standard frequencies their power is enough for all everyday tasks and for a pleasant relaxation while watching movies in Full HD, playing tanks, battlefield 4 and GTA 5 on ultra settings. 
We should also talk about built-in video cards. No, no, these are not those useless video cards built into the motherboard, which even when working in Word slowed down and could not draw the picture properly. This is a completely new technology for building a system, when there is both a processor and a graphics core on one chip. These models include the A-Series from AMD, while Intel has the majority modern models has such a graphics core. As for their performance, judging by the tests, it is enough even for some games, but this is purely individual for each processor, you need to read the tests. It is only worth noting that if you want to save on a video card, now you can do it easily and simply. Example standard solution from AMD: AMD A10-7850K Kaveri, when for very reasonable money you get an excellent processor and good graphics. Look at Intel Core line i3 – Core i7, but built-in graphics cores AMD is much better, I warn you right away!
Choosing a good processor - the heart of our system unit

Almost all computer performance depends on the processor. The fact is that it is the processor that is responsible for all calculations, so its power should be enough and even a little in excess, with a reserve for the future. It is also worth noting that many processors can be easily overclocked, that is, you can increase their performance without overpaying. But this is a separate topic, but for now let’s focus on the characteristics of the processors.
- Socket.
- Frequency.
- Number of Cores.
- Cache sizes at different levels.
We won’t go into detail about the first parameter – the socket, because we have already chosen the motherboard, so we look at what kind of socket it is. In our case, this is LGA 1150. Therefore, the entire Intel Core line from i3 to i7 is suitable for us, but the price range here is too large. For our budget solution we can take modern version Core i5. You can look, for example, at. Its power is enough for you to solve everyday tasks and all modern games.
The number of cores in our case is 4, the processor frequency is 3500 MHz, the 3rd level cache is 6 MB. You can use these numbers as a guide when making your choice.
Hard drive or cloud?
Recently, there has been a trend towards storing information on the Internet. Such technologies are called cloud technologies. The brightest and famous examples cloud data storage services can serve: Yandex.Disk, Google Drive, DropBox. You can listen to music on Vkontakte, Odnoklassniki, Yandex.Music and the like. Watch films in online cinemas, in general, you understand me. Thus, many can get by altogether hard drive 200GB and will not feel discomfort or lack of memory.
However, if you still want to keep a collection of music and movies on your computer, good quality, good resolution photos and much more, then you just need a large hard drive. I think 1TB is enough for huge collection anything. 
As for the other parameters, there is only one form factor for a home computer - 3.5 inches. The disc rotation speed is 7200 rpm. The connection interface is SATA 6Gb/s, the buffer volume is proportional to the volume of the disk itself. So, for a volume of 500GB the buffer will be 16-32MB, and for 1TB it will be about 64MB. Here I would recommend, for example, Western Digital WD10EFRX. This is the WD Red server series, which is distinguished by its survivability and reliability.
In general, the advantages of SSDs include greater speed. But besides this, they are silent, since they have no moving parts, are more reliable and consume less energy.
Now you can assemble a computer yourself, without outside help. Choose all the components for both the budget version and a completely powerful machine. I still advise you to assemble a home computer if you don’t need it game version. Since prices for components are falling very quickly, accordingly, chasing after new products, you can very much overpay! Also, it is most profitable to buy in online stores.
Greetings to all readers of my blog! Today's publication is devoted to a topic that interests many active users PC: “How to build a computer yourself and from scratch?” Therefore, I will try to help you in choosing parts for a desktop computer that is relevant for 2016-2017.
We will look at the components for the system unit, figure out how to install them, and discuss which components will be best choice. I will also tell you how to choose good monitor. And to provide more detailed information As examples, I gave several assemblies suitable for different price ranges. Let's get started!
System unit components
As you understand, the most important thing in a desktop computer is the system unit. Putting all the necessary ingredients together, checking their compatibility, and then making candy out of it with your own hands is much more difficult, and also longer. So let's start with it.
So, the system unit usually includes: a cooling system (cooler), a hard drive, a power supply and a motherboard on which the processor, video card, audio card and RAM are mounted. Let's look at everything in detail.
Essentially it is a frame for other components. Before purchasing it, and indeed before starting to select components for your computer, you should decide for what primary purpose the computer will be assembled: for training or office work, for games, or maybe for developing heavy projects?
Depending on this, the search for suitable spare parts for the future car will be significantly narrowed.
So, for example, to support graphics on maximum level In a variety of heavyweight modern games or other situations where high-quality frame display is required, you will need two video cards. This means you should choose a motherboard with two slots for them.
Well, if you plan to replenish your car with new gadgets after use, then in this case choose a board with big amount connectors. This also applies to assembly gaming computers. Typically these motherboards are ATX format.
Be sure to check the compatibility of the processor with the motherboard. Their connectors must match.
When choosing an equipment manufacturer, first of all pay attention to the products Asus brands and Gigabyte. They have proven themselves well in the market.

Processor power directly affects the speed of a personal computer. The most powerful processors have a clock frequency of more than 4 GHz and a cache memory of 8 MB or more. However, they are quite expensive.
If you are looking for this part cheaper, and you don’t need such power, then your requirements will be fully satisfied standard processors with a clock frequency of about 2 GHz - 3 GHz.
Today, the market leaders among processor manufacturers are Intel and AMD. Many people prefer the first company, since their equipment is somewhat more powerful. But similar AMD components are a little cheaper.

Or, random access memory (RAM) is needed to store temporary data and executable machine code, which in turn are processed by the processor.
There are types of RAM such as DDR2, DDR3 and DDR4. The first species is on the verge of extinction, but the young DDR4 is rightfully considered the leader. It entered mass production in 2014 and has leapt ahead in its performance, significantly increasing transmission speeds while reducing the machine's power consumption.
For office computers A memory capacity of 2 GB is suitable for a regular home use It is advisable to put more. The optimal volume would be 4-8 GB. However, if you want to get the most out of your computer, you can increase the RAM size to 16 GB or more.

If you want to store personal information on a PC, then you will need an SSD (solid state drive) or HDD (hard drive) with large supply memory. They are responsible for long-term data storage.
For home use, hard drives with a rotation speed of about 7200 rpm and a memory capacity in the range of 500 MB - 1 TB are ideal. The most famous brands: Toshiba, Fujitsu and Western Digital.
As for SSD, this type of drive will cost much more and is more suitable for corporate machines. The leaders among manufacturers are: Intel, Samsung and Micron. However, there are other good companies. Their list is quite long.))

The main characteristic of a power supply is its total power across all outputs (buses). It must be 40-50% greater than the total power consumed by all components of the system unit. This will save money in the future when upgrading your PC, and will also reduce the likelihood of PSU failure.
Most machines are suitable for a 350 W power supply, for gaming machines - 500-700 W.
I think here you will have a question: “Is it possible to find out exactly what indicator is required for my assembly?” Yes you can. There are special online calculators for this. In addition, you can always consult with specialists in hardware stores before buying a power supply.
I advise you to take a closer look at the products of STM, FSP and Cooler Master. I also want to emphasize that good power supplies cost no less than $40-$50.
Collecting details into a single picture
Now you are familiar with the main components of the system unit, but you still don’t know in what order and where to connect them. Let's look into this.
- To start, you'll need a case. Select it so that it circulates air well (it is open or, better yet, has good system cooling). Sometimes cases already have built-in power supplies;
- First, insert the I/O controller into back panel housings;
- Afterwards, the drive is usually installed in the front panel;
- If you purchased the power supply separately, now is the time to connect it. It is secured with screws in the rear upper part of the case;
- To install the processor, you need to open the socket on the motherboard using a lever. It will be in the shape of a triangle. Place the processor with the correct side to the connector so that the shape of the triangles coincides, and connect the latter with light pressure. Then secure the processor by pressing the lever;
- At this step connection in progress cooler/radiator. Follow the attached instructions;
- RAM is very easy to install. You just need to find the slots suitable for the RAM contacts on the board (outwardly they stand out from the rest) and after matching, connect the first one with a light press;
- Now we are introducing the motherboard itself into the system unit. To do this, match the holes for the screws on the case and the motherboard, and secure everything with screws;
- At this point you should connect the cables of other components to system board. Here the connection methods vary, so it is better to consult the instructions for help.
10.Install the video card(s);
11.And finally, you should connect the motherboard and power supply.

Now you know how to assemble a system unit yourself.)
Examples of finished assemblies
In this chapter, I tried to answer your question: “Can you give examples of assemblies and tell me approximately how much they will cost?”
About 30,000 rub.
About 55,000 rub.
About 75,000 rub.
More expensive than 100,000 rubles

Today, no one talks about monitors using ray tubes. So all discussions relate to residential complexes. Try to purchase a monitor with a good screen resolution of 1920x1080. And if you can afford it, then buy screens with an extension of 3840x2160.
Pay attention to the diagonal of the monitor. Today the minimum diagonal is 18.5 inches. However, it is better to get monitors with a diagonal of 21-24 inches. Also inquire about response time. The optimal value is 2-8 milliseconds.
On this note, I decided to end the article. I hope you have assimilated this entire huge flow of information at least partially. By the way, I want to add one small piece of advice. Most components from the system unit can be bought much cheaper on AliExpress.
Don't forget to subscribe to blog updates and repost my articles. See you! Bye bye!
Best regards, Roman Chueshov
Read: 327 times


