Download tl wr841n update. Preparatory work before the update procedure. Setting up a PPPoE connection
Hello! We will now flash the Tp-link TL-WR841N router. These instructions are also suitable for the TL-WR841ND model. We already have instructions on our website. There I told you how to find out the hardware version of the router, download the firmware, and actually flash the router. This is such a general article, and I thought that I would need to prepare a separate article on firmware for the Tp-link TL-WR841N router.
This is very popular model, one might say, folk :) Therefore, I think the article will be useful to many. By the way, I wrote about setting up this router in separate instructions, you can read it. As for the Tp-link TL-WR841N firmware, everything is just as simple:
- First, let's find out the hardware version of the router
- Download the firmware for our model from the official website (TL-WR841N, or TL-WR841ND) and hardware version.
- Let's connect to the router via cable and update the firmware.
All this will take a few minutes. And updating the software can significantly improve the performance of your router. In new updates, the manufacturer always improves, adds, and refines something. Therefore, after updating the firmware, your Tp-link TL-WR841N can work even better and more stable.
Firmware in Russian for TL-WR841ND
For this model, many people search and ask about the firmware in Russian. I think this question needs to be answered. Below, I will show how to download the firmware from the official Tp-Link website. So, for each hardware version of the router, the website displays several firmware versions. Yes, there are versions in Russian. At the time of writing, Russian firmware for Tp-link TL-WR841ND is only available for V9 and V8 (not the newest). The website indicates what language the firmware is in.
I agree that setting up a router is much easier when the control panel is in Russian. But in English there is nothing false there either. Moreover, almost all instructions for setting up this router are written using an example English version web interface.
Firmware update for Tp-link TL-WR841N
1 It doesn’t matter whether you have a TL-WR841N or an ND, first of all, we need to know the hardware version of our router. The easiest way is to look at the sticker on the bottom of the router itself. The hardware version will be indicated there. For example, my router has hardware version 7.2. Below, on the sticker it says Ver 7.2.

I have old model, now there is already 11 hardware version. That's it, we know the version of our device. This information will be useful to us when loading the sewing. Since the firmware must be downloaded for our version.
If you have a model TL-WR841N, then follow this link: http://www.tp-linkru.com/download/TL-WR841N.html
If you have TL-WR841ND, then follow this link: http://www.tp-linkru.com/download/TL-WR841ND.html

Selected and scroll down the page. Open the tab Firmware(or, firmware).
Download the first firmware in the list. She's the newest. We save the archive with the firmware to the computer. Save it to your desktop, for example.

Now, open the downloaded archive and extract the firmware file from it.

That's all we have required file. All that remains is to upload it to the router.
3 Attention! At the time of updating the firmware, connect your computer (laptop) to Tp-link TL-WR841N via network cable, which comes with the router. You cannot flash a router via Wi-Fi.
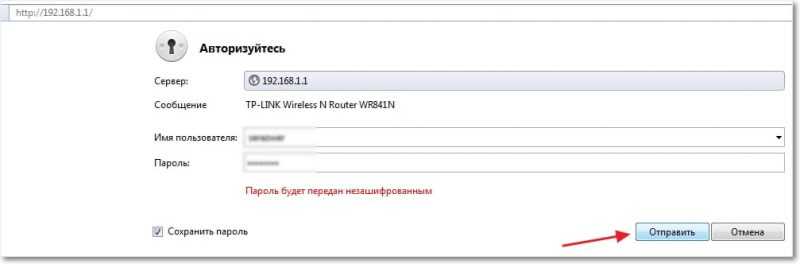
So, we connect via cable and go to settings. Open any browser in address bar dial the address 192.168.1.1 and we move along it. You will be prompted for your username and password (default admin and admin). If you can’t get into the settings, then look.
In the settings go to the tab System Tools - Firmware Upgrade. Click on the button Choose File, and select in Explorer the firmware file that we downloaded.

Click on the button Upgrade.

We are waiting for the firmware update process to complete.
We don’t touch anything and don’t turn it off. The router will reboot itself and will be ready for use.
TP-LINK network equipment is well known both in Russia and abroad. For those who have “grown up” on the capabilities of inexpensive single-antenna devices, the manufacturer offers wireless router mid-level - TP-LINK TL-WR841N. Being only one and a half times more expensive than the single-antenna TP-LINK TL-WR740N, it provides twice the fast access to a wireless network at a speed of 300 Mbit/s. The internal filling of the router will not only provide Internet access to an apartment or a private house, but also to deploy a local network for a small office. The model has already undergone several modifications and is still in production. What are the differences between routers of different years of manufacture, how to connect and configure them for maximum efficient work- the topic of our article.
Description of the TP-LINK TL-WR841N router
TP-LINK TL-WR841N is a router designed for use in the home or small office. It allows you to connect clients to the Internet both via cable (twisted pair) and using wireless connection(Wi-Fi). You can connect four computers via cable, and any number of clients via Wi-Fi. However, with each connected Wi-Fi device access speed will drop. If one client can operate at a speed of 300 Mbit/s, two can already operate at a speed of 150 Mbit/s, and so on.
The router comes in a colorful box painted in the manufacturer’s corporate colors
The router has been on the market for more than ten years, during which time eight generations (revisions) of this router have been released. Each version has two versions - with a removable and fixed antenna. A router with a detachable antenna is called TL-WR841ND, where the letter D (detachable) indicates that the antenna can be disconnected and replaced with a more powerful one.
Appearance and equipment
The router body is trapezoidal, with strongly rounded corners, White color plastic gives the device airiness and weightlessness. Early versions had black antennas; 2017–18 models are equipped with light gray antennas. On top panel There is a black insert that hides the LEDs - indicators of device activity. Power, wireless network activity, data transfer via wired ports, and Internet connection status are displayed.
Router activity indicators display its operating modes at any given time
The router comes in a large colorful box in corporate colors, but the equipment included with the device is modest:

Specifications
Almost all revisions of the TL-WR841N router have 32 megabytes random access memory, permanent memory for storing settings and firmware with a capacity of four megabytes and a processor that, in addition to computing functions, controls the operation wireless module communications and network switch. The two latest versions of the router (tenth and eleventh), in addition to the faster processor, have doubled the amount of RAM, which is now 64 megabytes. If you plan to use the router in an office with big amount connections, it is better to buy the latest revision model.
It should also be noted that early versions The routers were equipped with a processor cooling radiator. Later models do not have it, so warm time years, under increased load, the router may overheat and freeze. The solution may be to install a small radiator, for example, from a faulty motherboard.
A passive heatsink on the processor will allow the router to operate reliably even in hot summers
Table: comparative characteristics of different versions of TP-LINK TL-WR841N
| Version | v3 | v5 | v7 | v8 | v9 | v10 | v11 |
|---|---|---|---|---|---|---|---|
| Platform | AP81(ar71xx) | ||||||
| Architecture | MIPS | ||||||
| Manufacturer | Atheros | ||||||
| Loader | U-Boot | ||||||
| System Chip: | AR9130 | AR7240 rev 2 | AR7241-AH1A | AR9341 | QCA9533-AL3A | QCA9533-BL3A | QCA9533-AL3A |
| CPU frequency | 400 MHz | 400 MHz | 400 MHz | 535 MHz | 550 MHz | 650 MHz | |
| BogoMIPS | 265.42 | 266.24 | 265.42 | 266.64 | 366.18 | 432.53 | |
| Flash chip | ST 25P32V6P | Unknown | cFeon F32–100HIP/SPANSION FL032PIF | Spansion FL032PIF | Spansion FL032PIF | Winbond 25Q32FVS1G | Spansion FL032PIF |
| Flash volume | 4 MB | ||||||
| RAM chip | Hynix HY5DU561622FTP-5 | Unknown | Zentel A3S56D40FTP-G5 | ESMT M13S2561616A-5T | Winbond W9425G6JH-5 | Zentel A3S56D40GTP-50 | Zentel A3S56D40GTP-50L |
| RAM capacity | 32 MB | 32 MB | 32 MB | 32 MB | 32 MB | 64 MB | 64 MB |
| Radio chip | Atheros AR9100 Rev:7 | Atheros AR9280 Rev:2 | Atheros AR9287-BL1A 2.4GHz 802.11bgn | AR9341 | QCA9533-AL3A | QCA9533-BL3A | QCA9533-AL3A |
| Switch | Marvell 88E6060 | Built-in AR7240 | Built-in AR7241 | Built-in AR9341 | Built-in QCA9533-AL3A | Built-in QCA9533-BL3A | Built-in QCA9533-AL3A |
| USB port | Unknown | Modif. | Modif. | Modif. | No | No | No |
| Serial port | Eat | Eat | Eat | Eat | We need to remove R26 | No | |
| JTAG | Eat | Unknown | Unknown | Eat | No | ||
Video: review and configuration of the TP-LINK TL-WR841N router
Preparing the router for operation
In order for the TP-LINK TL-WR841N to connect all your devices into a single home network and provide each client with Internet access, it is necessary to carry out a number of preparatory measures. The router must be connected by cables to the provider's network and home computers, and the clients' network cards must be programmed to automatically obtain addresses. After this, you can configure Internet access and create a wireless network.
Connecting the router, preparing for setup
The router connection diagram is simple: the provider cable is plugged into the Internet socket, computers local network- into network connectors LAN1-LAN4. Smartphones, tablets and other wireless devices connect using a Wi-Fi network.
For creating home network the TP-LINK router has 4 wired ports and the ability to install unlimited quantity wireless connections
Configuring a computer's network card to work with a router
In the router “out of the box” it is automatically activated DHCP server- the router itself will issue network addresses to connected computers. Therefore, before you start setting up the router, it would be useful to make sure that network adapter computer or laptop is configured to automatically obtain an IP address.
- Click on the “Start” button with the right mouse button and select “Network Connections” from the user menu.
Open the window network settings from the Windows start menu
- In the Network Connections window, select required adapter and with the help right key mouse open its properties.
In the properties of each network connection contains the TCP/IP protocol settings installed for it
- From the list of protocols, select TCP/IP settings and open them for editing.
All network adapter parameters are set in the TCP/IP protocol settings
- Set up automatic receipt network address and addresses DNS servers, and then click OK.
Mode automatic receipt addresses are configured by setting the appropriate checkboxes in the mode switch
Login to the router settings, default login and password
The modem's web interface, through which most of its settings are performed, is located at 192.168.1.1. Username - admin, password - admin. Change the access password immediately after turning on the router for the first time. This will protect your network from outside interference.
- Open the web interface by entering the address 192.168.1.1 in the Internet browser.
The home page of the router's web interface contains its system statistics
- Go to the System Tools section, and from it select Password.
In chapter system settings The router has a submenu for setting login and password
- On the page for changing authorization data, sequentially enter the current login and password, and then their new values. The password must be confirmed to avoid accidental errors.
To enter New Password, you'll have to remember the old one
- Save the changes with the Save button.
Internet connection settings
The router's web interface allows you to configure your Internet connection both semi-automatically (using the setup wizard) and fully manual mode. Before starting setup, make sure your Internet connection is activated by your service provider. To do this, try connecting to the Internet without a router by inserting the ISP cable into your computer's network card.
Connect the provider cable to the socket Computer LAN to check the functionality of the connection
Setting up an L2TP connection
L2TP is one of the types of VPN in which a “tunnel” can be established not only over TCP/IP, but also over interfaces more low level: ATM, X.25 and Frame Relay. The L2TP protocol provides encrypted traffic, so this connection is more often used in corporate networks than for connecting individuals to the Internet.

Setting up a PPPoE connection
Connection via the PPPoE protocol is the most common among Internet providers, and it is easier to configure than others, since the only authorization parameters required are a login and password.

Setting up PPTP
Setting up a connection using the PPTP protocol is no different from setting up L2TP, discussed earlier. Similarly, two types of connections are supported: static and dynamic addresses. Login, password and name are enough for authorization VPN servers. Please note that this type of connection creates heavy load to the router processor. If your tariff plan provides a connection speed of 90 Mbit/s and higher, you should think about buying a new, more powerful router.

Setting up a static IP
If you are connected to the Internet with static address IP login and password are not required. In the parameters of the created connection, you enter the address received from the provider, the subnet mask and the gateway address, after which the router is ready for use.

Video: setting up a Wi-Fi router TP-LINK TL-WR841N
Settings for router operating parameters
After connecting to the provider, you need to set the internal network parameters - configure Wi-Fi distribution, addressing on the local network, port forwarding, etc. If necessary, you can change the firmware version or return the router to factory settings
Setting up Wi-Fi (creating an access point, setting a password)
Enabling and Configuring wireless point access will allow you to distribute the Internet to devices with WI-FI module: laptops, tablets, smartphones.

The password set for the wireless network is used by the router to encrypt transmitted data. The more characters in the password, the more secure the encryption, but also the higher the load on the router’s processor. Optimal size key - 8–13 characters.
Port forwarding
Some users need to access resources on their local network from the Internet. This could be an appeal to family network folders, picture from a home IP camera, remote administration Remote programs Administrator or Team Viewer and use a dozen more required applications. To organize the possibility of such access, so-called port forwarding is required, when a router connects a port external network With specific port internal. Setting up port forwarding is easy using the router's web interface.

Setting up IPTV (digital TV)
Setting up IPTV allows you to select one of four network ports for transmitting a digital video stream to it. You can connect to this port network media player, Smart-TV or digital television set-top box.

Video: setting up PPPoE and IPTV
Local LAN and DHCP
If you are not satisfied with the default local network settings, for example, because there is another router in it, you can always change them in the appropriate section.

Updating the firmware of the TP-LINK TL-WR841N router
Updating the internal software will help eliminate errors, increase performance and improve the stability of the router.
- Check the revision of your router; this information is on a sticker located on the bottom cover of the device.
The memo located on the bottom of the case contains information about the router revision and firmware number
- Download the firmware from the TP-LINK ftp server.
The manufacturer's website contains firmware files for all revisions of the router
- From System section Tools, select Firmware Upgrade.
- Using the “Select file” button, specify the path to the firmware file and click the Upgrade button. The router will begin the update procedure, which will take about 10 minutes.
After installation is complete, you can make sure that the router version has changed
Be extremely careful when choosing the firmware file. Software from a router of a different revision or even more old version When installed, the software may render your device completely inoperable. It can only be restored at a service center.
Video: updating TP-Link router firmware
Setting up TP-LINK TL-WR841N in repeater mode
The standard software does not support switching the router to repeater (repeater) mode. If you decide to use the TL-WR841N to expand your wireless coverage area, you can try installing the alternative firmware DD-WRT, in which the repeater mode is configured in just a few clicks.
- Using the firmware update function, install the DD-WRT firmware.
- Disable WAN interface and the DHCP server on the “Installation” tab (section “Basic Settings”). Enter the repeater network settings details. The device must be on the same network as the main router. We will have a network 192.168.128.0/255.255.255.0, in which the gateway is a machine with the address 192.168.128.5. It is also a DNS server. For the future Dir-300 repeater, a free address 192.168.128.2 was selected, which is not distributed by the DHCP server.
Enter the network address, subnet mask and gateway information to configure the repeater
- Specify the wireless network type as “Repeater-Bridge”, and as the wireless network name, enter the name of the network on the main router. For us this is the DizAr_net network. Save the settings again.
Activate repeater mode in Wi-Fi settings
- Go to the Wi-Fi tab and select the same encryption algorithm and network key as on the main router.
Network security settings are set on the Wi-Fi tab and should be the same as on the main router
Unfortunately, DD-WRT firmware does not support the entire line of TP-LINK TL-WR841N models. On the project website you can download update images for revisions 3, 5, 7 and 8.
Video: setting up the WR841N router in repeater-bridge mode
Factory reset
Resetting the router to factory settings may be necessary if the device does not work correctly and access to the web interface is impossible. Fortunately, all TP-LINK routers have the ability to perform a hardware reset to factory settings.

How to reboot the router
The simplest and effective way reboot the router - turn off the power. Unplug the AC adapter from the outlet, wait five to six seconds, and plug it back in.
— one of the long-lasting budget class models among the company’s wide range. It appeared back in the mid-2000s and has now gone through 15 hardware versions, the latest of which are now available as dual-band ones. The manufacturer recommends immediately after purchase flash TP-LINK TL-WR841N router the latest firmware version available on the official website. The new software fixes bugs found in older versions and improves stable work devices.
To update the software on the TL-WR841N from TP-Link, you will first need to download the latest software. To do this, first find out the version of the device's hardware platform. The easiest way to do this is to turn it over and look at what is written on the sticker:
The hardware version will be written next to the model number. Mine is V8. After that, open the TP-Link website and search by model:

Please note that there are two models on the site - TL-WR841N and TL-WR841ND. Despite the fact that these are similar platforms, their software is not always interchangeable with each other, and therefore we advise you to still download the firmware for the TL-WR841N - click on this model:


You need to download latest firmware for router TL-WR841N. It will be in the archive, so the software file will need to be unpacked.

Now everything is ready for reflash TP-Link router TL-WR841N to the latest version.
Now you need to go to the device settings. To do this, open a web browser and enter the address indicated on the sticker in the address bar:

Usually this is either tplinkwifi.net or tplinklogin.net. The login and password for logging in are also written there. If you can’t access the web interface, use .
In the router web interface, open the subsection System Tools >> Firmware Upgrade(System Tools >> Firmware Update):

Click on the “Select file” button, in the window that appears, specify the path where the TP-Link firmware TL-WR841N and click the “Open” button.

After that, it will appear in the “File” line. Now you can click the button Upgade.

Then the flashing will begin TP-Link router TL-WR841N, which usually takes from two to five minutes, during which the new software will be written to flash memory and the router will reboot with the new software.
Firmware update for dual-band TP-Link TL-WR841N
In order to flash the TL-WR841N firmware of the new model, which now comes as dual-band, the sequence of actions is almost the same. We start from the official website, from where we download and unpack the latest version of the software. Then open the router settings and select the section System Tools >> Firmware Update:

Click on the “Select file” button and specify the path to the firmware file for the TP-Link TL-WR841N router:

Click on the “Update” button and wait until the TP-Link router software is updated, after which it will reboot with the new version already installed.
Hello dear friends. Let's continue today Wi-Fi theme routers, I'll tell you how to flash a Wi-Fi router and I’ll show you how to do this using a router as an example TP-Link TL-WR841N. I’ll also write a few words about why this is all needed and what results can be obtained after flashing the router.
I have been wanting to write this article for a long time, and with each new comment on the article my desire only intensified. There are just a lot of problems that arise during the setup process and Wi-Fi work routers, and not only TL-WR841N. In the article linked above, I described a little the process of updating the TL-WR841N firmware, but for some reason it seems to me that everyone who configures the router according to these instructions simply does not pay attention to the process of updating the software on the Wi-Fi router.
When I installed the router at home, I immediately updated the firmware, and for almost six months of work I haven’t had a single problem. And judging by the comments to the article on setting up the TL-WR841N router, people are having a lot of problems. Most often, the Internet connection is interrupted, or the devices simply do not want to connect to Wi-Fi.
Of course, you shouldn’t blame the Wi-Fi router for everything; there may still be problems, both with the devices you want to connect and with the Internet connection itself. But the more stable the router works, the fewer of these problems that I wrote about above will be.
What am I getting at? And to the fact that Wi-Fi routers need to be updated, not just necessary, but necessary. It’s not just that manufacturers release software updates, in these updates they correct errors, thereby increasing the stability of the router itself. There are, of course, exceptions where errors are not corrected, but added :) but this is rare. Moreover, the firmware is not complicated and takes a few minutes. I'll demonstrate it now.
As I already wrote, I’ll show you how to update the software on the TP-Link TL-WR841N router, but if you have a different router, then read it anyway, since the update process is not very different. Just about to write this article, I went to the site and saw that there was a new update for my router. Great, let's update!
How to update the firmware on a Wi-Fi router?
Attention!
You only need to flash the router by connecting it to the computer via a network cable. You cannot update the firmware via Wi-Fi! If your computer has Wi-Fi, turn it off. Do not turn off the router while updating the firmware!
Attention!
Make sure you have selected the correct firmware. If the firmware is not for your device, then you may lose the warranty and the router itself.
Attention!
At the time of flashing, disconnect the cable from the WAN socket from the router (cable from provider).
Attention!
All settings will be reset to factory settings, but that’s okay, you can set it up in a couple of minutes. You can also make a copy of the settings before flashing the firmware, and after flashing the firmware, simply restore them. I wrote about this in the article ““
Before downloading the firmware, we need to find out the hardware version of our router. If you upload the firmware of a different version, there may be bad consequences, be careful. We take the router, turn it over with the antennas down :) and see what version is indicated there.
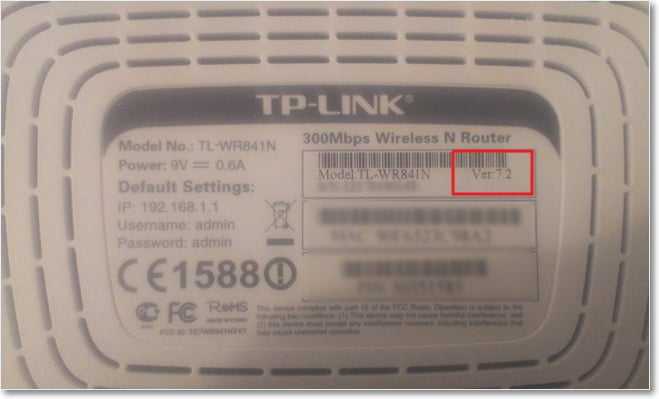
You see, it says “Ver: 7.2”, which means I need to download the update for version 7. Remember which version you have.
We go to the site (in our case) and in the search bar on the site we write the model of our Wi-Fi router, by the way, the model is also indicated at the bottom of the device itself.

We look at the search results and select our router. I need TL-WR841N.
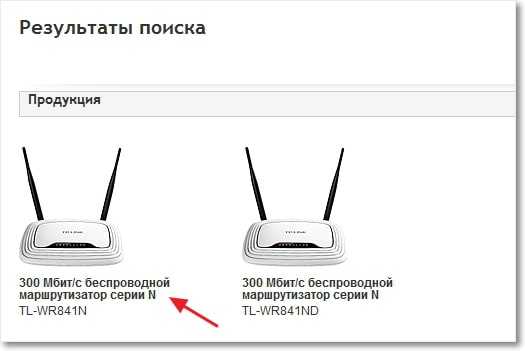
Go to the “Downloads” tab. 
So, now where "Software" opposite the version of our router we select “Firmware”, I have V7 and chose it.

We download the first firmware on the list, in theory this is the newest. You can also look at the date. To download, just click on the link and save the file, for example, to your desktop. As you can see, the firmware is small, 3.1 MB.

Now we need to extract from the archive that we downloaded the file itself with software. You can simply drag the file to your desktop, like I did.

That's it, the firmware is there, you can start updating.
The process of updating the firmware on the TL-WR841N Wi-Fi router
We need to go into the router settings. It must be connected to the computer via a network cable. I have written more than once in other articles about how to get into the settings. Enter 192.168.1.1 in the address bar of the browser, you can also try 192.168.0.1. Then enter your login and password to access the settings (standard admin and admin). Click “Send”.
By chance it fell into my hands wireless router Tp-Link WR-841ND. I have long wanted to test a router with the ability to install alternative firmware for speed and complexity of setup. Many people praise DD-WRT, but at the same time, I often see topics on the Internet “how to return factory firmware».
So, by tradition, a brief description of the device. There was no box, so there will be no photos of the printing.
The router body is made of white plastic and has a nice futuristic design. Along the perimeter of the upper part of the case there are hidden slots for ventilation of the device.
I was very pleased with the antennas. They look impressive and have a gain of 5 dBi. Moreover, they are removable, which can be useful (unlike the WR-841N model).

The bottom of the case also has many holes for air circulation.

Hardware revision of the router 8.1.

Overall, the router made a good impression. Appearance like a flying saucer, solid antennas, good ventilation housing (probably to cool the powerful filling). On such a device, the Internet should surf the vastness of the Universe, just fly.
Personally, I'm in this moment I use a Dlink DIR-300 router (rev. D1). Which has only one internal antenna with a gain of 3.75 dBi. Now is a good reason to compare devices different manufacturers, especially since they are both inexpensive devices for the home.
Specifications
The router is built on the Atheros AR9341 rev 1.1 chipset, operating at a frequency of 535 MHz. The router has 32 MB of RAM and 4 MB of flash memory on board. Has 2 antennas with a gain of 5 dBi. The maximum declared speed is 300 Mbit/s.
The second participant in the Dlink DIR-300 D1 tests is built on a Realtek RTL8196E chip with a frequency of 400 MHz. There is also 32 MB of RAM and 4 MB of flash memory on board. The maximum declared speed is 150 Mbit/s.
Test conditions
Connection to the Internet was carried out using the PPPoE protocol on maximum speed 100 Mbps. Wireless connection carried out according to the 802.11n standard, wireless network was protected by WPA2-PSK/AES.
Testing was carried out on a laptop with wireless adapter 802.11n standard on Realtek RTL8188CE chip. In some tests, a computer with a TP-Link TL-WN727N wifi adapter, which also supports the 802.11n standard, was used as a second wireless device.
The test was carried out in a typical panel high-rise building with many wireless devices. Scanning networks using the Acrylic WiFi Home program showed the presence of 20-30 networks in the 2.4 GHz range.
Firmware used
Firmware dated February 28, 2014 was used as standard firmware. This is the most latest version standard software.
Also, since this model The router supports DD-WRT, it was decided to flash it and see what happens. I will briefly describe the firmware process, especially since it is indecently simple.
Download files from dd-wrt.com factory-to-ddwrt.bin And tl-wr841nd-webflash.bin(the files are located )
We connect the router to the computer using a patch cord. Through the browser (192.168.0.1), go to the router menu under System Tools → Firmware Upgrade and insert the first file into the program (factory-to-ddwrt.bin). Click Upgrade.
When the loading indicator reaches the end, you will need to write in the address bar new address 192.168.1.1. We went to DD-WRT. Next, go to the Administration → Firmware Upgrade menu and feed the router the second part of the firmware (tl-wr841nd-webflash.bin). After the download is complete, you can start working.
Setting up the router is similar to any other router:
- Internet connection: Setup - Basic Setup - WAN Setup. To avoid packet fragmentation, you can set the MTU in accordance with the provider settings. My provider has MTU=1480 (default MTU=1492).
- setting up wi-fi: Wireless - Basic Settings.
- security settings: Wireless - Wireless Security.


By the way, if for some reason you want to return the factory firmware, then this will be just as easy. Just download the file wr841nv8_webrevert.bin from the website dd-wrt.com and flash the device via the web interface (here is a link to the relevant topic).
Testing data transmission within the network
Testing the data transfer speed between a computer and a laptop using the iperf utility showed the following results.

As you can see, the router does a good job of routing traffic between local clients. In particular, the speed between the router and wireless client rose to 90 Mbit/s, which is quite good.
The tests did not show much difference between the firmwares. The only thing is that DD-WRT coped somewhat better with multi-threaded data transfer.
Testing work with PPPoE
Testing the Internet connection using the PPPoE protocol using the speedtest.net service and downloading torrents showed the following results.

Speed measurements using speedtest showed noticeably top scores on DD-WRT firmware when connected via wi-fi. The speed of downloading torrents has also increased noticeably.
Noteworthy is the noticeable decrease in ping, especially when difficult conditions reception.
It should be noted that the speed measurement was carried out with the number of peers limited to 50, because a large number of peers can lead to slower download speeds.
Test D-link Dir-300 D1
Data transfer rates within the local network this router You can see it in this . Its speeds were noticeably lower than those of TP-Link. Let's see how this will affect working with the Internet via PPPoE.

The operating speed of D-Link was approximately at the level of TP-Link with stock firmware. Overall, this is not bad, considering more weak antenna. It definitely makes sense to switch to TP-Link, but you must change the firmware.
Additional modes. Repeater.
DD-WRT has many settings, but personally I was interested in how well the router would cope with the repeater function.
The stock firmware has WDS (Wireless Distribution System) mode, which allows you to combine several routers into one network. According to information from the forum Tp-Link given The function only works with routers from the same company. I couldn't get it to work with another router.
Settings required parameters in DD-WRT it is not obvious, but after a short dance with tambourines everything worked as it should (with some reservations you can use this instruction from Habr).
So, as an experiment, I shoved the basic router into the farthest corner of the closet. At the same time, to weaken the signal, it had to be put into a large stainless steel pan from Zepter (not an advertisement) and covered with a lid. :)
The repeater was installed in the next room, and the receiver was installed across 2 walls from it.
Signal level:
Dlink DIR-300 (basic) - 70 dBm
TP-Link WR841ND (repeater) - 57 dBm
The difference in signal power is more than 10 times. Let's run the test.

The indicators are quite good, the speed increase is approximately 2.5 times.
I also note that the DD-WRT firmware has its own WDS mode.
Additional modes. Access point.
Router functions such as support for PPPoE connections and NAT create a certain load on the router processor. Let's see if the router becomes faster if you disable them. To do this, we need to turn our router into a simpler device - an access point.
By means standard firmware I wasn’t able to do this (perhaps due to my lack of straightness), but with DD-WRT everything went relatively smoothly. Here you can see the options at this link DD-WRT settings For different tasks: repeater, bridge, access point, switch.
In access point mode, the router does not distribute IP addresses to connected devices; they must be entered manually in the parameters network cards. All connected devices (both wired and wireless) are on the same subnet and see each other (for example, you can easily share folders). No one has access to the Internet because NAT does not work. In order for one of the devices to gain access to the Internet, you need to install PPPoE connection with the provider (as well as when connecting the cable directly to the computer). As a rule, only one such connection can be established at a time (however, this depends on the provider).

In this mode, the router only forwards data packets from one port to another, the load on the processor is minimal. Test results are below.

The speed over the cable in this mode was no different from the router mode, but the speed over Wi-Fi was slightly lower, which is a little strange.
Downloading torrents
Separately, I will say a few words about downloading torrents. A large number of connections creates additional load on the router. IN in this case, when the number of peers increased to about 100, I noticed a slight decrease in speed (by 20-30 percent). This is not reflected in the tables.

To get maximum speed on DD-WRT firmware, it is better to limit the number of connections to 50.
Sensitivity to line quality
Oddly enough, the router turned out to be very sensitive to line quality. So, in the initial version of the texts, he showed the speed of the neighboring Internet in the region of 20-30 Mbit/s both via wi-fi and twisted pair. At the same time, the computer and laptop easily downloaded 60-80 Mbit/s.
Replacing the switch port and twisted pair connectors with technical support from the provider solved this problem.
Accordingly, we had to retest the speeds via PPPoE.
conclusions
So, based on the results of getting to know the device, I can say the following. This budget device has a good design and solid antennas (the signal is simply excellent).
Speed within local network wired connection slightly below 100 Mbit/s, and “over the air” can reach 90 Mbit/s. Exchange data between two wireless devices reduces the speed to 30-35 Mbit/s. However, this is quite enough for the exchange small volumes data (music, photo).
The router also showed average Internet speeds using the PPPoE protocol on standard firmware(40-60 Mbit/s).
Installation of an alternative DD-WRT firmware(latest version from December 2014) allows you to slightly improve the performance of the router, increasing the speed and significantly reducing delays. Also this firmware allows you to use the router as a repeater to expand network coverage or as an access point.
PS. Please note that test results depend on many factors, including room geometry, provider equipment, etc. Accordingly, in other operating conditions the results may differ slightly.


