Is it possible to clean a laptop from dust yourself? How to clean your laptop from dust yourself: anyone can do it. Complete cleaning at home
Regardless of how often and how well you clean your apartment, the smallest particles of dust still get inside our computers, laptops and other equipment, gradually polluting it. And if we talk about laptops, then at a certain point the amount of all kinds of small debris in them reaches the limit when the cooling system stops coping with its work and the device simply begins to overheat (in particular, the processor gets very hot, the temperature of which, due to dust, can be 15 -20 degrees above normal). Therefore, today’s question that we will discuss is how to clean a laptop from dust at home is very important and relevant at any time of the year.
You should also know that if there is a lot of dust in your laptop, then the system will not work properly. It will freeze, programs will take a long time to open, and general work Windows will be very slow. After cleaning your laptop, system slowdowns will be left behind, and you will just have to enjoy working on your laptop. Therefore, if in this moment If you are not satisfied with the operation of the system, and you are thinking of reinstalling Windows, then first you need to clean the laptop from dust, and only then draw your own conclusions. Yes, I won't just write an article about this process, but I will also disassemble my laptop and do the cleaning with you. This way I won't miss out on not one important nuance Well, I’ll clean my laptop. At the end of the article, you can watch a video on how to disassemble and clean a laptop.
But what is the danger of overheating a laptop, and is it possible to clean the laptop from dust yourself or will you have to go to specialized centers with this problem? More on this below.
What tools can be useful for cleaning a laptop?
First, let's define the things that you may need to clean your laptop:
- Hairdryer If there is little dust in the laptop, you can use a hairdryer.
- Spray can with compressed air – excellent replacement hairdryer But you can cope without it.
- Vacuum cleaner with reverse. If you have a vacuum cleaner with an air blowing function, then this vacuum cleaner will be very useful in this procedure.
- Brush. It is desirable that the bristles of the brush be a little rough. You can use a toothbrush if you don't have a brush at hand.
- Screwdrivers. Without this tool, you will not be able to disassemble the laptop. Of course, you can use a knife, but it is not convenient and extremely unsafe. You need a plain and Phillips screwdriver.
- You may need a regular plastic card, which will help you disassemble the laptop without damage. This tool Not everyone will need it.
- Thermal paste. If you disassemble the laptop completely, I recommend also replacing the thermal paste. Cost from 10-50 rubles in any computer store.
- Napkins. To wipe dusty and dirty places in the laptop.
- Excellent lighting. To see small parts and clean without damage, I recommend doing the cleaning process in good lighting.
- Time. If you are disassembling a laptop for the first time, then you should know that cleaning a laptop will take approximately 60 minutes. If you want to do it quickly, then it is better to leave this procedure for later, because in a hurry you can damage the laptop.
After reading this part of the article, I ask you not to rush to the laptop to clean it yourself. There are nuances in cleaning laptops that we will discuss further. Therefore, read the article to the end. As you probably already understood, to clean your laptop you do not need to buy expensive tools and equipment. Most likely, you have all of the above things at home and therefore cleaning your laptop can be done at home. If you don’t understand something in this instruction, then at the end of the article there will be a video from which you can understand how to disassemble the laptop. You should also understand that laptop models are different and therefore there will not be a 100% match with your laptop. I, in turn, will make pictures and detailed description so that everyone can complete this procedure.
Signs of a clogged laptop
Ideally, it is not recommended to bring it to a state where signs of dust clogging the laptop appear. It is better, for preventive purposes, to clean it once every six months to a year, and if you live near a busy highway, then it is recommended to clean it even more often.
But still, how can you tell if dust has accumulated in your laptop? The following signs indicate this:
- Happening spontaneous shutdowns apparatus. First the laptop turns off when heavy loads (computer games, programs that require large laptop resources), then when starting office programs and undemanding applications, after which - almost immediately after switching on (it’s better not to let it get to that point). As you understand from the above, when high load the laptop starts to freeze and self-saving is triggered - shutdown (so that the laptop components do not burn out).
- You clearly feel that the case around the keyboard or touchpad is heating up much more than before. During this time, your palms or wrists may become sweaty.
- The cooler makes a loud noise when operating. The laptop has a cooler (if you say in simple language- fan), which cools the inside of the laptop and when there is a lot of dust there it works on maximum level, since due to dust it does not cope with its purpose, which ultimately leads to hum.
- Very hot air comes out of the ventilation.
There is one for you good news– there are special programs that will help you understand what the temperature of the laptop components is in real time. In one of the articles I already talked about how to check the temperature: “”. I recommend following the link and reading this information. For example, you can install a free Speccy program(I talked about this program in the article), which will allow you to see the temperature: central processor, motherboard, graphics device and hard drive.
Problems caused by laptop overheating
As mentioned above, when there is a lot of dust, the laptop cooling system stops coping with its direct task, as a result of which such important parts as the central and GPUs, chipset, as well as hard drive ( HDD). The problem here lies in two things:
- First, laptop fans are often quite weak and, even under normal conditions, have difficulty cooling the device, not to mention severe contamination.
- Secondly, most of the internal microcircuits of a laptop are designed in such a way that with frequent and high temperature changes (in particular, an increase during operation and a decrease during shutdown), contact disruptions occur between the board and the chip, as well as between the chip substrate and the crystal. As a result, during extreme heating caused by dust in the cooling system (which becomes contaminated first), a defect appears, gradually increasing in size and leading to serious damage to the chip structure. The worst thing is that this process can no longer be eliminated by simple cleaning and you need to contact specialists.
In general, most laptop breakdowns, according to service center workers, are caused by overheating as a result of severe contamination (less often, as a result of some kind of technical breakdown or defect). For example, in addition to overheating of the processor and microcircuits, a hard drive often “flies”, in which the bearing that supports and moves the read heads fails due to overheating.
In short, the problem is so serious that it is better to periodically clean your laptop than to have it repaired or return it. computer technicians for not very much money. Yes, computer technicians buy broken laptops so that they can then use your laptop as a donor for another laptop that can still be restored in working condition. As is correct, the price of a badly damaged laptop ranges from 2000-5000 rubles.
Easy laptop cleaning - no disassembly required
One of the simplest ways to clean a laptop (suitable if the contamination is small) is to blow through the hole in the radiation grill using a hairdryer set to cold air. If you turn on hot air in a hairdryer, you can damage the laptop case or keys. Usually this hole located on the side of the body, sometimes at the back. First you need to turn off the laptop, then place the laptop on its edge, place a hair dryer near the hole, and blow it through.
Important: no need to blow for a long time! You should blow for 3-5 seconds, then turn off the hair dryer and after 10-15 seconds repeat this procedure 5 more times.

If you don’t have a hairdryer, you can also use a can of compressed air (you can buy it at a computer store). This method simple, but better done complete cleaning laptop to make sure everything is in order.
Laptop cleaning and disassembly
If there is a lot of dust in the laptop, and it has already turned into a compressed lump of dirt, then the cleaning method described above is not suitable. This method is suitable for users who regularly clean their laptop, for example, every 2-3 months. However, it should be borne in mind that such methods (a hair dryer and a can of compressed air) will not cope with severe dirt and it is better to disassemble the laptop for a deeper cleaning.
To do this you will need (below will be detailed instructions with pictures and videos):
- Unplug your laptop.
- Disconnect all devices from it: flash drives, mouse, power supply, etc.
- Now turn the laptop over and place it on the table. You want the bottom of the laptop to be on top and the screen to be on the table.

- Take out the battery, which is located at the bottom of the laptop. To do this operation, you must extend the clamp(s) that hold the battery. In the picture below you can see what it looks like:

Now you can remove the battery, move it away from you:

- Next, using a suitable screwdriver (usually a Phillips screwdriver), unscrew the bolts (it is better to put them in a separate box so as not to lose them). Some laptops do not need to be completely disassembled to get to the cooling system. It is enough to open one compartment that houses the cooling system. When you start disassembling the laptop, you will immediately understand where the cooling system is located (in a “visible” place or inside the laptop). In my case, I have one compartment, and to open it, I need to unscrew one bolt:

When the bolt is unscrewed, you need to lift the unscrewed part of the laptop or pay attention to the arrow, which will indicate where to move the unscrewed part. IN in this case I pulled her towards me:

- Next, remove the cover. You will see the main devices and immediately determine where the dust has accumulated most (cooler and radiator). If you do not see the cooler and radiator, then you need to disassemble the laptop further.

Now a little about the nuances during analysis. To do dust cleaning Asus laptops and Samsung you need to remove bottom panel in a laptop (not a compartment, but a panel). If you have these manufacturers, then cleaning is a little more complicated than, for example, Acer or Lenovo. There are laptops that need to be completely disassembled for cleaning, but don’t worry, because this article will have detailed nuances that will help you disassemble your laptop. For example, by unscrewing the lid Lenovo laptops G510 and G500, you will immediately have access to the cooling system:

You can watch the video if this is your situation:
When you remove the bottom panel, be careful, as this panel is held on by fragile clips. If you break the latches, then nothing bad will happen, but in the future there will be a small gap (the panel will not fit tightly to the laptop body).
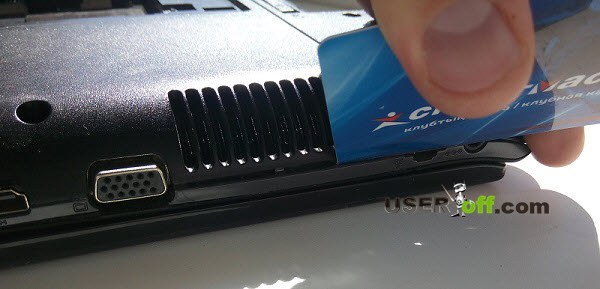
To remove the bottom panel, you can use a regular screwdriver and a plastic card. If you need a plastic card when disassembling your laptop, I recommend using the one you don’t need. When disassembling, it will come into close contact with parts of the laptop, and you may damage it.
So, you started disassembling your laptop. They turned it over, disconnected all devices from the laptop, put it on the table and began to unscrew the bolts. If your laptop has mini flash drives, then do not forget to remove them:

After removing the cover you may have 2 situations:
- You will see the hard drive, RAM and other components of the laptop.
- Or you will have access to a cooling system.
Of course, the second option is the simplest. Having reached the cooling system, you need to clean it; below I will describe how to do this. If you have the second option, then you can go a little lower, since now I will describe the process when the cooling system is inside the laptop. So, if you have the first option, then you will need to unscrew all the bolts! You need to carefully inspect the bottom of the laptop and make sure that all the bolts are unscrewed. Many users make the mistake of leaving a couple of bolts screwed in and then trying to remove the cover. In this situation, you can break the laptop cover, as you will use force to remove it, or by removing the cover, the bolts will remain screwed to the laptop body. In any case, the laptop will already be defective. I think you don't need this, and that's why unscrew all the bolts!
The bolts need to be put in one place so as not to lose them:

Note: There may also be bolts under the battery, so inspect this area.
Now take off optical drive(where you insert the disks). Near the hole where the bolt is located, there may be an inscription - ODD, which “says” that this bolt holds the drive.

To remove the drive, you need to carefully pry it up with a simple screwdriver, or you can use your fingers.


Now lift the hard drive a little and move it away from you:

After this you need to disconnect the cable from hard drive. Attention: do not pull the cable! Grab the plastic part of the cable and slowly pull it out:

Remove the RAM. In the image below I showed where to press (remove from the latches):

Disable and remove Wi-Fi if necessary (I do not remove):

If you see any loops, turn them off. If you have a plug in the SD slot, remove it so that it does not get in the way when opening the case (I don’t have one):
After all the bolts have been unscrewed and the devices have been removed, you now need to arm yourself with a simple screwdriver and plastic card. The lid is held on by latches and therefore this part of the laptop must be disconnected from the device. If all the bolts are removed, try using your fingers to remove the bottom of the laptop. If this is difficult, then use a plastic card. For example, you can start from the side where the VGA connects, the power supply, network cable, HDMI and flash drives:
On some laptops, you can start removing the clips in the area where the battery was:

Of course, the plastic card does not fit all laptop models, and therefore you can first use a screwdriver to remove one of the latches, and only then use the card if it is more convenient for you. When one lock is removed, carefully insert the plastic card inside the laptop (where the lock was removed) and slowly lift the card (we press the card down, and the other part of the card will rise up). In the picture above, I simply showed that the lock is removed; on the contrary, you need to lower the card below. When one of the latches is removed, you need to walk around the laptop in this way.
If the laptop has narrow parts where there is usually 1 latch, then in this case it is better to use a screwdriver, since it is difficult to work with a plastic card in such areas.

When the cover wobbles a little, it means that all the fasteners have been removed. Just take it off slowly back cover. When removing the cover, look inside the laptop to make sure there is nothing holding the cover.
Note: in some laptops, disassembly is done from the top - where the keyboard is located. In this case, you need to remove the keyboard, remove top part laptop case, disconnect the cable, unscrew the bolts and then the cooling system will be available to you. For example, this option suitable for Acer Aspire 5560G.
One way is to look at the sticker that is located at the bottom of the laptop (look for the word Model):

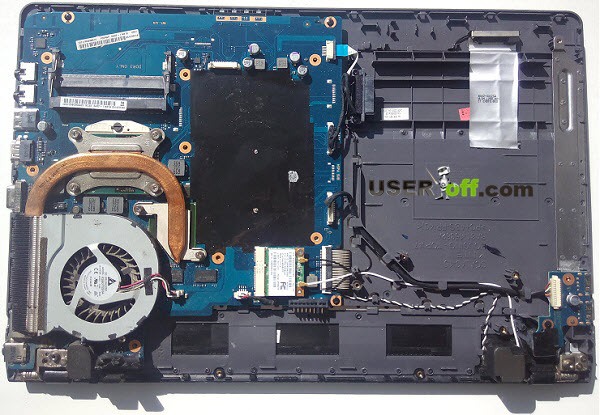
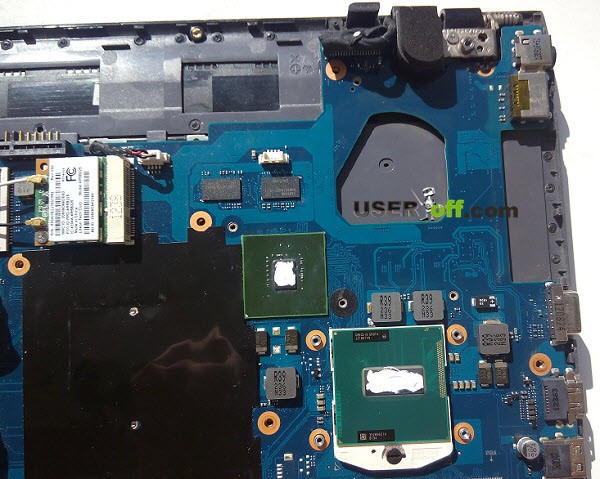
Having reached the inside of the laptop, you can now see how much dust is in it. The laptop was cleaned about 3 months ago (there is a little dust, but it is there, picture below). To remove the cooler you need to unscrew 2-3 bolts that hold its body:

Now disconnect the cooler from the motherboard:
Use a dry cloth or napkin to clean its blades. Very effective method– vacuum cleaner or hair dryer. Point the nozzle of the vacuum cleaner at the fan and, without touching it, turn on the vacuum cleaner. You can also use a brush or toothbrush.
This is what a not very dirty radiator looks like:

The radiator can be cleaned with a brush or with the same vacuum cleaner (the already mentioned can of compressed air will also work). Since these instructions are detailed, we will dismantle the cooling system; to do this, unscrew the screws that hold the radiator. When you unscrew the device, you need to pay attention to the numbers that are written next to each bolt:

It should be unscrewed strictly in in a certain order diagonally, following the numbers indicated next to the bolts. Namely: first unscrew the 6th bolt, then unscrew the 5th bolt, etc... 
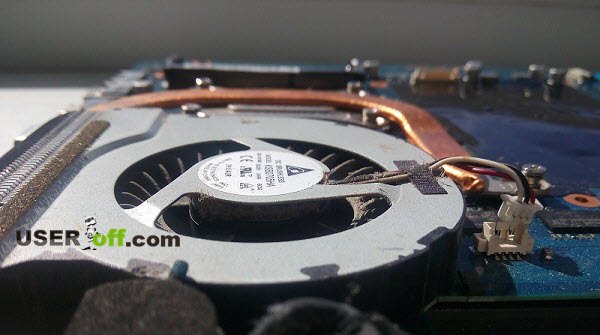
When you remove the radiator, you need to carefully lift it up. Perhaps it has stuck to the crystals (or rather, the thermal paste has glued them) and then in this case you need to move it a little to the right and left to loosen it a little. If the processor sticks to the radiator (it is removed together with the radiator), then you will need to slightly heat the radiator with a hairdryer and then carefully remove the processor. After removing the radiator, you should blow it out with a hairdryer/vacuum cleaner and clean it, for example, with a toothbrush. If you look at the photo, you can see that there is no dirt or dust inside:


The next step is to replace the thermal paste. To do this, remove the old one (it can be removed with a regular napkin or industrial alcohol). In the image above it was clear that there was thermal paste, but now it is gone:

Apply a new one:

There is no need to make a pile of thermal paste, just a thin layer is enough:
The radiator is installed strictly in reverse order(again, follow the numbers - 1, then 2, then 3, etc.). This is very important, since improper installation or removal of the heatsink can damage the crystal. The radiator is screwed on:
Now lubricate the cooler with the previously stored machine oil. To check whether the cooler needs lubrication, you can twist it with your finger. If it's easy to spin, and not extraneous noise, then you don’t have to lubricate it. Of course, if you are doing a full-fledged cleaning that you haven’t done for 3-4 years, then it’s better to do it. To lubricate the cooler, you need to peel off the edge of the sticker, which is placed in the center, and using, for example, a needle, remove the rubber plug. Next, you need to drop 1 drop, close the hole with a stopper and glue the sticker back on. If there is no traffic jam, then you need to inside pull the cooler blades to get to the desired location.

This is the end of the cleaning procedure. Insert the cover into the latches, pressing it gently. Next, connect the hard drive, optical drive and insert RAM, as shown in the picture below:

I think the procedure for cleaning a laptop from dust at home has been described in detail and you will not have any additional questions when cleaning your laptop. Here is an option when the entire laptop is disassembled (there is another useful video below that I recommend watching):
Cleaning the keyboard
Oh, if you only knew how badly and quickly a laptop keyboard gets dirty, thanks to the common love among most users of sitting at it with tea and sandwiches (or other goodies). Also, our hair, animal fur, etc. often get into the cracks between the keys.
There are two simple ways to clean your keyboard:
- Blowing can be done using: a vacuum cleaner, hair dryer or a can of compressed air.
- Deep cleaning when the keyboard is disassembled.
And if with the first method special problems If you don’t have this problem, then you need to consider the second one in a little more detail:
First you need to unpin top panel(it's usually latched). Then use a screwdriver to unscrew the screws that secure the keyboard to the laptop. It is also possible that the keyboard is secured with latches. Next, you will need to carefully remove the keyboard by unfastening the cable. Using a flat-head screwdriver or another object (for example, a knife), you should unfasten all the keys and wipe the entire space from debris.
You should also wipe down each key individually before replacing it. It is recommended to take a photo of the key layout in advance so as not to get confused later.
If you decide to thoroughly clean your keyboard, then go to the article “”, from which you will learn all the nuances and details of this process.
Cleaning the screen
The screen is the easiest to clean - just buy it in the store special napkins, which should be used to wipe it from time to time (the laptop must be turned off). The screen must be wiped dry.
Here is an example of a product from a popular manufacturer:

Approximate cost is about 500 rubles.
Prevention
It is important to understand that any equipment requires proper care and a laptop is no exception. Finally, a few simple tips that will help you clean it less often:
- When working with a laptop PC, place it on a table with a clean and level surface. It is not recommended to place the laptop on pillows, blankets, etc...
- Don't eat in front of your laptop (and certainly don't drink in front of it). I think there is no need to explain why!?.
- Clean your laptop regularly. If you want your device to serve you for a long time, then you need to clean your laptop 1-2 times a year.
At first glance, the cleaning procedure seems a little complicated and inaccessible to ordinary users, but in fact, once you complete this process once, you will remember all the steps and in the future cleaning your laptop will take about 30 minutes.
Video on how to clean a laptop (must watch):
Good day, dear friends! Over time, the laptop becomes clogged unnecessary information and this affects its speed and performance. You can solve the problem by reinstalling the system, but there is a less radical way. Today I will tell you how to clean your laptop from unnecessary programs and files manually.
Regardless of the OS version - Windows 7 or newer versions, the process is always the same.
It boils down to the following steps:
- Cleaning the desktop.
- Cleaning the hard drive.
- We remove unnecessary software.
- Getting rid of temporary files.
- Cleaning the registry.
- Checking autorun.
The six steps listed above allow you to thoroughly clean Windows system 8, 10 or early 7k. It won’t take much time and is suitable even for dummies, since you don’t need any special knowledge.
Desktop
IN standard situation the hard drive is divided into 2 partitions and the smaller one is used for storage operating system. In Windows 7 and higher, data from the desktop is also stored on this disk. Often users prefer to store all data on the desktop and thereby take memory from the disk, which is already not very large in volume. If the system starts to slow down, then you need to remove everything unnecessary from the table. We check what data is stored and also delete it unnecessary shortcuts, because often the program is launched through the START menu, and the shortcut still takes up space. I don’t recommend storing a lot of data on your desk, and if you really need it, it’s better to make a folder on a larger local drive and create a shortcut for it.
HDD
Most store data, photos, videos and various documents on the laptop hard drive. As memory fills up, performance slows down. I suggest removing everything unnecessary or moving it to external storage. I recommend using external storage or store everything in the cloud. Today, many resources offer this opportunity. Important point– should be deleted large files and various garbage - torrent shortcuts, pictures, etc. The less data, the faster the device works. An important point - if the file is not deleted simple actions, then you should install the Unlocker program. It stops any process that prevents the file from being deleted and allows you to get rid of it.
Unnecessary software
Many users do not remove unnecessary software or do it incorrectly. The best way to delete applications is through the Manager Windows programs 10 (available in earlier versions) or using special programs. Inexperienced users remove the software by deleting the folder or simply getting rid of the shortcut on the desktop. In this case, the program itself or the data it accessed remains on the hard drive. The best option use CCleaner. It allows you to get rid of both working software and software that was previously removed incorrectly.
Temporary files
When the laptop is running Windows 8 or early versions enjoys different files, which are not needed all the time. They remain in a special storage and gradually reduce the speed of the device. If these files are not deleted, the system will begin to freeze and generally not function properly. The easiest way to clear your hard drive of temporary files is to use the Disk Cleanup utility. It is located in the tab Utilities. Select the one you need local disk and start the procedure. The device will perform all actions independently.
Registry
The registry is a kind of place where information about different processes is stored. As you use the technology, it fills up, the data is saved incorrectly and does not work. This affects performance Windows systems 10. There are several ways to clean the registry. You can do this manually, but you need some knowledge here, since there is a chance to delete it by mistake necessary information. The easiest way, in my opinion, to clean it is to use the CCleaner application. It has a special section for cleaning the registry. You just need to indicate what exactly needs to be cleaned, and then the program itself will select safe unnecessary data and delete it.
Autostart
The operating system is designed in such a way that individual programs start automatically. They are recorded in autorun, and when the user turns on the laptop, these programs start on their own. Some of them have real benefits, but some simply slow down the inclusion process. In order to speed up the startup procedure of the laptop, autostart should be cleaned for unnecessary software. IN CCleaner app There is a special item that displays all the software contained in startup. Another option is to write msconfig on the command line and run the application, which will open upon request. It has a startup item, where you should uncheck unnecessary utilities.
Thank you for your attention! See you soon on the pages of my blog! Sincerely, Rostislav Kuzmin.
How Personal Computer, its portable counterpart is equipped with a ventilation system that protects the device from overheating. It is the cooling system - weakness laptop. Tiny debris and dust accumulate inside and penetrate far under the body. The rate at which dust accumulates will depend on the design and how carefully the user handled the laptop. The layer becomes thicker; As a result, it resembles felt, or “felt boots” in other words.
Signs that cleaning is needed
What happens to the PC:
- gets very hot;
- the processor makes noise that increases;
- the fan does not cope with its task;
- programs freeze;
- keys stick;
- switching on takes a long time;
- If the device overheats, it turns off unauthorized.
All of these things may indicate that your laptop needs cleaning. There are also diagnostic programs temperature regime. Indicators above 70 degrees are a sign of possible overheating due to contamination.
Possible consequences of heavy pollution
Over time, constant overheating of the laptop can lead to big problems than an emergency completion of work, including a failure of the cooling system, a radiator that came unglued from the video processor, a fire in the microcircuits and the laptop itself.
Types of cleaning
There are two types - superficial and deep. When deep, the device must be disassembled, thoroughly wipe all parts, completely removing dirt.
Superficial implies external care of the laptop. Keyboard on the outside, monitor, blowing dust through the fan and radiator grille. This type of cleaning is mostly preventive. The device will remain in service longer. Superficial “cleaning” is important not only for aesthetics, but also for the user’s health, because debris accumulates on the keyboard. great amount microbes
If there are all signs of serious contamination on the face, complete cleaning cannot be avoided. It's easier to spend time removing dirt than to pay for repairs.
Tools
What tools to choose when preparing for “ spring cleaning»:
- Vacuum cleaner/hair dryer for sucking/blowing dust. If the vacuum cleaner has both functions, you can only use it.
- A can of compressed air. The aerosol performs the same function as a hair dryer.
- Soft brushes, small brushes for cleaning the keyboard and other parts. For the same purpose, you can use cotton swabs or swabs.
- Microfiber cloth for wiping.
- Screwdriver Set. Screwdrivers of different diameters will be needed during disassembly.
- Machine oil for lubricating the cooler.
- Isopropyl alcohol for cleaning microcircuits.
- Pliers. Special pliers are used to remove the screen.
- Thermal paste. After cleaning the parts, you will need to replace the thermal paste to better cooling computer.
How to clean a laptop from dust without disassembling it?
Superficial “cleaning” without disassembly is sufficient simple procedure, which is easy to do at home. To get rid of dirt, you can arm yourself with a vacuum cleaner, hair dryer or spray can. Special cleaning wipes won't hurt.
The ventilation grilles are located on the bottom, they suck air inside, there is another grille on the side, from where the air is blown out. These are the places that need to be cleaned first.
If the device becomes too dusty and has not been cleaned for more than three years, it is dangerous to clean it superficially, since a large amount of dense dust will settle on the fan, rendering it inoperable.
Before you blow laptop, you can use cotton swabs to clean the ventilation grilles.
Procedure:
- Turn off the laptop.
- Place it edge-on, like a book.
- Place the vacuum cleaner one at a time ventilation grilles, holding for about 2 minutes each.
- Repeat the procedure with a hairdryer near the radiator.
- Go through the vacuum cleaner again.
Due to the long thin spout, the can is well suited for the entrance vent. Just insert the spout inside. The air will “start” the fan, blowing debris away from it. How to do this using an aerosol:
- Turn off the laptop.
- Place it edgewise.
- Blow out the outlet ventilation grilles.
- Return the device to its normal position.
- Blow out the inlets.
- Blow out debris between the keys.
- To consolidate the effect, you can use a vacuum cleaner.
All that remains is “cosmetic” beauty – tidying up the display and keys. The benefits of such events are purely individual, determined by the design of the laptop.
Complete cleaning at home
When starting “spring cleaning”, it is important to have at least basic disassembly skills. The housing needs to be cleaned motherboard, radiator, processor, video card. If the user is not sure that nothing will be damaged, it is better to entrust the task to specialists.
Before the cleaning procedure, any equipment must be completely de-energized. To do this, you need to shut down the work, disconnect the laptop from the network, and remove the battery. Otherwise, you risk injuring yourself and damaging the device.
If the user is not very experienced in disassembly, then it is worth filming the process. With the help of photographs, the reassembly process will go faster; the main thing is not to skip any steps when taking photographs. It’s worth looking online for a video with the design features of the same model in order to do everything correctly and not damage anything.
Keyboard
The keyboard is almost the dirtiest item in the house, so you should start with it. If it is not very dirty, it is enough to wipe it from the outside. To do this, you can use cleaning wipes for equipment. You can replace them with regular cloth and soap; they will cope just as well with dirty prints.
- Dampen the cloth and squeeze to prevent water from running off.
- Lather lightly.
- Wipe the keys, removing external dirt.
- Dampen a clean cloth and wring it out.
- Wipe again to remove soap.
- Wipe dry with a napkin.
Instead of soap, you can use cleaning products or diluted alcohol, as long as it does not damage the key markings. Such products can erase the paint. If this trouble does happen, special stickers will come to the rescue.
If the keys are too dirty, you can remove them with a knife and soak them in water and detergent. To position them correctly after drying, you can take a photo of the keyboard.
To clean the inside of the keyboard, you need to carefully remove it from the case so as not to damage the cable. This advice applies to all other manipulations, since this is not the only loop in the design.
Connectors
USB and other connectors also become dirty, which can cause interruptions in connecting a mouse, phone, or flash cards. A brush with long bristles is suitable for cleaning. If the connector is narrow and it won’t fit through, you can cut a narrow strip from an unnecessary plastic card to fit the size of the port and cover it with Velcro. It is necessary to moisten the brush or Velcro in alcohol and let it dry. Light movements, effortlessly clean the connectors from dirt. Then blow out the ports with a can of compressed air.
Opening the back cover
The laptop needs to be turned over. To get to the parts that need cleaning, you need to unscrew the bolts holding the back panel. Unscrewed bolts should be placed in a prepared container or bag so that they do not get lost. You should not open the cover by force if it does not give in; it is better to double-check that all the bolts are unscrewed. After removing the panel, use a napkin to wipe it from the inside.
Cooler and radiator
After unscrewing the screws that hold the fan, put them in another place so that they do not get confused with the rest. After removing the fan, use a brush or cotton swabs to wipe the blades and blow with air. If the fan does not spin well, lubricate the rotor with machine oil. One drop inside is enough. Then return the fan to its place by turning it.
Pay special attention to the radiator, which is the largest accumulation of dust. It should be thoroughly cleaned to remove any remaining thermal paste.
Motherboard, video card
Having pulled the motherboard out of the case, we can consider that half the job is done. Proceed with extreme caution as this is the most fragile part of the laptop. Walk over the surface with a soft brush slightly moistened with alcohol and use a spray can or hairdryer to blow on all the microcircuits, without missing a single dusty contact.
The video processor should be removed from the slot carefully. Pull the socket pedal to the side and lift it up. When the pedal accepts vertical position, grab the processor by the sides and remove it from the socket. Wipe the contacts with a regular eraser or an ear stick soaked in alcohol.
Replacing thermal paste
A complete disassembly of the cooling system involves replacing the thermal paste. First, use a dry cloth to remove any remaining old thermal paste. If the paste is dry, you can moisten a cloth with alcohol. Do not leave scratches on the surface of the processor and heatsink.
Before applying the composition, you need to make sure that the surfaces are clean and shiny. Apply thermal paste to large quantities, carefully spreading it over the heatsink plate and video card with your finger or a spatula, which is usually included with the thermal paste included.
Reassembly
Return the video card to the connector, pressing it with your finger, and tighten the bolts. It is necessary to hold it with your finger so that it does not form under it. air bubbles. Replace the remaining parts using the photographs taken.
Screen
Under no circumstances should the display be wiped with alcohol-containing compounds, as this will damage the screen. For gentle cleaning, you should choose wipes for LCD surfaces or sprays for TVs. Apply a small amount of spray onto the display, rub with a napkin, leaving no streaks.
Features of laptops from various companies
The process of cleaning models from various manufacturers almost identical, only the process of removing the back cover and removing the cooler and radiator changes.
Lenovo and Aser laptops have a simple design. It is enough to remove the battery, remove the cover over the fan by unscrewing the bolts.
Lenovo has developed Lenovo program Energy Management, which, in the “Dust Removal” mode, speeds up the fan and helps get rid of debris. Analogue of the program Hewlett Packard- HP CoolSense. The technology determines on what surface the device is used, selecting the appropriate performance mode and cooling system.
The Asus Eee PC will literally have to be disassembled piece by piece, because access to the cooler is difficult, like many Hewlett Packard models.
At Samsung disassembly and Asus K is completely removed back panel, and sometimes the keyboard.
Cleaning in specialized service centers during the warranty period and the cost of the service
To clean the cooler, you can use the services of a service center. This is not included in the service, which is clearly stated in warranty card any manufacturer, i.e. the service will be paid.
Once the laptop has been disassembled and cleaned at home, the warranty is no longer valid. The center recognizes this by the damaged seal and scratched screws.
You can clean your laptop in any repair shop in an hour. Prices on average range from 500 to 2000 rubles.
How often is cleaning required?
The best time to do the first cleaning is after the warranty has expired. Acer, Asus, Samsung, HP, IBM, Lenovo recommend cleaning at least once a year. More expensive models from SONY, HP and Asus will require attention in two years. Apple will operate without interruption for up to three years. In many ways, the frequency of cleaning depends on operating conditions. If you are using your laptop on a hard surface in a clean room, you will need to clean it later. On average, the device needs to be cleaned once every year and a half.
How to avoid frequent contamination
In order not to constantly blow dust out of the device, it is enough to arm yourself with simple tips:
- Use the laptop on a hard surface. By placing the computer on the lap or bed, the user blocks the air supply and small debris is sucked inside.
- You should not snack while working at the computer. Crumbs will get inside. And knocked over tea or coffee will completely kill the device.
- When finishing work, the laptop should be turned off so that it does not run idle.
- A USB cooler will provide additional cooling effect, but will not help avoid dust.
A laptop is a powerful portable computer, and keeping it clean is key to the safety and reliability of the device.
The laptop, of course, charms everyone with its size. It is convenient to work with it, both at a desk and while lying in bed. We take it to all places convenient for us (to work, vacation, on the bus, etc.). This is all correct. However, such mobility often backfires on us. How?! Yes, it’s very simple, basically we are talking about clogging the keyboard and cooler with various debris - dust, threads, crumbs, hairs, etc. Here it will no longer be possible to replace this or that part so easily and quickly, so it is better to prevent such a situation in advance by using regular cleaning laptop and in this article we will tell you how you can clean your laptop yourself.
8 steps to clean your laptop from dust and dirt
- Prepare a powerful vacuum cleaner for cleaning, but not a washing one (or turn off this function); a damp piece of cloth that would hold dirt well; as well as a brush (you can even have several with different diameters).
- First tidy up the case and keyboard. To do this, run a vacuum cleaner along the hole where the cooler is located and also thoroughly vacuum the keyboard. Remember that no matter how powerful a vacuum cleaner is, it most likely will not be able to suck in all the dust and dirt accumulated under the keyboard (if your keys are still old). Therefore, you will also have to help the vacuum cleaner, sweeping away dirt with a small brush, while holding the tube nearby. This will take a long time, but it’s better to do it now than to suffer from discomfort (a broken keyboard key) later.
- Pay special attention to the connectors. They shouldn't have extra items or elements that would obstruct the entry of the plug or power cord. After completing all external cleaning, run a damp cloth over the entire body to remove any fine dust that may have appeared as a result of your manipulations.
- Now it’s time to disassemble your laptop a little. As a rule, it is enough to remove the back cover of the laptop to get to the parts we need. It is attached to a large number of screws, so it would be great to have a screwdriver on hand, but if you don’t have one, then a small Phillips screwdriver will be enough. Try not to lose these screws, since, as practice shows, losing them is very, very easy. After unscrewing everything, be prepared that the lid will have additional latches; try to open the back cover of the laptop so as not to break them. Great idea will watch a video tutorial about disassembling and assembling your laptop model in advance.
- Having removed the cover and set it aside, you can begin to further actions. First, we remove the cooler, since it is this that often gets clogged and begins to generate dust throughout the laptop. Before you remove it, remember its position, or better yet, take a photo so you don’t rely on your memory. Wipe the cooler itself thoroughly with a damp cloth, but the radiator, which is cooled by it, needs to be cleaned under high power vacuum cleaner, sucking out dust particles from it.
- Once you turn on the vacuum cleaner, then walk it over the entire area of the back of the laptop, holding the tube at a distance of no more than one centimeter. It’s a good idea to thoroughly blow off the RAM board and also remove dust from the hard drive. In principle, you are unlikely to have access to everything else, but you don’t need it. The thing is that the main elements are considered to be the cooler, which cools the processor and transmits coolness through copper tubes further through the system, and RAM, since it also often gets quite large layers of dust, which creates a problem in its work.
- Once everything is clean, it's time to start assembling the laptop. You should not rush, because if you forget to screw or insert something, you will have to disassemble it again. The cooler must be dry; installing it in a wet state is strictly prohibited. When tightening the screws, you do not need to overtighten them, otherwise it will be more difficult to unscrew them later, and you can also tear off the head or thread, which will significantly complicate the task of assembling and disassembling the laptop.
- After putting the laptop back together, turn it on. If it works, it means everything was assembled normally, if not, then double-check the assembly and perhaps disassemble it again. If this does not help, please contact us immediately. service center for repairs. There is no need to worry too much, since the reason will most likely be bad contact, so the repairmen will put everything in order in 15-20 minutes.

How to avoid frequent laptop cleaning?
- enjoyUSB cooler in the form of a stand. A great thing for those who use a laptop on a desk. The main advantage of the cooler is that it is built into the stand, which is located at an angle to the table, which means it prevents the laptop from overheating.
- Use a special stand on a bed, sofa or chair. The stand is somewhat reminiscent of a table on which breakfast in bed is served. The good thing about it is that you don’t have to place the laptop on fabric, which impairs heat transfer and increases the chance of contamination.
- Eating over the keyboard less often. It’s clean not where they clean (in our case they clean), but where they don’t litter! Try to refrain from drinking or eating directly at your laptop. Let it be at least a meter away from you so that you cannot crumble it onto the keyboard.
- The laptop doesn't need to work just like that. A laptop is not full-fledged computer, in terms of size, the parts in it wear out much faster and also get dirty faster, so try not to just leave it on. It’s not for nothing that it has a “Sleep” function, use it more often.
That's all. Now you know how to clean your laptop yourself, as well as how to avoid regular cleaning.
Over time, the system becomes full of garbage that slows down the operation of the laptop: unnecessary programs, temporary files, registry entries. You can clean the system and speed up its operation using built-in tools or special software.
System cleaning procedure
The main thing in cleaning your laptop from debris is regularity. If you have never tried to clean the system, then so much unnecessary data will accumulate in it that you will normal work you can forget. Many users immediately begin to think that the hardware no longer holds up, and they need new laptop or at least complete reinstallation systems.
Reinstalling will solve the problem, there will be no garbage left, but you can speed up the system in a less radical way, which does not involve deleting user data from the laptop. Even cleaning with the built-in tools will have a huge positive effect. But in order not to forget anything, let’s create a clear sequence:
- Cleaning the desktop. Delete unnecessary files and shortcuts to unused programs.
- Checking documents, including downloaded torrents. Typical situation– I downloaded the season of the series, watched it, and left it as dead weight on the disk. Delete - the more space, the faster the system works.
- Uninstall unused programs.
- Cleaning the disk from temporary files.
- Cleaning the registry using CCleaner.
- Checking the startup list.
If the file is not deleted, use Unlocker utility. It independently unloads from memory the processes that are occupied by the file, helping to quickly clean the system of data that, when deleted, gives the error “Unable to delete. The file is being used by another program."
Uninstalling programs
Try to ensure that only valid required applications. It is better to clean the system of software “garbage” in order to free up space and slightly increase performance. There are several ways to remove a program:
- Through the “Uninstall a program” applet in the control panel.
- By using own file uninstall Uninstall.exe.
- Taking advantage of the utility's capabilities Revo Uninstaller(there is a free version).
The third option is preferable, because Revo Uninstaller removes the program completely, including erasing entries in system registry. After standard uninstallation, traces remain that are not beneficial to the system.

After Revo removal Uninstaller will offer to clean the system from remaining debris. Select a mode and click Scan. 
The program will show the remaining files and folders. Select them and click "Delete". 
With advanced scanning, you can erase entries in the registry, so that the application will be destroyed without a trace.
Deleting temporary files
A lot of temporary files accumulate in the system, clogging up memory, which need to be gotten rid of.

The same operation can be performed using the free cleaning utility CCleaner:

Deleting temporary files will empty the Recycle Bin, so make sure there is nothing useful in it before you start cleaning your system. Additionally, you can clean up system files:

Another list of data that can be deleted will be generated. Among them will be old updates, which sometimes take up a lot of space on your hard drive. After generating the list, click “Ok” to clear it.
Cleaning the registry
A huge amount of garbage also accumulates in the system registry - entries about programs that were deleted long ago. If you uninstalled using Revo Uninstaller, then there will be no entries left, but it won’t hurt to clean the registry in any case - there are still incorrect extensions or incorrect firewall rules. ABOUT manual removal out of the question: it is too long and dangerous - you can erase the wrong record and get errors in the system. The registry should be cleaned using CCleaner:

If you have never performed such a procedure before, you will immediately notice that the system has become faster and more stable.
Setting up autorun
To speed up your laptop boot time, you need to clear the startup list. It adds programs that are loaded with Windows. How more apps, the longer it takes to launch them. To clear the startup list of garbage:

IN standard list Autorun can only disable programs, but you cannot delete them. If you want to literally clean your startup of junk to speed up your system, use CCleaner.

Since you have opened the “Tools” tab in CCleaner, use one more convenient function cleaning the laptop - searching for duplicates. Everything is simple here: run the search, look at the result, select which version of the file you should get rid of (usually they are completely identical and created at the same time), and click “Delete selected”.


