Blowing a laptop with compressed air. Do-it-yourself laptop cleaning: easy dust removal and serious cleaning inside the case
At a certain point, the ergonomics and portability of a laptop become a disadvantage in the eyes of its owners. It’s enough to imagine a situation where you need to upgrade the hardware of a compact device, and all the “indisputable” advantages turn into one big problem: “labor-intensive dismantling of the case.” Infrequently, but still a need arises in the form of a question: “How to clean a laptop from dust without disassembling it?” - for many users it seems completely unsolvable. But is this really so? Let's find out!
Difficulty understanding the service process
How do you know when it's time to service your laptop?
So, the feasibility of the actions taken in resolving the situation “how to clean a laptop from dust without disassembling the device?” - This is, first of all, carefully carried out monitoring of the working elements of the system.

- Go to your computer's BIOS.
- Depending on the manufacturer of the underlying system, as well as its version, the section in which temperature information is displayed is often called PC Health Status.
- New UEFI firmware displays "degree" readings in the main BIOS window.
If you see the current value of 60 degrees Celsius or higher, it’s time to clean the “patient”. An irritating fan hum, statistical crackling and groundless “braking” of the OS are also unfavorable signs and a reason for your intervention. Of course, during the game you can feel the “hot potential” of your computer. However, this phenomenon may not always be a cause for concern. It is quite possible that you are “straining” the video card and central processor for too long. As you can see, the question: “How to clean a laptop from dust without disassembling it” can be anticipated!
Thoughtful design from caring developers: easy dismantling
Let's move a little away from the context of the main problem and still touch on the question: when is the disassembly process appropriate?

However, the question: “How to clean an Acer laptop?” can be resolved just as easily. Despite the fact that the process of disassembling devices of this brand is often incredibly difficult to implement. However, you can do without “crawling” inside with a screwdriver...
Internal cleaning of a laptop from dust contamination without “hacking” the case
Watching a video manual for servicing your specific laptop model is the first thing you need to do to make sure that unhindered access to the cooling system is not possible. Then remove the battery and follow the simple recommendations, which in the end will be a practical answer to the question: “How to clean a laptop from dust without disassembling it?”

How to clean
An Acer or HP modification of a laptop, as well as a portable device from another company, may become unmanageable! And in the literal sense of the mentioned expression.

If sweat marks are a blessing for fingerprint experts, then in the event of a critical accumulation of such a human waste product, it simply cannot be avoided. Dust and grease will cause the keyboard to become partially inoperable.
- Using a brush (by the way, the bristle should be of medium hardness) thoroughly clean the laptop control module.
- Pay special attention to the space between the keys. This is where you need alcohol!
- A drop of the mentioned substance between the buttons and a few intense presses will certainly give a positive result.
When self-cleaning can be dangerous: what to do?

If dirt gets under the body part of the buttons, the process of step-by-step removal of each such element cannot be avoided. In this case, it is advisable to clean the laptop (the price of such a service is from 300-700 rubles, by the way, not high) in a special service center or a workshop for repairing such electronics. As a rule, non-island buttons have a complex design, and if you remove them yourself, there is a high risk of breaking the latches and fixing elements of the keys. However, for those who doubt their abilities, whose equipment is still under warranty, it is, of course, better to turn to specialists. Agree - this will be a wise decision!
- Buy a special vacuum cleaner for your laptop.
- Do not use the portable device outdoors in high humidity, dusty conditions, or in an environment that is considered unfavorable.
- Completely clean the device regularly.
- Remember: free access of air to the ventilation ducts of the laptop is a full-fledged operation of the cooling system. Therefore, it is strictly forbidden to use a laptop when it is “sinking into the arms” of upholstered furniture or is in “on your lap” mode for a long time.
In conclusion
Now, if you have a question: “How to clean an HP laptop?” - you know what steps need to be taken for this. After all, literally all portable electronics undergo, in general, the same “sanitization” process.

Particularly savvy users, before using the high-pressure hose of a running compressor unit, should think about how organizing such cleaning might end up. You might smile, but the result will be forced movement of the laptop's internal components. Cleanliness to you and long-term operation of your laptop!
The computer is increasingly consuming our time. Social networks, TV series, preparing essays, work... This is a far from complete list of what the average modern person cannot imagine living without. And one more thing that many people don’t think about - in addition to time, the laptop also absorbs dust and quite a lot. This dust needs to be cleaned at least occasionally for the laptop to work properly. Today you will find out how to clean your laptop from dust yourself. But let's talk about everything in order. Our goal is your laptop without noise, without dust.
When you're having fun or working, your laptop is also running and using kilowatts of energy. It is known from school physics that static electromagnetic charges attract a variety of material objects. The smaller the object, the more easily it is attracted. Dust from the surrounding air is a good candidate for settling inside your laptop. If you don't pay attention to this, it will become increasingly difficult to clean your laptop later, and you may have to throw it away along with the dust.
Often people do not attach importance to all of the above factors. They don’t even pay attention to the overheating of equipment and the smell. You are reading this article, you are lucky, let's now look at how to clean your laptop from dust. First of all, remember that attempting to disassemble your laptop while it is under warranty will void your right to warranty repairs.
Is it time to clean your laptop from dust?
A sign that dust is seriously interfering with your laptop's performance is when it starts to heat up. The computer always gets a little warm, but if your palm starts to feel hot like a frying pan, then, of course, this is an alarming sign. Another sign that parts of your laptop are clogged can be strange noise, usually loud enough to be noticed. Slow loading of programs is another indirect sign that it’s time to clean up the dust.
Now let's talk about how we will clean it from dust. If you can’t disassemble or don’t want to, you can simply blow it out. A hairdryer, vacuum cleaner or other source of strong air jet will do.
It seems that everything is simple. However, let's clarify how to clean your laptop from dust and not regret getting into it.
If the laptop hasn’t been opened for a long time and the warranty period has expired, then let’s open it. The internal arrangement of parts may vary depending on the model. But fundamentally they are designed in a similar way. The main targets for cleaning are the cooling system and boards.
How to disassemble and clean a laptop from dust
The first thing to do is turn off the power supply. Trying to open a running laptop is dangerous for both you and it. Take this point seriously. A laptop is a mobile thing, so in addition to unplugging the power cord, you also need to remove the battery. Otherwise, static electricity combined with moisture can lead to short circuits and death of the motherboard.
To remove the battery, you may need to remove the back cover first. Its location may differ for different laptop models. If the battery is connected using a cable, carefully disconnect it.
Dust particles usually settle on fans and circuit boards. Other nooks and crannies can also harbor dirt. Let's start with the fans. In most cases it is not necessary to remove them at all. You can clean the blades with a damp cloth wrapped around a screwdriver or with cotton swabs. We blow the boards or wipe them in the same way, with a damp or alcohol wipe. After cleaning, let it dry, do not turn it on immediately to avoid short circuits.
For more detailed cleaning you will have to disassemble a little more. First, remove the hard drive and RAM board. Here again, there may be options for how this is done; in most cases, they are simply pulled out and removed with a simple movement of the finger. The hard drive is also screwed down, as it should not move freely.
The laptop keyboard is undoubtedly attacked by a variety of contaminants. This is especially noticeable if the keyboard is white. You can begin the cleaning process by simply wiping the keys with a damp cloth. You can buy special products for caring for the plastic of computers. If you suspect that a lot of dust has accumulated under the keys, you will have to remove the keyboard and clean it. To do this, carefully detach the top panel, then unscrew the screws that secure the keyboard to the case.
To cause minimal damage, it is better to use a plastic card where possible. It is better to use a screwdriver only for unscrewing fasteners. The panel is held on by latches that are clearly visible and easy to press. Don't rush to use the keyboard. It is attached to the board with cables using, again, latches.

Gently disconnect. There may be quite a few trails, so try not to get confused. It is recommended to mark them in a way that is convenient for you. You will have to disconnect them, since there is no other way to get to the board. Wipe the buttons and keyboard board.
Now you can get to the cooling system. She will already be visible.

Unscrew the fasteners and take out the fan. We remove all dirt and dust. It’s better to assemble everything manually at the moment, or blow it out with your exhalation. A vacuum cleaner, like an electrical appliance, will build up static electricity on your circuit board.

You can analyze it further. Can . But. The further you go, the more things you have to unscrew, and the more difficult it is to reconnect everything. If you are not sure that you can put it all back together as it was, then you better stop. And call the master. In principle, you have already reached the desired level and cleaned the dust.
Parting words to the master
Now you know in general terms how to clean your laptop from dust. Try to do everything carefully, it depends on whether you can put everything back together. The fasteners may be non-standard, and if you lose them, getting the necessary fasteners will be quite a task.
Finally, I would like to wish you not to forget to clean your laptop from dust from time to time. The frequency of care depends on the conditions in which he works. However, the dust must be cleaned at least once a year. A clean laptop will last much longer.
Did you read to the very end?
Was this article helpful?
Not really
What exactly did you not like? Was the article incomplete or false?
Write in comments and we promise to improve!
Modern laptops are characterized by high performance. To ensure normal operation of the device and adequate cooling of all elements, manufacturers equip them with a ventilation system, which is why it is so important to know how to clean a laptop from dust yourself.
Along with the air, dust and particles of debris enter the laptop case, which settle on the surface of the internal elements and fans and land on the bearings. Fan performance decreases, and the main elements of the system overheat. As a result, work slows down, and in some cases the laptop shuts down completely due to overheating.
To prevent the device from malfunctioning, it is recommended to regularly clean the laptop from dust, even at home. If the computer is under warranty, it is better to take it to a service center so as not to break the manufacturer’s seals yourself. In other cases, you can clean it yourself, using the article as step-by-step instructions.
Precautionary measures
If you plan to clean it yourself, be sure to take precautions to avoid unwanted consequences. This will keep you healthy and save money.
- Before starting the procedure, be sure to turn off the system, disconnect the device from the network, and remove the battery.
- When disassembling the laptop, unscrew the screws carefully. Remember or write down in a notebook how many and what length of screws are screwed on this or that element.
- If you cannot find the screws, most likely the element is held in place by latches. When removing such assemblies, proceed with extreme caution. If you encounter difficulties, use a small screwdriver and lightly pry the latch. Do not use force, otherwise you will break the fastener.
- Clean only with clean and dry hands. If you have gloves in your arsenal, be sure to use them.
- When using a vacuum cleaner, do not point the suction port at the motherboard. This can cause damage.
- Do not blow out dust and dirt with your mouth, otherwise it will get into your lungs and eyes. Better use a hairdryer. Direct only a stream of cold air at the internal elements.
- When cleaning a laptop, it is strictly forbidden to use cleaning products and wet wipes, except for special ones.
Step-by-step plan for cleaning your laptop from dust

If the system slows down, the “screen of death” has become a frequent visitor, the laptop body gets very hot, and the sound of the fans resembles the operation of jet engines, this is evidence that your personal assistant needs cleaning.
Cleaning a laptop without disassembling
Even if there is no knowledge in this area, and there is no way to seek qualified help, do not panic. Place the patient on the table, take the vacuum cleaner out of the closet, attach a thin nozzle to the nozzle, activate the blower mode and blow through the laptop, paying special attention to the keyboard and vents.
Video instruction
After completing the five-minute procedure, you will notice that your laptop's performance has improved significantly. It’s not surprising, because the procedure helps remove the main layer of dust. However, it is impossible to completely solve the problem using this cleaning method, so I do not recommend delaying total cleaning.
Cleaning a laptop with disassembly
If your laptop is out of warranty and you are brave enough to carry out the disassembly and cleaning procedure yourself, go ahead. Just be careful and remember what you unscrew and disconnect from where.
Before starting the procedure, prepare your equipment. To work, you will need a small screwdriver, a soft brush, a vacuum cleaner and a hair dryer. And the instructions below will be a good assistant in disassembling and cleaning.
- Turn off the laptop and disconnect the battery. Turn over and carefully unscrew all the screws and carefully remove the cover. Place removed and unscrewed elements in a container so as not to lose them.
- Identify areas where dust and debris accumulate. Traditionally, you will see the largest amount of dirt on the fan blades and between the radiator fins. In advanced cases, a continuous layer of dust and debris is discovered.
- Carefully remove the fan. Peel off the sticker, remove the washer and remove the impeller. Wipe the blades with a cloth, clean and lubricate the shaft with machine oil, and assemble the cooling element.
- Brush over the surface of the radiator, paying special attention to the cracks, and collect loose pieces of dust with a vacuum cleaner.
- Using a hair dryer, vacuum cleaner or compressed air can, remove dust from the surface of all internal components. Do not use a rag or cotton swab for this purpose. They leave behind tiny shreds, and this is fraught with short circuits. A brush is not suitable for cleaning the motherboard, as it is potentially harmful to the traces.
- Use a hair dryer or vacuum cleaner to remove dust from the keyboard. If a more thorough cleaning is planned, disassembling the module is not necessary.
- Once cleaning is complete, reassemble the patient in reverse order. Be careful not to force the components into place, otherwise you will damage the fragile parts.
After completing the assembly, turn on the computer and check its operation. If everything is done correctly, the room will be filled with a quiet and pleasant sound made by cleaned and lubricated fans. By the way, these instructions are also suitable for cleaning a netbook.
Video manual
I do not recommend disassembling and cleaning the laptop yourself if it is under warranty. It is better to entrust this task to a specialist who will carry out preventive maintenance as safely as possible for the system. The master will not charge much for the work, but in the long run such investments will pay off handsomely.
Features of cleaning laptops of different brands
Portable personal computers are produced by many companies, and each manufacturer uses a unique cooling system in its products. If you disassemble several laptops with identical technical characteristics, the contents inside will be different. My point is that the need to clean one model appears after six months, while the other quietly works much longer.
Asus and Acer companies are trying to make the plight of users as easy as possible. To clean a laptop of any of these brands, simply remove the back cover. This simple step allows easy access to the cooling system.
If we talk about products from HP, Sony or Samsung, it is more complicated. To carry out proper cleaning, you often have to completely disassemble the system. Be sure to take this into account.

If the user regularly monitors the cleanliness of the laptop and periodically cleans it from dust and dirt, this deserves respect. The procedure can be carried out much less frequently if you follow a few rules.
- If you like to work on a bed or in a chair, buy a special table. This will protect your laptop from dust accumulated in furniture upholstery and soft blankets. And it’s more convenient to work with such a stand.
- Don't combine work and meals. Experience shows that food and drinks often lead to breakdowns.
- Do not turn on the laptop if renovation work is being carried out in the house or apartment. Construction dust is more dangerous to the system than household waste. During repairs, it is better to place the device in a case.
- Turn on the laptop when necessary, and activate sleep mode when finished.
A careful attitude, complemented by prevention, significantly increases the life of the laptop. Do a general cleaning every six months, remove dust with a hairdryer once a month, regularly wipe the keyboard and monitor, and your laptop will reward you with quiet and trouble-free operation. You can continue
Regardless of how often and how well you clean your apartment, the smallest particles of dust still get inside our computers, laptops and other equipment, gradually polluting it. And if we talk about laptops, then at a certain point the amount of all kinds of small debris in them reaches the limit when the cooling system stops coping with its work and the device simply begins to overheat (in particular, the processor gets very hot, the temperature of which, due to dust, can be 15 -20 degrees above normal). Therefore, today’s question that we will discuss is how to clean a laptop from dust at home is very important and relevant at any time of the year.
You should also know that if there is a lot of dust in your laptop, then the system will not work properly. It will freeze, programs will take a long time to open, and the overall performance of Windows will be very slow. After cleaning your laptop, system slowdowns will be left behind, and you will just have to enjoy working on your laptop. Therefore, if at the moment you are not satisfied with the operation of the system, and you are thinking of reinstalling Windows, then first you need to clean the laptop from dust, and only then draw your own conclusions. Yes, I will not just write an article about this process, but I will also disassemble my laptop and clean it with you. This way, I won’t miss more than one important nuance, and I’ll clean my laptop. At the end of the article, you can watch a video on how to disassemble and clean a laptop.
But what is the danger of overheating a laptop, and is it possible to clean the laptop from dust yourself or will you have to go to specialized centers with this problem? More on this below.
What tools can be useful for cleaning a laptop?
First, let's define the things that you may need to clean your laptop:
- Hair dryer. If there is little dust in the laptop, you can use a hairdryer.
- A can of compressed air is an excellent replacement for a hairdryer. But you can cope without it.
- Vacuum cleaner with reverse. If you have a vacuum cleaner with an air blowing function, then this vacuum cleaner will be very useful in this procedure.
- Brush. It is desirable that the bristles of the brush be a little rough. You can use a toothbrush if you don't have a brush at hand.
- Screwdrivers. Without this tool, you will not be able to disassemble the laptop. Of course, you can use a knife, but it is not convenient and extremely unsafe. You need a plain and Phillips screwdriver.
- You may need a regular plastic card, which will help you disassemble the laptop without damage. Not everyone will need this tool.
- Thermal paste. If you disassemble the laptop completely, I recommend also replacing the thermal paste. Cost from 10-50 rubles in any computer store.
- Napkins. To wipe dusty and dirty places in the laptop.
- Excellent lighting. To see small details and clean without damage, I recommend doing the cleaning process in good lighting.
- Time. If you are disassembling a laptop for the first time, then you should know that cleaning a laptop will take approximately 60 minutes. If you want to do it quickly, then it is better to leave this procedure for later, because in a hurry you can damage the laptop.
After reading this part of the article, I ask you not to rush to the laptop to clean it yourself. There are nuances in cleaning laptops that we will discuss further. Therefore, read the article to the end. As you probably already understood, to clean your laptop you do not need to buy expensive tools and equipment. Most likely, you have all of the above things at home and therefore cleaning your laptop can be done at home. If you don’t understand something in this instruction, then at the end of the article there will be a video from which you can understand how to disassemble the laptop. You should also understand that laptop models are different and therefore there will not be a 100% match with your laptop. I, in turn, will make pictures and a detailed description so that everyone can perform this procedure.
Signs of a clogged laptop
Ideally, it is not recommended to bring it to a state where signs of dust clogging the laptop appear. It is better, for preventive purposes, to clean it once every six months to a year, and if you live near a busy highway, then it is recommended to clean it even more often.
But still, how can you tell if dust has accumulated in your laptop? The following signs indicate this:
- Spontaneous shutdowns of the device occur. First, the laptop turns off under heavy loads (computer games, programs that require large laptop resources), then when running office programs and undemanding applications, and then almost immediately after turning it on (it’s better not to let this happen). As you understand from the above, under high load the laptop begins to freeze and self-saving is triggered - shutdown (so that the laptop components do not burn out).
- You clearly feel that the case around the keyboard or touchpad is heating up much more than before. During this time, your palms or wrists may become sweaty.
- The cooler makes a loud noise when operating. The laptop has a cooler (in simple terms, a fan) that cools the inside of the laptop and when there is a lot of dust there, it works at the maximum level, because due to the dust it cannot cope with its purpose, which ultimately leads to hum.
- Very hot air comes out of the ventilation.
There is good news for you - there are special programs that will help you understand what the temperature of the laptop components is in real time. In one of the articles I already talked about how to check the temperature: “”. I recommend following the link and reading this information. For example, you can install the free Speccy program (this is the program I talked about in the article), which will allow you to see the temperature of the central processor, motherboard, graphics device and hard drive.
Problems caused by laptop overheating
As mentioned above, when there is a lot of dust, the laptop cooling system stops coping with its direct task, as a result of which such important parts as the central and graphic processors, the chipset, and the hard drive (hard drive) suffer greatly. The problem here lies in two things:
- First, laptop fans are often quite weak and, even under normal conditions, have difficulty cooling the device, not to mention severe contamination.
- Secondly, most of the internal chips of a laptop are designed in such a way that with frequent and high temperature changes (in particular, an increase during operation and a decrease during shutdown), contact disruptions occur between the board and the chip, as well as between the chip substrate and the crystal. As a result, during extreme heating caused by dust in the cooling system (which becomes contaminated first), a defect appears, gradually increasing in size and leading to serious damage to the chip structure. The worst thing is that this process can no longer be eliminated by simple cleaning and you need to contact specialists.
In general, most laptop breakdowns, according to service center workers, are caused by overheating as a result of severe contamination (less often, as a result of some kind of technical breakdown or defect). For example, in addition to overheating of the processor and microcircuits, a hard drive often “flies”, in which the bearing that supports and moves the read heads fails due to overheating.
In a word, the problem is so serious that it is better to periodically clean your laptop than to have it repaired or take it to computer technicians for not very much money. Yes, computer technicians buy back broken laptops in order to later use your laptop as a donor for another laptop that can still be restored to working condition. As is correct, the price of a badly damaged laptop ranges from 2000-5000 rubles.
Easy laptop cleaning - no disassembly required
One of the simplest ways to clean a laptop (suitable if the contamination is small) is to blow through the hole in the radiation grill using a hairdryer set to cold air. If you turn on hot air in a hairdryer, you can damage the laptop case or keys. Usually this hole is located on the side of the case, sometimes at the back. First you need to turn off the laptop, then place the laptop on its edge, place a hair dryer near the hole, and blow it through.
Important: no need to blow for a long time! You should blow for 3-5 seconds, then turn off the hair dryer and after 10-15 seconds repeat this procedure 5 more times.

If you don’t have a hairdryer, you can also use a can of compressed air (you can buy it at a computer store). This method is simple, but it is better to do a complete cleaning of the laptop to be sure that everything is in order.
Laptop cleaning and disassembly
If there is a lot of dust in the laptop, and it has already turned into a compressed lump of dirt, then the cleaning method described above is not suitable. This method is suitable for users who regularly clean their laptop, for example, every 2-3 months. However, it should be borne in mind that such methods (a hair dryer and a can of compressed air) will not cope with severe dirt and it is better to disassemble the laptop for a deeper cleaning.
To do this you will need (below there will be detailed instructions with pictures and videos):
- Unplug your laptop.
- Disconnect all devices from it: flash drives, mouse, power supply, etc.
- Now turn the laptop over and place it on the table. You want the bottom of the laptop to be on top and the screen to be on the table.

- Take out the battery, which is located at the bottom of the laptop. To do this operation, you must extend the clamp(s) that hold the battery. In the picture below you can see what it looks like:

Now you can remove the battery, move it away from you:

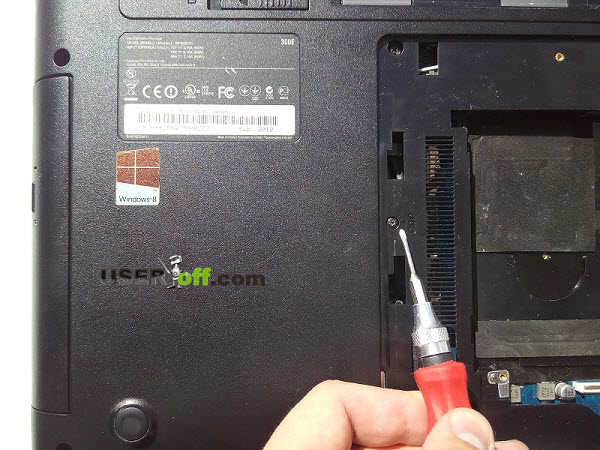
- Next, using a suitable screwdriver (usually a Phillips screwdriver), unscrew the bolts (it is better to put them in a separate box so as not to lose them). Some laptops do not need to be completely disassembled to get to the cooling system. It is enough to open one compartment that houses the cooling system. When you start disassembling the laptop, you will immediately understand where the cooling system is located (in a “visible” place or inside the laptop). In my case, I have one compartment, and to open it, I need to unscrew one bolt:

When the bolt is unscrewed, you need to lift the unscrewed part of the laptop or pay attention to the arrow, which will indicate where to move the unscrewed part. In this case, I pulled it towards myself:
- Next, remove the cover. You will see the main devices and immediately determine where the dust has accumulated most (cooler and radiator). If you do not see the cooler and radiator, then you need to disassemble the laptop further.

Now a little about the nuances during analysis. To clean dust in Asus and Samsung laptops, you need to remove the bottom panel of the laptop (not the compartment, but the panel). If you have these manufacturers, then cleaning is a little more complicated than, for example, Acer or Lenovo. There are laptops that need to be completely disassembled for cleaning, but don’t worry, because this article will have detailed nuances that will help you disassemble your laptop. For example, by unscrewing the lid on the Lenovo G510 and G500 laptops, you will immediately have access to the cooling system:

You can watch the video if this is your situation:
When you remove the bottom panel, be careful, as this panel is held on by fragile clips. If you break the latches, then nothing bad will happen, but in the future there will be a small gap (the panel will not fit tightly to the laptop body).
To remove the bottom panel, you can use a regular screwdriver and a plastic card. If you need a plastic card when disassembling your laptop, I recommend using the one you don’t need. When disassembling, it will come into close contact with parts of the laptop, and you may damage it.
So, you started disassembling your laptop. They turned it over, disconnected all devices from the laptop, put it on the table and began to unscrew the bolts. If your laptop has mini flash drives, then do not forget to remove them:

After removing the cover you may have 2 situations:
- You will see the hard drive, RAM and other components of the laptop.
- Or you will have access to a cooling system.
Of course, the second option is the simplest. Having reached the cooling system, you need to clean it; below I will describe how to do this. If you have the second option, then you can go a little lower, since now I will describe the process when the cooling system is inside the laptop. So, if you have the first option, then you will need to unscrew all the bolts! You need to carefully inspect the bottom of the laptop and make sure that all the bolts are unscrewed. Many users make the mistake of leaving a couple of bolts screwed in and then trying to remove the cover. In this situation, you can break the laptop cover, as you will use force to remove it, or by removing the cover, the bolts will remain screwed to the laptop body. In any case, the laptop will already be defective. I think you don't need this, and that's why unscrew all the bolts!
The bolts need to be put in one place so as not to lose them:

Note: There may also be bolts under the battery, so inspect this area.
Now remove the optical drive (where you insert the discs). Near the hole where the bolt is located, there may be an inscription - ODD, which “says” that this bolt holds the drive.
To remove the drive, you need to carefully pry it up with a simple screwdriver, or you can use your fingers.


Now lift the hard drive a little and move it away from you:
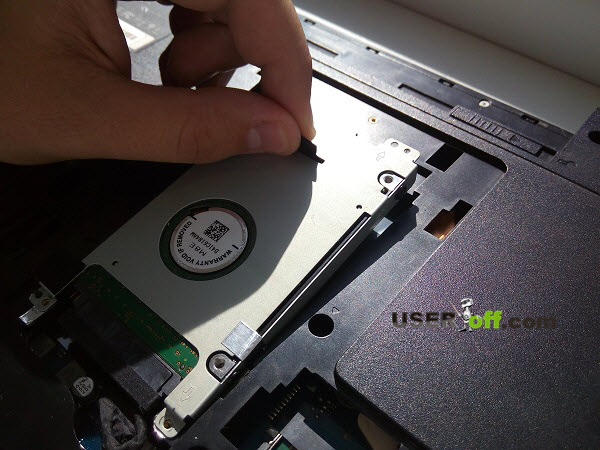
After this, you need to disconnect the cable from the hard drive. Attention: do not pull the cable! Grab the plastic part of the cable and slowly pull it out:

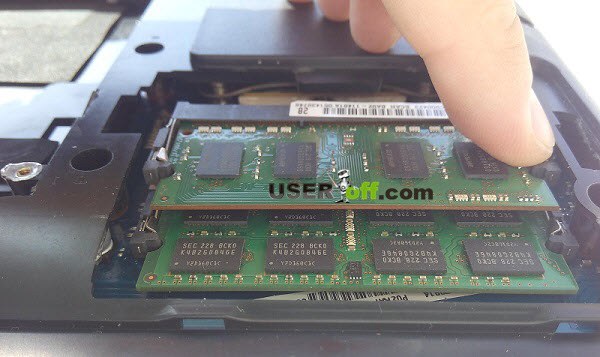
Remove the RAM. In the image below I showed where to press (remove from the latches):
Disable and remove Wi-Fi if necessary (I do not remove):
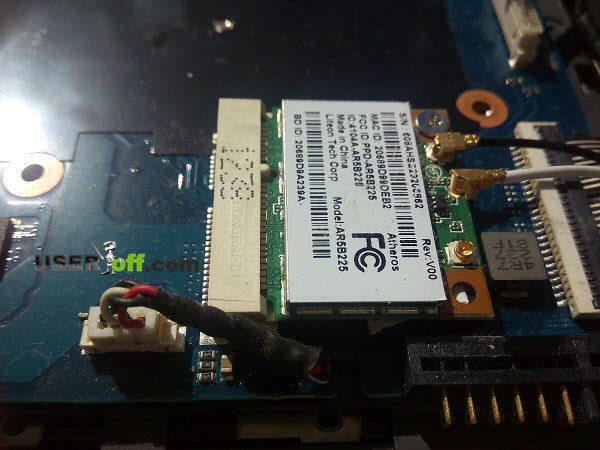
If you see any loops, turn them off. If you have a plug in the SD slot, remove it so that it does not get in the way when opening the case (I don’t have one):

After all the bolts have been unscrewed and the devices have been removed, you now need to arm yourself with a simple screwdriver and a plastic card. The lid is held on by latches and therefore this part of the laptop must be disconnected from the device. If all the bolts are removed, try using your fingers to remove the bottom of the laptop. If this is difficult, then use a plastic card. For example, you can start from the side where VGA, power supply, network cable, HDMI and flash drives are connected:

On some laptops, you can start removing the clips in the area where the battery was:

Of course, the plastic card does not fit all laptop models, and therefore you can first use a screwdriver to remove one of the latches, and only then use the card if it is more convenient for you. When one lock is removed, carefully insert the plastic card inside the laptop (where the lock was removed) and slowly lift the card (we press the card down, and the other part of the card will rise up). In the picture above, I simply showed that the lock is removed; on the contrary, you need to lower the card below. When one of the latches is removed, you need to walk around the laptop in this way.
If the laptop has narrow parts where there is usually 1 latch, then in this case it is better to use a screwdriver, since it is difficult to work with a plastic card in such areas.

When the cover wobbles a little, it means that all the fasteners have been removed. All that remains is to slowly remove the back cover. When removing the cover, look inside the laptop to make sure there is nothing holding the cover.

Note: in some laptops, disassembly is done from the top - where the keyboard is located. In this case, you need to remove the keyboard, remove the upper part of the laptop case, disconnect the cable, unscrew the bolts, and then you will have access to the cooling system. For example, this option is suitable for Acer Aspire 5560G.
One way is to look at the sticker that is located at the bottom of the laptop (look for the word Model):

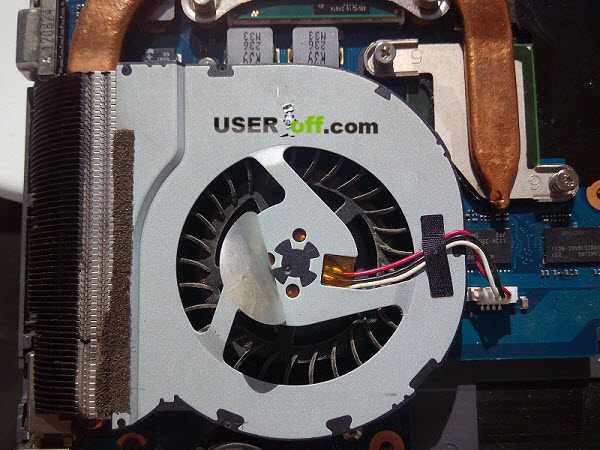
Having reached the inside of the laptop, you can now see how much dust is in it. The laptop was cleaned about 3 months ago (there is a little dust, but it is there, picture below). To remove the cooler you need to unscrew 2-3 bolts that hold its body:

Now disconnect the cooler from the motherboard:

Use a dry cloth or napkin to clean its blades. A very effective way is a vacuum cleaner or hair dryer. Point the nozzle of the vacuum cleaner at the fan and, without touching it, turn on the vacuum cleaner. You can also use a brush or toothbrush.
This is what a not very dirty radiator looks like:

The radiator can be cleaned with a brush or with the same vacuum cleaner (the already mentioned can of compressed air will also work). Since these instructions are detailed, we will dismantle the cooling system; to do this, unscrew the screws that hold the radiator. When you unscrew the device, you need to pay attention to the numbers that are written next to each bolt:
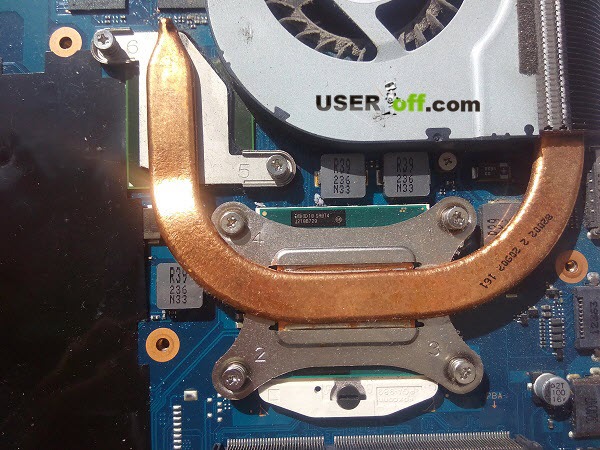
It must be unscrewed strictly in a certain order diagonally, following the numbers indicated next to the bolts. Namely: first unscrew the 6th bolt, then unscrew the 5th bolt, etc... 
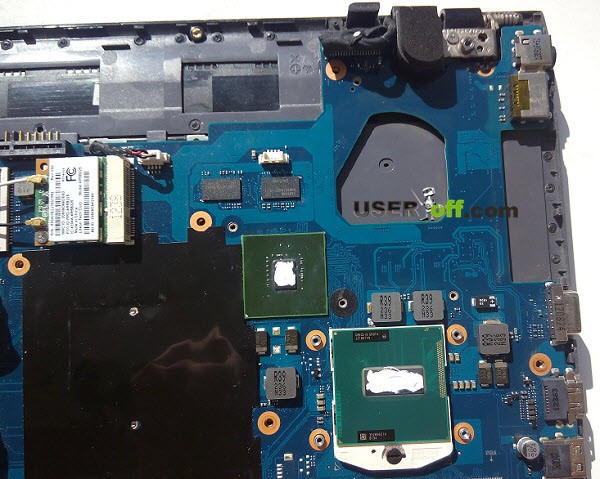
When you remove the radiator, you need to carefully lift it up. Perhaps it has stuck to the crystals (or rather, the thermal paste has glued them) and then in this case you need to move it a little to the right and left to loosen it a little. If the processor sticks to the radiator (it is removed together with the radiator), then you will need to slightly heat the radiator with a hairdryer and then carefully remove the processor. After removing the radiator, you should blow it out with a hairdryer/vacuum cleaner and clean it, for example, with a toothbrush. If you look at the photo, you can see that there is no dirt or dust inside:


The next step is to replace the thermal paste. To do this, remove the old one (it can be removed with a regular napkin or industrial alcohol). In the image above it was clear that there was thermal paste, but now it is gone:

Apply a new one:

There is no need to make a pile of thermal paste, just a thin layer is enough:
Installation of the radiator is carried out strictly in the reverse order (again, follow the numbers - 1, then 2, then 3, etc.). This is very important, since incorrect installation or removal of the heatsink can damage the crystal. The radiator is screwed on:
Now lubricate the cooler with the previously stored machine oil. To check whether the cooler needs lubrication, you can twist it with your finger. If it turns easily and there is no extraneous noise, then you don’t have to lubricate it. Of course, if you are doing a full-fledged cleaning that you haven’t done for 3-4 years, then it’s better to do it. To lubricate the cooler, you need to peel off the edge of the sticker, which is placed in the center, and using, for example, a needle, remove the rubber plug. Next, you need to drop 1 drop, close the hole with a stopper and glue the sticker back on. If there is no plug, then you need to pull the blades from the inside of the cooler to get to the desired place.
This is the end of the cleaning procedure. Insert the cover into the latches, pressing it gently. Next, connect the hard drive, optical drive and insert RAM, as shown in the picture below:

I think the procedure for cleaning a laptop from dust at home has been described in detail and you will not have any additional questions when cleaning your laptop. Here is an option when the entire laptop is disassembled (there is another useful video below that I recommend watching):
Cleaning the keyboard
Oh, if you only knew how badly and quickly a laptop keyboard gets dirty, thanks to the common love among most users of sitting at it with tea and sandwiches (or other goodies). Also, our hair, animal fur, etc. often get into the cracks between the keys.
There are two simple ways to clean your keyboard:
- Blowing can be done using: a vacuum cleaner, hair dryer or a can of compressed air.
- Deep cleaning when the keyboard is disassembled.
And if you don’t have any particular problems with the first method, then you need to consider the second one in a little more detail:
First you need to unfasten the top panel (it is usually latched). Then use a screwdriver to unscrew the screws that secure the keyboard to the laptop. It is also possible that the keyboard is secured with latches. Next, you will need to carefully remove the keyboard by unfastening the cable. Using a flat-head screwdriver or another object (for example, a knife), you should unfasten all the keys and wipe the entire space from debris.
You should also wipe down each key individually before replacing it. It is recommended to take a photo of the key layout in advance so as not to get confused later.
If you decide to thoroughly clean your keyboard, then go to the article “”, from which you will learn all the nuances and details of this process.
Cleaning the screen
The screen is easiest to clean - just buy special wipes in the store, which you should use to wipe it from time to time (the laptop must be turned off). The screen must be wiped dry.
Here is an example of a product from a popular manufacturer:

Approximate cost is about 500 rubles.
Prevention
It is important to understand that any equipment requires proper care and a laptop is no exception. Finally, a few simple tips that will help you clean it less often:
- When working with a laptop PC, place it on a table with a clean and level surface. It is not recommended to place the laptop on pillows, blankets, etc...
- Don't eat in front of your laptop (and certainly don't drink in front of it). I think there is no need to explain why!?.
- Clean your laptop regularly. If you want your device to serve you for a long time, then you need to clean your laptop 1-2 times a year.
At first glance, the cleaning procedure seems a little complicated and inaccessible to ordinary users, but in fact, after completing this process once, you will remember all the steps and in the future cleaning the laptop will take about 30 minutes.
Video on how to clean a laptop (must watch):
One of the common causes of laptop breakdowns.
Their cooling systems, unlike their stationary counterparts, are characterized by low power, which is just enough to ensure heat removal during normal operation.
When dust accumulates inside the case, the cooling system can no longer cope with the load. Let's talk about why this is dangerous and how to clean your laptop from dust yourself.
What can overheating lead to?
The heat sources themselves - the central and graphics processor, the chipset (north and south bridge) and the hard drive - suffer the most from ineffective heat dissipation.
The design feature of BGA chips - video chips, bridges and some mobile processors is such that with constant temperature changes (heating during operation and cooling when turned off), the solder contact between the chip and the board and between the crystal and the chip substrate is broken.
And the higher the heating, the faster the defect appears.
When current passes through the soldering defect, an electric arc occurs, which heats the chip even more, increasing the area of the defect and damaging the internal structure of the chip.
A vicious circle is created, which causes the progression of the malfunction. Once the process has started, cleaning the problem will no longer be possible.
Prolonged overheating of a hard drive can cause the bearings that support and move the read heads to fail.
As a result, the heads fall onto the surface of the “pancakes” and file down the magnetic layer on which the information is stored. It is impossible to recover data after this.
How do you know when it's time to clean your laptop?
The following are signs that dust has accumulated on your laptop:
- The device turns off spontaneously (thermal protection is triggered). First, this happens under intense load (games, movies), then under medium load (office programs), and finally, almost immediately after switching on.
- The cooler turbine rotates at high speed and makes loud noise.
- The case around the keyboard and touchpad gets hotter than usual.
- Hot air comes out of the ventilation grille. The flow intensity, despite the high turbine speeds, is low, since the grille is clogged with dust.
- The higher the load, the more performance drops. The laptop may freeze for a long time while working.
Objectively, the following temperature indicators indicate overheating:
- Central processor - 65-70 o C at idle and 80-90 o C under load.
- GPU - 85-90 o C at idle and 100-120 o C under load.
A lot of utilities have been invented to monitor the temperatures of laptop devices, for example:
- SensorsView, etc.
Preventative cleaning of ventilation without disassembly
Cleaning (blowing) the ventilation hole is a way to prevent contamination of the laptop, since it is in this place (on the radiator and grille) that the maximum amount of dust accumulates.
Carrying out the procedure once every 1-3 months will prevent the dust from being compressed into a lump.
For purging, compressed air cylinders (sold in computer stores) and paper napkins are used.
The method allows you to clean dust from any laptops, such as HP, Lenovo , Toshiba, MSI, etc.
Operating procedure:
- Turn off your laptop.
- Place the nozzle of the cylinder against the edge of the ventilation grille, cover the rest of the part with a napkin and hold it with your hand.
- Quickly press and release the balloon button - release air from it for no longer than 1 second, so as not to tear off the turbine bearing. At this time, dust will collect on the napkin.
- Repeat the operation until the napkin is no longer dirty.
Do not be afraid that dust will scatter inside the housing - the turbine compartment is limited on all sides by walls, so dirt will only be blown out.
Cleaning the cooling system by opening the case
Important! If you decide to disassemble the laptop yourself, without resorting to the services of service centers and specialists, we recommend that you do this very carefully and in accordance with the documents that came with the purchase of the laptop. Remember that any unqualified intervention in the operation of the computer system can lead to undesirable consequences! If you do not feel confident that you can assemble the hardware correctly after cleaning, it is better to entrust this to professionals.
If the dust has managed to form a dense conglomerate in front of the ventilation grille, blowing it out is no longer necessary. You will have to open the case and remove any accumulated dirt manually.
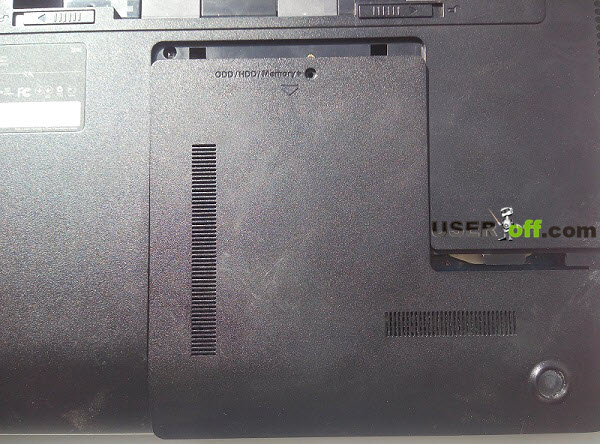
Note! To clean dust from a laptop such as Acer TravelMate2480\4220, Aspire 5600\4720\4720Z\4720G\4320, Lenovo G570 and the like, just remove the battery and unscrew the cooling system compartment cover.

Cleaning dust from laptops like Samsung or Asus K series is a little more difficult.
To access the cooling system, you will have to remove the entire bottom panel, and on some models, the keyboard.

The most difficult thing to clean from dust is a laptop such as the Asus Eee PC - it must be almost completely disassembled.

Before you start cleaning, prepare:
- A Phillips screwdriver, putty knife, pick, or hard plastic card to open the latches.
- Compressed air cylinder.
- Hard brush.
- Paper or cloth napkins.
- Tube of thermal paste, silicone thermal pads.
- Industrial alcohol.
- Machine oil.
The laptop must be de-energized during cleaning!


